Instrucciones de montaje - Blux
Instrucciones de montaje - Blux
Instrucciones de montaje - Blux

Create successful ePaper yourself
Turn your PDF publications into a flip-book with our unique Google optimized e-Paper software.
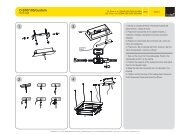
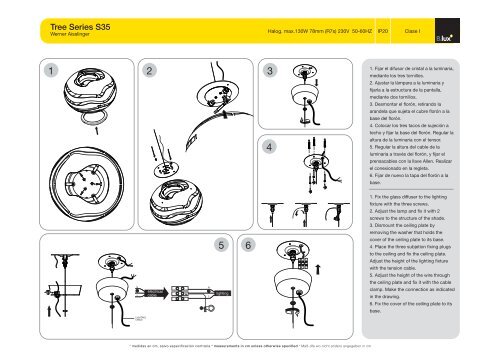
Tree Series S35<br />
Werner Aisslinger<br />
Halog. max.130W 78mm (R7s) 230V 50-60HZ<br />
IP20<br />
Clase I<br />
1 2<br />
3<br />
4<br />
1. Fijar el difusor <strong>de</strong> cristal a la luminaria,<br />
mediante los tres tornillos.<br />
2. Ajustar la lámpara a la luminaria y<br />
fijarla a la estructura <strong>de</strong> la pantalla,<br />
mediante dos tornillos.<br />
3. Desmontar el florón, retirando la<br />
aran<strong>de</strong>la que sujeta el cubre florón a la<br />
base <strong>de</strong>l florón.<br />
4. Colocar los tres tacos <strong>de</strong> sujeción a<br />
techo y fijar la base <strong>de</strong>l florón. Regular la<br />
altura <strong>de</strong> la luminaria con el tensor.<br />
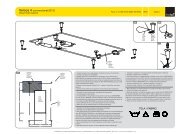
5. Regular la altura <strong>de</strong>l cable <strong>de</strong> la<br />
luminaria a través <strong>de</strong>l florón, y fijar el<br />
prensacables con la llave Allen. Realizar<br />
el conexionado en la regleta.<br />
6. Fijar <strong>de</strong> nuevo la tapa <strong>de</strong>l florón a la<br />
base.<br />
1. Fix the glass diffuser to the lighting<br />
fixture with the three screws.<br />
2. Adjust the lamp and fix it with 2<br />
screws to the structure of the sha<strong>de</strong>.<br />
3. Dismount the ceiling plate by<br />
removing the washer that holds the<br />
5 6<br />
cover of the ceiling plate to its base.<br />
4. Place the three subjetion fixing plugs<br />
to the ceiling and fix the ceiling plate.<br />
Adjust the height of the lighting fixture<br />
with the tension cable.<br />
5. Adjust the height of the wire through<br />
the ceiling plate and fix it with the cable<br />
N<br />
L<br />
electrical<br />
cable<br />
N<br />
L<br />
lighting<br />
clamp. Make the connection as indicated<br />
in the drawing.<br />
6. Fix the cover of the ceiling plate to its<br />
base.<br />
LIGHTING<br />
CABLE<br />
* medidas en cm, salvo especificación contraria * measurements in cm unless otherwise specified * Maß-dfe wo nicht an<strong>de</strong>rs angegeben in cm
Tree Series S50<br />
Werner Aisslinger<br />
Halog. max.130W (R7s) 230V 50-60HZ<br />
IP20<br />
Clase I<br />
1<br />
2<br />
3 5<br />
1. Coloque los tres tacos <strong>de</strong> sujeción a<br />
techo, utilizando como plantilla <strong>de</strong><br />
colocación el propio florón.<br />
2. Fijar el florón al techo y regular la<br />
altura <strong>de</strong> la luminaria con los tensores,<br />
tal y como se indica en la figura <strong>de</strong><br />
abajo.<br />
3. Fijar el difusor <strong>de</strong> cristal a la luminaria,<br />
mediante los tres tornillos.<br />
4. Pasar el cable <strong>de</strong> red eléctrica a través<br />
<strong>de</strong>l florón. Pasar el cable <strong>de</strong> la luminaria<br />
a través <strong>de</strong>l florón, y fijarlo con el<br />
prensacables. Realizar el conexionado a<br />
través <strong>de</strong> la regleta y el terminal <strong>de</strong> toma<br />
tierra, tal y como indica el esquema.<br />
5. Ajustar la lámpara a la luminaria y<br />
fijarla a la estructura <strong>de</strong> la pantalla,<br />
mediante dos tornillos.<br />
6. Fijar la tapa <strong>de</strong>l florón a la base.<br />
4 6<br />
1. Place the three subjetion fixing plugs<br />
to the ceiling using the ceiling plate as a<br />
positioning skecht.<br />
2. Fix the ceiling plate to the ceiling and<br />
adjust the height of the lighting fixture<br />
with the tension cables as it is indicated<br />
in the drawing below.<br />
3. Fix the glass diffuser to the lighting<br />
fixture with the three screws.<br />
4. Pass the electrical wire through the<br />
ceiling plate. Pass the wire of the lighting<br />
fixture through the ceiling plate as it is<br />
indicated and fix it with the cable clamp.<br />
5. Adjust the lamp and fix it with 2<br />
screws to the structure of the sha<strong>de</strong>.<br />
6. Fix the cover of the ceiling plate to its<br />
base.<br />
* medidas en cm, salvo especificación contraria * measurements in cm unless otherwise specified * Maß-dfe wo nicht an<strong>de</strong>rs angegeben in cm
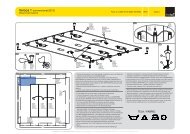
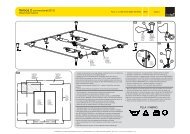
Tree Series S75<br />
Werner Aisslinger<br />
Halog. 2 x max.130W (R7s) 230V 50-60HZ<br />
IP20<br />
Clase I<br />
1<br />
2<br />
3 5<br />
1. Coloque los seis tacos <strong>de</strong> sujeción a<br />
techo, utilizando la plantilla <strong>de</strong><br />
colocación que adjuntamos.<br />
2. Fijar el florón al techo y regular la<br />
altura <strong>de</strong> la luminaria con los tensores,<br />
tal y como se indica en la imagen.<br />
3. Fijar el difusor <strong>de</strong> cristal a la luminaria,<br />
mediante los tres tornillos.<br />
4. Pasar el cable <strong>de</strong> red eléctrica a través<br />
<strong>de</strong>l florón. Pasar el cable <strong>de</strong> la luminaria<br />
a través <strong>de</strong>l florón y fijarlo con el<br />
prensacables. Realizar el conexionado a<br />
través <strong>de</strong> la regleta y el terminal <strong>de</strong> toma<br />
tierra, tal y como se indica en el<br />
esquema.<br />
5. Ajustar las lámparas a la luminaria y<br />
fijar el soporte mediante dos tornillos.<br />
6. Fijar la tapa <strong>de</strong>l florón a la base.<br />
4 6<br />
1. Place the six subjection fixing plugs to<br />
the ceiling using the positioning skecht<br />
that it is enclosed.<br />
2. Fix the ceiling plate to the ceiling and<br />
adjust the height of the lighting fixture<br />
with the tension cables as it is indicated<br />
in the drawing.<br />
3. Fix the glass diffuser to the lighting<br />
fixture with the three screws.<br />
4. Pass the electrical wire through the<br />
ceiling plate. Pass the wire of the lighting<br />
fixture through the ceiling plate as it is<br />
indicated and fix it with the cable clamp.<br />
5. Adjust the lamp and fix it with two<br />
screws to the structure of the sha<strong>de</strong>.<br />
6. Fix the cover of the ceiling plate to its<br />
base.<br />
* medidas en cm, salvo especificación contraria * measurements in cm unless otherwise specified * Maß-dfe wo nicht an<strong>de</strong>rs angegeben in cm
Tree Series S75<br />
Werner Aisslinger<br />
Halog. 2 x max.130W (R7s) 230V 50-60HZ<br />
IP20<br />
Clase I<br />
1.<br />
Fijar al techo el kit tensor mediante un taco<br />
y un tornillo.<br />
Fix the tensile kit to the ceiling with a fixing<br />
plug and a screw.<br />
2. Desenroscar la parte inferior para permitir<br />
el paso <strong>de</strong>l cable tensor.<br />
Unscrew the inferior part to allow the<br />
passage of the tensile cable.<br />
3. Introducir el cable por el orificio inferior<br />
hasta que salga por el agujero lateral.<br />
Introduce the cable through the inferior hole<br />
until goes out by the lateral hole.<br />
4. Tirar <strong>de</strong>l cable hasta posicionar a la altura<br />
<strong>de</strong>seada.<br />
Pull the cable until the <strong>de</strong>sired height.<br />
Posición <strong>de</strong> los tensores.<br />
Position of the tensions<br />
Posición <strong>de</strong>l florón<br />
Position of the ceiling plate.<br />
5. Una vez posicionado el cable, enroscar la<br />
parte inferior <strong>de</strong>l tensor para fijar el<br />
sistema.<br />
Once the cable is positioned, screw the<br />
inferior part of the tension to fix the system.<br />
6. Finalmente cortar el cable sobrante.<br />
Cut the leftover cable.<br />
* medidas en cm, salvo especificación contraria * measurements in cm unless otherwise specified * Maß-dfe wo nicht an<strong>de</strong>rs angegeben in cm
Información al consumidor:<br />
• Las luminarias sin marcado IP se consi<strong>de</strong>rarán IP20 y están diseñadas para uso general<br />
en interiores, excepto locales húmedos (cuartos <strong>de</strong> baño, etc.).<br />
• Las luminarias con marcado IP están diseñadas para su uso en exterior y en locales<br />
húmedos. (Ej. IP54).<br />
• La protección contra <strong>de</strong>scargas eléctricas sobre personas y animales está asegurada:<br />
• Clase I: por un único aislamiento eléctrico y por el conductor tierra <strong>de</strong>spués <strong>de</strong> su<br />
correcta conexión.<br />
• Clase II: por un doble aislamiento eléctrico.<br />
• Clase III: este tipo <strong>de</strong> luminarias <strong>de</strong>ben ser conectadas a muy baja tensión (12V,<br />
generalmente), por lo que no existe este riesgo.<br />
• Las luminarias con este marcado, o sin marcado, son a<strong>de</strong>cuadas para el <strong>montaje</strong><br />
directo sobre superficies normalmente inflamables.<br />
• Las luminarias con este marcado no son a<strong>de</strong>cuadas para el <strong>montaje</strong> directo sobre<br />
superficies normalmente inflamables.<br />
• La seguridad <strong>de</strong> esta luminaria está garantizada con una lámpara cuya potencia no<br />
exceda <strong>de</strong> la mencionada <strong>de</strong> forma visible en la luminaria.<br />
• El producto no pue<strong>de</strong> ser tratado como un residuo doméstico convencional, sino que<br />
<strong>de</strong>be entregarse en el correspondiente punto <strong>de</strong> recogida <strong>de</strong> equipos eléctricos y<br />
electrónicos.<br />
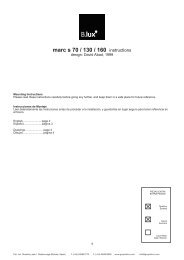
<strong>Instrucciones</strong> <strong>de</strong> <strong>montaje</strong><br />
Assembly instructions<br />
Montage - anleitungen<br />
Consumer information:<br />
• Lamps without the IP mark are classed as IP20 and are <strong>de</strong>signed for general interior<br />
use, except wet areas (bathrooms, etc.)<br />
• Lamps with the IP mark are <strong>de</strong>signed for exterior use and in wet areas. (E.g. IP54)<br />
• They offer guaranteed protection to people and animals against electrical discharge:<br />
• Class I: through single electrical insulation and an earthing conductor once<br />
correctly connected.<br />
• Class II: through double electrical insulation.<br />
• Class III: these kinds of lamps should be connected at very low voltage levels<br />
(generally 12V); therefore there is no risk.<br />
• Lamps with this symbol, or without any symbols, can be mounted directly onto<br />
normally inflammable surfaces.<br />
• Lamps with this symbol cannot be mounted directly onto normally inflammable<br />
surfaces.<br />
• The safety of this lamp is guaranteed by using a maximum wattage bulb that does not<br />
exceed the figure displayed visibly on the lamp.<br />
• The product cannot be treated like conventional domestic waste; it must be taken to<br />
the corresponding recycling point for electrical and electronic equipment.<br />
Verbraucherinformation:<br />
• Die nicht mit einer IB-Auszeichnung versehenen Leuchten gelten als IP20 und sind nur<br />
für Innenbereiche unter Ausnahme von Feuchträumen (Bä<strong>de</strong>r usw.) ausgelegt.<br />
• Leuchten mit IP-Auszeichnung sind für <strong>de</strong>n Einsatz in Außenbereichen und<br />
Feuchträumen ausgelegt. (z. B. IP54)<br />
- Der Schutz gegen Stromschläge ist für Personen und Tiere gewährleistet:<br />
• Klasse I: durch eine einfache Isolierung und die Erdung nach korrekter Installation.<br />
• Klasse II: durch eine doppelte Isolierung.<br />
• Klasse III: Dieser Typ von Leuchten darf nur an niedrige Spannung (i. d. R. 12 V)<br />
angeschlossen wer<strong>de</strong>n, daher besteht kein Risiko.<br />
• Leuchten mit dieser Auszeichnung o<strong>de</strong>r ohne Auszeichnung sind auch für die<br />
unmittelbare Montage auf normalerweise entflammbarem Untergrund geeignet.<br />
• Leuchten mit dieser Auszeichnung sind nicht für die direkte Montage auf<br />
normalerweise entflammbarem Untergrund geeignet.<br />
• Die Sicherheit dieser Leuchte ist durch eine Lampe als Leuchtmittel garantiert, <strong>de</strong>ren<br />
Stärke nicht höher ist als diejenige Wattstärke, die auf <strong>de</strong>r Leuchte sichtbar angegeben<br />
ist.<br />
• Dieses Produkt darf nicht wie konventioneller Haushaltsmüll entsorgt wer<strong>de</strong>n. Es ist<br />
vielmehr an einer entsprechen<strong>de</strong>n Sammelstelle für elektrische und elektronische<br />
Geräte abzugeben.<br />
B.LUX S.A.<br />
Pol. Ind. Okamika, pab. 1<br />
48289 Gizaburuaga (Bizkaia) Spain<br />
T.(+34) 94 682 72 72<br />
F. (+34) 94 682 49 02<br />
info@grupoblux.com<br />
www.grupoblux.com