for the Steel and Engineering - Industrial and Bearing Supplies
for the Steel and Engineering - Industrial and Bearing Supplies
for the Steel and Engineering - Industrial and Bearing Supplies

You also want an ePaper? Increase the reach of your titles
YUMPU automatically turns print PDFs into web optimized ePapers that Google loves.
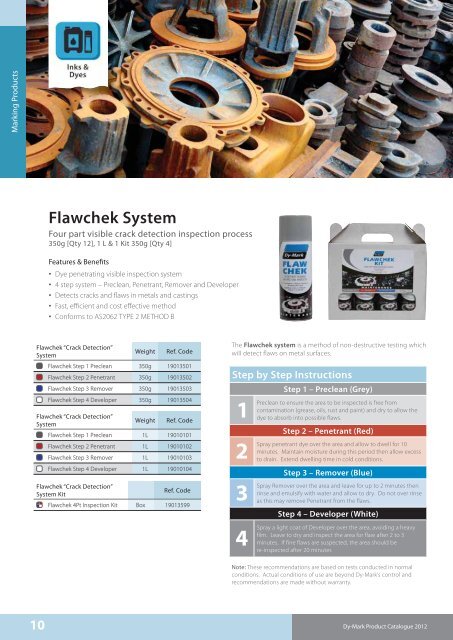
Marking Products<br />
Flawchek System<br />
Four part visible crack detection inspection process<br />
350g [Qty 12], 1 L & 1 Kit 350g [Qty 4]<br />
Features & Benefits<br />
• Dye penetrating visible inspection system<br />
• 4 step system – Preclean, Penetrant, Remover <strong>and</strong> Developer<br />
• Detects cracks <strong>and</strong> flaws in metals <strong>and</strong> castings<br />
• Fast, efficient <strong>and</strong> cost effective method<br />
• Con<strong>for</strong>ms to AS2062 TYPE 2 METHOD B<br />
Flawchek “Crack Detection”<br />
System<br />
Flawchek Step 1 Preclean<br />
Flawchek Step 2 Penetrant<br />
Flawchek Step 3 Remover<br />
Flawchek Step 4 Developer<br />
Flawchek “Crack Detection”<br />
System<br />
Flawchek Step 1 Preclean<br />
Flawchek Step 2 Penetrant<br />
Flawchek Step 3 Remover<br />
Flawchek Step 4 Developer<br />
Flawchek “Crack Detection”<br />
System Kit<br />
Flawchek 4Pt Inspection Kit<br />
Weight<br />
Ref. Code<br />
350g 19013501<br />
350g 19013502<br />
350g 19013503<br />
350g 19013504<br />
Weight<br />
Ref. Code<br />
1L 19010101<br />
1L 19010102<br />
1L 19010103<br />
1L 19010104<br />
Ref. Code<br />
Box 19013599<br />
The Flawchek system is a method of non-destructive testing which<br />
will detect flaws on metal surfaces.<br />
Step by Step Instructions<br />
Step 1 – Preclean (Grey)<br />
Preclean to ensure <strong>the</strong> area to be inspected is free from<br />
contamination (grease, oils, rust <strong>and</strong> paint) <strong>and</strong> dry to allow <strong>the</strong><br />
dye to absorb into possible flaws.<br />
Step 2 – Penetrant (Red)<br />
Spray penetrant dye over <strong>the</strong> area <strong>and</strong> allow to dwell <strong>for</strong> 10<br />
minutes. Maintain moisture during this period <strong>the</strong>n allow excess<br />
to drain. Extend dwelling time in cold conditions.<br />
Step 3 – Remover (Blue)<br />
Spray Remover over <strong>the</strong> area <strong>and</strong> leave <strong>for</strong> up to 2 minutes <strong>the</strong>n<br />
rinse <strong>and</strong> emulsify with water <strong>and</strong> allow to dry. Do not over rinse<br />
as this may remove Penetrant from <strong>the</strong> flaws.<br />
Step 4 – Developer (White)<br />
Spray a light coat of Developer over <strong>the</strong> area, avoiding a heavy<br />
film. Leave to dry <strong>and</strong> inspect <strong>the</strong> area <strong>for</strong> flaw after 2 to 3<br />
minutes. If fine flaws are suspected, <strong>the</strong> area should be<br />
re-inspected after 20 minutes.<br />
Note: These recommendations are based on tests conducted in normal<br />
conditions. Actual conditions of use are beyond Dy-Mark’s control <strong>and</strong><br />
recommendations are made without warranty.<br />
10 Dy-Mark Product Catalogue 2012