
Create successful ePaper yourself
Turn your PDF publications into a flip-book with our unique Google optimized e-Paper software.
two large bolts one complete turn, briefly run the winch, and re-tighten<br />
the two bolts.<br />
hose CONNECTIONS<br />
1. Connect two 1/2 in. NPT hydraulic hoses from the winch to the hydraulic<br />
power source.<br />
Operation<br />
The first use of your winch must be a test run during a non-recovery<br />
situation. During this trial run begin to recognize the sound of a steady pull, a<br />
heavy pull, load jerking or shifting.<br />
Spooling the wire rope<br />
1. Wear leather gloves while spooling. ATTENTION: DO NOT allow the wire<br />
rope to thread through your hand.<br />
2. Unwind the wire rope carefully along the floor to avoid kinking.<br />
3. Place the end of the wire rope in to the hole on the side of the drum.<br />
The wire rope will protrude ½”- 1”. Tighten the set screw.<br />
4. Keep a slight load on the wire rope while spooling.<br />
5. Using the remote control, wrap the wire rope on to the drum until<br />
the load is recovered. Make sure the wire rope lays smoothly on to<br />
the drum without spacing or overlapping using a crowbar or cable<br />
tensioner.<br />
Test Run<br />
1. Spool the wire rope until the red mark appears at five wraps.<br />
2. Under a load of 500 lbs (230 kg) re-spool the wire rope. This will stretch<br />
the new wire rope and create a tight wrap around the drum.<br />
PS654K . PS654MK<br />
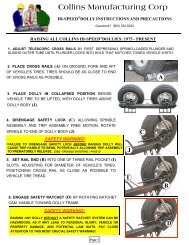
1. Place the transmission in neutral and apply the parking brake or lock the<br />
wheels.<br />
2. Spool the winch cable and connect to an anchor point.<br />
3. Engage the clutch by shifting it into the IN position. Use force to engage<br />
the clutch. If the freewheel easily moves IN and Out of position then<br />
the winch is not fully enegaged. NOTE: When the clutch is engaged your<br />
load will be securely held until the remote is used.<br />
4. Check cable rigging before proceeding.<br />
5. Plug in the winch remote control located on the solenoid assembly.<br />
NOTE: To ensure safe operation, it is recommended that winch<br />
operation take place from the driver’s position.<br />
6. Start vehicle engine, select neutral or park and maintain idle engine<br />
speed.<br />
7. Using the remote control, press IN or OUT until the vehicle has been<br />
retrieved. Regularly check to ensure the cable is winding onto the drum<br />
evenly.<br />
8. Secure your load using straps or chains.<br />
9. Re-spool the wire rope after the winch operation is completed.<br />
PS654HK<br />
1. Apply the parking brake or lock the wheels.<br />
2. Spool the winch cable and connect to an anchor point.<br />
3. Engage the clutch by shifting it into the IN position. Use force to engage<br />
the clutch. If the freewheel easily moves IN and Out of position then<br />
the winch is not fully enegaged. NOTE: When the clutch is engaged your<br />
load will be securely held until the remote is used.<br />
4. Check cable rigging before proceeding.<br />
5. Secure the load using chains or straps, not your winch wire rope.<br />
6. To ensure safe operation, it is recommended that winch operation take<br />
place from the driver’s position. Re-spool the wire rope after the winch<br />
operation is completed.<br />
PS654EK<br />
1. Turn on the breaker.<br />
2. Spool the cable and connect to an anchor point.<br />
3. Check the cable rigging before proceeding.<br />
4. Re-spool the wire rope after the winch operation is completed.<br />
Maintenance<br />
PS654K . PS654MK<br />
1. <strong>Winch</strong>es are pre-greased and do not require additional lubrication. If<br />
the gears are changed at any time use 20% Lucus HD oil stabilizer and<br />
80% 15w-40 oil.<br />
2. Check the grease fittings.<br />
3. Check all the electrical connections to ensure good contact and no<br />
corrosion. Replace as needed.<br />
4. Check all accessible bolts to ensure they are tightly bound.<br />
5. Check the wire rope for kinks or frays. Replace with a wire rope of equal<br />
strength.<br />
6. Check the clutch dog, clutch yoke and drum for damage.<br />
7. Contact your service center or the manufacturer before servicing your<br />
winch.<br />
PS654HK<br />
1. <strong>Winch</strong>es are pre-greased and do not require additional lubrication. If<br />
the gears are changed at any time use 20% Lucus HD oil stabilizer and<br />
80% 15w-40 oil.<br />
2. Check the grease fittings.<br />
3. Check the hose connections to ensure good contact and no leaks.<br />
Replace as needed.<br />
4. Check all accessible bolts to ensure they are tightly bound.<br />
5. Check the wire rope for kinks or frays. Replace with a wire rope of equal<br />
strength.<br />
6. Check the clutch dog, clutch yoke and drum for damage.<br />
7. Contact your service center or the manufacturer before servicing your<br />
winch.<br />
PS654EK<br />
1. Check oil levels.<br />
2. Check all electrical connections.<br />
3. Check all accessible bolts to ensure they are tightly bound.<br />
4. Check the wire rope for kinks or frays. Replace with a wire rope of equal<br />
strength.<br />
5. Contact your service center or the manufacturer before servicing your<br />
winch.<br />
Frequently Asked Questions<br />
Q: Can I increase the line speed of my worm drive winch<br />
A: Yes, but you will lose about half of your pulling power. On electric winches,<br />
a simple exchange of gears can provide up to a 50% line speed increase, and<br />
on hydraulic winches, you can change your motor to one with a different<br />
displacement.<br />
Q: How much wire rope will my winch hold<br />
A: The 8” drum will hold 100’ of 3/8” cable, and the 11” drum will hold 125’.<br />
Q: Can I use a fuse to protect my winch and vehicle<br />
A: Use of a fuse, or some circuit interrupting device, is highly recommended.<br />
A better idea would be to use a breaker. High amp fuses are costly, and<br />
amperage spikes are not uncommon when winching. A breaker that will<br />
throw at 400 amps is ideal. It may cost more in the beginning, but will<br />
far outweigh the cost of replacing 400 amp fuses. Cut-off switches are<br />
less costly, while not preventing amperage spikes, they will allow you to<br />
disconnect power in the event of a short in the winch.<br />
Q: Does my winch need it’s own battery<br />
A: Most electrical systems aren’t designed for accessories like a winch. Your<br />
winch will work with your OEM battery, but there is a heavy amperage load<br />
while winching. Think of the amperage to start your truck. It would be like<br />
starting your truck the whole time you are winching. It is a good idea to use a<br />
deep cycle battery, or even add a battery to your system just for your winch if<br />
you can. Just make sure your charging system can handle the load as well.<br />
Q: How much and what type of oil does my winch need<br />
A: Each housing takes 6-8 ounces of oil. We recommend using our special<br />
blend of Pierce <strong>Winch</strong> Oil. The viscosity range depends on use and location.<br />
You need a minimum of 30W but in some regions a heavy gear oil is too<br />
thick.<br />
Q: How can I test my motor<br />
A: Disconnect all three wires from your motor, making sure to mark<br />
which wire is which for reconnection. Supply a solid ground connection<br />
to the motor casing. Next, connect 12V to field terminal, F1. Take a long<br />
screwdriver, or similar tool, and make contact between field terminal, F2,<br />
and the armature post. This should bridge the electrical connection and start<br />
your motor. Now do this with the opposite field terminal. Connect power<br />
to F2, then make contact from F1 to the armature post. Again, your motor<br />
should run. See diagram on page 5. If the motor is unresponsive to both tests<br />
the motor must be replaced with a PS534H Pierce 12V motor.<br />
4 Pierce Arrow 940-538-5643