Create successful ePaper yourself
Turn your PDF publications into a flip-book with our unique Google optimized e-Paper software.
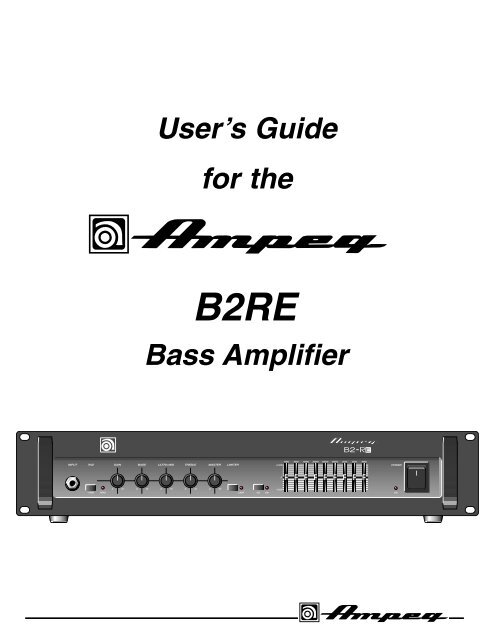
User’s Guide<br />
for the<br />
B2RE<br />
Bass Amplifier
B2RE Bass Amplifier<br />
TABLE OF CONTENTS<br />
Important Safeguards and Precautions . . . . . . . . . .2<br />
Introduction . . . . . . . . . . . . . . . . . . . . . . . . . . . . . .3<br />
Features . . . . . . . . . . . . . . . . . . . . . . . . . . . . . . . .4<br />
The Front Panel Controls and Their Use . . . . . . . .4<br />
The Rear Panel . . . . . . . . . . . . . . . . . . . . . . . . . . .5<br />
Some Suggested Settings . . . . . . . . . . . . . . . . . . .6<br />
Rack Mounting . . . . . . . . . . . . . . . . . . . . . . . . . . . .6<br />
A Word About Speakon Connectors . . . . . . . . . . . .7<br />
Troubleshooting . . . . . . . . . . . . . . . . . . . . . . . . . . .7<br />
System Block Diagram . . . . . . . . . . . . . .back cover<br />
Technical Specifications . . . . . . . . . . . . .back cover<br />
CAUTION<br />
RISK OF ELECTRIC SHOCK<br />
DO NOT OPEN<br />
WARNING: TO REDUCE THE RISK OF FIRE OR ELECTRIC SHOCK, DO NOT EXPOSE<br />
THIS APPARATUS TO RAIN OR MOISTURE. TO REDUCE THE RISK OF ELECTRIC<br />
SHOCK, DO NOT REMOVE COVER. NO USER-SERVICEABLE PARTS INSIDE. REFER<br />
SERVICING TO QUALIFIED SERVICE PERSONNEL.<br />
PRECAUCION<br />
RIESGO DE CORRIENTAZO<br />
NO ABRA<br />
PRECAUCION: PARA REDUCIR EL RIESGO DE INCENDIOS O DESCARGAS ELECTRICAS, NO PER-<br />
MITA QUE ESTE APARATO QUEDE EXPUESTO A LA LLUVIA O LA HUMEDAD. PARA DISMINUOIR EL<br />
RIESGO DE CORRIENTAZO. NO ABRA LA CUBIERTA. NO HAY PIEZAS ADENTRO QUE EL USARIO<br />
PUEDO REPARAR DEJE TODO MANTENIMIENTO A LOS TECHNICOS CALIFICADOS.<br />
ATTENTION<br />
RISQUE D'ELECTROCUTION<br />
NE PAS OUVRIR<br />
ATTENTION: PROTÉGEZ CET APPAREIL DE LA PLUIE ET DE L'HUMIDITÉ AFIN D'ÉVITER TOUT<br />
RISQUE D'INCENDIE OU D'ÉLECTROCUTION. POUR REDUIRE D'ELECTROCUTION NE PAS ENLEVER<br />
LE COUVERCLE. AUCUNE PIECE INTERNE N'EST REPRABLE PAR L'UTILISATEUR. POUR TOUTE<br />
REPARATION, S'ADRESSER A UN TECHNICIEN QUALIFIE.<br />
IMPORTANT SAFETY INSTRUCTIONS<br />
• READ, FOLLOW, HEED, AND KEEP ALL INSTRUCTIONS AND WARNINGS.<br />
• DO NOT OPERATE NEAR ANY HEAT SOURCE AND DO NOT BLOCK ANY VENTILATION OPENINGS ON THIS APPARATUS. FOR PROPER OPERATION, THIS UNIT REQUIRES 3”<br />
(75CM) OF WELL VENTILATED SPACE AROUND HEATSINKS AND OTHER AIR FLOW PROVISIONS IN THE CABINET.<br />
• DO NOT USE THIS APPARATUS NEAR SPLASHING, FALLING, SPRAYING, OR STANDING LIQUIDS.<br />
• CLEAN ONLY WITH LINT-FREE DAMP CLOTH AND DO NOT USE CLEANING AGENTS.<br />
• ONLY CONNECT POWER CORD TO A POLARIZED, SAFETY GROUNDED OUTLET WIRED TO CURRENT ELECTRICAL CODES AND COMPATIBLE WITH VOLTAGE, POWER, AND<br />
FREQUENCY REQUIREMENTS STATED ON THE REAR PANEL OF THE APPARATUS.<br />
• PROTECT THE POWER CORD FROM DAMAGE DUE TO BEING WALKED ON, PINCHED, OR STRAINED.<br />
• UNPLUG THE APPARATUS DURING LIGHTNING STORMS OR WHEN UNUSED FOR LONG PERIODS OF TIME.<br />
• ONLY USE ATTACHMENTS, ACCESSORIES, STANDS, OR BRACKETS SPECIFIED BY THE MANUFACTURER FOR SAFE OPERATION AND TO AVOID INJURY.<br />
• WARNING: TO REDUCE THE RISK OF ELECTRIC SHOCK OR FIRE, DO NOT EXPOSE THIS UNIT TO RAIN OR MOISTURE.<br />
• SERVICE MUST BE PERFORMED BY QUALIFIED PERSONNEL.<br />
• OUR AMPLIFIERS ARE CAPABLE OF PRODUCING HIGH SOUND PRESSURE LEVELS. CONTINUED EXPOSURE TO HIGH SOUND PRESSURE LEVELS CAN CAUSE PERMA-<br />
NENT HEARING IMPAIRMENT OR LOSS. USER CAUTION IS ADVISED AND EAR PROTECTION IS RECOMMENDED IF UNIT IS OPERATED AT HIGH VOLUME.<br />
• WARNING: THIS UNIT REQUIRES A SAFETY GROUNDED OUTLET WIRED TO CURRENT ELECTRIC CODES HAVING THE LINE SUPPLY VOLTAGE, POWER, AND FREQUENCY<br />
IDENTIFIED ON THE REAR OF THE UNIT. THE OUTLET MUST REMAIN ACCESSIBLE TO DISCONNECT THE UNIT IF A FAULT SHOULD ARISE WHILE IN USE. THIS UNIT SHOULD<br />
BE UNPLUGGED WHEN NOT IN USE.<br />
EXPLANATION OF GRAPHICAL SYMBOLS:<br />
EXPLICACION DE SIMBOLOS GRAFICOS:<br />
EXPLICATION DES SYMBÔLES GRAPHIQUES:<br />
"DANGEROUS VOLTAGE"<br />
= =<br />
“VOLTAJE PELIGROSO”<br />
"DANGER HAUTE TENSION"<br />
"IT IS NECESSARY FOR THE USER TO REFER TO THE INSTRUCTION MANUAL"<br />
“ES NECESARIO QUE EL USUARIO SE REFIERA AL MANUAL DE INSTRUCCIONES.”<br />
"REFERREZ-VOUS AU MANUAL D'UTILISATION"<br />
2
B2RE Bass Amplifier<br />
An introduction To Your New <strong>Ampeg</strong> B2RE Bass Amplifier<br />
Thank you for making one of the best choices you will ever make for your musical career – choosing one of the<br />
finest bass amplifiers available, the <strong>Ampeg</strong> B2RE.<br />
Your new B2RE bass amplifier provides many outstanding features in a compact package that takes up only two<br />
standard rack spaces. Four hundred and fifty watts of pure bass energy, total tone control and rugged construction<br />
help make this a true performer’s bass amp.<br />
Features<br />
In the world of high performance bass amps, <strong>Ampeg</strong> amplifiers stand alone. In true <strong>Ampeg</strong> tradition, the<br />
B2RE offers you more power, performance and flexibility than any other bass amplifier in its class. The outstanding<br />
features of your new amplifier, features which set it apart from the competition, are listed below.<br />
• 9-BAND GRAPHIC EQ: Use as a “second channel” for bass solos, or to shape your sound to your<br />
own exacting standards.<br />
• BALANCED LINE OUTPUT: XLR with independent level switch (20dB pad). Patch into house<br />
consoles, mixing boards, or external power amplifiers.<br />
• EFFECTS LOOP: For increased intensity and quieter operation of external effects.<br />
• POWER AMP IN and PREAMP OUT: Allows direct access into the power amp and a signal tap<br />
from the preamp section for even greater versatility.<br />
• 1/4” and SPEAKON ® SPEAKER JACKS: For versatility of speaker connections and the superior<br />
performance of Speakon connectors.<br />
SPEAKON ® is a registered trademark of Neutrik A.G.<br />
3
B2RE Bass Amplifier<br />
The Front Panel Controls and Their Use<br />
1 2 3 4 5 6 7 8 9 10 11 12 13<br />
1. INPUT: Use this jack to connect your<br />
instrument to the amplifier by means of a<br />
shielded instrument cable.<br />
2. -15dB PAD: This switch, when depressed,<br />
attenuates the input signal by 15dB.<br />
Attenuation allows the Gain control (#4) to be<br />
used over a larger portion of its range. If clipping<br />
is indicated with the Gain control near<br />
minimum, attenuation is needed.<br />
3. PEAK: This LED illuminates when the<br />
signal level into the preamp approaches<br />
clipping. Adjust the Gain control (#4) until a<br />
strong signal from your instrument causes<br />
this LED to flash.<br />
NOTE: If the LED flashes frequently with<br />
the Gain at a low setting, use the -15dB<br />
Pad (#2) to attenuate the input signal and<br />
readjust the Gain.<br />
4. GAIN: Use this control to adjust the input<br />
signal level. For the best signal to noise<br />
ratio, adjust this control until the Peak LED<br />
(#3) flashes on strong signals.<br />
5. BASS: This is the primary low frequency<br />
control which allows for 13dB of boost or<br />
15dB of cut at 40Hz.<br />
6. ULTRA-MID: This is the primary<br />
midrange control. Rotate the control to the<br />
left of center for a “contoured” sound (more<br />
distant, less midrange output) or to the<br />
right of center for a pronounced (more upfront)<br />
tone.<br />
7. TREBLE: This is the primary high frequency<br />
control which allows for 16dB of<br />
boost or 21dB of cut at 8kHz.<br />
8. MASTER: Set the overall output level of<br />
the amplifier with this control. The Effects<br />
Loop and Bal. Out (#20,21,24) are not<br />
affected by the Master control.<br />
9. LIMITER: The B2RE uses an internal<br />
Optocoupler Limiter to assist in keeping the<br />
power amplifier’s output “clean” at extreme<br />
volume levels. (All amplifiers begin to clip<br />
their output signals as they approach maximum<br />
output levels, resulting in distortion<br />
which may damage your speakers.) To<br />
engage the Limiter, depress the Limit<br />
switch. Whenever the amplifier is at full<br />
power, the adjacent Limit LED will flash.<br />
This is an indication that the limiter is keeping<br />
peak signals from clipping the output.<br />
NOTE: Playing at full power with the Limiter<br />
off will give you increased output power, but<br />
the sound may be distorted. Use discretion<br />
when playing without the Limiter.<br />
10. EQ: Depress this switch to activate the<br />
Graphic EQ. The adjacent On LED illuminates<br />
when the EQ is on.<br />
11. (NINE BAND GRAPHIC EQUALIZER):<br />
These sliders control the output of the frequencies<br />
indicated above each control.<br />
The center position of each control is flat<br />
(no boost or cut).<br />
12. ON: This LED indicator illuminates<br />
when the POWER switch (#13) is ON.<br />
13. POWER: This heavy-duty rocker<br />
switch applies the power to the amplifier.<br />
The amp is ON when the top of the switch<br />
is depressed, OFF when the bottom of the<br />
switch is depressed.<br />
4
B2RE Bass Amplifier<br />
The Rear Panel<br />
#98689<br />
14 15 16 17 17 18 19 20 21 22 23 24<br />
14. FAN: This temperature controlled, variable<br />
speed fan draws cool air into the<br />
amplifier, which forces heat out through the<br />
exhaust vents. Never block the vent holes<br />
or the fan opening.<br />
15. FUSE: This protects the unit from damage<br />
due to overload conditions or power<br />
line surges. If the fuse blows, replace it<br />
only with the same size and type.<br />
16. AC LINE IN: The grounded power cord<br />
should only be plugged into a grounded<br />
power outlet that meets all applicable electrical<br />
codes and is compatible with the voltage,<br />
power and frequency requirements<br />
stated on the rear panel. Do not attempt<br />
to defeat the safety ground connection!<br />
17. SPEAKERS: Use these jacks to connect<br />
the amplifier to your speaker(s) using<br />
high quality speaker cables terminated with<br />
the appropriate connectors. For more information<br />
about the Speakon jack, see page 7.<br />
WARNING: The speaker output of this unit can<br />
exceed 10 Watts and could be a shock injury.<br />
Connection to speakers should be performed by a<br />
skilled person in compliance with local building<br />
codes. Class 2 wiring is required for speaker<br />
cables. Use of external speakers outside the ratings<br />
stated at the speaker jack may result in a<br />
shock injury or damage to the unit.<br />
NOTE: When connecting multiple<br />
speaker cabinets to the B2RE, keep the<br />
overall impedance at or above four<br />
ohms! The following chart shows the total<br />
impedance load when connecting speaker<br />
cabinets in parallel:<br />
Cabinet # of Total<br />
Impedance Cabs Impedance<br />
8Ω 2 4Ω<br />
16Ω 2 8Ω<br />
16Ω 4 4Ω<br />
18. POWER AMP IN: This mono jack<br />
allows you to feed the preamp output of<br />
another amplifier to the input of the B2RE’s<br />
internal power amp. This bypasses the preamp<br />
circuitry of the B2RE.<br />
WARNING: This jack goes directly into<br />
the power amplifier. DO NOT connect<br />
high level signals to it!<br />
19. PREAMP OUT: A post-EQ signal may<br />
be taken from this jack and sent to the<br />
house mixing board, recording console or<br />
external power amplifier.<br />
20. EFFECTS LOOP RETURN: To use an<br />
external effects device, connect the OUT-<br />
PUT of the device to this jack by means of<br />
a shielded cable. This feeds the processed<br />
signal into the Master section of the B2RE.<br />
21. EFFECTS LOOP SEND: Connect the<br />
output from this jack to the INPUT of your<br />
effects by means of a shielded cable. This<br />
sends a post-EQ signal to your effects.<br />
22. -20dB/0dB: This switch sets the output<br />
level at the Balanced Line Output jack<br />
(#24). The control works independently<br />
from the front panel Master control.<br />
Depressing the switch activates the<br />
20dB pad. The result is a signal that is<br />
more compatible with the microphone<br />
inputs on a mixer.<br />
23. POST/PRE: You can select either Pre<br />
or Post EQ for the signal at the Balanced<br />
Out jack (#24) with this switch. With the<br />
switch in the OUT position, the signal at the<br />
jacks will be Pre-EQ. This is a direct output<br />
not affected by any EQ or boost settings.<br />
With the switch depressed, the signal is<br />
Post-EQ and is controlled and modified by<br />
the tone controls, Graphic EQ, and Effects<br />
Loop.<br />
24. BAL. OUT: This XLR-type connector<br />
supplies a balanced preamp output signal<br />
for connecting to a house mixing board,<br />
recording console or external amplifiers<br />
with balanced inputs. The signal can be set<br />
to Pre or Post EQ by the back panel<br />
Pre/Post switch (#23). The level can be<br />
adjusted for either mic or line type inputs<br />
using the -20dB/0dB switch (#22).<br />
5
B2RE Bass Amplifier<br />
Some Suggested Settings<br />
The setting of the Gain control depends on your particular instrument. The<br />
Master should be set to produce the appropriate output volume level. The<br />
Graphic EQ can be used to tailor the amplifier to your speaker cabinets, to<br />
compensate for room acoustics and to “fine tune” your sound.<br />
ROCK:<br />
JAZZ:<br />
COUNTRY:<br />
FUNK “POPPING:”<br />
Rack Mounting:<br />
When mounting the B2RE into a rack, the four bottom feet should be removed to maintain the two rack space height of the amplifier. Be<br />
sure to keep the feet and their attachment bolts for future use. If the feet are reinstalled, never use screws which will protrude farther<br />
into the amplifier than the original hardware.<br />
The rack must be a high quality enclosure capable of securely supporting the weight of the amplifier. Tighten the mounting screws<br />
securely through the amplifier’s face plate, into the rack rails. Check the rack and mounting screws occasionally to ensure a continually<br />
safe and secure installation.<br />
6
B2RE Bass Amplifier<br />
A Word About Speakon Connectors<br />
Speakon connectors offer a superior method of connecting your amp head to your speaker enclosure and have<br />
several advantages over traditional 1/4” connectors. Speakons offer better conductivity and signal flow, are much better<br />
at handling high power, and have a locking mechanism that won’t allow the speaker cable to be pulled out. There are<br />
(4) wiring posts inside a Speakon. The (2) speaker wires in the cable can be hooked up to different posts for different<br />
applications. For the B2RE Speakon jack, pin 1+ is positive (+), pin 1– is negative (–).<br />
#98689<br />
Troubleshooting<br />
In the unlikely event that your B2RE should malfunction, take a few minutes to troubleshoot it before you call for service.<br />
You can save yourself a lot of time and sometimes money by doing it yourself, and often the cure for the problem is something<br />
quite simple.<br />
NO SOUND<br />
POOR SOUND<br />
LEDs LIGHT<br />
LEDs DON'T LIGHT<br />
Check bass, cables<br />
Check amp controls, check<br />
for signal from bass<br />
NO SOUND<br />
Listen for hum<br />
SOUND OK<br />
Check AC outlet<br />
OUTLET OK<br />
Check power cord,<br />
fuse, power switch<br />
NO POWER<br />
Check house fusebox<br />
or circuit breaker<br />
POOR SOUND<br />
Check speaker(s)<br />
SPEAKER(S) OK,<br />
POOR SOUND<br />
SOUND OK<br />
SPEAKER(S)<br />
DEFECTIVE<br />
NO HUM<br />
HUM<br />
OK<br />
Replace speaker(s)<br />
Check speaker<br />
Speaker OK<br />
SOUND OK<br />
Unplug bass,<br />
touch tip of cable<br />
NO CHANGE<br />
Replace cable<br />
LOUD HUM<br />
Check inst. pickup<br />
POOR SOUND<br />
SOUND OK<br />
NO CHANGE<br />
SOUND OK<br />
SEE BELOW<br />
SEE BELOW<br />
If the problem isn’t covered above, or if the steps lead you here, then contact your <strong>Ampeg</strong> dealer for service information.<br />
Also, you should refer your amp to an authorized service center for servicing if it gets dropped, has liquid spilled<br />
into it, or sustains damage to its power cord.<br />
7
B2RE Bass Amplifier<br />
Technical Specifications<br />
OUTPUT POWER RATING<br />
450 Watts RMS, 4 ohm load<br />
250 Watts RMS, 8 ohm load<br />
POWER REQUIREMENTS<br />
Domestic:<br />
120VAC, 60Hz, 450VA<br />
Export:<br />
100/120VAC, 50/60Hz, 450VA<br />
230-240VAC, 50/60Hz, 450VA<br />
TONE CONTROL RANGE<br />
Bass:<br />
+13/-15dB @ 40Hz<br />
Ultra Mid:<br />
+5/-13dB @ 400Hz<br />
Treble:<br />
+16dB/-21dB @ 8kHz<br />
GRAPHIC EQ RANGE<br />
40Hz:<br />
±12dB<br />
80Hz:<br />
±9dB<br />
150, 300, 550Hz: ±8dB<br />
1kHz:<br />
±9dB<br />
2.2kHz:<br />
±8dB<br />
4.5kHz:<br />
±10dB<br />
8kHz:<br />
±13dB<br />
GAIN<br />
62dB<br />
SIGNAL TO NOISE RATIO<br />
75dB typical<br />
SIZE AND WEIGHT<br />
19” W x 3.25” H x 12.75” D; 26 lbs.<br />
<strong>Ampeg</strong> reserves the right to change specifications without notice.<br />
System Block Diagram<br />
POWER<br />
AMP<br />
LIMIT<br />
LED<br />
PROTECTION<br />
RELAY<br />
1–<br />
1+<br />
SPEAKON ®<br />
JACK<br />
INPUT<br />
-15dB<br />
PAD<br />
PRE<br />
POST<br />
-20dB<br />
BAL. OUT<br />
COOLING<br />
FAN<br />
LIMIT<br />
THERMAL<br />
SHUTDOWN,<br />
LOW VOLTAGE,<br />
DC PROTECT<br />
SPEAKER<br />
OUTPUT<br />
SPEAKER<br />
OUTPUT<br />
POWER<br />
AMP IN<br />
PEAK<br />
MASTER<br />
PREAMP<br />
OUT<br />
GAIN<br />
EQ<br />
EFFECTS<br />
LOOP<br />
RETURN<br />
BASS<br />
ULTRA MID TREBLE<br />
9 BAND EQ<br />
ON<br />
EFFECTS<br />
LOOP<br />
SEND<br />
www.ampeg.com<br />
P/N 47-577-04 • 111604


