gs30 - HAAN Professional Garment Steamer User Manual
gs30 - HAAN Professional Garment Steamer User Manual
gs30 - HAAN Professional Garment Steamer User Manual

You also want an ePaper? Increase the reach of your titles
YUMPU automatically turns print PDFs into web optimized ePapers that Google loves.
Using Your <strong>Garment</strong> <strong>Steamer</strong><br />
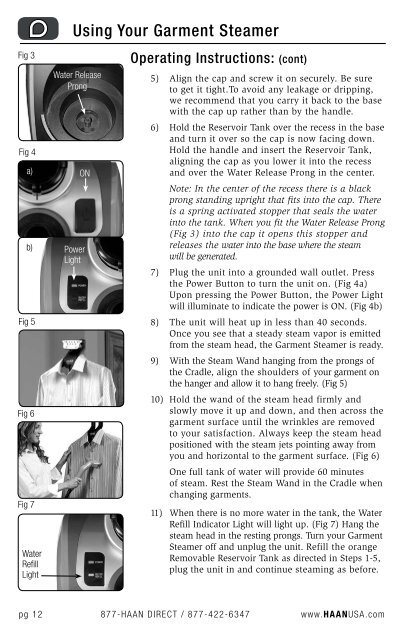
Fig 3<br />
Fig 4<br />
a)<br />
Fig 6<br />
Fig 7<br />
Water Release<br />
Prong<br />
ON<br />
b) Power<br />
Light<br />
Fig 5<br />
Water<br />
Refill<br />
Light<br />
Operating Instructions: (cont)<br />
5) Align the cap and screw it on securely. Be sure<br />
to get it tight.To avoid any leakage or dripping,<br />
we recommend that you carry it back to the base<br />
with the cap up rather than by the handle.<br />
6) Hold the Reservoir Tank over the recess in the base<br />
and turn it over so the cap is now facing down.<br />
Hold the handle and insert the Reservoir Tank,<br />
aligning the cap as you lower it into the recess<br />
and over the Water Release Prong in the center.<br />
Note: In the center of the recess there is a black<br />
prong standing upright that fits into the cap. There<br />
is a spring activated stopper that seals the water<br />
into the tank. When you fit the Water Release Prong<br />
(Fig 3) into the cap it opens this stopper and<br />
releases the water into the base where the steam<br />
will be generated.<br />
7) Plug the unit into a grounded wall outlet. Press<br />
the Power Button to turn the unit on. (Fig 4a)<br />
Upon pressing the Power Button, the Power Light<br />
will illuminate to indicate the power is ON. (Fig 4b)<br />
8) The unit will heat up in less than 40 seconds.<br />
Once you see that a steady steam vapor is emitted<br />
from the steam head, the <strong>Garment</strong> <strong>Steamer</strong> is ready.<br />
9) With the Steam Wand hanging from the prongs of<br />
the Cradle, align the shoulders of your garment on<br />
the hanger and allow it to hang freely. (Fig 5)<br />
10) Hold the wand of the steam head firmly and<br />
slowly move it up and down, and then across the<br />
garment surface until the wrinkles are removed<br />
to your satisfaction. Always keep the steam head<br />
positioned with the steam jets pointing away from<br />
you and horizontal to the garment surface. (Fig 6)<br />
One full tank of water will provide 60 minutes<br />
of steam. Rest the Steam Wand in the Cradle when<br />
changing garments.<br />
11) When there is no more water in the tank, the Water<br />
Refill Indicator Light will light up. (Fig 7) Hang the<br />
steam head in the resting prongs. Turn your <strong>Garment</strong><br />
<strong>Steamer</strong> off and unplug the unit. Refill the orange<br />
Removable Reservoir Tank as directed in Steps 1-5,<br />
plug the unit in and continue steaming as before.<br />
pg 12 877-<strong>HAAN</strong> DIRECT / 877-422-6347 www.<strong>HAAN</strong>USA.com