SERDES24-35OVT Evaluation Kit for OV7710 Image Sensor ...
SERDES24-35OVT Evaluation Kit for OV7710 Image Sensor ...
SERDES24-35OVT Evaluation Kit for OV7710 Image Sensor ...

You also want an ePaper? Increase the reach of your titles
YUMPU automatically turns print PDFs into web optimized ePapers that Google loves.
<strong>SERDES24</strong>-<strong>35OVT</strong><br />
<strong>Evaluation</strong> <strong>Kit</strong> <strong>for</strong> <strong>OV7710</strong> <strong>Image</strong> <strong>Sensor</strong><br />
Application with a FPD-Link II<br />
(DS90C241/DS90C124) Serial Interface<br />
<strong>SERDES24</strong>-<strong>35OVT</strong> Rev 0.2
Description:<br />
The <strong>SERDES24</strong>-<strong>35OVT</strong> is an evaluation kit designed to demonstrate<br />
per<strong>for</strong>mance and capabilities of the DS90C124 and DS90C241 FPD-Link II<br />
Serializer/Deserializer Chipset <strong>for</strong> use with the OmniVision “CLOTHO”<br />
development system that features the <strong>OV7710</strong> 640 x 480 Color <strong>Image</strong> <strong>Sensor</strong>.<br />
This serves as an add-on to the OmniVision development system, providing a<br />
serialized digital interface between camera and controller.<br />
The DS90C241 Serializer board accepts LVCMOS input signals from the <strong>Image</strong><br />
<strong>Sensor</strong> and provides single serialized FPD-Link II LVDS data pair as an output.<br />
The DS90C124 Deserializer board accepts the FPD-Link II LVDS serialized data<br />
stream and converts the data back into parallel LVCMOS signals and clock that<br />
connects to the OmniVision USB Host Board.<br />
Contents:<br />
• One DS90C241 Serializer board<br />
• One DS90C124 Deserializer board<br />
What the user needs to provide:<br />
• OmniVision <strong>OV7710</strong> Demo Board<br />
• OmniVision USB Board<br />
• CAT5 cable<br />
• External 5V power supply<br />
• PC with USB interface and Omnivision software (or alternate control<br />
interface)<br />
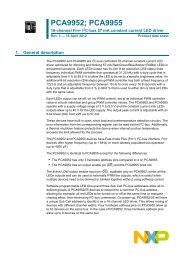
SER<br />
DES<br />
5V<br />
OVT USB<br />
Board<br />
OVT<br />
<strong>Image</strong>r<br />
Figure 1. <strong>Image</strong>r - Serializer and Deserializer - Controller Connections<br />
Setup instructions:<br />
1. Connect the DS90C241 Serializer board to the Omnivision <strong>OV7710</strong> Demo<br />
Board. Refer to Figure 1.<br />
<strong>SERDES24</strong>-<strong>35OVT</strong> Rev 0.2
2. Connect the DS90C124 Deserializer board to the OmniVision USB Board.<br />
Refer to Figure 1.<br />
3. Connect the DS90C241 Serializer board to the DS90C124 Deserializer<br />
board via the CAT5 cable.<br />
4. Connect 5V power to the Deserializer board<br />
5. Push “ON” button (S2) on Deserializer board. Green light should now be<br />
visible on RJ45 connectors at Serializer (J3) board and Deserializer (J6)<br />
board.<br />
6. Connect PC/Controller to the Deserializer board via USB cable. Green<br />
light should be visible on USB controller board (D2).<br />
7. Launch Omnivision software (or alternate control application)<br />
Troubleshooting:<br />
Problem…<br />
No image<br />
No green light on RJ45 connectors<br />
No green light on USB board<br />
All lights on, but no image<br />
No image<br />
Solution…<br />
Check that all RJ45 and USB green<br />
lights are on<br />
Check that 5V power supply is<br />
provided, and CAT cable connection<br />
is good<br />
Cycle “ON” button on deserializer<br />
board<br />
Check that USB is connected to PC<br />
Check that orientation of board<br />
connections is correct<br />
Check that lens cap is removed from<br />
camera<br />
<strong>SERDES24</strong>-<strong>35OVT</strong> Rev 0.2