Procedure for Mounting New Rudder Blades - Hobie Cat
Procedure for Mounting New Rudder Blades - Hobie Cat
Procedure for Mounting New Rudder Blades - Hobie Cat

You also want an ePaper? Increase the reach of your titles
YUMPU automatically turns print PDFs into web optimized ePapers that Google loves.
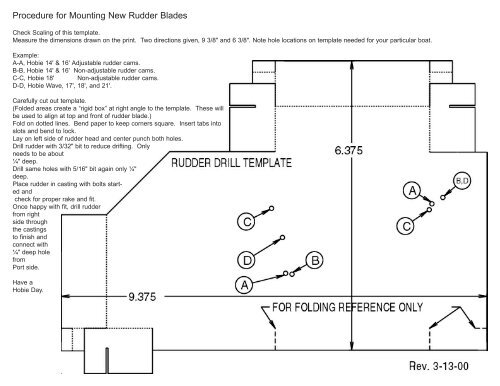
<strong>Procedure</strong> <strong>for</strong> <strong>Mounting</strong> <strong>New</strong> <strong>Rudder</strong> <strong>Blades</strong><br />
Check Scaling of this template.<br />
Measure the dimensions drawn on the print. Two directions given, 9 3/8" and 6 3/8". Note hole locations on template needed <strong>for</strong> your particular boat.<br />
Example:<br />
A-A, <strong>Hobie</strong> 14' & 16' Adjustable rudder cams.<br />
B-B, <strong>Hobie</strong> 14' & 16' Non-adjustable rudder cams.<br />
C-C, <strong>Hobie</strong> 18' Non-adjustable rudder cams.<br />
D-D, <strong>Hobie</strong> Wave, 17', 18', and 21'.<br />
Carefully cut out template.<br />
(Folded areas create a “rigid box” at right angle to the template. These will<br />
be used to align at top and front of rudder blade.)<br />
Fold on dotted lines. Bend paper to keep corners square. Insert tabs into<br />
slots and bend to lock.<br />
Lay on left side of rudder head and center punch both holes.<br />
Drill rudder with 3/32" bit to reduce drifting. Only<br />
needs to be about<br />
¼" deep.<br />
Drill same holes with 5/16" bit again only ¼"<br />
deep.<br />
Place rudder in casting with bolts started<br />
and<br />
check <strong>for</strong> proper rake and fit.<br />
Once happy with fit, drill rudder<br />
from right<br />
side through<br />
the castings<br />
to finish and<br />
connect with<br />
¼" deep hole<br />
from<br />
Port side.<br />
Have a<br />
<strong>Hobie</strong> Day.