
You also want an ePaper? Increase the reach of your titles
YUMPU automatically turns print PDFs into web optimized ePapers that Google loves.
COMPACT DISC PLAYER<br />
REPRODUCTOR DE DISCOS COMPACTOS<br />
<strong>C<strong>DJ</strong></strong>-<strong>400</strong><br />
Operating Instructions<br />
Manual de instrucciones
Thank you for buying this <strong>Pioneer</strong> product.<br />
Please read through these operating instructions<br />
so you will know how to operate your<br />
model properly. After you have finished reading<br />
the instructions, put them away in a safe<br />
place for future reference.<br />
In some countries or regions, the shape of<br />
the power plug and power outlet may sometimes<br />
differ from that shown in the explanatory<br />
drawings. However the method of connecting<br />
and operating the unit is the same.<br />
K015 En<br />
IMPORTANT<br />
The lightning flash with arrowhead symbol,<br />
within an equilateral triangle, is intended to<br />
alert the user to the presence of uninsulated<br />
"dangerous voltage" within the product's<br />
enclosure that may be of sufficient<br />
magnitude to constitute a risk of electric<br />
shock to persons.<br />
2<br />
<br />
En<br />
CAUTION<br />
RISK OF ELECTRIC SHOCK<br />
DO NOT OPEN<br />
CAUTION:<br />
TO PREVENT THE RISK OF ELECTRIC<br />
SHOCK, DO NOT REMOVE COVER (OR<br />
BACK). NO USER-SERVICEABLE PARTS<br />
INSIDE. REFER SERVICING TO QUALIFIED<br />
SERVICE PERSONNEL.<br />
CAUTION<br />
This product is a class 1 laser product, but this product contains a laser<br />
diode higher than Class 1. To ensure continued safety, do not remove any<br />
covers or attempt to gain access to the inside of the product.<br />
Refer all servicing to qualified personnel.<br />
The following caution label appears on your unit.<br />
Location: Inside of the player<br />
WARNING<br />
This equipment is not waterproof. To prevent a fire<br />
or shock hazard, do not place any container filled<br />
with liquid near this equipment (such as a vase or<br />
flower pot) or expose it to dripping, splashing, rain<br />
or moisture. D3-4-2-1-3_A_En<br />
WARNING<br />
Before plugging in for the first time, read the following<br />
section carefully.<br />
The voltage of the available power supply differs<br />
according to country or region. Be sure that the<br />
power supply voltage of the area where this unit<br />
will be used meets the required voltage (e.g., 230V<br />
or 120V) written on the rear panel. D3-4-2-1-4_A_En<br />
The exclamation point within an equilateral<br />
triangle is intended to alert the user to the<br />
presence of important operating and<br />
maintenance (servicing) instructions in the<br />
literature accompanying the appliance.<br />
D3-4-2-1-1_En-A<br />
CLASS 1<br />
LASER PRODUCT<br />
D3-4-2-1-8_A_En<br />
NOTE: This equipment has been tested and found to comply with the limits for a Class B digital device, pursuant to<br />
Part 15 of the FCC Rules. These limits are designed to provide reasonable protection against harmful interference in<br />
a residential installation. This equipment generates, uses, and can radiate radio frequency energy and, if not<br />
installed and used in accordance with the instructions, may cause harmful interference to radio communications.<br />
However, there is no guarantee that interference will not occur in a particular installation. If this equipment does<br />
cause harmful interference to radio or television reception, which can be determined by turning the equipment off<br />
and on, the user is encouraged to try to correct the interference by one or more of the following measures:<br />
– Reorient or relocate the receiving antenna.<br />
– Increase the separation between the equipment and receiver.<br />
– Connect the equipment into an outlet on a circuit different from that to which the receiver is connected.<br />
– Consult the dealer or an experienced radio/TV technician for help. D8-10-1-2_En<br />
FEDERAL COMMUNICATIONS COMMISSION DECLARATION OF CONFORMITY<br />
This device complies with part 15 of the FCC Rules. Operation is subject to the following two conditions: (1) This<br />
device may not cause harmful interference, and (2) this device must accept any interference received, including<br />
interference that may cause undesired operation.<br />
Product Name: COMPACT DISC PLAYER<br />
Model Number: <strong>C<strong>DJ</strong></strong>-<strong>400</strong><br />
Responsible Party Name: PIONEER ELECTRONICS SERVICE, INC.<br />
Address: 1925 E. DOMINGUEZ ST. LONG BEACH, CA 90801-1760, U.S.A.<br />
Phone: 1-800-421-1404<br />
AC power cord<br />
The type of cord which can be used depends on the power voltage in each region or country.<br />
Please make sure you use the correct cord due to the possibility of fire or other hazard<br />
if used incorrectly (see below).<br />
AC power cord and converter plug use<br />
Region Plug type<br />
For European type region<br />
Caution<br />
European two-pin plug<br />
Do not use this power cord set in Taiwan.<br />
For Taiwan exclusively<br />
Caution<br />
For use in Taiwan only.<br />
In other areas, please do not use.<br />
Taiwanese two-pin<br />
flat-bladed plug<br />
WARNING<br />
To prevent a fire hazard, do not place any naked<br />
flame sources (such as a lighted candle) on the<br />
equipment. D3-4-2-1-7a_A_En<br />
VENTILATION CAUTION<br />
When installing this unit, make sure to leave space<br />
around the unit for ventilation to improve heat<br />
radiation (at least 5 cm at rear, and 5 cm at each<br />
side).<br />
WARNING<br />
Slots and openings in the cabinet are provided for<br />
ventilation to ensure reliable operation of the<br />
product, and to protect it from overheating. To<br />
prevent fire hazard, the openings should never be<br />
blocked or covered with items (such as newspapers,<br />
table-cloths, curtains) or by operating the<br />
equipment on thick carpet or a bed. D3-4-2-1-7b_A_En<br />
Operating Environment<br />
Operating environment temperature and humidity:<br />
+5 ºC – +35 ºC (+41 ºF – +95 ºF); less than 85 %RH<br />
(cooling vents not blocked)<br />
Do not install this unit in a poorly ventilated area, or in<br />
locations exposed to high humidity or direct sunlight (or<br />
strong artificial light) D3-4-2-1-7c_A_En<br />
CAUTION: This product satisfies FCC regulations<br />
when shielded cables and connectors are used to<br />
connect the unit to other equipment. To prevent<br />
electromagnetic interference with electric appliances<br />
such as radios and televisions, use shielded cables<br />
and connectors for connections. D8-10-3a_En<br />
If the AC plug of this unit does not match the AC<br />
outlet you want to use, the plug must be removed<br />
and appropriate one fitted. Replacement and<br />
mounting of an AC plug on the power supply cord of<br />
this unit should be performed only by qualified<br />
service personnel. If connected to an AC outlet, the<br />
cut-off plug can cause severe electrical shock. Make<br />
sure it is properly disposed of after removal.<br />
The equipment should be disconnected by removing<br />
the mains plug from the wall socket when left<br />
unused for a long period of time (for example, when<br />
on vacation). D3-4-2-2-1a_A_En<br />
CAUTION<br />
The POWER switch on this unit will not completely<br />
shut off all power from the AC outlet. Since the<br />
power cord serves as the main disconnect device for<br />
the unit, you will need to unplug it from the AC outlet<br />
to shut down all power. Therefore, make sure the<br />
unit has been installed so that the power cord can<br />
be easily unplugged from the AC outlet in case of an<br />
accident. To avoid fire hazard, the power cord should<br />
also be unplugged from the AC outlet when left<br />
unused for a long period of time (for example, when<br />
on vacation). D3-4-2-2-2a_A_En<br />
When using this product follow the instructions<br />
written on the underside of the unit, which<br />
concern rated voltage, etc. D3-4-2-2-4_En<br />
POWER-CORD CAUTION<br />
Handle the power cord by the plug. Do not pull out the<br />
plug by tugging the cord and never touch the power<br />
cord when your hands are wet as this could cause a<br />
short circuit or electric shock. Do not place the unit, a<br />
piece of furniture, etc., on the power cord, or pinch the<br />
cord. Never make a knot in the cord or tie it with other<br />
cords. The power cords should be routed such that they<br />
are not likely to be stepped on. A damaged power cord<br />
can cause a fire or give you an electrical shock. Check<br />
the power cord once in a while. When you find it<br />
damaged, ask your nearest PIONEER authorized<br />
service center or your dealer for a replacement. S002_En<br />
Information to User<br />
Alteration or modifications carried out without<br />
appropriate authorization may invalidate the user’s<br />
right to operate the equipment.<br />
D8-10-2_En
FEATURES<br />
Designed for professional use by <strong>DJ</strong>s, the <strong>C<strong>DJ</strong></strong>-<strong>400</strong> compact<br />
disc player provides all the functions and performance required<br />
in disco clubs while offering performance, sound quality<br />
and functionality superior to analog players.<br />
SCRATCH JOG EFFECT<br />
Equipped with Scratch Jog Effect for new scratch sounds.<br />
Equipped with three buttons [BUBBLE], [TRANS] and [WAH]<br />
for new scratch sounds. Effects that are different from the normal<br />
scratch sound can be obtained, broadening the possibilities<br />
of your <strong>DJ</strong> play.<br />
DIGITAL JOG BREAK<br />
Equipped with Digital Jog Break for original sound effects.<br />
Individual remix assist functions [JET], [ROLL] and [WAH]<br />
have been provided individually in three buttons. By choosing<br />
a function and operating the jog dial in time with the music, a<br />
new remix world can be experienced.<br />
JOG DIAL<br />
The large 115 mm diameter jog dial enables better handling<br />
than an analog turntable.<br />
■ PITCH BEND<br />
This function changes the music tempo depending on the direction<br />
and speed the jog dial is rotated.<br />
■ SCRATCH PLAY<br />
In the VINYL mode when the surface of the jog dial is pressed<br />
playback is discontinued and then continues according to the<br />
direction and speed the dial is rotated.<br />
■ FRAME SEARCH<br />
Moves the pause position in frame units (1/75 sec) when the<br />
jog dial is rotated in the pause mode.<br />
■ SUPER-FAST SEARCH<br />
By turning the jog dial while holding down the manual search<br />
button or the track search button, disc search can be performed<br />
faster than normal search or track search functions.<br />
TEMPO CONTROL<br />
100 mm long high-precision slider allowing free speed adjustment.<br />
With a digital display calibrated in 0.02 % units (within a ±6 %<br />
range), tempo adjustments can be made more easily and accurately.<br />
■ TEMPO CONTROL RANGE<br />
The maximum variable range can be set to four variable<br />
ranges; ±6 %, ±10 %, ±16 %, WIDE, to provide easier operation<br />
environment.<br />
■ MASTER TEMPO<br />
Maintains the same pitch of sound while changing the music<br />
tempo.<br />
REVERSE PLAY<br />
When the reverse button (DIRECTION REV) is pressed so that<br />
the button’s indicator lamp lights, play is performed in the reverse<br />
direction.<br />
BEFORE OPERATING (FEATURES)<br />
CUE<br />
■ BACK CUE<br />
After storing cue points in memory, press the CUE button<br />
while playing a track to return and start from the stored cue<br />
point.<br />
■ AUTO CUE<br />
Skips the non-recorded part at the top of a track and automatically<br />
enters stand-by mode at the track’s starting point, allowing<br />
playback to begin instantly when the PLAY/PAUSE button<br />
(6) is pressed.<br />
■ CUE POINT SAMPLER<br />
Playback can be started at one touch from a stored cue point,<br />
convenient for confirming start points and as sampler.<br />
CUE/LOOP MEMORY<br />
This player is equipped with an internal memory that permits<br />
the recording of cue point or loop point; the recorded points<br />
can later be recalled as desired.<br />
REAL TIME SEAMLESS LOOP<br />
This function simplifies the setting and canceling of loops.<br />
The loop can be set at the very instant the track is being<br />
played. By setting a loop just before the end of the track, the<br />
track can be made so that it doesn’t stop. In addition, an<br />
A<strong>DJ</strong>UST mode has been added to enable one-touch adjustments<br />
to the loop-out point, thereby facilitating the loop operation.<br />
RELOOP<br />
Allows returning to the set loop position any number of times.<br />
Press the RELOOP/EXIT button after canceling loop play to<br />
return to the loop start position. By using the loop ON and OFF<br />
combined with the rhythm of the track, new sound effects can<br />
be created.<br />
BEAT LOOP/LOOP DIVIDE<br />
Automatically sets a loop-out point according to the track’s<br />
BPM and starts loop-play. Each additional time the button is<br />
pressed, the loop is divided and a new rhythm produced.<br />
PLAYING ADDRESS<br />
The bar graph provides a visual reference of the track playback<br />
progress that enables the user to visualize the current<br />
playback position, in the same way as is done with an analog<br />
record by checking the position of the needle. The current position<br />
can be confirmed by the length of the graph, and in addition,<br />
the graph flashes to notify the ending of the track.<br />
FADER START<br />
When a <strong>Pioneer</strong> <strong>DJ</strong> mixer (sold separately) is connected, the<br />
mixer’s fader operation can be used to perform quick start<br />
and back cue.<br />
RELAY PLAY<br />
Two <strong>C<strong>DJ</strong></strong>-<strong>400</strong> units can be connected in tandem to perform<br />
automatic relay play.<br />
When track playback stops on one of the players, the standby<br />
mode of the other player is released and playback begins automatically.<br />
3<br />
<br />
En<br />
English
BEFORE OPERATING (FEATURES)<br />
OIL DAMPER FLOAT<br />
OIL DAMPER FLOAT construction helps resist shakes and impacts.<br />
This unit features an OIL DAMPER FLOAT design, making it<br />
harder for distortions and sound breakup to occur due to impacts<br />
from operation and vibrations from the floor.<br />
MULTI READ<br />
Supports playback of CD-R and CD-RW discs. (Some discs<br />
may not replay properly, however, due to certain special<br />
characteristics of some discs and recorders, as well as due to<br />
dirty or damaged discs.)<br />
MP3 <strong>DJ</strong> PLAY<br />
MP3 files recorded on CD-ROM or USB memory device can be<br />
played with <strong>DJ</strong> functions.<br />
PC CONNECTION<br />
Virtually all the button and slider functions of the <strong>C<strong>DJ</strong></strong>-<strong>400</strong> can<br />
be output to external devices.<br />
These signals can then be used to control <strong>Pioneer</strong>’s own <strong>DJ</strong><br />
software “<strong>DJ</strong>S” as well as other computer software applications.<br />
In addition, music tracks played on the computer can be<br />
output as audio from the <strong>C<strong>DJ</strong></strong>-<strong>400</strong>.<br />
CONTENTS<br />
BEFORE OPERATING<br />
FEATURES ................................................................... 3<br />
DISCS USABLE WITH THIS UNIT .............................. 5<br />
CAUTIONS REGARDING HANDLING ........................ 7<br />
CONNECTIONS............................................................ 8<br />
PANEL FACILITIES .................................................... 10<br />
OPERATIONS<br />
DISC LOADING/UNLOADING ................................... 13<br />
<strong>DJ</strong> PLAYER OPERATIONS ........................................ 14<br />
Auto cue function ................................................ 14<br />
Starting playback ................................................. 14<br />
Resume function.................................................. 14<br />
To stop playback.................................................. 14<br />
To temporarily interrupt playback ..................... 14<br />
Jog dial functions ................................................ 15<br />
Fast-forward/fast-reverse ................................... 15<br />
Track cueing ......................................................... 15<br />
Rotary seach ........................................................ 15<br />
4<br />
<br />
En<br />
Disclaimer<br />
¶ Microsoft and Windows are registered trademarks of Microsoft<br />
Corporation, registered in the U.S. and other countries.<br />
Apple and Mac OS are trademarks of Apple Inc., registered in the<br />
U.S. and other countries.<br />
¶ The typefaces included herein are partially developed by<br />
DynaComware Taiwan Inc.<br />
¶ ASIO is a registered trademark of Steinberg Media Technologies<br />
GmbH.<br />
Change playback speed ...................................... 16<br />
Applying master tempo ...................................... 16<br />
Scratch Jog Effect ............................................... 16<br />
Digital Jog Break ................................................. 16<br />
Cue point settings ............................................... 17<br />
Mixing different tracks ........................................ 17<br />
ADVANCED OPERATIONS ....................................... 18<br />
Loop playback ...................................................... 18<br />
Fader start playback ............................................ 18<br />
Scratch play ......................................................... 18<br />
Spin play ............................................................... 18<br />
Reverse play ......................................................... 18<br />
Cue point/loop point memory ............................ 19<br />
Relay play using two players ............................. 19<br />
Writing and reading data .................................... 19<br />
MIDI SETTING............................................................ 20<br />
OTHER<br />
TROUBLESHOOTING ................................................ 21<br />
SPECIFICATIONS ....................................................... 22
DISCS USABLE WITH THIS UNIT<br />
Types of discs playable on this unit<br />
÷ The following marks and logos are displayed on disc labels,<br />
packaging, or jackets.<br />
Types and Logos of playable discs<br />
CD CD-TEXT (Note 1) CD-R (Note 2) (Note 2)<br />
CD-RW<br />
Note 1) Regarding TEXT display:<br />
The number of characters that can be displayed is up to 48.<br />
When a display exceeds eight characters in length, the display<br />
will scroll. Only alpha-numerics and a limited number of<br />
symbols can be displayed (☞ P.12).<br />
Note 2) CD-R/CD-RW discs:<br />
This player supports playback of CD-R/CD-RW discs recorded<br />
in audio CD format or MP3.<br />
* For details, consult the Operating Instructions for your recorder.<br />
Playing MP3 files<br />
BEFORE OPERATING (DISCS USABLE WITH THIS UNIT)<br />
Notes:<br />
¶ Some CD-R/CD-RW discs recorded on standalone recorders<br />
or computer drives may not be playable back on this<br />
player, due to a variety of reasons, including disc characteristics,<br />
scratches, dirt, player lens dirt or condensation, etc.<br />
¶ Some discs recorded on computer drives may not be<br />
playable on this player, depending on the recording application<br />
used, its settings, and operating environment. Be<br />
sure to use the correct formatting for the discs used. For<br />
details, consult the application author.<br />
¶ This unit cannot play partially recorded CD-R or CD-RW<br />
discs that have not been finalized.<br />
¶ For detailed information regarding the handling of CD-R/<br />
CD-RW discs, consult the handling precautions supplied<br />
with each disc.<br />
■ Regarding CD-R/RW discs<br />
Due to the unique construction of CD-R/RW discs, leaving<br />
them for extended periods of time in the pause (or cue<br />
standby) mode at a single point may result in the discs’ becoming<br />
difficult to play at that place. The same symptom may<br />
also occur if the loop function is used to play back a single<br />
point on the disc excessively.<br />
As a result, users are advised to construct backup archive<br />
discs when playing discs containing important data.<br />
■ About DualDisc playback<br />
This product is designed to conform to standards for music<br />
CDs. No warranty is made for operation or performance when<br />
used with discs not conforming to such music CD standards.<br />
MP3 files may be found in two formats: Constant Bit Rate (CBR) and Variable Bit Rate (VBR). This component supports playback<br />
and <strong>DJ</strong> play with both CBR and VBR type MP3 files, but in comparison with CBR files, files recorded in VBR format will experience<br />
slower search and super-fast search speeds. As a result, when operating speed is most important, the use of the CBR recording<br />
format is recommended for MP3 files.<br />
MP3 files must follow the format requirements listed below.<br />
MP3 format MPEG-1<br />
MPEG-2<br />
ID3 tag<br />
File extension<br />
Supports Audio Layer-3 sampling frequency 32 kHz, 44.1 kHz, 48 kHz,<br />
Bit Rate 32 Kbps to 320 Kbps.<br />
Supports Audio Layer-3 sampling frequency 16 kHz, 22.05 kHz, 24 kHz,<br />
Bit Rate 16 Kbps (stereo) to 160 Kbps.<br />
Supports ID3 Vers. 1.0/1.1/2.2/2.3/2.4. Displays title, album, artist.<br />
Only alpha-numerics and a limited number of symbols can be<br />
displayed.<br />
.mp3, .MP3, .mP3, .Mp3<br />
5<br />
<br />
En<br />
English
BEFORE OPERATING (DISCS USABLE WITH THIS UNIT)<br />
■ Playing Tracks from USB memory<br />
By connecting a USB memory device to the <strong>C<strong>DJ</strong></strong>-<strong>400</strong>, MP3 files on the USB memory can be played.<br />
÷ The <strong>C<strong>DJ</strong></strong>-<strong>400</strong> may not support playback with all USB memory devices or provide sufficient electrical power. Additionally, note<br />
that <strong>Pioneer</strong> is not responsible for any loss of data on a USB memory device that may occur as the result of connecting to the<br />
<strong>C<strong>DJ</strong></strong>-<strong>400</strong>.<br />
÷ Reading from a USB memory device may take time if large quantities of data are involved.<br />
÷ Erratic performance may result when a USB hub is used.<br />
■ To disconnect a USB memory device<br />
Use SOURCE SELECT to cancel the selection of the USB memory device, and then confirm that the USB memory device indicator<br />
has gone out before removing the device.<br />
USB Memory Device<br />
Format<br />
* No file sort function. Playback is in order recorded in memory.<br />
* Longer startup times are required with increasing numbers of files.<br />
6<br />
<br />
En<br />
Folder hierarchy<br />
Folder Max<br />
File Max<br />
Recording format<br />
■ About CD-ROM playback<br />
MP3 files recorded on CD-ROM can be played back on this unit.<br />
Disc format File extension<br />
Folder layers<br />
Maximum number of folders<br />
Maximum number of files<br />
Multi-session<br />
CD-R recording method<br />
* No file sort function. Playback is in order recorded in memory.<br />
* Longer startup times are required with increasing numbers of files.<br />
Maximum eight levels (cannot play files in folders exceeding 8th<br />
hierarchy level)<br />
10 000<br />
20 000 (maximum 10 000 in single folder)<br />
Devices conforming to USB mass storage class (USB MSC), including<br />
external hard discs, portable flash memory devices, and digital audio<br />
playback devices (supporting FAT16 and FAT32 format).<br />
.mp3, .MP3, .mP3, .Mp3<br />
Maximum eight layers; files in folders exceeding eight layers cannot<br />
be played.<br />
2 000<br />
3 000<br />
Does not support multi-session.<br />
When the disc used is a multi-session disc, only the first session will<br />
be played.<br />
Record following the ISO9660 CD-ROM file system.<br />
Supports only Disc At Once or Track At Once.<br />
<strong>C<strong>DJ</strong></strong>-<strong>400</strong> does not support Packet Write recorded discs.
CAUTIONS REGARDING HANDLING<br />
Location<br />
Install the player in a well-ventilated location where it will not be<br />
exposed to high temperatures or humidity.<br />
Do not install the player in a location which is exposed to direct sunlight,<br />
or near stoves or radiators. Excessive heat can adversely affect<br />
the cabinet and internal components. Installation of the player in a<br />
damp or dusty environment may aiso result in a malfunction and can<br />
be hazardous. Avoid installation near cookers etc., where the player<br />
may be exposed to oily smoke, steam or heat.<br />
Installation Guidelines<br />
÷ Placing and using the compact disc player for long periods on<br />
heat-generating sources such as amplifiers or near spotlights, etc.<br />
will affect product performance. Avoid placing the player on heatgenerating<br />
sources.<br />
÷ Install this compact disc player as far as possible away from tuners<br />
and TV sets. A compact disc player installed in close proximity to<br />
such equipment may cause noise or degradation of the picture.<br />
÷ Noise may be noticeable when an indoor antenna is used. In such<br />
cases, make use of an outdoor antenna or turn off power to the<br />
compact disc player.<br />
÷ When the unit is used in a loud-sound environment, e.g., near a<br />
speaker, sound skip may occur. Install the unit away from the<br />
speaker or reduce the listening volume.<br />
÷ Place this unit on a level surface<br />
and a stable platform.<br />
÷ Be sure the player, including its audio<br />
and power supply cords, does<br />
not touch vibrating materials. Any<br />
cause of vibration other than the insulators<br />
may cause the disc to skip.<br />
Take special care when using the<br />
player while it is installed in a carrying<br />
case.<br />
Cleaning the Player<br />
¶ Please be sure to leave<br />
a space to allow for<br />
heat radiation.<br />
Do not place on or<br />
against vibrating<br />
materials!<br />
To clean the PLAYER wipe with a polishing or a soft, dry cloth. For<br />
stubborn dirt, moisten a soft cloth with a weak solution of neutral<br />
detergent (diluted in five to six parts water), wring the cloth well, and<br />
wipe away the dirt. Use a dry cloth to wipe the surface dry. Do not use<br />
volatile liquids such as benzene or thinner which will damage the<br />
unit.<br />
CD Lens Cleaner<br />
The player’s pickup lens should not become dirty in normal use. If for<br />
some reason, the lens becomes soiled and malfunctions, contact<br />
your nearest PIONEER authorized service center. Lens cleaners for<br />
CD players are commercially available, but special care should be<br />
exercised in their use as some may cause damage to the lens.<br />
BEFORE OPERATING (CAUTIONS REGARDING HANDLING)<br />
Storing Discs<br />
÷ Discs are made of the same kinds of plastic used for conventional<br />
analog audio records. Be careful not to allow discs to warp. Always<br />
store discs in their cases vertically, avoiding locations with<br />
high heat, humidity, or extremely low temperatures. Avoid leaving<br />
discs in cars; the interior of a car in direct sunlight can become<br />
extremely hot.<br />
÷ Always read and abide by the precautionary notes listed on disc<br />
labels.<br />
Condensation<br />
When this unit is brought into a warm room from previously cold<br />
surroundings or when the room temperature rises sharply, condensation<br />
may form inside the unit and impair its performance. In such<br />
cases, allow the unit to stand for about an hour or raise the room<br />
temperature gradually.<br />
Cleaning and Handling Compact Discs<br />
÷ The presence of fingerprints or smudges on the surface of the disc<br />
will not directly affect the recorded signals, but, depending on the<br />
degree of contamination, the brightness of the light reflected from<br />
the signal surfaces may be reduced causing degradation of sound<br />
quality. Always keep your discs clean by wiping them gently with<br />
a soft cloth from the inner edge toward the outer edge.<br />
÷ If a disc becomes very dirty, dampen a soft cloth with water, (be<br />
sure to wring it out well) and wipe the away dirt gently. Remove<br />
any water drops with another soft, dry cloth.<br />
÷ Do not use record cleaning sprays or anti-static agents on discs.<br />
Never clean discs with benzene, thinner, or other volatile solvents<br />
or damage to the disc surface may result.<br />
÷ With this player, use only those discs<br />
which display the mark shown right<br />
(Optical audio digital discs).<br />
÷ SACD hybrid discs cannot be played.<br />
'<br />
÷ When holding discs, do not touch their signal surfaces. Hold by<br />
the edges, or by one edge and the center hole.<br />
÷ Do not affix gummed labels or tape to the disc surface. Also, do<br />
not scratch or damage the label.<br />
÷ Discs rotate at high speeds inside the player. Do not use damaged,<br />
cracked or warped discs.<br />
Do not play a CD with a special shape<br />
Do not play a CD having other shape than a circular disc, such as<br />
heart shaped disc. Otherwise malfunction may occur.<br />
7<br />
<br />
En<br />
English
BEFORE OPERATING (CONNECTIONS)<br />
CONNECTIONS<br />
Before making or changing connections, switch off the power and disconnect the power cord from the AC outlet.<br />
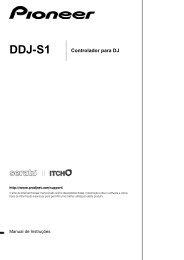
1. Connection to a <strong>Pioneer</strong> <strong>DJ</strong> mixer (audio output and CONTROL connector)<br />
Using the supplied audio cables, connect the white plug into the L (left) terminal and the red plug to the R (right) terminal.<br />
Connect the supplied control cable to enable control of the unit from the mixer for fader start play and back cue.<br />
When connecting to a <strong>DJ</strong> mixer (<strong>DJ</strong>M-<strong>400</strong>)<br />
÷ When connecting to <strong>DJ</strong>M-600, <strong>DJ</strong>M-300 and <strong>DJ</strong>M-500, connect as shown in the accompanying illustration.<br />
÷ When connecting to <strong>DJ</strong>M-909 and <strong>DJ</strong>M-707, connect CH-1 CD with A PLAYER, CH-2 CD with B PLAYER using the supplied<br />
audio cables.<br />
÷ When connecting to <strong>DJ</strong>M-3000, connect A PLAYER to LINE 1 of CH-1, and B PLAYER to LINE 3 of CH-2.<br />
÷ When connecting to the <strong>DJ</strong>M-1000, use the supplied audio cable to connect one set of the CD/LINE connectors to PLAYER A<br />
and the other CD/LINE connectors to PLAYER B. For digital audio signal output, use a coaxial digital signal cable (sold<br />
separately) to connect the <strong>C<strong>DJ</strong></strong>-<strong>400</strong>’s DIGITAL OUT connector to one of the <strong>DJ</strong>M-1000’s DIGITAL IN connectors (channel 4 to 6).<br />
÷ When connecting to the <strong>DJ</strong>M-800, use the supplied audio cable to connect one set of the CD/LINE connectors to PLAYER A and<br />
the other set of CD/LINE connectors to PLAYER B. For digital output of audio signals, use a coaxial digital signal cable (sold<br />
separately) to connect the <strong>C<strong>DJ</strong></strong>-<strong>400</strong>’s DIGITAL OUT connector to the <strong>DJ</strong>M-800’s DIGITAL IN connector.<br />
÷ When connecting to the <strong>DJ</strong>M-700, use the supplied audio cable to connect one set of CD/LINE connectors to PLAYER A and the<br />
other set of CD/LINE connectors to PLAYER B.<br />
÷ When connecting to a audio mixer other than the ones listed above, connect the unit’s AUDIO OUT terminal to the mixer’s line<br />
in terminal, or the AUX terminal (* do not connect to the PHONO terminal, since distortion or improper operation may occur).<br />
2. Connecting control cable for relay play<br />
Alternating playback can be automatically performed when the CONTROL connectors of the two units are connected with the<br />
supplied control cable. (☞P.19)<br />
8<br />
<br />
En<br />
LINE PHONO<br />
<strong>DJ</strong>M-<strong>400</strong><br />
L<br />
R<br />
Supplied<br />
audio cable<br />
PHONO<br />
LINE<br />
CD<br />
CONTROL<br />
LINE PHONO<br />
<strong>C<strong>DJ</strong></strong>-<strong>400</strong> B <strong>C<strong>DJ</strong></strong>-<strong>400</strong> A<br />
<strong>C<strong>DJ</strong></strong>-<strong>400</strong> <strong>C<strong>DJ</strong></strong>-<strong>400</strong><br />
Supplied control cable<br />
L<br />
R<br />
PHONO<br />
LINE<br />
Supplied<br />
control cable<br />
CD<br />
CONTROL<br />
Supplied audio<br />
cable<br />
Supplied<br />
control<br />
cable
3. Connecting to other devices<br />
A Connecting to a stereo amplifier (when not using a <strong>DJ</strong> mixer)<br />
Stereo amplifier<br />
B Connecting to a component with digital input connectors<br />
CD recorder or amplifier with<br />
digital inputs<br />
BEFORE OPERATING (CONNECTIONS)<br />
÷ The DIGITAL OUT connectors produce audio data only (without subcodes; CD graphics are not supported).<br />
÷ Depending on the CD recorder or other component connected, some recording or other functions may be limited. For details,<br />
consult the operating instructions for the connected component.<br />
C Connecting to a Computer<br />
Computer<br />
Connect to the CD or AUX input connectors<br />
(Do not use the PHONO input connectors.)<br />
Supplied audio cable<br />
Digital signal cable<br />
USB cable<br />
Connect to USB port.<br />
<strong>C<strong>DJ</strong></strong>-<strong>400</strong><br />
<strong>C<strong>DJ</strong></strong>-<strong>400</strong><br />
<strong>C<strong>DJ</strong></strong>-<strong>400</strong><br />
÷ Supported computer operating systems include Windows Vista, Windows XP, Windows 2000, and Mac OS 10.3 or later.<br />
÷ When used with Windows 2000, a special MIDI driver must be installed before performing connections.<br />
÷ A special ASIO driver is also available to allow audio signals to be output from computer.<br />
÷ Please visit the following website to download special drivers, and for more information about the <strong>Pioneer</strong> <strong>DJ</strong> software<br />
program “<strong>DJ</strong>S.”<br />
http://www.prodjnet.com/support/<br />
4. Connecting the power cord<br />
After all other connections have been made, connect the power cord to the AC inlet on the rear panel of the player and connect the<br />
power plug to an AC wall outlet or to a power receptacle on the rear panel of the amplifier.<br />
9<br />
<br />
En<br />
English
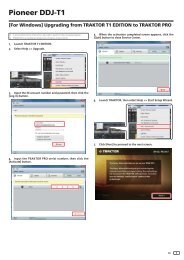
BEFORE OPERATING (PANEL FACILITIES)<br />
PANEL FACILITIES<br />
29<br />
28<br />
27<br />
26<br />
25<br />
24<br />
23<br />
22<br />
23 21<br />
20<br />
19<br />
18<br />
17<br />
1. POWER switch (—OFF/ _ON)<br />
This switch is located on the rear panel of the unit. Switches<br />
the unit’s power ON/OFF.<br />
2. Display (☞P.12)<br />
3. Folder BACK button<br />
Returns to the next higher level in the folder hierarchy when<br />
using a CD-ROM or USB memory with a hierarchical folder<br />
structure (☞P.15).<br />
4. EJECT button<br />
Ejects the disc. (☞P.13)<br />
5. CUE/LOOP button<br />
7 CUE/LOOP MEMORY/DELETE button<br />
Use to record cue points and loop points. (☞P.19)<br />
7 CUE/LOOP CALL buttons (2, 3)<br />
Use to call cue points and loop points recorded. (☞P.19)<br />
6. Rotary dial (SELECT PUSH 4, ¢)<br />
Use to select tracks in forward or reverse direction (track advance)<br />
and to select folders. (☞P.15)<br />
Press to confirm folder/track selections.<br />
7. HOLD button<br />
Preserves the effect of the Digital Jog Break and Scratch Jog<br />
Effect. (☞P.16)<br />
8. JOG MODE VINYL button<br />
VINYL mode: The button indicator lights. When the surface of<br />
the jog dial is pressed during playback, play stops, and if the<br />
jog dial is then rotated, sound is produced in accordance with<br />
the degree of rotation.<br />
<strong>C<strong>DJ</strong></strong> mode: The above action does not occur when the jog dial<br />
is pressed.<br />
¶ The currently set jog mode is stored in memory even when<br />
power is turned off.<br />
10<br />
<br />
En<br />
POWER<br />
SOURCE SELECT TEXT<br />
MODE<br />
MEMORY PC<br />
UTILITY<br />
MODE<br />
USB<br />
CD<br />
REALTIME CUE<br />
DIRECTION IN OUT RELOOP/EXIT BEAT LOOP<br />
JOG MODE<br />
REV LOOP VINYL<br />
TRACK SEARCH<br />
SEARCH<br />
CUE<br />
PLAY/PAUSE<br />
30<br />
1 2<br />
3 4<br />
TIME<br />
MODE<br />
AUTO<br />
CUE<br />
SCRATCH<br />
JOG EFFECT<br />
DIGITAL<br />
JOG BREAK<br />
OFF<br />
ON<br />
BUBBLE TRANS<br />
HOT LOOP<br />
MULTI PLAYER<br />
<strong>C<strong>DJ</strong></strong>-<strong>400</strong><br />
JET ROLL WAH<br />
OUT A<strong>DJ</strong>UST<br />
HOLD<br />
BACK<br />
SELECT PUSH<br />
REV FWD<br />
16<br />
15<br />
WAH<br />
14<br />
LOOP DIVIDE<br />
13<br />
12<br />
0<br />
EJECT<br />
MEMORY<br />
DELETE<br />
CUE/LOOP<br />
CALL<br />
TEMPO<br />
±6 ±10 ±16 WIDE<br />
MASTER TEMPO<br />
TEMPO<br />
5<br />
6<br />
7<br />
8<br />
9<br />
10<br />
11<br />
9. TEMPO control range button (±6/±10/±16/WIDE)<br />
Changes the variable range of the tempo control. (☞P.16)<br />
¶ The tempo range will be saved in memory when the power<br />
is turned off.<br />
10. MASTER TEMPO button/indicator<br />
Turns the Master Tempo function ON/OFF (lights when turned<br />
ON). (☞P.16)<br />
11. TEMPO control slider<br />
Controls the track’s tempo (playback speed). (☞P.16)<br />
12. Jog dial (–REV/+FWD) (☞P.15)<br />
A photograph or other graphic of your choice can be inserted<br />
(☞P.12)<br />
13. Jog indicator<br />
¶ Indicator lights when disc is inserted during normal mode,<br />
or if USB memory is selected during normal mode.<br />
¶ The illumination pattern of the jog indicator can be<br />
changed.<br />
7 Changing the jog indicator’s illumination pattern.<br />
1. Hold the TEXT MODE/UTILITY MODE button depressed for<br />
one second or more to enter utility setting mode.<br />
Turn the rotary dial so that the display screen shows [JOG<br />
ILLUMI], and then press to confirm the selection.<br />
The display screen will show [PATTERN 1].<br />
2. Turn the rotary dial to change the illumination pattern.<br />
Patterns can be chosen from PATTERN 1 to PATTERN 6.<br />
3. Press the rotary dial to confirm.<br />
Utility setting mode will be canceled if no command is entered<br />
for 15 seconds. Pressing the BACK button will also<br />
exit the setting mode.<br />
14. Disc loading slot<br />
Located in front panel. (☞P.13)<br />
15. Disc indicator<br />
¶ When no disc is inserted, the indicator is turned off.<br />
¶ When disc loading is completed, indicator turns on.<br />
16. Forced ejection hole<br />
Located in front panel of the unit. (☞P.13)<br />
17. PLAY/PAUSE button (6)<br />
(☞P.14)<br />
18. PLAY/PAUSE indicator (6)<br />
Lights when playing, and flashes when in pause mode.<br />
19. CUE button<br />
Use to set and confirm cue point. (☞P.17)<br />
20. CUE indicator<br />
Lights when cue point is set, and flashes when in pause mode.<br />
21. SEARCH buttons (1, ¡)<br />
Use to perform fast-forward and fast-reverse (with sound)<br />
during playback mode. (☞P.15)<br />
22. TRACK SEARCH buttons (4, ¢)<br />
Changes tracks in the forward/reverse direction. (☞P.15)<br />
23. Reverse button (DIRECTION REV) (☞P. 18)<br />
When this button is pressed, its indicator lights and the unit is<br />
set to reverse play.
24. LOOP buttons<br />
7 IN/REALTIME CUE/HOT LOOP button/indicator<br />
Use to input loop-in point. (IN ☞P.18)<br />
Use to set the current playback point as cue point. (REALTIME<br />
CUE ☞P.17)<br />
When pressed during loop play, returns playback to loop-in<br />
point and begins replay. (HOT LOOP ☞P.18)<br />
7 OUT/OUT A<strong>DJ</strong>UST button/indicator<br />
Use to input loop-out point. (OUT ☞P.18)<br />
When pressed during loop play, adjusts loop-out point. (OUT<br />
A<strong>DJ</strong>UST ☞P.18)<br />
7 RELOOP/EXIT button<br />
After finishing loop play, the stored loop-in/out information<br />
can be used to begin loop play again. (RELOOP ☞P.18)<br />
When pressed during loop play, loop play stops and playback<br />
returns to normal playback mode. (EXIT ☞P.18)<br />
7 BEAT LOOP/LOOP DIVIDE buttons/indicator<br />
If pressed while playing or pausing a track, the loop-end will<br />
be calculated based on the BPM (Beat Per Minute) of the track,<br />
and loop-play will then start (BEAT LOOP ☞P.18).<br />
Pressing the – button during loop-playback will divide the<br />
playback loop, and pressing the + button will return the<br />
playback loop to its original length (LOOP DIVIDE ☞P.18).<br />
During loop-playback, the button’s indicator will light to<br />
indicate that the LOOP DIVIDE button is enabled.<br />
Rear Panel<br />
1. USB port<br />
Use to connect a computer.<br />
2. AUDIO OUT L, R connectors<br />
RCA-type analog audio output jacks.<br />
3. CONTROL connector<br />
When the accessory control cord is used to connect this connector<br />
to the corresponding CONTROL connector on a <strong>Pioneer</strong><br />
<strong>DJ</strong> mixer, the <strong>DJ</strong> mixer can be used to control the CD<br />
player for fader start play and back cue.<br />
Also, by connecting this connector to the CONTROL connector<br />
on another <strong>Pioneer</strong> <strong>DJ</strong> CD player, automatic relay play can<br />
be performed. (☞ P. 19)<br />
1<br />
2<br />
3 4<br />
BEFORE OPERATING (PANEL FACILITIES)<br />
25. SCRATCH JOG EFFECT/DIGITAL JOG BREAK<br />
buttons<br />
The button’s function changes depending on the JOG mode.<br />
7 SCRATCH JOG EFFECT buttons<br />
Turns on/off each of the effects BUBBLE, TRANS, and WAH<br />
during VINYL mode (☞P.16).<br />
7 DIGITAL JOG BREAK buttons<br />
Turns on/off each of the effects JET, ROLL, and WAH during<br />
<strong>C<strong>DJ</strong></strong> mode (☞P.16).<br />
26. SOURCE SELECT buttons<br />
7 USB select button<br />
Select when playing files from a connected USB memory device.<br />
Each time the button is pressed, the function alternates<br />
between USB and PC.<br />
7 CD select button<br />
Select when playing CDs or files on a CD-ROM.<br />
27. USB port<br />
Use to connect a USB memory device.<br />
28. TEXT MODE/UTILITY MODE button<br />
Changes the TEXT display (☞P.12)<br />
Hold the button depressed to enter utility setting mode.<br />
29. TIME MODE/AUTO CUE button<br />
Switches the display between the track’s elapsed time and remaining<br />
time (☞P.12).<br />
Hold the button depressed to turn the auto cue function on/off<br />
(☞P.14).<br />
30. Jog touch indicators<br />
During VINYL mode, lights when the top of the jog dial is<br />
pressed.<br />
5<br />
6<br />
4. DIGITAL OUT connector<br />
RCA type coaxial digital output connectors used to connect a<br />
<strong>DJ</strong> mixer or AV amplifier, CD player, etc., equipped with digital<br />
input connectors. The digital outputs here support all <strong>DJ</strong><br />
and other functions, but only audio data is output (without<br />
subcodes; CD graphics are not supported).<br />
5. AC inlet (AC IN)<br />
Use the accessory power cord to connect this inlet to a standard<br />
AC power outlet.<br />
6. POWER — OFF/_ ON switch<br />
11<br />
<br />
En<br />
English
BEFORE OPERATING (PANEL FACILITIES)<br />
12<br />
<br />
En<br />
14 13 12<br />
1 2 3 4 5 6 7 8<br />
Display<br />
1. Segment display x3<br />
Displays folder number, track number, or alphanumeric data.<br />
2. REMAIN<br />
Lights when the track remaining time is displayed.<br />
3. Segment display x3<br />
Displays time (minutes) or alphanumeric data.<br />
4. Segment display x2<br />
Displays time (seconds) or alphanumeric data.<br />
5. Segment display x2<br />
Displays time (frame) or alphanumeric data.<br />
6. TEMPO<br />
Displays the change rate of tempo.<br />
7. MT<br />
Lights when Master Tempo function is ON.<br />
8. WIDE<br />
Lights when the TEMPO control range button is set to WIDE.<br />
9. ±6, ±10, ±16<br />
Lights to display tempo range.<br />
10. BPM<br />
Displays the BPM of the track displayed.<br />
11. Dot matrix display (7x5) x12<br />
Displays text.<br />
12. A.CUE<br />
Lights when Auto Cue function is turned on.<br />
13. Playing address display<br />
Displays the current playback position in a one-track full-scale<br />
graph.<br />
When displaying elapsed time, the graph lights from the left,<br />
and when displaying the remaining time the graph light turns<br />
off from the left.<br />
When remaining time is less than 30 seconds, the graph<br />
flashes slowly, and when remaining time is less than 15 seconds<br />
the graph flashes rapidly.<br />
14. MEMORY<br />
Lights when a cue/loop point is saved.<br />
Time display<br />
¶ Press the TIME MODE button to alternate between elapsed<br />
time (TIME) and the track’s remaining time (REMAIN).<br />
¶ The display mode is saved when the power is turned off.<br />
11<br />
About TEXT display<br />
Press the TEXT MODE button to switch the display between<br />
track name/album name/artist name for CD-TEXT. During MP3<br />
playback, the display shows ID3 tag track name (if no ID3 tag is<br />
recorded, the display shows the file name) /ID3 tag album name/<br />
ID3 tag artist name.<br />
¶ Each item can display up to 48 characters of text; text longer<br />
than 10 characters is scrolled.<br />
¶ Text may include alphanumerics and some symbols.<br />
¶ If no text is available, the [NO TEXT] message will be displayed.<br />
When a track name is selected in TEXT display, the [ ] icon will<br />
be displayed followed by the track name (with MP3, the ID3 tag’s<br />
title name or file name will be displayed).<br />
Also, during MP3 play, the bit rate will be displayed following the<br />
track name.<br />
<strong>C<strong>DJ</strong></strong>-<strong>400</strong><br />
When an album name is selected in TEXT display, the [ ] icon<br />
will be displayed followed by the album name.<br />
<strong>Pioneer</strong><br />
When an artist name is selected in TEXT display, the [ ] icon<br />
will be displayed followed by the artist’s name.<br />
<strong>Pioneer</strong> PRO <strong>DJ</strong><br />
When folder search is performed with MP3, the folder name is<br />
displayed during the search.<br />
<strong>Pioneer</strong> <strong>DJ</strong><br />
Removing the jog sheet<br />
Using the furnished screwdriver, remove the two screws and the<br />
jog plate. The inner jog sheet can then be replaced with another<br />
supplied jog sheet or a graphic of your choice.<br />
REV<br />
CUE<br />
Screws<br />
9<br />
10<br />
VYNIL<br />
Jog sheet<br />
Jog plate
DISC LOADING/UNLOADING<br />
Label surface up<br />
Insert straight<br />
1. Set the rear-panel POWER switch to ON.<br />
Do not force a disc into the unit when the POWER switch<br />
is set to OFF as this may damage the disc and the unit.<br />
2. Insert a disc.<br />
÷ Hold the disc with label surface upwards, and insert into<br />
the front panel disc loading slot.<br />
÷ Only one disc can be loaded at a time. Never attempt to<br />
load more than one disc at the same time, or attempt to<br />
load a second disc when one disc has already been<br />
loaded.<br />
÷ When loading a disc, do not placing any twisting force<br />
on the disc, or try to force the disc into the slot. Also, do<br />
not attempt to interrupt or defeat the motion of the disc<br />
when the player begins to draw a disc into the slot or to<br />
eject a disc, since damage to the disc or player could<br />
occur.<br />
Forced disc ejection<br />
If the EJECT button (0) does not function or the disc cannot<br />
be removed, pushing the pin provided into the<br />
forced ejection hole on the front panel will enable the<br />
disc to be removed.<br />
When performing forced ejection, be sure to follow the<br />
precautions below.<br />
1 Be sure to turn OFF the power of the CD player, and<br />
check that the disc has stopped rotating. It takes<br />
about 60 seconds for the disc to stop rotating after the<br />
power has been turned OFF.<br />
If forced ejection is performed while the disc is rotating;<br />
÷ As the disc will be ejected outside the CD player rotating,<br />
it may hit your finger and cause injuries.<br />
÷ As the disc will be rotating with the clamp unstable, it<br />
may be scratched.<br />
For the above reasons, never attempt to eject the disc<br />
forcibly while it is rotating.<br />
OPERATIONS (DISC LOADING/UNLOADING)<br />
3. Press the EJECT button to remove the disc.<br />
÷ When the EJECT button is pressed, disc rotation stops<br />
and the disc is ejected from the loading slot.<br />
÷ If the disc cannot be ejected with the EJECT button, insert<br />
a pin in the forced ejection hole on the front panel of<br />
the player.<br />
7 Canceling eject command<br />
In the event the EJECT button is pressed by mistake, if the<br />
PLAY/PAUSE (6) button is pressed immediately (before<br />
[EJECT] is displayed), the eject command will be canceled<br />
and playback will restart from the place immediately<br />
before the EJECT button was pressed (during this time,<br />
sound output will be temporarily interrupted).<br />
CAUTION:<br />
Do not attempt to press a disc back into the slot when<br />
the [EJECT] indicator appears. Pressing a disc back into<br />
the slot while the [EJECT] indicator appears may cause<br />
the player to stop. In this case, press the EJECT button<br />
again and wait until the [EJECT] indicator goes out before<br />
reinserting the disc.<br />
2 Always use the pin provided (Do not use other objects).<br />
The provided pin is found in a groove in the bottom surface<br />
of the player.<br />
When the provided forced eject pin is inserted fully into<br />
the forced eject hole on the front panel, the loaded disc<br />
is ejected about 5 mm to 10 mm from the loading slot,<br />
making it possible to remove it by hand.<br />
Forced ejection hole<br />
13<br />
<br />
En<br />
English
OPERATIONS (<strong>DJ</strong> PLAYER OPERATIONS)<br />
<strong>DJ</strong> PLAYER OPERATIONS<br />
AUTO CUE<br />
TEXT MODE<br />
SOURCE<br />
SELECT<br />
PLAY/PAUSE<br />
Auto cue function<br />
When a disc is loaded or track search/track change is performed, this<br />
function automatically sets the cue point (☞P.17) to the point immediately<br />
before the actual audio starts.<br />
¶ Turning on/off<br />
Hold down the AUTO CUE button to turn the auto cue function on.<br />
The auto cue indicator [A. CUE] in the display lights when auto cue<br />
is on. Hold down the AUTO CUE button again to turn the auto cue<br />
function off.<br />
¶ The on/off of the auto cue function will still be saved when the<br />
power is turned off.<br />
¶ The auto cue level can be varied.<br />
7 Changing the auto cue level<br />
1. Hold down the TEXT MODE/UTILITY MODE button for one<br />
second or more.<br />
Utility setting mode is enabled. Turn the rotary dial so the display<br />
screen shows [A.CUE LEVEL], then press to confirm.<br />
The display screen will show [–60dB](when in default state).<br />
2. Change the value by turning the rotary dial.<br />
Values can be selected from –36 dB, –42 dB, –48 dB, –54 dB,<br />
–60 dB, –66 dB, –72 dB, and –78 dB.<br />
3. Press the rotary dial to select.<br />
Utility setting mode will be canceled if no command is entered for<br />
15 seconds. Pressing the BACK button will also exit the setting<br />
mode.<br />
14<br />
<br />
En<br />
REV<br />
CUE<br />
Jog dial<br />
VINYL<br />
EJECT<br />
SELECT<br />
PUSH<br />
Starting playback<br />
1. Insert disc in the player.<br />
¶ When inserting a disc, keep the label-side up, and insert only<br />
one disc into the disc loading slot located in the front panel of<br />
the unit. (☞P.13)<br />
¶ If a CD-ROM with no MP3 file in the first session is inserted, the<br />
display will read [NO TRACK] and the CD-ROM will not be<br />
played.<br />
¶ When a USB memory device is connected to the USB port,<br />
press the SOURCE SELECT button to alternate between playback<br />
from disc (CD) or files on the USB memory.<br />
2. When Auto Cue function is ON, press the PLAY/PAUSE<br />
button (6).<br />
¶ Wait for the display’s time display to appear before pressing the<br />
button. The non-recorded portion at the beginning of the displayed<br />
track will be skipped and playback will begin instantly.<br />
When the first track’s playback ends, the player will automatically<br />
search for the beginning of the next track. The indicator<br />
on the CUE button will light, the PLAY/PAUSE button (6) indicator<br />
will flash and the player will then wait for the PLAY/<br />
PAUSE button (6) to be pressed before beginning playback<br />
of the next track.<br />
When the Auto Cue function is turned off, playback will<br />
begin automatically from the first track.<br />
¶ When Auto Cue function is turned off, playback will continue<br />
after the first track has been played, with all subsequent tracks<br />
being played in sequence.<br />
Resume function<br />
When the same disc is inserted after being ejected once, the disc will<br />
be restarted from the place immediately before the disc was ejected.<br />
However, the Digital Jog Break and Scratch Jog Effect functions will<br />
not be restored. If desired, the TRACK SEARCH button can be pressed<br />
before playback begins to perform normal track search and playback.<br />
To stop playback<br />
1. Press the EJECT button.<br />
¶ Playback will stop and the disc will be ejected.<br />
¶ The <strong>C<strong>DJ</strong></strong>-<strong>400</strong> is not provided with a conventional stop button.<br />
¶ In the event the EJECT button is pressed accidentally, immediately<br />
(before [EJECT] is displayed in the display) press the<br />
PLAY/PAUSE button (6) to cancel the eject command; playback<br />
will then restart from the place immediately before the<br />
EJECT button was pressed (during this time, sound output will<br />
be temporarily interrupted).<br />
To temporarily interrupt playback<br />
Press the PLAY/PAUSE button (6) during playback.<br />
¶ The PLAY/PAUSE button (6) indicator and the CUE button indicator<br />
will flash and playback will be paused.<br />
¶ When the PLAY/PAUSE button (6) is pressed again, the indicator<br />
on the button will light and the playback will continue.<br />
¶ In <strong>C<strong>DJ</strong></strong> mode, broken playback sound will be output even during<br />
pause. If you wish for no sound to be output, lower the output<br />
level of the audio mixer.<br />
¶ After setting the unit to pause, if no subsequent operation is performed<br />
for 100 minutes, the disc rotation will automatically stop.<br />
In this event, pressing the PLAY/PAUSE button (6) will cause<br />
playback to resume.<br />
¶ If the [END] display is left on for 100 minutes without further<br />
player operations, the unit will stop, even if it is in the play mode.
TRACK<br />
SEARCH<br />
4, ¢<br />
SEARCH<br />
1, ¡<br />
REV<br />
CUE<br />
Jog dial functions<br />
Jog dial<br />
[Pitch Bend]<br />
Rotate jog dial during playback.<br />
When jog mode is set to [VINYL], operate the jog dial by touching<br />
only the beveled sides of the dial. Different functions are enabled if<br />
the top surface is touched.<br />
¶ In proportion to the amount of rotation, the playback speed is accelerated<br />
(FWD+) or decelerated (REV–). When in the reverse<br />
mode, the playback speed accelerates when the dial is rotated in<br />
the REV– direction, and decelerates when rotated in the FWD+ direction.<br />
¶ When dial rotation is stopped, playback reverts to the previous<br />
speed.<br />
[Scratch play]<br />
Rotate jog dial during playback.<br />
See “Scratch play” in the ADVANCED OPERATIONS.<br />
[Frame search]<br />
Rotate jog dial during pause.<br />
When jog mode is set to <strong>C<strong>DJ</strong></strong>, the audible pause mode is enabled and<br />
when set to [VINYL], inaudible pause is performed; the audio is<br />
played at a speed corresponding to the speed of jog dial rotation.<br />
¶ The pause position will change in units of one frame.<br />
¶ One rotation of the jog dial corresponds to 1.8 seconds of playback<br />
(135 frames).<br />
[Cue point adjust]<br />
☞P.17 “Changing the cue point”<br />
[Super-Fast Search]<br />
☞P.15 “Super-Fast search”<br />
[Super-Fast track search]<br />
☞P.15 “Super-Fast track search”<br />
[Digital Jog Break]<br />
☞P.16 “Digital Jog Break”<br />
[Scratch Jog Effect]<br />
☞P.16 “Scratch Jog Effect”<br />
Fast-forward/fast-reverse<br />
SELECT<br />
PUSH<br />
4, ¢<br />
VINYL<br />
7 SEARCH buttons (1, ¡)<br />
Press one of the SEARCH buttons (1, ¡) during playback.<br />
Press and hold the ¡ button for fast forward the disc; press and<br />
hold the 1 button for fast reverse.<br />
¶ During playback of MP3s, fast-forward/fast-reverse are supported<br />
only for tracks inside the same folder.<br />
VINYL<br />
OPERATIONS (<strong>DJ</strong> PLAYER OPERATIONS)<br />
7 Super-Fast search<br />
Rotate the jog dial while pressing one of the SEARCH buttons<br />
(1, ¡).<br />
¶ Hold down one of the SEARCH buttons (1, ¡) while turning<br />
the jog dial in the desired direction to enter super-fast forward<br />
or super-fast reverse mode.<br />
¶ During Super-Fast search, the search direction is determined<br />
by the direction the jog dial is turned. The direction of the<br />
pressed SEARCH button (1, ¡) is ignored.<br />
¶ When the jog dial rotation stops, the unit returns to playback<br />
mode.<br />
¶ When the SEARCH button (1, ¡) is released, Super-Fast<br />
search is canceled.<br />
¶ During playback of MP3s, fast-forward/fast-reverse is supported<br />
only tracks inside the same folder.<br />
Track cueing<br />
7 TRACK SEARCH buttons (4, ¢)<br />
Press one of the TRACK SEARCH buttons (4, ¢).<br />
¶ Each time the button is pressed, the track is cued in the direction<br />
corresponding to the arrow on the button (during playback of a<br />
track, to cue playback to the beginning of the preceding track,<br />
press the 4 button twice). During playback of MP3s, the first<br />
track found in the direction pressed will be cued, and only those<br />
tracks inside the same folder are searched.<br />
¶ When the Auto Cue function is turned ON, the track will be set in<br />
cue standby position at the beginning of the track after cueing.<br />
¶ When the TRACK SEARCH button (4, ¢) is held depressed,<br />
cueing is performed continuously. If the button is held depressed<br />
for two seconds or more, the cue speed increases.<br />
¶ By pressing the 4 button twice at the beginning of the first<br />
track (Track NO.1), the last track will be cued. During playback<br />
of MP3s, when the 4 button is pressed the track with the<br />
smallest number, the last track in the same folder will be cued.<br />
¶ By pressing the ¢ button at the last track, the first track (Track<br />
NO.1) will be cued. During playback of MP3s, when the ¢<br />
button is pressed at the last track, the track with the smallest<br />
number in the same folder will be cued.<br />
7 Super-Fast track search<br />
Rotate the jog dial while pressing one of the TRACK<br />
SEARCH buttons (4, ¢).<br />
¶ By turning the jog dial in the desired search direction while<br />
pressing either of the TRACK SEARCH buttons (4, ¢), the<br />
track number will be searched corresponding to the turning of<br />
the jog dial.<br />
¶ During Super-Fast track search, the search direction is determined<br />
by the direction of rotation of the jog dial. The direction<br />
of the pressed TRACK SEARCH button (4, ¢) is ignored.<br />
¶ When the TRACK SEARCH button (4, ¢) is released, Super-<br />
Fast track search will be ended.<br />
Rotary search<br />
1. Turn the rotary dial (SELECT PUSH 4, ¢).<br />
¶ The search will move one track for each calibration unit the dial<br />
is rotated, corresponding to the direction of rotation. If the<br />
search arrives at the root directory, the folder name [ROOT]<br />
will be displayed.<br />
¶ When text mode is selected, the folder name will be displayed<br />
after rotary search, followed by the folder’s beginning track<br />
number and file name.<br />
¶ Turn the rotary dial during playback to select tracks while the<br />
track is being played. Turn the rotary dial before inserting discs<br />
or a USB memory device to preset the track number.<br />
2. Press the rotary dial (SELECT PUSH 4, ¢).<br />
¶ The playback of the selected track will begin. If a folder is selected,<br />
the hierarchy of that folder will be entered. Press the<br />
BACK button to return one level higher in the folder hierarchy.<br />
15<br />
<br />
En<br />
English
OPERATIONS (<strong>DJ</strong> PLAYER OPERATIONS)<br />
SCRATCH<br />
JOG EFFECT<br />
DIGITAL<br />
JOG BREAK/<br />
Change playback speed<br />
Sliding the TEMPO Control slider forward and back.<br />
By sliding the lever towards you (+) increases the tempo; sliding the<br />
lever away from you (–) decreases the tempo. The center detent position<br />
is the normal speed.<br />
¶ The rate of change in playback speed (tempo) is shown in the display.<br />
¶ The playback speed can be changed without changing the pitch<br />
(☞”Applying master tempo”).<br />
7 Selecting range of tempo adjustment<br />
Press the TEMPO ±6/±10/±16/WIDE button.<br />
Each time the button is pressed, the variable range of the TEMPO<br />
control slider alternates between ±6 %, ±10 %, ±16 % and WIDE. The<br />
tempo can be adjusted in units of 0.02 % when set to ±6 %, units of<br />
0.05 % when set to either ±10 % or ±16 %, and units of 0.5 % when set<br />
to WIDE.<br />
The variable tempo range for MP3s is ±6 %/±10 %/±16 %.<br />
¶ The set variable range will be shown in the display.<br />
¶ The tempo range will be saved in memory when the power is<br />
turned off.<br />
Applying master tempo<br />
Press the MASTER TEMPO button during playback.<br />
The MASTER TEMPO button and the [MT] indicator in the display will<br />
light, and the speed (tempo) can be changed using the TEMPO control<br />
slider without changing the pitch (key).<br />
¶ Due to digital processing of the sound, the sound quality will drop.<br />
¶ The setting will be saved in memory when the power is turned off.<br />
16<br />
<br />
En<br />
REV<br />
CUE<br />
VINYL<br />
HOLD<br />
VINYL<br />
TEMPO<br />
�6/�10/<br />
�16/WIDE<br />
MASTER<br />
TEMPO<br />
TEMPO control slider<br />
Scratch Jog Effect<br />
Press one of the SCRATCH JOG EFFECT buttons (BUBBLE,<br />
TRANS, WAH) during playback while in VINYL mode.<br />
¶ The effect is produced only while scratching.<br />
BUBBLE<br />
Produces a bubbly sound effect, simulating the bubble scratch technique.<br />
TRANS<br />
Produces an effect resembling sound muted with the mixer’s cross<br />
fader.<br />
WAH<br />
Produces an effect resembling the wah-wah pedal used for guitars.<br />
Digital Jog Break<br />
Press one of the DIGITAL JOG BREAK buttons (JET, ROLL,<br />
WAH) during playback while in <strong>C<strong>DJ</strong></strong> mode.<br />
¶ The selected effect will appear in the display, and the effect will<br />
change corresponding to the degree of rotation of the jog dial.<br />
JET<br />
Changes the delay time in response to rotation of the jog dial, and<br />
adds a short delay sound to the original, thereby causing an interference<br />
between the sounds and creating a “swooshing” effect.<br />
¶ The delay time corresponds to the jog dial’s rotation and changes<br />
between 0 ms (when jog dial is completely stopped) to a maximum<br />
of 3 ms.<br />
¶ When removing hand from jog dial, the sound will gradually settle<br />
back into the original sound.<br />
¶ The setting is canceled when the disc is ejected.<br />
ROLL<br />
The playback sound will be affected with pitch and playback time varied<br />
in response to the rotation of the jog dial.<br />
¶ When the jog dial was touched, audio will be loop-played then<br />
rolled.<br />
¶ When removing hand from jog dial, the sound will gradually settle<br />
back into the original sound.<br />
¶ The setting is canceled when the disc is ejected.<br />
¶ ROLL cannot be performed during reverse playback.<br />
WAH<br />
Adds a filter with cutoff frequency that changes in response to jog<br />
dial rotation.<br />
¶ The filter changes into a high-pass filter when the jog dial is turned<br />
clockwise; the filter changes into a low-pass filter when the jog<br />
dial is turned counterclockwise.<br />
¶ When removing hand from jog dial, the sound gradually settle<br />
back into the original sound.<br />
¶ The setting is canceled when the disc is ejected.<br />
[HOLD function]<br />
Used to maintain the effect that has been created by the turning of<br />
the jog dial even after the jog dial’s rotation is stopped.<br />
Press the HOLD button during usage of Digital Jog Break or<br />
Scratch Jog Effect function.<br />
¶ If you remove hand from jog dial, the effect at that point will be<br />
maintained.<br />
¶ When the HOLD function is turned ON, even if another effect is<br />
selected, the setting prior to the new effect selection will be preserved<br />
in memory so long as hold is not turned off.
IN/<br />
REALTIME CUE/<br />
HOT LOOP<br />
SEARCH<br />
1, ¡<br />
CUE<br />
PLAY/PAUSE<br />
REV<br />
CUE<br />
Cue point settings<br />
VINYL<br />
VINYL<br />
Once a cue point has been stored in memory, it can be used during<br />
playback to set the player in the cue standby mode (ready to begin<br />
playback from the cueing position by pressing the CUE button).<br />
7 Setting the cue during <strong>C<strong>DJ</strong></strong> mode<br />
1. During playback, press the PLAY/PAUSE button (6) to<br />
pause playback at the point you wish to set as cue point.<br />
2. Search for the precise position of the cue point.<br />
¶ Using frame numbers to specify cue points.<br />
Cue points may be specified in one frame units (where 75<br />
frames are equivalent to one second).<br />
Use the jog dial or the forward or reverse SEARCH button (1,<br />
¡) to advance to the desired frame. Each rotation of the jog<br />
dial corresponds to 135 frames in the specified direction; by<br />
pressing the SEARCH button (1, ¡) frames will advance<br />
one frame in the specified direction. During the playback of<br />
MP3s, only files inside the same folder can be searched.<br />
¶ Listening to the sound to determine the cue point.<br />
While turning the jog dial slowly, return the track to the point<br />
immediately before the desired playback point (The cue point<br />
will be the point directly after the sound which can be heard<br />
during the cueing pause).<br />
3. Press the CUE button when the frame number or sound<br />
has reached the desired cueing point.<br />
¶ The sound is muted, and the time display lights steadily when<br />
the cue point has been stored in memory.<br />
¶ Each time a new cue point is stored to memory, the previous<br />
cue point will be erased.<br />
[Changing the cue point]<br />
1. Press the CUE button during playback.<br />
¶ This will take you back to the set cue point.<br />
2. Press the SEARCH button (1, ¡) and set to audible<br />
pause mode.<br />
3. Go through steps 2 and 3 of “Cue Point Settings” mentioned<br />
above.<br />
7 Setting the cue during VINYL mode<br />
7 REALTIME CUE<br />
During playback, press the IN/REALTIME CUE/HOT LOOP<br />
button at the desired cueing point.<br />
¶ This point will be set as a new cue point.<br />
7 Back Cue (returning to cue point)<br />
1. Press the CUE button during playback.<br />
¶ This will take you back to the set cue point.<br />
¶ During the playback of MP3 files, back cue can be performed<br />
only within the same folder. As long as a new cue<br />
point is not overwritten, the cue point will be saved after<br />
folder search as well.<br />
OPERATIONS (<strong>DJ</strong> PLAYER OPERATIONS)<br />
2. Press the PLAY/PAUSE button (6).<br />
¶ Playback will instantly start from the set cue point.<br />
7 Cue point sampler (confirming cue points)<br />
After specifying a cueing point, press the CUE button<br />
in the cue standby mode.<br />
¶ The sound at the specified cue point will continue to play as<br />
long as the CUE button is pressed.<br />
¶ During playback of MP3s, sounds can be heard only for cue<br />
points within the same folder.<br />
Mixing different tracks<br />
Example: Mix track B with track A which is currently playing from<br />
the speakers.<br />
¶ Connect CD1 to the <strong>DJ</strong> mixer’s CH-1, and connect CD2 to CH-2.<br />
¶ Raise the TRIM, CHANNEL FADER, and MASTER VOLUME settings<br />
appropriately so that sound is produced from CD1.<br />
1. Set the <strong>DJ</strong> mixer’s CROSS FADER slider at its left side (CH-1).<br />
¶ Track A is heard from speakers.<br />
2. Load a CD on player CD2.<br />
3. Press the TRACK SEARCH buttons (4, ¢) on player<br />
CD2 to find and select track B.<br />
4. Operate the <strong>DJ</strong> mixer’s MONITOR SELECTOR button to<br />
monitor CH-2.<br />
5. Turn the <strong>DJ</strong> mixer’s MONITOR LEVEL dial so that track B<br />
can be heard from the headphones.<br />
¶ Only track A is heard from the main speakers.<br />
6. Set cueing position for track B on the headphones.<br />
1 With player CD2 in the playback mode, press the PLAY/PAUSE<br />
button (6) near the desired cueing point.<br />
¶ The player will enter the pause mode.<br />
2 Rotate player CD2’s jog dial and search for the track’s cueing<br />
point (first beat).<br />
3 When cueing point is found, press player CD2’s CUE button.<br />
¶ The player’s sound will be muted and cueing will be completed.<br />
7. Simultaneously press player CD2’s PLAY/PAUSE button<br />
(6) along with the sound of track A played from the<br />
speakers.<br />
¶ Only track A will be heard from the main speakers.<br />
¶ Track B will be heard from the headphones.<br />
8. Move the TEMPO control slider so that the tempo<br />
(BPM=Beat Per Minutes) of track B and A matches.<br />
Move the TEMPO control slider of player CD2’s so that the BPM of<br />
track B matches the BPM of track A.<br />
¶ When the two BPM rates match, the BPM synchronization is<br />
complete.<br />
9. Press the CUE button on player CD2.<br />
¶ Player CD2 will enter pause mode at the cue point.<br />
10. Press the PLAY/PAUSE button (6) of player CD2 in time<br />
with track A of player CD1 (the sound heard from speaker).<br />
¶ Track B will begin playing.<br />
11. While checking the sound on the headphones, gradually<br />
move the <strong>DJ</strong> mixer’s CROSS FADER slider from left to<br />
right.<br />
¶ The sound of track A from the speakers will gradually be<br />
mixed with the sound of track B.<br />
¶ When the <strong>DJ</strong> mixer’s CROSS FADER slider is completely<br />
moved to the right side, the sound heard from the speaker<br />
will have changed from track A to track B, and the operation is<br />
complete.<br />
7 Long Mix Play<br />
If the BPM rates match, the mixed sound of track A and track B will<br />
not sound unnatural even if the CROSS FADER slider is placed in the<br />
middle position.<br />
7 Fader Start Play<br />
By using the Cross Fader Start function of <strong>Pioneer</strong> <strong>DJ</strong> mixer, step 10<br />
above can be skipped for simpler mixing.<br />
In addition, when the CROSS FADER slider is returned to its original<br />
position, the status returns to that in step 9, so that the same play can<br />
be repeated.<br />
17<br />
<br />
En<br />
English
OPERATIONS (ADVANCED OPERATIONS)<br />
ADVANCED OPERATIONS<br />
RELOOP/<br />
EXIT<br />
OUT/<br />
OUT A<strong>DJ</strong>UST<br />
IN/<br />
REALTIME CUE/<br />
HOT LOOP<br />
SEARCH<br />
1, ¡<br />
PLAY/PAUSE<br />
REV<br />
CUE<br />
Loop playback<br />
Jog dial<br />
7 Creating a loop<br />
1. Press the PLAY/PAUSE button (6) button to start playback.<br />
2. During playback, press the IN/REALTIME CUE/HOT LOOP<br />
button at the loop-in point.<br />
¶ Note that this operation is not needed if a prerecorded cue<br />
point is to be used as the start of the loop.<br />
3. During playback, press the OUT/OUT A<strong>DJ</strong>UST button at<br />
the desired loop-out point.<br />
¶ Loop playback will start between the loop-in point and loop-out<br />
point.<br />
¶ By using the frame search, the loop-out point can be set in<br />
units of frames.<br />
¶ During playback of MP3s, looping is only possible within one<br />
and the same track set having a cue point.<br />
7 To start loop playback with automatically set<br />
loop-out point (Auto BEAT LOOP)<br />
Press the BEAT LOOP/LOOP DIVIDE during playback or<br />
pause mode.<br />
¶ The point at which the button is pressed will be set as the loopin<br />
point, and a loop-out point will automatically be set based on<br />
the track’s BPM; loop playback will then start.<br />
¶ If the numerical BPM value is not displayed, loop play will begin<br />
based on BPM=130.<br />
7 To divide loops (LOOP DIVIDE)<br />
Press the BEAT LOOP/LOOP DIVIDE buttons during loop<br />
playback.<br />
¶ Pressing the – button will divide the playback loop, and pressing<br />
the + button will return the playback loop to its original<br />
length.<br />
7 Returning to loop-in point during loop playback<br />
to start over the loop playback (HOT LOOP)<br />
Press IN/REALTIME CUE/HOT LOOP button during loop playback.<br />
¶ Returns to loop-in point and restarts loop playback.<br />
7 To exit loop playback<br />
Press RELOOP/EXIT button during loop playback.<br />
¶ The track will continue playback in sequence from the loop out<br />
point without returning to the loop-in point.<br />
18<br />
<br />
En<br />
VINYL<br />
BEAT LOOP/<br />
LOOP DIVIDE<br />
JOG MODE<br />
VINYL<br />
7 Changing the loop-out point<br />
1. Press the OUT/OUT A<strong>DJ</strong>UST button during loop playback.<br />
¶ The time of the out point is shown in the display, the OUT/OUT<br />
A<strong>DJ</strong>UST button starts to flash rapidly and the IN/REALTIME<br />
CUE/HOT LOOP button indicator turns off.<br />
2. Press one of the SEARCH buttons (1, ¡) or turn the jog<br />
dial.<br />
¶ The loop-out point is moved forwards or backwards in one<br />
frame units.<br />
¶ The loop-out point cannot be moved before the loop-in point.<br />
¶ During playback of MP3s, loop adjustment is only possible<br />
within one and the same track set having a cue point.<br />
¶ Pressing the OUT/OUT A<strong>DJ</strong>UST button or waiting 30 seconds<br />
or longer will cause the player to exit from the loop-out adjust<br />
mode and to resume loop playback.<br />
7 Returning to loop playback (RELOOP)<br />
After loop playback has been stopped, press the RELOOP/<br />
EXIT button during playback.<br />
¶ Returns to the previously set loop-in point, and restarts loop<br />
playback. If the loop is divided with loop divide, the loop will<br />
return to its original length.<br />
¶ During playback of MP3s, re-looping is possible only within the<br />
same folder.<br />
Fader start playback<br />
The supplied control cable may be used to connect the CONTROL<br />
connector of the <strong>C<strong>DJ</strong></strong>-<strong>400</strong> to the matching CONTROL connector on a<br />
<strong>Pioneer</strong> <strong>DJ</strong> mixer, thus making it possible to exit from cueing standby<br />
mode and start playback immediately by raising the channel fader on<br />
the <strong>DJ</strong> mixer. The cross fader may also be used to perform fade-in<br />
starts on the player as well. The fader may also be returned to its<br />
original position to return the player to the cueing point (back<br />
cueing.) (See P.8 for instructions on connecting the units.)<br />
Scratch play<br />
When jog mode is set to [VINYL], pressing the top surface of the jog<br />
dial and turning it causes playback to occur in proportion to the speed<br />
and direction of jog dial rotation.<br />
1. Press the JOG MODE VINYL button so the button indicator<br />
lights.<br />
2. During playback, press the top surface of the jog dial.<br />
¶ The playback will stop and become playback corresponding to<br />
the rotation of the jog dial (as explained in step 3).<br />
3. Rotate the jog dial in the direction and at the speed you<br />
wish playback to be performed.<br />
¶ Playback will be heard in the direction and speed proportional<br />
to the jog dial rotation.<br />
4. Remove hand from jog dial.<br />
¶ Returns to original playback.<br />
Spin play<br />
During playback in VINYL mode, either press the surface of the jog<br />
dial or press the PLAY/PAUSE button (6) to pause playback, then<br />
rotate the jog dial quickly; playback will occur in the direction and at a<br />
speed proportional to the direction and speed of jog dial rotation,<br />
even if you then release your hand from the jog dial.<br />
Reverse play<br />
Press the DIRECTION REV button. The button indicator will light.<br />
Playback will begin in the reverse direction.<br />
¶ Playback acceleration/deceleration produced with jog dial rotation<br />
will operate in reverse.
¶ Reloop cannot be performed during reverse playback.<br />
¶ Seamless reverse playback cannot be performed with loops of 15<br />
seconds or more.<br />
¶ If track search or loop play are performed, scratch/reverse operations<br />
may be temporarily disabled.<br />
¶ In the case of MP3, reverse play that overlaps multiple folders is<br />
not possible.<br />
¶ During MP3 play, reverse playback may not occur immediately<br />
with some tracks. (The message [Searching] may appear on the<br />
display while play time information is read into the unit before<br />
playback starts.)<br />
AUTO CUE<br />
DIRECTION<br />
REV<br />
CUE<br />
PLAY/PAUSE<br />
REV<br />
CUE<br />
Cue point/loop point memory<br />
VINYL<br />
MEMORY/<br />
DELETE<br />
CUE/LOOP<br />
CALL<br />
The <strong>C<strong>DJ</strong></strong>-<strong>400</strong> is able to save cue points and loop points in memory.<br />
One cue/loop point can be saved in memory for each track.<br />
¶ A single loop is composed of two points (IN/OUT).<br />
7 Recording a cue point<br />
1. Use the auto cue function or CUE button to input a cue<br />
point.<br />
2. Press the CUE/LOOP MEMORY button.<br />
¶ The [MEMORY] indicator will light, showing that the cue point<br />
has been stored.<br />
7 Recording a loop point<br />
1. Set a loop-in point and loop-out point and begin loop playback.<br />
2. During loop playback, press the CUE/LOOP MEMORY button.<br />
¶ The [MEMORY] indicator will light, showing that the loop data<br />
has been stored.<br />
7 To recall a memorized cue/loop point<br />
If a cue/loop point is saved, the [MEMORY] indicator will light.<br />
1. Press the CUE/LOOP CALL button.<br />
¶ When the CALL button is pressed, the cue/loop point will be<br />
called up from memory, and the player will enter the standby<br />
mode at that point.<br />
2. Press the PLAY/PAUSE button (6).<br />
¶ Play/loop play will begin.<br />
7 To delete cue/loop points<br />
1. Press the CUE/LOOP CALL button.<br />
¶ When the CALL button is pressed, the cue/loop point will be<br />
called up from memory, and the player will enter the standby<br />
mode at that point.<br />
2. Hold down the MEMORY/DELETE button for one second<br />
or more at the cue/loop point you wish to delete.<br />
¶ The display will show the [DELETE] message, and the selected<br />
cue point or loop point data will be erased.<br />
OPERATIONS (ADVANCED OPERATIONS)<br />
Relay play using two players<br />
By using the supplied control cable to connect the CONTROL connectors<br />
of two <strong>C<strong>DJ</strong></strong>-<strong>400</strong>, or other <strong>C<strong>DJ</strong></strong> series CD players, relay play can be<br />
performed. ☞P.8<br />
¶ Set both players’ auto cue function to ON (The [A.CUE] indicators<br />
will light in the displays.)<br />
¶ Set the <strong>DJ</strong> mixers Cross Fader control to its center position.<br />
1. Begin playback on the first player.<br />
2. When the currently playing track ends, playback will begin<br />
automatically on the standby player.<br />
3. The first player will enter cue pause mode at the beginning<br />
of the next track on its disc.<br />
¶ By repeating this operation, the two players can be used to perform<br />
continuous relay play.<br />
¶ By loading new discs and choosing desired tracks on the player<br />
in standby, a continuous program of selected tracks can be<br />
played.<br />
¶ By setting a cue point on the standby player, a relay of any<br />
desired cue point of the selected track can be performed.<br />
☞P.17 “Cue Point Settings”<br />
Note:<br />
¶ Relay play may not operate properly if the AUDIO<br />
OUT jacks on the two players are not connected to<br />
the same <strong>DJ</strong> mixer.<br />
¶ If the power to one player is turned off during its<br />
playback, the other player may begin playback.<br />
¶ Fader start and relay play cannot be performed simultaneously,<br />
since different control cord connections<br />
are required.<br />
Writing and reading data<br />
Using a USB memory device, data (cue/loop points) saved from the<br />
<strong>C<strong>DJ</strong></strong>-<strong>400</strong> can be copied to other players.<br />
7 Writing data to USB memory devices<br />
1. With no USB memory device or discs inserted into the<br />
player, hold the OUT/OUT A<strong>DJ</strong>UST button depressed for<br />
five seconds or more.<br />
The OUT/OUT A<strong>DJ</strong>UST button will light, and [WRITE MODE] will<br />
appear in the display.<br />
2. Connect a USB memory device, and press PLAY/PAUSE<br />
once the USB MEMORY indicator lights.<br />
The playing address section will begin to light, and data will begin<br />
writing to the USB memory device. Once the writing of data finishes,<br />
[END] will appear in the display, and the unit will return to<br />
the regular operating mode.<br />
¶ If [ERROR] appears in the display, the data writing has not been<br />
completed properly. Turn the unit’s power off then on again,<br />
and restart the process from step 1.<br />
¶ Any data in the USB device will be overwritten, so all previously<br />
saved data on the device will be lost.<br />
7 Reading data from a USB memory device<br />
1. With no USB memory device connected or disc inserted,<br />
hold the IN/REALTIME CUE/HOT LOOP button depressed<br />
for five seconds or more.<br />
The IN/REALTIME CUE/HOT LOOP button will light, and [READ<br />
MODE] will appear in the display.<br />
2. Connect the USB memory device, and press PLAY/PAUSE<br />
once the USB MEMORY indicator lights.<br />
The playing address section will begin to light, and data read-in<br />
will begin. Once all data has been read, [END] will appear in the<br />
display, and the unit will return to normal operation mode.<br />
¶ If [ERROR] appears in the display, the reading of data has not<br />
been properly completed. Turn the unit’s power off then on<br />
again, and restart the process from step 1.<br />
* Any data within the <strong>C<strong>DJ</strong></strong>-<strong>400</strong> will be overwritten, so all previously<br />
saved data will be lost.<br />
19<br />
<br />
En<br />
English
OPERATIONS (MIDI DETTING)<br />
MIDI SETTING<br />
MIDI (Musical Instrument Digital Interface) is a unified standard for data exchange between electronic instruments and computers. By selecting<br />
the computer with the SOURCE SELECT button, the <strong>C<strong>DJ</strong></strong>-<strong>400</strong> is able to send its operating information to applications supporting USB MIDI.<br />
Setting the MIDI channel<br />
Set and save the MIDI channel (1 to 16).<br />
1. Hold the TEXT MODE/UTILITY MODE button depressed for one second or more to enter the utility setting mode.<br />
Turn the rotary dial so that the display screen shows [MIDI CH], then press to confirm.<br />
The display screen will show [CH 1] (if factory default has not been changed).<br />
2. Change the channel by turning the rotary dial.<br />
Channels can be selected from [CH 1] to [CH 16].<br />
3. Press the rotary dial to confirm the selection.<br />
Utility setting mode will be canceled if no command is entered for 15 seconds. Pressing the BACK button will also exit this mode.<br />
SW Name<br />
JOG (TOUCH)<br />
TEMPO SLIDER<br />
JOG RING<br />
ENCODER<br />
PLAY/PAUSE<br />
CUE<br />
SEARCH FWD<br />
SEARCH REV<br />
TRACK SEARCH Next<br />
TRACK SEARCH Prev<br />
LOOP IN<br />
LOOP OUT<br />
RELOOP<br />
MEMORY<br />
CALL<br />
TIME/A.CUE<br />
TEXT<br />
TEMPO RANGE<br />
MT<br />
JOG MODE (VINYL)<br />
LOOP DEVIDE +<br />
LOOP DEVIDE –<br />
JOG TOUCH<br />
REVERSE<br />
HOLD<br />
WAH<br />
TRANS/ROLL<br />
BUBBLE/JET<br />
EJECT<br />
BACK<br />
ENCODER PUSH<br />
20<br />
<br />
En<br />
SW Type<br />
General Purpose<br />
Controller<br />
VR<br />
General Purpose<br />
Controller<br />
General Purpose<br />
Controller<br />
SW<br />
SW<br />
SW<br />
SW<br />
SW<br />
SW<br />
SW<br />
SW<br />
SW<br />
SW<br />
SW<br />
SW<br />
SW<br />
SW<br />
SW<br />
SW<br />
SW<br />
SW<br />
SW<br />
SW<br />
SW<br />
SW<br />
SW<br />
SW<br />
SW<br />
SW<br />
SW<br />
MIDI Message<br />
Bn 10 dd<br />
Bn<br />
Bn<br />
Bn<br />
9n<br />
9n<br />
9n<br />
9n<br />
9n<br />
9n<br />
9n<br />
9n<br />
9n<br />
9n<br />
9n<br />
9n<br />
9n<br />
9n<br />
9n<br />
9n<br />
9n<br />
9n<br />
9n<br />
9n<br />
9n<br />
9n<br />
9n<br />
9n<br />
9n<br />
9n<br />
9n<br />
1D<br />
30<br />
4F<br />
00<br />
01<br />
02<br />
03<br />
04<br />
05<br />
06<br />
07<br />
08<br />
0A<br />
0B<br />
0E<br />
0F<br />
10<br />
11<br />
12<br />
16<br />
17<br />
20<br />
21<br />
22<br />
23<br />
24<br />
25<br />
2F<br />
32<br />
33<br />
dd<br />
dd<br />
dd<br />
dd<br />
dd<br />
dd<br />
dd<br />
dd<br />
dd<br />
dd<br />
dd<br />
dd<br />
dd<br />
dd<br />
dd<br />
dd<br />
dd<br />
dd<br />
dd<br />
dd<br />
dd<br />
dd<br />
dd<br />
dd<br />
dd<br />
dd<br />
dd<br />
dd<br />
dd<br />
dd<br />
Remarks<br />
Linear value for speeds between stop to x4 speed, 64 at stop, FWD<br />
(CW) direction: 65 (x0.06 speed) to 127 (x4 speed). REV (CCW) direction:<br />
63 (x0.06 speed) to 0 (x4 speed).<br />
0-127 0 at – side, 127 at + side, 64 at center.<br />
Linear value for speeds between x0.5 to x4. 64 at stop (below x0.49<br />
speed), FWD (CW) direction: 65 (x0.5 speed) to 127 (x4 speed). REV<br />
(CCW) direction: 63 (x0.5 speed) to 0 (x4 speed).<br />
Transfers differential count value from previous time.<br />
64 with no difference. In CW direction: 64 + change amount (Max<br />
127), CCW direction: 64 – change amount (Min 0).<br />
OFF=0, ON=127<br />
OFF=0, ON=127<br />
OFF=0, ON=127<br />
OFF=0, ON=127<br />
OFF=0, ON=127<br />
OFF=0, ON=127<br />
OFF=0, ON=127<br />
OFF=0, ON=127<br />
OFF=0, ON=127<br />
OFF=0, ON=127<br />
OFF=0, ON=127<br />
OFF=0, ON=127<br />
OFF=0, ON=127<br />
OFF=0, ON=127<br />
OFF=0, ON=127<br />
OFF=0, ON=127<br />
OFF=0, ON=127<br />
OFF=0, ON=127<br />
OFF=0, ON=127<br />
OFF=0, ON=127<br />
OFF=0, ON=127<br />
OFF=0, ON=127<br />
OFF=0, ON=127<br />
OFF=0, ON=127<br />
OFF=0, ON=127<br />
OFF=0, ON=127<br />
OFF=0, ON=127
TROUBLESHOOTING<br />
OTHER (TROUBLESHOOTING)<br />
Incorrect operations can be mistaken as malfunctions. If you believe the unit is not operating correctly, consult the chart below.<br />
Sometimes incorrect operation may be due to a malfunction in another component. If the problem is not fixed, check the other<br />
components used with the player. If the problem still persists, contact your nearest <strong>Pioneer</strong> authorized service center or dealer for<br />
service.<br />
Symptom<br />
Disc doesn’t eject even when EJECT<br />
button is pressed.<br />
Play doesn’t commence even when<br />
the disc is inserted.<br />
Playback immediately stops when<br />
started. During playback, the player<br />
pauses or stops.<br />
Cannot playback MP3s.<br />
Cannot search MP3s.<br />
No sound is audible.<br />
Sound is distorted, noise is output.<br />
With certain discs, loud noise is<br />
produced or play stops.<br />
When the auto cue function is set<br />
ON, track search is not finished.<br />
Back cue function cannot be carried<br />
out even though the CUE button is<br />
pressed in playback mode.<br />
Pressing the OUT/OUT A<strong>DJ</strong>UST<br />
button does not start loop play.<br />
The jog dial does not operate as<br />
desired.<br />
The picture of the TV screen is<br />
fluctuated or FM broadcast is<br />
interfered with noise.<br />
The disc is not rotating when power<br />
is ON.<br />
Cause<br />
÷ Power plug is disconnected from outlet.<br />
÷ The auto cue function is set to on.<br />
÷ Smudges on the disc, etc.<br />
÷ The files are in the wrong format.<br />
÷ Attempted to search (fast-forward/fastreverse)<br />
MP3s into a different folder.<br />
÷ Output cables are connected incorrectly or<br />
are loose.<br />
÷ Incorrect operation of <strong>DJ</strong> mixer.<br />
÷ Pin plugs and/or amplifier terminals are<br />
dirty.<br />
÷ Player is in pause mode.<br />
÷ Incorrect connections.<br />
÷ Pin plugs and/or amplifier terminals are<br />
dirty.<br />
÷ Interference is being picked up from a TV<br />
set.<br />
÷ Disc has a bad scratch or warp.<br />
÷ Disc is extremely dirty.<br />
÷ If the sound muted portion between<br />
selections is long, searching time will be<br />
long.<br />
÷ If the point cannot be found within 10<br />
seconds, the cue point is set at the track’s<br />
beginning.<br />
÷ The cue point is not set yet.<br />
÷ The cue point is set to an MP3 file in a<br />
different folder.<br />
÷ No cue points (loop-in points) have been set.<br />
÷ In the case of MP3, loop cannot be performed<br />
if no loop-in point is located within<br />
the currently playing track.<br />
÷ Incorrect jog mode (VINYL/<strong>C<strong>DJ</strong></strong>) is set.<br />
÷ Interference is being picked up from the CD<br />
player.<br />
÷ The disc rotation stops automatically if no<br />
operation has been performed for 100<br />
minutes or more in pause mode.<br />
Remedy<br />
÷ Connect plug to wall outlet.<br />
÷ Press the AUTO CUE button to turn off the<br />
Auto Cue function.<br />
÷ Clean the smudges from the disc and then<br />
play it again.<br />
÷ ☞P.5 “Playing MP3 Files.”<br />
÷ Track searching with MP3s are only possible<br />
within the same folder.<br />
÷ Recheck connections. Refer to installation<br />
instructions. (☞P. 8, 9)<br />
÷ Check the settings of the <strong>DJ</strong> mixer switches<br />
and sound volume controls.<br />
÷ Clean away dirt.<br />
÷ Press the PLAY/PAUSE button (6).<br />
÷ Connect to audio mixer's LINE INPUT terminals.<br />
(Do not connect to MIC terminals.)<br />
÷ Clean away dirt.<br />
÷ Switch OFF TV set, move player away from TV<br />
set or plug the player into a separate outlet.<br />
÷ Replace disc.<br />
÷ Clean disc.<br />
÷ Press the AUTO CUE button to turn off the<br />
Auto Cue function.<br />
÷ Set the cue point. (☞P. 17)<br />
÷ During playback of MP3s, back cue is possible<br />
only within the same folder.<br />
÷ Set a cue point. (☞P. 17)<br />
÷ During playback of MP3s, looping is possible<br />
only within the same track that has a cue point<br />
(loop-in point) set.<br />
÷ Press the JOG MODE VINYL button to set the<br />
desired jog mode (VINYL or <strong>C<strong>DJ</strong></strong>).<br />
÷ Turn off POWER switch of the player, or move<br />
the player away from the TV or tuner.<br />
÷ Playback can be started from the first track by<br />
pressing the PLAY/PAUSE button (6). Press<br />
the EJECT button to eject the disc.<br />
÷ Static electricity and other external effects may cause this unit to malfunction. In this case, set the POWER switch to OFF, then<br />
switch it on again after the disc has come to a complete stop.<br />
÷ This unit cannot playback unfinalized (partial discs) CD-R or CD-RW discs.<br />
÷ Irregularly shaped discs cannot be played on the <strong>C<strong>DJ</strong></strong>-<strong>400</strong> (as it may result in breakage or accidents). Please use only standard<br />
circular 12 cm discs.<br />
÷ The BPM value measured by the <strong>C<strong>DJ</strong></strong>-<strong>400</strong> may differ from the BPM value recorded on a CD or from our <strong>DJ</strong> mixer, but this<br />
difference is a result of differences in the BPM value measurement method; not a result of a fault with the player.<br />
÷ When playing CD-R/RW discs, the performance rate may drop due to quality of the recorded data.<br />
21<br />
<br />
En<br />
English
OTHER (TROUBLESHOOTING/SPECIFICATIONS)<br />
Error message display<br />
When the <strong>C<strong>DJ</strong></strong>-<strong>400</strong> CD player is unable to operate properly, an error code is displayed on the display panel. Check the error code<br />
displayed against the following table and take the recommended action to correct the error. If an error code other than any of the<br />
error codes listed in the table below is displayed or if the same error code is displayed even after corrective action has been taken,<br />
contact your nearest <strong>Pioneer</strong> Service Station or contact the store from which you purchased your player for assistance.<br />
Error Code<br />
E-72 01<br />
E-83 01<br />
E-83 02<br />
E-83 03<br />
E-83 04<br />
E-83 05<br />
E-91 01<br />
22<br />
<br />
En<br />
Error Type<br />
TOC READ ERROR<br />
PLAYER ERROR<br />
MP3 DECODE ERROR<br />
DATA FORMAT ERROR<br />
MECHANICAL TIME OUT<br />
SPECIFICATIONS<br />
Description<br />
Player unable to read TOC data.<br />
Disc is rotating, but rotation cannot be<br />
ascertained.<br />
Player unable to play back currently<br />
inserted disc.<br />
The disc loaded cannot be played<br />
properly.<br />
Mechanical operation has failed to<br />
complete within specified time<br />
interval.<br />
1. General<br />
System.............................. Compact disc digital audio system<br />
Power requirements ............... AC 110 V to 240 V, 50 Hz/60 Hz<br />
Power consumption ..........................................................19 W<br />
Operating temperature ..................................... +5 ˚C to +35 ˚C<br />
Operating humidity ........ 5 % to 85 % (without condensation)<br />
Weight ............................................................................. 2.7 kg<br />
Dimensions .... 217.9 mm (W) × 107.5 mm (H) × 296.3 mm (D)<br />
2. Audio section<br />
Frequency response........................................... 4 Hz to 20 kHz<br />
Signal-to-noise ratio .......................... 115 dB or more (JEITA)<br />
Distortion ......................................................... 0.006 % (JEITA)<br />
Possible cause and recommended action<br />
Disc is cracked.<br />
= Recommended action: replace disc.<br />
Disc is soiled or dirty.<br />
= Recommended action: clean disc.<br />
If other discs play normally, the problem is with<br />
the disc itself.<br />
The disc format does not conform to MP3.<br />
= Change to disc conforming to MP3 format.<br />
Dust or some other form of foreign particles have<br />
found their way into disc insertion slot.<br />
= Recommended action: remove dust or other<br />
foreign particles.<br />
3. Accessories<br />
÷ Operating instructions ........................................................ 1<br />
÷ Power cord (☞P. 2) ............................................................. 2<br />
÷ Audio cable ......................................................................... 1<br />
÷ Control cable....................................................................... 1<br />
÷ Forced eject pin (housed in a groove in the bottom panel) ..... 1<br />
÷ Screwdriver (housed in a groove in the bottom panel) .......... 1<br />
÷ Jog sheets (for replacing) .................................................. 3<br />
NOTE:<br />
Specifications and design are subject to possible modification without<br />
notice.<br />
Published by <strong>Pioneer</strong> Corporation.<br />
Copyright © 2007 <strong>Pioneer</strong> Corporation.<br />
All rights reserved.
23<br />
<br />
En<br />
English
Enhorabuena por la adquisición de este producto <strong>Pioneer</strong>.<br />
Lea completamente este manual de instrucciones para aprender a operar correctamente el aparato. Después de haber terminado la lectura<br />
de las instrucciones, guarde el manual en un lugar seguro para poderlo consultar en el futuro.<br />
En algunos países o regiones, la forma de la clavija de alimentación y del enchufe de corriente pueden ser diferentes de la mostrada en las<br />
ilustraciones de explicación. Sin embargo, el método de conexión y operación del aparato es el mismo. K015 Sp<br />
IMPORTANTE<br />
La luz intermitente com el símbolo de punta<br />
de flecha dentro un triángulo equilátero.<br />
Está convenido para avisar el usuario de la<br />
presencia de “voltaje peligrosa” no aislada<br />
dentro el producto que podría constituir un<br />
peligro de choque eléctrico para las<br />
personas.<br />
24<br />
<br />
Sp<br />
CAUTION<br />
RISK OF ELECTRIC SHOCK<br />
DO NOT OPEN<br />
ATENCIÓN:<br />
PARA PREVENIR EL PELIGRO DE CHOQUE<br />
ELÉCTRICO NO REMOVER LA TAPA NI LAS<br />
PARTES DENTRO NO UTILIZADAS,<br />
LLAMAR UNA PERSONA CUALIFICADA<br />
PRECAUCIÓN<br />
Este aparato es un producto de láser de clase 1, pero contiene un<br />
diodo de láser de clase superior a 1.<br />
Para mantener la seguridad en todo momento, no quite ninguna<br />
cubierta ni intente acceder al interior del aparato.<br />
Solicite todo el servicio técnico a personal cualificado.<br />
En su aparato encontrará la siguiente etiqueta de precaución.<br />
Ubicación: Dentro del reproductor<br />
Entorno de funcionamiento<br />
Temperatura y humedad del entorno de funcionamiento<br />
+5 – +35°C; menos del 85% de humedad relativa<br />
(rejillas de refrigeración no obstruidas)<br />
No instale este aparato en un lugar mal ventilado, ni en<br />
lugares expuestos a alta humedad o a la luz directa del<br />
sol (o de otra luz artificial potente). D3-4-2-1-7c_A_Sp<br />
Si la clavija del cable de alimentación de CA de este<br />
aparato no se adapta a la toma de corriente de CA<br />
que usted desea utilizar, deberá cambiar la clavija<br />
por otra que se adapte apropiadamente. El<br />
reemplazo y montaje de una clavija del cable de<br />
alimentación de CA sólo deberá realizarlos personal<br />
de servicio técnico cualificado. Si se enchufa la<br />
clavija cortada a una toma de corriente de CA,<br />
puede causar fuertes descargas eléctricas.<br />
Asegúrese de que se tira de la forma apropiada<br />
después de haberla extraído.<br />
El aparato deberá desconectarse desenchufando la<br />
clavija de la alimentación de la toma de corriente<br />
cuando no se proponga utilizarlo durante mucho<br />
tiempo (por ejemplo, antes de irse de vacaciones).<br />
D3-4-2-2-1a_A_Sp<br />
PRECAUCIÓN<br />
El interruptor de la alimentación POWER de este<br />
aparato no corta por completo toda la alimentación<br />
de la toma de corriente de CA. Puesto que el cable<br />
de alimentación hace las funciones de dispositivo de<br />
desconexión de la corriente para el aparato, para<br />
desconectar toda la alimentación del aparato deberá<br />
desenchufar el cable de la toma de corriente de CA.<br />
Por lo tanto, asegúrese de instalar el aparato de<br />
modo que el cable de alimentación pueda<br />
desenchufarse con facilidad de la toma de corriente<br />
de CA en caso de un accidente. Para evitar correr el<br />
peligro de incendio, el cable de alimentación<br />
también deberá desenchufarse de la toma de<br />
corriente de CA cuando no se tenga la intención de<br />
utilizarlo durante mucho tiempo seguido (por<br />
ejemplo, antes de irse de vacaciones). D3-4-2-2-2a_A_Sp<br />
El punto exclamativo dentro un triángulo<br />
equilátero convenido para avisar el usuário<br />
de la presencia de importantes instruciones<br />
sobre el funcionamento y la manutención<br />
en la libreta que acompaña el aparato.<br />
CLASS 1<br />
LASER PRODUCT<br />
D3-4-2-1-1_Sp<br />
D3-4-2-1-8_B_Sp<br />
ADVERTENCIA<br />
Este aparato no es impermeable. Para evitar el<br />
riesgo de incendio y de descargas eléctricas, no<br />
ponga ningún recipiente lleno de líquido (como<br />
pueda ser un vaso o un florero) cerca del aparato ni<br />
lo exponga a goteo, salpicaduras, lluvia o<br />
humedad. D3-4-2-1-3_A_Sp<br />
Cuando emplee este producto, siga las<br />
instrucciones escritas en la parte inferior de la<br />
unidad, relacionadas con la tensión nominal, etc.<br />
D3-4-2-2-4_Sp<br />
ADVERTENCIA<br />
Antes de enchufar el aparato a la corriente, lea la<br />
sección siguiente con mucha atención.<br />
La tensión de la red eléctrica es distinta según el<br />
país o región. Asegúrese de que la tensión de la<br />
alimentación de la localidad donde se proponga<br />
utilizar este aparato corresponda a la tensión<br />
necesaria (es decir, 230 V ó 120 V) indicada en el<br />
panel posterior. D3-4-2-1-4_A_Sp<br />
ADVERTENCIA<br />
Para evitar el peligro de incendio, no ponga nada<br />
con fuego encendido (como pueda ser una vela)<br />
encima del aparato. D3-4-2-1-7a_A_Sp<br />
PRECAUCIÓN PARA LA VENTILACIÓN<br />
Cuando instale este aparato, asegúrese de dejar<br />
espacio en torno al mismo para la ventilación con el<br />
fin de mejorar la disipación de calor (por lo menos 5<br />
cm detrás, y 5 cm en cada lado).<br />
ADVERTENCIA<br />
Las ranuras y aberturas de la caja del aparato sirven<br />
para su ventilación para poder asegurar un<br />
funcionamiento fiable del aparato y para protegerlo<br />
contra sobrecalentamiento. Para evitar el peligro de<br />
incendio, las aberturas nunca deberán taparse ni<br />
cubrirse con nada (como por ejemplo, periódicos,<br />
manteles, cortinas) ni ponerse en funcionamiento el<br />
aparato sobre una alfombra gruesas o una cama.<br />
D3-4-2-1-7b_A_Sp<br />
PRECAUCIONES CONCERNIENTES A LA<br />
MANIPULACIÓN DEL CABLE DE<br />
ALIMENTACIÓN<br />
Tome el cable de alimentación por la clavija. No<br />
extraiga la clavija tirando del cable. Nunca toque el<br />
cable de alimentación cuando sus manos estén<br />
mojadas, ya que esto podría causar cortocircuitos o<br />
descargas eléctricas. No coloque la unidad, algún<br />
mueble, etc., sobre el cable de alimentación. Asegúrese<br />
de no hacer nudos en el cable ni de unirlo a otros<br />
cables. Los cables de alimentación deberán ser<br />
dispuestos de tal forma que la probabilidad de que<br />
sean pisados sea mínima. Una cable de alimentación<br />
dañado podrá causar incendios o descargas eléctricas.<br />
Revise el cable de alimentación está dañado, solicite el<br />
reemplazo del mismo al centro de servicio autorizado<br />
PIONEER más cercano, o a su distribuidor. S002_Sp<br />
Cable de alimentación de CA<br />
El tipo de cable que se pueden utilizar, dependen de la tensión<br />
de la alimentación de cada país o región. Asegúrese por favor<br />
de utilizar el cable, pues existe la posibilidad de que ocurran<br />
incendios si se utilizan dichos elementos incorrectamente (ver<br />
el cuadro que sigue a continuación).<br />
Uso del cable de alimentación de CA y del adaptador de clavija<br />
Región Tipo de clavija<br />
Para región de tipo Europeo<br />
Precaución<br />
No utilice este juego de cable<br />
de alimentación en Taiwán.<br />
Para uso exclusivo en Taiwán<br />
Precaución<br />
Sólo para uso en Taiwán.<br />
No lo utilice por favor en otras<br />
áreas.<br />
Clavija Europea de dos<br />
contactos planos<br />
Clavija Taiwanesa de dos<br />
contactos planos
ANTES DE LA OPERACIÓN (CARACTERÍSTICAS)<br />
CARACTERÍSTICAS<br />
El <strong>C<strong>DJ</strong></strong>-<strong>400</strong>, diseñado para <strong>DJ</strong> profesionales, es un reproductor<br />
de discos compactos que ofrece todas las funciones y el<br />
rendimiento necesarios en las discotecas y, al mismo tiempo,<br />
ofrece un rendimiento, una calidad de sonido y una<br />
funcionalidad superiores a los reproductores analógicos.<br />
EFECTO DE RASCADO DEL MANDO DE<br />
LANZADERA<br />
Está equipado con el efecto de rascado del mando de<br />
lanzadera para obtener nuevos sonido de rascado.<br />
Está equipado con tres botones, [BUBBLE], [TRANS] y [WAH],<br />
para los nuevos sonidos de rascado. Pueden obtenerse<br />
efectos que son distintos del sonido de rascado normal,<br />
ampliando así las posibilidades de su interpretación de <strong>DJ</strong>.<br />
INTERRUPCIÓN DE MANDO DE<br />
LANZADERA DIGITAL<br />
Está equipado con la función de interrupción de mando de<br />
lanzadera digital para obtener efectos de sonido originales.<br />
Se han incorporado las funciones de asistencia a la mezcla<br />
individual [JET], [ROLL] y [WAH] de forma independiente en<br />
tres botones. Seleccionando una función y accionando el<br />
mando de lanzadera en sincronización con la música, podrá<br />
experimentarse un nuevo mundo de mezclas.<br />
MANDO DE LANZADERA<br />
El mando de lanzadera de diámetro grande, de 115 mm,<br />
permite una mejor manipulación que un giradiscos analógico.<br />
■ INFLEXIÓN DEL TONO<br />
Esta función cambia el tempo de la música dependiendo de la<br />
dirección y velocidad con la que se gira el mando de lanzadera.<br />
■ REPRODUCCIÓN RASCADA<br />
En el modo VINYL, cuando se presiona la superficie del mando<br />
de lanzadera, se interrumpe la reproducción y luego continúa<br />
de acuerdo con la dirección y velocidad con la que se gira el<br />
mando.<br />
■ BÚSQUEDA POR TRAMAS<br />
Desplaza desde la posición de pausa en unidades de tramas<br />
(1/75 de seg.) cuando se gira el mando de lanzadera en el<br />
modo de pausa.<br />
■ BÚSQUEDA SÚPER RÁPIDA<br />
Girando el mando de lanzadera mientras se mantiene<br />
presionado el botón de búsqueda manual o el botón de<br />
búsqueda de pistas, podrá efectuarse la búsqueda del disco<br />
con más rapidez que con las funciones de búsqueda normal y<br />
búsqueda de pistas.<br />
CONTROL DEL TEMPO<br />
Control deslizante de alta precisión de 100 mm que permite el<br />
libre ajuste de la velocidad.<br />
Con un visualizador digital calibrado en unidades del 0,02 %<br />
(dentro de un margen del ±6 %), los ajustes del tempo pueden<br />
hacerse con más facilidad y precisión.<br />
■ MARGEN DE CONTROL DEL TEMPO<br />
El margen variable máximo puede ajustarse a cuatro<br />
márgenes variables; ±6 %, ±10 %, ±16 %, WIDE, para facilitar<br />
el entorno de operación.<br />
■ TEMPO PRINCIPAL<br />
Mantiene el mismo tono del sonido mientras cambia el tempo<br />
de la música.<br />
26<br />
<br />
Sp<br />
REPRODUCCIÓN HACIA ATRÁS<br />
Cuando se presiona el botón de inversión (DIRECTION REV)<br />
de modo que se encienda la lámpara indicadora del botón, la<br />
reproducción se lleva a cabo en la dirección de inversión.<br />
LOCALIZACIÓN<br />
■ LOCALIZACIÓN REGRESIVA<br />
Después de haber almacenado puntos de localización en la<br />
memoria, presione el botón CUE mientras reproduce una<br />
pista para volver al punto de localización almacenado y<br />
empezar desde este punto.<br />
■ LOCALIZACIÓN AUTOMÁTICA<br />
Salta la parte sin grabar que hay al principio de las pistas y se<br />
establece automáticamente en el modo de espera en el punto<br />
de inicio de la pista, permitiendo el inicio instantáneo de la<br />
reproducción al presionar el botón PLAY/PAUSE (6).<br />
■ MUESTREADOR DE PUNTOS DE LOCALIZACIÓN<br />
La reproducción puede iniciarse de un accionamiento desde<br />
un punto de localización almacenado, lo cual es conveniente<br />
para confirmar los puntos de inicio y como muestreador.<br />
MEMORIA DE LOCALIZACIÓN/BUCLE<br />
Este reproductor está provisto de una memoria interna que<br />
permite grabar el punto de localización o el punto de bucle, y<br />
los puntos grabados pueden activarse posteriormente cuando<br />
se desee.<br />
BUCLE CONTINUO EN TIEMPO REAL<br />
Esta función simplifica el ajuste y la cancelación de bucles. El<br />
bucle puede ajustarse en el mismo momento que se inicia la<br />
reproducción de la pista. Ajustando un bucle justo antes de<br />
terminar la pista, puede prepararse la pista para que no<br />
termine. Adicionalmente, se ha añadido un modo A<strong>DJ</strong>UST<br />
para permitir los ajustes de un accionamiento del punto de<br />
salida del bucle, facilitando así la operación con bucles.<br />
REPETICIÓN DE BUCLES<br />
Permite el retorno a la posición del ajuste del bucle tantas<br />
veces como se desee. Presione el botón RELOOP/EXIT<br />
después de cancelar la reproducción de bucle para volver a la<br />
posición de inicio del bucle. Empleando la función de bucle<br />
ON y OFF en combinación con el ritmo de la pista, podrán<br />
crearse nuevos efectos de sonido.<br />
BUCLE DE TIEMPOS/DIVISIÓN DE BUCLE<br />
Establece automáticamente un punto de salida de bucle de<br />
acuerdo con el valor de BPM de la pista y comienza la<br />
reproducción de bucle. Cada vez adicional que se presiona el<br />
botón, se divide el bucle y se produce un nuevo ritmo.<br />
DIRECCIÓN DE REPRODUCCIÓN<br />
La barra gráfica proporciona una referencial visual del<br />
progreso de la reproducción de la pista que permite al usuario<br />
visualizar la posición actual de la reproducción, del mismo<br />
modo que cuando se hace con un disco analógico mirando la<br />
posición de la aguja. La posición actual puede confirmarse<br />
por la longitud de la gráfica y, además, la gráfica parpadea<br />
para indicarle el final de la pista.
INICIO CON FUNDIDO<br />
Cuando se conecta una consola de mezcla para <strong>DJ</strong> <strong>Pioneer</strong><br />
(vendida por separado), la operación de fundido de la consola<br />
de mezcla puede utilizarse para efectuar el inicio rápido y la<br />
localización regresiva.<br />
REPRODUCCIÓN POR RELEVOS<br />
Pueden conectarse en tándem dos unidades <strong>C<strong>DJ</strong></strong>-<strong>400</strong> para<br />
efectuar la reproducción automática por relevos.<br />
Cuando se detiene la reproducción de una pista en uno de los<br />
reproductores, se libera el modo de espera del otro<br />
reproductor y la reproducción se inicia automáticamente.<br />
FLOTADOR CON AMORTIGUADOR DE ACEITE<br />
La construcción de FLOTADOR CON AMORTIGUADOR DE<br />
ACEITE ayuda a soportar las vibraciones y los golpes.<br />
Esta unidad tiene un diseño de FLOTADOR CON AMORTI-<br />
GUADOR DE ACEITE, para que sea más difícil que se<br />
produzcan distorsiones y saltos del sonido debido a los<br />
golpes de la operación y a las vibraciones del piso.<br />
LECTURA MÚLTIPLE<br />
Es compatible con discos CD-R y CD-RW. (No obstante, es<br />
posible que algunos discos no se reproduzcan correctamente<br />
debido a ciertas características especiales de ciertos discos y<br />
grabadoras, así como a la suciedad o daños de los discos.)<br />
REPRODUCCIÓN <strong>DJ</strong> DE ARCHIVOS MP3<br />
Los archivos MP3 grabados en discos CD-ROM o en<br />
dispositivos de memoria USB pueden reproducirse con las<br />
funciones de <strong>DJ</strong>.<br />
CONEXIÓN DE UN PC<br />
Virtualmente, todas las funciones de los botones y controles<br />
deslizantes del <strong>C<strong>DJ</strong></strong>-<strong>400</strong> pueden enviarse a dispositivos<br />
externos.<br />
Entonces, estas señales pueden utilizarse para controlar el<br />
software de <strong>DJ</strong> propio de <strong>Pioneer</strong> “<strong>DJ</strong>S” así como otras<br />
aplicaciones de programas de ordenador. Adicionalmente,<br />
las pistas musicales reproducidas en el ordenador pueden<br />
emitirse como audio desde el <strong>C<strong>DJ</strong></strong>-<strong>400</strong>.<br />
Limitación de responsabilidades<br />
¶ Microsoft y Windows son marcas comerciales registradas de<br />
Microsoft Corporation, registradas en los EE.UU. y en otros países.<br />
Apple y Mac OS son marcas comerciales de Apple Inc., registradas<br />
en los EE.UU. y en otros países.<br />
¶ Los tipos de caracteres incluidos han sido parcialmente<br />
desarrollados por DynaComware Taiwan Inc.<br />
¶ ASIO es una marca comercial registrada de Steinberg Media<br />
Technologies GmbH.<br />
ANTES DE LA OPERACIÓN (CARACTERÍSTICAS)<br />
ÍNDICE<br />
ANTES DE LA OPERACIÓN<br />
CARACTERÍSTICAS ................................................... 26<br />
DISCOS UTILIZABLES CON ESTA UNIDAD ........... 30<br />
PRECAUCIONES RELATIVAS AL MANEJO ............ 34<br />
CONEXIONES ............................................................ 36<br />
DISPOSITIVOS DEL PANEL ...................................... 40<br />
OPERACIONES<br />
INSERCIÓN/EXPULSIÓN DE DISCOS ...................... 46<br />
OPERACIÓN DEL REPRODUCTOR PARA <strong>DJ</strong> .......... 48<br />
Función de localización automática .................. 48<br />
Inicio de la reproducción .................................... 49<br />
Función de reanudación ..................................... 49<br />
Para detener la reproducción ............................. 49<br />
Para interrumpir temporalmente<br />
la reproducción .................................................... 49<br />
Funciones del mando de lanzadera ................... 50<br />
Avance rápido/inversión rápida ......................... 51<br />
Localización de pistas ......................................... 51<br />
Búsqueda por rotación ....................................... 52<br />
Cambio de la velocidad de reproducción ......... 53<br />
Aplicación del tempo principal .......................... 53<br />
Efecto de rascado del mando de lanzadera ...... 54<br />
Interrupción de mando de lanzadera digital .... 54<br />
Ajuste de puntos de localización ....................... 55<br />
Mezcla de pistas distintas ................................... 56<br />
OPERACIONES AVANZADAS .................................. 58<br />
Reproducción de bucle ....................................... 58<br />
Reproducción con inicio de fundido ................. 59<br />
Reproducción rascada ........................................ 60<br />
Reproducción con rotación ................................ 60<br />
Reproducción en inversión ................................ 60<br />
Memoria de puntos de<br />
localización/puntos de bucle .............................. 61<br />
Reproducción con relevo<br />
empleando dos reproductores ........................... 62<br />
Escritura y lectura de datos ................................ 62<br />
AJUSTES DE MIDI ..................................................... 64<br />
OTROS<br />
SOLUCIÓN DE PROBLEMAS .................................... 66<br />
Presentación de mensajes de error ................... 67<br />
ESPECIFICACIONES .................................................. 67<br />
27<br />
<br />
Sp<br />
Español
ANTES DE LA OPERACIÓN (DISCOS UTILIZABLES CON ESTA UNIDAD)<br />
DISCOS UTILIZABLES CON ESTA UNIDAD<br />
Tipos de discos reproducibles en esta unidad<br />
÷ Las marcas y logotipos siguientes están indicados en las<br />
etiquetas, las envolturas, o las fundas de los discos.<br />
30<br />
<br />
Sp<br />
Tipos y logotipos de los discos reproducibles<br />
CD CD-TEXT (Nota 1) CD-R (Nota 2) (Nota 2)<br />
CD-RW<br />
Nota 1) Acerca de la visualización de TEXT:<br />
El número de caracteres que podrán visualizarse es de un<br />
máximo de 48. Cuando una visualización sobrepase 8<br />
caracteres, ésta se desplazará. Solamente podrán visualizarse<br />
caracteres alfanuméricos y un número limitado de símbolos<br />
(☞ P. 45)<br />
Nota 2) Acerca de los discos CD-R/CD-RW:<br />
Este reproductor puede reproducir discos CD-R/CD-RW<br />
grabados en el formato CD de audio o MP3.<br />
* Con respecto a los detalles, consulte el Manual de<br />
instrucciones de su grabadora.<br />
Reproducción de archivos MP3<br />
Notas:<br />
¶ Algunos discos CD-R/CD-RW grabados en grabadoras<br />
autónomas o unidades de ordenador pueden no<br />
reproducirse en este reproductor debido a gran variedad<br />
de razones, como las características de los discos, rayas,<br />
suciedad, suciedad en el objetivo del reproductor,<br />
condensación de humedad, etc.<br />
¶ Algunos discos grabados en unidades de ordenador<br />
pueden no reproducirse en este reproductor dependiendo<br />
de la aplicación de grabación utilizada, los ajustes, y el<br />
entorno de operación. Cerciórese de utilizar el formato<br />
correcto para los discos que use. Con respecto a los<br />
detalles, consulte al autor de la aplicación.<br />
¶ Este reproductor no podrá reproducir discos CD-R ni CD-<br />
RW parcialmente grabados que no se hayan finalizado.<br />
¶ Con respecto a la información detallada sobre el manejo de<br />
los discos CD-R/CD-RW, consulte las precauciones de<br />
manejo suministradas con cada disco.<br />
■ Acerca de los discos CD-R/RW<br />
Debido a la fabricación particular de los discos CD-R/RW, si se<br />
dejan durante períodos prolongados de tiempo en el estado<br />
de pausa (o de espera de localización) en un mismo punto, es<br />
posible que se dificulte la reproducción del disco en dicho<br />
lugar. Puede producirse el mismo síntoma si se emplea la<br />
función de bucle para reproducir excesivamente un mismo<br />
punto del disco.<br />
Como resultado, se aconseja a los usuarios que creen discos<br />
de copia de seguridad cuando reproduzcan discos que<br />
contengan datos importantes.<br />
■ Acerca de la reproducción de discos DualDisc<br />
Este aparato ha sido diseñado de acuerdo con las normas de<br />
discos CD de música. No se garantiza la operación ni el<br />
rendimiento cuando se emplea con discos que no cumplen<br />
las normas de discos CD de música.<br />
Los archivos MP3 pueden tener dos formatos: Velocidad en bits constante (CBR) y velocidad en bits variable (VBR). Este<br />
componente es compatible con la reproducción normal y la reproducción de <strong>DJ</strong> de ambos tipos de archivos MP3, CBR y VBR,<br />
pero en comparación con los archivos CBR, los archivos grabados en el formato VBR mostrarán unas velocidades más lentas de<br />
búsqueda normal y de búsqueda súper rápida. Como resultado, cuando la velocidad de operación sea lo más importante, se<br />
recomienda emplear el formato de grabación CBR para los archivos MP3.<br />
Los archivos MP3 deben cumplir los requisitos de formato que se enumeran a continuación.<br />
Formato MP3 MPEG-1<br />
MPEG-2<br />
Etiqueta ID3<br />
Extensión de archivo<br />
Compatible con Audio Layer-3 con frecuencias de muestreo de 32<br />
kHz, 44,1 kHz, 48 kHz, y velocidad en bits de 32 Kbps a 320 Kbps.<br />
Compatible con Audio Layer-3 con frecuencias de muestreo de 16<br />
kHz, 22,05 kHz, 24 kHz, y velocidad en bits de 16 Kbps (estéreo) a 160<br />
Kbps.<br />
Es compatible con ID3 de las versiones 1.0/1.1/2.2/2.3/2.4.<br />
Visualiza el título, el álbum, y el artista. Solamente podrán visualizarse<br />
caracteres alfanuméricos y un número limitado de símbolos.<br />
.mp3, .MP3, .mP3, .Mp3
ANTES DE LA OPERACIÓN (DISCOS UTILIZABLES CON ESTA UNIDAD)<br />
■ Reproducción de pistas desde la memoria USB<br />
Conectando un dispositivo de memoria USB al <strong>C<strong>DJ</strong></strong>-<strong>400</strong>, pueden reproducirse los archivos MP3 de la memoria USB.<br />
÷ Es posible que el <strong>C<strong>DJ</strong></strong>-<strong>400</strong> no sea compatible con la reproducción de todos los dispositivos de memoria USB o que no pueda<br />
suministrar suficiente alimentación eléctrica. Además, téngase presente que <strong>Pioneer</strong> no se hace responsable por ninguna<br />
pérdida de datos de un dispositivo de memoria USB que pueda ocurrir debido a la conexión del dispositivo al <strong>C<strong>DJ</strong></strong>-<strong>400</strong>.<br />
÷ La lectura del dispositivo de memoria USB puede tardar cierto tiempo si se manipulan grandes cantidades de datos.<br />
÷ Si se emplea un concentrador de USB el funcionamiento puede ser errático.<br />
■ Desconexión de un dispositivo de memoria USB<br />
Emplee los botones SOURCE SELECT para cancelar la selección del dispositivo de memoria USB, y luego confirme que el<br />
indicador del dispositivo de memoria USB se haya apagado antes de quitar el dispositivo.<br />
Formato de los<br />
dispositivos de memoria<br />
USB<br />
Jerarquía de carpetas<br />
Carpetas máx.<br />
Archivos máx.<br />
Formato de grabación<br />
* No hay función de clasificación de archivos. La reproducción se lleva a cabo en el orden grabado en la memoria.<br />
* Cuando hay muchos archivos, se alarga el tiempo de inicio necesario.<br />
■ Acerca de la reproducción de discos CD-ROM<br />
Los archivos MP3 grabados en discos CD-ROM pueden reproducirse en este aparato.<br />
Formato del disco Extensión de archivo<br />
Capas de carpetas<br />
Número máximo de carpetas<br />
Número máximo de archivos<br />
Multisesión<br />
Método de grabación de discos<br />
CD-R<br />
Máximo de 8 niveles (los archivos ubicados en carpetas que exceden<br />
el octavo nivel de la jerarquía no pueden reproducirse)<br />
10 000<br />
20 000 (10 000 como máximo en una misma carpeta)<br />
Dispositivos que conforman la clase de almacenamiento masivo USB<br />
(USB MSC), incluyendo discos duros externos, dispositivos de<br />
memoria flash portátiles, y dispositivos de reproducción de audio<br />
digital (compatibles con los formatos FAT16 y FAT32).<br />
.mp3, .MP3, .mP3, .Mp3<br />
Máximo de 8 capas; los archivos ubicados en carpetas que exceden<br />
de 8 capas no pueden reproducirse.<br />
2 000<br />
3 000<br />
No es compatible con multisesión.<br />
Cuando el disco utilizado es un disco de multisesión, sólo se<br />
reproducirá la primera sesión.<br />
Grabe según el sistema de archivos de CD-ROM ISO9660.<br />
Sólo es compatible con “Disc At Once” o “Track At Once”.<br />
El <strong>C<strong>DJ</strong></strong>-<strong>400</strong> no es compatible con discos grabados con el método de<br />
escritura por paquetes.<br />
* No hay función de clasificación de archivos. La reproducción se lleva a cabo en el orden grabado en la memoria.<br />
* Cuando hay muchos archivos, se alarga el tiempo de inicio necesario.<br />
31<br />
<br />
Sp<br />
Español
ANTES DE LA OPERACIÓN (PRECAUCIONES RELATIVAS AL MANEJO)<br />
PRECAUCIONES RELATIVAS AL MANEJO<br />
Ubicación<br />
Instale el reproductor en un lugar bien ventilado, donde no quede<br />
expuesto a gran temperatura ni humedad.<br />
No instale el reproductor en un lugar expuesto a los rayos directos del<br />
sol, ni cerca de estufas o radiadores. El calor excesivo puede dañar la<br />
caja y los componentes internos. Además, la instalación en un<br />
ambiente húmedo o polvoriento puede resultar en mal funcionamiento<br />
o accidentes. No lo instale cerca de cocinas, etc., donde el aparato<br />
puede quedar expuesto a humos de aceite, vapor, o calor.<br />
Pecauciones relativas a la instalación<br />
÷ El rendimiento del aparato se verá afectado si éste se coloca y<br />
utiliza durante mucho tiempo sobre aparatos que generen calor,<br />
tales como amplificadores, o cerca de focos de luz, etc. Evite<br />
colocar el reproductor sobre aparatos que generen calor como,<br />
por ejemplo, amplificadores.<br />
÷ Instale este reproductor de discos compactos lo más alejado<br />
posible de sintonizadores y aparatos de TV. Si se instala un<br />
reproductor de discos compactos cerca de tales equipos, puede<br />
producirse ruido o degradación de la imagen.<br />
÷ El ruido puede ser especialmente notable cuando se emplee una<br />
antena interior. En tal caso, utilice una antena exterior, o<br />
desconecte la alimentación del reproductor de discos compactos.<br />
÷ Si utiliza la unidad en un ambiente ruidoso, por ejemplo, cerca de un<br />
altavoz, es posible que se produzca salto de sonido. En tal caso,<br />
instale la unidad separada del altavoz, o reduzca el nivel de escucha.<br />
÷ Coloque este aparato sobre una superficie plana y estable.<br />
÷ Asegúrese de que el reproductor,<br />
incluyendo sus cables de audio y de<br />
alimentación eléctrica, no toquen<br />
materiales que vibren. Las vibraciones<br />
que los aisladores no puedan absorber<br />
podrán ser la causa de que salte el disco.<br />
Tenga cuidado especial cuando utilice el<br />
reproductor mientras está instalado en<br />
una caja para el transporte.<br />
Limpieza del reproductor<br />
Limpie el reproductor con un paño de limpieza suave y seco. Para las<br />
manchas difíciles de quitar, humedezca un paño suave en una<br />
solución compuesta de 5 partes de detergente suave y 6 partes de<br />
agua, escúrralo bien y luego quite la suciedad.<br />
Pase finalmente un paño seco para secar la superficie. No utilice<br />
líquidos volátiles, como bencina ni diluyentes de pintura, porque<br />
estropeará el aparato.<br />
Limpiador de lentes de reproductores de discos<br />
compactos<br />
Las lentes del fonocaptor del reproductor no deben ensuciarse durante<br />
la reproducción normal, pero si por alguna que otra razón funciona mal<br />
debido a suciedad, lea la sección sobre solución de consulte al centro<br />
de servicio técnico PIONEER autorizado más cercano. Los limpiadores<br />
de lentes para reproductores de discos compactos están desponibles<br />
en las tiendas del ramo, pero debe tenerse mucho cuidado en su<br />
empleo porque algunos productos pueden causar daños en las lentes.<br />
34<br />
<br />
Sp<br />
¶ Asegúrese de dejar un<br />
espacio para que pueda<br />
disiparse el calor.<br />
No lo ponga contra<br />
materiales que vibren.<br />
Almacenamiento de los discos<br />
÷ Los discos están hechos del mismo tipo de plástico que el que se<br />
utiliza para los discos de audio analógicos convencionales. Tenga<br />
cuidado de no permitir que se comben los discos. Ponga siempre<br />
los discos en sus cajas verticalmente, evitando lugares con mucho<br />
calor o humedad, o temperaturas extremadamente bajas. No deje<br />
los discos dentro de automóviles, porque el asiento de un<br />
automóvil bajo la luz directa del sol puede ponerse muy caliente.<br />
÷ Lea y respete siempre las notas de precaución que se listan en las<br />
etiquetas de los discos.<br />
Condensación<br />
Cuando el reproductor se desplaza de un lugar frío a otro cálido, o<br />
cuando la temperatura de la sala aumenta repentinamente, puede<br />
condensarse humedad en el interior, y es posible que el reproductor<br />
no rinda al máximo. En tal caso, deje el reproductor en reposo durante<br />
una hora o aumente gradualmente la temperatura de la sala.<br />
Limpieza de discos y manipulación de discos<br />
compactos<br />
÷ La presencia de huellas dactilares o suciedad en la superficie de<br />
los discos no afectará directamente las señales grabadas, pero<br />
dependiendo del grado de suciedad, puede reducirse el brillo de<br />
la luz reflejada de la superficies de señal, ocasionándose<br />
degradación de la calidad del sonido. Mantenga siempre los discos<br />
limpios frotándolos con cuidado con un paño suave desde el<br />
borde interior hacia el borde exterior.<br />
÷ Si un disco se ensucia demasiado, humedezca un paño suave en<br />
agua y, después de escurrirlo bien, limpie suavemente la<br />
suciedad, y después seque bien las gotas de agua con otro paño<br />
suave y seco.<br />
÷ No emplee rociadores para limpieza de discos convencionales ni<br />
agentes antiestáticos. Además, no limpie nunca los discos con<br />
bencina, diluidor de pintura, ni ningún otro disolvente volátil, ya<br />
que podría dañar la superficie de los discos.<br />
÷ Con este reproductor, emplee sólo<br />
discos que tengan la marca mostrada<br />
en la figura derecha. (Discos audiodigitales<br />
ópticos.)<br />
÷ Los discos SACD híbridos no pueden<br />
reproducirse.<br />
'<br />
÷ Cuando manipule discos no toque las superficies de las señales (el<br />
lado con los colores del arco iris, el lado opuesto al de la etiqueta).<br />
Sujételos por los bordes, o por un borde y su orificio central.<br />
÷ No pegue etiquetas ni cintas en la superficie del disco. Además,<br />
no raye ni dañe dicha etiqueta.<br />
÷ Los discos giran a gran velocidad dentro del reproductor. No<br />
emple discos dañados, rajados o alabeados.<br />
No reproduzca discos CD que tengan una forma especial<br />
No reproduzca discos CD que no tengan una forma circular, como<br />
por ejemplo discos en forma de corazón, porque podría producirse<br />
un mal funcionamiento.
OPERACIONES (INSERCIÓN/EXPULSIÓN DE DISCOS)<br />
INSERCIÓN/EXPULSIÓN DE DISCOS<br />
Cara de la<br />
etiqueta arriba<br />
46<br />
<br />
Sp<br />
Insértelo recto<br />
1. Ajuste el interruptor POWER del panel posterior a la<br />
posición ON.<br />
No fuerce un disco adentro del aparato cuando el<br />
interruptor POWER esté en la posición OFF porque<br />
podría dañar el disco y el aparato.<br />
2. Inserte un disco.<br />
÷ Tome el disco con la etiqueta arriba, e insértelo en la<br />
ranura de inserción de discos del panel frontal.<br />
÷ Sólo puede insertarse un disco a un mismo tiempo. No<br />
intente nunca introducir más de un disco al mismo<br />
tiempo ni de insertar otro disco cuando ya haya<br />
insertado un disco en el reproductor.<br />
÷ Cuando inserte el disco, no aplique fuerza en el disco ni<br />
trate de forzarlo adentro de la ranura. No intente<br />
tampoco interrumpir ni de cancelar el movimiento del<br />
disco cuando el reproductor empieza a insertar un disco<br />
en la ranura o a expulsar un disco, porque podría<br />
ocasionarse daños al disco o al reproductor.<br />
Expulsión forzada del disco<br />
Si el botón EJECT no funciona o el disco no puede<br />
extraerse, presionando el pasador incorporado en el<br />
orificio de expulsión forzada del panel frontal, podrá<br />
extraerse el disco.<br />
Cuando efectúe la expulsión forzada, tenga presente las<br />
precauciones siguientes.<br />
1 Asegúrese de haber desconectado la alimentación<br />
del reproductor de CD y de haber comprobado que el<br />
disco haya dejado de girar. El disco tarda unos 60<br />
segundos en pararse después de haber desconectado<br />
la alimentación.<br />
Si se efectúa la expulsión forzada mientras el disco está<br />
girando:<br />
÷ Puesto que el disco saldrá expulsado fuera del<br />
reproductor de CD, puede golpearle un dedo y<br />
causarle heridas.<br />
÷ Puesto que el disco está girando con la retención<br />
inestable, puede rayarse.<br />
Por estas razones, no intente nunca sacar el disco con<br />
expulsión forzada mientras esté girando.<br />
3. Presione el botón EJECT para extraer el disco.<br />
÷ Cuando se presiona el botón EJECT, se detiene la<br />
rotación del disco y el disco se expulsa por la ranura de<br />
inserción.<br />
÷ Si el disco no puede expulsarse con el botón EJECT,<br />
inserte un pasador en el orificio de expulsión forzada del<br />
panel frontal del reproductor.<br />
7 Cancelación del comando de expulsión<br />
En el caso de presionar por error el botón EJECT, si se<br />
presiona inmediatamente el botón PLAY/PAUSE (6)<br />
(antes de que se visualice [EJECT]), se cancelará el<br />
comando de expulsión y la reproducción se reiniciará<br />
desde el lugar inmediatamente anterior al momento en<br />
que se presionó el botón EJECT (durante este tiempo, la<br />
salida de sonido quedará temporalmente interrumpida).<br />
PRECAUCIÓN:<br />
No intente presionar un disco de nuevo adentro de la<br />
ranura cuando haya aparecido el indicador [EJECT]. Si<br />
se presiona un disco hacia la ranura mientras aparece el<br />
indicador [EJECT] puede causar la parada del<br />
reproductor. En este caso, presione de nuevo el botón<br />
EJECT y espere a que se apague el indicador [EJECT]<br />
antes de reinsertar el disco.<br />
2 Emplee siempre el pasador suministrado (no emplee<br />
otros objetos). Encontrará el pasador suministrado en<br />
una ranura de la parte inferior del reproductor.<br />
Cuando se inserta a fondo el pasador de expulsión<br />
forzada suministrado en el orificio de expulsión forzada<br />
del panel frontal, el disco insertado sale de 5 mm a 10<br />
mm de la ranura de carga, haciendo posible su<br />
extracción con la mano.<br />
Orificio de expulsión<br />
forzada
OPERACIONES (AJUSTES DE MIDI)<br />
AJUSTES DE MIDI<br />
MIDI (interfaz digital para instrumentos musicales) es una norma unificada para intercambio de datos entre instrumentos electrónicos y<br />
ordenadores. Seleccionando el ordenador con el botón SOURCE SELECT, el <strong>C<strong>DJ</strong></strong>-<strong>400</strong> podrá enviar la información de su operación a aplicaciones<br />
compatibles con MIDI de USB.<br />
Ajuste del canal MIDI<br />
Ajuste y guarde el canal MIDI (1 a 16).<br />
1. Mantenga presionado el botón TEXT MODE/UTILITY MODE durante 1 o más segundos para establecer el modo de ajuste de<br />
utilidad.<br />
Gire el mando rotativo de modo que la pantalla del visualizador muestre [MIDI CH], y presiónelo luego para confirmarlo.<br />
La pantalla del visualizador mostrará [CH 1] (si no se ha cambiado el ajuste predeterminado de fábrica).<br />
2. Cambie el canal girando el mando rotativo.<br />
Podrá seleccionar los canales desde [CH 1] a [CH 16].<br />
3. Presione el mando rotativo para confirmar la selección.<br />
Si no se introduce ningún comando durante 15 segundos, se cancelará el modo de ajuste de utilidad. Si se presiona el botón BACK también se<br />
cerrará este modo.<br />
Nombre del interruptor Tipo de interruptor Mensaje MIDI<br />
JOG (TOUCH)<br />
Aplicaciones<br />
generales<br />
Controlador<br />
Bn 10 dd<br />
TEMPO SLIDER<br />
JOG RING<br />
ENCODER<br />
PLAY/PAUSE<br />
CUE<br />
SEARCH FWD<br />
SEARCH REV<br />
TRACK SEARCH Next<br />
TRACK SEARCH Prev<br />
LOOP IN<br />
LOOP OUT<br />
RELOOP<br />
MEMORY<br />
CALL<br />
TIME/A.CUE<br />
TEXT<br />
TEMPO RANGE<br />
MT<br />
JOG MODE (VINYL)<br />
LOOP DEVIDE +<br />
LOOP DEVIDE –<br />
JOG TOUCH<br />
REVERSE<br />
HOLD<br />
WAH<br />
TRANS/ROLL<br />
BUBBLE/JET<br />
EJECT<br />
BACK<br />
ENCODER PUSH<br />
64<br />
<br />
Sp<br />
VR<br />
Aplicaciones<br />
generales<br />
Controlador<br />
Aplicaciones<br />
generales<br />
Controlador<br />
SW<br />
SW<br />
SW<br />
SW<br />
SW<br />
SW<br />
SW<br />
SW<br />
SW<br />
SW<br />
SW<br />
SW<br />
SW<br />
SW<br />
SW<br />
SW<br />
SW<br />
SW<br />
SW<br />
SW<br />
SW<br />
SW<br />
SW<br />
SW<br />
SW<br />
SW<br />
SW<br />
Bn<br />
Bn<br />
Bn<br />
9n<br />
9n<br />
9n<br />
9n<br />
9n<br />
9n<br />
9n<br />
9n<br />
9n<br />
9n<br />
9n<br />
9n<br />
9n<br />
9n<br />
9n<br />
9n<br />
9n<br />
9n<br />
9n<br />
9n<br />
9n<br />
9n<br />
9n<br />
9n<br />
9n<br />
9n<br />
9n<br />
1D<br />
30<br />
4F<br />
00<br />
01<br />
02<br />
03<br />
04<br />
05<br />
06<br />
07<br />
08<br />
0A<br />
0B<br />
0E<br />
0F<br />
10<br />
11<br />
12<br />
16<br />
17<br />
20<br />
21<br />
22<br />
23<br />
24<br />
25<br />
2F<br />
32<br />
33<br />
dd<br />
dd<br />
dd<br />
dd<br />
dd<br />
dd<br />
dd<br />
dd<br />
dd<br />
dd<br />
dd<br />
dd<br />
dd<br />
dd<br />
dd<br />
dd<br />
dd<br />
dd<br />
dd<br />
dd<br />
dd<br />
dd<br />
dd<br />
dd<br />
dd<br />
dd<br />
dd<br />
dd<br />
dd<br />
dd<br />
Observaciones<br />
Valor lineal para velocidades desde parada a la velocidad de x4, 64 en<br />
parada, dirección de avance (FWD) (hacia la derecha (CW)): 65 (velocidad de<br />
x0,06) a 127 (velocidad de x4). inversión (RV) (hacia la izquierda (CCW)): 63<br />
(velocidad de x0,06) a 0 (velocidad de x4).<br />
0 a 127 0 en el lado -, 127 en el lado +, 64 en el centro.<br />
Valor lineal para velocidades entre x0,5 a x4,64 en parada (por debajo de la<br />
velocidad de x0,49), dirección de avance (FWD) (hacia la derecha (CW)): 65<br />
(velocidad de x0,5) a 127 (velocidad de x4). dirección de inversión (hacia la<br />
izquierda (CCW)): 63 (velocidad de x0,5) a 0 (velocidad de x4).<br />
Transfiere el valor de la cuenta diferencial desde la vez anterior.<br />
64 sin diferencia. En la dirección hacia la derecha (CW): 64 + cantidad de cambio<br />
(máx. 127), dirección hacia la izquierda (CCW): 64 – cantidad de cambio (mín. 0).<br />
OFF=0, ON=127<br />
OFF=0, ON=127<br />
OFF=0, ON=127<br />
OFF=0, ON=127<br />
OFF=0, ON=127<br />
OFF=0, ON=127<br />
OFF=0, ON=127<br />
OFF=0, ON=127<br />
OFF=0, ON=127<br />
OFF=0, ON=127<br />
OFF=0, ON=127<br />
OFF=0, ON=127<br />
OFF=0, ON=127<br />
OFF=0, ON=127<br />
OFF=0, ON=127<br />
OFF=0, ON=127<br />
OFF=0, ON=127<br />
OFF=0, ON=127<br />
OFF=0, ON=127<br />
OFF=0, ON=127<br />
OFF=0, ON=127<br />
OFF=0, ON=127<br />
OFF=0, ON=127<br />
OFF=0, ON=127<br />
OFF=0, ON=127<br />
OFF=0, ON=127<br />
OFF=0, ON=127
OTROS (SOLUCIÓN DE PROBLEMAS)<br />
SOLUCIÓN DE PROBLEMAS<br />
Es posible que operaciones incorrectas se tomen equivocadamente como síntomas de mal funcionamiento. Si usted cree que el aparato no<br />
funciona correctamente, consulte la tabla siguiente. Algunas veces la operación incorrecta se debe al mal funcionamiento de otro componente.<br />
Si el problema no puede solucionarse, compruebe los otros componentes empleados con el reproductor. Si el problema persiste, póngase en<br />
contacto con el centro de servicio autorizado o distribuidor de <strong>Pioneer</strong> que le quede más cercano para que efectúen el servicio técnico.<br />
Síntoma<br />
El disco no sale expulsado cuando<br />
se presiona el botón EJECT.<br />
No se inicia la reproducción cuando<br />
se inserta el disco.<br />
Al intentar iniciar la reproducción,<br />
ésta se detiene inmediatamente.<br />
Pausas o interrupciones durante la<br />
reproducción.<br />
No pueden reproducirse pistas MP3.<br />
No pueden buscarse archivos MP3.<br />
No hay sonido.<br />
El sonido está distorsionado, ruido<br />
en la salida.<br />
Con ciertos discos, se produce mucho<br />
ruido, o la reproducción se para.<br />
Cuando se activa la función de<br />
búsqueda automática, la búsqueda<br />
de las canciones no termina.<br />
La función de localización regresiva<br />
no puede llevarse a cabo al<br />
presionar el botón CUE durante el<br />
modo de reproducción.<br />
Al presionar el botón OUT/OUT<br />
A<strong>DJ</strong>UST no se inicia la reproducción<br />
de bucle.<br />
El mando de lanzadera no funciona<br />
como se desea.<br />
La imagen del televisor fluctúa o las<br />
radiodifusiones de FM tienen ruidos.<br />
El disco no gira al conectar la<br />
alimentación.<br />
66<br />
<br />
Sp<br />
Causa probable<br />
÷ El cable de alimentación está<br />
desenchufado de la toma de corriente.<br />
÷ La función de localización automática está<br />
activada.<br />
÷ El disco está sucio, etc.<br />
÷ El formato de los archivos es incorrecto.<br />
÷ Se ha intentado la búsqueda (avance<br />
rápido/inversión rápida) de pistas MP3 en<br />
una carpeta distinta.<br />
÷ Los cables de salida están incorrectamente<br />
conectados o flojos.<br />
÷ Operación incorrecta de la consola de<br />
mezcla para <strong>DJ</strong>.<br />
÷ Las clavijas y/o terminales del amplificador<br />
están sucios.<br />
÷ El reproductor está en el modo de pausa.<br />
÷ Conexiones incorrectas.<br />
÷ Las clavijas y/o las tomas del amplificador<br />
están sucias.<br />
÷ Interferencias causadas por un aparato de<br />
TV.<br />
÷ Disco muy rayado o alabeado.<br />
÷ Disco extremadamente sucio.<br />
÷ Si la parte de sonido silenciado entre las<br />
melodías es larga, el tiempo de búsqueda<br />
será largo también.<br />
÷ Si el punto de localización no puede<br />
encontrarse antes de 10 segundos, el punto<br />
de localización se ajusta al principio de la<br />
pista.<br />
÷ El punto de localización todavía no está<br />
ajustado.<br />
÷ El punto de localización se ha ajustado en<br />
un archivo MP3 de una carpeta distinta.<br />
÷ Los puntos de localización (punto de<br />
entrada de bucle) no se han ajustado.<br />
÷ En el caso de archivos MP3, el bucle no<br />
puede efectuarse si no hay ningún punto<br />
de entrada de bucle dentro de la pista que<br />
actualmente se está reproduciendo.<br />
÷ El modo JOG MODE (VINYL/<strong>C<strong>DJ</strong></strong>) se ha<br />
ajustado incorrectamente.<br />
÷ Las interferencias provienen del<br />
reproductor de discos compactos.<br />
÷ El disco dejará de girar automáticamente<br />
cuando no se haya realizado ninguna<br />
operación durante 100 minutos o más en el<br />
modo de pausa.<br />
Remedio<br />
÷ Enchufe el cable a la toma de corriente.<br />
÷ Presione el botón AUTO CUE para desactivar<br />
la localización automática.<br />
÷ Limpie el disco y vuélvalo a reproducir.<br />
÷ ☞ P.30 “Reproducción de archivos MP3”.<br />
÷ La búsqueda de pistas con archivos MP3 sólo<br />
puede efectuarse dentro de la misma carpeta.<br />
÷ Vuelva a comprobar las conexiones. Consulte<br />
el manual de instrucciones. (☞ P. 36, 37, 38)<br />
÷ Compruebe los ajustes de los interruptores y<br />
controles de volumen del sonido de la consola<br />
de mezcla para <strong>DJ</strong>.<br />
÷ Límpielos la suciedad.<br />
÷ Presione el botón PLAY/PAUSE (6).<br />
÷ Conecte a los terminales LINE INPUT del<br />
mezclador de audio. No conecte a los<br />
terminales MIC.<br />
÷ Limpie la suciedad.<br />
÷ Desconecte el televisor, separe el reproductor<br />
del televisor o enchufe el reproductor en una<br />
toma de corriente separada.<br />
÷ Reemplace el disco.<br />
÷ Limpie el disco.<br />
÷ Presione el botón AUTO CUE para desactivar<br />
la localización automática.<br />
÷ Ajuste el punto de localización. (☞ P. 55)<br />
÷ Durante la reproducción de discos MP3, la<br />
localización regresiva sólo puede efectuarse<br />
dentro de la misma carpeta.<br />
÷ Ajuste un punto de localización. (☞ P. 55)<br />
÷ Durante la reproducción de discos MP3, el<br />
bucle sólo podrá crearse dentro de la misma<br />
pista que tenga ajustado un punto de<br />
localización (punto de entrada de bucle).<br />
÷ Presione el botón JOG MODE VINYL para<br />
ajustar el modo deseado de JOG MODE<br />
(VINYL o <strong>C<strong>DJ</strong></strong>).<br />
÷ Desconecte la alimentación del reproductor<br />
con el interruptor POWER o separe el<br />
reproductor del televisor o sintonizador.<br />
÷ La reproducción puede iniciarse desde la<br />
primera pista presionando el botón PLAY/<br />
PAUSE (6). Presione el botón EJECT para<br />
expulsar el disco.
Presentación de mensajes de error<br />
OTROS (SOLUCIÓN DE PROBLEMAS / ESPECIFICACIONES)<br />
÷ La electricidad estática y otros efectos externos pueden causar mal funcionamiento de este aparato. En este caso, ajuste el interruptor de la<br />
alimentación (POWER) en la posición OFF y vuélvalo a conectar (ON) después de que el disco se haya parado por completo.<br />
÷ La unidad no puede reproducir discos CD-R ni discos CD-RW que no están finalizados (discos parciales).<br />
÷ Los discos con formas irregulares no pueden reproducirse en el <strong>C<strong>DJ</strong></strong>-<strong>400</strong> (porque podrían producirse averías o accidentes). Emplee sólo<br />
discos estándar circulares de 12 cm.<br />
÷ El valor de BPM medido por el <strong>C<strong>DJ</strong></strong>-<strong>400</strong> puede ser diferente al valor de BPM grabado en el CD o al de nuestro mezclador de <strong>DJ</strong>, pero esta<br />
diferencia es el resultado de las diferencias en el método utilizado para medir el valor de BPM; no es el resultado de un fallo en el reproductor.<br />
÷ Cuando se reproducen discos CD-R/RW, es posible que se reduzca el índice de rendimiento debido a la calidad de los datos grabados.<br />
Cuando el reproductor de CD <strong>C<strong>DJ</strong></strong>-<strong>400</strong> no sea capaz de funcionar de forma correcta, se visualizará un mensaje de error en el panel<br />
del visualizador. Compruebe el código de error visualizado en la tabla siguiente y siga la acción que se recomienda para corregir<br />
el error. Si se muestra un código de error distinto al de los que se listan en esta tabla o si se presenta el mismo código de error<br />
incluso después de haber llevado a cabo la acción correctora, póngase en contacto con el centro de servicio <strong>Pioneer</strong> más próximo<br />
o con el establecimiento en el que adquirió su reproductor para solicitar asistencia.<br />
Código de error<br />
E-72 01<br />
E-83 01<br />
E-83 02<br />
E-83 03<br />
E-83 04<br />
E-83 05<br />
E-91 01<br />
Tipo de error<br />
TOC READ ERROR<br />
PLAYER ERROR<br />
MP3 DECODE ERROR<br />
DATA FORMAT ERROR<br />
MECHANICAL TIME OUT<br />
ESPECIFICACIONES<br />
Descripción<br />
El reproductor no puede leer los datos<br />
de la TOC.<br />
El disco está girando, pero no puede<br />
determinarse la rotación.<br />
El reproductor no es capaz de<br />
reproducir el disco actualmente<br />
insertado.<br />
El disco cargado no puede<br />
reproducirse correctamente.<br />
Ha fallado el funcionamiento<br />
mecánico para completar sin el<br />
intervalo de tiempo especificado.<br />
1. Generalidades<br />
Sistema ................ Sistema audiodigital de discos compactos<br />
Alimentación ........................... 110 V a 240 V CA, 50 Hz/60 Hz<br />
Consumo ...........................................................................19 W<br />
Temperatura de funcionamiento ....................... +5 ˚C a +35 ˚C<br />
Humedad de funcionamiento ................................ 5 % al 85 %<br />
(Sin condensación)<br />
Peso ................................................................................. 2,7 kg<br />
Dimensiones<br />
............... 217,9 mm (An) × 107,5 mm (Al) × 296,3 mm (Prf)<br />
2. Sección de audio<br />
Respuesta en frecuencia ..................................... 4 Hz a 20 kHz<br />
Relación señal a ruido .........................Más de 115 dB (JEITA)<br />
Distorsión ........................................................ 0,006 % (JEITA)<br />
Causa posible y acción recomendada<br />
El disco está roto.<br />
= Acción recomendada: sustituir el disco.<br />
El disco está manchado o sucio.<br />
= Acción recomendada: limpie el disco.<br />
Si otros discos se reproducen con normalidad,<br />
significa que el problema reside en el mismo<br />
disco.<br />
El formato del disco no cumple con las normas de<br />
MP3.<br />
= Cambie a otro disco que cumpla las normas de<br />
MP3.<br />
Ha entrado polvo o cualquier otro tipo de<br />
partículas extrañas por la ranura de inserción de<br />
discos<br />
= Acción recomendada: quite el polvo u otras<br />
partículas extrañas.<br />
3. Accesorios<br />
÷ Manual de instrucciones .................................................... 1<br />
÷ Cable de alimentación (☞ P. 24) ....................................... 2<br />
÷ Cable de audio .................................................................... 1<br />
÷ Cable de control ................................................................. 1<br />
÷ Pasador de expulsión forzada<br />
(colocado en una ranura del panel inferior) ...................... 1<br />
÷ Destornillador<br />
(colocado en una ranura del panel inferior) ...................... 1<br />
÷ Láminas del mando de lanzadera (para reemplazo) ......... 3<br />
NOTA:<br />
Las especificaciones y el diseño están sujetos a cambios sin previo<br />
aviso por motivos de mejoras.<br />
Publicado por <strong>Pioneer</strong> Corporation.<br />
Copyright © 2007 <strong>Pioneer</strong> Corporation.<br />
Todos los derechos reservados.<br />
67<br />
<br />
Sp<br />
Español