Double Needle Cast-On - Knitting Universe
Double Needle Cast-On - Knitting Universe
Double Needle Cast-On - Knitting Universe
- No tags were found...

Create successful ePaper yourself
Turn your PDF publications into a flip-book with our unique Google optimized e-Paper software.
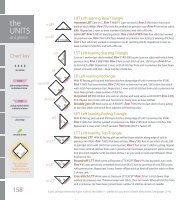
6. Bring this strand through the loop formed<br />
between thumb and needles. Before you<br />
drop the loop off the thumb, bring the top<br />
strand of the loop between the two needles<br />
from farside to nearside so it is caught on<br />
the lower needle.<br />
7. Now drop the loop from the thumb, and<br />
pick the strand up again below the newly<br />
formed stitch. Apply tension to both strands<br />
to tighten the stitch on the top needle and<br />
the half-hitch on the bottom needle. The<br />
half-hitch should be tightened firmly.<br />
8. Holding both strands steady with the left<br />
hand, rotate the two needles away from you<br />
so the tips draw a complete circle around<br />
the taut strands of yarn. At the same time,<br />
the two needles should rotate around each<br />
other in your hand, with the top one going<br />
down to the farside, under, and up into<br />
position again.<br />
9. Continue in this manner – making a stitch,<br />
then rotating the needles – until you have<br />
the required number of stitches. When you<br />
do, pull the bottom, smaller needle out of<br />
the stitches.<br />
As you can see, the top needle determines the<br />
size of the first row of stitches, while the size of<br />
the bottom needle determines the amount of<br />
yarn allowed to the half-hitch. When you rotate<br />
the needles, the yarn that forms the stitches<br />
will pass under the yarn of the baseline, which<br />
ties it against the fabric to keep it neat. If you<br />
want to study the structure of the caston, use<br />
two colors of yarn, one on the thumb for the<br />
baseline, the other on the forefinger for the<br />
stitches.<br />
Just as with Half-Hitch <strong>Cast</strong>-<strong>On</strong>, there is a Knit<br />
and Purl side to this edge. If you want the<br />
"Knit" aspect on the outside and you are<br />
working flat, turn and start with an inside row.<br />
After you have worked a row or two of your<br />
pattern, stretch the material out to its<br />
maximum. This smoothes out the funny little<br />
loops left when you pulled out the bottom<br />
needle, and at the same time you will see how<br />
beautifully expandable this edge is. I used this<br />
technique for the first time on a young boy’s<br />
sweater – the ultimate test of the ability of an<br />
edge to stretch rather than break with hard<br />
use – and it has performed superbly. It is also<br />
particularly good for lace patterns, which tend<br />
to widen considerably and often have irregular<br />
edges, and I have heard tell that some people<br />
like it for sock tops.<br />
3