Limbinator Operation - Priefert Manufacturing
Limbinator Operation - Priefert Manufacturing
Limbinator Operation - Priefert Manufacturing
- No tags were found...

Create successful ePaper yourself
Turn your PDF publications into a flip-book with our unique Google optimized e-Paper software.
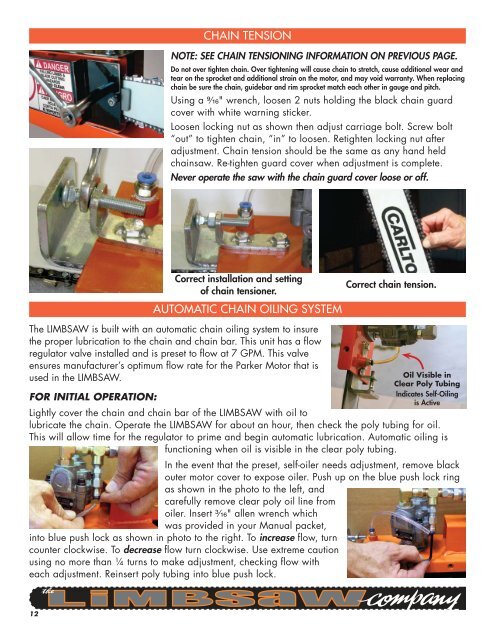
CHAIN TENSION<br />
NOTE: SEE CHAIN TENSIONING INFORMATION ON PREVIOUS PAGE.<br />
Do not over tighten chain. Over tightening will cause chain to stretch, cause additional wear and<br />
tear on the sprocket and additional strain on the motor, and may void warranty. When replacing<br />
chain be sure the chain, guidebar and rim sprocket match each other in gauge and pitch.<br />
Using a 9/16" wrench, loosen 2 nuts holding the black chain guard<br />
cover with white warning sticker.<br />
Loosen locking nut as shown then adjust carriage bolt. Screw bolt<br />
“out” to tighten chain, “in” to loosen. Retighten locking nut after<br />
adjustment. Chain tension should be the same as any hand held<br />
chainsaw. Re-tighten guard cover when adjustment is complete.<br />
Never operate the saw with the chain guard cover loose or off.<br />
AUTOMATIC CHAIN OILING SYSTEM<br />
The LIMBSAW is built with an automatic chain oiling system to insure<br />
the proper lubrication to the chain and chain bar. This unit has a fl ow<br />
regulator valve installed and is preset to flow at 7 GPM. This valve<br />
ensures manufacturer’s optimum flow rate for the Parker Motor that is<br />
used in the LIMBSAW.<br />
FOR INITIAL OPERATION:<br />
Correct installation and setting<br />
of chain tensioner.<br />
Correct chain tension.<br />
Oil Visible in<br />
Clear Poly Tubing<br />
Indicates Self-Oiling<br />
is Active<br />
Lightly cover the chain and chain bar of the LIMBSAW with oil to<br />
lubricate the chain. Operate the LIMBSAW for about an hour, then check the poly tubing for oil.<br />
This will allow time for the regulator to prime and begin automatic lubrication. Automatic oiling is<br />
functioning when oil is visible in the clear poly tubing.<br />
In the event that the preset, self-oiler needs adjustment, remove black<br />
outer motor cover to expose oiler. Push up on the blue push lock ring<br />
as shown in the photo to the left, and<br />
carefully remove clear poly oil line from<br />
oiler. Insert 3/16" allen wrench which<br />
was provided in your Manual packet,<br />
into blue push lock as shown in photo to the right. To increase fl ow, turn<br />
counter clockwise. To decrease fl ow turn clockwise. Use extreme caution<br />
using no more than ¼ turns to make adjustment, checking fl ow with<br />
each adjustment. Reinsert poly tubing into blue push lock.<br />
12