How to use your Portable Ultrasonic Flowmeter, UFP-20 1 2 3 4
How to use your Portable Ultrasonic Flowmeter, UFP-20 1 2 3 4
How to use your Portable Ultrasonic Flowmeter, UFP-20 1 2 3 4

Create successful ePaper yourself
Turn your PDF publications into a flip-book with our unique Google optimized e-Paper software.
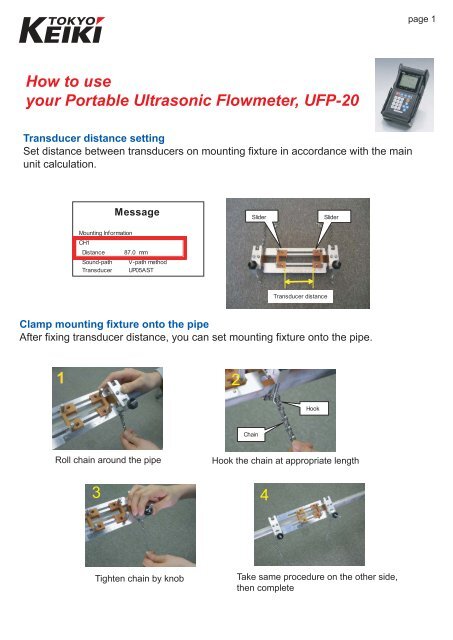
page 1<br />
<strong>How</strong> <strong>to</strong> <strong>use</strong><br />
<strong>your</strong> <strong>Portable</strong> <strong>Ultrasonic</strong> <strong>Flowmeter</strong>, <strong>UFP</strong>-<strong>20</strong><br />
Transducer distance setting<br />
Set distance between transducers on mounting fixture in accordance with the main<br />
unit calculation.<br />
Message<br />
Messagee<br />
Slider<br />
Slider<br />
Mounting Information<br />
CH1<br />
Distance 87.0 mm<br />
Sound-path V-path method<br />
Transducer UP05AST<br />
Transducer distance<br />
Clamp mounting fixture on<strong>to</strong> the pipe<br />
After fixing transducer distance, you can set mounting fixture on<strong>to</strong> the pipe.<br />
1<br />
2<br />
Hook<br />
Chain<br />
Roll chain around the pipe<br />
Hook the chain at appropriate length<br />
3 4<br />
Tighten chain by knob<br />
Take same procedure on the other side,<br />
then complete
<strong>How</strong> <strong>to</strong> <strong>use</strong> <strong>your</strong> <strong>Portable</strong> <strong>Ultrasonic</strong> <strong>Flowmeter</strong>, <strong>UFP</strong>-<strong>20</strong> page 2<br />
Add couplant and set transducer <strong>to</strong> mounting fixture<br />
Add silicone grease as acoustic couplant on<strong>to</strong> surface of transducers.<br />
Then set them in<strong>to</strong> mounting fixture.<br />
5 6<br />
7<br />
Put couplant on<strong>to</strong> surface of<br />
transducer as pho<strong>to</strong><br />
Set transducer <strong>to</strong> fixture<br />
Fix transducers by screw<br />
Set cables with the transducers and the main unit<br />
Connect cables with the transducers and the main unit.<br />
8 9<br />
Insert connec<strong>to</strong>r <strong>to</strong> be<br />
straight<br />
Connect with the transducers<br />
Connect with the main unit<br />
Let's start measurement<br />
Finished prepare <strong>to</strong> measurement. Push OK key <strong>to</strong> start measurement.