SMATV Master Controller
SMATV Master Controller
SMATV Master Controller

You also want an ePaper? Increase the reach of your titles
YUMPU automatically turns print PDFs into web optimized ePapers that Google loves.
14) On Off Auto Selecting 'On' will keep the backlite on indefinitely. Selecting 'Off' will stop the backlite<br />
switching on at all and selecting 'Auto' will keep the backlite on for the time period as<br />
Backlite<br />
specified in the delays menu.<br />
<strong>SMATV</strong> MASTER CONTROLLER<br />
15)<br />
PIN 0001<br />
Set Pin<br />
This screen is used for setting up the Pin Number for each receiver that will be using pin<br />
protection. For each receiver simply insert the pin number taken from the last four digits on<br />
the viewing card and then press select. The SMC will then send the pin to the receiver<br />
number that has been setup.<br />
Each receiver can be independently set with its own pin number.<br />
Application Guide<br />
Approved by Sky Business<br />
16)<br />
Test Unit Advanced<br />
Selecting more[2] from fig 11 will access the following menu as shown in fig 16.<br />
(c)2006<br />
Main[0]<br />
Selecting TestUnt will go to the screen as shown in fig 17.<br />
17)<br />
IR Test VidTest<br />
AudTest<br />
Main[0]<br />
Selecting IR Test will test the remote control functions when used with the SMC. Each time a<br />
remote key is pressed, the corresponding RC6 code will be displayed on the SMC. Press<br />
'help' on the remote control to exit.<br />
18) VidIn 12345 Selecting 'VidTest' will open the display as shown in fig 18. Your SMC may not look exactly<br />
like that of fig 18 as it is dependant on the number of Digiboxes connected to the SMC. In the<br />
“Help” to exit example of fig 18 we have all five Digiboxes connected, hence numbers 1 to 5. If the SMC is<br />
detecting video from a Digibox then its number will be shown in the display area. When video<br />
is not detected, that Digibox number will turn to a - for as long as video remains un detected. If that time exceeds the VideoIn<br />
delay time, the SMC will attempt to reset that digibox. The video test facility helps ion determining if video is being received<br />
from a Digibox.<br />
Selecting 'AudTest' will open a display very similar to the “VidTest”. The “AudTest” is used for checking audio is being received<br />
by the SMC and works in exactly the same way as the VidTest.<br />
Selecting Main[0] will take you back to the main menu.<br />
The Advanced Menu as shown in fig 16 is used for Factory settings and has no functionality in the field. Please do NOT<br />
change any settings within the advanced menu.<br />
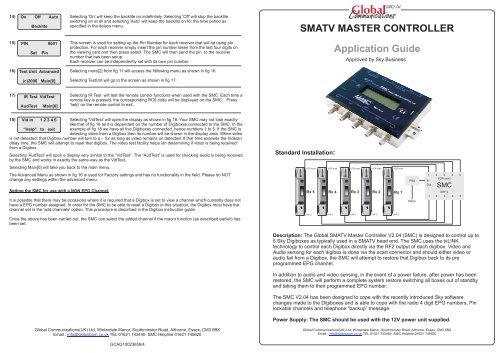
Standard Installation:<br />
VCR scart<br />
VCR scart<br />
VCR scart<br />
VCR scart<br />
VCR scart<br />
Setting the SMC for use with a NON EPG Channel.<br />
It is possible that there may be occasions where it is required that a Digibox is set to view a channel which currently does not<br />
have a EPG number assigned. In order for the SMC to be able to reset a Digibox in this situation, the Digibox must have the<br />
channel set in the 'add channels' option. This procedure is described in the Digibox instruction guide.<br />
Rx 5 Rx 4<br />
Rx 3<br />
Rx 2<br />
Rx 1<br />
PSU<br />
Mains<br />
1 2 3 4 5<br />
In<br />
VCR scart<br />
Out<br />
SMC<br />
UHF 2<br />
1 2 3 4 5<br />
Once the above has been carried out, the SMC can select the added channel if the macro function (as described earlier) has<br />
been set.<br />
UHF 2<br />
UHF 2<br />
UHF 2<br />
UHF 2<br />
UHF 2<br />
Description: The Global <strong>SMATV</strong> <strong>Master</strong> <strong>Controller</strong> V2.04 (SMC) is designed to control up to<br />
5 Sky Digiboxes as typically used in a <strong>SMATV</strong> head end. The SMC uses the tvLINK<br />
technology to control each Digibox directly via the RF2 output of each digibox. Video and<br />
Audio sensing for each digibox is done via the scart connector and should either video or<br />
audio fail from a Digibox, the SMC will attempt to restore that Digibox back to its pre<br />
programmed EPG channel.<br />
In addition to audio and video sensing, in the event of a power failure, after power has been<br />
restored, the SMC will perform a complete system restore switching all boxes out of standby<br />
and taking them to their programmed EPG number.<br />
The SMC V2.04 has been designed to cope with the recently introduced Sky software<br />
changes made to the Digiboxes and is able to cope with the radio 4 digit EPG numbers, Pin<br />
lockable channels and telephone “backup” message.<br />
Power Supply: The SMC should be used with the 12V power unit supplied.<br />
Global Communications(UK) Ltd, Winterdale Manor, Southminster Road, Althorne, Essex, CM3 6BX<br />
Email : info@globalcom.co.uk TEL 01621 743440 SMC Helpline 01621 745620<br />
Global Communications(UK) Ltd, Winterdale Manor, Southminster Road, Althorne, Essex, CM3 6BX<br />
Email : info@globalcom.co.uk TEL 01621 743440 SMC Helpline 01621 745620<br />
GCAG10023658/4
Operation<br />
From the point when mains power is applied to the SMC and Digiboxes, the SMC will begin a countdown from 90 seconds.<br />
This time period is set to allow the Digiboxes to stabilize and accept commands sent via the RF2 port.<br />
After the 90 seconds has elapsed, the SMC then wakes up each box taking them out of standby.<br />
The SMC then counts down a further 20 seconds to ensure that each Digibox has come out of standby, aquired the EPG<br />
listings and is ready to receive the EPG number programmed into the SMC. At the end of the 20 second period, the EPG<br />
number is sent to each Digibox and the SMKC then monitors for audio and video coming back to it via the scart plug. As long<br />
as the SMC receives this a/v signal, no further action will be performed. If on the other hand the SMC does not receive any<br />
audio or video within a 40 second window, it will try to wake up the Digibox and resend the EPG number. This will continue<br />
indefinitely until correct a/v levels are received by the SMC.<br />
It should be noted that the SMC only receives and monitors Audio and video levels so should the Digibox be moved from the<br />
desired EPG channel to another, the SMC will NOT perform a reset operation since audio and video will still be present.<br />
Initial Setup<br />
Setup will require the use of a Sky Digibox or Sky+ remote control. The remote control should be aimed at the point marked<br />
IR on the SMC.<br />
1)<br />
2)<br />
3)<br />
GC(UK) SMC V2.04<br />
“Sky” to start<br />
DirToRx SetChan#<br />
Restart more[1]><br />
Rx - 1: 000<br />
SetChan#<br />
After all cables have been connected to the Digiboxes from the SMC, Power has been<br />
applied and the SMC has finished all count downs, the SMC will display the Start Screen<br />
and all digiboxes should be on Sky News Channel. Press Sky button on the remote control.<br />
You should now find that the menu has changed to fig 2. Using the remote control right<br />
arrow key, move the curser across to SetChan# and the press Select.<br />
Using the right arrow key on the remote, move the cursor across to the first 0 and then enter<br />
the 3 digit EPG number of the channel you require Digibox Rx1 to go to. You must then<br />
press select to store this number.<br />
7)<br />
8)<br />
9)<br />
10)<br />
Rx - 1: 501m<br />
SetChan#<br />
If you require the SMC to select a non EPG channel, press the blue button on the<br />
remote control whilst the cursor is flashing over the first digit. A small 'm' will appear<br />
as per fig 6 and the cursor will then move back to flashing on the 1 of Rx-1. Setting<br />
up the macro is discussed under additional features.<br />
It should be noted that it is possible to include any combination of the above additional features.<br />
Rx - 1: 0501P<br />
SetChan#<br />
The example in fig 7 has Rx-1: set it up as a radio channel with a pin number<br />
With the cursor flashing on the 1 of Rx-1, using the remote control up and down arrows, the same programming procedure<br />
can be implemented for the other 5 SMC channels.<br />
If you do NOT have a Digibox connected to a port of the SMC you MUST set that channel number to 000. This will prevent the<br />
SMC trying to access that channel and reset it.<br />
Once all of the channels have been programmed up you should then press the backup button on the remote to exit the set<br />
Channel menu and return you to the main menu as shown in fig 2.<br />
DirToRx SetChan#<br />
Restart more[1]><br />
Reset All Rx’s<br />
No Yes<br />
Move the cursor down to the position marked restart and press the select key.<br />
Move the cursor across to 'Yes' and press select on the remote control.<br />
The SMC will now begin a full reset of all Digiboxes and place each Digibox onto its correct programmed EPG channel.<br />
Providing all Digiboxes have correctly been set by the SMC, the screen will revert to the Welcome Screen and no further<br />
action should be necessary.<br />
It should be noted that the SMC V2.04 no longer has the option to pin lock out the programming options.<br />
Additional Programming Options<br />
At this point you are now able to set the channel up for other options as detailed below. The example diagrams are shown<br />
with the EPG No 501 however the additional features can be applied to any EPG No. The SMC now sends backup before<br />
sending any EPG number to overcome the problem of the telephone line being disconnected.<br />
4)<br />
5)<br />
Rx - 1: + 501<br />
SetChan#<br />
Rx - 1: 0501<br />
SetChan#<br />
It is possible for the SMC to control a SKY + digibox if this is connected to a port. In order to<br />
do this, when the cursor is flashing over the first digit of the EPG number , press the RED<br />
button on the remote control. A + sign will appear before the EPG number signifying that this<br />
channel will now control a SKY+ unit.<br />
It should be noted that the SMC can be programmed with either a standard remote control<br />
or alternatively, a SKY+ remote control.<br />
If you require the SMC to reset a radio channel which has four digits, press the green button<br />
on the remote control whilst the cursor is flashing over the first digit. A leading zero will<br />
appear as per fig 4 and the cursor will then move back to flashing on the 1 of Rx-1.<br />
6) Rx - 1: 501 P If you require the SMC to send a pin code to unlock an adult content channel you will need<br />
to perform the following actions.<br />
SetChan#<br />
a, For the epg channel that is to be pin protected , you must first set the channel<br />
restriction on the digibox via the Parental Control Features. Bear in mind that the pin<br />
number for the digibox will be the last four digits of the viewing card number.<br />
b. Once the channel has been pin code restricted, move into the set channel menu on<br />
the SMC for that digibox and with the cursor placed on the first digit of the EPG<br />
number, press the yellow button on the remote control. The letter 'P' as per fig 6.<br />
c. Then see section concerning how to set the SMC to send the correct Pin Number<br />
to the digibox.<br />
Please note that if you expect a epg channel to randomly ask for a pin number through the day, it is important that you set that<br />
digibox channel to be restricted and permanently pin locked. In this way the SMC will prevent the digibox constantly asking for<br />
a pin number.<br />
Additional SMC Program Features.<br />
The SMC has a number of other menu features designed to help change certain operating parameters or to help in fault<br />
diagnosis and they are listed below in no particular order. Corresponding SMC screens are also displayed to aid naviagation<br />
within the SMC.<br />
Selecting more [1] from the start up screen will navigate you to screen as in fig 11.<br />
11)<br />
12)<br />
13)<br />
Delays Backlight<br />
Set Pin more [2]<br />
StartUp Video In<br />
Audio In dlys [1]<br />
Using the arrow keys to navigate around the menu, selecting 'Delays' will take you<br />
to screen Fig 12, selecting Backlite will take you to screen fig 14, selecting Set Pin<br />
will take you to screen Fig 15, and finally , selecting more[2] will take you to screen<br />
fig16.<br />
This screen allows you to adjust the various timing perameters of the SMC as<br />
follows:- StartUP :- Adjusts the the time that the SMC waits between taking the unit<br />
out of standby to sending the EPG number. Default time is 20 seconds.<br />
VideoIn:- Adjusts the time the SMC waits from the moment when video is lost to<br />
when the SMC tries to reboot the digibox. Default time is 40 seconds.<br />
AudioIn:- Adjusts the time the SMC waits from the moment when video is lost to<br />
when the SMC tries to reboot the digibox. Default time is 40 seconds.<br />
Dlys[1] :- Selecting this option will take you to the second timing screen as shown in fig 13.<br />
Auto-BL RsetMenu<br />
PowerUp RestrDly<br />
This screen allows you to adjust the following timing parameters of the SMC as<br />
follows<br />
Auto-BL:- Adjusts the time the back light stays illuminated between remote key presses. Default time is 120 Seconds.<br />
PowerUp:- Adjusts the time the SMC waits from power up before it brings the Digibox out of standby. Default time is 90<br />
seconds.<br />
RestrDly:- Adjusts the time the SMC waits before returning to the welcome screen. Default time is 240 seconds.<br />
RestrDly:- Restores all timing delays to their factory default setting.