Omnisports Training - Speed & Compact glued installation I⦠- Tarkett
Omnisports Training - Speed & Compact glued installation I⦠- Tarkett
Omnisports Training - Speed & Compact glued installation I⦠- Tarkett
You also want an ePaper? Increase the reach of your titles
YUMPU automatically turns print PDFs into web optimized ePapers that Google loves.
Installation<br />
Instructions<br />
<strong>Omnisports</strong> <strong>Training</strong> -<br />
<strong>Speed</strong> & <strong>Compact</strong><br />
Glued Installation except on a Lumaflex sub construction<br />
17 01 2011<br />
NOTA BENE<br />
These 3 products <strong>glued</strong> on any support except a Lumaflex sub construction, do not meet the EN 14 904 Standard<br />
requierements, ans as a consequence can not be considered as Sports floors. In order to provide the customer with the<br />
best use of product, this <strong>installation</strong> guide has to be followed carefully to guarantee conformity. If not, <strong>Tarkett</strong> Sports<br />
will not be responsible for damages following <strong>installation</strong>.<br />
Any use of the product for purposes other than the ones set out, in the condition of use, should be submitted to<br />
<strong>Tarkett</strong> for prior approval.<br />
If you need any further information, please contact your dealer who will provide you with the appropriate advice.<br />
Choice of laying techniques<br />
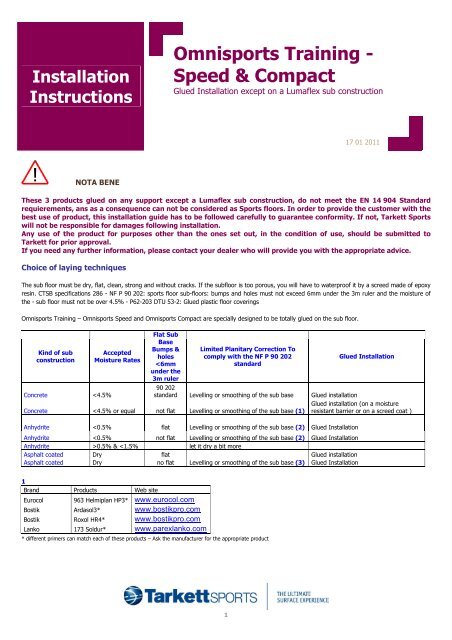
The sub floor must be dry, flat, clean, strong and without cracks. If the subfloor is too porous, you will have to waterproof it by a screed made of epoxy<br />
resin. CTSB specifications 286 - NF P 90 202: sports floor sub-floors: bumps and holes must not exceed 6mm under the 3m ruler and the moisture of<br />
the - sub floor must not be over 4.5% - P62-203 DTU 53-2: Glued plastic floor coverings<br />
<strong>Omnisports</strong> <strong>Training</strong> – <strong>Omnisports</strong> <strong>Speed</strong> and <strong>Omnisports</strong> <strong>Compact</strong> are specially designed to be totally <strong>glued</strong> on the sub floor.<br />
Kind of sub<br />
construction<br />
Accepted<br />
Moisture Rates<br />
Flat Sub<br />
Base<br />
Bumps &<br />
holes<br />
Installation<br />
Instructions<br />
<strong>Omnisports</strong> <strong>Training</strong> –<br />
<strong>Speed</strong> & <strong>Compact</strong><br />
Glued Installation except on a Lumaflex sub construction<br />
17 02 2010<br />
2<br />
Brand Products Web site<br />
Eurocol<br />
Alphy 920 +<br />
Universal primer<br />
044/2 www.eurocol.com<br />
3 For this particular sub-floor, please contact one of these Manufacturer for further advice<br />
For all these products – Follow the manufacturer’s <strong>installation</strong> recommendations<br />
Storage conditions<br />
<strong>Omnisports</strong> rolls are to be stored horizontally, on a plain/flat, dry and without any ruggedness. They must not be stacked.<br />
Positioning the rolls (for all the different kinds of <strong>installation</strong>)<br />
The temperature at the sub-floor level must be between 16°C (61°F) in the room and 12°C (53°F) on the sub-floor.<br />
Mark out the centreline of the arena/gymnasium on the floor.<br />
Position the rolls at this centre line, following the layout numbers<br />
Start at the middle of the centre line, unroll the strips towards the back of the arena/gymnasium<br />
Unroll in alternate directions (except for the wooden patterns), positioning the sheets edge-to-edge. If necessary, re-cut the selvedge.<br />
Let the <strong>Omnisports</strong> rest for 24 or 48 hours before welding the sheets. During this time, the arena/gymnasium must be kept within the temperature<br />
range specified above. Relative air rate moisture needs to be between 35 and 65%, this means that ventilation or in cold seasons, heating system must<br />
be running constantly.<br />
2
Installation<br />
Instructions<br />
<strong>Omnisports</strong> <strong>Training</strong> –<br />
<strong>Speed</strong> & <strong>Compact</strong><br />
Glued <strong>installation</strong> except on a Lumaflex Sub construction<br />
17 01 2011<br />
As you already know, the <strong>installation</strong> can be handled in two different ways, on the transverse or lengthwise side.<br />
Plain coloured <strong>Omnisports</strong> must be unrolled following the drawing below. Wooden pattern can be unrolled in the same sense:<br />
Unrolling direction<br />
≤20lm<br />
3
Installation<br />
Instructions<br />
<strong>Omnisports</strong> <strong>Training</strong> –<br />
<strong>Speed</strong> & <strong>Compact</strong><br />
Glued Installation except on a Lumaflex sub construction<br />
17 01 2011<br />
Urolling direction<br />
Glued Laying<br />
Sub-floor must be clean, dry, smooth, un-cracked, compression resistant and free of any material that could prevent from a good adherence.<br />
Roll halfway back the sheets carefully of the first half of the gymnasium. Avoid moving the sheets from their original positions.<br />
Apply the glue to the uncovered half of the sub-floor, starting with the center strips and working outwards.<br />
Glue two or three sheets at the same time.<br />
Apply the glue to the sub-floor in even coats. In order to ensure that the glue is properly transferred to the back of the floor covering, do not glue too<br />
large an area at any one time. For a normal absorbent sub-floor, glue consumption is about 350gr/sqm with a thin toothed spatula.<br />
Lay the covering on the sub-floor after the setting time specified by the glue manufacturer.<br />
Then you will have to eliminate the air bubbles that can be located between the sub-floor and the covering by using a 50kg roller.<br />
Glue that are recommended by <strong>Tarkett</strong> Sports :<br />
Brand MANG: Polymang HPE, Polymang SM<br />
Brand Sader: Sadertac S41, Sadertac V3<br />
Brand Miplacol: Miplafix 700, Miplafix 300<br />
Manufacturer Bostik: www.bostikpro.com<br />
4
Installation<br />
Instructions<br />
<strong>Omnisports</strong> <strong>Training</strong> –<br />
<strong>Speed</strong> & <strong>Compact</strong><br />
Glued Installation except on a Lumaflex sub construction<br />
17 01 2011<br />
The welding (common to the three kinds of <strong>installation</strong>)<br />
The Trimming<br />
This operation should be performed by using an electric tool with a curved blade as described, the dimension of the chamfer depends on the diameter<br />
of the welding rod and of the thickness of the product:<br />
<strong>Omnisports</strong> <strong>Training</strong> – 5mm thick => welding rod 5mm – width of the trimming 4,3mm, depth 2mm<br />
<strong>Omnisports</strong> <strong>Speed</strong> – 3.45mm thick => welding rod 4mm – width of the trimming 3.3mm, depth 2mm<br />
<strong>Omnisports</strong> <strong>Compact</strong> – 2mm thick => welding rod 4mm – width of the trimming 3.3mm, depth 1,13mm<br />
Chamfer<br />
Double-sided tape or glue<br />
Gap maximum 1 mm<br />
Sub floor<br />
Trimming machine<br />
The welding<br />
We strongly recommend, for this operation, an automatic cart, which will produce more regular, professional quality welds.<br />
Before welding the <strong>Omnisports</strong>, first of all, try to weld on an apart piece of product, in order to check that the temperature, the pressure and the speed<br />
of this material enables to perform a good welding conditions.<br />
5
Installation<br />
Instructions<br />
<strong>Omnisports</strong> <strong>Training</strong> –<br />
<strong>Speed</strong> & <strong>Compact</strong><br />
Glued Installation except on a Lumaflex sub construction<br />
17 01 2011<br />
Cutting back the bead<br />
Weld is hot First trim before cooling 2 nd trim after cooling<br />
Tool required for trimming: “Quarter moon” knife or crescent-shaped knife with the cutting guide.<br />
Painting game lines<br />
1 Permanent marking:<br />
Conipur 45 – BASF AG– phone number +41 58 958 22 44 –www.conica.com<br />
Follow the manufacturer’s <strong>installation</strong> recommendations.<br />
2 Temporary marking lines<br />
The producer of these tapes is 3M – reference 471 - 5cm width -www.3M.com<br />
Follow the manufacturer’s <strong>installation</strong> recommendations.<br />
6


