
Create successful ePaper yourself
Turn your PDF publications into a flip-book with our unique Google optimized e-Paper software.
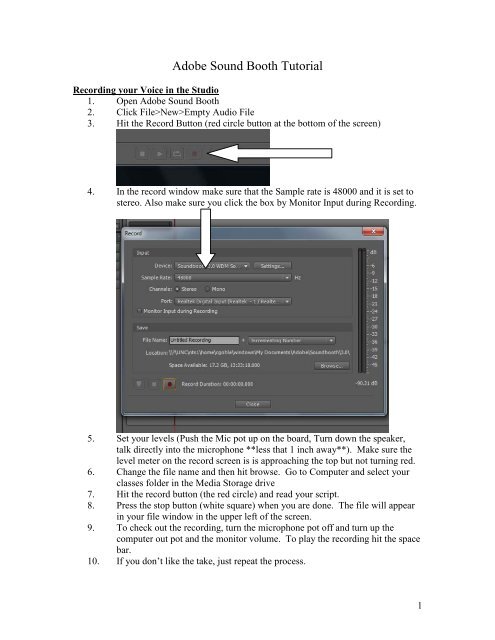
<strong>Adobe</strong> Sound Booth <strong>Tutorial</strong><br />
Recording your Voice in the Studio<br />
1. Open <strong>Adobe</strong> Sound Booth<br />
2. Click File>New>Empty Audio File<br />
3. Hit the Record Button (red circle button at the bottom of the screen)<br />
4. In the record window make sure that the Sample rate is 48000 and it is set to<br />
stereo. Also make sure you click the box by Monitor Input during Recording.<br />
5. Set your levels (Push the Mic pot up on the board, Turn down the speaker,<br />
talk directly into the microphone **less that 1 inch away**). Make sure the<br />
level meter on the record screen is is approaching the top but not turning red.<br />
6. Change the file name and then hit browse. Go to Computer and select your<br />
classes folder in the Media Storage drive<br />
7. Hit the record button (the red circle) and read your script.<br />
8. Press the stop button (white square) when you are done. The file will appear<br />
in your file window in the upper left of the screen.<br />
9. To check out the recording, turn the microphone pot off and turn up the<br />
computer out pot and the monitor volume. To play the recording hit the space<br />
bar.<br />
10. If you don’t like the take, just repeat the process.<br />
1
11. Back in the computer lab, copy the wav file(s) you created into your folder on<br />
the lab computer. (Go to Network … … Select the Audio Production<br />
computer… Go into the the class folder… Click on your wav files… Click<br />
copy file… Paste them in your folder on the lab computer.)<br />
Importing Music into a Project<br />
1. To import production music click on Computer>Network .<br />
2. Click on AudioProd.<br />
3. Click on ProdMusic or SFX.<br />
4. Select the file you want and right click.<br />
5. Select copy.<br />
6. Go to Computer and find your file folder under RTV on the Media Storage<br />
drive.<br />
7. Right click and select paste.<br />
8. Now go into Soundbooth.<br />
9. Click on the Import file icon or go to File>Import>Files<br />
10. Navigate to your folder, select the file you copied and click open.<br />
11. Click on the audio file that now appears on your list.<br />
12. This opens the waveform in the right.<br />
13. This process should be repeated to load all the files you will need for your<br />
edit into the file window (including your voice that was recorded in the<br />
studio).<br />
2
Editing Single Audio Tracks<br />
1. From the file window, double click on the audio file you want to edit.<br />
2. To preview your audio file you can hit the spacebar to stop and start<br />
playback or you can hit the play button on the bottom left controls.<br />
3. You can also zoom in to make cleaner edits using the zoom tool.<br />
4. Click and drag to highlight the portion of waveform you want to zoom in<br />
on and release. That section of the waveform will fill the screen.<br />
5. To look at the whole waveform again. Hit the Zoom Out Full button<br />
3
6. Simple Deleting Audio: To delete a portion of the audio is very simple.<br />
Choose the time selection tool.<br />
7. Place the cursor on a point in the waveform, click and drag to highlight the<br />
section you want to delete.<br />
8. Then hit the delete button.<br />
9. Simple Cutting, Copying and Pasting: Highlight the audio, right click<br />
and select either Cut or Copy.<br />
10. Place the cursor on the spot you wish to put this section of audio.<br />
11. Right Click and select Paste .<br />
12. Equalizing the Audio: This process needs to be done to your vocal<br />
recording to make sure the levels are even.<br />
13. Make sure you have the whole waveform showing on the screen (Click the<br />
Zoom Out Full button). Double click anywhere on the wave form. This<br />
will highlight the whole waveform.<br />
14. Click on the Tasks tab.<br />
4
15. In that window, click on the Volume Correction tab and then click on<br />
Equalize Volume tab.<br />
16. Then click on the Equalize Volume Levels. This will make all of the<br />
volume the same throughout the waveform.<br />
17. This should not be done to music since the volume should vary during<br />
songs but your voice should be constant.<br />
18. If you have multiple voice track you may consider Equalizing one and<br />
using the Match Volume tab for the other files. (Come talk to me if you<br />
wish to use that function).<br />
Editing Multiple Tracks of Audio<br />
1. Once you have done your simple editing, now it is time to mix the tracks<br />
together. In your files window, there should be a file called Untitiled<br />
Multi-track. Double click on that file.<br />
5
2. This will open up a multi-track editing window on the right side of the<br />
screen.<br />
3. Click and drag each file into its own track.<br />
4. Now save the Multi-track document (the overall work you have done).<br />
Click File>Save. And give the file a name for the project itself and save it<br />
into your project folder.<br />
5. Make sure you save often.<br />
6. Moving an Audio Track: Put the cursor on the track, when you see this<br />
symbol<br />
you can click and move the track to any position on<br />
the timeline.<br />
7. Modifying a Track in the Multi-track document: There are three major<br />
modification you will need to do to a track; length, volume and fading.<br />
8. Changing the track length: Click on a track to select it. (The track you<br />
have selected will be brighter than the other tracks).<br />
9. Put your cursor on the start/end of the track and you will see this icon.<br />
6
10. Click and drag that point to where you want the track to start/end.<br />
11. Changing the track volume: Each track has a control area.<br />
12. There is a number readout.<br />
13. Click and hold on that number.<br />
14. Moving the cursor left will decrease the volume while moving right will<br />
increase the volume.<br />
15. There is also a dial next to the number. You can move that to increase or<br />
decrease volume as well.<br />
7
16. Fading the track in/out: At the beginning and ending of each track these<br />
is a button that controls fading.<br />
.<br />
17. To fade in, click on the button and move it to the point in the waveform<br />
where you want the audio to be at full volume.<br />
18. Repeat this at the end of the waveform and now the audio will fade in/out.<br />
8
Exporting and Finishing an Audio Project<br />
1. Save the multi-track document one more time.<br />
2. Click File>Export>Multitrack Mixdown<br />
3. Type in a logical file name & make sure that mp3 is selected in the Save<br />
as type drop down.<br />
4. Click Save.<br />
5. Make sure it is set to 128 Kbps and stereo in the options window and click<br />
save.<br />
6. The file will load into your project automatically<br />
7. Compressing the Audio to a Certain Length: This can be useful when<br />
you are trying to make something to exact time (for example: a 30 second<br />
radio spot that your recording is 31)<br />
8. Double click and highlight the whole waveform.<br />
9. Click on the Tasks tab and then the Pitch and Timing tab.<br />
10. Click on Pitch and Timing button to open up the controls.<br />
11. Make sure Preserve Speech Characteristics is checked.<br />
12. Click on New Duration and type in the length you want. (for example: if<br />
the spot is 00:00:28:52 to make it exact you would type in 00:00:30.00).<br />
13. Click Preview to make sure it sounds correct.<br />
14. Click Ok.<br />
15. Click File>Save As<br />
16. Now type the final name for the file you created (this will be the audio<br />
project you turn in) and Click Save.<br />
9