Parts List Installation Instructions Part Number 200-512-1 99 ... - Airaid
Parts List Installation Instructions Part Number 200-512-1 99 ... - Airaid
Parts List Installation Instructions Part Number 200-512-1 99 ... - Airaid

You also want an ePaper? Increase the reach of your titles
YUMPU automatically turns print PDFs into web optimized ePapers that Google loves.
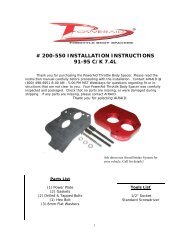
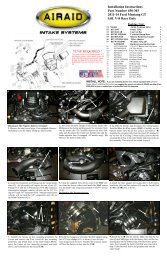
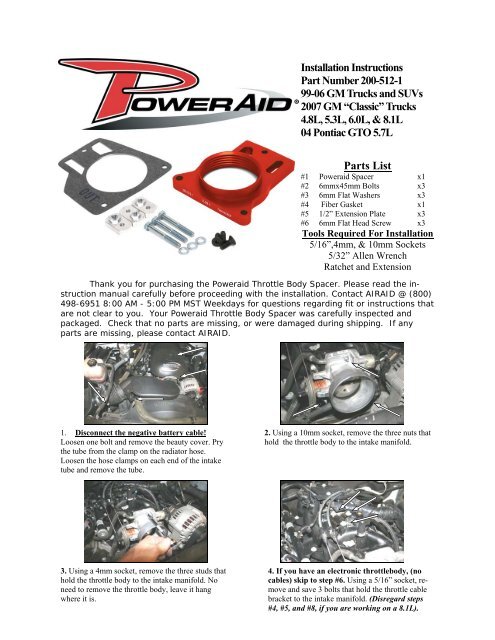
<strong>Installation</strong> <strong>Instructions</strong><br />
<strong>Part</strong> <strong>Number</strong> <strong>200</strong>-<strong>512</strong>-1<br />
<strong>99</strong>-06 GM Trucks and SUVs<br />
<strong>200</strong>7 GM “Classic” Trucks<br />
4.8L, 5.3L, 6.0L, & 8.1L<br />
04 Pontiac GTO 5.7L<br />
<strong><strong>Part</strong>s</strong> <strong>List</strong><br />
#1 Poweraid Spacer x1<br />
#2 6mmx45mm Bolts x3<br />
#3 6mm Flat Washers x3<br />
#4 Fiber Gasket x1<br />
#5 1/2” Extension Plate x3<br />
#6 6mm Flat Head Screw x3<br />
Tools Required For <strong>Installation</strong><br />
5/16”,4mm, & 10mm Sockets<br />
5/32” Allen Wrench<br />
Ratchet and Extension<br />
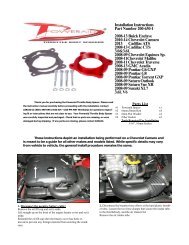
Thank you for purchasing the Poweraid Throttle Body Spacer. Please read the instruction<br />
manual carefully before proceeding with the installation. Contact AIRAID @ (800)<br />
498-6951 8:00 AM - 5:00 PM MST Weekdays for questions regarding fit or instructions that<br />
are not clear to you. Your Poweraid Throttle Body Spacer was carefully inspected and<br />
packaged. Check that no parts are missing, or were damaged during shipping. If any<br />
parts are missing, please contact AIRAID.<br />
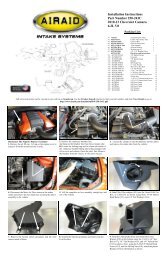
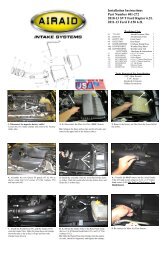
1. Disconnect the negative battery cable!<br />
Loosen one bolt and remove the beauty cover. Pry<br />
the tube from the clamp on the radiator hose.<br />
Loosen the hose clamps on each end of the intake<br />
tube and remove the tube.<br />
2. Using a 10mm socket, remove the three nuts that<br />
hold the throttle body to the intake manifold.<br />
3. Using a 4mm socket, remove the three studs that<br />
hold the throttle body to the intake manifold. No<br />
need to remove the throttle body, leave it hang<br />
where it is.<br />
4. If you have an electronic throttlebody, (no<br />
cables) skip to step #6. Using a 5/16” socket, remove<br />
and save 3 bolts that hold the throttle cable<br />
bracket to the intake manifold. (Disregard steps<br />
#4, #5, and #8, if you are working on a 8.1L).
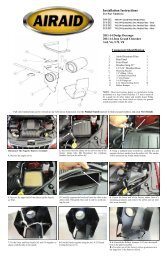
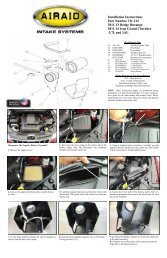
O-ring<br />
Gasket<br />
5. Install three 1/2” extension plates (#5) using the<br />
provided flat head countersunk bolts(#6). Point the<br />
long end towards the radiator, and snug them down.<br />
6. Place one fiber gasket (#4) between the<br />
Poweraid spacer (#1) and the throttle body. Make<br />
sure the flat face of the Poweraid spacer is against<br />
the throttle body with the bore extending into the<br />
intake manifold. Use caution to retain the factory<br />
o-ring gasket on the intake manifold.<br />
7. Install the top bolt (#2) and washer (#3) first,<br />
run it in a few threads with your fingers, leave it<br />
loose, and then align the two bottom holes and<br />
install the bolts and washers. Use caution not to<br />
cross thread the bolts. Do Not Over Tighten The<br />
Bolts!<br />
8. If you have an electronic throttlebody, (no<br />
cables) skip to step #10. Re-install the throttle<br />
cable bracket and the 3 factory bolts removed in<br />
step 4. Some minor adjustments to the extension<br />
plates may be necessary to get all three bolts to be<br />
aligned in position.<br />
9. Inspect & test the throttle linkage for full open and closed<br />
travel before driving. Some cruise and kickdown cables may<br />
require adjustment. Please refer to vehicles service manual<br />
for proper adjustment.<br />
The sound of power...The “whistle” means its<br />
working!<br />
10. Re-install the intake tube and tighten the<br />
hose clamps. Re-install the plastic holder from<br />
step #1.<br />
Re-install the beauty cover and bolt.<br />
Re-connect the negative battery cable!<br />
Included with your Poweraid Spacer is a sticker with a California Air Resources Board<br />
(C.A.R.B.) Executive Order (EO) number. This sticker must be placed in plain view inside of<br />
the engine compartment. Failure to do so may prevent you from passing a smog inspection.<br />
<strong>Instructions</strong> Revision<br />
01/14/09