SIERRA XP VERSION 3.3.3 - Cadwell Laboratories, Inc.
SIERRA XP VERSION 3.3.3 - Cadwell Laboratories, Inc.
SIERRA XP VERSION 3.3.3 - Cadwell Laboratories, Inc.

You also want an ePaper? Increase the reach of your titles
YUMPU automatically turns print PDFs into web optimized ePapers that Google loves.
320372-000, Rev. 02<br />
<strong>SIERRA</strong> <strong>XP</strong><br />
<strong>VERSION</strong> <strong>3.3.3</strong><br />
Purpose of the Sierra <strong>XP</strong> <strong>3.3.3</strong> Upgrade<br />
• Fix problem with Store key in NCV test protocol. This fixes the problem of missing NCV tables in<br />
the TabData window.<br />
• Fix problem with NCV cursor values when using Spanish (Mexican) for the regional settings.<br />
**Note: French language is not supported with this version.<br />
Installation Instructions:<br />
Follow these steps exactly. If there is a step that you don't understand please call <strong>Cadwell</strong> <strong>Laboratories</strong><br />
for instructions. The steps must be completed in the exact order shown below. Phone: (800) 245-3001<br />
or (509) 735-6481<br />
1. Turn On the Sierra base unit (make sure the 10 Base T network cable is connected between the<br />
Laptop or PC and the base). Turn On the Laptop or PC computer. Allow the computer to boot to the<br />
Windows desktop. Make sure the Amplifier is connected to the base.<br />
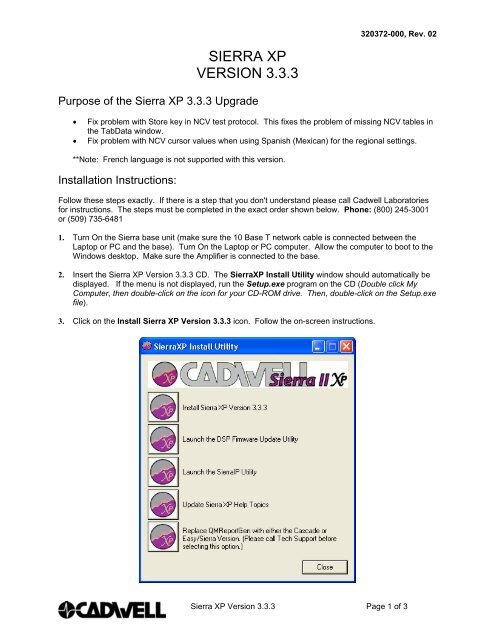
2. Insert the Sierra <strong>XP</strong> Version <strong>3.3.3</strong> CD. The Sierra<strong>XP</strong> Install Utility window should automatically be<br />
displayed. If the menu is not displayed, run the Setup.exe program on the CD (Double click My<br />
Computer, then double-click on the icon for your CD-ROM drive. Then, double-click on the Setup.exe<br />
file).<br />
3. Click on the Install Sierra <strong>XP</strong> Version <strong>3.3.3</strong> icon. Follow the on-screen instructions.<br />
Sierra <strong>XP</strong> Version <strong>3.3.3</strong> Page 1 of 3
320372-000, Rev. 02<br />
4. Now you need to upgrade the firmware in the base unit. Click on the Launch the DSP Firmware<br />
Update Utility icon. The EthernetLoad window will be displayed. Click on the Download button for<br />
the Controller program (the button at the top-right of the window). This will download the latest<br />
firmware to the base unit.<br />
5. After the firmware download is completed click the Close button.<br />
6. Turn OFF the base unit and wait about 3 seconds, then turn the base unit back ON.<br />
7. Now click on the Update Sierra <strong>XP</strong> Help Topics icon. The most recent version of the application<br />
Help Topics will be installed on the computer.<br />
8. Close the Sierra<strong>XP</strong> Install Utility window and remove the CD from the drive. Do not run any of the<br />
other installation icons unless you are instructed to do so by <strong>Cadwell</strong> personnel.<br />
9. From the Windows Desktop, double click the Sierra <strong>XP</strong> icon to start the program.<br />
10. Check for the appropriate version numbers. From the Help Menu, select About SierraWin. The<br />
software version number should be <strong>3.3.3</strong> and the base version number should be 1.94. See picture<br />
on next page.<br />
Sierra <strong>XP</strong> Version <strong>3.3.3</strong> Page 2 of 3
320372-000, Rev. 02<br />
Remove the old Sierra Icon from the Desktop:<br />
If you are upgrading from a previous version (3.2.17) of Sierra software you can delete the old<br />
Sierra icon from the Windows desktop after the installation is completed. Simply right-click on the<br />
icon and select delete.<br />
Additional Word & PDF documents included on the CD:<br />
- Basic Operating Instructions for the Sierra II.<br />
- Performing Evoked Potentials on the Sierra II.<br />
- Report Generation and Template Editor Description.<br />
- What’s New in Sierra <strong>XP</strong> 3.3.1 and 3.3.2.<br />
Sierra <strong>XP</strong> Version <strong>3.3.3</strong> Page 3 of 3