
Create successful ePaper yourself
Turn your PDF publications into a flip-book with our unique Google optimized e-Paper software.
SECTION 1<br />
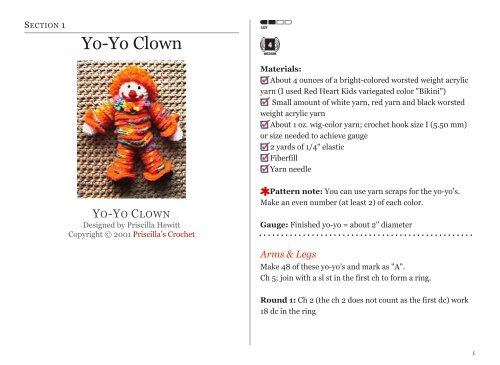
<strong>Yo</strong>-<strong>Yo</strong> <strong>Clown</strong><br />
Materials:<br />
About 4 ounces of a bright-colored worsted weight acrylic<br />
yarn (I used Red Heart Kids variegated color "Bikini")<br />
Small amount of white yarn, red yarn and black worsted<br />
weight acrylic yarn<br />
About 1 oz. wig-color yarn; crochet hook size I (5.50 mm)<br />
or size needed to achieve gauge<br />
2 yards of 1/4" elastic<br />
Fiberfill<br />
Yarn needle<br />
YO-YO CLOWN<br />
Designed by Priscilla Hewitt <br />
Copyright © 2001 Priscilla’s <strong>Crochet</strong><br />
Pattern note: <strong>Yo</strong>u can use yarn scraps for the yo-yo’s.<br />
Make an even number (at least 2) of each color.<br />
<br />
Gauge: Finished yo-yo = about 2" diameter<br />
<br />
Arms & Legs <br />
Make 48 of these yo-yo’s and mark as "A". <br />
Ch 5; join with a sl st in the first ch to form a ring.<br />
<br />
Round 1: Ch 2 (the ch 2 does not count as the first dc) work<br />
18 dc in the ring<br />
1
<br />
Round 2: Sl st in each of the 18 dc around; join with a sl st in<br />
the first sl st. Fasten off. Weave in ends.<br />
<br />
Body <br />
Make 15 of these circles and mark as "Piece B" <br />
Ch 5; join with a sl st in the first ch to form a ring; join with a<br />
sl st in the top of the beginning ch 3.<br />
<br />
Round 1: Ch 2 (the ch 2 does not count as the first dc) work<br />
18 dc in the ring<br />
<br />
Round 2: Ch 2 (the ch 2 does not count as the first dc), work<br />
2 dc in each dc around; join with a sl st in the first dc. (36 dc)<br />
<br />
Round 3: Sl st in each of the 36 dc around; join with a sl st in<br />
the first sl st. Fasten off. Weave in ends.<br />
<br />
Collar <br />
Make 1 of these ruffled circles and mark as "Piece C".<br />
<br />
Round 1: Ch 2 (the ch 2 does not count as the first dc) work<br />
18 dc in the ring<br />
<br />
Round 2: Ch 2 (the ch 2 does not count as the first dc), work<br />
3 dc in each dc around; join with a sl st in the first dc. (54 dc)<br />
<br />
Round 3: (Sl st , ch 1) in each of the 54 dc around; join with a<br />
sl st in the first sl st. Fasten off. Weave in ends.<br />
<br />
Neck: With white and size I hook, make 2 of the "piece A" yoyo's<br />
<br />
Head <br />
With white and size I hook, ch 4; join with a sl st in the first ch<br />
to form a ring.<br />
<br />
Round 1: Work 6 sc in the ring. Do not join rounds. Instead,<br />
use a st marker to mark the first st of each round.<br />
<br />
Round 2: Work 2 sc in each sc around. (12 sc)<br />
<br />
Round 3: (Sc in the next sc, 2 sc in the next sc) 6 times. (18<br />
sc)<br />
<br />
Round 4: (Sc in each of the next 2 sc, 2 sc in the next sc) 6<br />
times. (24 sc)<br />
<br />
Rounds 5-9: Sc in each sc around. (24 sc)<br />
<br />
Round 10: (Sc in each of the next 2 sc, sc dec over the next 2<br />
sc) 6 times. (18 sts)<br />
<br />
Round 11: (Sc in the next sc, sc dec over the next 2 sc) 6<br />
times. (12 sts)<br />
<br />
Round 12: (Sc dec over the next 2 sc) 6 times. (6 sts) Fasten<br />
off, leaving a 12" yarn tail for sewing.<br />
2
<br />
Wig <br />
With wig color and size I hook, ch 4; join with a sl st in the<br />
first ch to form a ring.<br />
<br />
Round 1: Work 6 loop sts in the ring. Do not join rounds. Instead,<br />
use a st marker to mark the first st of each round.<br />
<br />
Round 2: Work 2 loop sts in each loop st around. (12 sts)<br />
<br />
Round 3: (Loop st in the next sc, 2 loop sts in the next sc) 6<br />
times. (18 sts)<br />
<br />
Round 4: (Loop st in each of the next 2 loop sts, 2 loop sts in<br />
the next sc) 6 times. (24 sts) Round 5: (Loop st in each of the<br />
next 3 loop sts, 2 loop sts in the next sc) 6 times. (30 sts)<br />
Rounds 5-6: Loop st in each loop st around. (30 sts) Fasten<br />
off after round 6, leaving a 20" yarn tail for sewing.<br />
<br />
Glove <br />
Make 2.<br />
With white and size I hook, ch 4; join with a sl st in the first ch<br />
to form a ring.<br />
<br />
Round 1: Work 6 sc in the ring. Do not join rounds. Instead,<br />
use a st marker to mark the first st of each round.<br />
<br />
Round 2: Work 2 sc in each sc around. (12 sc)<br />
<br />
Rounds 3-4: Sc in each sc around. (12 sc)<br />
<br />
Round 5: Ch 3, sc in the 2nd ch from hook and in the next<br />
ch, sc in each sc around. (14 sc)<br />
<br />
Round 6: Skip first 2 sc, sc in each sc around. (12 sc)<br />
<br />
Round 7: Sc in each sc around, (12 sc) Fasten off, leaving a<br />
12" yarn tail for sewing.<br />
Shoe <br />
Make 2.<br />
With black and size I hook, ch 6.<br />
<br />
Round 1: Work 2 sc in the 2nd ch from hook, sc in each of<br />
the next 3 chs, 3 sc in the last ch; working along the opposite<br />
side of the chain, sc in each of the next 3 chs, sc in the same ch<br />
as the first 2 sc; join with a sl st in the first sc. (12 sc)<br />
<br />
Round 2: Ch 1, work 2 sc in the same st as joining, sc in each<br />
of the next 5 sc, 3 sc in the next sc, sc in each of the next 5 sc,<br />
sc in the same st as the first sc; join with a sl st in the first<br />
sc.(16 sc)<br />
<br />
Round 3: Ch 1, sc in the same st as joining, 2 sc in the next<br />
sc, sc in each of the next 5 sc, 2 sc in each of the next 3 sc, sc in<br />
each of the next 5 sc, 2 sc in the next sc, sc in the same st as<br />
3
the first sc; join with a sl st in the back loop only of the first sc.<br />
(22 sc)<br />
Round 4: Working in the back loop only, (sc dec over the<br />
next 2 sts) 11 times; join with a sl st in the first st. (11 sts)<br />
<br />
Round 5: (Sc dec over the next 2 sts) 5 times, sc in the next<br />
sc. (6 sts) Fasten off, leaving a 12" yarn tail for sewing.<br />
Assembly <br />
Thread yarn needle with elastic. Leaving an elastic tail of<br />
about 12", thread the center of the 2 neck yo-yo's on the elastic,<br />
then run the elastic through the ruffled piece C, then<br />
through 11 of the piece A yo-yo's for the first arm, then between<br />
2 dc on round 1 of one of the piece B circles and then<br />
through the opposite space between 2 dc on the same piece B<br />
to secure the end of the first arm. Run the needle and elastic<br />
back through the 11 yo-yo's of the first arm, then through 11 of<br />
the piece B circles for the body, then through 15 of the piece A<br />
yo-yo's for the first leg, then between 2 dc on round 1 of one of<br />
the piece B circles and then through the opposite space between<br />
2 dc on the same piece B to secure the end of the first<br />
leg. Run the needle and elastic back through the 11 yo-yo's of<br />
the first leg, then through then through 15 of the piece A yoyo's<br />
for the second leg, then between 2 dc on round 1 of one of<br />
the piece B circles and then through the opposite space between<br />
2 dc on the same piece B to secure the end of the second<br />
leg. Run the elastic back through the 11 body circles, then<br />
through 11 of the piece A yo-yo's for the second arm, then between<br />
2 dc on round 1 of one of the piece B circles and then<br />
through the opposite space between 2 dc on the same piece B<br />
to secure the end of the second arm. Run the elastic back<br />
through the ruffled piece C, the through the 2 neck yo-yo's,<br />
then through the opening at the bottom of the head at out the<br />
top of the head between 2 sc on round 1. Remove elastic from<br />
needle. Thread needle with beginning elastic tail and run<br />
through then through the opening at the bottom of the head at<br />
out the top of the head between 2 sc on round 1. Remove elastic<br />
from needle. Stuff head through bottom opening with fiber<br />
fill. Tie elastic ends together securely together and trim ends.<br />
Thread yarn needle with yarn tail on head and sew opening<br />
closed. Arrange wig on head and sew to head with yarn tail on<br />
wig. Sew gloves to the ends of arms and shoes to ends of legs.<br />
Embroider a face on the head as desired.<br />
Happy <strong>Crochet</strong>ing!<br />
4