Mini Lime Instructions UK - Patton
Mini Lime Instructions UK - Patton
Mini Lime Instructions UK - Patton

You also want an ePaper? Increase the reach of your titles
YUMPU automatically turns print PDFs into web optimized ePapers that Google loves.
Servicing:<br />
• This Pump, like all mechanical equipment, requires maintenance.<br />
• Every six months the pump should be removed, and the top (pump unit) should be<br />
unclipped from the reservoir. Care should then be taken to clean the filter, float and<br />
reservoir thoroughly prior to reassembly. We recommend this is done in the Spring<br />
and the Autumn, using an anti-bacterial wash.<br />
• Take great care to replace the float with the magnet<br />
facing upwards:<br />
Troubleshooting:<br />
Fault: The Pump runs all the time.<br />
1. Is the float positioned with the magnet uppermost<br />
2. Is the pump located firmly onto the reservoir, with the float located inside the<br />
reservoir, around the sensor column<br />
3. Is there any sludge inside the reservoir, preventing the float from resting on the<br />
bottom (This may be the case if the pump has been in operation for some time.<br />
Clean using an anti-bacterial wash).<br />
Please note:<br />
The pump will only switch off when the float is at the bottom of the reservoir.<br />
Fault: The Pump stops and starts, and makes a loud noise.<br />
1. The water is siphoning back through the pump. Follow advice in section on<br />
preventing siphoning.<br />
Fault: The Pump runs but does not pump any water.<br />
1. Are there any air-leaks in the pipe running to the pump<br />
2. Are the pump reservoir and the inlet tube free from sludge and debris<br />
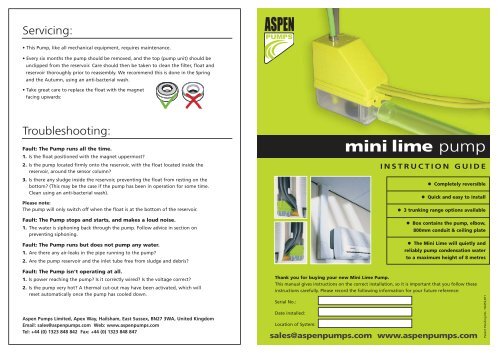
mini lime pump<br />
INSTRUCTION GUIDE<br />
• Completely reversible<br />
• Quick and easy to install<br />
• 3 trunking range options available<br />
• Box contains the pump, elbow,<br />
800mm conduit & ceiling plate<br />
• The <strong>Mini</strong> <strong>Lime</strong> will quietly and<br />
reliably pump condensation water<br />
to a maximum height of 8 metres<br />
Fault: The Pump isn't operating at all.<br />
1. Is power reaching the pump Is it correctly wired Is the voltage correct<br />
2. Is the pump very hot A thermal cut-out may have been activated, which will<br />
reset automatically once the pump has cooled down.<br />
Aspen Pumps Limited, Apex Way, Hailsham, East Sussex, BN27 3WA, United Kingdom<br />
Email: sales@aspenpumps.com Web: www.aspenpumps.com<br />
Tel: +44 (0) 1323 848 842 Fax: +44 (0) 1323 848 847<br />
Thank you for buying your new <strong>Mini</strong> <strong>Lime</strong> Pump.<br />
This manual gives instructions on the correct installation, so it is important that you follow these<br />
instructions carefully. Please record the following information for your future reference:<br />
Serial No.:<br />
Date installed:<br />
Location of System:<br />
sales@aspenpumps.com www.aspenpumps.com<br />
Patent Pending No. 10/453,871
Technical Data:<br />
Typical Performance:<br />
• Power supply 230V AC<br />
±10%~20W<br />
Alternative voltages available<br />
• 1PH 50/60 Hz<br />
• Volt-free N.O., N.C. 8A Resistive<br />
(5A INDUCTIVE)<br />
• Hall effect semi conductor level<br />
sensors<br />
• Water flow rate: 14 litres at zero head<br />
• Maximum recommended head:<br />
8 metres<br />
• 23dB(A) @ 1 metre & 8 metre head<br />
• Gravity inlet<br />
• Thermally protected pump<br />
• Max pipe size: 5/8 ” and 3/8 ”<br />
(including insulation)<br />
• CE marked<br />
HEAD IN METRES<br />
14<br />
13<br />
12<br />
11<br />
10<br />
9<br />
WE RECOMMEND USING THIS PUMP<br />
8<br />
FOR NO GREATER THAN 8 METRES HEAD<br />
7<br />
6<br />
5<br />
4<br />
3<br />
2<br />
1<br />
0<br />
0 1 2 3 4 5 6 7 8 9 10 11 12 13 14 15<br />
LITRES PER HOUR<br />
In the box:<br />
1. 1 x Elbow back<br />
2. 1 x Assembled <strong>Mini</strong> <strong>Lime</strong> pump,<br />
including:<br />
a. Vinyl breather tube (15cm x 9mm o/d)<br />
b. lime silicone rubber tube<br />
3. 1 x Elbow front<br />
4. 1 x Internal conduit sleeve<br />
(slim-line system only)<br />
5. 1 x Conduit back (800mm)<br />
6. 1 x Conduit front (800mm)<br />
7. 1 x Ceiling plate<br />
8. 1 x 6mm 4mm reducer<br />
9. 6 x rawl plugs and screws<br />
10. 4 x cable ties<br />
Please note:<br />
You will also need several metres<br />
of 9mm o/d x 6mm i/d vinyl tube<br />
Operating Levels:<br />
The float inside the reservoir operates at<br />
three different heights. These approximate<br />
heights are shown in this diagram.<br />
Note - the float must rest in the lowest<br />
position (on the floor of the reservoir) to<br />
stop the pump running:<br />
9mm - Off<br />
20mm - On<br />
25mm - Safety<br />
Product Safety:<br />
25 20 9<br />
Please note:<br />
Additional Internal conduit sleeves and<br />
800mm lengths of Conduit are available<br />
on request (for slim-line system only)<br />
• The <strong>Mini</strong> <strong>Lime</strong> Pump has been evaluated for use with water only.<br />
• For correct and safe electrical installation please refer to the instruction manual.<br />
• Ensure the Pump is disconnected from the Mains supply before carrying out<br />
any adjustments or servicing.<br />
• The Pump is ideal for most working and living environments. It is not recommended<br />
where the environment is oily or particularly dusty.
Preventing Siphoning: advice<br />
• Cut discharge tube above water level of evaporator tray and direct end into<br />
large pipe<br />
FALSE CEILING<br />
Installation:<br />
1<br />
Decide whether right or left handed system is required<br />
A<br />
B<br />
END OF DISCHARGE TUBE<br />
• More tube length horizontal than vertical<br />
FALSE CEILING<br />
WATER LEVEL IN TRAY<br />
X<br />
2<br />
Disassemble system. Hold ‘Elbow back’, ‘Internal conduit sleeve’ and ‘Conduit back’<br />
against the wall, squaring up to th ceiling and the evaporator unit. Drill fixing holes<br />
in wall and secure using rawl plugs and screws supplied.<br />
X>Y<br />
Y<br />
END OF DISCHARGE TUBE<br />
WATER LEVEL IN TRAY<br />
• Create increased resistance • Add a loop • Turn back on itself<br />
END OF<br />
DISCHARGE<br />
TUBE<br />
3<br />
Cut out area of ceiling above conduit<br />
WATER LEVEL<br />
IN TRAY
Installation:<br />
Installation:<br />
4<br />
• Remove internal sleeve (slim-line system only)<br />
• Locate pump in ‘Elbow back’<br />
7<br />
Locate pipes and cables in 'Elbow back' and 'Conduit back'.<br />
Ensure breather tube is channelled up inside conduit.<br />
• Push drain tray hose firmly into lime tube<br />
• Connect pump outlet to 9mm o/d tube using<br />
reducer. Then channel this tube to an<br />
appropriate drain<br />
POWER:<br />
EARTH: Green/Yellow<br />
LIVE: Brown<br />
NEUTRAL: Blue<br />
8<br />
Slide ‘Internal sleeve’ (slim-line system<br />
only) into place and clip 'Elbow front'<br />
and 'Conduit front' into position.<br />
ALARM/VOLT FREE<br />
COMMON:<br />
Grey<br />
NORMALLY CLOSED: Purple<br />
NORMALLY OPEN: Orange<br />
5<br />
Wire<br />
the <strong>Mini</strong> <strong>Lime</strong> Pump to the permanent Live, Neutral and Earth terminals of the<br />
Evaporator. Install a 1.0 amp in-line fuse between the <strong>Mini</strong> <strong>Lime</strong> Pump and the<br />
Evaporator.<br />
A high-level alarm switch should be wired into the cooling signal wire, to prevent the<br />
continued operation of the Air-conditioning unit in the event of the pump failing.<br />
These are volt-free contacts and operate as follows:<br />
COMMON AND NORMALLY CLOSED when the water rises to the alarm level<br />
the circuit opens.<br />
COMMON AND NORMALLY OPEN when the water rises to the alarm level<br />
the circuit closes.<br />
Test pump operation<br />
6 FALSE CEILING<br />
9<br />
Remove backing and push<br />
'Ceiling plate' into position.