a light touch - primotec
a light touch - primotec
a light touch - primotec

You also want an ePaper? Increase the reach of your titles
YUMPU automatically turns print PDFs into web optimized ePapers that Google loves.
ench Mastery<br />
step-by-step Primopattern<br />
A <strong>light</strong> <strong>touch</strong><br />
Creating a precise implant bar using Primopattern <strong>light</strong>-cured modeling resin<br />
Information provided by Primotec USA<br />
Formulated with optimal strength and accuracy,<br />
Primopattern single-component <strong>light</strong>-cured universal<br />
modeling resin is available in a syringeable modeling gel<br />
and a modeling paste. As a modeling gel, it is applied<br />
directly from the syringe, usually to buildup copings<br />
and implant abutments; as a modeling paste, it offers<br />
a clay-like consistency and can be applied, formed, or<br />
adjusted with fingers or hand instrument. The material<br />
burns out cleanly and completely for casting or pressing,<br />
can be scanned with either a laser or probe scanner,<br />
and works well for zirconia copymilling systems.<br />
Primopattern is used at room temperature, which<br />
reduces the risk of distortion because no heating is<br />
involved as with wax and there is no mixing of materials<br />
(i.e., powder and liquid of PMMA modeling resins). It<br />
has a long working time of more than 20 minutes and<br />
a short curing time of less than 5 minutes. It does not<br />
contain any MMA or peroxide and has no taste or smell.<br />
If needed, it can be used in conjunction with conventional<br />
waxes or <strong>light</strong>-cured wax (e.g., Metacon).<br />
Following are steps for creating an implant bar.<br />
In this case, six Nobel Direct implants were placed in<br />
an ideal position due to a successful backward planning<br />
with the Nobel guide implant navigation system<br />
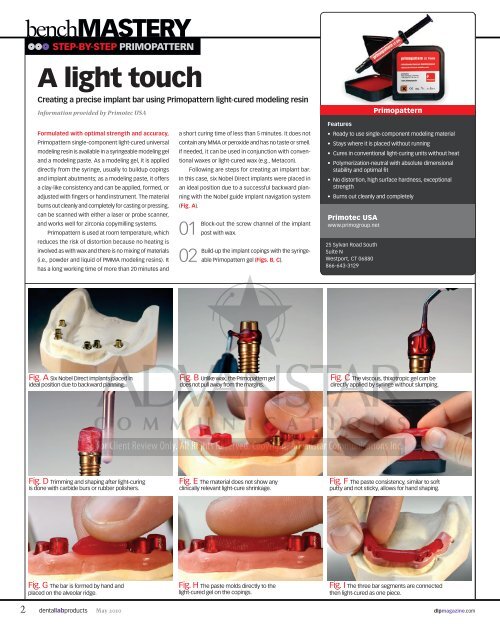
(Fig. A).<br />
01<br />
02<br />
Block-out the screw channel of the implant<br />
post with wax.<br />
Build-up the implant copings with the syringeable<br />
Primopattern gel (Figs. B, C).<br />
Primotec USA<br />
www.primogroup.net<br />
25 Sylvan Road South<br />
Suite N<br />
Westport, CT 06880<br />
866-643-3129<br />
Primopattern<br />
Features<br />
• Ready to use single-component modeling material<br />
• Stays where it is placed without running<br />
• Cures in conventional <strong>light</strong>-curing units without heat<br />
• Polymerization-neutral with absolute dimensional<br />
stability and optimal fit<br />
• No distortion, high surface hardness, exceptional<br />
strength<br />
• Burns out cleanly and completely<br />
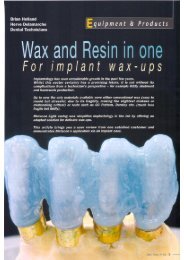
Fig. A Six Nobel Direct implants placed in<br />
ideal position due to backward planning.<br />
Fig. B Unlike wax, the Primopattern gel<br />
does not pull away from the margins.<br />
Fig. C The viscous, thixotropic gel can be<br />
directly applied by syringe without slumping.<br />
Fig. D Trimming and shaping after <strong>light</strong>-curing<br />
is done with carbide burs or rubber polishers.<br />
Fig. E The material does not show any<br />
clinically relevant <strong>light</strong>-cure shrinkage.<br />
Fig. F The paste consistency, similar to soft<br />
putty and not sticky, allows for hand shaping.<br />
Fig. G The bar is formed by hand and<br />
placed on the alveolar ridge.<br />
Fig. H The paste molds directly to the<br />
<strong>light</strong>-cured gel on the copings.<br />
Fig. I The three bar segments are connected<br />
then <strong>light</strong>-cured as one piece.<br />
dentallabproducts May 2010<br />
dlpmagazine.com
03<br />
Once the coping is built-up, <strong>light</strong>-cure the material<br />
and adjust if necessary (Fig. D).<br />
Fig. J The bar can be milled immediately following curing.<br />
04<br />
Prepare the remaining five copings in the same<br />
manner. Note: Because the Primopattern material<br />
polymerizes towards the <strong>light</strong>, the copings fit without<br />
gripping the abutments (Fig. E).<br />
05<br />
Create the bar segments using Primopattern<br />
paste where larger amounts of material need to<br />
be applied. Note: The modeling paste also is suitable for<br />
use on pontics, transfer or insertion guides, implant jigs,<br />
verification indexes, etc.<br />
06<br />
Use a small amount of paste to create the bar by<br />
hand (Fig. F) and then place on the alveolar ridge<br />
(Fig. G). Note: The material has a consistency similar to soft<br />
putty, is not sticky, and can be easily shaped by hand.<br />
07<br />
08<br />
bench Mastery<br />
Adapt the paste to the already made copings<br />
(Fig. H).<br />
Build-up the posterior bar segments in the same<br />
way as the anterior bar (Fig. I). The case is ready<br />
to be <strong>light</strong>-cured together as a single unit.<br />
09<br />
10<br />
step-by-step Primopattern<br />
After <strong>light</strong>-curing, the bar can be easily removed<br />
to check for fit and milled (Fig. J).<br />
When the milling is complete, make any corrections<br />
by applying the gel (Fig. K) and then re-<strong>light</strong>curing<br />
with a hand-held lab <strong>light</strong> (Fig. L).<br />
The finished bar fits perfectly and can be either sprued<br />
and cast, pressed, scanned, or copymilled (Fig. M). lab<br />
Fig. K Any corrections or reinforcements<br />
can be made with the syringeable gel.<br />
Fig. L The corrections can be stabilized by<br />
prepolymerizing using a hand-held lab curing <strong>light</strong>.<br />
Fig. M The completed bar can be sprued for casting or<br />
pressing, scanned for CAD/CAM processes, or copymilled.<br />
dlpmagazine.com May 2010 dentallabproducts