

Atwood Water Heater - RV Owner's Manuals
Atwood Water Heater - RV Owner's Manuals
Atwood Water Heater - RV Owner's Manuals

Create successful ePaper yourself
Turn your PDF publications into a flip-book with our unique Google optimized e-Paper software.
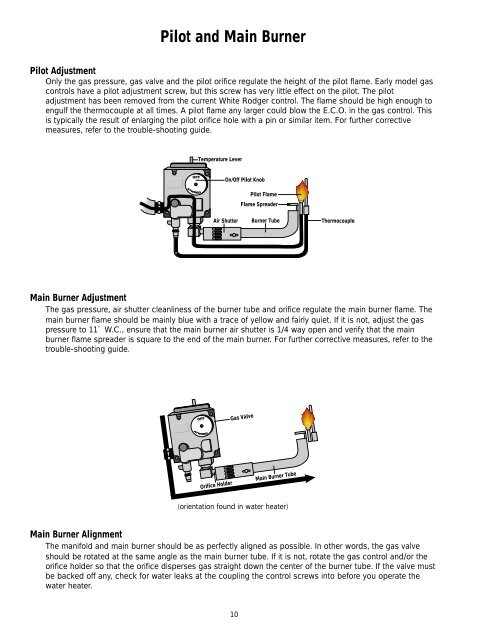
Pilot and Main Burner<br />
Pilot Adjustment<br />
Only the gas pressure, gas valve and the pilot orifice regulate the height of the pilot flame. Early model gas<br />
controls have a pilot adjustment screw, but this screw has very little effect on the pilot. The pilot<br />
adjustment has been removed from the current White Rodger control. The flame should be high enough to<br />
engulf the thermocouple at all times. A pilot flame any larger could blow the E.C.O. in the gas control. This<br />
is typically the result of enlarging the pilot orifice hole with a pin or similar item. For further corrective<br />
measures, refer to the trouble-shooting guide.<br />
Temperature Lever<br />
On/Off Pilot Knob<br />
Pilot Flame<br />
Flame Spreader<br />
Air Shutter<br />
Burner Tube<br />
Thermocouple<br />
Main Burner Adjustment<br />
The gas pressure, air shutter cleanliness of the burner tube and orifice regulate the main burner flame. The<br />
main burner flame should be mainly blue with a trace of yellow and fairly quiet. If it is not, adjust the gas<br />
pressure to 11˝ W.C., ensure that the main burner air shutter is 1/4 way open and verify that the main<br />
burner flame spreader is square to the end of the main burner. For further corrective measures, refer to the<br />
trouble-shooting guide.<br />
Gas Valve<br />
Orifice Holder Main Burner Tube<br />
(orientation found in water heater)<br />
Main Burner Alignment<br />
The manifold and main burner should be as perfectly aligned as possible. In other words, the gas valve<br />
should be rotated at the same angle as the main burner tube. If it is not, rotate the gas control and/or the<br />
orifice holder so that the orifice disperses gas straight down the center of the burner tube. If the valve must<br />
be backed off any, check for water leaks at the coupling the control screws into before you operate the<br />
water heater.<br />
10