Marconi Hydrophones
Marconi Hydrophones
Marconi Hydrophones

You also want an ePaper? Increase the reach of your titles
YUMPU automatically turns print PDFs into web optimized ePapers that Google loves.
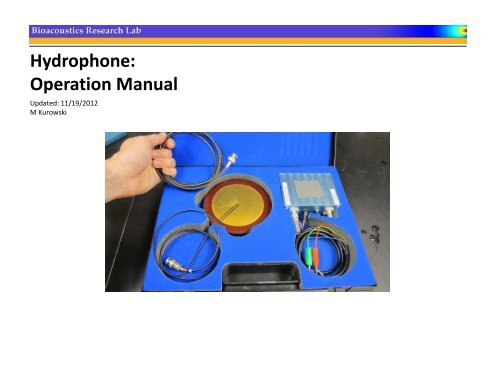
Hydrophone:<br />
Operation Manual<br />
Updated: 11/19/2012<br />
M Kurowski
1 : Hydrophone Overview<br />
A hydrophone is a receiving device that detects ultrasound waves in water and convert them into electrical signals. There are the two<br />
<strong>Marconi</strong> PDVF hydrophones, M1 & M3, that are frequently used in the BRL.<br />
The hydrophone is used to calibrate ultrasound devices.<br />
Depending on the location and strength of the acoustic field of an ultrasound source, the hydrophone’s received electrical signals will vary<br />
in Voltage amplitude. This Voltage can be converted into a pressure to determine the spatial acoustic pressure of a source.<br />
The hydrophone is used as the receiver for transducers in thru-transmission mode to measure material insertion-loss, attenuation, and<br />
speed of sound.<br />
Information can be extracted from the signals recorded when different materials of a known thickness are placed between an ultrasound<br />
transmitter and the hydrophone receiver.<br />
1
2 : Hydrophone Location & Components<br />
The two <strong>Marconi</strong> hydrophones are located in the Daedal room. They are in the bottom drawers next to the green double doors. The drawers are<br />
labeled M1 & M3 <strong>Marconi</strong> Hydrophone. Each drawer contains the proper hydrophone stored in a protective case and a calibration document.<br />
The calibration document provides the conversion factor from Voltage<br />
to Pressure in Pascal. The hydrophone has linear sensitivity from 1-<br />
60MHz. However, by using the matched preamplifier the hydrophone<br />
has a flat frequency response from 1-20 MHz ( ~ 0.44 nV/Pa).<br />
Each hydrophone is stored in a protective case; it comes with a<br />
matched pre-amplifier and cable that must always be used<br />
between the pre-amp output and monitoring scope input.<br />
2
3 : Hydrophone Holder<br />
The hydrophone holders are located on the accessory table in the daedal room. There<br />
are two hydrophone holders that can fit the <strong>Marconi</strong> hydrophones. Remove the holder<br />
ring piece with the thumbscrews. Remove the hydrophone from the case by only<br />
touching the wooden edges.<br />
Place the concave part of the hydrophone face down<br />
in the thick holder piece. The hydrophone is very<br />
fragile and must be handled with extreme care. Do<br />
not touch or wipe the face of the hydrophone (let air<br />
dry).<br />
The flat side of the hydrophone must sit<br />
face up in the holder. The hydrophone is<br />
directional. The Hydrophone’s active<br />
element is calibrated to this face direction.<br />
The transmitting source must be in placed<br />
in front of this face.<br />
Place the thinner ring holder piece<br />
over the thicker holder piece to<br />
sandwich the hydrophone.<br />
Secure the hydrophone in the holder by tightening<br />
the thumb screws finger tight. Screw in a rod (at<br />
least 24” inches) in the right threaded hole on the<br />
edge of the holder.<br />
3
4 : Hydrophone Pre-Amplifier<br />
The matched pre-amplifier is used with the<br />
hydrophone when performing calibrations. Its multicolored<br />
plugs must be connected to a power supply.<br />
There are two power supplies located next to Daedal<br />
2 on the table behind the computer. Either one can<br />
be used; however, the bottom power supply is<br />
preferred. The proper color plug to port connections<br />
are stated on the pre-amp.<br />
Simply plug the red plug into the +20 v port, the blue plug into the -20 V<br />
port, and the green plug into the GND port.<br />
Turn on the Power Supply if the hydrophone is not attached or after the<br />
hydrophone has been placed in the water.<br />
Adjust the Voltage knob so that the power supply is at 15V.<br />
Set the amplifier gain to X1. Switching to X5 gain will amplify the<br />
original signal by a factor of 5.<br />
4
5 : Hydrophone Daedal and Cable Connections<br />
Put the hydrophone in degassed water; all of the gold<br />
membrane must be submerged. Once it is completely<br />
submerged connect the cord from the hydrophone to the<br />
input of the pre-amp.<br />
Use the cable which came in the hydrophone case to connect the output<br />
of pre-amp to the input channel of a monitoring device.<br />
Use the trigger out from the transmitting source as the trigger sync for the hydrophone’s received input signals.<br />
5