

August - Austin Scale Modeler's Society
August - Austin Scale Modeler's Society
August - Austin Scale Modeler's Society

Create successful ePaper yourself
Turn your PDF publications into a flip-book with our unique Google optimized e-Paper software.
IPMS/Republic of Texas<br />
Newsletter of the <strong>Austin</strong> <strong>Scale</strong> Modelers <strong>Society</strong> <strong>August</strong> 2004<br />
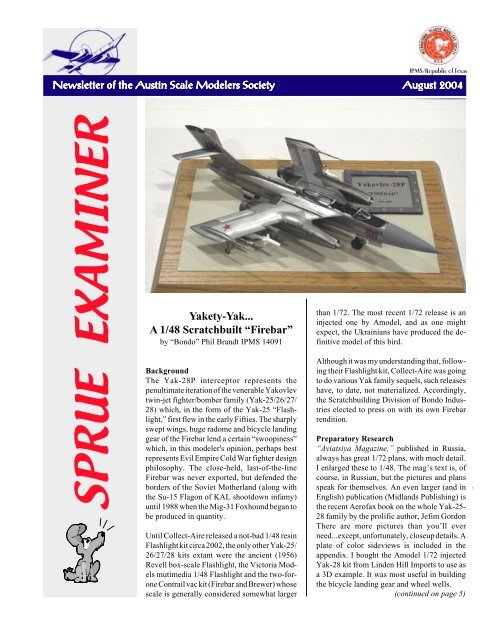
SPRUE EXAMINER<br />
Yakety-Yak...<br />
A 1/48 Scratchbuilt “Firebar”<br />
by “Bondo” Phil Brandt IPMS 14091<br />
Background<br />
The Yak-28P interceptor represents the<br />
penultimate iteration of the venerable Yakovlev<br />
twin-jet fighter/bomber family (Yak-25/26/27/<br />
28) which, in the form of the Yak-25 “Flashlight,”<br />
first flew in the early Fifties. The sharply<br />
swept wings, huge radome and bicycle landing<br />
gear of the Firebar lend a certain “swoopiness”<br />
which, in this modeler's opinion, perhaps best<br />
represents Evil Empire Cold War fighter design<br />
philosophy. The close-held, last-of-the-line<br />
Firebar was never exported, but defended the<br />
borders of the Soviet Motherland (along with<br />
the Su-15 Flagon of KAL shootdown infamy)<br />
until 1988 when the Mig-31 Foxhound began to<br />
be produced in quantity.<br />
Until Collect-Aire released a not-bad 1/48 resin<br />
Flashlight kit circa 2002, the only other Yak-25/<br />
26/27/28 kits extant were the ancient (1956)<br />
Revell box-scale Flashlight, the Victoria Models<br />
mutimedia 1/48 Flashlight and the two-forone<br />
Contrail vac kit (Firebar and Brewer) whose<br />
scale is generally considered somewhat larger<br />
than 1/72. The most recent 1/72 release is an<br />
injected one by Amodel, and as one might<br />
expect, the Ukrainians have produced the definitive<br />
model of this bird.<br />
Although it was my understanding that, following<br />
their Flashlight kit, Collect-Aire was going<br />
to do various Yak family sequels, such releases<br />
have, to date, not materialized. Accordingly,<br />
the Scratchbuilding Division of Bondo Industries<br />
elected to press on with its own Firebar<br />
rendition.<br />
Preparatory Research<br />
“Aviatsiya Magazine,” published in Russia,<br />
always has great 1/72 plans, with much detail.<br />
I enlarged these to 1/48. The mag’s text is, of<br />
course, in Russian, but the pictures and plans<br />
speak for themselves. An even larger (and in<br />
English) publication (Midlands Publishing) is<br />
the recent Aerofax book on the whole Yak-25-<br />
28 family by the prolific author, Jefim Gordon<br />
There are more pictures than you’ll ever<br />
need...except, unfortunately, closeup details. A<br />
plate of color sideviews is included in the<br />
appendix. I bought the Amodel 1/72 injected<br />
Yak-28 kit from Linden Hill Imports to use as<br />
a 3D example. It was most useful in building<br />
the bicycle landing gear and wheel wells.<br />
(continued on page 5)
2<br />
Our Sponsors<br />
These are some of the individuals and<br />
organizations which help make <strong>Austin</strong><br />
<strong>Scale</strong> Modelers <strong>Society</strong> possible.<br />
K ing’s Hobby Shop<br />
8810 N. Lamar, <strong>Austin</strong> TX 78753<br />
Phone 836-7388<br />
Roger Williams<br />
PO Box 291<br />
Pflugerville, TX 78691-0291<br />
Rudy Cline<br />
Ray Katzaman<br />
A K Young & Associates<br />
Squadron Mail Order<br />
1115 Crowley Drive<br />
Carrollton, TX 75011<br />
Action Traffic Services<br />
11012 Georgian Dr.<br />
<strong>Austin</strong>, TX 78753<br />
MB Publishing & Photography<br />
7509 St. Phillip, <strong>Austin</strong>, TX 78757,<br />
Phone 454-2395<br />
Dave Edgerly<br />
Commander Series Models<br />
Ian Edgerly<br />
Texas Military Forces Museum<br />
Pat Lowe<br />
Testors Corporation<br />
Bob Kieras<br />
SD&D<br />
Roll Models<br />
P.O. Box 27066<br />
Golden Valley, MN 55427<br />
Cedar Park Hobbies<br />
12617 Ridgeline #A-01<br />
Special 20% discount for members,<br />
on 1 Tuesday; 5% everyday.<br />
www.cedarparkhobbies.com<br />
Editor’s Notes...<br />
Newsletter of the <strong>Austin</strong> <strong>Scale</strong> Modelers <strong>Society</strong><br />
2004 Show Schedule<br />
IPMS/Fort. Worth TX, 2004 SuperCon Sept. 11, 2004<br />
IPMS/West Central Missouri Sept. 18, 2004<br />
IPMS/Baton Rouge Sept. 25. 2004<br />
IPMS/Abilene TX, GASCON V October 2, 2004<br />
IPMS/Flying Tigers, New Orleans, LA October 23, 2004<br />
IPMS/El Paso, Desert Con October 23, 2004<br />
AMPS Centex Regional 2004, <strong>Austin</strong>, TX October 2004<br />
IPMS /Alamo Squadron, San Antonio. TX Feb. 19, 2005<br />
This month’s meeting will see a change in location. We’re going to try the room at<br />
Flores’ Mexican Restaurant on Anderson Lane in the Village Shopping Center. We’ll<br />
be meeting in the upstairs room and yes, you can have dinner and a drink if you want<br />
it. Meeting time is 7 P.M. but we can go in earlier—probably a good idea if you plan<br />
to have dinner.<br />
The program will be Basic Construction, Part Two, presented by your faithful editor.<br />
We will probably have a brief report on the just concluded IPMS National Convention<br />
as well. But, in case you can’t make the meeting, here is a synopsis of the event.<br />
Bondo and I made the trip west down IH-10 into a very hot—but it was a dry heat!—<br />
central Arizona for four days of gawking at fine models, nice bronze art work (!),<br />
vendors, and some very faded but well kept real airplanes at Pima. It was a fun trip.<br />
Several other ASMS modelers did likewise but some of them took the easy way out and<br />
flew. Bruce Burden, Terry Lowman, Russ Holm and his wife, and the two of us drove<br />
while Marc Hobbs, Jack Johnston, Rick Willmon made use of the airlines.<br />
It was a good show. And a big one as well. There were 2034 entries making it the third<br />
largest IPMS/USA show ever! Four modelers entered 30 models each! I have to say that<br />
most of the models were very, very good. Bondo took a second for vac-form aircraft and<br />
a third for scratchbuilt aircraft. Russ did a little better with five total awards including<br />
at least one First! I didn’t scratch but wasn’t surprised nor disappointed. Next year’s<br />
show will be in Atlanta, June 20-23.<br />
Milton<br />
ASMS Officers for 2004<br />
Kenny Roady,<br />
president, kar66@swbell.net 260-2907<br />
Jeff Forster,<br />
vice president, jforster2@aol.com 331-4644<br />
Bill Delk,<br />
secretary, falconfyre@austin.rr.com 282-6832<br />
Dave Orloff.<br />
treasurer, theorloffs@sbcglobal.net 989-2795<br />
Milton Bell,<br />
editor, mbell6@austin.rr.com 454-2395<br />
<strong>Austin</strong> Model Show Coordinators<br />
Bruce Burden, webmaster, brucegb@bga.com 246-8916<br />
Web Site www.austin-scale-modelers-society.org<br />
Ken Laronde (Vendor Liason) 288-2137<br />
<strong>Austin</strong> <strong>Scale</strong> Modelers <strong>Society</strong> (ASMS) is affiliated with the International Plastic Modeler’s <strong>Society</strong> (IPMS) as the Republic of Texas Chapter.<br />
ASMS meets the third Tuesday of each month except December. Dues for full membership are $20.00 yearly. Subscription to the newsletter Sprue<br />
Examiner is $15 yearly. For more information on meeting times and location, call Milton Bell at (512) 454-2395. The views expressed in this<br />
newsletter are those of the authors. The <strong>Austin</strong> <strong>Scale</strong> Modelers <strong>Society</strong> does not endorse the contents of any article.
Newsletter of the <strong>Austin</strong> <strong>Scale</strong> Modelers <strong>Society</strong><br />
Kenny’s Korner<br />
What a great time! For all you poor, unfortunate people who<br />
missed the picnic, I’m saddened at all the fun you missed. Oh<br />
well, there is always Christmas. My thanks again to Mike and<br />
Sally Kachoris for opening their home to us. Thanks for getting<br />
the BBQ Milton, it was delicious. I think the auction went really<br />
well. Kind of long, but I hope we will get better at it. I hope to<br />
see you all at the meeting Tuesday, 8/17/04. We will be meeting<br />
at Flores Mexican Restaurant in the Village Shopping Center on<br />
Anderson near Burnet. Please bring your current project and/or<br />
some of your latest triumphs of accomplishment (finished kits).<br />
See y’all Tuesday.<br />
Kenny<br />
are also color plates showing different aircraft assigned to<br />
Lexington during her career. This is a super book that you<br />
should pick up if you are at all interested in Essex class carriers.<br />
Jeff’s Rating <br />
3<br />
Jeff’s Book Reviews<br />
By Jeff Forster IPMS# 30833<br />
On Deck #2<br />
USS Lexington(CV-16)<br />
Squadron/Signal Publications<br />
By Al Adcock<br />
In Action #185<br />
F-105 Thunderchief<br />
Squadron/Signal Publications<br />
By<br />
Ken Nubeck<br />
This is the latest re-release of Squadron/Signals in action series.<br />
It has 49 pages and it’s in their usual excellent format. It begins<br />
with the 105’s development and progresses through each of the<br />
different models. It has some really great photos. Page 9 shows<br />
an F-105 refueling another F-105, a feature I don’t think was<br />
actually used very much. There’s a short chapter on the F-105B’s<br />
usage in the Thunderbirds. As usual, the color plates in the<br />
middle of the book are excellent. There are several shots of<br />
battle-damaged aircraft from Vietnam. If you’ve ever been<br />
stationed on a base with F-105s then this book is for you. I<br />
always thought the 105 was an impressive aircraft and I enjoyed<br />
this book. Jeff’s Rating <br />
This is one of Squadron’s books covering naval subjects and is<br />
in the same format as their In Action series. There are more<br />
pages in this one, 79, than in the In Action books. The book<br />
begins with some great pictures of CV-2, the first carrier named<br />
Lexington in WW2. The second Lexington was the eighth of 26<br />
Essex class carriers and was launched on 26 Sept. 1942. There<br />
are plenty of photographs, many of which are really nice color<br />
shots. Of interest on pages 12 & 13 is a color reference chart of<br />
flight deck crew jerseys with an explanation of who wears<br />
which color. Page 15 includes a photo of the Lexington right<br />
after she was struck by a kamikaze while operating near the<br />
Philippine Islands. A lot of color pictures are included that<br />
cover her training days after the war. Pages 68 & 69 have color<br />
plates of her different configurations during her career. There<br />
Airship Collection from IPMS/USANational Convention, <strong>August</strong><br />
’04, Phoenix AZ, winning entry.
4<br />
Newsletter of the <strong>Austin</strong> <strong>Scale</strong> Modelers <strong>Society</strong><br />
Nathan’s<br />
Historic Rides<br />
by Nathan Perrine IPMS 40167<br />
Of the most recent reissues by AMT/ERTL, the one I am<br />
reviewing this month is one of the best, and I am fortunate<br />
enough to have an original issue to compare it to. I can tell you<br />
that piece-for-piece this kit is an exact duplicate of the original.<br />
Because of its sloped nose and sleek lines the coupe was very<br />
popular at the Bonneville Salt Flats for many years. Even today<br />
the occasional “stude” will pop up on the scene, be it the salt<br />
flats, a street rod meet, or at your local drive-in on a Saturday<br />
night.<br />
The Starliner looks as good today as it did when introduced to<br />
the public almost 60 years ago. It is one of the few automobiles<br />
to be included in the American Museum of Art as an example<br />
of excellent Industrial Design solely as a work of art.<br />
The 1953 Studebaker Starliner Coupe, kit # 31759 can actually<br />
be built one of three different ways, stock, custom and competition.<br />
It even comes with the clear hood to make it a “Double<br />
Whammy” which was a dual-blowered 426 Hemi powered<br />
funny car or “gasser”. This is a true 3-in-1 kit. Molded in the<br />
customary gray of AMT/ERTL, clear, chrome and transparent<br />
red, it also has black vinyl tires and some “big” slicks. This is<br />
a kit I would like to find some more of, as it is so loaded with<br />
‘extra’ goodies, deep-dish mag-type wheels for the “big slicks”,<br />
it has an optional chopped top already cut to make it into a saltflats<br />
racer.<br />
A little background on this highly desirable car, it is still<br />
considered a high point in American Automotive Design, this<br />
sleek and even sexy by some standards, Studebaker Commander<br />
Starliner hardtop was an immediate success when<br />
introduced to the public in 1953. Originally conceived as a show<br />
car, the designer convinced the upper echelon of Studebaker to<br />
introduce the striking coupe along with the other models in the<br />
fall of ’52. They found they had a hit on their hands in both the<br />
hardtop and two-door sedan versions as the public loved them.<br />
Also keep in mind this was introduced with a V-8 engine which<br />
was already several years ahead of Chevrolet and Ford. The car<br />
was so popular that Studebaker possibly “lost out” because they<br />
only produced a limited of their coupes and the public demand<br />
was more than the allotted production.<br />
I got my kit at Big Lots for—are you ready for this—$4.99, and<br />
I would love to find some more. This kit has so many possibilities<br />
that I can come up with all kinds of ideas for it. Anyway, on<br />
to the kit. As I said, it comes with two engines, and enough extra<br />
parts to do whatever I want to build it my way. I have two cars<br />
started (pics enclosed). The yellow one is going to be a street<br />
machine, or mild custom, and the purple one is going to be a salt<br />
flats racer. In addition to the parts for the competition version,<br />
the custom includes front and rear rolled pans and “Frenched”<br />
headlights. The interior consists of both custom buckets and a<br />
stock bench seat and a full roll cage for racing.<br />
On a scale of 1-10 with 10 being the very best, I would have to<br />
give this a high 9.<br />
Nathan
Newsletter of the <strong>Austin</strong> <strong>Scale</strong> Modelers <strong>Society</strong><br />
(Yak 28 Firebar continued)<br />
Fuselage<br />
As this boy hotrodder did in the<br />
Fifties, I prefer to adapt already<br />
available components which have<br />
the general shape desired. The<br />
huge centerline fuel pod of the<br />
Monogram B-58 filled the bill for<br />
the torpedo-like Firebar fuselage.<br />
The tank was split horizontally so<br />
that a cockpit and maingear bays<br />
could be fashioned from plastic<br />
sheet. The long, ogival radome<br />
came from a vacuformed Polish<br />
HitKit of the Flagon. The radome<br />
was filled with epoxy putty and adapted to the B-58 tank. The<br />
cockpit outline piece came from that area on the Revell F-89<br />
and was integrated with the basic fuselage pod.<br />
Cockpit<br />
Because the cockpit tub of the<br />
Firebar is strongly reminiscent of<br />
its progenitor, the Flashlight, I<br />
cloned (in resin) the two-place tub<br />
and instrument panels from the<br />
Collect-Aire Flashlight kit. Seats<br />
are Neomega KK-2s. Sidewall detail was added using artistic<br />
license, since I was unable to obtain interior pix of same.<br />
Landing Gear<br />
Maingear wheel bays were formed from plastic sheet, and the<br />
struts built from parts box components and brass tubing. Main<br />
wheels are from the 1/48 Lindberg Mig-31. Outriggers were<br />
fashioned from Monogram Harrier units, with scratchbuilt bay<br />
doors made from plastic tubing. Gear doors were laminated<br />
from sheet.<br />
Engines<br />
The long-nosed, semi-podded engines<br />
were built from Plexiglas<br />
tube, brass tube, plastic sheet and<br />
lots of epoxy putty! Kitbashed<br />
afterburner cans (decreased diameter)<br />
came from the Zhengdefu ripoff of the Academy F-111<br />
kit. Intake spikes are modified from the monogram B-58. The<br />
engines are canted vertically from the significant anhedral of<br />
the wings. Because of the thick Plexiglas tubing used as the<br />
“keel” of each engine assembly, doing turbine/afterburner<br />
interior details was bypassed in favor of scratchbuilt typical red<br />
Soviet FOD covers.<br />
Flaps came from the Cutlass, and the ailerons and leading edge<br />
extensions were scratchbuilt. The faired-in wingtip “bullets”<br />
which house the outriggers were created from the ends of Mk 82<br />
bombs with the center sections from plastic tube. Proper wing<br />
anhedral was achieved by a sturdy bent brass carry-through rod<br />
epoxied through the fuselage. The long, slender spikes jutting<br />
forward from each wingtip were built from two diameters of<br />
thin brass tube.<br />
Tail<br />
The vertical fin, rudder and slabs<br />
were created from those of the<br />
Heller RF-84F kit.<br />
Windscreen/Canopy<br />
I was unable to find a suitable existing canopy assembly, so I<br />
carved a master and vacuformed same. The canopy interior rails<br />
came from the Revell F-89, the aft canopy bulkhead was<br />
scratchbuilt and the canopy/windscreen arches were Dremelled<br />
out of .060 sheet.<br />
Weapons<br />
Pylons were scratchbuilt and mounted to the wings with brass<br />
tube. The large radar and IR missiles are from the Trumpeter<br />
Flagon kit, and the Sidewinder-like IR Atolls from the Monogram<br />
Harrier.<br />
Finishing<br />
After coating all components with gray automotive lacquer<br />
primer, the overall surface was practically immersed in repeated<br />
iterations of my favorite lacquer putty, 3M Blue Acryl.<br />
Although it does shrink if applied too thickly, its quick drying<br />
and sandabilty are IMO unmatched. I also used Mr. Surfacer<br />
and slow drying CA glue for major discrepancies. Panel lines<br />
were also scribed at this time. Final wetsanding of the primer<br />
was with 12,000 grit.<br />
5<br />
Wings<br />
The Hobbycraft Cutlass furnished<br />
the inner wings, transitioning to<br />
the outer units which were made<br />
from the venerable Hawk/Testors<br />
OV-10.<br />
Alclad was, as usual, the NMF of choice. I used four basic<br />
shades with two custom blended ones thrown in. The shade<br />
differentiation may seem fairly strong, but the cover of the<br />
(continued on page 10)
6<br />
Trumpeter’s<br />
1963 Chevrolet Nova SS Sports Coupe<br />
by Keith Townsend<br />
Newsletter of the <strong>Austin</strong> <strong>Scale</strong> Modelers <strong>Society</strong><br />
The Car’s History<br />
In 1961 Chevrolet only had a small car in the Corvair and the<br />
rest of the big cars in the Chevy line. Ford was winning the midsize<br />
car battle with the Falcon, so Chevy decided to provide a<br />
third economical option for Chevy buyers and to compete with<br />
the Falcon. The economical side of the car came in its power<br />
plant. These cars came with either a 153 c.i. inline Four cylinder<br />
or a 193 c.i. Straight Six. In 1961 the Chevy II, which would<br />
eventually become the Chevy Nova, was introduced for model<br />
year 1962 . In 1963 Chevy introduced the Nova SS that came in<br />
two versions, the Coupe and the Convertible. Today the 1963<br />
Nova SS Convertible is one of the more valuable in this line of<br />
cars since this was the only model available in a “drop-top”.<br />
Ok, so this is my first attempt at writing an article, but what a<br />
great kit to start with.<br />
As you will begin to see, most of my articles (that is if I get to<br />
do more of these) will be a basic walk-around of the kit—a<br />
“when I open the box this is what I see and what I think about<br />
this kit” type of article. I may give you a little car and kit history,<br />
but mostly I am going to write about how the kit looks and<br />
maybe some build and modification ideas that I might have on<br />
a particular kit. The actual build article may come a little later<br />
and in multiple parts. For me, the look of the final topic is more<br />
important than the look of the kit itself. What can I do to the kit<br />
Or how can I make it look These are questions I like asking<br />
myself when I am at the hobby shop or looking at a kit on the<br />
Internet.<br />
Most of the time when I am building a non-racing kit I have<br />
already bought the paint or know what color I am going to paint<br />
the model before I have actually bought the kit. Like the paint<br />
scheme for this kit, I am not going to go with a factory color. I<br />
have a custom color scheme in mind and no, I am not going to<br />
tell you what it will be. You are going to have to wait for a future<br />
article to see what I have in mind. (Anyway I will probably blab<br />
it to you at one of the meetings.)<br />
The Kit<br />
Trumpeter came out with both versions of the Nova SS. The kit<br />
I am using for this article is the Sports Coupe and is molded<br />
primarily in white plastic. It also comes with one clear parts tree<br />
for the windshield, one red parts tree for the tail lights, one<br />
chrome parts tree for the wheels, interior and exterior trim and<br />
exhaust system. It also comes with Photo-etched metal for the<br />
working hood hinges and make badges. YES, I said working<br />
hood hinges. Damn cool if you ask me, but it remains to be seen<br />
if they are worth the build. The kit also comes with a piece of<br />
wire to help in the building of the working hood hinges and<br />
metal springs for the front-end suspension.<br />
The instructions are great and start off with the building of the<br />
“Six Banger” that came as the original power plant of the ’63<br />
Nova SS. This is one place I might start modifying. Drop a V-<br />
6 or a blown V-8 in the car to give a little more horsepower. I<br />
have photos of a 1:1 car that has an oversized intake manifold<br />
and a four-barrel carburetor hanging off the side of an original<br />
Straight 6, now that might be cool to do and I have good<br />
reference photos to work from.<br />
Anyway, back to the kit. Once the engine is done, you get the<br />
tires. An “Oh man, what were they thinking!” comes up here.<br />
This will be my first build of a kit with plastic white-walls fitted<br />
to rubber tires. I am not sure I like the look that this will give me<br />
so I am already looking for new wheels. Now I will get to build<br />
the front suspension. Yes, it is separate from the rear, which will<br />
make alignment of the front and rear suspension fun at the end.<br />
The interior and exterior trim are items that I like versus<br />
Trumpeters Pontiac Bonneville. The trim down the exterior<br />
side is in three pieces instead of one long piece, as in the<br />
“Bonnie”. The same goes for the trim on the door interior.<br />
Another thing about the kit that I like is the color chart at the end<br />
of the instructions. It is a detailed list of the OEM colors this car<br />
came in 1963 and the Testors or Model Masters equivalent.<br />
Even though I am not going to use it for my build, it is still a good<br />
thing when a model company saves you some research time.<br />
The body is one piece and when painting you need to remember<br />
that the rear cove is to be painted silver. The jury it still out on<br />
(Continued on page 10)
Newsletter of the <strong>Austin</strong> <strong>Scale</strong> Modelers <strong>Society</strong><br />
Hasegawa 1/48 F6F Hellcat and the HobbyCraft Bearcat,<br />
correct prop blades for AMT’s 1/48 Tigercat, as well as numerous<br />
items for 1/72 and 1/32 kits. You should see what they are<br />
doing for a line of 1/72 F-100s!<br />
Anyway, back to the F-8E wing. As it is cast, the dropped flaps<br />
are already in place and the four “droops” are supplied as<br />
separate items. The inner droops droop at 37 degrees while the<br />
outer droops droop at 55 degrees. I hope that’s clear. It’s up to<br />
the modeler to get it right because the folks at Obscureco have<br />
done their part. There doesn’t seem to be a practical way to<br />
make the wing in one piece, besides, that would take the fun out<br />
of modeling.<br />
7<br />
Obscureco’s Resin Wing for<br />
Academy’s 1/72 F-8E Crusader<br />
by Milton Bell, IPMS 16702<br />
Academy’s new, or almost new, 1/72 kit of the F-8E is one of<br />
their best offerings and features a wing that can be displayed in<br />
the up or down position. Since this was a “salient” feature of the<br />
airplane, most modelers would prefer to show the wing in the<br />
high incidence position. The two-position wing had flaps and<br />
slats that automatically dropped when the wing was raised for<br />
takeoffs or landings. When the wing was up, they drooped and<br />
dropped. Unfortunately, the kit has them in the fixed “up”<br />
position.<br />
Fear no more, brother modelers, someone has come to our<br />
rescue with an excellent piece of resin that cures the ills of the<br />
kit wing. Chris Bucholtz’ company—Obscureco—is producing<br />
the resin parts from a master by Norm Filer of the Seattle IPMS<br />
club. Bill Ferrante did the mold design and production of the<br />
parts. The resin is about as good as it gets which is normal for<br />
the young man and associates from Vacaville, CA. In the past<br />
they have produced such items as corrected cowlings for the<br />
Unfortunately, about the only way to get this new wing is to call<br />
or contact Chris or be lucky enough to be at a show where he is<br />
set up. Since he is on the west coast and the IPMS Nationals are<br />
over, your chances of seeing him are slim unless you journey to<br />
the far west. You can contact him online at ObscurAir@aol.com<br />
which is what I usually do. The five piece set was $15 at the Nats<br />
and I suspect it’s about the same if you mail order. I suggest you<br />
email him for details. I can recommend any of the resin items<br />
Obscureco has produced.<br />
My hat’s off to the Obscureco team for producing a very good<br />
product.<br />
And, in the event that you want to model an early version of the<br />
F-8, (the kit is of a late one) Norm Filer has published an article<br />
in the Seattle Chapter Newsletter that describes how he modified<br />
the kit to build a very nice F-8K. Among other details, the<br />
early versions had a more narrow and smaller radome and did<br />
not have the avionics necessary to carry the Bullpup missile. If<br />
anyone is interest in trying this modificatioin, let me know and<br />
I’ll share the article.<br />
Milton<br />
ASMS kit auction, July ’04. What Am I Bid
8<br />
The New ASMS Website<br />
by Michael Kupka<br />
Newsletter of the <strong>Austin</strong> <strong>Scale</strong> Modelers <strong>Society</strong><br />
Next, you may want to set your time zone to GMT-6. After you<br />
have done this, press the submit button.<br />
ASMS has a new web site at www.ipmsaustin.org.<br />
The purpose of the new Web Site is to serve as a virtual home<br />
for ASMS. It allows members to share with and learn from each<br />
other, as well as to keep in touch more frequently. Through the<br />
message forums, it is now possible to share your thoughts, or to<br />
help others without waiting for the next meeting. Explore the<br />
site, check out all the sections. Please visit the Message<br />
Forums, Photo Gallery, and Classified Ads. Your feedback is<br />
crucial to making the ASMS website a valuable modeling<br />
resource and is greatly appreciated.<br />
First of all, please take the time to register on the message<br />
forums. Once you register on the message boards, you will have<br />
a UserName and Password. This UserName/Password combination<br />
will be used for the photo gallery, and controlling access<br />
to the restricted sections of the website. If you want to get the<br />
most out of the new ASMS Website, it is very important that you<br />
register in the message forums. Once you have registered I can<br />
grant you permission to enter private message forums. Currently,<br />
ASMS Club Business is open to everyone. As of the<br />
September meeting, It will be a private forum, that only club<br />
members will be able to see.<br />
Congratulations! You are now a registered user. Now you can<br />
Login. Enter your UserName and Password, then click the Log<br />
In button.<br />
Here is a basic registration tutorial:<br />
Visit http://ipmsaustin.org/forums<br />
Click on the register button on the top right of your screen.<br />
Once you have logged in, you can post and reply to messages<br />
in the forums. Have Fun!<br />
The message forums have been split into several categories.<br />
Urgent News contains important information about the forums.<br />
Please take the time to read these whenever they are updated.<br />
Enter you user name, email address, and your password. When<br />
you type your password, you will see asterisks instead of the<br />
characters that you type. This is a security feature.<br />
Test Category contains test forums. If you are new to message<br />
boards, you can try some test posts here. Keep in mind that test<br />
messages will be deleted every few days, so if it is important,<br />
please post in one of the designated forums.<br />
Modeling – The category has six topic specific forums. These<br />
forums are Aircraft, Armor, Automotive, Figures, Ships, and<br />
Tips, Tools & Techniques.<br />
ASMS Club Business will contain private forums. They are<br />
open to the public, because at the time this article was being<br />
written, we only have four club members registered as users.<br />
General Discussion – Post messages about Previous or Upcoming<br />
events.
Newsletter of the <strong>Austin</strong> <strong>Scale</strong> Modelers <strong>Society</strong><br />
Once you have logged in, you can post and reply to messages in<br />
the forums.<br />
If you are interested in some of the more technical details, the<br />
basic format was designed using Xara’s Webstyle 4, and then<br />
customized using MS FrontPage 2000. For those of you with an<br />
interest in web site development, the site makes us of php for<br />
sever side programming. Using php allowed me to add message<br />
forums, a photo manager, buy/sell classifieds, calendar, and to<br />
add page access control.<br />
There is good news for all the modeling packrats. ASMS now<br />
has a Classifieds Ad board on the website. Find a good home for<br />
all of your orphaned models, whether they are already built or<br />
still in the shrink-wrap. You can list items for sale or trade, free<br />
of charge.<br />
We also have the Coppermine online Photo Gallery on the<br />
ASMS website. Check out some of the photos from IPMS<br />
Nationals. Over the next several months we will be adding<br />
photos from previous shows.<br />
Since the master—the original—still had marks of the original<br />
prop blades, locating the new ones was not a problem. The<br />
problem came in drilling out the back of the spinner to accept<br />
a new shaft to attach the prop assembly to the engine nacelle.<br />
Eyeballing the center of a circle about 3/8 inch in diameter was<br />
not something I looked forward to so, I devised a simple tool to<br />
mark the exact center of the back side of the spinners.<br />
I had a small plastic “square”, much like a carpenter’s square.<br />
Each leg was about six inches long and the inside angle was, of<br />
course, 90 degrees. Since each leg was the same width, the apex<br />
of the internal and external angles split the 90 degrees evenly.<br />
With B the aid of a couple of clamps, I attached a 6 inch steel rule<br />
across the apex of each angle and had a crude but effective<br />
divider.<br />
9<br />
Use the message forums. They are the heart and soul of any<br />
online community. We have a wide variety of skill and experience<br />
levels, so if you need help, just ask. If you have anything<br />
that you think may be interesting to other members, please let<br />
us know on the message boards.<br />
Please take a few minutes to visit the new web site, and place<br />
your comments on the message forums. If you have any trouble,<br />
please feel free to contact me. My phone number is 512-261-<br />
1812. Now go have some fun.<br />
Michael<br />
Tips, Tools & Techniques<br />
Finding Centers of Round Parts<br />
by Milton Bell IPMS 16702<br />
A few months ago I was asked by a USAF retiree to repair a<br />
model of “his” airplane, an OV-10 Bronco. The model had<br />
suffered a fall and the prop blades were broken off the hub/<br />
spinners and all but two were lost. Since the model was in an odd<br />
scale—something like 1/28—there was no chance of using a<br />
stock part from a similar kit. My only hope was to make the parts<br />
from resin or whittle and sand each blade from wood. I chose<br />
resin since I had two good blades to use as masters. Making the<br />
mold was pretty simple and, since the spinners were made to fit<br />
a now non-existent brass insert, I decided to make new ones.<br />
A<br />
Making the mold for the spinners was pretty easy. I simply stuck<br />
a spinner to the bottom of a small plastic box, pointy end up and<br />
poured in the latex. When it had set up, I removed the master and<br />
had a very nice, clean RTV mold. Since the big end was open,<br />
pouring the resin was pretty simple as well and I soon had three<br />
spinners (I always make spares) to work with.<br />
C<br />
Now back to the spinner. Since I knew I had to “mark” the center<br />
and since the resin was very light colored, I decided to paint it<br />
black and use a scriber to mark the center lines. When the paint<br />
dried, I placed the spinner in open part of the square and under<br />
the steel rule. When it was flush against the square I scribed a<br />
line through the black paint. Then I rotated it about 30 degrees<br />
and scribed another line, and then another. The result was three<br />
lines that crossed in the exact center of the spinner. Now all I had<br />
to do was drill holes for the prop blades and drill the spinnercenter<br />
for a brass tube assembly that let the prop spin.<br />
D<br />
Then the prop blades were cast and finished with few problems—except<br />
that they seemed awfully fragile, being all resin<br />
and not too thick. My solution... I recast them with a brass wire<br />
core that doubled as the mounting hub. It made a very secure<br />
joint between prop blade and spinner. Problems solved and<br />
retired OV-10 driver is happy!<br />
If you have a favorite tip, suggestion, or want to share the way<br />
you solved a particular problem, we would like to hear from<br />
you. Sharing information is the way we all advance in this<br />
hobby and even the simplest ideas may be just what some<br />
frustrated E modeler is waiting on.<br />
Milton
10<br />
(63 Chevy Nova continued)<br />
the one-piece front, side, and back windshield. This one-piece<br />
item also has the interior top incorporated and I am afraid it will<br />
make the interior look a bit out of scale.<br />
All in all, this kit is very appealing to me. Only after seeing<br />
Trumpeter’s Bonneville was I interested in doing one of their<br />
kits. Plus, these two are not the only Trumpeter car kits out.<br />
Trumpeter has a couple of the Chinese car company “Red Flag”<br />
limousine kits under their belts as well. By the way, the<br />
Bonneville never really appealed to me as a car model that I<br />
would want to build. The Nova, on the other hand, intersts me<br />
as well as Trumpeter’s next car, which is supposed to be a 1978<br />
Chevrolet Monte Carlo Landau. Lowrider fans will get a kick<br />
out of that kit, as the Monte Carlo is one of the more common<br />
lowrider subjects used. There is lots of fun to be had with this<br />
kit and I will keep you all up to date on the build-up of this kit.<br />
Newsletter of the <strong>Austin</strong> <strong>Scale</strong> Modelers <strong>Society</strong><br />
Models From the IPMS Nationals<br />
HAPPY HOBBY HACKING!<br />
Keith<br />
(Yak 28 Firebar continued)<br />
above-mentioned Aerofax book has a color shot of just such a<br />
strongly contrasting metal panel mix. The radome was done in<br />
acrylic Dark Gunship Gray.<br />
Markings<br />
The typical Soviet aircraft of the time was unadorned, save for<br />
the requisite Soviet stars and fuselage number. The stars came<br />
from an Aeromaster sheet, and the numbers from the forthcoming<br />
Collect-Aire Mig-31.<br />
Conclusion<br />
It’s been a real Chinese fire drill, and I know where the mistakes<br />
and shortcuts are. But, it’s over now, I’m glad, and the Firebar<br />
has been bloodied in competition at the Phoenix Nats. Time to<br />
give the total scratchbuilding a rest, and get on with other less<br />
involved kitbashes at the Weirdness Division of Bondo Industries.<br />
“Bondo” Phil
Newsletter of the <strong>Austin</strong> <strong>Scale</strong> Modelers <strong>Society</strong><br />
Old Rumors & New Kits<br />
One of the best things about big model shows like the IPMS/<br />
USA National Convention, is the chance to see the new goodies<br />
that the manufacturers have planned for us. The Phoenix show<br />
was no exception but there were no “knock your socks off”<br />
announcements. Here is just a sample of what we saw:<br />
The biggest display and the one that attracted the biggest<br />
crowds was Trumpeter. Trumpeter had the sprues for many of<br />
their soon to be released new kits and I’ve got to say, they were<br />
all impressive. The one I was most interested in, the 1/48 P-40B/<br />
C, was there and I can tell you that it looks like a smaller version<br />
of their excellent 1/32 kit. They also showed sprues of their<br />
Liberty Ship “Obrian,” Karl Morser with transporter, 1/72<br />
Kawanishi H6K5 seaplane and examples of their two new<br />
1/350 carriers; the Adm. Kuznetsov and the USS Nimitz. You<br />
can bet that we’ll eventually see some diminutive USN and<br />
Russian aircraft to grace the decks.<br />
Also displayed were the new—and very large—1/32 Su-27 and<br />
the 1/24 Fw 190D9. Both very nicely done but way too big for<br />
this modeler with limited shelf space. As time goes by, I’m<br />
more inclined to look toward the smaller scales, especially for<br />
large subjects. That’s why I’ve taken to looking at the really<br />
small ones; 1/144 scale.<br />
Tamiya did not show up until the last couple of days and had<br />
only a few “new” models, chief among them an armored car that<br />
the JSDF uses, the JGDF LAV, and that has recently seen<br />
service in Iraq. They showed a number of new tools including<br />
their new Lycra gloves that might prove handy for holding a<br />
model while it gets a coat of paint from can or airbrush.<br />
Anyway, I got a free sample that I plan to test very soon!<br />
Revell/Monogram had sprues of their new 1/32 He-162<br />
Volksjager and 1/144 E2C Hawkeye. Both looked very nice and<br />
I’ll be looking forward to seeing both in the shops. The He-162<br />
is just the right size for the little jet and it comes with a pretty<br />
well detailed engine. I expect to see a resin engine and a bunch<br />
of PE for this one. The Hawkeye looks like a nice little model<br />
that should sell well. I have an old 1/72 scale Fujimi kit of the<br />
E2C and I’ve always wanted one in 1/48. Fat chance!<br />
Eduard was there with some excellent deals on their kits,<br />
especially the new mirage IIIC, CD, and profipacks. These are<br />
great little kits of a very interesting delta wing fighter. Expect<br />
some new decals from the industry since there are plenty of<br />
colorful markings for this Mirage. I had the chance to meet<br />
Vladimir Scholtz, the owner, who explained that he named the<br />
company Eduard because that was his nickname when he was<br />
growing up. Vladimir is a tall, bald fellow with a very outgoing<br />
personality who seems to really like his job.<br />
MPM had a bunch of tables and was a major vendor. One of their<br />
most popular items as a CMK resin interior for the Revell 1/72<br />
11<br />
U-Boat VII. I don’t know when the parts will be available but<br />
they were really well done. Three internal areas—engine section,<br />
command compartment, and torpedo room—will be offered.<br />
There are sets for the exterior as well. You can choose<br />
from a crew on sentry duty around the 20mm gun, an armament<br />
crew loading a torpedo, two crew-at-rest sets, provisions being<br />
loaded, a field kitchen set, an 88mm gun crew in action, and a<br />
three figure set call guards with binoculars. This should cover<br />
just about any situation you can think of for doing a cutaway or<br />
diorama.<br />
CMK, MPM, Czech model, Azur, and Special Hobby are all<br />
part of the same company, MPM, so, the booth had plenty to<br />
look at. One of the more spectacular items—besides the sub<br />
interiors—was the new 1/32 Polikarpov I-16 and the 1/72<br />
Piaggio Italian four engine bomber. They also showed an<br />
interior set for Tamiya’s LVT-4 Water Buffalo and the Sherman<br />
M4. Each set includes resin and photoetched parts for the<br />
driver’s interior, control panel, transmission, seats, and battery.<br />
CMK also has detail parts for aircraft. There will be four sets for<br />
the Academy F-8E Crusader which include a new cockpit, seat,<br />
and radar, an exterior set for the gun and gun cover, a set for the<br />
flaps and speed brake, and a set for the landing gear with new<br />
wheels, wheel wells, and gear covers.<br />
Dragon showed a couple of really neat Leopold railway guns in<br />
1/144 scale, on in gray and desert schemes. They appeared to be<br />
shrunken versions of their larger kits and were very well done.<br />
They should be available very soon. Some vendors had them at<br />
the show and quickly sold out.<br />
Academy handed out flyers announcing their third quarter<br />
releases which include a 1/72 P-51 Allison Mustang. This is<br />
from an all new tool of course and will be a welcome addition<br />
to their fine line. You can also expect to see their boxing of the<br />
HobbyCraft HA-1112, the Hispano powered Messerschmitt.<br />
They will also release an M1A1 Abrams “Iraq 2003,” a Warrior<br />
MCV “Iraq 2003,” and an M4A2 Sherman “US Marines.” If the<br />
P-51 is as good as their P-38J (for which CMK offers some<br />
excellent details) or F-8E, it will be a killer kit!<br />
Here is an odd thing about the Nationals. The folks who<br />
represent Hasegawa had examples of the latest announced kits,<br />
including the He-111 H6, the A-4M, etc. which we have known<br />
about for some time. There was no mention of new kits. There<br />
is, however, a website that lists the new Hasegawa kits for Nov.<br />
’04 through Feb. ’05 and on this list are a couple of surprises.<br />
Appearing on the list, and with a part number, is a Curtiss P-40E<br />
in 1/48 scale and a Ki84 Frank in 1/32. Either kit would be a<br />
surprise but to get two nice subjects is great. They also list an<br />
Fw-190 F-8 which is no real surprise but it makes one wonder<br />
if other P-40s or Franks are planned. I hope the Frank is as good<br />
as their earlier kit in 1/48. I just hope they lose the vinyl inserts<br />
for the landing gear and fuel tanks. That’s all for now. See you<br />
all at Flores Restaurant on Tuesday evening.<br />
Milton


