Mini Implant Technical Information - American Orthodontics
Mini Implant Technical Information - American Orthodontics
Mini Implant Technical Information - American Orthodontics
Create successful ePaper yourself
Turn your PDF publications into a flip-book with our unique Google optimized e-Paper software.
Gebrauchsanweisung<br />
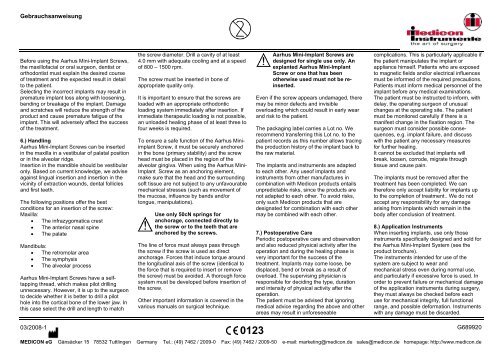
Before using the Aarhus <strong>Mini</strong>-<strong>Implant</strong> Screws,<br />
the maxillofacial or oral surgeon, dentist or<br />
orthodontist must explain the desired course<br />
of treatment and the expected result in detail<br />
to the patient.<br />
Selecting the incorrect implants may result in<br />
premature implant loss along with loosening,<br />
bending or breakage of the implant. Damage<br />
and scratches will reduce the strength of the<br />
product and cause premature fatigue of the<br />
implant. This will adversely affect the success<br />
of the treatment.<br />
6.) Handling<br />
Aarhus <strong>Mini</strong>-<strong>Implant</strong> Screws can be inserted<br />
in the maxilla in a vestibular of palatal position<br />
or in the alveolar ridge.<br />
Insertion in the mandible should be vestibular<br />
only. Based on current knowledge, we advise<br />
against lingual insertion and insertion in the<br />
vicinity of extraction wounds, dental follicles<br />
and first teeth.<br />
The following positions offer the best<br />
conditions for an insertion of the screw:<br />
Maxilla:<br />
• The infrazygomatica crest<br />
• The anterior nasal spine<br />
• The palate<br />
Mandibula:<br />
• The retromolar area<br />
• The symphysis<br />
• The alveolar process<br />
Aarhus <strong>Mini</strong>-<strong>Implant</strong> Screws have a selftapping<br />
thread, which makes pilot drilling<br />
unnecessary. However, it is up to the surgeon<br />
to decide whether it is better to drill a pilot<br />
hole into the cortical bone of the lower jaw. In<br />
this case select the drill and length to match<br />
the screw diameter. Drill a cavity of at least<br />
4.0 mm with adequate cooling and at a speed<br />
of 800 – 1500 rpm.<br />
The screw must be inserted in bone of<br />
appropriate quality only.<br />
It is important to ensure that the screws are<br />
loaded with an appropriate orthodontic<br />
loading system immediately after insertion. If<br />
immediate therapeutic loading is not possible,<br />
an unloaded healing phase of at least three to<br />
four weeks is required.<br />
To ensure a safe function of the Aarhus <strong>Mini</strong>implant<br />
Screw, it must be securely anchored<br />
in the bone (primary stability) and the screw<br />
head must be placed in the region of the<br />
alveolar gingiva. When using the Aarhus <strong>Mini</strong>-<br />
<strong>Implant</strong> Screw as an anchoring element,<br />
make sure that the head and the surrounding<br />
soft tissue are not subject to any unfavourable<br />
mechanical stresses (such as movement of<br />
the mucosa, influence by bands and/or<br />
tongue, manipulations).<br />
Use only 50cN springs for<br />
anchorage, connected directly to<br />
the screw or to the teeth that are<br />
anchored by the screws.<br />
The line of force must always pass through<br />
the screw if the screw is used as direct<br />
anchorage. Forces that induce torque around<br />
the longitudinal axis of the screw (identical to<br />
the force that is required to insert or remove<br />
the screw) must be avoided. A thorough force<br />
system must be developed before insertion of<br />
the screw.<br />
Other important information is covered in the<br />
various manuals on surgical technique.<br />
Aarhus <strong>Mini</strong>-<strong>Implant</strong> Screws are<br />
designed for single use only. An<br />
explanted Aarhus <strong>Mini</strong>-<strong>Implant</strong><br />
Screw or one that has been<br />
otherwise used must not be reinserted.<br />
Even if the screw appears undamaged, there<br />
may be minor defects and invisible<br />
overloading which could result in early wear<br />
and risk to the patient.<br />
The packaging label carries a Lot no. We<br />
recommend transferring this Lot no. to the<br />
patient records as this number allows tracing<br />
the production history of the implant back to<br />
the raw material.<br />
The implants and instruments are adapted<br />
to each other. Any useof implants and<br />
instruments from other manufactures in<br />
combination with Medicon products entails<br />
unpredictable risks, since the products are<br />
not adapted to each other. To avoid risks,<br />
only such Medicon products that are<br />
designated for combination with each other<br />
may be combined with each other.<br />
7.) Postoperative Care<br />
Periodic postoperative care and observation<br />
and also reduced physical activity after the<br />
operation and during the healing phase is<br />
very important for the success of the<br />
treatment. <strong>Implant</strong>s may come loose, be<br />
displaced, bend or break as a result of<br />
overload. The supervising physician is<br />
responsible for deciding the type, duration<br />
and intensity of physical activity after the<br />
operation.<br />
The patient must be advised that ignoring<br />
medical advice regarding the above and other<br />
areas may result in unforeseeable<br />
complications. This is particularly applicable if<br />
the patient manipulates the implant or<br />
appliance himself. Patients who are exposed<br />
to magnetic fields and/or electrical influences<br />
must be informed of the required precautions.<br />
Patients must inform medical personnel of the<br />
implant before any medical examinations.<br />
The patient must be instructed to inform, with<br />
delay, the operating surgeon of unusual<br />
changes at the operating site. The patient<br />
must be monitored carefully if there is a<br />
manifest change in the fixation region. The<br />
surgeon must consider possible consequences,<br />
e.g. implant failure, and discuss<br />
with the patient any necessary measures<br />
for further healing.<br />
It cannot be excluded that implants will<br />
break, loosen, corrode, migrate through<br />
tissue and cause pain.<br />
The implants must be removed after the<br />
treatment has been completed. We can<br />
therefore only accept liability for implants up<br />
to the completion of treatment.. We do not<br />
accept any responsibility for any damage<br />
arising from implants which remain in the<br />
body after conclusion of treatment.<br />
8.) Application Instruments<br />
When inserting implants, use only those<br />
instruments specifically designed and sold for<br />
the Aarhus <strong>Mini</strong>-<strong>Implant</strong> System (see the<br />
product brochure).<br />
The instruments intended for use of the<br />
system are subject to wear and<br />
mechanical stress even during normal use,<br />
and particularly if excessive force is used. In<br />
order to prevent failure or mechanical damage<br />
of the application instruments during surgery,<br />
they must always be checked before each<br />
use for mechanical integrity, full functional<br />
range, and possible deformation. Instruments<br />
with any damage must be discarded.<br />
03/2008-1<br />
0123<br />
G689920<br />
MEDICON eG Gänsäcker 15 78532 Tuttlingen Germany Tel.: (49) 7462 / 2009-0 Fax: (49) 7462 / 2009-50 e-mail: marketing@medicon.de sales@medicon.de homepage: http://www.medicon.de


