

Sling Instructions page - Natures Sway
Sling Instructions page - Natures Sway
Sling Instructions page - Natures Sway

You also want an ePaper? Increase the reach of your titles
YUMPU automatically turns print PDFs into web optimized ePapers that Google loves.
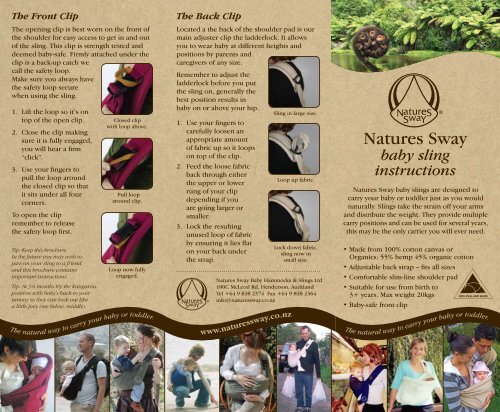
The Front Clip<br />
The opening clip is best worn on the front of<br />
the shoulder for easy access to get in and out<br />
of the sling. This clip is strength tested and<br />
deemed baby-safe. Firmly attached under the<br />
clip is a back-up catch we<br />
call the safety loop.<br />
Make sure you always have<br />
the safety loop secure<br />
when using the sling.<br />
1. Lift the loop so it’s on<br />
top of the open clip.<br />
2. Close the clip making<br />
sure it is fully engaged,<br />
you will hear a firm<br />
“click”.<br />
3. Use your fingers to<br />
pull the loop around<br />
the closed clip so that<br />
it sits under all four<br />
corners.<br />
To open the clip<br />
remember to release<br />
the safety loop first.<br />
Tip: Keep this brochure.<br />
In the future you may wish to<br />
pass on your sling to a friend<br />
and this brochure contains<br />
important instructions.<br />
Tip: At 3-6 months try the kangaroo<br />
position with baby's back to your<br />
tummy so they can look out like<br />
a little joey (see below, middle).<br />
Closed clip<br />
with loop above.<br />
Pull loop<br />
around clip.<br />
Loop now fully<br />
engaged.<br />
The natural way to carry your baby or toddler.<br />
The Back Clip<br />
Located a the back of the shoulder pad is our<br />
main adjuster clip the ladderlock. It allows<br />
you to wear baby at different heights and<br />
positions by parents and<br />
caregivers of any size.<br />
Remember to adjust the<br />
ladderlock before you put<br />
the sling on, generally the<br />
best position results in<br />
baby on or above your hip.<br />
<strong>Sling</strong> in large size.<br />
1. Use your fingers to<br />
carefully loosen an<br />
appropriate amount<br />
of fabric up so it loops<br />
on top of the clip.<br />
2. Feed the loose fabric<br />
back through either<br />
Loop up fabric.<br />
the upper or lower<br />
rung of your clip<br />
depending if you<br />
are going larger or<br />
smaller.<br />
3. Lock the resulting<br />
unused loop of fabric<br />
by ensuring it lies flat<br />
on your back under<br />
the strap.<br />
<strong>Natures</strong> <strong>Sway</strong> Baby Hammocks & <strong>Sling</strong>s Ltd<br />
180C McLeod Rd, Henderson, Auckland<br />
Tel +64 9 838 2374 Fax +64 9 838 2364<br />
info@naturessway.co.nz<br />
www.naturessway.co.nz<br />
Lock down fabric,<br />
sling now in<br />
small size.<br />
<strong>Natures</strong> <strong>Sway</strong><br />
baby sling<br />
instructions<br />
<strong>Natures</strong> <strong>Sway</strong> baby slings are designed to<br />
carry your baby or toddler just as you would<br />
naturally. <strong>Sling</strong>s take the strain off your arms<br />
and distribute the weight. They provide multiple<br />
carry positions and can be used for several years,<br />
this may be the only carrier you will ever need.<br />
• Made from 100% cotton canvas or<br />
Organics: 55% hemp 45% organic cotton<br />
• Adjustable back strap – fits all sizes<br />
• Comfortable slim-line shoulder pad<br />
• Suitable for use from birth to<br />
3+ years. Max weight 20kgs<br />
• Baby-safe front clip<br />
The natural way to carry your baby or toddler.
The Diagonal Cradle<br />
From newborn to 6 months, this position offers the best support<br />
for baby's head and back. It's great help for feeding and baby can<br />
hear your heart beat.<br />
For your ease of use, we have included a line of diagonal<br />
stitching to help position your baby. They fit best across the<br />
sling, not along it as one might expect.<br />
First, adjust the sling to your size (see over). So as to have baby’s<br />
head close to your heart, adjust the back clip for size and keep the<br />
front clip at minimum adjustment. Here are two ways to fit the sling:<br />
Option 1:<br />
Lie the sling on a<br />
flat surface.<br />
1. Place baby with their<br />
head about ¹/ ³ down<br />
the side rail (or on<br />
the row of stitching)<br />
and their body in the<br />
middle of the sling<br />
on a 45˚ angle.<br />
2. Do up the front clip<br />
and safety loop, note<br />
that baby’s head is the<br />
same side as this clip.<br />
3. Put your head and<br />
opposite arm through<br />
the sling so that the<br />
shoulder pad sits<br />
diagonally between<br />
your shoulder blades.<br />
4. Lift baby and sling<br />
together, stand up<br />
and check you and<br />
baby are comfortable.<br />
Tip: Machine wash up to 40˚<br />
with plastic parts, normal<br />
spin, drip dry, warm iron if<br />
necessary. Do not bleach.<br />
Baby on 45˚<br />
angle with head<br />
on side rail.<br />
Do up clip and<br />
safety loop.<br />
Put head and<br />
shoulder through.<br />
Carefully lift<br />
baby and sling to<br />
standing.<br />
Front Clip<br />
Part B<br />
Option 2:<br />
Put the sling on<br />
yourself.<br />
1. Find the row of<br />
stitches or simply<br />
pull the side rail<br />
out in front of you,<br />
this is where you<br />
want to aim to get<br />
baby’s head.<br />
2. With baby facing you,<br />
feed them feet first<br />
into the sling.<br />
3. Pull up the side rail<br />
between you and<br />
baby.<br />
4. Now you are hands<br />
free, you can see baby<br />
and they have full,<br />
even support from<br />
top to tail.<br />
Tip: Wear your baby on<br />
alternating sides to develop<br />
your waist muscles equally.<br />
Front Clip Part A<br />
with Safety Loop<br />
Side<br />
Rails<br />
Tip: Remember to take the<br />
sling for outings by keeping it<br />
on the carseat. It keeps your<br />
sling close by and provides a<br />
handy sunshade.<br />
*<br />
Diagonal Stitching<br />
Place baby along stitching<br />
with head on side rail<br />
* .<br />
Shoulder Back Clip<br />
Pad (Ladderlock)<br />
Feed baby feet<br />
first into the sling.<br />
Baby’s head<br />
on side rail.<br />
Adjustable<br />
Back Strap<br />
Pull inner rail<br />
up between you.<br />
Check shoulder<br />
pad is flat and<br />
comfortable.<br />
The Hip Position<br />
At about 4 to 6 months baby can sit up and<br />
will naturally straddle your hip when carried.<br />
Using the sling will help spread the weight<br />
and save strain on your back and arms.<br />
This position may be used for toddlers<br />
even up to 2 and 3 years old.<br />
1. Tighten the sling so<br />
that the side rails<br />
are above your hip<br />
bone and check that<br />
the front and back<br />
clips are at equal<br />
adjustment.<br />
2. Pick up your child<br />
and tuck his or her<br />
feet right through<br />
the sling.<br />
3. Open the body of the<br />
sling and seat baby<br />
so that their bottom<br />
is lower than their<br />
knees.<br />
4. Spread the legs so<br />
baby is fully seated on<br />
your hip, any excess<br />
fabric can be tucked<br />
up or used to pull up<br />
baby’s back if they are<br />
sleepy or need extra<br />
support.<br />
Tip: <strong>Sling</strong>s work by<br />
counterbalance. If you<br />
wear your baby high on<br />
your body you will save<br />
straining your lower back.<br />
Tip: Helps bonding.<br />
We have a lovely story about<br />
a little boy who would present<br />
his sling to Mum whenever<br />
he wanted a cuddle.<br />
Pick baby up.<br />
Slip feet right<br />
through.<br />
Spread sling.<br />
Seat baby,<br />
legs spread.


