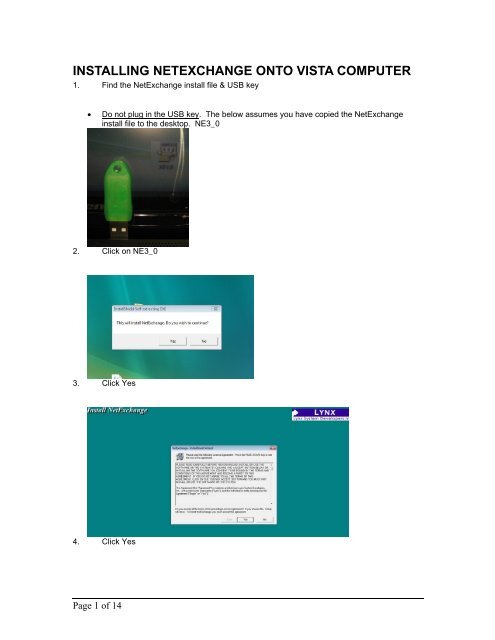
INSTALLING NETEXCHANGE ONTO VISTA COMPUTER
INSTALLING NETEXCHANGE ONTO VISTA COMPUTER
INSTALLING NETEXCHANGE ONTO VISTA COMPUTER

You also want an ePaper? Increase the reach of your titles
YUMPU automatically turns print PDFs into web optimized ePapers that Google loves.
<strong>INSTALLING</strong> <strong>NETEXCHANGE</strong> <strong>ONTO</strong> <strong>VISTA</strong> <strong>COMPUTER</strong><br />
1. Find the NetExchange install file & USB key<br />
• Do not plug in the USB key. The below assumes you have copied the NetExchange<br />
install file to the desktop. NE3_0<br />
2. Click on NE3_0<br />
3. Click Yes<br />
4. Click Yes<br />
Page 1 of 14
5. Click Next<br />
6. Choose USB Dongle and Standalone. If you’re using the Parallel Dongle choose that<br />
7. Click OK<br />
Page 2 of 14
8. Click OK<br />
9. Now Plug in your USB key let windows Automatically find it.<br />
10. Once it’s loaded click Start then Choose NetExchange<br />
11. Click NetExchange<br />
12. Click Unblock<br />
Page 3 of 14
Your NetExchange should now be lit up green indicating it has been installed correctly<br />
Next is assigning an IP# to your NetExchange computer<br />
Please follow the images below -<br />
1. Go into the Control Panel<br />
2. Click Manage network connections on the left<br />
Page 4 of 14
3. Right Click choose properties<br />
4. Double Click TCP/IPv4<br />
Page 5 of 14
5. Use the numbers shown above and click ok. Then ok again.<br />
<strong>INSTALLING</strong> FIELD LYNX <strong>ONTO</strong> POCKET PCS<br />
1. Connect your PocketPC to your computer through the USB<br />
2. Go into Windows “My Computer” and verify Windows has located your PocketPC<br />
3. Install FieldLynx onto your Computer. Download the file or run it from wherever you have it.<br />
In this example. I copied the installer to the desktop<br />
Page 6 of 14
4. Double Click FLPPC1_23<br />
5. Click Yes<br />
6. Click Yes<br />
Pay attention to where you’re installing FieldLynx. In this case the default is C:\Program<br />
Files\Lynx\FieldLynx WinCE<br />
7. Click Next let the install continue then click finish when it’s done. You’ve just installed<br />
FieldLynx onto your computer. The Field Lynx files you’ve just installed onto your computer<br />
must now be copied onto your Pocket PC. Click start in the lower left<br />
Page 7 of 14
8. Click Computer<br />
9. Double Click Local Disk C:<br />
10. Double Click Program Files<br />
11. Double Click Lynx<br />
Page 8 of 14
12. Double Click FieldLynx WinCE<br />
13. Right click on the file called FieldLynx this file is what we are going to paste onto the Pocket<br />
PC. Again right click on it and click Copy. Then minimize these screens.<br />
14. Double Click now on PocketPC<br />
15. Double Click on this icon<br />
Page 9 of 14
16. Double Click on Application Data<br />
17. Left click and hit Paste. You’ve just copied the FieldLynx installer to the PocketPC.<br />
18. Now you will need to take your PocketPC and navigate to this directory to install FieldLynx.<br />
19. Click Programs<br />
Page 10 of 14
20. Choose File Explorer<br />
21. Choose Show (up top) then select My Device<br />
22. Choose Application Data<br />
23. Choose FieldLynx this will install FieldLynx onto the PocketPC<br />
Page 11 of 14
This will be the program installing<br />
Once it’s complete you can click on the start menu and see the Field Lynx icon.<br />
We now have to setup the POCKETPC with an IP # and<br />
to connect to your wireless Access point.<br />
This assumes you have already setup an Access point with an SSID of Lynx and an Ip # of<br />
192.168.0.30<br />
1. Click Start on the Pocket PC<br />
2. Click settings<br />
3. Click the connections tab on the bottom then HP iPAQ wireless<br />
Page 12 of 14
4. Click View WLAN Networks<br />
5. Click the Network Adapters tab Marvell SDIO8686 not NE2000Compatible Ethernet Driver.<br />
On other pocket pc’s choose your installed wireless card.<br />
6. Choose Use Specific IP address then enter this IP address 192.168.0.35 if you have another<br />
PocketPC please assign it 192.168.0.36 if another 192.168.0.37 and so on. No two devices<br />
can I have the same IP #.<br />
7. Click ok in the upper left hand corner. Then Click ok again.<br />
Page 13 of 14
8. Choose the Access Point that is connected to the hub which your NetExchange computer is<br />
also connected to and click Connect<br />
You’re now connected to the AP called Lynx.<br />
Page 14 of 14