"Whoever holds this hammer, if he be worthy, shall possess the ...
"Whoever holds this hammer, if he be worthy, shall possess the ...
"Whoever holds this hammer, if he be worthy, shall possess the ...

Create successful ePaper yourself
Turn your PDF publications into a flip-book with our unique Google optimized e-Paper software.
"<strong>Whoever</strong> <strong>holds</strong> <strong>this</strong> <strong>hammer</strong>, <strong>if</strong> <strong>he</strong> <strong>be</strong> <strong>worthy</strong>,<br />
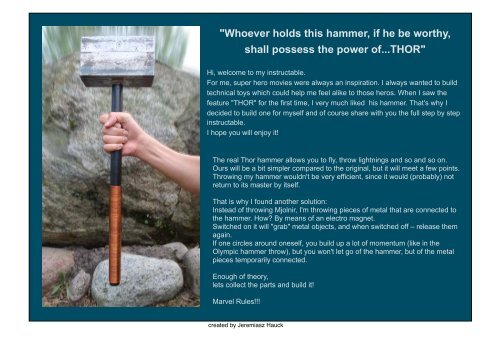
T<strong>he</strong> real Thor <strong>hammer</strong> allows you to fly, throw lightnings and so and so on.<br />
Ours will <strong>be</strong> a bit simpler compared to t<strong>he</strong> original, but it will meet a few points.<br />
Throwing my <strong>hammer</strong> wouldn't <strong>be</strong> very efficient, since it would (probably) not<br />
return to its master by itself.<br />
That is why I found anot<strong>he</strong>r solution:<br />
Instead of throwing Mjolnir, I'm throwing pieces of metal that are connected to<br />
t<strong>he</strong> <strong>hammer</strong>. How? By means of an electro magnet.<br />
Switc<strong>he</strong>d on it will "grab" metal objects, and w<strong>he</strong>n switc<strong>he</strong>d off – release t<strong>he</strong>m<br />
again.<br />
If one circles around oneself, you build up a lot of momentum (like in t<strong>he</strong><br />
Olympic <strong>hammer</strong> throw), but you won't let go of t<strong>he</strong> <strong>hammer</strong>, but of t<strong>he</strong> metal<br />
pieces temporarily connected.<br />
Enough of t<strong>he</strong>ory,<br />
lets collect t<strong>he</strong> parts and build it!<br />
Marvel Rules!!!<br />
<strong>shall</strong> <strong>possess</strong> t<strong>he</strong> power of...THOR"<br />
Hi, welcome to my instructable.<br />
For me, super <strong>he</strong>ro movies were always an inspiration. I always wanted to build<br />
technical toys which could <strong>he</strong>lp me feel alike to those <strong>he</strong>ros. W<strong>he</strong>n I saw t<strong>he</strong><br />
feature "THOR" for t<strong>he</strong> first time, I very much liked his <strong>hammer</strong>. That's why I<br />
decided to build one for myself and of course share with you t<strong>he</strong> full step by step<br />
instructable.<br />
I hope you will enjoy it!<br />
created by Jeremiasz Hauck
created by Jeremiasz Hauck
Like every good project, <strong>this</strong> too<br />
started off on t<strong>he</strong> designing table.<br />
T<strong>he</strong> original plans are a bit crude,<br />
though some ideas (copper wire,<br />
meassures) were already<br />
sketc<strong>he</strong>d out. See t<strong>he</strong> included<br />
PDF file for a more refined layout.<br />
Refering to my initial idea to make<br />
stripes of copper decoration on<br />
t<strong>he</strong> handle, I started to pre-<strong>be</strong>nd<br />
8,8 metres of 2mm wire into<br />
shape. Use tape to fasten your<br />
starting point.<br />
T<strong>he</strong> metal used <strong>he</strong>re is steel<br />
(3mm), <strong>be</strong>nt to spec<strong>if</strong>ications<br />
(see PDF file).<br />
One can see t<strong>he</strong> added tongues<br />
to later close t<strong>he</strong> body of t<strong>he</strong><br />
<strong>hammer</strong> <strong>he</strong>ad. T<strong>he</strong> side walls<br />
arenʻt fixed yet.<br />
T<strong>he</strong>n itʻs just pure handwork –<br />
turn t<strong>he</strong> <strong>hammer</strong> and try to keep<br />
t<strong>he</strong> wire as snuggly to t<strong>he</strong><br />
handleʻs wall as possible. At that<br />
moment I had no plan yet how to<br />
keep t<strong>he</strong> wire fixed to t<strong>he</strong> handle.<br />
Two more tongues fixed to<br />
connect with t<strong>he</strong> side walls. A<br />
hole to connect t<strong>he</strong> <strong>hammer</strong> <strong>he</strong>ad<br />
(holding t<strong>he</strong> electronic gear) with<br />
t<strong>he</strong> handle (carrying t<strong>he</strong> switch).<br />
created by Jeremiasz Hauck<br />
Here you can see <strong>be</strong>tter t<strong>he</strong> side<br />
walls – plus t<strong>he</strong> 8 holes (4<br />
tongues, 4 sides) for t<strong>he</strong> screws,<br />
to keep t<strong>he</strong> gear inside<br />
accessible. Later it came to my<br />
mind that one could have used a<br />
C-<strong>be</strong>am (half an I-<strong>be</strong>am) to build<br />
<strong>this</strong> structure,too.<br />
T<strong>he</strong> <strong>hammer</strong><strong>he</strong>ad assembled, itʻs<br />
a tight fit, with almost no gaps to<br />
<strong>be</strong> seen. On <strong>this</strong> picture you can<br />
see t<strong>he</strong> handle connected to t<strong>he</strong><br />
body, itʻs a 27 mm metal tu<strong>be</strong>, 50<br />
cm long.<br />
At that<br />
moment t<strong>he</strong><br />
<strong>hammer</strong> has<br />
already got<br />
itʻs cool look!<br />
Now letʻs go<br />
on for its<br />
functionality.
To make our <strong>hammer</strong> magnetic,<br />
we need to have a power supply.<br />
I chose to use 9x 9V batteries,<br />
t<strong>he</strong>y are small, c<strong>he</strong>ap and easy to<br />
get.<br />
Before connecting t<strong>he</strong> 9V<br />
batteries toget<strong>he</strong>r, I tried d<strong>if</strong>ferent<br />
locations for t<strong>he</strong>m – <strong>this</strong> one in<br />
t<strong>he</strong> end didnʻt get used, but it<br />
gave me a good sense of t<strong>he</strong><br />
space available.<br />
This is t<strong>he</strong> electro magnet. You<br />
can buy one, like I did, or you<br />
could build one yourself (using<br />
similar copper wire I used for t<strong>he</strong><br />
outside deco, but thinner). This<br />
one cost around $30.<br />
T<strong>he</strong> batteries are bundled in 3x3<br />
blocks, t<strong>he</strong>y are separated to<br />
leave a center space for t<strong>he</strong><br />
electro magnet. T<strong>he</strong> batteries in<br />
each block are connected in<br />
paralleles. This way t<strong>he</strong> Amperes<br />
are rising – thus t<strong>he</strong> power of t<strong>he</strong><br />
electro magnet.<br />
Small picture shows a switch<br />
relay. It works on t<strong>he</strong> basis of<br />
anot<strong>he</strong>r electro magnet, Since Iʻm<br />
using an altoget<strong>he</strong>r voltage of<br />
27V and a few Amperes, I didnʻt<br />
want to risk to destroy t<strong>he</strong> simple<br />
push button (later fixed to t<strong>he</strong><br />
handle).<br />
To get a hig<strong>he</strong>r voltage, t<strong>he</strong><br />
blocks are now connected in<br />
series. T<strong>he</strong> little loop in t<strong>he</strong> small<br />
picture connects minuses (3) of<br />
one block with t<strong>he</strong> pluses (3) of<br />
t<strong>he</strong> second block.<br />
created by Jeremiasz Hauck<br />
This is t<strong>he</strong> circuit layout (see<br />
PDF). One can see t<strong>he</strong> 3 blocks<br />
of batteries, linked to t<strong>he</strong> emagnet<br />
and t<strong>he</strong> relay. T<strong>he</strong> relay is<br />
fed by its own battery circuit,<br />
(seen on t<strong>he</strong> previous picture)<br />
and switc<strong>he</strong>d on by a push<br />
button.<br />
T<strong>he</strong> last block to <strong>be</strong> connected in<br />
series needs a longer cable to<br />
cover t<strong>he</strong> gap (<strong>be</strong>cause t<strong>he</strong><br />
magnet goes in <strong>be</strong>tween).<br />
Now we have 27V (9+9+9V).<br />
And a few Amperes (donʻt own an<br />
ammeter :-)).<br />
A test of t<strong>he</strong> circuit: instead of t<strong>he</strong><br />
magnet t<strong>he</strong>re is a control lamp,<br />
t<strong>he</strong> switch is not t<strong>he</strong> switch later<br />
to <strong>be</strong> used on t<strong>he</strong> handle – but<br />
t<strong>he</strong> lit diode showed t<strong>he</strong> system<br />
worked.<br />
T<strong>he</strong> complete circuit waiting to <strong>be</strong><br />
packed. From left to right:<br />
T<strong>he</strong> battery for t<strong>he</strong> relay, t<strong>he</strong><br />
relay, t<strong>he</strong> power unit (27V) and<br />
t<strong>he</strong> electro magnet.
Letʻs take out t<strong>he</strong> hot glue to<br />
make every part at home w<strong>he</strong>re it<br />
<strong>be</strong>longs. In t<strong>he</strong> <strong>he</strong>ad of t<strong>he</strong><br />
<strong>hammer</strong> you can see t<strong>he</strong> real<br />
placement of t<strong>he</strong> power unit. I<br />
tried to use t<strong>he</strong> hot glue on t<strong>he</strong> emagnet<br />
itself too, but it kept<br />
falling off. A d<strong>if</strong>ferent solution<br />
(later more) had to <strong>be</strong> called for.<br />
Letʻs see how we can fix t<strong>he</strong><br />
copper wire. How about providing<br />
a start and an end hole on t<strong>he</strong><br />
handle – like <strong>this</strong> t<strong>he</strong> wire wonʻt<br />
slide up or down, and is kept from<br />
unwinding itself, too.<br />
Locate t<strong>he</strong> place for your switch.<br />
T<strong>he</strong> <strong>hammer</strong> is supposed to build<br />
up centr<strong>if</strong>ugal force, so both<br />
hands should always sty in<br />
contact with t<strong>he</strong> handle. T<strong>he</strong> red<br />
tape indicates t<strong>he</strong> place under my<br />
thumb that I can easily<br />
manipulate without losing control<br />
of t<strong>he</strong> <strong>hammer</strong>.<br />
This is t<strong>he</strong> hole opposite to t<strong>he</strong><br />
switch, seen <strong>be</strong>fore. To also keep<br />
t<strong>he</strong> plastic tu<strong>be</strong> from sliding inside<br />
t<strong>he</strong> handle, but keeping it at t<strong>he</strong><br />
same time retractable in case of<br />
repair, I thought of making a<br />
channel, back and front. T<strong>he</strong> hole<br />
on t<strong>he</strong> plastic outlines t<strong>he</strong> depth<br />
needed.<br />
Hereʻs t<strong>he</strong> real switch, itʻs a micro<br />
switch. Once t<strong>he</strong> hole is drilled,<br />
t<strong>he</strong> body of t<strong>he</strong> switch vanis<strong>he</strong>s in<br />
t<strong>he</strong> tu<strong>be</strong>. But it canʻt <strong>be</strong> pressed<br />
in completely, so t<strong>he</strong>reʻs a<br />
resistance needed, <strong>he</strong>re provided<br />
by inserting a plastic tu<strong>be</strong>, that<br />
perfectly fit into t<strong>he</strong> handle.<br />
To make t<strong>he</strong> channel I used an<br />
angle grinder. Watch out for your<br />
hands and keep t<strong>he</strong> working<br />
object fixed properly. Two clamps<br />
for a stabilizing wood, two for t<strong>he</strong><br />
tu<strong>be</strong>. I used t<strong>he</strong> red line on t<strong>he</strong><br />
tu<strong>be</strong> to keep t<strong>he</strong> longer channel<br />
straight, t<strong>he</strong> shorter to t<strong>he</strong> switch<br />
went freehand.<br />
created by Jeremiasz Hauck<br />
After drilling, t<strong>he</strong>re is t<strong>he</strong> time to<br />
do some cosmetic work. I wanted<br />
t<strong>he</strong> <strong>he</strong>ad to <strong>be</strong> of a clean metal<br />
look, t<strong>he</strong> handle contrasted with<br />
black and copper. This was t<strong>he</strong><br />
final color from t<strong>he</strong>se spray cans,<br />
so to avoid t<strong>he</strong> usual speckles I<br />
covered t<strong>he</strong> <strong>he</strong>ad completely.<br />
T<strong>he</strong> place for t<strong>he</strong> switch was<br />
marked <strong>be</strong>fore. T<strong>he</strong> notch (rat<strong>he</strong>r<br />
than channel) allows me to bring<br />
t<strong>he</strong> cables to t<strong>he</strong> micro switch,<br />
which will „sit“ on t<strong>he</strong> plastic tu<strong>be</strong>.<br />
Switch and copper starter are 180<br />
degrees opposite to each ot<strong>he</strong>r.<br />
Iʻm painting t<strong>he</strong> handle. Itʻs a nice<br />
black matte finish.<br />
T<strong>he</strong> bottom hole to fix t<strong>he</strong> copper<br />
wire. It has to <strong>be</strong> 90 degrees to<br />
eit<strong>he</strong>r switch or starting point.<br />
I had t<strong>he</strong> intention to lead t<strong>he</strong> wire<br />
through metal and plastic tu<strong>be</strong>,<br />
but I had to change my plan a bit<br />
later…
I put t<strong>he</strong> pre-<strong>be</strong>nt wire into t<strong>he</strong><br />
starting hole as deep as t<strong>he</strong><br />
plastic tu<strong>be</strong> inside allowed, thus<br />
blocking it from escaping. With a<br />
(real) <strong>hammer</strong>, I <strong>be</strong>nt t<strong>he</strong> wire<br />
tight towards t<strong>he</strong> handleʻs wall,<br />
t<strong>he</strong>n putt t<strong>he</strong> loops on t<strong>he</strong> handle<br />
and tightened t<strong>he</strong>m to t<strong>he</strong> bottom.<br />
T<strong>he</strong>re t<strong>he</strong> wire was cut and fixed<br />
to t<strong>he</strong> bottom hole.<br />
This micro switch actually has got<br />
four legs, but we need just two for<br />
our cables. One leg goes into t<strong>he</strong><br />
notch, for t<strong>he</strong> second leg we need<br />
to drill anot<strong>he</strong>r hole.<br />
Bend away t<strong>he</strong> ones you donʻt<br />
need.<br />
To keep it tight, <strong>be</strong>nd t<strong>he</strong> wire to<br />
t<strong>he</strong> internal wall.<br />
Now how do we get t<strong>he</strong> plastic<br />
tu<strong>be</strong> inside, and keep it<br />
moveable?<br />
Change of plans: letʻs make a<br />
groove all along t<strong>he</strong> tu<strong>be</strong>…<br />
See – shown on t<strong>he</strong> small pict.<br />
T<strong>he</strong> two operating legs connected<br />
to wiring.<br />
Great – everything fits!<br />
So far t<strong>he</strong> external design of my<br />
<strong>hammer</strong>…<br />
T<strong>he</strong> cables going out from t<strong>he</strong><br />
<strong>hammer</strong> <strong>he</strong>ad, reaching t<strong>he</strong> hole<br />
for t<strong>he</strong> switch. Now connect…<br />
created by Jeremiasz Hauck<br />
Small picture: t<strong>he</strong> switch is<br />
connected.<br />
Big picture: t<strong>he</strong> switch in its final<br />
place of destination. Add some<br />
epoxy glue <strong>if</strong> needed. Mine fit<br />
quite tight.<br />
It looks so<br />
nice – just<br />
as a<br />
decoration<br />
object!<br />
Now letʻs<br />
add t<strong>he</strong><br />
switch and<br />
see <strong>if</strong> it<br />
works, too?<br />
Do you remem<strong>be</strong>r me trying to fix<br />
t<strong>he</strong> magnet with hot glue?<br />
Didnʻt stuck to t<strong>he</strong> straight metal<br />
surface…:-)<br />
So I had to come up with <strong>this</strong><br />
solution, a metal band strapped<br />
around to <strong>be</strong> tightened.
A last decorative element, to <strong>be</strong><br />
fixed along t<strong>he</strong> <strong>hammer</strong> <strong>he</strong>ad. I<br />
went to a printer to get me some<br />
writing on self-ad<strong>he</strong>sive foil.<br />
I included t<strong>he</strong> text on a PDF file.<br />
T<strong>he</strong> foil is a one-go element, so<br />
you canʻt tear it off and try again <strong>if</strong><br />
you glued it warped or false.<br />
Iʻve <strong>be</strong>en told that some water<br />
with dishwashing liquid allows for<br />
prolonged manipulation of t<strong>he</strong> foil.<br />
T<strong>he</strong>n squeeze out t<strong>he</strong> excess<br />
water with a credit card or<br />
something.<br />
Looking at t<strong>he</strong> result, Iʻm not sure<br />
<strong>if</strong> I can endorse t<strong>he</strong> advice I got,<br />
t<strong>he</strong>reʻs some goo remains under<br />
t<strong>he</strong> (transparent) foil.<br />
Oh gee!<br />
I gat<strong>he</strong>red too much of a speed – t<strong>he</strong>re I go…<br />
created by Jeremiasz Hauck