
Create successful ePaper yourself
Turn your PDF publications into a flip-book with our unique Google optimized e-Paper software.
INSTALLATION:<br />
The air pump should be installed by following either of the two<br />
recommended methods:<br />
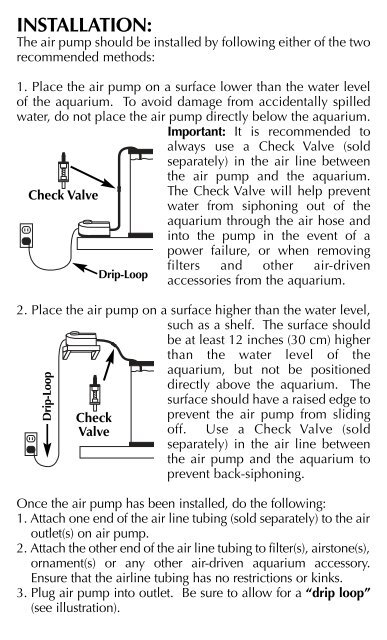
1. Place the air pump on a surface lower than the water level<br />
of the aquarium. To avoid damage from accidentally spilled<br />
water, do not place the air pump directly below the aquarium.<br />
Important: It is recommended to<br />
always use a Check Valve (sold<br />
separately) in the air line between<br />
the air pump and the aquarium.<br />
Check Valve<br />
The Check Valve will help prevent<br />
water from siphoning out of the<br />
aquarium through the air hose and<br />
into the pump in the event of a<br />
power failure, or when removing<br />
filters and other air-driven<br />
Drip-Loop<br />
accessories from the aquarium.<br />
2. Place the air pump on a surface higher than the water level,<br />
such as a shelf. The surface should<br />
be at least 12 inches (30 cm) higher<br />
than the water level of the<br />
aquarium, but not be positioned<br />
directly above the aquarium. The<br />
Drip-Loop<br />
Check<br />
Valve<br />
surface should have a raised edge to<br />
prevent the air pump from sliding<br />
off. Use a Check Valve (sold<br />
separately) in the air line between<br />
the air pump and the aquarium to<br />
prevent back-siphoning.<br />
Once the air pump has been installed, do the following:<br />
1. Attach one end of the air line tubing (sold separately) to the air<br />
outlet(s) on air pump.<br />
2. Attach the other end of the air line tubing to filter(s), airstone(s),<br />
ornament(s) or any other air-driven aquarium accessory.<br />
Ensure that the airline tubing has no restrictions or kinks.<br />
3. Plug air pump into outlet. Be sure to allow for a “drip loop”<br />
(see illustration).