Fire Control Panels “Solution F1” Operating and ... - CENTRALSEG
Fire Control Panels “Solution F1” Operating and ... - CENTRALSEG
Fire Control Panels “Solution F1” Operating and ... - CENTRALSEG

You also want an ePaper? Increase the reach of your titles
YUMPU automatically turns print PDFs into web optimized ePapers that Google loves.
<strong>Fire</strong> <strong>Control</strong> <strong>Panels</strong> <strong>“Solution</strong> <strong>F1”</strong><br />
<strong>Operating</strong> <strong>and</strong> Installation Manual<br />
Issue : June 2006<br />
NSC Sicherheitstechnik GmbH 1/58 22.06.2006<br />
Eckendorfer Str. 125 c<br />
<strong>Operating</strong> Installation Manual Solution F1 20060621.doc<br />
33609 Bielefeld Version S040A05.00
NSC Sicherheitstechnik GmbH 2/58 22.06.2006<br />
Eckendorfer Str. 125 c<br />
<strong>Operating</strong> Installation Manual Solution F1 20060621.doc<br />
33609 Bielefeld Version S040A05.00
Content<br />
1. Description of <strong>Control</strong> Panel :..................................................................................................... 7<br />
LED indications :......................................................................................................................... 7<br />
LC module indications : .............................................................................................................. 7<br />
Description of the push buttons :................................................................................................ 9<br />
2. Menus for the end user :........................................................................................................... 10<br />
General Main menu for end user.............................................................................................. 10<br />
FCP selection ........................................................................................................................... 10<br />
Main menu „Switch on / switch off“........................................................................................... 10<br />
Alarmcounter ............................................................................................................................ 11<br />
Changing the end user access code........................................................................................ 11<br />
Diagnosis Menu........................................................................................................................ 11<br />
Switching on/off : zones <strong>and</strong> single detectors .......................................................................... 12<br />
Switching on/off : OC-Outputs.................................................................................................. 12<br />
Switching on/off : 4 internal relays............................................................................................12<br />
Switching on/off : 3 internal power outputs............................................................................... 13<br />
Switching on/off : sounders / strobes ....................................................................................... 13<br />
Switching on/off : Alarm Transmission Device (TD)................................................................. 13<br />
Switching on/off : Alarm transmission delay............................................................................. 14<br />
Switching on/off : <strong>Fire</strong> outputs .................................................................................................. 14<br />
Event memory .......................................................................................................................... 14<br />
Detector data ............................................................................................................................ 14<br />
Internal Modules (PCBs) : Overview ........................................................................................ 15<br />
Network data ............................................................................................................................ 15<br />
Example of Power Supply Voltages ......................................................................................... 15<br />
Example of Power Outputs Voltages........................................................................................ 16<br />
Example of Input voltages ........................................................................................................ 16<br />
Example of displaying software version <strong>and</strong> Serial No. ........................................................... 16<br />
Switching on/off : Addressable detectors ................................................................................. 16<br />
Event memory : „Filter“............................................................................................................. 16<br />
Event memory : „Printing“......................................................................................................... 17<br />
Table of detectors..................................................................................................................... 17<br />
Internal Modules (PCBs) : Details ............................................................................................ 19<br />
Display of network adapters .....................................................................................................19<br />
Modem data.............................................................................................................................. 19<br />
Display of RS485 devices ........................................................................................................20<br />
Example of detector data : MCP .............................................................................................. 20<br />
Example of detector data : Optical smoke detector ................................................................. 20<br />
Example of loop card details ...................................................................................................21<br />
Example of details of a fire brigade repeater panel with fire brigade control panel ................. 21<br />
Only for Hochiki ESP............................................................................................................... 21<br />
Only for Apollo Discovery ......................................................................................................... 22<br />
Only for Hochiki ESP............................................................................................................... 21<br />
Example of „Zeropoint“ <strong>and</strong> „<strong>Fire</strong>point“ display ........................................................................ 21<br />
Only for Apollo Discovery ......................................................................................................... 22<br />
3. Menus for the installer : ............................................................................................................ 23<br />
Access to the installer menu ....................................................................................................24<br />
General Main menu for installer ............................................................................................... 24<br />
Main menu : Test functions ......................................................................................................25<br />
Main menu : Automatic <strong>Control</strong>ling .......................................................................................... 25<br />
Main menu : Alarm configuration.............................................................................................. 25<br />
Settings 1 of FCP ..................................................................................................................... 26<br />
Settings 2 of FCP ..................................................................................................................... 26<br />
Settings 3of FCP ...................................................................................................................... 27<br />
Detector test (only for addressable detectors) ......................................................................... 27<br />
Menu „Manual <strong>Control</strong>ling“ .......................................................................................................28<br />
NSC Sicherheitstechnik GmbH 3/58 22.06.2006<br />
Eckendorfer Str. 125 c<br />
<strong>Operating</strong> Installation Manual Solution F1 20060621.doc<br />
33609 Bielefeld Version S040A05.00
Menu „Simulation“ .................................................................................................................... 28<br />
Menu „Revision“ ....................................................................................................................... 28<br />
Automatic <strong>Control</strong> : internal OC Outputs.................................................................................. 29<br />
Automatic <strong>Control</strong> : 4 internal Relays ....................................................................................... 29<br />
Automatic <strong>Control</strong> : 3 monitored Power outputs....................................................................... 29<br />
Automatic <strong>Control</strong> : Output modules (loop) .............................................................................. 29<br />
Automatic <strong>Control</strong> : Input modules (loop)................................................................................. 30<br />
Automatic <strong>Control</strong> : 8 resistor monitored Inputs ....................................................................... 30<br />
Automatic <strong>Control</strong> : 2 monitored, conventional inputs.............................................................. 31<br />
Select the kind of detectors to configure : Loop or conventional ............................................. 31<br />
Detector settings....................................................................................................................... 31<br />
Zone settings ............................................................................................................................ 31<br />
Zone Alarm Coincidences ........................................................................................................ 32<br />
Timer programs ........................................................................................................................ 32<br />
Delay times of Main alarm (TD)................................................................................................ 33<br />
To set date <strong>and</strong> time................................................................................................................. 33<br />
To configure Holidays............................................................................................................... 34<br />
System settings ........................................................................................................................ 34<br />
Scan detectors.......................................................................................................................... 35<br />
Delete Configuration................................................................................................................. 35<br />
Delete Texts ............................................................................................................................. 36<br />
Delete Events ........................................................................................................................... 36<br />
Configuring macro push buttons S1 – S8 ................................................................................ 36<br />
Changing the installer access code.......................................................................................... 36<br />
Selecting the panel language ................................................................................................... 36<br />
Configuring the interfaces ........................................................................................................ 36<br />
Alarm <strong>and</strong> fault thresholds for conventional detectors ............................................................. 37<br />
Scanning RS485 devices ......................................................................................................... 37<br />
Modem functions ...................................................................................................................... 37<br />
Network settings ....................................................................................................................... 37<br />
Flash Update ............................................................................................................................ 38<br />
Power outputs: Thresholds.......................................................................................................38<br />
Loop parameters ...................................................................................................................... 38<br />
Options ..................................................................................................................................... 39<br />
Manual <strong>Control</strong> : internal OC Outputs ...................................................................................... 39<br />
Manual <strong>Control</strong> : 4 internal Relays ........................................................................................... 39<br />
Manual <strong>Control</strong> : 3 monitored Power Outputs .......................................................................... 39<br />
Manual <strong>Control</strong> : Output modules (loop) .................................................................................. 40<br />
Automatic <strong>Control</strong> : Settings for outputs................................................................................... 40<br />
Automatic <strong>Control</strong> : Functions .................................................................................................. 40<br />
Selection of displaying cause <strong>and</strong> effect events ...................................................................... 41<br />
Automatic <strong>Control</strong> : Settings for output modules (loop)............................................................ 41<br />
Automatic <strong>Control</strong> : Settings for sounders/ sounder modules (loop)........................................ 42<br />
Automatic <strong>Control</strong> : Settings of 8 internal monitored inputs ..................................................... 42<br />
Configuring zones (loop) .......................................................................................................... 43<br />
Configuring conventional zones ............................................................................................... 43<br />
Analogue addressable detector’s sensitivity / modes / delays................................................. 43<br />
To configure timer programs .................................................................................................... 45<br />
Interface protocols.................................................................................................................... 45<br />
Interface baudrates................................................................................................................... 45<br />
Configuring thresholds for conventional detectors ................................................................... 46<br />
Maintenance ............................................................................................................................. 46<br />
Push button S_ settings ........................................................................................................... 46<br />
Configuring the timer ................................................................................................................ 46<br />
Cause <strong>and</strong> Effect events configuration 1.................................................................................. 47<br />
Cause <strong>and</strong> Effect events configuration 2.................................................................................. 47<br />
Codes for cause <strong>and</strong> effect events........................................................................................... 48<br />
4. Mounting instruction ................................................................................................................. 49<br />
NSC Sicherheitstechnik GmbH 4/58 22.06.2006<br />
Eckendorfer Str. 125 c<br />
<strong>Operating</strong> Installation Manual Solution F1 20060621.doc<br />
33609 Bielefeld Version S040A05.00
5. Commissioning certificate FCP „Solution F1“................................................................................ 50<br />
General..................................................................................................................................... 50<br />
Checking the documentation.................................................................................................... 50<br />
Checking the system components ........................................................................................... 50<br />
Checking the wiring system......................................................................................................51<br />
Measure end of line resistors of conventional zones (without voltage) ................................... 51<br />
Measure cable resistance of loop wiring (without voltage)....................................................... 51<br />
Measurement of the end of line resistors of the monitored power outputs (without voltage) .. 52<br />
Measurement of the end of line resistors of the monitored inputs (without voltage)................ 52<br />
Checking the end of line resistor on the RS485 bus................................................................ 52<br />
Commissioning of the power supply......................................................................................... 52<br />
Scanning of internal an external components .......................................................................... 53<br />
Detector modules ..................................................................................................................... 53<br />
RS485 devices ......................................................................................................................... 53<br />
Addressable detectors/modules ............................................................................................... 54<br />
Checking of earth fault.............................................................................................................. 55<br />
Measurement of loop voltage <strong>and</strong> current................................................................................ 55<br />
Configure power outputs .......................................................................................................... 56<br />
Configuration of the fire control system.................................................................................... 56<br />
Functional tests ........................................................................................................................ 57<br />
6. Technical specifications :............................................................................................................... 58<br />
Attachment A : Menus for the end user<br />
Attachment B : Menus for the installer<br />
Attachment C : Volumes <strong>and</strong> tones of addressable sounders B07150-00 / B07160-00<br />
NSC Sicherheitstechnik GmbH 5/58 22.06.2006<br />
Eckendorfer Str. 125 c<br />
<strong>Operating</strong> Installation Manual Solution F1 20060621.doc<br />
33609 Bielefeld Version S040A05.00
NSC Sicherheitstechnik GmbH 6/58 22.06.2006<br />
Eckendorfer Str. 125 c<br />
<strong>Operating</strong> Installation Manual Solution F1 20060621.doc<br />
33609 Bielefeld Version S040A05.00
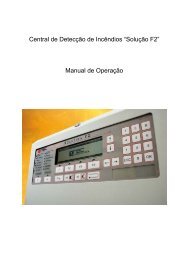
1. Description of <strong>Control</strong> Panel :<br />
Picture of the control panel of the „Solution F1“ :<br />
LED indications<br />
Dynamic functions keys F1 – F4,<br />
The functions is individually indicated<br />
in the bottom line of the LC module<br />
Field programmable push buttons S1 – S8<br />
<strong>and</strong> mounting place for printer<br />
‘Prog’ : to select the main menu<br />
‘ext. sounders off / on’<br />
‘int. buzzer off“ // “LED test’<br />
‘Reset’<br />
Keypad <strong>and</strong> cursor push buttons<br />
LED indications :<br />
LED : Description :<br />
green LED „In Operation“<br />
The <strong>Fire</strong> <strong>Control</strong> Panel (FCP) is in operation.<br />
green LED „Day Mode“<br />
Indicates that the FCP is in „Day Mode“. That means<br />
the main alarm is delayed if a delay time is configured.<br />
green LED „Night Mode“<br />
Indicates that the FCP is in „Day Mode“. That means<br />
the main alarm is NOT delayed <strong>and</strong> any alarm<br />
activates the <strong>Fire</strong> Brigade immediately.<br />
green LED „Service“<br />
Indicates that the FCP is in „Service Mode“.<br />
red LED „Main alarm“<br />
Indicates that the FCP is in Alarm condition. See LC<br />
module for detailed information. If an alarm<br />
transmission device (TD) is connected to the panel the<br />
panel has tried to activate the TD.<br />
red LED „Internal alarm“<br />
Indicates that the FCP is in Alarm condition. See LC<br />
module for detailed information.<br />
red LED „<strong>Fire</strong> Brigade alarmed“<br />
Indicates that the FCP has activated the alarm<br />
transmission device (TD) to the <strong>Fire</strong> Brigade <strong>and</strong> the<br />
TD gave a response to confirm the activation. (Input<br />
“TD response” in the wiring diagrams can be used for<br />
NSC Sicherheitstechnik GmbH 7/58 22.06.2006<br />
Eckendorfer Str. 125 c<br />
<strong>Operating</strong> Installation Manual Solution F1 20060621.doc<br />
33609 Bielefeld Version S040A05.00
ed LED „Call <strong>Fire</strong> Brigade“<br />
yellow LED „Fault“<br />
yellow LED „Disabling“<br />
yellow LED „Transmission Device“ (TD)<br />
yellow LED „Sounders“<br />
yellow LED „System“<br />
this confirmation signal).<br />
Indicates that the FCP is in Main Alarm condition but<br />
the alarm transmission device (TD) could not be<br />
activated. So the <strong>Fire</strong> Brigade maybe has to be called<br />
by phone.<br />
Indicates that the FCP is in fault condition. At least one<br />
device (detector, module), input, output or system<br />
component is not in normal condition. See LC module<br />
for detailed information.<br />
Indicates that at least one device (detector, module),<br />
input or output is disabled (switched off).<br />
In case of flashing this LED (<strong>and</strong> yellow LED „Fault“ is<br />
on) the TD is in fault condition.<br />
In case this LED is on (<strong>and</strong> yellow LED „Disabled“ is<br />
on) the TD is switched off.<br />
In case of flashing this LED (<strong>and</strong> yellow LED „Fault“ is<br />
on) one of the sounder outputs is in fault condition.<br />
In case this LED is on (<strong>and</strong> yellow LED „Disabled“ is<br />
on) one of the sounder outputs is switched off.<br />
The FCP itself is in fault condition. That means that<br />
maybe the main board (micro controller) does not<br />
work well <strong>and</strong> the correct function of the FCP is<br />
not guaranteed. Please check immediately by the<br />
installation company.<br />
LC module indications :<br />
The LC module is a graphics LCD which is automatically illuminated in the case of any event. That<br />
means if an alarm message, a fault message, a disabled message or just if any push button is<br />
pressed the LC module activated the illumination. Then detailed information is shown in the display.<br />
Either the LCD shows the information in 8 lines of alpha numerical texts or in a graphics mode like bar<br />
charts or columns.<br />
Usually the FCP shows the condition of the panel in the middle of the LC module. There is in big letter<br />
the current status on a dark background. The following messages are possible :<br />
IN OPERATION<br />
ALARM<br />
T E S T ALARM<br />
FAULT<br />
SWITCH OFF<br />
= normal condition<br />
= the FCP is in alarm condition<br />
= the FCP is in test alarm condition<br />
= the FCP is in fault condition<br />
= certain devices of the FCP are switched off<br />
If the user enters one of the menus (by pressing the push button „Prog“) at the bottom line of the LC<br />
module he sees the dynamic function keys F1 – F4. Sometimes all 4 keys are used, sometimes only<br />
one or two. It depends on the menu. Here we do not describe the function keys in details. Therefore<br />
please have a look into section 2.<br />
NSC Sicherheitstechnik GmbH 8/58 22.06.2006<br />
Eckendorfer Str. 125 c<br />
<strong>Operating</strong> Installation Manual Solution F1 20060621.doc<br />
33609 Bielefeld Version S040A05.00
Please note that : usually there are the following st<strong>and</strong>ard functions for<br />
‣ „F1“ = „cancel“ or „back“. Means to leave the current menu <strong>and</strong> jump into the menu<br />
above, <strong>and</strong><br />
‣ „F4“ = „Enter“. Means to select (or confirm) the function which is marked in the LC<br />
module by a black background.<br />
Description of the push buttons :<br />
The control panel of the FCP „Solution F1“ contains a br<strong>and</strong> new technology of push buttons. There<br />
are no more mechanical push buttons or ordinary foil key pads but it is a pressure sensitive piezo<br />
lacquer technology which is printed on the aluminium plate. These push buttons must not be<br />
adjusted <strong>and</strong> this technology has not known any attrition or abrasion for many years <strong>and</strong> it is<br />
very resistant to EMC interferences <strong>and</strong> detergents. An intelligent circuit detects any pressing of<br />
the push buttons <strong>and</strong> confirms it by a beep.<br />
The push buttons which are maybe not self-explanatory are these :<br />
Push button : Description :<br />
By this push button the user leaves the normal operation <strong>and</strong> enters the main menu of<br />
the FCP. See the detailed description in section 2.<br />
This push button deactivates (switch off) the external sounder outputs in case of an<br />
alarm. This is a temporary deactivation because if another alarm comes in the<br />
sounders will be activated again.<br />
−<br />
−<br />
−<br />
This push button deactivates (switch off) the internal buzzer in case of an alarm or<br />
fault message. This is a temporary deactivation because if another message<br />
comes in the buzzer will be activated again.<br />
In case of an alarm <strong>and</strong> if the alarm transmission is delayed, the delay time will be<br />
started.<br />
If there is no alarm <strong>and</strong> no fault this push button activates an LED test.<br />
This push button resets the FCP.<br />
Field programmable push buttons (S1 – S8). See detailed description in the installer<br />
manual.<br />
Use this push button in the menus to confirm your inputs line by line.<br />
Use this push button in the menus to cancel your inputs.<br />
Cursor control keypad.<br />
NSC Sicherheitstechnik GmbH 9/58 22.06.2006<br />
Eckendorfer Str. 125 c<br />
<strong>Operating</strong> Installation Manual Solution F1 20060621.doc<br />
33609 Bielefeld Version S040A05.00
2. Menus for the end user :<br />
The following description contains all the menus for the end user. If the push button „Prog"<br />
is pressed it starts with the main menu.<br />
No. Indication of the LC module : Description :<br />
01 Main menu<br />
1. Switch on/off<br />
2. Alarm counter<br />
3. End user code<br />
4. Diagnosis<br />
Cancel Installer Enter<br />
Display on network devices<br />
Main menu FCP 001<br />
1. Switch on/off<br />
2. Alarm counter<br />
3. End user code<br />
4. Diagnosis<br />
Cancel FCP Installer Enter<br />
General Main menu for end user<br />
This menu appears immediately after pressing „Prog“.<br />
The functions have the followings meanings :<br />
1. To switch on / off detectors, input-/ output<br />
modules, day/night mode, zones <strong>and</strong> general<br />
outputs Jump to Menu 02<br />
2. Indication of the alarm counter. This alarm<br />
counter cannot be set back. It is a 4 digit<br />
number (1 – 9999) Menü 03<br />
3. To change the end user code Jump to<br />
Menu 04<br />
4. To jump to the diagnosis menu Jump to<br />
Menu 05<br />
The push button "cancel“ (F1) leads to the normal<br />
status indication of the FCP.<br />
The function "FCP" (F2) is only available in networked<br />
fire control panels. After pressing F2 a list of all<br />
networked devices appears Menü 1.1 .<br />
The push button "Installer“ (F3) is to use for the installer<br />
company only. It leads to the menus for service <strong>and</strong><br />
configuration.<br />
The push button „Enter“ (F4) selects (activates) the<br />
function which is marked by a black background.<br />
Instead you can also select the function by pressing<br />
the no. left in front of the functions (here : 1 – 4).<br />
01.1<br />
02<br />
choose active device<br />
No. 001 : FCP 001<br />
↓+1 ↑-1 Selection -> +10 001 FCP 001 Zone offset 10000 <<br />
001 FCP 002 Zone offset 20000<br />
001 RCP 003 Zone offset 00000<br />
001 FCP 000 Zone offset 00000<br />
zurück all Selection<br />
Switch on/off<br />
1. Zones & detect. 5. Sounder/Strobe<br />
2. Output 6. Alarm Trans.Dev.<br />
3. Relay 7. Delay<br />
4. Power Output 8. <strong>Fire</strong> Outputs<br />
Cancel<br />
Enter<br />
FCP selection<br />
On networked systems here you can choose a device<br />
for which the next switching function should be done.<br />
You can scroll to a device by the cursor buttons <strong>and</strong><br />
then activate this device by pressing "Selection" (F4).<br />
The next enable/disable function then will be executed<br />
for the chosen panel. To send a common comm<strong>and</strong> to<br />
all network devices you can push "all" (F3).<br />
Main menu „Switch on / switch off“<br />
1. Switching on/off of zones <strong>and</strong> detectors <br />
Jump to Menu 06<br />
2. Switching on/off of OC-Outputs Jump to<br />
Menu 07<br />
3. Switching on/off of Relays inside the FCP <br />
Jump to Menu 08<br />
4. Switching on/off of 3 monitored power outputs<br />
Jump to Menu 09<br />
NSC Sicherheitstechnik GmbH 10/58 22.06.2006<br />
Eckendorfer Str. 125 c<br />
<strong>Operating</strong> Installation Manual Solution F1 20060621.doc<br />
33609 Bielefeld Version S040A05.00
Display on network devices<br />
Switch on/off<br />
1. Zones & detect. 5. Sounder/Strobe<br />
2. Output 6. Alarm Trans.Dev.<br />
3. Relay 7. Delay<br />
4. Power Output 8. <strong>Fire</strong> Outputs<br />
Cancel FCP Enter<br />
5. Continuously switching on/off of sounders /<br />
strobes (incl. loop sounders) Jump to<br />
Picture 10<br />
6. Switching on/off the alarm transmission device<br />
(TD) Jump to Picture 11<br />
7. To activate / deactivate the alarm delay for the<br />
TD Jump to Picture 12<br />
8. Temporary switching on/off the fire outputs.<br />
This means all outputs will be deactivated until<br />
this function is canceled Jump to Picture<br />
13<br />
The function "FCP" (F2) is only available in networked<br />
fire control panels. After pressing F2 a list of all<br />
networked devices appears Menü 1.1 .<br />
03 Alarmcounter<br />
FCP - Alarm : 0025<br />
Testalarm : 0011<br />
Network - Alarm : 0033<br />
Testalarm : 0017<br />
Cancel<br />
04 End user<br />
old access code : 0000<br />
new access code : 3528<br />
new access code : 3528<br />
Cancel<br />
05 Diagnosis<br />
1. Event memory 5. Voltages<br />
2. Detector data 6. Power Outputs<br />
3. Internal Modules 7. Inputs<br />
4. Network 8. FCP data<br />
Cancel<br />
Enter<br />
Alarmcounter<br />
This alarm counter cannot be set back. It is a 4 digit<br />
number (1 – 9999).<br />
Testalarms (Detector test/revision) will be displayed by<br />
a seperate counter.<br />
The lower two rows only will be displayed in networked<br />
systems. Here the Alarms <strong>and</strong> testalarms of other<br />
devices in the network will be counted.<br />
Changing the end user access code<br />
First you have to type the old access code, then you<br />
have to type two times the new access code.<br />
Every line has to be confirmed with „OK“.<br />
Example left side : old access code 0000 is replaced by<br />
new access code 3528.<br />
Diagnosis Menu<br />
1. To display the event memory on the LCD.<br />
The youngest message will be displayed first.<br />
Jump to Menu 14<br />
2. To analyse the zones <strong>and</strong> detector data. A list<br />
of all zones with detectors will be displayed.<br />
You can investigate in the details Jump<br />
to Menu 15<br />
3. A list with possible types of internal modules<br />
(PCBs) will be displayed Jump to Menu 16<br />
4. Here a list of all recognized network devices will be<br />
displayed -> Jump to Menu 17.<br />
5. A list will be displayed with real time<br />
measurements of power supply voltage <strong>and</strong><br />
earth fault voltages. You can check power<br />
supply <strong>and</strong> earth fault messages here <br />
Example in Picture 18<br />
6. A list will be displayed with real time<br />
measurements of the monitored power<br />
outputs. You can check fault messages here<br />
Example in Picture 19<br />
7. A list will be displayed with real time<br />
measurements of the 8 monitored inputs.<br />
You can check fault messages here <br />
Example in Picture 20<br />
8. To display FCP Software version <strong>and</strong> Serial<br />
no. Example in Picture 21<br />
NSC Sicherheitstechnik GmbH 11/58 22.06.2006<br />
Eckendorfer Str. 125 c<br />
<strong>Operating</strong> Installation Manual Solution F1 20060621.doc<br />
33609 Bielefeld Version S040A05.00
06 Zones & detect. FCP 001<br />
Status<br />
from zone : 5<br />
programmed zone text<br />
To zone :<br />
Cancel On Off Detect.<br />
Switching on/off : zones <strong>and</strong> single detectors<br />
You can switch off single zones or several zones<br />
simultaneously. This is done by using the “from … to… “<br />
function. Please type the zone number <strong>and</strong> confirm by<br />
“OK”.<br />
„Status“ means the current status of the zone (e.g.<br />
normal, alarm, fault). To switch off the zone you have to<br />
press „Off“ (F3) or for switching on the zone you have to<br />
press „On“ (F2).<br />
If only one zone shall be switched the line „to zone“ can<br />
be missed <strong>and</strong> F2/F3 (on/off) can be pressed<br />
immediately.<br />
If single detectors shall be switched you have to type<br />
“Detect.” (F4) after the zone has been confirmed (do<br />
not use F2/F3 (on/off) in this case) Jump to Menu 22<br />
07 Switch on/off RCP 003<br />
from output : 001 normal<br />
to output :<br />
↓+1 ↑-1 Selection -> +10 001 Output 001 Main processor<br />
002 Output 002 Main processor<br />
003 Output 003 Main processor<br />
Cancel On Off Enter<br />
Switching on/off : OC-Outputs<br />
Here the 16 OC-outputs on the main processor board of<br />
the FCP „Solution <strong>F1”</strong> as well as the OC-outputs on the<br />
loop cards can be switched on/off.<br />
The outputs are located like this :<br />
Outputs 1 – 16 : OC- Outputs on main board<br />
Outputs 17 – 24 : OC- Outputs on 1. loop card<br />
Outputs 25 – 32 : OC- Outputs on 2. loop card<br />
etc.<br />
To switch on/off the outputs there are two possibilities<br />
you can choose :<br />
a) To type the output no. directly by the key pad<br />
<strong>and</strong> confirming with „OK“. Please use the line<br />
“from output” <strong>and</strong> “to output” for this.<br />
b) Select the outputs by using the cursor keys ↓<br />
<strong>and</strong> ↑ (means 1 line up or 1 line down) or the<br />
cursor keys <strong>and</strong> (means 10 lines down<br />
or 10 lines up) <strong>and</strong> confirm the output numbers<br />
with „Enter“ (F4) or “Ok”.<br />
The actual „status“of the output (e.g. normal condition<br />
or active) will be displayed behind the number.<br />
After selecting the output / outputs you have to switch<br />
them by pressing F3 („off“) or F2 („on“).<br />
08 Switch on/off FCP 001<br />
from relay : 001 normal<br />
to relay :<br />
↓+1 ↑-1 Selection -> +10 001 Relay 001 Main processor<br />
002 Relay 002 Main processor<br />
003 Relay 003 Main processor<br />
Cancel On Off Enter<br />
Switching on/off : 4 internal relays<br />
Here the 4 internal relays on the main processor board<br />
of the FCP „Solution <strong>F1”</strong> can be switched on/off.<br />
To switch on/off the relays there are two possibilities<br />
you can choose :<br />
a) To type the relay no. directly by the key pad<br />
<strong>and</strong> confirming with „OK“. Please use the line<br />
“from relay” <strong>and</strong> “to relay” for this.<br />
b) Select the relays by using the cursor keys ↓<br />
<strong>and</strong> ↑ (means 1 line up or 1 line down) or the<br />
cursor keys <strong>and</strong> (means 10 lines down<br />
or 10 lines up) <strong>and</strong> confirm the relay numbers<br />
with „Enter“ (F4) or “OK”. Then press „Enter“<br />
(F4) to confirm the switching.<br />
The actual „status“of the relay (e.g. normal condition or<br />
NSC Sicherheitstechnik GmbH 12/58 22.06.2006<br />
Eckendorfer Str. 125 c<br />
<strong>Operating</strong> Installation Manual Solution F1 20060621.doc<br />
33609 Bielefeld Version S040A05.00
active) will be displayed behind the number.<br />
After selection the relay / relays you have to switch<br />
them by pressing F3 („off“) or F2 („on“).<br />
09 Switch on/off FCP 001<br />
from power output : 001<br />
normal<br />
to power output :<br />
↓+1 ↑-1 Selection -> +10 001 Power Output 001 Main processor<br />
002 Power Output 002 Main processor<br />
003 Power Output 003 Main processor<br />
Cancel On Off Enter<br />
Switching on/off : 3 internal power outputs<br />
Here the 3 internal power outputs on the main<br />
processor board of the FCP „Solution <strong>F1”</strong> can be<br />
switched on/off.<br />
To switch on/off the relays there are two possibilities<br />
you can choose :<br />
a) To type the power output no. directly by the<br />
key pad <strong>and</strong> confirming with „OK“. Please use<br />
the line “from power output” <strong>and</strong> “to power<br />
output” for this.<br />
b) Select the power outputs by using the cursor<br />
keys ↓ <strong>and</strong> ↑ (means 1 line up or 1 line down)<br />
or the cursor keys <strong>and</strong> (means 10 lines<br />
down or 10 lines up) <strong>and</strong> confirm the power<br />
output numbers with „Enter“ (F4) or “OK”.<br />
The actual „status“of the power output (e.g. normal<br />
condition, fault or active) will be displayed behind the<br />
number.<br />
After selection the power output / power outputs you<br />
have to switch them by pressing F3 („off“) or F2<br />
(„on“).<br />
10 Switch on/off FCP 001<br />
1. Zones & detect. 5. Sounder/Strobe<br />
2. Output 6. Alarm Trans.Dev.<br />
3. Relay 7. Delay<br />
4. Power Output 8. <strong>Fire</strong> Outputs<br />
Cancel<br />
off<br />
Switching on/off : sounders / strobes<br />
After selecting this function in the switch on/off main<br />
menu you see at the bottom line of the LCD „off“ (F3)<br />
or „on“ (F2).<br />
By pressing F3 all sounders / strobes will be switched<br />
off continuously.<br />
Pay attention :<br />
By the function (F3) all sounders <strong>and</strong> strobes will<br />
be switched off continuously. If another alarm<br />
comes in the sounders / strobes will not be<br />
activated again until they are switched on again.<br />
11 Switch on/off FCP 001<br />
1. Zones & detect. 5. Sounder/Strobe<br />
2. Output 6. Alarm Trans.Dev.<br />
3. Relay 7. Delay<br />
4. Power Output 8. <strong>Fire</strong> Outputs<br />
Cancel<br />
off<br />
Switching on/off : Alarm Transmission Device<br />
(TD)<br />
After selecting this function in the switch on/off main<br />
menu you see at the bottom line of the LCD „off“ (F3)<br />
or „on“ (F2).<br />
By pressing F3 the Alarm transmission device will be<br />
switched off continuously.<br />
The current status of the TD will additionally indicated<br />
by the yellow LED on the control panel.<br />
NSC Sicherheitstechnik GmbH 13/58 22.06.2006<br />
Eckendorfer Str. 125 c<br />
<strong>Operating</strong> Installation Manual Solution F1 20060621.doc<br />
33609 Bielefeld Version S040A05.00
12 Switch on/off FCP 001<br />
1. Zones & detect. 5. Sounder/Strobe<br />
2. Output 6. Alarm Trans.Dev.<br />
3. Relay 7. Delay<br />
4. Power Output 8. <strong>Fire</strong> Outputs<br />
Cancel<br />
on<br />
Switching on/off : Alarm transmission delay<br />
Here the delay of the alarm transmission device of the<br />
FCP „Solution <strong>F1”</strong> can be switched on/off.<br />
After selecting this function you see at the bottom line<br />
of the LCD „off“ (F3) or „on“ (F2). “On” means to<br />
activate the delay (Day Mode)<br />
The current status of the delay will be additionally<br />
indicated by the green LEDs (Day Mode, Night Mode)<br />
on the control panel.<br />
When the delay is activated there is an additional<br />
indication in the LC module (“Delay activated”)<br />
Pay attention :<br />
To switch on the delay of the alarm transmission<br />
device is only possible if “Response time” <strong>and</strong><br />
“Inspection time” in the menus “Alarm configurat. -<br />
> Delay” are configured. This can only be done by<br />
the installer company.<br />
13 Switch on/off FCP 001<br />
1. Zones & detect. 5. Sounder/Strobe<br />
2. Output 6. Alarm Trans.Dev.<br />
3. Relay 7. Delay<br />
4. Power Output 8. <strong>Fire</strong> Outputs<br />
Cancel<br />
off<br />
14 Event memory<br />
Message 0001 of 0391<br />
Fault<br />
Power output 001 wire break<br />
08-07-2004 18:25:22<br />
Cancel Filter print<br />
Switching on/off : <strong>Fire</strong> outputs<br />
This function disables in case of an alarm all outputs<br />
which have been configured with „yes“ in the menu<br />
„Automat. <strong>Control</strong>ling“ Selection 1 to 4 „Settings“<br />
„Operate like <strong>Fire</strong> Output“.<br />
These could be 3 internal power outputs, all OCoutputs,<br />
4 internal relays <strong>and</strong> all loop output modules.<br />
After selecting this function you see at the bottom line<br />
of the LCD „off“ (F3) or „on“ (F2).<br />
Pay attention :<br />
By the function (F3) all fire outputs will be switched<br />
off continuously. If an alarm comes in no output<br />
will be activated.<br />
Event memory<br />
The last message (the youngest) is shown first in the<br />
upper area of the LC module. In the last but one line of<br />
the LCD data <strong>and</strong> time of the message are shown. This<br />
is the time when the event has appeared.<br />
You can scroll with the cursor keys up <strong>and</strong> down the<br />
messages :<br />
↓ <strong>and</strong> ↑ : 1 line up or 1 line down<br />
und : 10 lines down or 10 lines up<br />
By pressing F2 („Filter“) Jump to Menu 23<br />
By pressing F3 („print“) Jump to Menu 24<br />
15 Zone | existing | config.<br />
> 0001 | 010 | 010<br />
0002 | 010 | 010<br />
0003 | 011 | 107<br />
0004 | 003 | 127<br />
0005 | 010 | 010<br />
0006 | 021 | 117<br />
Cancel Segment Details<br />
Detector data<br />
Here the zones which contain at least one detector are<br />
listed line by line (left column).<br />
The middle column shows the number of detectors<br />
which were found during last loop scanning.<br />
The right column „config.“ shows the number of<br />
detectors which were configured by configuration<br />
NSC Sicherheitstechnik GmbH 14/58 22.06.2006<br />
Eckendorfer Str. 125 c<br />
<strong>Operating</strong> Installation Manual Solution F1 20060621.doc<br />
33609 Bielefeld Version S040A05.00
Segment | existing | Current<br />
> 01 | 024 | 008,4mA<br />
02 | 031 | 010,9mA<br />
03 | 068 | 023,8mA<br />
04 | 044 | 015,4mA<br />
| |<br />
| |<br />
Cancel Zone Details<br />
16 Internal Modules<br />
17<br />
1. Loop card HOCHIKI ESP : 01<br />
2. Loop card Apollo XP : 00<br />
3. Conventional detector card : 00<br />
4. Input-/output module : 00↓<br />
Cancel<br />
Details<br />
Cursor key „↓“ show more :<br />
5. Network interface card : 00<br />
6. Modem : 00<br />
7. RS485 Devices : 00<br />
No.| Type | Zone offset |Mode<br />
>001|FCP 001 | 01000 |Day *<<br />
002|FCP 002 | 02000 |Night<br />
003|RCP 001 | 00000 |Night<br />
004|FCP 000 | 00000 |Night<br />
005|FCP 000 | 00000 |Night<br />
006|FCP 000 | 00000 |Night<br />
Cancel<br />
Details<br />
18 Voltages<br />
Power supply voltage<br />
: 28,15 V<br />
Battery charg. voltage : 27,72 V<br />
Pow. supply batt.volt. : 27,57 V<br />
Earth fault voltage : 1,57 V (00)<br />
RTC battery<br />
: 3,07 V<br />
Cancel<br />
software or by manual operating on the control panel.<br />
Ideally the numbers in the middle <strong>and</strong> right columns<br />
should be identical.<br />
By pressing key F3 „Segment", the display will change<br />
to a list of segments with number of connected devices<br />
<strong>and</strong> current on each segment.<br />
Please select with the cursor keys the zone/segment<br />
which should be investigated more detailed <strong>and</strong> press<br />
„Details“ (F4) Jump to Menu 25<br />
Internal Modules (PCBs) : Overview<br />
Here all possible types of internal modules (PCBs) are<br />
listed <strong>and</strong> behind them you can see how many number<br />
of modules are installed in the FCP (here : only 1 pc.<br />
Loop card Hochiki ESP).<br />
These types of modules are possible (depending on<br />
software version) :<br />
‣ Loop card supporting Hochiki ESP detectors<br />
‣ Loop card supporting Apollo XP95/Discovery<br />
detectors<br />
‣ Conventional detector card<br />
‣ Input- / Output module<br />
‣ ARCNET network card<br />
‣ Telephone modem for software configuration<br />
‣ RS485 devices<br />
Please select with the cursor keys the module which<br />
should be investigated more detailed <strong>and</strong> press<br />
„Details“ (F4) Jump to Menu 26<br />
Network data<br />
Here you see a list of all network devices. The<br />
consecutive number corresponds to the configured<br />
network-ID of the device. In the column Type the device<br />
type <strong>and</strong> the device number will be displayed. The next<br />
column shows the configured Zone offset for each<br />
device. This zone offset will be added to the original<br />
zone number in case of messages from<br />
detectors/zones, if the display system for the network is<br />
configured to zone offset. The mode (day or Night)<br />
specifies, at which devices the delay for the<br />
transmission device is active or not.<br />
You can scroll through the list of network devices using<br />
the cursor keys. The * marks the device you are actual<br />
working on. By pressing „Details“ (F4) you will get<br />
further informations about the selected device Jump<br />
to Menu 27<br />
Example of Power Supply Voltages<br />
The charging voltage should be in between 27,3V <strong>and</strong><br />
27,8V (20°C). This should be checked by voltage meter.<br />
Behind the earth fault voltage a counter is displayed to<br />
count the values beyond the threshold. On 10<br />
consecutive faulty measurements a fault message will<br />
be displayed..<br />
The RTC battery should be replaced if the voltage drops<br />
below 2,1 V.<br />
Leaving the menu by pressing F1 („Cancel“).<br />
NSC Sicherheitstechnik GmbH 15/58 22.06.2006<br />
Eckendorfer Str. 125 c<br />
<strong>Operating</strong> Installation Manual Solution F1 20060621.doc<br />
33609 Bielefeld Version S040A05.00
19 Power outputs<br />
Power Output 1: 1,77V Reply 1 : 3,37V<br />
Power Output 2: 1,79V Reply 2 : 3,67V<br />
Power Output 3: 1,72V<br />
KDB-output : 2,48V<br />
Extinguish.output : 13,7V<br />
Cancel<br />
20 Inputs<br />
Input 1 : 2,97V | Input 5 : 2,98V<br />
Input 2 : 2,96V | Input 6 : 2,96V<br />
Input 3 : 3,03V | Input 7 : 2,98V<br />
Input 4 : 3,05V | Input 8 : 2,97V<br />
|<br />
Cancel<br />
Example of Power Outputs Voltages<br />
Leaving the menu by pressing F1 („Cancel“).<br />
Example of Input voltages<br />
Here the FCP listed the input voltages of 8 OC-inputs<br />
which can be monitored if pull-down resistors are used<br />
(see schematic diagrams for installer company)<br />
Leaving the menu by pressing F1 („Cancel“).<br />
21 FCP data<br />
Software version<br />
S040A04.03<br />
Example of displaying software version <strong>and</strong><br />
Serial No.<br />
Serial number 0905/0067<br />
Cancel<br />
22 Zone 0005 Status<br />
from detector : 1 normal<br />
evt. individual detector text<br />
to detector : 3 normal<br />
evt. individual detector text<br />
Cancel On Off<br />
Leaving the menu by pressing F1 („Cancel“).<br />
Switching on/off : Addressable detectors<br />
The first line of the LC module shows the zone where<br />
the detectors are located (here : 5).<br />
It is possible just to switch off only one detector as<br />
well as several detectors. Please type the detector<br />
number <strong>and</strong> confirm by “OK”.<br />
„Status“ means the current status of the detector (e.g.<br />
normal condition, alarm condition, fault condition). If a<br />
individual detector text has been configured, this text<br />
will be displayed right below the detector line after<br />
pressing “OK”.<br />
For switching off you have to press „Off“ (F3) or for<br />
switching on you have to press „On“ (F2).<br />
23 Filter<br />
1. Alarm x 5. Off -<br />
2. Pre alarm x 6. Activation -<br />
3. Test alarm -<br />
4. Fault -<br />
Cancel<br />
on<br />
If only one detector shall be switched the line „to<br />
detector“ can be missed <strong>and</strong> F2/F3 (on/off) can be<br />
pressed immediately.<br />
Event memory : „Filter“<br />
The FCP Solution F1 saves all messages in their<br />
event memory.<br />
This filter functions allow to display only certain kind<br />
of messages in the LC module (e.g. only alarm<br />
messages).<br />
There are 6 different kinds of messages, which can<br />
be displayed in the LC module. If a message is<br />
marked with „x“ this message will be displayed. If it is<br />
marked with „-„ this message will not be displayed.<br />
You can switch from „x“ to „-“ by push button F3<br />
(“off”) <strong>and</strong> from “-“ to “x” by push button F2 (“on”).<br />
The example on the left side shows only alarm <strong>and</strong><br />
pre alarm messages but all other kind of message are<br />
hidden.<br />
NSC Sicherheitstechnik GmbH 16/58 22.06.2006<br />
Eckendorfer Str. 125 c<br />
<strong>Operating</strong> Installation Manual Solution F1 20060621.doc<br />
33609 Bielefeld Version S040A05.00
24 Event memory<br />
from message :<br />
to message :<br />
Cancel<br />
print<br />
Event memory : „Printing“<br />
Please type the number of messages <strong>and</strong> confirm<br />
every line by „OK“: The last (youngest) message is<br />
message no. 1 <strong>and</strong> the oldest one is message no.<br />
1034.<br />
After selecting the messages press F4 („print“) for<br />
printing.<br />
The print goes out through the interface which is<br />
selected by menu „Settings 2“ -> „Interfaces“.<br />
25 Zone 0003 Detect. 002/010<br />
No. |Type<br />
|Seg.|Add|Status<br />
001|Conv. mo. CHQ_MZ|01:o|001|Normal<br />
>002|Flashl . CHQ_AB|01:o|002|Normal<br />
003|Ion. det. AIE_E |01:o|003|Normal<br />
004|opt. det. ALG_E |01:o|004|Normal<br />
005|Conv. mo. CHQ_Z |01:o|005|Normal<br />
Cancel existing Details<br />
Table of detectors<br />
The first line of the LC module shows zone <strong>and</strong><br />
number of the detector which is marked by „>“ in the<br />
left column of the display area. Here in this example it<br />
is zone 0003 <strong>and</strong> detector 002 of 10 detectors in<br />
this zone at all.<br />
The second column shows all configured detectors of<br />
this zone by name (abbreviated), doesn’t matter if<br />
they are connected to the panel or not. If you want to<br />
see only the connected detectors of this zone press<br />
„existing“ (F2).<br />
In this case the bottom line changes <strong>and</strong> „config.“ is<br />
written above F2. Additionally the number of<br />
detectors in line 1 will change, if there is a difference<br />
between connected <strong>and</strong> configured detectors for this<br />
zone.<br />
Pressing F2 again will show all configured detectors<br />
again.<br />
One detector is shown per line. The grey line have the<br />
following meanings :<br />
No. : Detector number within the displayed zone<br />
Type : Kind of detector, e.g. optical, MCP etc. This<br />
information is automatically transmitted by the<br />
detectors to the FCP.<br />
The meanings of the abbreviations are :<br />
1. Hochiki ESP<br />
opt. det. ALG-E<br />
Ion. det. AIE-E<br />
Heat det. ATG-E<br />
Multisen. ACA-E<br />
Multisen. ACB-E<br />
MCP CHQ-CP<br />
Sounder CHQ-BS<br />
Sounderm. CHQ-B<br />
Inp.mod. CHQ_S<br />
Zone mod.CHQ_MZ<br />
Zone mod.CHQ_Z<br />
Inp/Outp. CHQ_SIO<br />
Inp/Outp. CHQ_R<br />
Inp/Outp. CHQ_FIO<br />
Strobe CHQ-AB<br />
Remote CHQ-ARI<br />
Ad. Sock. YCA_3H2<br />
Ad. Sock. YCA_5H2<br />
Optical smoke detector<br />
Ionisation smoke detect.<br />
Heat detector<br />
Multisensor<br />
Multisensor Heat<br />
Manual Call Point<br />
Base Sounder<br />
Sounder output module<br />
Input module<br />
Mini convention. module<br />
Conventional module<br />
Input-/output module<br />
Input-/output module<br />
Input-/output module<br />
Addressable strobe<br />
Addressable remote ind..<br />
Addressable base<br />
Addressable base<br />
NSC Sicherheitstechnik GmbH 17/58 22.06.2006<br />
Eckendorfer Str. 125 c<br />
<strong>Operating</strong> Installation Manual Solution F1 20060621.doc<br />
33609 Bielefeld Version S040A05.00
2. Apollo Discovery/XP95/Xplorer<br />
opt. det. DISCOV.<br />
Ion. det. DISCOV.<br />
CO detect.DISCOV.<br />
Heat det. DISCOV.<br />
Multisen. DISCOV.<br />
MCP DISCOV.<br />
opt. det. XP95<br />
Ion. Det. XP95<br />
Heat det. XP95<br />
H.Thermo. XP95<br />
Multisen. XP95<br />
MCP XP95<br />
Sounderm. XP95<br />
Inp.mod. XP95<br />
Zone mod. XP95<br />
Inp/Outp. XP95<br />
Flame det. XP95<br />
Beam XP95<br />
Ref.Beam XP95<br />
opt. det. XPlorer<br />
Heat det. XPlorer<br />
H.Thermo. XPlorer<br />
Optical smoke detector<br />
Ionisation smoke detect.<br />
Co detector<br />
Heat detector<br />
Multisensor<br />
Manual Call Point<br />
Optical smoke detector<br />
Ionisation smoke detect.<br />
Heat detector<br />
Heat detector high<br />
temperatur<br />
Multisensor<br />
Manual Call Point<br />
Sounder output module<br />
Input module<br />
Conventional module<br />
Input-/output module<br />
Flame detector<br />
Beam detector<br />
Beam detector with<br />
reflector<br />
Optical smoke detector<br />
Heat detector<br />
Heat detector high<br />
temperatur<br />
Seg. :<br />
Segment = Section of addresses with a<br />
maximum of 254 Hochiki detectors,<br />
modules / base sounders <strong>and</strong> a maximum<br />
of 126 Apollo detectors, modules. The<br />
segments are partitioned on the loop card<br />
according this list :<br />
• Loop card 1 : Segment 1 <strong>and</strong> 2<br />
• Loop card 2 : Segment 3 <strong>and</strong> 4<br />
• Loop card 3 : Segment 5 <strong>and</strong> 6<br />
• Loop card 4 : Segment 7 <strong>and</strong> 8<br />
• Loop card 5 : Segment 9 <strong>and</strong> 10<br />
• Loop card 6 : Segment 11 <strong>and</strong> 12<br />
• Loop card 7 : Segment 13 <strong>and</strong> 14<br />
• Loop card 8 : Segment 15 <strong>and</strong> 16<br />
• Loop card 9 : Segment 17 <strong>and</strong> 18<br />
o : This is a symbol for a loop.<br />
- : This is a symbol for a stub line.<br />
Adr. : Detector address (physical address stored<br />
in the detector)<br />
Status : Current status of the detector (e.g. normal<br />
condition, alarm condition, fault condition,<br />
disabled condition)<br />
By pressing F4 („Details“) it is possible to display<br />
more details of the detectors. That means analogue<br />
values, dust contamination, input bits <strong>and</strong> so on.<br />
Jump to Picture 27 for Manual Call Points<br />
Jump to Picture 28 for optical smoke detector<br />
NSC Sicherheitstechnik GmbH 18/58 22.06.2006<br />
Eckendorfer Str. 125 c<br />
<strong>Operating</strong> Installation Manual Solution F1 20060621.doc<br />
33609 Bielefeld Version S040A05.00
26<br />
Internal Modules 01/09<br />
>01 Loop card HOCHIKI ESP<br />
02 Conventional detector card<br />
03 -<br />
04 -<br />
05 -<br />
06 -<br />
Cancel<br />
Details<br />
26.2<br />
Arcnet 1 Arcnet 2<br />
Station ID : 001 | 001<br />
Next ID : 002 | 002<br />
Receive : OK | OK<br />
Token seen : OK | OK<br />
Send : OK | OK<br />
Counter Reconfig.: 000 | 000<br />
Cancel<br />
26.3<br />
Modem<br />
Internal Modules (PCBs) : Details<br />
The FCP displays the physically installed internal<br />
modules (PCBs) with their addresses (1-9). These are<br />
the addresses of the DIL switches on the PCBs.<br />
Please select by the cursor keys the PCB which shall<br />
be investigated more detailed <strong>and</strong> press F4<br />
(„Details“) Jump to Picture 29<br />
Display of network adapters<br />
Installed network adapters will be dispayed with<br />
the following informations:<br />
• Station ID (1-255) is the network number of the<br />
device (device no. set in the network<br />
configuration Menu 81).<br />
• Next ID (1-255) is the device number, to which<br />
the token will be passed.<br />
• Receive (OK or F) shows, if the network card is<br />
receiving data from another device.<br />
• Token seen (OK or F) shows, if the network card<br />
has seen the token even if it doesn’t take part at<br />
the network communication.<br />
• Send (OK or F) shows activity of the driver for<br />
sending.<br />
• Counter Reconfig. counts, how often this card<br />
initiated a network reconfiguration. Comparing<br />
this counter with other devices gives information<br />
about a damaged network component.<br />
Modem data<br />
If a telephone modem has been installed on the main<br />
board, this menu displays the following information :<br />
Cancel<br />
Call accept off<br />
hang up<br />
Line 2: Product code<br />
Line 3: Firmware version<br />
Line 4: Modem version<br />
Line 5: Country code (FD=Europe)<br />
Line 6: Version of "Data pump"<br />
In line 7 the actual modem status will be displayed.<br />
The modem only accepts an incoming call, if the<br />
automatic call acceptance has been activated in the<br />
installer menu Menü 80.<br />
Possible messages are:<br />
• Call acceptance on<br />
• Call acceptance off<br />
• RING (of other modem)<br />
• CONNECT 33600 (Connection to other modem<br />
established)<br />
• NO CARRIER (Connection terminated)<br />
You can cancel a connection by pressing F3 „hang<br />
up“.<br />
NSC Sicherheitstechnik GmbH 19/58 22.06.2006<br />
Eckendorfer Str. 125 c<br />
<strong>Operating</strong> Installation Manual Solution F1 20060621.doc<br />
33609 Bielefeld Version S040A05.00
26.4<br />
Internal Modules 01/63<br />
>01 FRP with FBC<br />
02 Remote LCD Panel A<br />
03 Remote LCD Panel A<br />
04 FRP A B<br />
05 -<br />
06 -<br />
Cancel<br />
Details<br />
27 0001/001 MCP CHQ-CP<br />
Configured detector text<br />
1 2 3 4 5 6 7 8<br />
Inputs |0| | | | | | | |<br />
Outputs |0| | | | | | | |<br />
Fault : missing<br />
Cancel<br />
Display of RS485 devices<br />
A number of max. 63 devices can be connected to the<br />
redundant RS485 interface..<br />
The device types will be shown as text:.<br />
By characters "A" <strong>and</strong> "B" will be signalised, on which<br />
channels a device has been connected.<br />
For further informations please press „Details“ (F4)<br />
jump to menu 29.1<br />
Example of detector data : MCP<br />
The input bits display the status of the alarm contact<br />
of the MCP or - in case of input modules – the status<br />
of the input bits of the module (high / low).<br />
The “Output” bits show – in case of output modules –<br />
which outputs are active or in fault condition.<br />
Following status are possible:<br />
28<br />
Hochiki ESP<br />
0002/001 opt. det. ALG-E<br />
Configured detector text<br />
A-Value ████████<br />
0,8%/m<br />
Pre alarm███████████████ 2,7%/m<br />
Alarm █████████████████ 3,4%/m<br />
Cancel Calib. Details<br />
• 0 = inactive<br />
• 1 = active<br />
• x = reset<br />
• = open curcuit<br />
• S = short curcuit<br />
• U = undefined<br />
The last but one line shows any additional fault<br />
information if the detector/module is not in normal<br />
condition (here : fault because detector is missing).<br />
Leaving the menu by pressing F1 („Cancel“).<br />
Example of detector data : Optical smoke<br />
detector<br />
The FCP displays the current values of the detector<br />
as horizontal bar charts. The meanings of the bars<br />
are :<br />
• Analogue value (measured in detector<br />
chamber)<br />
• Pre alarm threshold<br />
• Alarm threshold<br />
The percentage values on the right relates to the bar<br />
charts.<br />
The Pre alarm/alarm threshold depend on<br />
a) the detector sensitivity which can be<br />
adjusted<br />
b) the mode if the detector is a multi sensor<br />
Only for Hochiki ESP<br />
The push button „Calib“ration (F3) can be used to<br />
calibrate an optical smoke detector or a multi sensor<br />
manually. This will be done by the panel usually<br />
automatically once a day (see Settings -> System<br />
settings -> Parameter 12). That means usually this is<br />
not necessary to do manually except :<br />
1. after replacing a detector <strong>and</strong> if the fault<br />
message "Calibration fault" appears.<br />
2. if after the daily automatic calibration the<br />
fault message "Calibration fault" appears.<br />
The manual calibration process needs about 20 sec.<br />
If in the second case the fault message does not<br />
disappear the detector has to be replaced.<br />
NSC Sicherheitstechnik GmbH 20/58 22.06.2006<br />
Eckendorfer Str. 125 c<br />
<strong>Operating</strong> Installation Manual Solution F1 20060621.doc<br />
33609 Bielefeld Version S040A05.00
Apollo<br />
0002/001 opt. det. XP95<br />
Configured detector text<br />
A-Value █████ 025<br />
Pre alarm ██████████ 045<br />
Alarm ████████████ 055<br />
Cancel Compens. Details<br />
29 Loop card HOCHIKI ESP<br />
Software version : S060A01.00-1<br />
Status<br />
: OK<br />
Number of spurs : 2/4<br />
Number of loops : 1,2<br />
The push button „Details“ (F4) shows the result of the<br />
last calibration of the detector Jump to Picture 30.<br />
Only for Apollo<br />
By pressing „Compens.“ation (F3) an automatic<br />
smoke detector (Optical, Multi) can be readjusted<br />
manually. This should be done, if a polluted detector<br />
will be changed by a new one. By compensating the<br />
detector the drift value (Discovery) or the alarm<br />
threshold (XP95, XPlorer) will be reset. Without<br />
manual compensation the FCP will adjust these<br />
values automatically but this process may last several<br />
hours..<br />
The push button „Details“ (F4) shows more<br />
information for Apollo Discovery detectors Jump to<br />
Picture 30.<br />
Example of loop card details<br />
The display indicates that the panel has 4 spurs or 2<br />
loops.<br />
Cancel<br />
29.1<br />
FRP with FBC<br />
Softwareversion<br />
24V 1<br />
24V 2<br />
FBC<br />
Checksum<br />
Restart<br />
zurück<br />
: S150A01.01<br />
: OK<br />
: Fault<br />
: OK<br />
: OK<br />
: OK<br />
Example of details of a fire brigade repeater<br />
panel with fire brigade control panel<br />
In case of a fault of a RS485 device this menu<br />
gives a hint about fault reason. In this example<br />
24V supply voltage on input 2 of the FRP is<br />
missing.<br />
30 Only for Hochiki ESP<br />
0002/001 opt. det. ALG-E<br />
029 094 156 232<br />
| | | |<br />
______|______ ______|_____<br />
Zeropoint<br />
<strong>Fire</strong>point<br />
61 190<br />
Cancel<br />
0002/001 Multisen ALG-E<br />
029 094 156 232<br />
| | | |<br />
______|______ ______|_____<br />
Zeropoint<br />
<strong>Fire</strong>point<br />
61 190<br />
Cancel<br />
0002/001 Ion det. ACA-E<br />
008 110 138 246<br />
| | | |<br />
______|______ ______|_____<br />
Zeropoint<br />
<strong>Fire</strong>point<br />
61 190<br />
Cancel<br />
Only for Hochiki ESP<br />
Example of „Zeropoint“ <strong>and</strong> „<strong>Fire</strong>point“<br />
display<br />
Zeropoint = quiescent analogue value<br />
(9-109 depending on detector type)<br />
<strong>Fire</strong>point = testalarm threshold<br />
(139-246 depending on detector type)<br />
Out of these two values the actual smoke density <strong>and</strong><br />
the alarm thresholds will be calculated. (s. picture<br />
28).<br />
By calibrating the detector the smoke density will be<br />
set to 0 <strong>and</strong> the alarmthresholds will be readjusted.<br />
The zeropoint represents the pollution of the detector.<br />
In the bar charts on the left h<strong>and</strong> the limits <strong>and</strong> the<br />
st<strong>and</strong>ard values for the different detector types are<br />
demonstrated.<br />
A pollution fault will be generated automatically<br />
at the following smoke densities::<br />
opt. det. ALG-E<br />
Multisen ALG-E<br />
Ion det. ACA-E<br />
+- 1,1 %/m<br />
+- 1,1 %/m<br />
+- 0,17%/m<br />
NSC Sicherheitstechnik GmbH 21/58 22.06.2006<br />
Eckendorfer Str. 125 c<br />
<strong>Operating</strong> Installation Manual Solution F1 20060621.doc<br />
33609 Bielefeld Version S040A05.00
Only for Apollo Discovery<br />
0002/001 opt. det. DISCOV.<br />
Date of manufact. : 04/05<br />
Pollution : 16<br />
Sensitivity : 3<br />
Last revision : -<br />
Det.LED flash at poll. : 0<br />
zurück<br />
Only for Apollo Discovery<br />
The Apollo "Discovery" series has the ability to store<br />
data in the flash memory of the detector itself. These<br />
data remains in memory even if the detector will be<br />
removed from the base. The reading <strong>and</strong> transmitting<br />
of the data will last about 1-2 seconds.Therefore you<br />
have a short delay before first value will be displayed.<br />
The following data is aavailable:<br />
- date of manufacture of the detector in format<br />
MM/JJ<br />
- pollution in the range 0-31.<br />
• 16 = clean air value<br />
•
3. Menus for the installer :<br />
The following menus are available only for the installer as the access is protected by a separate<br />
access code. When the panel is shipped out by NSC the access code for the installer is :<br />
00000<br />
This access code can be changed by the installer. In any case it should be kept at a save place. When<br />
the installer has changed this access code it is unique <strong>and</strong> nobody else can operate in the installer<br />
menus of the panel.<br />
Please keep the installer code (access code) in a save place.<br />
It is the protection of the panel against wrong operation.<br />
After pressing the push button<br />
you will enter the main menu of the FCP „Solution F1“. Then<br />
please press F3 („Installer“) to enter the installer menus. After that the installer code is required.<br />
To select sub menus you have the following possibilities :<br />
• Using the cursor keys ↓ <strong>and</strong> ↑ to mark the sub menu with the black background <strong>and</strong> then<br />
press F4 („Enter“) to confirm the selection.<br />
• Directly by pressing the number of the sub menu. No „Enter“ button is necessary in this case.<br />
Some times you will see a listing of e.g. outputs, inputs etc. in the LC module. In which case usually<br />
there is a selection bar like this :<br />
↓+1 ↑-1 Selection -> +10
No. Indication of the LC module : Description :<br />
31 Installer<br />
Access Code: *****<br />
Cancel<br />
Access to the installer menu<br />
After pressing push button F3 („Installer“) the FCP<br />
requires the installer access code. Please type this<br />
code <strong>and</strong> confirm by F4 (“Enter”).<br />
32 Main menu<br />
1. Switch on/off 5. Test mode<br />
2. Alarm counter 6. Autom.controlling<br />
3. End user code 7. Alarm configurat.<br />
4. Diagnosis 8. Settings<br />
Cancel End use Enter<br />
General Main menu for installer<br />
This menu appears immediately after pressing „Prog“.<br />
The functions have the followings meanings :<br />
1. To switch on / off detectors, input-/ output<br />
modules, zones <strong>and</strong> general outputs <br />
Jump to Menu 02<br />
2. Indication of the alarm counter. This alarm<br />
counter cannot be set back. It is a 4 digit<br />
number (1 – 9999).<br />
3. To change the end user code Jump to<br />
Menu 04<br />
4. To enter the diagnosis menu Jump to<br />
Menu 05<br />
5. To enter the test mode. That are the<br />
following functions :<br />
‣ Detector test<br />
‣ Manual <strong>Control</strong>ling<br />
‣ Simulation<br />
‣ Revision<br />
Jump to Menu 33<br />
6. To enter automatic control functions. These<br />
are :<br />
‣ OC outputs inside the FCP<br />
‣ Relays inside FCP<br />
‣ Power outputs of the FCP<br />
‣ Output modules (on the loops)<br />
‣ Input modules (on the loop)<br />
‣ 8 monitored inputs of the main board<br />
‣ 2 conventional inputs of the main<br />
board<br />
Jump to Menu 34<br />
7. To enter alarm configuration. These are :<br />
‣ Configuring detectors / zones<br />
‣ Alarm dependencies<br />
‣ Configuring 16 timer programs<br />
‣ Configuring alarm / fault delays<br />
Jump to Menu 35<br />
8. To enter settings menu. Which means :<br />
‣ To set data <strong>and</strong> time<br />
‣ National holidays<br />
‣ System settings<br />
‣ Scanning of detectors<br />
‣ To delete the configuration<br />
‣ To delete detector texts<br />
‣ To delete event memory<br />
‣ To configure push buttons S1-S8<br />
‣ To change installer access code<br />
‣ To select the language<br />
‣ To configure the interfaces<br />
‣ To configure conventional zones<br />
‣ To scan RS485 devices<br />
Settings 1 Jump to Menu 36<br />
Settings 2 Jump to Menu 37<br />
NSC Sicherheitstechnik GmbH 24/58 22.06.2006<br />
Eckendorfer Str. 125 c<br />
<strong>Operating</strong> Installation Manual Solution F1 20060621.doc<br />
33609 Bielefeld Version S040A05.00
The push button „cancel“ (F1) leads to the normal<br />
status indication of the FCP.<br />
The push button „End user“ (F3) is for entering<br />
the end user area.<br />
The push button „Enter“ (F4) selects (activates) the<br />
function which is marked by a black background.<br />
Instead you can also select the function by pressing<br />
the no. left in front of the functions (here : 1 – 8).<br />
33 Test mode<br />
1. Detector test<br />
2. Manual <strong>Control</strong><br />
3. Simulation<br />
4. Revision<br />
Cancel<br />
34 Autom. <strong>Control</strong>ling<br />
Enter<br />
1. Output 5. Input module<br />
2. Relay 6. Input<br />
3. Power output 7. Monitored Input<br />
4. Output module<br />
Cancel<br />
35 Alarm configurat.<br />
Enter<br />
1. Zones 5. Timer program<br />
2. Detector settings 6. Delay<br />
3. Zone settings<br />
4. Alarm coincidences<br />
Cancel<br />
Enter<br />
Main menu : Test functions<br />
As soon as this menu is selected the FCP is in the<br />
service mode. This will be indicated by the green<br />
LED „Service“. After leaving this menu the green<br />
LED is off.<br />
1. The function „Detector test“ can be used to<br />
set individual detectors in alarm condition<br />
(electronically) Jump to Menu 50<br />
2. „Manual <strong>Control</strong>“ means manual controlling<br />
of the outputs. With a simple press on a<br />
push button an output can be activated <br />
Jump to Menu 51<br />
3. „Simulation“ can be used to set individual<br />
detectors in alarm condition without<br />
connected detectors (by software). This is<br />
useful for testing the panel outputs /<br />
indications as long as the panel is not<br />
installed Jump to Menu 52<br />
4. „Revision“ means a „One-Man-Test<br />
procedure“ to set smoke <strong>and</strong> heat detectors<br />
in alarm by using special test equipment.<br />
During this procedure the FCP resets all<br />
alarms on the relevant zones automatically<br />
after a certain time Jump to Menu 53<br />
Main menu : Automatic <strong>Control</strong>ling<br />
The following options can be selected :<br />
1. Configuration of internal OC outputs (on<br />
main board <strong>and</strong> loop cards) Jump to<br />
Menu 54<br />
2. Configuration of 4 internal relays on main<br />
board Jump to Menu 55<br />
3. Configuration of 3 internal monitored power<br />
outputs on main board Jump to Menu 56<br />
4. Configuration of output modules on the loops<br />
Jump to Menu 57<br />
5. Configuration of input modules on the loops<br />
Jump to Menu 58<br />
6. Configuration of 8 internal digital inputs on<br />
main board Jump to Menu 59<br />
7. Configuration of 2 internal monitored<br />
conventional inputs on main board Jump<br />
to Menu 60<br />
Main menu : Alarm configuration<br />
The following options can be selected :<br />
1. Sub menu „Zones“ to configure detectors<br />
into zones Jump to Menu 61<br />
2. Sub menu „Detector settings“ to configure<br />
the detectors. E.g. day <strong>and</strong> night sensitivity,<br />
multi sensor modes, selecting timer<br />
NSC Sicherheitstechnik GmbH 25/58 22.06.2006<br />
Eckendorfer Str. 125 c<br />
<strong>Operating</strong> Installation Manual Solution F1 20060621.doc<br />
33609 Bielefeld Version S040A05.00
programs for detectors, delay <strong>and</strong> pre-alarm<br />
functions Jump to Menu 62<br />
3. Sub menu „Zone settings“ to configure the<br />
zones for 2-detector-dependency, internal<br />
alarm zones, technical or fault alarms etc. <br />
Jump to Menu 63<br />
4. Sub menu „Alarm coincidences“ to create<br />
alarm dependencies between two or more<br />
zones Jump to Menu 64<br />
5. Sub menu „Timer programs“ to configure up<br />
to 16 timer programs Jump to Menu 65<br />
6. Sub menu „Delay“ to configure „Response<br />
time“ <strong>and</strong> „Inspection time“ for the alarm<br />
transmission device (only relevant if the main<br />
alarm shall be investigated before passing to<br />
the <strong>Fire</strong> Brigade). Jump to Menu 66<br />
36 Settings 1<br />
1. Date/Time 5. Delete program<br />
2. Holidays 6. Delete texts<br />
3. System settings 7. Delete Events<br />
4. Scan detectors 8. Push buttons S_<br />
Cancel more Enter<br />
Settings 1 of FCP<br />
1. To change date, time <strong>and</strong> day of the week <br />
Jump to Menu 67<br />
2. To configure bank or national holidays which<br />
can be configured individually for any<br />
country Jump to Menu 68<br />
3. To enter sub menu for system settings<br />
where some individual hardware <strong>and</strong><br />
software features can be configured <br />
Jump to Menu 69<br />
4. To enter sub menu for new scanning of<br />
addressable detectors Jump to Menu<br />
70<br />
5. To delete configuration of FCP. Before<br />
deleting there will be a security inquiry <br />
Jump to Picture 71<br />
6. To delete detector texts. Before deleting<br />
there will be a security inquiry Jump to<br />
Picture 72<br />
7. To delete all events in event memory. Before<br />
deleting there will be a security inquiry <br />
Jump to Picture 73<br />
8. To enter sub menu for configuration of<br />
special push buttons S1 to S8 Jump to<br />
Menu 74<br />
For another settings menu please press F3 („more“)<br />
to enter sub menu „Settings 2“ Jump to Menu 37<br />
37 Settings 2<br />
1. Installer code 5. Scan RS485<br />
2. Language 6. Modem<br />
3. Interfaces 7. Network<br />
4. Convent. Detect. 8. Flash Update<br />
Cancel more Enter<br />
Settings 2 of FCP<br />
1. To change installer access code Jump to<br />
Menu 75<br />
2. To change the panel’s language Jump to<br />
Menu 76<br />
3. To enter sub menu of 3 serial interfaces RS-<br />
232. It is possible to configure the interfaces<br />
with different protocols <strong>and</strong> different baud<br />
rates Jump to Menu 77<br />
4. To configure alarm thresholds for<br />
conventional detectors so that it is possible<br />
NSC Sicherheitstechnik GmbH 26/58 22.06.2006<br />
Eckendorfer Str. 125 c<br />
<strong>Operating</strong> Installation Manual Solution F1 20060621.doc<br />
33609 Bielefeld Version S040A05.00
38 Settings 3<br />
1. Power outouts<br />
2. Loop parameters<br />
3. Options<br />
Cancel<br />
Enter<br />
to use conventional detectors of different<br />
manufacturers Jump to Menu 78<br />
5. After pressing 5. the RS-485 devices<br />
connected to the RS-485 interfaces will be<br />
scanned. The number of found RS-485<br />
devices will be displayed in the last but one<br />
display line Jump to Picture 79<br />
6. Opens input screen "Modem" Jump to<br />
Menu 80<br />
7. Opens input screen for network settings <br />
Jump to Menu 81<br />
8. Facilitates a software update of the main<br />
board using the configuration software <br />
Jump to Menu 82<br />
For another settings menu please press F3 („more“)<br />
to enter sub menu „Settings 3“ Jump to Menu 38<br />
Settings 3of FCP<br />
1. Opens input screen to configure power<br />
output settings Jump to Menu 83<br />
2. Opens input screen to configure loop<br />
settings Jump to Menu 84<br />
3. Jumps into menu to unlock options Menu<br />
85<br />
50 Detector test Status<br />
Zone : 2 Normal<br />
Detector : 3 Normal<br />
Alarm unset (outputs inactive) !<br />
Cancel On set<br />
Example of detector test :<br />
Detector not yet in alarm :<br />
0002/002 opt. det.<br />
ALG-E<br />
Evt. individual detector text<br />
A-Value ████████<br />
0,0%/m<br />
Pre alarm███████████████<br />
2,7%/m<br />
Alarm █████████████████ 3,4%/m<br />
Cancel Calib. Details<br />
Detector in alarm :<br />
Detector test (only for addressable<br />
detectors)<br />
First zone <strong>and</strong> detector number (within the zone) has<br />
to be typed. Every line has to be confirmed by “OK”.<br />
The push button F4 („set / unset“) can be used to<br />
configure if the outputs of the FCP shall be activated<br />
during the test alarm or not. The current selection is<br />
displayed in the last but one line of the LC module<br />
(here : „outputs inactive“).<br />
After that the test alarm can be activated by pressing<br />
F2 („On“).<br />
By using the „System Settings“ (parameter 16) it is<br />
possible to configure an auto-reset of the test alarm<br />
condition or no auto-reset. In that case the test alarm<br />
has to be reset by pressing „Reset“ .<br />
The bar charts as in the example on the left side show<br />
how the test alarm will arise (see A-value). If the<br />
analogue value passes the alarm threshold the<br />
detector goes into alarm condition.<br />
0002/002 opt. det.<br />
ALG-E<br />
Evt. individual detector text<br />
A-Value ██████████████████████ 4,5%/m<br />
Pre alarm███████████████<br />
2,7%/m<br />
Alarm █████████████████ 3,4%/m<br />
Cancel Calib. Details<br />
NSC Sicherheitstechnik GmbH 27/58 22.06.2006<br />
Eckendorfer Str. 125 c<br />
<strong>Operating</strong> Installation Manual Solution F1 20060621.doc<br />
33609 Bielefeld Version S040A05.00
51 Manual <strong>Control</strong>ling<br />
1. Output<br />
2. Relay<br />
3. Power Output<br />
4. Output module<br />
Cancel<br />
Enter<br />
52 Simulation Status<br />
Zone : 5 Normal<br />
Detect. : 33<br />
Alarm unset (outputs inactive) !<br />
Cancel Alarm set<br />
Menu „Manual <strong>Control</strong>ling“<br />
Please select the kind of output you want to activate<br />
manually (1-4). The possibilities are :<br />
1. „Output“ means internal OC-outputs on main<br />
board <strong>and</strong> loop cards Jump to Menu 100<br />
2. „Relay“ means 4 internal dry contact relays<br />
on main board Jump to Menu 101<br />
3. „Power Output“ means 3 internal monitored<br />
power outputs 24V / 500 mA on main board<br />
Jump to Menu 102<br />
4. „Output module“ means loop modules <br />
Jump to Menu 103<br />
Menu „Simulation“<br />
The purpose of the menu „Simulation“ is to simulate<br />
alarm conditions of certain addressable detectors or<br />
certain conventional zones without having any<br />
detector connected. The sense is to test the<br />
configuration before installation of the panel.<br />
<strong>Operating</strong> for<br />
a) addressable detector<br />
Please type the Zone <strong>and</strong> the Detector (Detector<br />
number, not physically address) <strong>and</strong> confirm every<br />
line by “OK”.<br />
b) conventional zone<br />
Please type the Zone <strong>and</strong> as „Detector“ type a „1“<br />
<strong>and</strong> confirm every line by „OK“.<br />
53 Revision Status<br />
from zone : 2 Normal<br />
to zone : 4 Normal<br />
Cancel On Off<br />
The push button F4 („set“) can be used to switch the<br />
function of the outputs : „set“ means the outputs will<br />
be activated in case of a simulated alarm <strong>and</strong> „unset“<br />
means the outputs will not be activated.<br />
The test alarm will be activated by F2 („Alarm“) <strong>and</strong><br />
the LC module displays „ALARM“<br />
The alarm has to be reset by „Reset BMZ“ .<br />
Press cancel to leave this menu.<br />
Menu „Revision“<br />
The revision mode can be used to check the<br />
detectors by detector test equipment (e.g. Solo test<br />
equipment). When the detector is activated by the test<br />
equipment the alarm is displayed at the FCP <strong>and</strong><br />
reset automatically after 30 sec.<br />
Please type in the number of the zones which shall be<br />
investigated by the revision mode. Every line has to<br />
be confirmed by “OK“.<br />
Please activated the revision mode for the selected<br />
zones by F2 („on“). Pay attention : the zones in<br />
revision will be displayed at the panel as „disabled“.<br />
The alarm of such a zone will be displayed in the LC<br />
module as „T E S T A L A R M“<br />
After finishing the revision do not forget to switch<br />
off the revision mode by F3 („Off“) because an<br />
alarm of these zones will not be transmitted to the<br />
fire brigade.<br />
NSC Sicherheitstechnik GmbH 28/58 22.06.2006<br />
Eckendorfer Str. 125 c<br />
<strong>Operating</strong> Installation Manual Solution F1 20060621.doc<br />
33609 Bielefeld Version S040A05.00
54 Autom.controlling Status<br />
Output : 001 Normal<br />
↓+1 ↑-1 Selection ->+10 001 Output 001 Main board<br />
002 Output 002 Main board<br />
003 Output 003 Main board<br />
Cancel<br />
Enter<br />
Autom.controlling<br />
Status<br />
Output : 001 Normal<br />
↓+1 ↑-1 Selection ->+10 001 Output 001 Main board<br />
002 Output 002 Main board<br />
003 Output 003 Main board<br />
Cancel Settings Function Event<br />
Automatic <strong>Control</strong> : internal OC Outputs<br />
Please select the OC output which shall be configured<br />
by the cursor keys :<br />
↑,↓ : Marker „>“ one line up / one line down<br />
: Marker „>“ 10 lines up / 10 lines down<br />
or type the number of the OC output directly by using<br />
the keypad <strong>and</strong> confirm this by “OK”.<br />
Underneath the grey line „Selection“ the FCB<br />
indicates where the selected outputs are. OC outputs<br />
1 to 16 are on the main board, any further outputs are<br />
on the additional loop cards :<br />
OC outputs 01 – 16 : on Main board<br />
OC outputs 17 – 24 : on loop card / convent. card 1<br />
OC outputs 25 – 32 : on loop card / convent. card 2<br />
etc.<br />
The selected output has to confirmed by „OK” or by<br />
F4 („Enter“). After this the last line of the LC<br />
module looks like the example left.<br />
Press F2 („Settings“) Jump to Menu 104<br />
(Menu 104 to assign on/off functions to the outputs)<br />
Press F3 („Function“) Jump to Menu 105<br />
(Menu 105 to link the outputs with fixed st<strong>and</strong>ard<br />
functions of activation)<br />
Press F4 („Event“) Jump to Menu 106<br />
(Menu 106 to configure cause <strong>and</strong> effects events<br />
when the output has to activate)<br />
55 Autom.controlling Status<br />
Relay : 001 Normal<br />
↓+1 ↑-1 Selection ->+10 001 Relay 001 Main board<br />
002 Relay 002 Main board<br />
003 Relay 003 Main board<br />
Cancel<br />
Enter<br />
Automatic <strong>Control</strong> : 4 internal Relays<br />
This configuration menu relates to 4 internal relays on<br />
the main board.<br />
The operation is he same as described in Menu 54.<br />
56 Autom.controlling Status<br />
Power Output : 001 Normal<br />
↓+1 ↑-1 Selection ->+10 001 Power Output1 Main board<br />
002 Power Output2 Main board<br />
003 Power Output3 Main board<br />
Cancel<br />
Enter<br />
57 Output module<br />
Segment :<br />
Address :<br />
Output :<br />
Cancel<br />
Automatic <strong>Control</strong> : 3 monitored Power<br />
outputs<br />
This configuration menu relates to 3 internal power<br />
outputs on the main board.<br />
The operation is he same as described in Menu 54.<br />
Automatic <strong>Control</strong> : Output modules (loop)<br />
This configuration menu relates to the output modules<br />
on the loops.<br />
Please type the loop number (”Seg.”)<strong>and</strong> the output<br />
module’s address <strong>and</strong> confirm every line by “OK”.<br />
Because some of the modules (B02450/51-00 <strong>and</strong><br />
B02460/61-00) have two separate outputs you can<br />
select the output (1 or 2) in the line “Output” <strong>and</strong><br />
confirm by “OK”.<br />
After this the last line of the LC module looks like the<br />
example on the left.<br />
NSC Sicherheitstechnik GmbH 29/58 22.06.2006<br />
Eckendorfer Str. 125 c<br />
<strong>Operating</strong> Installation Manual Solution F1 20060621.doc<br />
33609 Bielefeld Version S040A05.00
Example of loop 1, module addr. 99 :<br />
Output module<br />
Segment : 1<br />
Address : 99<br />
Output : 1<br />
Cancel Module Sounder Event<br />
Press F2 („Module“) or F3 („Sounder“) Jump to<br />
Menu 107<br />
(Menu 107 to assign on/off functions to the output<br />
modules or to configure tones / volume for base<br />
sounders.)<br />
Press F4 („Event“) Jump to Menu 106<br />
(Menu 106 to configure cause <strong>and</strong> effects events<br />
when the output module has to activate)<br />
58 Input module<br />
Seg. :<br />
Address :<br />
Input :<br />
Cancel<br />
Event<br />
Automatic <strong>Control</strong> : Input modules (loop)<br />
This configuration menu relates to the input modules<br />
on the loops.<br />
You can use input modules to :<br />
‣ disable detectors / zones<br />
‣ change the sensitivity of addressable<br />
detectors (Day mode/Night mode)<br />
‣ activate outputs, relays <strong>and</strong> power outputs<br />
‣ switch off the internal buzzer<br />
Please type the loop number (“Seg.”) <strong>and</strong> the output<br />
module’s address as well as the input number <strong>and</strong><br />
confirm every line by “OK”.<br />
Press F4 („Event“) Jump to Menu 106<br />
59 Autom.controlling Status<br />
Input : 001 Normal<br />
↓+1 ↑-1 Selection ->+10 001 Input 001 Main board<br />
002 Input 002 Main board<br />
003 Input 003 Main board<br />
Cancel<br />
Enter<br />
Automatic <strong>Control</strong> : 8 resistor monitored<br />
Inputs<br />
This configuration menu relates to the 8 monitored<br />
inputs on main board.<br />
Please select the input which shall be configured by<br />
the cursor keys :<br />
↑,↓ : Marker „>“ one line up / one line down<br />
: Marker „>“ 10 lines up / 10 lines down<br />
or type the number of the input directly by using the<br />
keypad <strong>and</strong> confirm this by “OK”.<br />
Underneath the grey line „Selection“ the FCB<br />
indicates where the selected inputs are : in this case<br />
on the main board.<br />
After selecting the input the last line of the LC module<br />
changes <strong>and</strong> you can choose :<br />
Press F2 („Settings“) Jump to Menu 108<br />
(Menu 108 to configure monitoring <strong>and</strong> delay of OC<br />
inputs) or<br />
Press F3 („Function“) Jump to Menü 105<br />
(selection of st<strong>and</strong>ard function for this input) or<br />
Press F4 („Event“) Jump to Menu 106<br />
(Menu 106 to configure cause <strong>and</strong> effects events<br />
when the output module has to activate)<br />
NSC Sicherheitstechnik GmbH 30/58 22.06.2006<br />
Eckendorfer Str. 125 c<br />
<strong>Operating</strong> Installation Manual Solution F1 20060621.doc<br />
33609 Bielefeld Version S040A05.00
60 Autom.controlling Status<br />
Monitored Input : 001<br />
↓+1 ↑-1 Selection ->+10 001 Monitored Input1 Main board<br />
002 Monitored Input2 Main board<br />
Cancel<br />
Enter<br />
Automatic <strong>Control</strong> : 2 monitored,<br />
conventional inputs<br />
This configuration menu relates to the both monitored<br />
conventional inputs on main board.<br />
If no event is programmed each input has a st<strong>and</strong>ard<br />
function. These functions are :<br />
conventional input 1 = Key deposite box Alarm<br />
conventional input 2 = exting. syst. interface (VdS)<br />
As soon as one event has been programmed the<br />
st<strong>and</strong>ard functionen of this input will be out of order.<br />
Please select the input which shall be configured by<br />
the cursor keys :<br />
↑,↓ : Marker „>“ one line up / one line down<br />
<strong>and</strong> confirm this by “OK” or by F4 („Enter“).<br />
Then the function of F4 changes <strong>and</strong> please<br />
press F4 („Event“) Jump to Menu 106<br />
61 Zones<br />
1. Analogue Detect.<br />
2. Convent. Detect.<br />
Cancel<br />
62 Detector settings<br />
Seg. : 1<br />
from Address : 2<br />
to Address : 2<br />
Cancel<br />
Enter<br />
Select the kind of detectors to configure :<br />
Loop or conventional<br />
Here you select the kind of detectors which shall be<br />
configured : analogue addressable or conventional.<br />
The FCP „Solution F1“ has the ability not only to<br />
configure analogue addressable detectors but<br />
conventional detectors too. That means you can<br />
assign to every hardware output for conventional<br />
detectors a software zone.<br />
Please select the right detectors by the push<br />
buttons 1 or 2 :<br />
Pressing 1 Jump to Menu 109<br />
Pressing 2 Jump to Menu 110<br />
Detector settings<br />
This menu is to configure every single (analogue<br />
addressable) detector with some of the following<br />
functions :<br />
‣ Sensitivity for the day<br />
‣ Day mode (only Multi sensor)<br />
‣ Sensitivity for the night<br />
‣ Night mode (only Multi sensor)<br />
‣ Assigning a timer program<br />
‣ Delay in case of alarm condition<br />
‣ Delay in case of fault condition<br />
‣ Pre-alarm<br />
63 Zone settings<br />
Zone : 6<br />
Cross detection<br />
: No<br />
Internal alarm zone<br />
: No<br />
Fault zone (non latching) : No<br />
Fault zone (latching)<br />
: No<br />
MCP zone : No ↓<br />
Cancel No Yes save<br />
After typing loop no. <strong>and</strong> address(es) (please confirm<br />
every line by „OK“) the LC module changes Jump<br />
to Menu 111<br />
Zone settings<br />
Here you can configure certain settings for every<br />
software zone of the FCP.<br />
„Cross detection“ means at least 2 detectors of this<br />
zone have to be in alarm to activate the transmission<br />
devices to the fire brigade.<br />
A “fault zone” does not activate an alarm but only a<br />
fault message. „non latching“ means a fault<br />
condition is automatically reset when the fault has<br />
disappeared.<br />
NSC Sicherheitstechnik GmbH 31/58 22.06.2006<br />
Eckendorfer Str. 125 c<br />
<strong>Operating</strong> Installation Manual Solution F1 20060621.doc<br />
33609 Bielefeld Version S040A05.00
Zone settings<br />
Alarm delay for convent. Detect.: No<br />
Extinguishsyst. Activ<br />
: No<br />
Cancel No Yes save<br />
64 Alarm Coincidences 002/512<br />
Zone 0007 with zone 0011<br />
↓+1 ↑-1 Selection ->+10 002:Zone 0000 with Zone 0000<br />
003:Zone 0000 with Zone 0000<br />
Cancel<br />
save<br />
65 Timer programs 01/16<br />
>Timer program 01 Day<br />
Timer program 02 Night<br />
Timer program 03 Night<br />
Timer program 04 Night<br />
Timer program 05 Night<br />
Timer program 06 Night<br />
Cancel<br />
Weekday<br />
↑<br />
By pressing the cursor push button „↓“ you find two<br />
more functions :<br />
‣ “alarm delay of conventional detectors”.<br />
This means, an alarm on a conventional<br />
zone will be reset automatically by the FCP<br />
has to return within 60 seconds. Otherwise<br />
no alarm will be displayed on the FCP.<br />
‣ "Extinguish system active" :zones with<br />
this parameter set, can activate an output,<br />
signalising that an extinguishing system has<br />
been triggered.<br />
Press the push button F2 („No“) for deactivating this<br />
functions <strong>and</strong> press F3 („Yes“) to activate the<br />
functions individually.<br />
Please confirm every line by OK.<br />
When you have finished all settings for one zone<br />
please press F4 („save“) to save the configuration.<br />
Zone Alarm Coincidences<br />
Use this menu to create alarm coincidences of two or<br />
more zones. An alarm coincidence means that at<br />
least 2 zones have to be in alarm condition to activate<br />
the main alarm passing to the fire brigade station. If<br />
only one of the relating zones is in alarm there is only<br />
an internal alarm indication on the FCP.<br />
Way of operation :<br />
− You have to type the zones which shall be in<br />
alarm coincidence in the second display line.<br />
Therefore please use the keypad <strong>and</strong> confirm<br />
every zone by OK.<br />
− After this press F4 („save“) to save the<br />
configuration.<br />
− The new zone coincidence will be taken over into<br />
the list just underneath the grey selection line.<br />
There you can see all alarm coincidence which<br />
are configured yet.<br />
− The marker ‚>’ at the left side of the LC display<br />
jumps to the next line just after you have<br />
configured a new zone coincidence.<br />
Timer programs<br />
The FCP „Solution F1“ supports up to 16 different<br />
timer programs.<br />
A timer program has two different functions :<br />
1) You can assign a timer program to detectors<br />
<strong>and</strong> zones to switch sensitivities or detector<br />
modes 4 times per day. (Menu 62 „Detector<br />
settings“)<br />
2) To switch from „day mode“ to „night mode“<br />
<strong>and</strong> vice versa. During day mode the main<br />
alarm is not directly passed to the fire<br />
brigade but there is a delay to inspect the<br />
alarm condition (Menu 66 „Delay“).<br />
The notation "Day" resp. "Night" behind the timer<br />
program number shows the actual status.<br />
Please select a timer program by the cursor keys :<br />
↑,↓ : Marker „>“ one line up / one line down<br />
<strong>and</strong> then press F4 („Weekday“) Jump to<br />
Menu 112<br />
NSC Sicherheitstechnik GmbH 32/58 22.06.2006<br />
Eckendorfer Str. 125 c<br />
<strong>Operating</strong> Installation Manual Solution F1 20060621.doc<br />
33609 Bielefeld Version S040A05.00
66 Delay<br />
Response time<br />
: 180 Sec.<br />
Inspection time : 7 Min.<br />
Timer program : 00<br />
Cancel<br />
save<br />
Delay times of Main alarm (TD)<br />
These delay times – consisting of response time <strong>and</strong><br />
inspection time – relates to the Main alarm <strong>and</strong> so<br />
usually to the transmission device (TD) of the fire<br />
brigade station.<br />
Way of operation :<br />
If a smoke detector detects an alarm <strong>and</strong> the panel is<br />
in day mode – delay is activated – the response time<br />
will be started immediately. Now the end user has the<br />
obligation to acknowledge the alarm condition by<br />
pressing „internal buzzer off“<br />
Otherwise if that is not done, the main alarm is<br />
indicated <strong>and</strong> the fire brigade will be called.<br />
If the button is pressed the inspection time will be<br />
started <strong>and</strong> the user has several minutes to inspect<br />
the alarm. At the end of the inspection time the main<br />
alarm is indicated <strong>and</strong> the fire brigade will be called.<br />
He can avoid that by resetting the FCP.<br />
If the user presses a MCP during one of the above<br />
described periods a main alarm will be activated<br />
immediately.<br />
The response time can be 0 – 180 Sec.<br />
The inspection time can be 1 – 7 Min.<br />
Please confirm every line by OK <strong>and</strong> press F4<br />
(„save“) to save the new delay times.<br />
67 Date/Time<br />
Day : 09 Friday<br />
Month : 07 Winter<br />
Year : 04<br />
Hour : 07<br />
Minute : 46<br />
Second : 39<br />
Cancel Weekday Maintenanc save<br />
Pay attention :<br />
The delay can be linked to a timer program. This<br />
offers the possibility to configure the day <strong>and</strong> night<br />
mode individually for every weekday <strong>and</strong> – if<br />
necessary – to switch between day <strong>and</strong> night mode<br />
up to 4 times per day.<br />
So that means one of the timer programs should be<br />
reserved for this function if the user needs the day<br />
<strong>and</strong> night modes (Menu 65 „Timer programs“).<br />
If the user doesn’t need an automatic switching from<br />
day to night mode <strong>and</strong> vice versa you can switch it<br />
manually too. Therefore please have a look in „Main<br />
Menu“ „1. Switch on/off“ „7. Delay“<br />
To set date <strong>and</strong> time<br />
Please type the right data line by line <strong>and</strong> confirm<br />
every line by OK.<br />
Select the right weekday by pressing F2<br />
(“weekday”).<br />
It is not necessary to configure summer or winter<br />
time because the panel does this automatically. This<br />
means at the last weekend in March <strong>and</strong> October the<br />
panel switches to summer or winter time.<br />
This can be deactivated if you go to „System<br />
settings“ (Menu 69) item 7.<br />
By pressing F3 ("Maintenance") a Maintenance<br />
interval can be configured. When this interval<br />
elapsed, a fault message will be generated -> Menü<br />
116<br />
When you have finished data, time <strong>and</strong> weekday<br />
please press F4 („save“) to save the new<br />
configuration.<br />
NSC Sicherheitstechnik GmbH 33/58 22.06.2006<br />
Eckendorfer Str. 125 c<br />
<strong>Operating</strong> Installation Manual Solution F1 20060621.doc<br />
33609 Bielefeld Version S040A05.00
68 Holidays<br />
Day : 25<br />
Month : 12<br />
↓+1 ↑-1 Selection ->+10 02: Day 00 Month 00<br />
03: Day 00 Month 00<br />
Cancel<br />
save<br />
To configure Holidays<br />
Please type the day of a holiday in the second line of<br />
the LC display <strong>and</strong> the month in the third line. The<br />
example on the left side shows Christmas holiday.<br />
Please confirm every line by OK.<br />
The marker „>“ indicates the number of holiday which<br />
the user is configuring at the moment.<br />
When you have finished day <strong>and</strong> month press F4<br />
(„save“) to save the holiday. It will be transferred into<br />
the list in the middle part of the LC display.<br />
69 System settings<br />
FBC settings : 00<br />
↓+1 ↑-1 Selection ->+10 01: FBC settings (0-5) 00<br />
02: Transm. Device settings(0-2) 00<br />
03: FCP cover contact (0-2) 01<br />
Cancel<br />
save<br />
To cancel a holiday : Please put the marker „>“ by<br />
the cursor push buttons ↑,↓ on the holiday which shall<br />
be erased <strong>and</strong> type „00“ for day <strong>and</strong> month <strong>and</strong> save<br />
it by F4.<br />
System settings<br />
Here the user can configure certain individual<br />
software <strong>and</strong> hardware settings which are listed in the<br />
table below.<br />
The marker „>“ indicates the kind of setting which the<br />
user is configuring at the moment. It is displayed in<br />
the 2. line of the LC module.<br />
Please select the setting by the cursor keys <strong>and</strong> type<br />
the right value according the table below. The<br />
possible values are listed in brackets.<br />
If all settings are configured please press F4 („save“)<br />
to save the new configuration.<br />
The FCP supports the following settings :<br />
*) If the German <strong>Fire</strong> Brigade <strong>Control</strong> Panel is<br />
connected to the „Solution F1“ the following<br />
outputs are occupied :<br />
- Output OC 01 – 06 on main board<br />
for NSC-FBC<br />
- Output OC 01 – 07 on main board<br />
for SeTec-FBC<br />
- Input 01 – 05 on main board<br />
(see wiring diagram)<br />
Nr. Parameter Value Description<br />
01 FBC 0 no FBC<br />
(<strong>Fire</strong> Brigade 1 *) NSC-FBC<br />
<strong>Control</strong> Panel) 2 *) SeTec-FBC<br />
3 FBC<br />
Switzerl<strong>and</strong><br />
02 Transm. Device 0 Contin. signal<br />
(TD) 1 puls signal<br />
2 puls signal <strong>and</strong><br />
puls feed back<br />
03 FCP cover 0 Deactivated<br />
contact<br />
1 Switch off TD<br />
2 Switch on <strong>and</strong><br />
off TD<br />
04 Mains fault 0-30 Minutes<br />
delay<br />
05 Fault reset 0 Automatically<br />
1<br />
by „ “<br />
06 Fault remind 0-30 Minutes or<br />
0=no remind<br />
07 Summer time 0 Automatically<br />
switching<br />
1 Off<br />
08 Detector LED 0 Off<br />
flash at polling<br />
1 On<br />
NSC Sicherheitstechnik GmbH 34/58 22.06.2006<br />
Eckendorfer Str. 125 c<br />
<strong>Operating</strong> Installation Manual Solution F1 20060621.doc<br />
33609 Bielefeld Version S040A05.00
The shielding will be controlled under the following<br />
conditions:<br />
- During detector scanning<br />
- ca. 15 seconds after FCP reset<br />
- every 24h during detector calibration<br />
09 LED Intensity<br />
(LEDs of FCP)<br />
10 Sounder output<br />
Activation<br />
11 ext. Supply<br />
voltage 24V<br />
0-15 0= dark<br />
7= st<strong>and</strong>ard<br />
15= bright<br />
0 In case of<br />
main alarm<br />
1 At any alarm<br />
0 No<br />
1 Yes<br />
12 Calibration time 0-24 Corresponds<br />
to time<br />
13 Earth fault 0 On<br />
detection<br />
1 Off<br />
14 Not used<br />
15 Pre alarm 0 Off<br />
(for all detectors)<br />
1 On<br />
16 Reset detector 0 Automatic<br />
test<br />
1 Manual<br />
17 RS485 channels 1,2 Corresponds<br />
to the numbers<br />
18 Shielding<br />
control<br />
of channels<br />
0-1 0 = off<br />
1 = on<br />
70 Scan detectors<br />
Loop card : 01<br />
↓+1 ↑-1 Selection ->+10 Loop card 01<br />
Cancel all Enter<br />
71 Delete program<br />
Are you sure <br />
Scan detectors<br />
This menu relates to loop cards (addressable<br />
detectors) only.<br />
The sense of this function is to scan all detectors of<br />
one loop card again to find some new installed<br />
detectors or if some detectors are removed. Always<br />
both loops of one loop card are scanned.<br />
Please type the address (IIC-BUS) of the loop card<br />
<strong>and</strong> confirm it by OK. After pressing „Enter“ (F4) a<br />
questions „Are you sure “ appears on the LC<br />
module. If you confirm it by F4 („Yes“) the selected<br />
loop card starts scanning all connected detectors<br />
again.<br />
Alternative you can select all loop cards for new<br />
scanning by pressing F2 („all“). Again the question<br />
„Are you sure “ appears on the LC module <strong>and</strong> you<br />
can confirm it by F4 (“Yes”).<br />
Delete Configuration<br />
This function deletes all configurations besides the<br />
individual texts of the detectors. Even zones, macro<br />
push buttons <strong>and</strong> timer programs will be deleted.<br />
No<br />
Yes<br />
Before deleting there will appear the question „Are<br />
you sure “ on the LC module which has to be confirm<br />
by F4 (“Yes”).<br />
These configurations will not be deleted :<br />
‣ Texts of the detector<br />
‣ Event memory<br />
NSC Sicherheitstechnik GmbH 35/58 22.06.2006<br />
Eckendorfer Str. 125 c<br />
<strong>Operating</strong> Installation Manual Solution F1 20060621.doc<br />
33609 Bielefeld Version S040A05.00
72 Delete texts<br />
No<br />
Are you sure <br />
Yes<br />
Delete Texts<br />
This function deletes all individual texts of the<br />
detectors.<br />
Before deleting there will appear the question „Are<br />
you sure “ on the LC module which has to be confirm<br />
by F4 (“Yes”).<br />
73 Delete Events<br />
No<br />
Are you sure <br />
Yes<br />
Delete Events<br />
This function deletes the event memory.<br />
Before deleting there will appear the question „Are<br />
you sure “ on the LC module which has to be confirm<br />
by F4 (“Yes”).<br />
74 Push buttons S_<br />
Push buttons S_ : 001<br />
↓+1 ↑-1 Selection ->+10 001 Push button S_1<br />
002 Push button S_1<br />
003 Push button S_1<br />
Cancel Settings Enter<br />
Configuring macro push buttons S1 – S8<br />
Please select the push button which shall be<br />
configured by the cursor keys :<br />
↑,↓ : Marker „>“ one line up / one line down<br />
or by typing the number of the push button on the<br />
keypad <strong>and</strong> confirm this by “OK” or by F4 („Enter“).<br />
The marker „>“ indicates the push button which the<br />
user is configuring now.<br />
Then press F4 („Event“) Jump to Menu 106<br />
After selecting a push button an access code can be<br />
specified by pressing F2 ("settings") -> Sprung in<br />
Menü 117<br />
75 Installer<br />
old access code: 00000<br />
new access code: 22351<br />
new access code: 22351<br />
Cancel<br />
76 Language<br />
1. German 5. Slovenian<br />
2. English 6. Czech<br />
3. French 7. Serbian<br />
4. Dutch<br />
Changing the installer access code<br />
First you have to type the old access code, then you<br />
have to type two times the new access code.<br />
Every line has to be confirmed with „OK“.<br />
Example left side : old access code 00000 is replaced<br />
by new access code 22351.<br />
Selecting the panel language<br />
Use this function to select the panel language on the<br />
LC module. Please choose one of the numbers<br />
offered on the LC module to select the right language.<br />
Cancel<br />
Enter<br />
77 Interfaces<br />
1. UART 1<br />
2. UART 2<br />
3. UART 3<br />
Cancel Protocol Baud rate<br />
Configuring the interfaces<br />
The FCP offers 3 different serial interfaces RS-232<br />
(see wiring diagrams). UART 2 can also be used as<br />
RS-485 interface.<br />
For every interface a certain protocol can be<br />
configured e.g. for printer, PC configuration etc. This<br />
means the FCP is easily to adapt to the required<br />
application <strong>and</strong> very flexible.<br />
Please select UART 1, 2 or 3 by the cursor keys ↑,↓<br />
<strong>and</strong> then press F2 („Protocol“) Jump to Menu 113<br />
After that you can configure the “baud rate” by<br />
pressing F3 Jump to Menu 114<br />
NSC Sicherheitstechnik GmbH 36/58 22.06.2006<br />
Eckendorfer Str. 125 c<br />
<strong>Operating</strong> Installation Manual Solution F1 20060621.doc<br />
33609 Bielefeld Version S040A05.00
78 Convent. Detect.<br />
Loop card : 3<br />
from ML : 1<br />
to ML : 8<br />
Cancel<br />
Alarm <strong>and</strong> fault thresholds for conventional -<br />
detectors<br />
This function enables the user to adjust every<br />
conventional zone individual relating alarm <strong>and</strong> fault<br />
thresholds. So nearly every detector on the fire<br />
market can be connected to the „Solution F1“.<br />
The conventional detector PCBs inside the „Solution<br />
F1“ are preset for Hochiki CDX detectors <strong>and</strong> Apollo<br />
S65/Orbis.<br />
For other detectors please have a look into their data<br />
sheet to adjust the right values.<br />
In the example on the left side „Loop card“ means<br />
conventional detector card <strong>and</strong> you have to type here<br />
the card address. Then type the zone(s) of this<br />
conventional detector card which shall be reconfigured<br />
<strong>and</strong> after confirming every line by “OK”<br />
the LC display changes Jump to Menu 115<br />
79 I N I T I A L I S A T I O N<br />
80 Modem<br />
RSRS485 Devices : 001<br />
------------------<br />
1. Call accept on<br />
2. Call accept off<br />
3. Initialisation<br />
4. Hang up<br />
Scanning RS485 devices<br />
The picture on the left side shows the scanning of the<br />
RS-485 devices. The line with the slashes „-„ is<br />
running from left to right und during this time the RS-<br />
485 interfaces addresses all the connected devices.<br />
In the last but one line of the LC module the FCP<br />
shows the number of RS-485 devices found. (here :<br />
1).<br />
Modem functions<br />
If there is mounted a telephone modem in the<br />
FCP, from here you can send comm<strong>and</strong>s to the<br />
modem. These comm<strong>and</strong>s are:<br />
81<br />
Cancel<br />
Network<br />
OK<br />
Network device : 003<br />
Device no. : 003<br />
Device type : 000<br />
Zone offset : 03000<br />
Offset/Device no. : Zone offset<br />
Cancel Sections scan save<br />
1. Call accept on<br />
Will cause the modem to answer an<br />
external phone call.<br />
2. Call accept off<br />
Disables the automatic call acceptance<br />
3. Initialisation<br />
Initializes the modem with an ATZ<br />
comm<strong>and</strong><br />
4. Hang up<br />
Disconnects modem from telephone line<br />
Network settings<br />
Each networkcard has its own ID-number in the range<br />
1-255. This ID-number will be determined by input a<br />
number in line Network device. Please take care,<br />
that each number is only existing one time in the<br />
whole network.<br />
The device number is the number that will be<br />
displayed in the panels LCDin case of a message.<br />
Existing device types are:<br />
1. FCP = 000<br />
2. RCP = 001 (Remote <strong>Control</strong> Panel)<br />
The difference is, that in a RCP all incoming<br />
NSC Sicherheitstechnik GmbH 37/58 22.06.2006<br />
Eckendorfer Str. 125 c<br />
<strong>Operating</strong> Installation Manual Solution F1 20060621.doc<br />
33609 Bielefeld Version S040A05.00
82 Flash Update<br />
Nein<br />
Are you sure <br />
Ja<br />
messages will be stored in the event memory. A FCP<br />
only will save ist own messages.<br />
Zone offset determines the starting number of zones<br />
for this FCP if ithe parameter Offset/Device no. Is<br />
set to zone offset. Then in case of a message from a<br />
detector/module the zone number plus zone offset will<br />
be displayed <strong>and</strong> not the device no.<br />
Flash Update<br />
With this function you can update the software of the<br />
mainboard. The actual software version (e.g.<br />
S040A04.04.x) will be downloaded through RS232<br />
interface by the NSC configuration software.<br />
The protocol for UART 1 has to be set to "PC" <strong>and</strong> the<br />
baudrate for UART 1 <strong>and</strong> the selcetd COM-interface<br />
of the computer have to be the same.<br />
ready<br />
83 Load resistance<br />
Flash Update<br />
ready<br />
Flash Update<br />
627<br />
Power output 1 : 0476<br />
Power output 2 : 1059<br />
Power output 3 : 0960<br />
repeat<br />
repeat<br />
Cancel Calib. save<br />
84 Loop parameters<br />
Loop : 1<br />
Open curcuit<br />
: 9999 mV<br />
Short curcuit<br />
: 100 mA<br />
Number of detector LEDs : 4<br />
zurück<br />
speichern<br />
After confirming the safety request with "yes" the<br />
opposite display will appear.<br />
Now you have to start the communication on the<br />
PC. Instaed of "ready" then the number of<br />
transmitted kilobytes will be displayed. A<br />
transmission error will be signalized by "error"<br />
<strong>and</strong> by pressing "repeat" F4 key the procedure<br />
can be restartet.<br />
After completed transmisson above key F1<br />
"ready" will be displayed. Pressing F1 will erase<br />
<strong>and</strong> reprogram the flash memory. Afterwards the<br />
FCP will automatically restart. You can check<br />
the new version under diagnosis – FCP data..<br />
Power outputs: Thresholds<br />
Here for the 3 monitored power outputs the<br />
thresholds for open curcuit <strong>and</strong> short curcuit will<br />
be adjusted. The thresholds depend on the<br />
loadresistance of the connected device inclusive<br />
the line resistance. This total resistance can be<br />
ascertained automatically for each power output<br />
individually by pressing "Calib." F3. The<br />
software then calculates the thresholds for open<br />
curcuit <strong>and</strong> short curcuit. The resistance can<br />
also be measured with a multimeter <strong>and</strong> typed in<br />
directly using the keyboard.<br />
Loop parameters<br />
In this menu the values for open curcuit <strong>and</strong><br />
short curcuit determined with the loopcalculation<br />
program (Excel sheet) can be entered.<br />
Furthermore the number of detector LEDs, that<br />
will be activated simultanously on a loop, can be<br />
specified in the range 3-12. This input is<br />
important for the maximum alarm current, which<br />
has influence on the maximum allowed cable<br />
length <strong>and</strong>, as a consequence, to the<br />
functionality of the system.<br />
NSC Sicherheitstechnik GmbH 38/58 22.06.2006<br />
Eckendorfer Str. 125 c<br />
<strong>Operating</strong> Installation Manual Solution F1 20060621.doc<br />
33609 Bielefeld Version S040A05.00
85 Options<br />
1. ESPA 4.4.4<br />
zurück<br />
OK<br />
100 Manual control Status<br />
from Output : 001 Active<br />
to Output :<br />
↓+1 ↑-1 Selection ->+10 001 Output 001 Main board<br />
002 Output 002 Main board<br />
003 Output 003 Main board<br />
Cancel On Off Enter<br />
Options<br />
are additional functions that are not part of the<br />
st<strong>and</strong>rd software. The release of these options<br />
has to be done by a 6 digit code you can request<br />
form NSC.<br />
Manual <strong>Control</strong> : internal OC Outputs<br />
This menu to activate open collector outputs manually<br />
by the user / installer to test their function.<br />
Please select the OC output which shall be activated<br />
by the cursor keys :<br />
↑,↓ : Marker „>“ one line up / one line down<br />
: Marker „>“ 10 lines up / 10 lines down<br />
or type the number of the OC output directly by using<br />
the keypad <strong>and</strong> confirm this by “OK” or by F4<br />
(„Enter“).<br />
It is possible to operate several outputs<br />
simultaneously by using the “from – to” function.<br />
Underneath the grey line „Selection“ the FCB<br />
indicates where the selected outputs are. OC outputs<br />
1 to 16 are on the main board, any further outputs are<br />
on the additional loop cards :<br />
OC outputs 01 – 16 : on Main board<br />
OC outputs 17 – 24 : on loop card / convent. card 1<br />
OC outputs 25 – 32 : on loop card / convent. card 2<br />
etc.<br />
After confirming the output the last line of the LC<br />
module changes <strong>and</strong> you can<br />
‣ activate the output by F2 (“On”)<br />
‣ deactivate the output by F3 (“Off”)<br />
The activations can be checked on the LC module<br />
because they will be displayed immediately or you<br />
can check the status as shown “Active” in the picture<br />
left side. If the output is not active it is indicated as<br />
“normal”.<br />
101 Manual <strong>Control</strong> Status<br />
from relay : 001 Normal<br />
to relay :<br />
↓+1 ↑-1 Selection ->+10 001 Relay 001 Main board<br />
002 Relay 002 Main board<br />
003 Relay 003 Main board<br />
Cancel On Off Enter<br />
Manual <strong>Control</strong> : 4 internal Relays<br />
This menu to activate the 4 internal relay outputs on<br />
the main board manually by the user / installer to test<br />
their function.<br />
The way of operation is the same as in Menu 100.<br />
102 Manual <strong>Control</strong> Status<br />
from power output : 001 Normal<br />
to power out :<br />
↓+1 ↑-1 Selection ->+10 001 Power output1 Main board<br />
002 Power output2 Main board<br />
003 Power output3 Main board<br />
Cancel On Off Enter<br />
Manual <strong>Control</strong> : 3 monitored Power Outputs<br />
This menu to activate the 3 internal monitored power<br />
outputs on the main board manually by the user /<br />
installer to test their function.<br />
The way of operation is the same as in Menu 100.<br />
NSC Sicherheitstechnik GmbH 39/58 22.06.2006<br />
Eckendorfer Str. 125 c<br />
<strong>Operating</strong> Installation Manual Solution F1 20060621.doc<br />
33609 Bielefeld Version S040A05.00
103 Manual <strong>Control</strong> Status<br />
Zone : 2 Normal<br />
Detect : 3 Normal<br />
Output/Relay : 1<br />
Cancel On Off<br />
Manual <strong>Control</strong> : Output modules (loop)<br />
This menu to activate output modules on the loops.<br />
Please type :<br />
− the zone of the module<br />
− die number of the module within the zone<br />
− the output (1 or 2) of the module<br />
<strong>and</strong> confirm every line by “OK”.<br />
After confirming the output you can<br />
‣ activate the output by F2 (“On”)<br />
‣ deactivate the output by F3 (“Off”)<br />
The activations can be checked on the LC module<br />
because they will be displayed immediately or you<br />
can check the status as shown “Active” in the picture<br />
left side. If the output is not active it is indicated as<br />
“normal”.<br />
104 Settings Output 001<br />
On/Off like <strong>Fire</strong> Output : No<br />
On/Off like sounders<br />
: No<br />
On/Off like Transm.Dev. : No<br />
Off like buzzer<br />
: No<br />
Inactive by door cont.<br />
: No<br />
Delay : 000<br />
Cancel No Yes save<br />
Automatic <strong>Control</strong> : Settings for outputs<br />
This menu offers the possibility to assign certain<br />
on/off switching functions to outputs. For example it is<br />
possible to link the on/off switching of the Alarm<br />
Transmission Device to an output <strong>and</strong> in that case the<br />
output is disabled at the same time the user disables<br />
the Alarm Transmission Device.<br />
The following on/off switching functions are available :<br />
‣ On/Off like „<strong>Fire</strong> Outputs“. This function<br />
relates to the push button “<strong>Fire</strong> Outputs off”<br />
on the German <strong>Fire</strong> Brigade <strong>Control</strong> Panel. If<br />
this parameter is set to “yes” <strong>and</strong> the push<br />
button is pressed the relating outputs are<br />
disabled.<br />
‣ On/Off like „external sounders“. This function<br />
relates to the push button .<br />
‣ On/Off like „Alarm Transmission Device”<br />
(TD).<br />
‣ On/Off like „buzzer off“. This function relates<br />
to the push button .<br />
‣ If the output shall be disabled by taking off<br />
the cover of the housing set this parameter<br />
to „yes“.<br />
‣ Here the user can configure a delay for the<br />
activation of the output. The value for the<br />
delay is in seconds <strong>and</strong> the possible range is<br />
0 – 240 s.<br />
The functions are disabled by F2 („No“) <strong>and</strong> the<br />
functions are enabled by F3 („Yes“).<br />
After setting the parameters please press F4<br />
(„Enter“) to save the configuration.<br />
105 Functions for outputs<br />
Function Output 001<br />
Sounder/Strobe activation : No<br />
Tansm.Dev. activat. permanent : No<br />
Tansm.Dev. activat. impulse : No<br />
Saved Reply Message<br />
: No<br />
Reset FCP<br />
: No<br />
KDB output active<br />
: No<br />
Cancel No Yes save<br />
Automatic <strong>Control</strong> : Functions<br />
Here the user can assign certain fixed functions to the<br />
outputs. For example he can assign the<br />
“sounder/strobe activation” to an output <strong>and</strong> in that<br />
case this output is activated <strong>and</strong> deactivated at the<br />
same time as the external sounders/strobes.<br />
If one of these functions is used it is not possible<br />
NSC Sicherheitstechnik GmbH 40/58 22.06.2006<br />
Eckendorfer Str. 125 c<br />
<strong>Operating</strong> Installation Manual Solution F1 20060621.doc<br />
33609 Bielefeld Version S040A05.00
to assign any other cause <strong>and</strong> effect events to the<br />
same output.<br />
Functions for inputs<br />
Function Input 001<br />
<strong>Fire</strong> outputs<br />
: No<br />
Sounder<br />
: No<br />
Alarm Transm.Dev.<br />
: No<br />
Delay<br />
: No<br />
Buzzer off<br />
: No<br />
BMZ Rückstellen<br />
: No<br />
Cancel No Yes save<br />
The sense is to create a parallel output to the listed<br />
outputs on the left side.<br />
The function “Saved Reply Message” is a special<br />
function of the German Alarm Transmission Device.<br />
This device sends back a signal to the panel if the<br />
<strong>Fire</strong> Brigade is alarmed. This signal is acknowledged<br />
by the FCP <strong>and</strong> if this parameter is set to “yes” the<br />
relating output indicates this feed back signal by an<br />
activation.<br />
106 Autom.controlling Output 001<br />
Cancel<br />
all events<br />
Events for selection<br />
Enter<br />
The functions are disabled by F2 („No“) <strong>and</strong> the<br />
functions are enabled by F3 („Yes“).<br />
After setting the parameters please press F4<br />
(„Enter“) to save the configuration.<br />
Selection of displaying cause <strong>and</strong> effect<br />
events<br />
A cause <strong>and</strong> effect event is a link / configuration of<br />
inputs <strong>and</strong> outputs combined with logical AND or OR.<br />
Cause <strong>and</strong> effect events are possible at the FCP<br />
„Solution F1“ for OC outputs, relays, power outputs,<br />
output modules, inputs, input modules und macro<br />
push buttons.<br />
The user can choose if he wants to see all events in<br />
the LC module or just the events relating to the output<br />
he is configuring at the moment :<br />
„All Events“ means all 2048 possible events will be<br />
displayed.<br />
„Events for selection“ means only the cause <strong>and</strong><br />
effect events of the selected input / output / push<br />
button will be displayed.<br />
Please select your choice by the cursor keys :<br />
↑,↓ : Marker „>“ one line up / one line down<br />
<strong>and</strong> confirm this F4 („Enter“) Jump to Menu<br />
121<br />
107 Only for output modules<br />
Settings Output module 01/099<br />
On/Off like <strong>Fire</strong> Output : No<br />
Activ. in case of emerg. mode : No<br />
Cancel No Yes save<br />
Automatic <strong>Control</strong> : Settings for output<br />
modules (loop)<br />
The example on the left side shows an output module<br />
of segment (loop) 1, address 99 (indicated in the first<br />
line of the LC module).<br />
This menu offers the possibility to assign certain<br />
on/off switching functions to relay <strong>and</strong> sounder output<br />
modules.<br />
The following on/off switching functions are available :<br />
‣ On/Off like <strong>Fire</strong> Outputs - This function<br />
relates to the push button “<strong>Fire</strong> Outputs off”<br />
on the German <strong>Fire</strong> Brigade <strong>Control</strong> Panel. If<br />
this parameter is set to “yes” <strong>and</strong> the push<br />
button is pressed the relating outputs are<br />
disabled.<br />
‣ Activation in case of emergency mode<br />
means that the output module is activated if<br />
there is a system fault on the main board<br />
(CPU) <strong>and</strong> simultaneously an alarm of a<br />
detector on the same loop card where the<br />
NSC Sicherheitstechnik GmbH 41/58 22.06.2006<br />
Eckendorfer Str. 125 c<br />
<strong>Operating</strong> Installation Manual Solution F1 20060621.doc<br />
33609 Bielefeld Version S040A05.00
Only for sounders/sounder modules<br />
Settings Output module 01/099<br />
Activ. in case of emerg. mode : No<br />
Continous<br />
: Yes<br />
intermittent<br />
: No<br />
Sounder group (0-15) : 00<br />
Volume (0-10) : 04<br />
Tone 1 (0-7) : 0 Tone 2 (0-7) : 0<br />
Cancel No Yes save<br />
output module is connected too.<br />
The functions are disabled by F2 („No“) <strong>and</strong> the<br />
functions are enabled by F3 („Yes“).<br />
After setting the parameters please press F4<br />
(„Enter“) to save the configuration.<br />
Automatic <strong>Control</strong> : Settings for sounders/<br />
sounder modules (loop)<br />
For base sounders <strong>and</strong> sounder modules the<br />
following functions can be configured:<br />
‣ Activ. in case of emerg. mode - same as for<br />
output modules (s.a.)<br />
‣ Continous tone<br />
‣ Intermittent (alternate) tone<br />
‣ Sounder group – on each loop a maximum<br />
of 15 sounder groups can be configured.<br />
That means several sounders van be<br />
subsumed tinto one group. The setting of the<br />
group will be made by software (Hochiki) or<br />
by DIP switch (Apollo)..To activate all<br />
sounders of the group you just have to<br />
program events under "automatic controlling"<br />
for one device of this group..<br />
‣ The volume can be set in the range 0 (off) up<br />
to ten. See apndix C. (table of tones <strong>and</strong><br />
volumes for loop sounders).<br />
‣ The tone can be varied from 0 (off) up to 7.<br />
See apndix C. (table of tones <strong>and</strong> volumes<br />
for loop sounders).<br />
See technical device specification for details of<br />
functionality of each device type.<br />
Note :<br />
Sounder output modules are generally operated like<br />
sounders / strobes connected to the monitored power<br />
outputs : If the push button<br />
silenced.<br />
is pressed they are<br />
108<br />
Settings Input 001<br />
with monitoring<br />
: No<br />
Switch<br />
: Yes<br />
Push button<br />
: No<br />
Activation delay : 000<br />
Cancel No Yes save<br />
Automatic <strong>Control</strong> : Settings of 8 internal<br />
monitored inputs<br />
The picture on the left side shows an example of input<br />
1 (indicated in the first line of the LC module).<br />
These inputs can be configured :<br />
‣ With monitoring (only wire break) or without<br />
(default value)<br />
‣ wether a switch or a push button is<br />
connected to the input<br />
‣ With or without activation delay. The delay<br />
can be adjusted in steps by one from 1 –<br />
250. Every step means 0,1 sec. The sense<br />
of this delay is e.g. to compensate bouncing<br />
of a switch. The maximum delay is 250 x 0,1<br />
s = 25 s.<br />
0 means no delay.<br />
The functions are disabled by F2 („No“) <strong>and</strong> the<br />
NSC Sicherheitstechnik GmbH 42/58 22.06.2006<br />
Eckendorfer Str. 125 c<br />
<strong>Operating</strong> Installation Manual Solution F1 20060621.doc<br />
33609 Bielefeld Version S040A05.00
functions are enabled by F3 („Yes“).<br />
After setting the parameters please press F4<br />
(„Enter“) to save the configuration.<br />
109 Zones<br />
Seg. : 1<br />
from address : 1<br />
to address : 12<br />
Zone : 32<br />
from detector : 1<br />
Cancel<br />
save<br />
Configuring zones (loop)<br />
Please type the loop number (”Seg.”)<strong>and</strong> the<br />
detector address (from – to).<br />
Segment = Section of addresses (loop) with a<br />
maximum of 254 Hochiki detectors, modules /<br />
base sounders <strong>and</strong> a maximum of 126 Apollo<br />
detectors, modules. The segment are partitioned<br />
on the loop card according this list :<br />
‣ Loop card 1 : Segment 1 <strong>and</strong> 2<br />
‣ Loop card 2 : Segment 3 <strong>and</strong> 4<br />
‣ Loop card 3 : Segment 5 <strong>and</strong> 6<br />
‣ Loop card 4 : Segment 7 <strong>and</strong> 8<br />
‣ Loop card 5 : Segment 9 <strong>and</strong> 10<br />
‣ Loop card 6 : Segment 11 <strong>and</strong> 12<br />
‣ Loop card 7 : Segment 13 <strong>and</strong> 14<br />
‣ Loop card 8 : Segment 15 <strong>and</strong> 16<br />
‣ Loop card 9 : Segment 17 <strong>and</strong> 18<br />
110 Zones<br />
Loop card : 3<br />
from ML : 1<br />
to ML : 8<br />
from zone : 20<br />
Cancel<br />
save<br />
Address = Detector address (physical address stored<br />
in the detector).<br />
Zone = logical group of detectors (software zone)<br />
where the detectors should be in<br />
from detector = means the starting number of the<br />
detector in the new zone.<br />
Please confirm every line by “OK” <strong>and</strong> after finishing<br />
all lines press „save“ (F4) to save the new<br />
configuration.<br />
Configuring conventional zones<br />
When using the FCP „Solution F1“ the conventional<br />
zones are field programmable too :<br />
Please type the address of the conventional<br />
detector card (PCB). That means the DIL switch<br />
address on the PCB (see wiring diagrams).<br />
The following inputs in the lines „from ML“ <strong>and</strong> „to<br />
ML“ relates to the terminals on the conventional<br />
detector card (1-8). See wiring diagrams again. In the<br />
wiring diagrams <strong>and</strong> on the PCB itself they are<br />
marked by “ML”.<br />
After this the user can select the new zone(s). “From<br />
zone” means the starting zone <strong>and</strong> any sequencing<br />
zones will be put into the next zones.<br />
Please confirm every line by “OK” <strong>and</strong> after finishing<br />
press „save“ (F4) to save the new configuration.<br />
111 Sensitivity Day 4 Mode 3<br />
Sensitivity Night 2 Mode 1<br />
Timer program : 02<br />
Delay on alarm : 000<br />
Delay on fault : 000<br />
Pre alarm<br />
: No<br />
Analogue addressable detector’s sensitivity /<br />
modes / delays<br />
Selected detectors can be configured :<br />
Cancel No Yes save<br />
NSC Sicherheitstechnik GmbH 43/58 22.06.2006<br />
Eckendorfer Str. 125 c<br />
<strong>Operating</strong> Installation Manual Solution F1 20060621.doc<br />
33609 Bielefeld Version S040A05.00
Only for Hochiki ESP<br />
Table of the detector sensitivities :<br />
Sens Opt + Multi Heat Ion<br />
.<br />
0 2,0 % 50° 0,20 V<br />
1 2,5 % 55 ° 0,24 V<br />
2 3,0 % EN54 60° - A1S 0,28V EN54<br />
3 3,5 % 66° 0,32 V<br />
4 4,0 % 72° 0,36 V<br />
5 4,5 % 78° - BS 0,40 V<br />
6 5,0 % 83° 0,44 V<br />
7 5,5 % 88° - CS 0,48 V<br />
(Opt. + Multi : smoke obscuration in %/m)<br />
Table of multi sensor modes :<br />
Mode<br />
<strong>Operating</strong><br />
1 Multi sensor<br />
2 Optical smoke detector<br />
3 Heat detector<br />
Only for Hochiki ESP<br />
‣ one of 8 sensitivities during the day (see<br />
table below)<br />
‣ one of 8 sensitivities during the night (see<br />
table below)<br />
‣ 4 different modes (only multi sensors) (see<br />
table below)<br />
Mode 4 is a special setting, where an alarm in<br />
optical part will cause a prealarm at the FCP,<br />
independently of the parameter settings for<br />
prealarm. An alarm in the heat component will<br />
activate an alarm in any case. If there is<br />
programmed an alarm delay for a multisensor in<br />
mode 4, this will have the effect, that a prealarm<br />
of the optical part will change to an alarm after<br />
expiry of the delay. If the delay is 0 the optical<br />
component never will raise a real alarm.<br />
Table of multisensor sensitivities <strong>and</strong> modes:<br />
Sens<br />
.<br />
Mode ½<br />
Opt./ Multi<br />
Mode 3<br />
Heat<br />
Mode 4<br />
Heat+Opt.<br />
1 2,0 % 50° 60°+2,0%<br />
2 2,5 % 55 ° 78°+2,0%<br />
3 3,0 % EN54 60° - A1S 60°+3,0%<br />
4 3,5 % 66° 78°+3,0%<br />
5 4,0 % 72° 60°+4,0%<br />
6 4,5 % 78° - BS 78°+4,0%<br />
7 - 83° 88°+2,5%<br />
8 - 88° - CS 88°+3,5%<br />
Only for Apollo<br />
Table for detector sensitivities:<br />
Ionisation smoke detector Discovery<br />
Sens<br />
.<br />
Alarm threshold Minimum time to<br />
alarm<br />
1 0,45 5 Sec.<br />
2 0,45 30 Sec.<br />
3 0,70 5 Sec.<br />
4 0,70 30 Sec.<br />
5 1,0 5 Sec.<br />
Only for Apollo<br />
‣ one of 5 sensitivities during the day (see<br />
table below)<br />
‣ one of 5 sensitivities during the night (see<br />
table below)<br />
‣ the mode has no meaning <strong>and</strong> will be<br />
automatically set by the sensitivities (see<br />
table on the left side of next page).<br />
Optical smoke detector Discovery<br />
Sens<br />
.<br />
Alarm threshold Minimum time to<br />
alarm<br />
1 1,4 5 Sec.<br />
2 1,4 30 Sec.<br />
3 2,1 5 Sec.<br />
4 2,1 30 Sec.<br />
5 2,8 5 Sec.<br />
NSC Sicherheitstechnik GmbH 44/58 22.06.2006<br />
Eckendorfer Str. 125 c<br />
<strong>Operating</strong> Installation Manual Solution F1 20060621.doc<br />
33609 Bielefeld Version S040A05.00
112<br />
Heat detector Discovery<br />
Sens Class<br />
. EN54-5:2000<br />
static alarmtemperature<br />
min. typ. max.<br />
1 A1R 54 57 65.<br />
2 A2 54 61 70<br />
3 A2S 54 61 70<br />
4 CR 84 90 100<br />
5 CS 84 90 100.<br />
Multisensor Discovery<br />
Sens Alarm threshold<br />
.<br />
Minimum time to<br />
alarm<br />
1 1,1 Multi. 20 Sec.<br />
2 2,1 Optical 30 Sec.<br />
3 2,8 Multi. 20 Sec.<br />
4 4,2 Multi. 20 Sec.<br />
5 - Heat 30 Sec.<br />
all automatic detectors XP95/XPlorer<br />
Sens. Alarm<br />
threshold<br />
1 45 EN54<br />
2 50 EN54<br />
3 55 EN54<br />
4 60 No EN54<br />
5 64 No EN54<br />
Timer program 01<br />
1. Sunday 5. Thursday<br />
2. Monday 6. Friday<br />
3. Tuesday 7. Saturday<br />
4. Wednesday<br />
Cancel<br />
113 Interfaces UART 1<br />
Enter<br />
1. Printer x<br />
2. FRP<br />
3. PC<br />
4. ESPA 4.4.4<br />
Cancel On save<br />
For all detector types<br />
‣ 1 timer program for switching day / night<br />
mode<br />
‣ an alarm delay time – if the detector detects<br />
an alarm the acception of the alarm condition<br />
can be delayed here just to make sure that it<br />
is no false alarm. During this time the<br />
detector checks the alarm signal again <strong>and</strong><br />
again.<br />
‣ an fault delay time which way of operation is<br />
similar to the alarm delay above<br />
‣ Individual pre alarm of every detector<br />
If you want to use the Timer program it must be<br />
configured before according menu 65. This timer<br />
program h<strong>and</strong>les the day / night mode switching <strong>and</strong><br />
the switching from one sensitivity (mode) to another<br />
one <strong>and</strong> vice versa.<br />
Please confirm every line by “OK” <strong>and</strong> after finishing<br />
press „save“ (F4) to save the new configuration.<br />
To configure timer programs<br />
The example on the left side shows timer program 01.<br />
Please first select the day by using the cursor keys<br />
↑,↓ : Marker „>“ one line up / one line down<br />
<strong>and</strong> confirm this by F4 („Enter“) or type the number<br />
of the day directly by using the keypad Jump to<br />
Menu 120<br />
Interface protocols<br />
The example on the left side shows UART 1.<br />
Please select the protocol you want to assign to<br />
UART 1 by using the cursor keys. The following<br />
protocols are available :<br />
‣ Printer<br />
‣ FRP (<strong>Fire</strong> Brigade Repeater Panel)<br />
‣ PC configuration (Laptop)<br />
‣ ESPA 4.4.4 (Option)<br />
After selecting the protocol it has to be activated by<br />
pressing F2 („On“). The activation will be indicated<br />
by a „x“ at the end of the line.<br />
By pressing F3 („Off“) the protocol will be<br />
deactivated again.<br />
114 Interfaces UART 1<br />
1. 4800 5. 57600<br />
2. 9600 x 6. 115200<br />
3. 19200 7. 1200<br />
4. 38400 8. 2400<br />
Cancel Off save<br />
Press „save“ (F4) to save the new configuration.<br />
Interface baudrates<br />
The example on the left side selects baudrate of 9600<br />
of UART 1.<br />
The way or operation is similar to selecting the<br />
protocol as described above.<br />
NSC Sicherheitstechnik GmbH 45/58 22.06.2006<br />
Eckendorfer Str. 125 c<br />
<strong>Operating</strong> Installation Manual Solution F1 20060621.doc<br />
33609 Bielefeld Version S040A05.00
115 Convent. detect.<br />
Open Circuit [x0,01mA] : 0180<br />
1. Alarm [x0,01mA] : 1000<br />
2. Alarm [x0,01mA] : 3000<br />
Reset time [x100ms] : 020<br />
Cancel<br />
save<br />
Configuring thresholds for conventional<br />
detectors<br />
This menu is to configure several thresholds for<br />
conventional detectors. This is important if<br />
It is necessary to configure a threshold for open circuit<br />
(wire break), 1. <strong>and</strong> 2. alarm as well as a reset time<br />
fort he detectors which is needed in case of alarm<br />
reset. This time determines the period when the<br />
voltage on the line drops down to zero to reset all<br />
detectors on this line.<br />
Press „save“ (F4) to save the new configuration.<br />
116 Maintenance<br />
Day : 09 Status<br />
Month : 07 Off<br />
Year : 04<br />
Hour : 07<br />
Cancel On save<br />
If you have any doubts about these values for the<br />
requested detectors have a look into their data sheet.<br />
If the FCP is shipped out by NSC the values above<br />
are adjusted for Hochiki CDX <strong>and</strong> Apollo S65 / Orbis.<br />
Maintenance<br />
Here you can define a date for the next necessary<br />
maintanance. When this date is reached, a fault<br />
message will be generated.<br />
By pressing F2 ("on") this function will be enabled.<br />
By pressing F4 ("save") the date will be saved.<br />
117 Push button S_1<br />
1. End user code x<br />
2. Installer code<br />
Cancel off save<br />
Push button S_ settings<br />
For the special push buttons S1-S8 the following<br />
access levels can be configured:<br />
• No code<br />
• End user code<br />
• Installer code<br />
By F2 ("on") resp.. F3 ("off") the code will be<br />
activated resp. deactivated..<br />
By F4 ("save") the settings will be saved..<br />
120 Timer program 01 Sunday<br />
time 1: 06:00 Day<br />
time 2: 18:00 Night<br />
time 3: 00:00 Night<br />
time 4: 00:00 Night<br />
Cancel Day Night save<br />
Configuring the timer<br />
The example on the left side shows timer program 01.<br />
The selected weekday is indicated in the 2. line of the<br />
LC module.<br />
Please select first if you want to switch into day mode<br />
(F2) or night mode (F3) <strong>and</strong> then type in hour <strong>and</strong><br />
minute. Please confirm hour <strong>and</strong> minute by “OK“.<br />
The cursor runs automatically into the next line when<br />
you have confirmed the minute by OK.<br />
Day- <strong>and</strong> Night relates to the sensitivities/modes as<br />
described in Menu 111.<br />
When you have finished press „save“ (F4) to save<br />
the new configuration.<br />
NSC Sicherheitstechnik GmbH 46/58 22.06.2006<br />
Eckendorfer Str. 125 c<br />
<strong>Operating</strong> Installation Manual Solution F1 20060621.doc<br />
33609 Bielefeld Version S040A05.00
121 Event Output module 01/089/01<br />
0001/2048 Output 001 Inactive<br />
>0001:Alarm 0001/000-0003/000<br />
0002:Activation Relay 0001-0001<br />
0003:Alarm 0032/000-0064/000<br />
0004:free<br />
0005:free<br />
Cancel insert delete Enter<br />
Cause <strong>and</strong> Effect events configuration 1<br />
The example on the left side shows a list (an<br />
overview) of all configured cause <strong>and</strong> effect events.<br />
They have numbers at the left side of the LC module<br />
<strong>and</strong> behind there is written what kind of cause <strong>and</strong><br />
effect event they are.<br />
The first line of the LC module shows the device<br />
which shall be configured at the moment because this<br />
has been selected before. The last two digits (here :<br />
01) indicates that output 1 of this module is selected.<br />
The second line of the LC module relates to the<br />
marker „>“ <strong>and</strong> shows the configuration which is<br />
saved at the marker’s position. In the example above<br />
it is the first cause <strong>and</strong> effect event at all <strong>and</strong> it is an<br />
alarm event of OC output 01 (on the main board).<br />
If you want to configure a new event you have to put<br />
the marker on a “free” event <strong>and</strong> type “Enter” (F4”)<br />
Jump to Menu 130<br />
The FCP <strong>“Solution</strong> F1-6 <strong>and</strong> F1-18“ support up to<br />
2048 events.<br />
Event<br />
Push button S1<br />
0001/2048 ->Output 001 Inactive<br />
0001:Alarm 0000/000-0000/000<br />
0002:Activation Relay 0001-0001<br />
0003:Alarm 0000/000-0000/000<br />
>0004:free<br />
0005:free<br />
Cancel insert delete Enter<br />
130 Event 0004/2048<br />
Output module 01/089/01 Inactive<br />
Code<br />
: Alarm<br />
FCP : 001<br />
from zone : 0001 Detect. : 000<br />
to zone : 0064 Detect. : 000<br />
OR<br />
Cancel modify OK save<br />
The user can also „delete“ (F3) events <strong>and</strong> “insert”<br />
(F2) new events in between existing events.<br />
Therefore the marker „>“ has to be put at the right<br />
position. The sequence doesn’t really matter but if the<br />
user likes to have e.g. all cause <strong>and</strong> effect events of<br />
the loop output modules one under the other he can<br />
arrange it by inserting at the right place.<br />
Left : Example of cause <strong>and</strong> effect event for macro<br />
push button S1.<br />
Cause <strong>and</strong> Effect events configuration 2<br />
The example on the left side shows in line 1 that we<br />
are going to configure event 4 of 2048 possible<br />
events. The second line shows the selected device. In<br />
this case an Output module on loop 1, address 89<br />
output 1.<br />
The kind of event which shall cause an effect is<br />
always preset to “Alarm” (line 3 of the LC module). If<br />
you want to change it please press F2 („modify“) <br />
Jump to Menu 131<br />
Otherwise confirm the code by pressing F3 ("OK").<br />
The number of the FCP is always 1 besides there is a<br />
network with several FCP interlinked.<br />
Then type the zone(s) <strong>and</strong> detector(s) which have to<br />
be in alarm to activate this output module. If you want<br />
to select whole zone(s) (<strong>and</strong> no individual detectors)<br />
leave the detector = 000. Please confirm every input<br />
by „OK“.<br />
Pay attention to the fact that the zone(s) <strong>and</strong><br />
detector(s) can be configured logical AND or OR.<br />
That means (in case of AND) that all zones or<br />
detectors must be in alarm simultaneously to activate<br />
the output.<br />
NSC Sicherheitstechnik GmbH 47/58 22.06.2006<br />
Eckendorfer Str. 125 c<br />
<strong>Operating</strong> Installation Manual Solution F1 20060621.doc<br />
33609 Bielefeld Version S040A05.00
131<br />
Codes for outputs<br />
Page 1<br />
Code<br />
1. Alarm 5. Switch off<br />
2. Pre alarm 6. Reset FCP<br />
3. Main alarm 7. Fault power sup.<br />
4. Fault 8. Mains fault<br />
Cancel more Enter<br />
You can change between “AND“ <strong>and</strong> “OR” by F3.<br />
Then please press F4 („save“) to save the new<br />
cause <strong>and</strong> effect event.<br />
Codes for cause <strong>and</strong> effect events<br />
Please type the code you need for the application<br />
directly by the keypad or use the cursor keys to put<br />
the grey background on it <strong>and</strong> press F4 („Enter“) to<br />
confirm your choice.<br />
The selection will be taken over to the menu before.<br />
Page 2<br />
Code<br />
1. Alarm autom. det.<br />
2. Alarm MCP<br />
By these codes outputs can be activated to verify the<br />
alarm origin..<br />
Cancel more Enter<br />
Codes for inputs<br />
Code<br />
1. Alarm 5. Switch off<br />
2. Pre alarm 6. Change sensit.<br />
3. Main alarm 7. Activation<br />
4. Fault 8. Information<br />
Cancel<br />
Codes for push buttons<br />
Code<br />
1. Switch off<br />
2. Change sensit.<br />
3. Activation<br />
Enter<br />
The events "Alarm", "Pre alarm", "Main<br />
alarm" <strong>and</strong> "Fault" require additionally the input<br />
of a zone- <strong>and</strong> a detector number. For this<br />
reason any non existing detector has to be<br />
programmed to the zone- <strong>and</strong> detector number<br />
specified in the eventt (see alarm configuration -<br />
zones ->Menu 109) That even can be a detector<br />
on a non existing loop card..This means, the<br />
input simulates an automatic detector with all<br />
programmable functions of the detector (i.e.<br />
customer text)<strong>and</strong> the zone (i.e. alarm<br />
configuration).<br />
The event "Information" just generates an<br />
activation message but no alarm or fault message.<br />
Cancel<br />
Enter<br />
By programming the event "Activation" you can<br />
directly control OC outputs, relais, power outputs or<br />
modules on the loop..<br />
NSC Sicherheitstechnik GmbH 48/58 22.06.2006<br />
Eckendorfer Str. 125 c<br />
<strong>Operating</strong> Installation Manual Solution F1 20060621.doc<br />
33609 Bielefeld Version S040A05.00
4. Mounting instruction<br />
1. First please remove the cover of the FCP. You will find the key on the backside of the panel<br />
housing.<br />
2. The FCP „Solution F1“ has a wall mounting housing. The B1 <strong>and</strong> B2 housings provide a<br />
drilling template for easier mounting. Use this template for drilling the holes.<br />
3. Please use 8mm dowels for fixing the screws. Don’t put the batteries into the panel yet. Start<br />
with the upper screws, hang the back plate of the housing on the screws <strong>and</strong> then you can<br />
screw the lower holes.<br />
4. The control panel can be opened by unscrewing the plastic screws only on the right side of the<br />
control panel, giving free access to the terminals for connecting the wires.<br />
5. Don’t connect the panel to Mains AC yet. Use the wiring diagrams for connecting loops,<br />
conventional zones <strong>and</strong> sounders / strobes.<br />
6. If you are connecting the shielding of the loop wires (the FCP „Solution F1“ does NOT need<br />
that in any case but it can be advantageous to do so) then you have to connect the wire on<br />
both sides at the loop card.<br />
7. Please connect peripheral components like LCD repeater panels, remote control panels etc.<br />
8. Now you have to connect the Mains AC cable. Make sure that the Mains AC fuse on the<br />
power supply is plugged in.<br />
9. Switch on Mains AC voltage.<br />
10. If the internal buzzer sounds, please switch of by using push button .<br />
11. Put the batteries on the bottom of the panel housing <strong>and</strong> fix them by using the cable fixer.<br />
Connect the batteries to the power supply by using the supplied cables (see wiring diagram).<br />
12. Please follow the commissioning instruction.<br />
NSC Sicherheitstechnik GmbH 49/58 22.06.2006<br />
Eckendorfer Str. 125 c<br />
<strong>Operating</strong> Installation Manual Solution F1 20060621.doc<br />
33609 Bielefeld Version S040A05.00
5. Commissioning certificate FCP „Solution F1“<br />
____________________________________________<br />
Serial number<br />
____________________________________________<br />
Date of delivery<br />
F1-6 : □ F1-18 : □ ___________________________________________<br />
Panel type (please mark)<br />
Commission/ Sight<br />
____________________________________________<br />
Installed by : date, technician<br />
General<br />
The commissioning according the national rules requires the complete <strong>and</strong> accurate installation of<br />
all components of fire control system, as it is specified in the engineering documents.<br />
Checking the documentation<br />
Document<br />
Engineering order<br />
Final planning documents<br />
Updated planning documents<br />
<strong>Fire</strong> brigade documents<br />
available<br />
yes/no<br />
Repository<br />
Checking the system components<br />
You have to compare the quantity of planned components with the quantity of actually installed<br />
components.<br />
Component Planned quantity Installed quantity<br />
<strong>Fire</strong> control panel<br />
Modules for addressable detectors<br />
Modules for convetional detectors<br />
Automatic detectors<br />
Manual call points<br />
Input-/output modules<br />
Sounder modules<br />
Remote panel<br />
<strong>Fire</strong> brigade panel<br />
<strong>Fire</strong> brigade remote panel<br />
Transmission device<br />
<strong>Fire</strong> brigade key deposite box<br />
Key deposite box release device<br />
Additional power supply<br />
Sounder<br />
Flashlight<br />
NSC Sicherheitstechnik GmbH 50/58 22.06.2006<br />
Eckendorfer Str. 125 c<br />
<strong>Operating</strong> Installation Manual Solution F1 20060621.doc<br />
33609 Bielefeld Version S040A05.00
Checking the wiring system<br />
Before checking the wiring system you should disconnect all cables from the fire control panel by<br />
removing the pluggable terminals.<br />
Measure end of line resistors of conventional zones (without voltage) .<br />
6k8 (±10%) end of line resistor measurable on each conventional zone<br />
Ο Fault check wiring <strong>and</strong> end of line resistor.<br />
Ο ok<br />
plug terminals in fire control panel<br />
Measure cable resistance of loop wiring (without voltage).<br />
If isolators are installed on the loop you only can measure the resistance of the minus wire.<br />
You have to measure the cable resistance of each loop. The minimum operating voltage for each<br />
loop device will be calculated from the cable resistance <strong>and</strong> the loop current, which has to be<br />
measured later.<br />
The resistance of the shielding also has to be written down in the following table. Additionally this<br />
measurement guarantees that the shielding isn’t interrupted in any loop device. As long as the<br />
shielding hasn’t been connected to earth in the FCP there must not be any other connection to<br />
earth potential (e.g. in a detector base).You can check this by measuring the resistance between<br />
the shielding <strong>and</strong> earth potential.<br />
Loopcard Loop ML-Wire Shielding Earthless wiring<br />
[Ω}<br />
[Ω]<br />
1 1 (ML-1-/ML-2-) yes no<br />
1 2 (ML-5-/ML-6-) yes no<br />
2 3 (ML-1-/ML-2-) yes no<br />
2 4 (ML-5-/ML-6-) yes no<br />
3 5 (ML-1-/ML-2-) yes no<br />
3 6 (ML-5-/ML-6-) yes no<br />
4 7 (ML-1-/ML-2-) yes no<br />
4 8 (ML-5-/ML-6-) yes no<br />
5 9 (ML-1-/ML-2-) yes no<br />
5 10 (ML-5-/ML-6-) yes no<br />
6 11 (ML-1-/ML-2-) yes no<br />
6 12 (ML-5-/ML-6-) yes no<br />
7 13 (ML-1-/ML-2-) yes no<br />
7 14 (ML-5-/ML-6-) yes no<br />
8 15 (ML-1-/ML-2-) yes no<br />
8 16 (ML-5-/ML-6-) yes no<br />
9 17 (ML-1-/ML-2-) yes no<br />
9 18 (ML-5-/ML-6-) yes no<br />
If the cable resistance is correct please plug the terminals in the FCP.<br />
NSC Sicherheitstechnik GmbH 51/58 22.06.2006<br />
Eckendorfer Str. 125 c<br />
<strong>Operating</strong> Installation Manual Solution F1 20060621.doc<br />
33609 Bielefeld Version S040A05.00
Measurement of the end of line resistors of the monitored power outputs<br />
(without voltage) .<br />
Power Key deposit box Sounder/flashlight Transmission device<br />
output<br />
1 depends on type 1KΩ/1W<br />
- Ο fault<br />
tolerance 10%<br />
Ο ok<br />
2 - 1KΩ/1W<br />
1KΩ/1W<br />
tolerance 10% tolerance 10%<br />
Ο fault<br />
3 - 1KΩ/1W<br />
tolerance 10%<br />
1KΩ/1W<br />
tolerance 10%<br />
Ο ok<br />
Ο fault<br />
Ο ok<br />
The end of line resistor has to be mounted in the last device of the power output cable. The adaption<br />
of open curcuit <strong>and</strong> short curcuit thresholds for the connected devices has to be done directly at the<br />
FCP. Please go to "Installer" -> "more" (F3) -> "more" (F3) -> "Power outputs".<br />
Measurement of the end of line resistors of the monitored inputs (without<br />
voltage).<br />
Input line<br />
Key deposit box alarm<br />
Extinguish interface<br />
End of line resistor<br />
2,2KΩ/0,5W<br />
tolerance 10%<br />
3,3KΩ/0,5W<br />
tolerance 10%<br />
Ο fault<br />
Ο ok<br />
Ο fault<br />
Ο ok<br />
Checking the end of line resistor on the RS485 bus.<br />
End of line resistor activated at first <strong>and</strong> last device (jumper matched)<br />
Ο o.k. Ο fault<br />
Commissioning of the power supply<br />
- plug 230VAC mains cable or check aöready plugged cable!<br />
- switch on power supply for fire control panel!<br />
The internal buzzer will be on: please switch off by pressing<br />
NSC Sicherheitstechnik GmbH 52/58 22.06.2006<br />
Eckendorfer Str. 125 c<br />
<strong>Operating</strong> Installation Manual Solution F1 20060621.doc<br />
33609 Bielefeld Version S040A05.00
Scanning of internal an external components<br />
Detector modules<br />
After scanning process <strong>and</strong> uploading of the programming out of the flash memory all recognised<br />
components will be displayed in a list.<br />
Exampel:<br />
Internal Modules<br />
1. Loop card HOCHIKI ESP : 01<br />
2. Loop card Apollo XP : 00<br />
3. Conventional detector card : 01<br />
4. Input-/output module : 00↓<br />
zurück<br />
Details<br />
Number of mounted detector modules correctly recognised<br />
Ο o.k. Ο fault<br />
By pressing the „Details“ key F3 the addresses of the modules can be checked.<br />
Exampel:<br />
Internal Modules<br />
01/09<br />
>01 Loop card HOCHIKI ESP<br />
02 Conventional detector card<br />
03 -<br />
04 -<br />
05 -<br />
06 -<br />
Cancel<br />
Details<br />
Addresses of the mounted detector modules correctly set<br />
Ο o.k. Ο fault<br />
RS485 devices<br />
Afterwards the RS485-BUS will be scanned for connected components. The result with the<br />
number of recognised devices will be noticed in the module list.<br />
.<br />
Exampel:<br />
Internal Modules<br />
4. Input-/output module : 00↑<br />
5. Network interface card : 00<br />
6. Modem : 00<br />
7. RS485 device : 04<br />
zurück<br />
Details<br />
Number of installed RS485 devices correctly recognised<br />
Ο o.k. Ο fault<br />
NSC Sicherheitstechnik GmbH 53/58 22.06.2006<br />
Eckendorfer Str. 125 c<br />
<strong>Operating</strong> Installation Manual Solution F1 20060621.doc<br />
33609 Bielefeld Version S040A05.00
By pressing the „Details“key F3 the addresses of the modules can be checked.<br />
Exampel:<br />
Internal Modules<br />
01/63<br />
>01 FRP with FBC A B<br />
02 Remote LCD Panel A<br />
03 Remote LCD Panel A<br />
04 FRP A B<br />
05 -<br />
06 -<br />
zurück<br />
Details<br />
By letters "A" und "B" will be displayed, on which channel of the redundant RS485 bus each<br />
device has been connected.<br />
Addresses of the RS485 devices correctly set<br />
Wiring of the RS485 devices correct<br />
Ο o.k. Ο fault<br />
Ο o.k. Ο fault<br />
Addressable detectors/modules<br />
During the initialisation permanently a counter will be displayed which is counting the total number of<br />
all detectors <strong>and</strong> modules. After scanning the loop devices, a list of these devices will be displayed.<br />
This list will be visible each time the number of recognised detectors/modules has changed after<br />
scanning the loops. Therefore after first time initialisation process all new recognised<br />
detectors/modules will be listed.<br />
Exampel:<br />
Detector configuration 0001/0265<br />
Seg. |Add| Error |<br />
Zone |Detect<br />
>01 o 1|001| new | 0000 | 000<br />
01 o 1|002| new | 0000 | 000<br />
01 o 1|003| new | 0000 | 000<br />
01 o 1|004| new | 0000 | 000<br />
01 o 1|005| new | 0000 | 000<br />
continue all ok<br />
ok<br />
In line 1 the number of all recognised detectors <strong>and</strong> modules will be displayed. In the table for each<br />
device will be displayed :<br />
- Segment, where the device is connected to<br />
- Symbol for loop "o" or spur wiring "-"<br />
- number of loop/spur<br />
- configured device address<br />
- error code ("new" in this exampel)<br />
- programmed zone <strong>and</strong> detector number<br />
By pressing the "ok" key each single detector can be stored in the FCP programming, by pressing "all<br />
ok" all connected devices will be stored in the FCP flash memory simultaneously.<br />
NSC Sicherheitstechnik GmbH 54/58 22.06.2006<br />
Eckendorfer Str. 125 c<br />
<strong>Operating</strong> Installation Manual Solution F1 20060621.doc<br />
33609 Bielefeld Version S040A05.00
Checking of earth fault<br />
A constant voltage must not be measurable between potential earth <strong>and</strong> fire control panel<br />
potential there<br />
Voltage between PE / - accumulator<br />
Voltage between PE / + accumulator<br />
Ο o.k. Ο fault -> .............V<br />
Ο o.k. Ο fault -> .............V<br />
In case of an earth fault this has to be localised by disconnecting single cables in the fire control<br />
panel. Then the earth fault has to be removed. The supervision of an earth fault can be<br />
deactivated by system parameter 13.<br />
Measurement of loop voltage <strong>and</strong> current<br />
.<br />
Dependent of the used multimeter the voltage <strong>and</strong> the current will vary differently. This is caused<br />
by the modulated protocol between the FCP <strong>and</strong> the loop devices. For the measurement of the<br />
current the loop has to be separated on one side in the FCP <strong>and</strong> on the other side the current has<br />
to be measured on the ML+ or ML- wire. At the same time the loop devices have to be in the<br />
quiescent state. Decisive for a faultless operation is the fact, that all loop devices are supplied by<br />
a sufficient voltage (17V). The voltage drop on the cable has to be calculated form the quiescent<br />
current <strong>and</strong> the cable resistance measured under point 4.2.<br />
Loop card Loop Voltage<br />
33V ± 3V<br />
1 1 (ML-1-/ML-2-)<br />
1 2 (ML-5-/ML-6-)<br />
2 3 (ML-1-/ML-2-)<br />
2 4 (ML-5-/ML-6-)<br />
3 5 (ML-1-/ML-2-)<br />
3 6 (ML-5-/ML-6-)<br />
4 7 (ML-1-/ML-2-)<br />
4 8 (ML-5-/ML-6-)<br />
5 9 (ML-1-/ML-2-)<br />
5 10 (ML-5-/ML-6-)<br />
6 11 (ML-1-/ML-2-)<br />
6 12 (ML-5-/ML-6-)<br />
7 13 (ML-1-/ML-2-)<br />
7 14 (ML-5-/ML-6-)<br />
8 15 (ML-1-/ML-2-)<br />
8 16 (ML-5-/ML-6-)<br />
9 17 (ML-1-/ML-2-)<br />
9 18 (ML-5-/ML-6-)<br />
Quiescent<br />
current<br />
[mA]<br />
Voltage drop[V]<br />
(quiescent current x<br />
cable resistance)<br />
NSC Sicherheitstechnik GmbH 55/58 22.06.2006<br />
Eckendorfer Str. 125 c<br />
<strong>Operating</strong> Installation Manual Solution F1 20060621.doc<br />
33609 Bielefeld Version S040A05.00
Configure power outputs<br />
Load resistance<br />
Power output 1 : 0476<br />
Power output 2 : 1059<br />
Power output 3 : 0960<br />
Cancel Calib. save<br />
The thresholds depend on the loadresistance of the connected device inclusive the line resistance.<br />
This total resistance can be ascertained automatically for each power output individually by pressing<br />
"calib." F3. The software then calculates the thresholds for open curcuit <strong>and</strong> short curcuit. The<br />
resistance can also be measured with a multimeter <strong>and</strong> typed in directly using the keyboard.<br />
Configuration of the fire control system<br />
The configuration of the fire control system is very comprehensive <strong>and</strong> is mainly dependent of the<br />
largeness of installation. The details have to be specified in the planning documents. The<br />
following checklist describes the individual steps of the programming of the fire control panel:.<br />
Programming<br />
Menu topic<br />
Zones Alarmorganisation Ο ok.<br />
Detector configuration<br />
Alarmorganisation<br />
- sensitivity<br />
Ο ok Ο not used<br />
- mode of multisensors<br />
Ο ok Ο not used<br />
- time program<br />
Ο ok Ο not used<br />
- prealarm<br />
Ο ok Ο not used<br />
- alarm delay<br />
Ο ok Ο not used<br />
Detector texts by PC software Ο ok Ο not used<br />
Programming<br />
Menu topic<br />
Zone parameters<br />
- cross detection<br />
Alarmorganisation<br />
Ο ok Ο not used<br />
- internal alarm zone<br />
Ο ok Ο not used<br />
- fault zone<br />
Ο ok Ο not used<br />
- manual call point (only for<br />
Ο ok Ο not used<br />
conventional detectors or<br />
modules)<br />
Cross zoning Alarmorganisation Ο ok Ο not used<br />
Timer programs<br />
- for delay<br />
Alarmorganisation<br />
Ο ok Ο not used<br />
- for detector sensitivity<br />
Ο ok Ο not used<br />
Delay Alarmorganisation Ο ok Ο not used<br />
Power outputs<br />
- key deposit box<br />
Autom. controlling<br />
Ο ok Ο not used<br />
- sounders/flashlights<br />
Ο ok Ο not used<br />
- transmission device<br />
Ο ok Ο not used<br />
<strong>Control</strong>ling of relays, outputs or<br />
Autom. controlling Ο ok Ο not used<br />
output modules<br />
Loop sounders Autom. controlling Ο ok Ο not used<br />
<strong>Control</strong>ling by special keys Configuration Ο ok Ο not used<br />
Systemparameters Configuration Ο ok Ο not used<br />
Holidays Configuration Ο ok Ο not used<br />
Interfaces Configuration -> more Ο ok Ο not used<br />
Thresholds for conventional zones Configuration -> more Ο ok Ο not used<br />
NSC Sicherheitstechnik GmbH 56/58 22.06.2006<br />
Eckendorfer Str. 125 c<br />
<strong>Operating</strong> Installation Manual Solution F1 20060621.doc<br />
33609 Bielefeld Version S040A05.00
Functional tests<br />
Test Measured value Test result<br />
Normal operation<br />
- green LED „Operation" lights<br />
Ο ok. Ο fault<br />
- green LED „Night“ lights<br />
<strong>Fire</strong> condition<br />
- Test of all automatic detectors<br />
Ο ok. Ο fault<br />
- Test of all manual call points<br />
Ο ok. Ο fault<br />
The fire condition can be generated in the installer<br />
level by functions „testalarm“ or „simulation“.<br />
Check display at FCP, remote panels <strong>and</strong> printer<br />
Fault condition<br />
- loop<br />
- power outputs<br />
- monitored inputs<br />
- RS485 bus<br />
- battery<br />
- mains fault (mains fault delay)<br />
Check display at FCP, remote panels <strong>and</strong> printer<br />
Disabled condition<br />
- detector<br />
- zone<br />
- power output<br />
Check display at FCP, remote panels <strong>and</strong> printer<br />
Alarm devices<br />
- transmission device activation<br />
- flash lights<br />
- sounders<br />
<strong>Fire</strong> outputs<br />
- relays<br />
- outputs<br />
- output modules<br />
Current of FCP at mains fault<br />
Required bridge over time<br />
Required battery capacity<br />
..........Min<br />
...............mA<br />
………….h<br />
…………Ah<br />
Ο ok. Ο fault<br />
Ο ok. Ο fault<br />
Ο o.k. Ο fault<br />
Ο o.k. Ο fault<br />
Ο o.k. Ο fault<br />
Ο o.k. Ο fault<br />
Ο o.k. Ο fault<br />
Ο o.k. Ο fault<br />
Ο ok. Ο fault<br />
Ο ok. Ο fault<br />
Ο ok. Ο fault<br />
Ο ok. Ο fault<br />
Ο ok. Ο fault<br />
Ο ok. Ο fault<br />
Ο ok. Ο fault<br />
Ο ok. Ο fault<br />
NSC Sicherheitstechnik GmbH 57/58 22.06.2006<br />
Eckendorfer Str. 125 c<br />
<strong>Operating</strong> Installation Manual Solution F1 20060621.doc<br />
33609 Bielefeld Version S040A05.00
6. Technical specifications :<br />
Main AC voltage :<br />
<strong>Operating</strong> voltage :<br />
Output supply current Solution F1-6 (Order code<br />
B01050-00) :<br />
Battery charging current Solution F1-6 (Order code<br />
B01050-00) :<br />
Output supply current Solution F1-18 (Order code<br />
B01070-00) :<br />
Battery charging current Solution F1-18 (Order code<br />
B01070-00) :<br />
Quiescent current FCP w/o additional modules :<br />
Quiescent current loop card B01260-00 :<br />
Quiescent current loop card B01270-00 :<br />
Quiescent current conventional card B01300-00 :<br />
Quiescent current conventional card B01310-00 :<br />
Quiescent current relay card B01330-00 :<br />
Battery charging voltage :<br />
Battery low voltage :<br />
Ripple voltage :<br />
<strong>Operating</strong> temperature :<br />
Humidity :<br />
230V AC, -15% to +10%, 50 – 60 Hz<br />
24V DC (21,0 – 29,2 V DC)<br />
Max. 4,2 A<br />
Max. 2,5 A<br />
Max. 6,7,A<br />
Max. 2,5 A<br />
90 mA<br />
33 mA (without Detector)<br />
35 mA (without Detector)<br />
40 mA (without Detector)<br />
42 mA (without Detector)<br />
0 mA<br />
27,6 V (at 20°C)<br />
21,0 V<br />
0,8 V pp<br />
-5 to +40° C<br />
Max. 95 % rel.<br />
Housing : Steel, RAL 7035<br />
IP rating : IP 40<br />
Dimensions housing A1, A2 : 540 x 492 x 162 mm (B x H x T)<br />
Weight FCP Solution F1-6 with housing A1, A2 :<br />
14 kg<br />
Dimensions housing B1, B2 : 540 x 540 x 245 mm (B x H x T)<br />
Weight FCP Solution F1-18 with housing B1, B2 :<br />
18,5 kg<br />
NSC Sicherheitstechnik GmbH 58/58 22.06.2006<br />
Eckendorfer Str. 125 c<br />
<strong>Operating</strong> Installation Manual Solution F1 20060621.doc<br />
33609 Bielefeld Version S040A05.00
Attachement A FCP "Solution F1"<br />
Menu Description Menu Description Menu Description Menu Description Menu Desrciption Menu Description<br />
1 Main menu 2 Switch on/off 6 Zones & detectors 22 Addressable detectors<br />
7 OC outputs<br />
8 4 internal relays<br />
9 3 internal power outputs<br />
10 Sounders / Strobes<br />
11 Alarm transmission dev.<br />
12 Alarm transm. Delay<br />
13 <strong>Fire</strong> outputs<br />
3 Alarm counter<br />
4 End user code<br />
1.1 FCP selection<br />
5 Diagnosis 14 Event memory 23 Filter<br />
24 printing<br />
15 Zones overview 25 Table of detectors 27 Data of MCP<br />
28 Data of optical 30 Zero- /<strong>Fire</strong>point<br />
16 Int. PCBs overview 26 Int. PCBs (details) 29 Loop card details<br />
26.1 Input-/output card<br />
26.2 Network adapter<br />
26.3 Modem<br />
26.4 RS485 devices 29.1 Softwareversion, Status<br />
17 Network devices 27 List of network devices<br />
18 Power Supply voltages<br />
19 Power output voltages<br />
20 8 int. input voltages<br />
21 Panel data (softw. Version etc.)<br />
NSC Sicherheitstechnik GmbH<br />
Eckendorfer Str. 125 c<br />
D-33609 Bielefeld End user menus<br />
22.06.2006<br />
Menüstruktur F1 20060621.xls<br />
Betr. Engl.
Attachement B FCP "Solution F1"<br />
Menu Description Menu Description Menu Description Menu Description Menu Desrciption Menu Description<br />
32 Main menu 33 Test functions 50 Detector test<br />
51 Manual <strong>Control</strong>ling 100 Internal OC outputs<br />
101 4 internal relays<br />
102 3 monit. power outputs<br />
52 Simulation<br />
103 Output modules (Loop)<br />
53 Revision<br />
34 Automatic <strong>Control</strong>ling 54 internal OC outputs<br />
55 4 internal relays<br />
56 3 monitored power outputs 104 Settings<br />
105 Functions<br />
106 Cause&Effect events<br />
57 Output modules (Loop) 107 Settings<br />
106 Cause&Effect events<br />
58 Input modules (Loop) 106 Cause&Effect events<br />
59 8 monitored inputs 108 Settings<br />
106 Cause&Effect events<br />
60 2 monitored conv. Inputs 106 Cause&Effect events<br />
35 Alarm Configuration 61 Addressable / Conventional 109 Config. Addressable det.<br />
109 Config. Convent. zones<br />
62 Detector settings 110 Sensitivity / Modes etc.<br />
63 Zone settings<br />
64 Zone Alarm Coincidences<br />
65 Timer programs 111 Config. Timer programs 120 Config. Timer<br />
66 Delay times of Main Alarm<br />
36 Settings 1 67 To set date <strong>and</strong> time 116 Maintanance<br />
NSC Sicherheitstechnik GmbH<br />
Eckendorfer Str. 125 c<br />
D-33609 Bielefeld Installer menus<br />
22.06.2006<br />
Menüstruktur F1 20060621.xls<br />
Inst. Engl.
Attachement B FCP "Solution F1"<br />
68 To configure holidays<br />
69 System settings<br />
70 Scan detectors<br />
71 Delecte Configuration<br />
72 Delete Texts<br />
73 Delete Events<br />
74 Configure push buttons S1-8 106 Cause&Effect events 121 Config. C&E #1 130 Config. C&E #2<br />
117 Settings S1-8<br />
37 Settings 2 75 Changing installer code 131 Codes for C&E<br />
76 Selecting panel language<br />
77 Configuring interfaces 112 Protocols<br />
113 Baudrate<br />
78 Thresholds of conv. Detectors 114 Config. Thresholds<br />
79 Scanning RS-485 devices<br />
80 Modem<br />
81 Netzwerk<br />
82 Flash Update<br />
38 Settings 3 83 Power outputs<br />
84 Loop parameters<br />
85 Options<br />
NSC Sicherheitstechnik GmbH<br />
Eckendorfer Str. 125 c<br />
D-33609 Bielefeld Installer menus<br />
22.06.2006<br />
Menüstruktur F1 20060621.xls<br />
Inst. Engl.
Attachement C<br />
Loop Sounder<br />
Tones <strong>and</strong> volumes<br />
LoopSounder<br />
CHQ-BS / B07150-00<br />
(Base sounder)<br />
Volumes<br />
Loop Sounder<br />
CHQ-WS / B07160-00<br />
(Wall Sounder)<br />
Value<br />
dB mA dB mA<br />
0 Sounder off Sounder off<br />
1 70 0,8 100 7,3<br />
2 78 1,5 100 7,3<br />
3 80 2 100 7,3<br />
4 85 3 100 7,3<br />
5 88 4,5 100 7,3<br />
6 90 6,5 100 7,3<br />
7 93 8 100 7,3<br />
8 94 10 100 7,3<br />
9 95 11 100 7,3<br />
10 98 16 100 7,3<br />
Tones<br />
Value<br />
Basesounder<br />
CHQ-BS<br />
Wallsounder<br />
CHQ-WS<br />
0 Sounder off<br />
Sounder off<br />
1 925Hz/628Hz (change rate 2Hz)<br />
990Hz/650Hz (2Hz)<br />
2 925Hz continual<br />
990Hz/650Hz (2Hz)<br />
3 628Hz continual<br />
990Hz/650Hz (2Hz)<br />
4 554Hz 100ms / 440Hz 400ms<br />
990Hz/650Hz (2Hz)<br />
5 660Hz 150ms on 150ms off<br />
990Hz/650Hz (2Hz)<br />
6 925Hz 150ms on 600ms off<br />
990Hz/650Hz (2Hz)<br />
7 670Hz 250ms / 845Hz 375ms<br />
990Hz/650Hz (2Hz)<br />
CHQ-BS tones <strong>and</strong> volume.xls US 10.09.2004