INSTALLATION: NON FIRE-RATED FIRE EXTINGUISHER CABINET ...
INSTALLATION: NON FIRE-RATED FIRE EXTINGUISHER CABINET ...
INSTALLATION: NON FIRE-RATED FIRE EXTINGUISHER CABINET ...

Create successful ePaper yourself
Turn your PDF publications into a flip-book with our unique Google optimized e-Paper software.
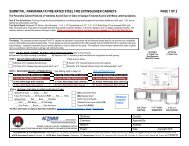
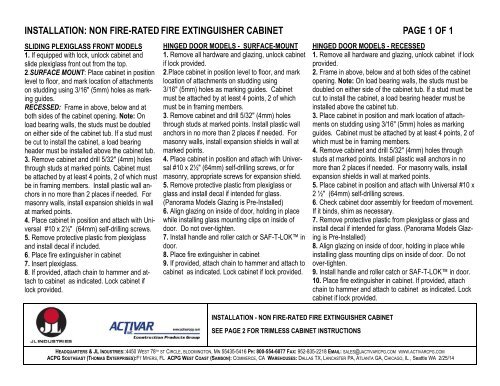
<strong>INSTALLATION</strong>: <strong>NON</strong> <strong>FIRE</strong>-<strong>RATED</strong> <strong>FIRE</strong> <strong>EXTINGUISHER</strong> <strong>CABINET</strong> PAGE 1 OF 1<br />
SLIDING PLEXIGLASS FRONT MODELS<br />
1. If equipped with lock, unlock cabinet and<br />
slide plexiglass front out from the top.<br />
2.SURFACE MOUNT: Place cabinet in position<br />
level to floor, and mark location of attachments<br />
on studding using 3/16" (5mm) holes as marking<br />
guides.<br />
RECESSED: Frame in above, below and at<br />
both sides of the cabinet opening. Note: On<br />
load bearing walls, the studs must be doubled<br />
on either side of the cabinet tub. If a stud must<br />
be cut to install the cabinet, a load bearing<br />
header must be installed above the cabinet tub.<br />
3. Remove cabinet and drill 5/32" (4mm) holes<br />
through studs at marked points. Cabinet must<br />
be attached by at least 4 points, 2 of which must<br />
be in framing members. Install plastic wall anchors<br />
in no more than 2 places if needed. For<br />
masonry walls, install expansion shields in wall<br />
at marked points.<br />
4. Place cabinet in position and attach with Universal<br />
#10 x 2½" (64mm) self-drilling screws.<br />
5. Remove protective plastic from plexiglass<br />
and install decal if included.<br />
6. Place fire extinguisher in cabinet<br />
7. Insert plexiglass.<br />
8. If provided, attach chain to hammer and attach<br />
to cabinet as indicated. Lock cabinet if<br />
lock provided.<br />
HINGED DOOR MODELS - SURFACE-MOUNT<br />
1. Remove all hardware and glazing, unlock cabinet<br />
if lock provided.<br />
2.Place cabinet in position level to floor, and mark<br />
location of attachments on studding using<br />
3/16" (5mm) holes as marking guides. Cabinet<br />
must be attached by at least 4 points, 2 of which<br />
must be in framing members.<br />
3. Remove cabinet and drill 5/32" (4mm) holes<br />
through studs at marked points. Install plastic wall<br />
anchors in no more than 2 places if needed. For<br />
masonry walls, install expansion shields in wall at<br />
marked points.<br />
4. Place cabinet in position and attach with Universal<br />
#10 x 2½" (64mm) self-drilling screws, or for<br />
masonry, appropriate screws for expansion shield.<br />
5. Remove protective plastic from plexiglass or<br />
glass and install decal if intended for glass.<br />
(Panorama Models Glazing is Pre-Installed)<br />
6. Align glazing on inside of door, holding in place<br />
while installing glass mounting clips on inside of<br />
door. Do not over-tighten.<br />
7. Install handle and roller catch or SAF-T-LOK in<br />
door.<br />
8. Place fire extinguisher in cabinet<br />
9. If provided, attach chain to hammer and attach to<br />
cabinet as indicated. Lock cabinet if lock provided.<br />
<strong>INSTALLATION</strong> - <strong>NON</strong> <strong>FIRE</strong>-<strong>RATED</strong> <strong>FIRE</strong> <strong>EXTINGUISHER</strong> <strong>CABINET</strong><br />
SEE PAGE 2 FOR TRIMLESS <strong>CABINET</strong> INSTRUCTIONS<br />
HINGED DOOR MODELS - RECESSED<br />
1. Remove all hardware and glazing, unlock cabinet if lock<br />
provided.<br />
2. Frame in above, below and at both sides of the cabinet<br />
opening. Note: On load bearing walls, the studs must be<br />
doubled on either side of the cabinet tub. If a stud must be<br />
cut to install the cabinet, a load bearing header must be<br />
installed above the cabinet tub.<br />
3. Place cabinet in position and mark location of attachments<br />
on studding using 3/16" (5mm) holes as marking<br />
guides. Cabinet must be attached by at least 4 points, 2 of<br />
which must be in framing members.<br />
4. Remove cabinet and drill 5/32" (4mm) holes through<br />
studs at marked points. Install plastic wall anchors in no<br />
more than 2 places if needed. For masonry walls, install<br />
expansion shields in wall at marked points.<br />
5. Place cabinet in position and attach with Universal #10 x<br />
2 ½" (64mm) self-drilling screws.<br />
6. Check cabinet door assembly for freedom of movement.<br />
If it binds, shim as necessary.<br />
7. Remove protective plastic from plexiglass or glass and<br />
install decal if intended for glass. (Panorama Models Glazing<br />
is Pre-Installed)<br />
8. Align glazing on inside of door, holding in place while<br />
installing glass mounting clips on inside of door. Do not<br />
over-tighten.<br />
9. Install handle and roller catch or SAF-T-LOK in door.<br />
10. Place fire extinguisher in cabinet. If provided, attach<br />
chain to hammer and attach to cabinet as indicated. Lock<br />
cabinet if lock provided.<br />
HEADQUARTERS & JL INDUSTRIES::4450 WEST 78 TH ST CIRCLE, BLOOMINGTON, MN 55435-5416 PH: 800-554-6077 FAX: 952-835-2218 EMAIL: SALES@JACTIVARCPG.COM WWW.ACTIVARCPG.COM<br />
ACPG SOUTHEAST (THOMAS ENTERPRISES):FT MYERS, FL ACPG WEST COAST (SAMSON): COMMERCE, CA WAREHOUSES: DALLAS TX, LANCASTER PA, ATLANTA GA, CHICAGO, IL , Seattle WA 2/25/14
HINGED DOOR MODELS - EMBASSY FULLY RECESSED<br />
HINGED DOOR MODELS - SURFACE-MOUNTED<br />
HINGED DOOR MODELS - RECESSED, TRIMLESS<br />
1. Remove all hardware and glazing, unlock cabinet if lock provided.<br />
2. Frame in above, below and at both sides of the cabinet opening. Note: On<br />
load bearing walls, the studs must be doubled on either side of the cabinet tub.<br />
If a stud must be cut to install the cabinet, a load bearing header must be installed<br />
above the cabinet tub.<br />
3. Since there is no trim on this cabinet, make sure that the edges of wallboard<br />
are cleanly cut to minimize opening around cabinet.<br />
4. Place cabinet in position and mark location of attachments on studding using<br />
3/16" (5mm) holes as marking guides.<br />
5. Remove cabinet and drill 5/32" (4mm) holes through studs at marked points. Cabinet must be attached by<br />
at least 4 points, 2 of which must be in framing members. Install plastic wall anchors in no more than 2 places<br />
if needed. For masonry walls, install expansion shields in wall at marked points<br />
6. Place cabinet in position and attach with Universal #10 x 2 ½" (64mm) self-drilling screws. On the lock<br />
side of the opening, make sure that cabinet wall does not flex by attaching directly to stud or shimming so<br />
that cabinet wall cannot move. Check the door to make sure that it<br />
does not bind, and shim if necessary.<br />
7. Fill gap between cabinet and wallboard with caulking or use a<br />
product such as Phillips gripSTIK® to create a finished edge.<br />
Finish wallboard with compound as needed.<br />
8. Remove protective plastic from plexiglass or glass and install<br />
decal if intended for glass.<br />
9. Align glazing on inside of door, holding in place while installing<br />
glass mounting clips on inside of door. Do not over-tighten.<br />
10. Install handle and roller catch or SAF-T-LOK in door. Adjust<br />
position of roller catch so that side wall does not deflect when closing.<br />
11. Place fire extinguisher in cabinet. Lock cabinet if lock provided.<br />
HINGED DOOR MODELS - RECESSED