Mazda6 Workshop Manual Supplement
Mazda6 Workshop Manual Supplement
Mazda6 Workshop Manual Supplement

Create successful ePaper yourself
Turn your PDF publications into a flip-book with our unique Google optimized e-Paper software.
<strong>Mazda6</strong><br />
<strong>Workshop</strong><br />
<strong>Manual</strong><br />
<strong>Supplement</strong><br />
FOREWORD<br />
This manual contains on-vehicle service<br />
and diagnosis for the <strong>Mazda6</strong>.<br />
For proper repair and maintenance,<br />
a thorough familiarization with this manual<br />
is important, and it should always be kept<br />
in a handy place for quick and easy<br />
reference.<br />
All the contents of this manual, including<br />
drawings and specifications, are the latest<br />
available at the time of printing.<br />
As modifications affecting repair or<br />
maintenance occur, relevant information<br />
supplementary to this volume will be made<br />
available at Mazda dealers. This manual<br />
should be kept up-to-date.<br />
Mazda Motor Corporation reserves<br />
the right to alter the specifications and<br />
contents of this manual without obligation<br />
or advance notice.<br />
All rights reserved. No part of this book<br />
may be reproduced or used in any form or<br />
by any means, electronic or<br />
mechanical—including photocopying and<br />
recording and the use of any kind of<br />
information storage and retrieval<br />
system—without permission in writing.<br />
Mazda Motor Corporation<br />
HIROSHIMA, JAPAN<br />
APPLICATION:<br />
This manual is applicable to vehicles<br />
beginning with the Vehicle Identification<br />
Numbers (VIN), and related materials shown<br />
on the following page.<br />
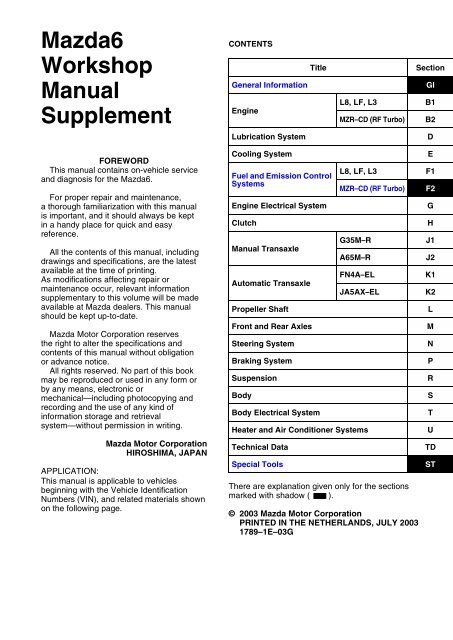
CONTENTS<br />
Title Section<br />
General Information GI<br />
Engine<br />
L8, LF, L3 B1<br />
MZR–CD (RF Turbo) B2<br />
Lubrication System D<br />
Cooling System E<br />
Fuel and Emission Control<br />
Systems<br />
L8, LF, L3 F1<br />
MZR–CD (RF Turbo) F2<br />
Engine Electrical System G<br />
Clutch H<br />
<strong>Manual</strong> Transaxle<br />
Automatic Transaxle<br />
G35M–R J1<br />
A65M–R J2<br />
FN4A–EL K1<br />
JA5AX–EL K2<br />
Propeller Shaft L<br />
Front and Rear Axles M<br />
Steering System N<br />
Braking System P<br />
Suspension R<br />
Body S<br />
Body Electrical System T<br />
Heater and Air Conditioner Systems U<br />
Technical Data TD<br />
Special Tools ST<br />
There are explanation given only for the sections<br />
marked with shadow ( ).<br />
© 2003 Mazda Motor Corporation<br />
PRINTED IN THE NETHERLANDS, JULY 2003<br />
1789–1E–03G
VEHICLE IDENTIFICATION NUMBERS (VIN)<br />
European (L.H.D. U.K.) specs.<br />
JMZ GG12R20# 100001—<br />
JMZ GG12T20# 100001—<br />
JMZ GG14R20# 100001—<br />
JMZ GG14T20# 100001—<br />
JMZ GY19R20# 100001—<br />
JMZ GY19T20# 100001—<br />
RELATED MATERIALS<br />
<strong>Mazda6</strong> Training <strong>Manual</strong><br />
(European (L.H.D. U.K.), GCC specs.) . . . . . . . . . . . . 3359–1*–02C<br />
<strong>Mazda6</strong> <strong>Workshop</strong> <strong>Manual</strong><br />
(European (L.H.D. U.K.), GCC specs.) . . . . . . . . . . . . 1730–1*–02C<br />
<strong>Mazda6</strong> <strong>Workshop</strong> <strong>Manual</strong> <strong>Supplement</strong><br />
(European (L.H.D. U.K.), GCC specs.) . . . . . . . . . . . . 1749–1*–02G<br />
<strong>Mazda6</strong> <strong>Workshop</strong> <strong>Manual</strong> <strong>Supplement</strong><br />
(European (L.H.D. U.K.), GCC specs.) . . . . . . . . . . . . 1776–10–03G<br />
Engine <strong>Workshop</strong> <strong>Manual</strong> MZR–CD (RF Turbo) . . . . . 1744–1E–02D<br />
<strong>Manual</strong> Transaxle <strong>Workshop</strong> <strong>Manual</strong> A65M–R . . . . . . 1739–1E–02D<br />
<strong>Mazda6</strong> Wiring Diagram<br />
(European (L.H.D.), GCC specs.) . . . . . . . . . . . . . . . . 5558–1*–02G<br />
<strong>Mazda6</strong> Wiring Diagram <strong>Supplement</strong><br />
(European (L.H.D.), GCC specs.) . . . . . . . . . . . . . . . . 5575–10–03A<br />
<strong>Mazda6</strong> Wiring Diagram<br />
(U.K. specs.) . . . . . . . . . . . . . . . . . . . . . . . . . . . . . . . . . 5559–1*–02G<br />
<strong>Mazda6</strong> Wiring Diagram <strong>Supplement</strong><br />
(U.K. specs.) . . . . . . . . . . . . . . . . . . . . . . . . . . . . . . . . . 5576–10–03A<br />
<strong>Mazda6</strong> Bodyshop <strong>Manual</strong><br />
(European (L.H.D. U.K.), GCC specs.) . . . . . . . . . . . . 3360–1*–02C<br />
<strong>Mazda6</strong> Bodyshop <strong>Manual</strong> <strong>Supplement</strong> Wagon<br />
(European (L.H.D. U.K.), Australian,<br />
General (L.H.D. R.H.D.) specs.). . . . . . . . . . . . . . . . . . 3368–1*–02I<br />
EOBD Training <strong>Manual</strong><br />
(General (L.H.D. R.H.D.) specs.) . . . . . . . . . . . . . . . . . 3345–1*–00B<br />
* : Indicates the printing location<br />
E: Europe<br />
0: Japan
WARNING<br />
Servicing a vehicle can be dangerous. If you have not received<br />
service-related training, the risks of injury, property damage, and<br />
failure of servicing increase. The recommended servicing procedures<br />
for the vehicle in this workshop manual were developed with<br />
Mazda-trained technicians in mind. This manual may be useful to<br />
non-Mazda trained technicians, but a technician with our<br />
service-related training and experience will be at less risk when<br />
performing service operations. However, all users of this manual are<br />
expected to at least know general safety procedures.<br />
This manual contains "Warnings" and "Cautions" applicable to risks<br />
not normally encountered in a general technician's experience.<br />
They should be followed to reduce the risk of injury and the risk that<br />
improper service or repair may damage the vehicle or render it unsafe.<br />
It is also important to understand that the "Warnings" and "Cautions"<br />
are not exhaustive. It is impossible to warn of all the hazardous<br />
consequences that might result from failure to follow the procedures.<br />
The procedures recommended and described in this manual are<br />
effective methods of performing service and repair. Some require tools<br />
specifically designed for a specific purpose. Persons using procedures<br />
and tools which are not recommended by Mazda Motor Corporation<br />
must satisfy themselves thoroughly that neither personal safety nor<br />
safety of the vehicle will be jeopardized.<br />
The contents of this manual, including drawings and specifications, are<br />
the latest available at the time of printing, and Mazda Motor Corporation<br />
reserves the right to change the vehicle designs and alter the contents<br />
of this manual without notice and without incurring obligation.<br />
Parts should be replaced with genuine Mazda replacement parts or<br />
with parts which match the quality of genuine Mazda replacement<br />
parts. Persons using replacement parts of lesser quality than that of<br />
genuine Mazda replacement parts must satisfy themselves thoroughly<br />
that neither personal safety nor safety of the vehicle will be<br />
jeopardized.<br />
Mazda Motor Corporation is not responsible for any problems which<br />
may arise from the use of this manual. The cause of such problems<br />
includes but is not limited to insufficient service-related training, use of<br />
improper tools, use of replacement parts of lesser quality than that of<br />
genuine Mazda replacement parts, or not being aware of any revision<br />
of this manual.
GIGENERAL INFORMATION<br />
HOW TO USE THIS MANUAL ............................. GI-2<br />
RANGE OF TOPICS.......................................... GI-2<br />
VIN CODE............................................................. GI-3<br />
VIN CODE.......................................................... GI-3<br />
NEW STANDARDS .............................................. GI-4<br />
NEW STANDARDS TABLE ............................... GI-4<br />
ABBREVIATIONS ................................................ GI-6<br />
ABBREVIATIONS TABLE.................................. GI-6<br />
SCHEDULED MAINTENANCE ............................ GI-7<br />
SCHEDULED MAINTENANCE TABLE ............. GI-7<br />
GI–1<br />
GI
RANGE OF TOPICS<br />
GI–2<br />
HOW TO USE THIS MANUAL<br />
HOW TO USE THIS MANUAL<br />
B6E201000001101<br />
• This manual indicates only changes/additions, as it is supplemental to the related materials. Therefore it may<br />
not contain the necessary reference service procedures to perform the service indicated in this manual.<br />
End Of Sie
VIN CODE<br />
European (L.H.D. U.K.) specs.End Of Sie<br />
J M Z GG 1 2 3 2 0 # 1 2 3 4 5 6<br />
VIN CODE<br />
VIN CODE<br />
Plant<br />
Dammy<br />
Dammy<br />
For Others (Israel etc.) : Model year<br />
Transaxle<br />
Engine<br />
Body style<br />
Remarks<br />
Vehicle type<br />
World manufacturer identification<br />
Serial No.<br />
0=Hiroshima<br />
1=Hofu<br />
0<br />
3 to 9 (same as Model year-Israel)<br />
3=2003, 4=2004<br />
2=5MTX<br />
5=4ATX<br />
7=5ATX<br />
3=2.3L (L3)<br />
8=1.8L (L8)<br />
F=2.0L (LF)<br />
R=MZR-CD (RF-Turbo)-Hi<br />
T=MZR-CD (RF-Turbo)-Low<br />
2=4SD<br />
4=5HB<br />
9=WAGON<br />
8=4WD<br />
1=2WD<br />
GG=MAZDA6 (4SD, 5HB)<br />
GY=MAZDA6 (WAGON)<br />
JMZ=Europe (L.H.D. U.K.)<br />
B6E200800021101<br />
B6E2008W001<br />
GI–3<br />
GI
NEW STANDARDS TABLE<br />
GI–4<br />
NEW STANDARDS<br />
NEW STANDARDS<br />
• The following is a comparison of the previous standard and the new standard.<br />
B6E202800020101<br />
New Standard Previous Standard<br />
Abbreviation<br />
Name<br />
Abbreviation<br />
Name<br />
Remark<br />
AP Accelerator Pedal — Accelerator Pedal<br />
ACL Air Cleaner — Air Cleaner<br />
A/C Air Conditioning — Air Conditioning<br />
BARO Barometric Pressure — Atmospheric Pressure<br />
B+ Battery Positive Voltage VB Battery Voltage<br />
— Brake Switch — Stoplight Switch<br />
— Calibration Resistor — Corrected Resistance #6<br />
CMP sensor Camshaft Position Sensor — Crank Angle Sensor<br />
CAC Charge Air Cooler — Intercooler<br />
CLS Closed Loop System — Feedback System<br />
CTP Closed Throttle Position — Fully Closed<br />
— Closed Throttle Position Switch — Idle Switch<br />
CPP Clutch Pedal Position — Clutch Position<br />
CIS Continuous Fuel Injection System EGI Electronic Gasoline Injection System<br />
CS sensor Control Sleeve Sensor CSP sensor Control Sleeve Position Sensor #6<br />
CKP sensor Crankshaft Position Sensor — Crank Angle Sensor 2<br />
DLC Data Link Connector — Diagnosis Connector<br />
DTM Diagnostic Test Mode — Test Mode #1<br />
DTC Diagnostic Trouble Code — Service Code(s)<br />
DI Distributor Ignition — Spark Ignition<br />
DLI Distributorless Ignition — Direct Ignition<br />
EI Electronic Ignition — Electronic Spark Ignition #2<br />
ECT Engine Coolant Temperature — Water Thermo<br />
EM Engine Modification — Engine Modification<br />
— Engine Speed Input Signal — Engine RPM Signal<br />
EVAP Evaporative Emission — Evaporative Emission<br />
EGR Exhaust Gas Recirculation — Exhaust Gas Recirculation<br />
FC Fan Control — Fan Control<br />
FF Flexible Fuel — Flexible Fuel<br />
4GR Fourth Gear — Overdrive<br />
— Fuel Pump Relay — Circuit Opening Relay #3<br />
FSO<br />
solenoid<br />
Fuel Shut Off Solenoid FCV Fuel Cut Valve #6<br />
GEN Generator — Alternator<br />
GND Ground — Ground/Earth<br />
HO2S Heated Oxygen Sensor — Oxygen Sensor With heater<br />
IAC Idle Air Control — Idle Speed Control<br />
— IDM Relay — Spill Valve Relay #6<br />
— Incorrect Gear Ratio — —<br />
— Injection Pump FIP Fuel Injection Pump #6<br />
— Input/Turbine Speed Sensor — Pulse Generator<br />
IAT Intake Air Temperature — Intake Air Thermo<br />
KS Knock Sensor — Knock Sensor<br />
MIL Malfunction Indicator Lamp — Malfunction Indicator Light<br />
MAP Manifold Absolute Pressure — Intake Air Pressure<br />
MAF sensor Mass Air Flow Sensor — Airflow Sensor<br />
MFI Multiport Fuel Injection — Multiport Fuel Injection<br />
OBD On Board Diagnostic — Diagnosis/Self Diagnosis
NEW STANDARDS<br />
New Standard Previous Standard<br />
Abbreviation<br />
Name<br />
Abbreviation<br />
Name<br />
Remark<br />
OL Open Loop — Open Loop<br />
— Output Speed Sensor — Vehicle Speed Sensor 1<br />
OC Oxidation Catalytic Converter — Catalytic Converter<br />
O2S Oxygen Sensor — Oxygen Sensor<br />
PNP Park/Neutral Position — Park/Neutral Range<br />
— PCM Control Relay — Main Relay #6<br />
PSP Power Steering Pressure — Power Steering Pressure<br />
PCM Powertrain Control Module ECU Engine Control Unit #4<br />
— Pressure Control Solenoid — Line Pressure Solenoid Valve<br />
PAIR Pulsed Secondary Air Injection — Secondary Air Injection System<br />
Pulsed<br />
injection<br />
— Pump Speed Sensor — NE Sensor #6<br />
Injection<br />
AIR Secondary Air Injection — Secondary Air Injection System with air<br />
pump<br />
SAPV Secondary Air Pulse Valve — Reed Valve<br />
SFI Sequential Multiport Fuel Injection — Sequential Fuel Injection<br />
— Shift Solenoid A<br />
—<br />
—<br />
1–2 Shift Solenoid Valve<br />
Shift A Solenoid Valve<br />
— Shift Solenoid B<br />
—<br />
—<br />
2–3 Shift Solenoid Valve<br />
Shift B Solenoid Valve<br />
— Shift Solenoid C — 3–4 Shift Solenoid Valve<br />
3GR Third Gear — 3rd Gear<br />
TWC Three Way Catalytic Converter — Catalytic Converter<br />
TB Throttle Body — Throttle Body<br />
TP sensor Throttle Position Sensor — Throttle Sensor<br />
TCV Timer Control Valve TCV Timing Control Valve #6<br />
TCC Torque Converter Clutch — Lockup Position<br />
TCM<br />
Transmission (Transaxle) Control<br />
Module<br />
— EC-AT Control Unit<br />
—<br />
Transmission (Transaxle) Fluid<br />
Temperature Sensor<br />
— ATF Thermosensor<br />
TR Transmission (Transaxle) Range — Inhibitor Position<br />
TC Turbocharger — Turbocharger<br />
VSS Vehicle Speed Sensor — Vehicle Speed Sensor<br />
VR Voltage Regulator — IC Regulator<br />
VAF sensor Volume Air Flow Sensor — Airflow Meter<br />
WU-TWC<br />
Warm Up Three Way Catalytic<br />
Converter<br />
— Catalytic Converter #5<br />
WOT Wide Open Throttle — Fully Open<br />
#1 : Diagnostic trouble codes depend on the diagnostic test mode.<br />
#2 : Controlled by the PCM<br />
#3 : In some models, there is a fuel pump relay that controls pump speed. That relay is now called the fuel pump<br />
relay (speed).<br />
#4 : Device that controls engine and powertrain<br />
#5 : Directly connected to exhaust manifold<br />
#6 : Part name of diesel engine<br />
End Of Sie<br />
GI–5<br />
GI
ABBREVIATIONS TABLE<br />
CAN Controller Area Network<br />
IDM Injector Driver Module<br />
KOEO Key On Engine Off<br />
KOER Key Off Engine Running<br />
OFF Switch Off<br />
ON Switch On<br />
PID Parameter Identification<br />
SW Switch<br />
TCV Timer Control Valve<br />
VBC Variable Boost Control<br />
VSC Variable Swirl Control<br />
WDS Worldwide Diagnostic System<br />
End Of Sie<br />
GI–6<br />
ABBREVIATIONS<br />
ABBREVIATIONS<br />
B6E203000011101
SCHEDULED MAINTENANCE TABLE<br />
SCHEDULED MAINTENANCE<br />
SCHEDULED MAINTENANCE<br />
B6E203400013101<br />
For Europe (L.H.D. U.K.)<br />
Chart symbols:<br />
I : Inspect and clean, repair, adjust, or replace if necessary.<br />
R : Replace<br />
C : Clean<br />
Remarks:<br />
• The ignition and fuel systems are highly important to the emission control system and to efficient engine operation. All<br />
inspections and adjustments must be made by an expert repairer, we recommend an Authorized Mazda Repairer.<br />
• After the described period, continue to follow the described maintenance at the recommended intervals.<br />
• Refer below for a description of items marked* in the maintenance chart.<br />
*1: If the vehicle is operated under any of the following conditions, change the engine oil and oil filter every 10,000 km<br />
(6,250 miles) or shorter.<br />
a. Driving in dusty conditions.<br />
b. Extended periods of idling or low speed operation.<br />
c. Driving for long period in cold temperatures or driving regularly at short distance only.<br />
*2: Also inspect and adjust the power steering and air conditioner drive belts, if installed.<br />
*3: If the brakes are used extensively (for example, continuous hard driving or mountain driving) or if the vehicle is<br />
operated in extremely humid climates, change the brake fluid annually.<br />
*4: If the vehicle is operated in very dusty or sandy areas, clean and if necessary, replace the air cleaner element more<br />
often than the recommended intervals.<br />
*5: Replacement of the timing belt is required at every 100,000 km (62,500 miles).<br />
Failure to replace the timing belt may result in damage to the engine.<br />
*6: Replacement of the timing belt is required at every 120,000 km (75,000 miles).<br />
Failure to replace the timing belt may result in damage to the engine.<br />
*7: If the vehicle is operated under any of the following conditions, change the rear differential oil every 45,000 km (27,000<br />
miles).<br />
a. Towing a trailer or using a car - top carrier<br />
b. Driving in dusty, sandy or wet condition<br />
c. Extended periods of idling or low speed operation<br />
d. Repeated short trips of less than 16 km (10 miles)<br />
*8: If this component has been submerged in water, the oil should be changed.<br />
Maintenance Interval (Number of months or km (miles), whichever comes first)<br />
Maintenance Item<br />
Months<br />
×1000 km<br />
12<br />
20<br />
24<br />
40<br />
36<br />
60<br />
48<br />
80<br />
60<br />
100<br />
72<br />
120<br />
84<br />
140<br />
96<br />
160<br />
108<br />
180<br />
GASOLINE ENGINE<br />
×1000 miles 12.5 25 37.5 50 62.5 75 87.5 100 112.5<br />
Engine valve clearance Audible inspect every 120,000 km (75,000 miles), if noisy, adjust<br />
Spark plugs Replace every 100,000 km (62,500 miles)<br />
Air cleaner element *4 R R R<br />
Evaporative system (if installed)<br />
DIESEL ENGINE<br />
I I I<br />
Engine valve clearance I I<br />
Engine timing belt<br />
Finland, Sweden, Norway*5<br />
Others*6<br />
Replace every 100,000 km (62,500 miles)<br />
Replace every 120,000 km (75,000 miles)<br />
Fuel filter R R R<br />
Fuel injection system I I I I<br />
Air cleaner element *4 C C R C C R C C R<br />
E.G.R. system<br />
GASOLINE and DIESEL ENGINE<br />
I I I<br />
Engine oil *1 R R R R R R R R R<br />
Engine oil filter *1 R R R R R R R R R<br />
Drive belts *2 I I I<br />
Cooling system (including coolant level adjustment) I I I I<br />
Engine coolant<br />
Replace at first 4 years or 100,000 km (62,500 miles);<br />
after that, every 2 years<br />
GI–7<br />
GI
GI–8<br />
SCHEDULED MAINTENANCE<br />
Maintenance Interval (Number of months or km (miles), whichever comes first)<br />
Maintenance Item<br />
Months<br />
×1000 km<br />
12<br />
20<br />
24<br />
40<br />
36<br />
60<br />
48<br />
80<br />
60<br />
100<br />
72<br />
120<br />
84<br />
140<br />
96<br />
160<br />
108<br />
180<br />
×1000 miles 12.5 25 37.5 50 62.5 75 87.5 100 112.5<br />
Fuel lines & hoses I I I I<br />
Battery electrolyte level & specific gravity I I I I I I I I I<br />
Brake fluid *3 R R R R<br />
Brake lines, hoses & connections I I I I I I I I I<br />
Parking brake I I I I I I I I I<br />
Power brake unit & hoses I I I I I I I I I<br />
Disc brakes I I I I I I I I I<br />
Power steering fluid, lines, hoses, and connections I I I I I I I I I<br />
Steering operation & linkages I I I I<br />
<strong>Manual</strong> transaxle oil R<br />
Automatic transaxle fluid level I I I<br />
Rear differential oil (for 4WD)<br />
* 7 * 8<br />
Transfer oil (for 4WD)<br />
* 8<br />
Front & rear suspension & ball joints I I I I<br />
Drive shaft dust boots I I I I<br />
Exhaust system and heat shields I I<br />
Cabin air filter (if installed) (pollen filter) R R R R<br />
Body condition<br />
(for rust, corrosion & perforation)<br />
Inspect annually<br />
Tires (including spare tyre)<br />
(with inflation pressure adjustment)<br />
I I I I I I I I I<br />
Scheduled Maintenance Service (Specific Work Required)<br />
• The specific work required for each maintenance item is listed in the following table. (Please refer to the section<br />
applicable to the model serviced.)<br />
For Europe (L.H.D. U.K.)<br />
Bold frames: New item<br />
Maintenance Item Specific Work Required<br />
ENGINE<br />
Engine valve clearance Measure clearance<br />
Inspect for wear, cracks and fraying, and check tension.<br />
Drive belts<br />
Replace drive belt.<br />
Engine timing belt Replace engine timing belt.<br />
Engine oil Replace engine oil and inspect for leakage.<br />
Oil filter Replace oil filter and inspect for leakage.<br />
COOLING SYSTEM<br />
Cooling system<br />
Check coolant level and quality, and inspect for leakage.<br />
(including coolant level adjustment)<br />
Engine coolant Replace coolant.<br />
FUEL SYSTEM<br />
Inspect for dirt, oil and damage.<br />
Air cleaner element<br />
Clean air cleaner element (by blowing air).<br />
Replace air cleaner element.<br />
Fuel filter Replace fuel filter.<br />
Fuel lines & hoses Inspect for cracks, leakage and loose connection.<br />
Fuel injection system (for MZR-CD (RF Turbo)) Update to injection amount correction with WDS. (see W/M)<br />
IGNITION SYSTEM (FOR GASOLINE)<br />
Inspect for wear, damage, carbon, high-tension lead condition and measure<br />
Spark plugs<br />
plug gap.<br />
Replace spark plugs.<br />
EMISSION CONTROL SYSTEM<br />
Check system operation (see W/M), vapor lines, vacuum fitting hoses and<br />
Evaporative system (for gasoline)<br />
connection.<br />
Check system operation (see W/M), vacuum fitting hoses and connection.<br />
E.G.R. system (MZR-CR (RF Turbo))<br />
Update to MAF correction for E.G.R control with WDS. (see W/M)
End Of Sie<br />
SCHEDULED MAINTENANCE<br />
Maintenance Item<br />
ELECTRICAL SYSTEM<br />
Specific Work Required<br />
Battery electrolyte level & specific gravity<br />
CHASSIS & BODY<br />
Check level and specific gravity.<br />
Brake fluid<br />
Check fluid level and inspect for leakage.<br />
Replace brake fluid.<br />
Brake lines, hoses & connections<br />
Inspect for cracks, damage, chafing, corrosion, scars, swelling and fluid<br />
leakage.<br />
Parking brake Check lever stroke.<br />
Power brake unit & hoses<br />
Check vacuum lines, connections and check valve for improper attachment,<br />
air tightness, cracks chafing and deterioration.<br />
Disc brakes<br />
Test for judder and noise. Inspect caliper for correct operation and fluid<br />
leakage, brake pads for wear. Check disc plate condition and thickness.<br />
Power steering fluid & lines<br />
Check fluid level and lines for improper attachment, leakage, cracks,<br />
damage, loose connections, chafing and deterioration.<br />
Power steering fluid Check fluid level.<br />
Power steering system & hoses<br />
Check lines for improper attachment, leakage, cracks, damage, loose<br />
connections, chafing and deterioration.<br />
Check that the steering wheel has the specified play. Be sure to check for<br />
Steering operation & gear housing<br />
changes, such as excessive play, hard steering or strange noises.<br />
Check gear housing and boots for looseness, damage and grease/gear oil<br />
leakage.<br />
Steering linkages tie rod ends & arms<br />
Check ball joint, dust cover and other components for looseness, wear,<br />
damage and grease leakage.<br />
Front & rear suspension ball joints Inspect for grease leakage, cracks, damage and looseness.<br />
<strong>Manual</strong> transmission/transaxle oil<br />
Check oil level and inspect for leakage.<br />
Replace manual transmission/transaxle oil.<br />
Automatic transmission/transaxle fluid level Check fluid level.<br />
Rear differential oil<br />
Check oil level and inspect for leakage.<br />
Replace rear differential oil.<br />
Transfer oil (for 4×4)<br />
Check oil level and inspect for leakage.<br />
Replace transfer oil.<br />
Drive shaft dust boots Inspect for grease leakage, cracks, damage and looseness.<br />
Body condition<br />
(for rust, corrosion & perforation)<br />
Inspect body surface for paint damage, rust, corrosion and perforation.<br />
Exhaust system and heat shields Inspect for damage, corrosion, looseness of connections and gas leakage.<br />
Tires<br />
(including spare tire)<br />
(with inflation pressure adjustment)<br />
AIR CONDITIONER SYSTEM (IF EQUIPPED)<br />
Cabin air filter Replace cabin air filter.<br />
Check air pressure and inspect tires for tread wear, damage and cracks;<br />
and wheels for damage and corrosion.<br />
GI–9<br />
GI
F2FUEL AND EMISSION CONTROL SYSTEMS<br />
[MZR-CD (RF Turbo)]<br />
FEATURES<br />
OUTLINE .............................................................. F2-3<br />
OUTLINE OF CONSTRUCTION ....................... F2-3<br />
FEATURES........................................................ F2-3<br />
SPECIFICATIONS ............................................. F2-3<br />
CONTROL SYSTEM DIAGRAM........................ F2-4<br />
CONTROL SYSTEM WIRING DIAGRAM.......... F2-6<br />
CONTROL SYSTEM........................................... F2-10<br />
CONTROL SYSTEM OUTLINE ....................... F2-10<br />
STRUCTURAL VIEW....................................... F2-13<br />
BLOCK DIAGRAM ........................................... F2-15<br />
CONTROL DEVICE AND CONTROL<br />
RELATIONSHIP CHART .............................. F2-17<br />
ON-BOARD DIAGNOSTIC................................. F2-18<br />
ON-BOARD DIAGNOSTIC OUTLINE.............. F2-18<br />
DIAGNOSTIC TEST MODE............................. F2-18<br />
DTC DETECTION LOGIC AND<br />
CONDITIONS ............................................... F2-21<br />
PID/DATA MONITOR AND RECORD ............. F2-26<br />
SIMULATION TEST......................................... F2-28<br />
SERVICE<br />
OUTLINE ............................................................ F2-30<br />
SUPPLEMENTAL SERVICE<br />
INFORMATION............................................. F2-30<br />
CONTROL SYSTEM........................................... F2-31<br />
PCM INSPECTION .......................................... F2-31<br />
EGR VALVE POSITION SENSOR<br />
INSPECTION ................................................ F2-37<br />
ON-BOARD DIAGNOSTIC................................. F2-38<br />
FOREWORD.................................................... F2-38<br />
OBD PENDING TROUBLE CODES ................ F2-38<br />
OBD FREEZE FRAME DATA.......................... F2-38<br />
OBD READ/CLEAR DIAGNOSTIC<br />
TEST RESULTS ........................................... F2-38<br />
OBD PARAMETER IDENTIFICATION<br />
(PID) ACCESS.............................................. F2-38<br />
ON-BOARD DIAGNOSTIC TEST .................... F2-38<br />
OBD DRIVE MODE ......................................... F2-39<br />
DTC TABLE ..................................................... F2-40<br />
DTC P0016 ...................................................... F2-42<br />
DTC P0045 ...................................................... F2-43<br />
DTC P0088 ...................................................... F2-46<br />
DTC P0093 ...................................................... F2-47<br />
DTC P0096 ...................................................... F2-48<br />
DTC P0097 ...................................................... F2-49<br />
DTC P0098 ...................................................... F2-51<br />
DTC P0101 ...................................................... F2-54<br />
DTC P0102 ...................................................... F2-55<br />
DTC P0103 ...................................................... F2-58<br />
DTC P0106 ...................................................... F2-60<br />
DTC P0107 ...................................................... F2-61<br />
DTC P0108 ...................................................... F2-64<br />
DTC P0111 ...................................................... F2-66<br />
DTC P0112 ...................................................... F2-67<br />
DTC P0113 ...................................................... F2-69<br />
DTC P0116 ...................................................... F2-72<br />
DTC P0117 ...................................................... F2-74<br />
DTC P0118 ...................................................... F2-75<br />
DTC P0122 ...................................................... F2-78<br />
DTC P0123 ...................................................... F2-80<br />
DTC P0182 ...................................................... F2-82<br />
DTC P0183 ...................................................... F2-84<br />
DTC P0191 ...................................................... F2-86<br />
DTC P0192 ...................................................... F2-87<br />
DTC P0193 ...................................................... F2-90<br />
DTC P0200 ...................................................... F2-92<br />
DTC P0201 ...................................................... F2-95<br />
DTC P0202 ...................................................... F2-98<br />
DTC P0203 .................................................... F2-101<br />
DTC P0204 .................................................... F2-104<br />
DTC P0222 .................................................... F2-107<br />
DTC P0223 .................................................... F2-110<br />
DTC P0225 .................................................... F2-112<br />
DTC P0301, P0302, P0303, P0304 ............... F2-114<br />
DTC P0336 .................................................... F2-116<br />
DTC P0337 .................................................... F2-117<br />
DTC P0341 .................................................... F2-120<br />
DTC P0342 .................................................... F2-121<br />
DTC P0401 .................................................... F2-124<br />
DTC P0402 .................................................... F2-125<br />
DTC P0404 .................................................... F2-126<br />
DTC P0406 .................................................... F2-127<br />
DTC P0489 .................................................... F2-130<br />
DTC P0490 .................................................... F2-132<br />
DTC P0500 .................................................... F2-134<br />
DTC P0504 .................................................... F2-134<br />
DTC P0512 .................................................... F2-137<br />
DTC P0562 .................................................... F2-140<br />
DTC P0563 .................................................... F2-141<br />
DTC P0564 .................................................... F2-144<br />
DTC P0602 .................................................... F2-146<br />
DTC P0606 .................................................... F2-146<br />
DTC P0610 .................................................... F2-147<br />
DTC P0627 .................................................... F2-147<br />
DTC P0628 .................................................... F2-150<br />
DTC P0629 .................................................... F2-152<br />
DTC P0661 .................................................... F2-154<br />
DTC P0662 .................................................... F2-156<br />
DTC P0664 .................................................... F2-158<br />
DTC P0665 .................................................... F2-160<br />
DTC P0704 .................................................... F2-162<br />
DTC P0850 .................................................... F2-164<br />
DTC P1190 .................................................... F2-166<br />
DTC P1211 .................................................... F2-169<br />
DTC P1391 .................................................... F2-170<br />
DTC P1392 .................................................... F2-173<br />
DTC P2009 .................................................... F2-176<br />
DTC P2010 .................................................... F2-178<br />
DTC P2135 .................................................... F2-180<br />
DTC P2136 .................................................... F2-180<br />
DTC P2141 .................................................... F2-182<br />
F2–1<br />
F2
DTC P2142 .................................................... F2-185<br />
DTC P2144 .................................................... F2-187<br />
DTC P2145 .................................................... F2-189<br />
DTC P2146 .................................................... F2-191<br />
DTC P2149 .................................................... F2-194<br />
DTC P2227 .................................................... F2-197<br />
DTC P2228 .................................................... F2-197<br />
DTC P2229 .................................................... F2-198<br />
TROUBLESHOOTING...................................... F2-200<br />
SYMPTOM QUICK DIAGNOSIS CHART ...... F2-200<br />
NO.5 ENGINE STALLS-AFTER<br />
START/AT IDLE.......................................... F2-205<br />
NO.6 CRANKS NORMALLY BUT WILL<br />
NOT START................................................ F2-209<br />
NO.8 ENGINE RUNS ROUGH/ROLLING<br />
IDLE ............................................................ F2-212<br />
NO.10 LOW IDLE/STALLS DURING<br />
DECELERATION ........................................ F2-214<br />
NO.11 ENGINE STALLS/QUITS, ENGINE<br />
RUNS ROUGH, MISSES, BUCK/LERK,<br />
HESITATION/STUMBLE............................. F2-217<br />
NO.12 LACK/LOSS OF POWER-<br />
ACCELERATION/CRUISE.......................... F2-220<br />
NO.13 KNOCKING/PINGING ........................ F2-224<br />
NO.15 EMISSION COMPLIANCE ................. F2-227<br />
NO.19 EXCESSIVE BLACK SMOKE............. F2-230<br />
ENGINE CONTROL SYSTEM OPERATION<br />
INSPECTION .............................................. F2-232<br />
F2–2
OUTLINE<br />
OUTLINE OF CONSTRUCTION<br />
B6E400218881101<br />
• The fuel and emission control system is essentially carried over from that of the previous <strong>Mazda6</strong> (GG, GY)<br />
MZR-CD (RF Turbo) engine models, except for the following features. (See <strong>Mazda6</strong> <strong>Workshop</strong> <strong>Manual</strong><br />
<strong>Supplement</strong> 1749-1*-02G.)<br />
End Of Sie<br />
FEATURES<br />
B6E400218881102<br />
Improved Emission Performance<br />
• A EGR valve position sensor has been adopted.<br />
Improved Serviceability<br />
• The number of DTCs has been increased to provide more detail information.<br />
• The DTC troubleshooting procedures have been renewed due to the adoption of the diagnostic test mode and<br />
OBD drive mode.<br />
• The PID item has been added.<br />
• The simulation item has been added.<br />
End Of Sie<br />
SPECIFICATIONS<br />
B6E400218881103<br />
End Of Sie<br />
OUTLINE<br />
Item<br />
New <strong>Mazda6</strong> (GG, GY) Previous <strong>Mazda6</strong> (GG, GY)<br />
MZR-CD (RF Turbo)<br />
Air cleaner element Type Non woven fabric (dry)<br />
Supercharger Type Turbocharger<br />
Glow plug Type Metal<br />
Pump Type Supply pump<br />
Fuel tank<br />
Capacity<br />
(L {US gal, lmp gal})<br />
64 {17, 14}<br />
Catalyst Type Warm up oxidation catalyst, Oxidation catalyst<br />
EGR control Type Duty control<br />
PCV system Type Closed<br />
F2–3<br />
F2
CONTROL SYSTEM DIAGRAM<br />
.<br />
47<br />
46<br />
F2–4<br />
48<br />
54<br />
43<br />
49<br />
50<br />
45<br />
24<br />
23<br />
22<br />
51 52 53<br />
44<br />
57<br />
25<br />
1 Air cleaner<br />
2 Vacuum chamber<br />
3 VBC check valve<br />
4 MAF/IAT sensor<br />
5 VBC solenoid valve<br />
6 Vacuum damper<br />
7 Guide blade actuator<br />
8 Turbocharger<br />
9 Charge air cooler<br />
10 IAT sensor No.2<br />
11 Boost sensor<br />
12 Intake shutter valve actuator<br />
13 Intake shutter solenoid valve (half)<br />
14 Intake shutter solenoid valve (full)<br />
15 EGR solenoid valve (vacuum)<br />
16 EGR solenoid valve (vent)<br />
17 EGR control solenoid valve<br />
18 EGR valve<br />
19 EGR water cooler<br />
20 VSC valve actuator<br />
21 VSC solenoid valve<br />
22 Fuel tank<br />
23 Fuel filter<br />
24 Fuel warmer<br />
25 Supply pump<br />
26 Suction control valve<br />
27 Fuel temperature sensor<br />
28 Common rail<br />
29 Fuel pressure sensor<br />
30 Fuel pressure limiter<br />
26<br />
27<br />
56<br />
15<br />
A<br />
A<br />
13<br />
30<br />
21<br />
16<br />
17<br />
12<br />
14<br />
29 28<br />
OUTLINE<br />
20<br />
B<br />
11<br />
31<br />
10<br />
*<br />
55<br />
18<br />
19<br />
9<br />
35<br />
33<br />
32<br />
39 37<br />
38<br />
40<br />
34<br />
6<br />
5<br />
8<br />
36<br />
7<br />
4<br />
B<br />
42<br />
3<br />
2<br />
1<br />
41<br />
B6E400218881104<br />
B6E4002W002
31 Glow plug<br />
32 Fuel injector<br />
33 ECT sensor<br />
34 Calibration resistor<br />
35 CMP sensor<br />
36 Warm up oxidation catalytic converter<br />
37 Oxidation catalytic converter<br />
38 Silencer<br />
39 Vacuum pump<br />
40 CKP sensor<br />
41 Idle switch<br />
42 APP sensor<br />
43 Glow plug relay<br />
44 IDM<br />
45 PCM<br />
46 BARO sensor<br />
47 PCM control relay<br />
48 Engine switch<br />
49 Starter (starter signal)<br />
50 Neutral switch<br />
51 Clutch switch<br />
52 A/C switch<br />
53 CAN bus<br />
54 To PCM<br />
55 EGR valve position sensor<br />
56 DLC-2<br />
57 Fuel flow<br />
End Of Sie<br />
OUTLINE<br />
F2–5<br />
F2
CONTROL SYSTEM WIRING DIAGRAM<br />
.<br />
7<br />
8<br />
LOCK<br />
ACC<br />
ON<br />
ST<br />
F2–6<br />
B ACC IG2 IG1 ST<br />
10<br />
C<br />
D<br />
A A<br />
1 PCM<br />
2 DLC-2<br />
3 Water heater unit<br />
4 Fuel pump<br />
5 Other unit<br />
6 IDM<br />
2<br />
M<br />
57<br />
E<br />
A<br />
9<br />
B D<br />
P<br />
1A 1B 1C 1D 1E 1F<br />
78<br />
4<br />
3<br />
13 39<br />
OUTLINE<br />
B6E400218881105<br />
1A 1B 1C 1D 1E 1F 1G 1H 2A 2B 2C 2D 2E 2F 2G 2H<br />
30 42 44 45 43<br />
56 33 80 28 4 27 1 7 34 64 104 103 85 65 91 69 53 79 9 14 60<br />
15 16<br />
11 12<br />
14<br />
17<br />
5<br />
A A B<br />
13<br />
18<br />
1<br />
19<br />
21<br />
20<br />
7 Battery<br />
8 Engine switch<br />
9 Starter relay<br />
10 Starter<br />
11 Generator<br />
12 Oil pressure switch<br />
6<br />
E<br />
C<br />
A D<br />
22<br />
A C B D E<br />
23<br />
a<br />
b<br />
c<br />
d<br />
e<br />
f<br />
g<br />
h<br />
i<br />
j<br />
k<br />
l<br />
m<br />
n<br />
o<br />
A6E40022002
13 Sedimentor switch<br />
14 Instrument cluster<br />
15 Neutral switch<br />
16 Clutch switch<br />
17 Coil<br />
18 Brake switch<br />
19 Brake switch 2<br />
20 Cruise control switch<br />
21 With cruise control system<br />
22 PCM control relay<br />
23 MAF/IAT sensor<br />
OUTLINE<br />
F2–7<br />
F2
.<br />
a<br />
b<br />
c<br />
d<br />
e<br />
f<br />
g<br />
h<br />
i<br />
j<br />
k<br />
C<br />
l<br />
m<br />
n<br />
o<br />
F2–8<br />
24 25 26 27 28 29 30<br />
A C B D A C B D A C B D A C B D<br />
37 62 89 11<br />
36 10<br />
B<br />
41<br />
A<br />
A B D C<br />
42<br />
88 31 90<br />
43<br />
24 Calibration resistor No.1<br />
25 Fuel injector No.1<br />
26 Calibration resistor No.2<br />
27 Fuel injector No.2<br />
28 Calibration resistor No.3<br />
29 Fuel injector No.3<br />
OUTLINE<br />
A A C A B A B A B A B A B A B A B<br />
B<br />
B<br />
81 55 29 3 99 72 101 74 100 67 77<br />
61 87 35 94 93 32 8<br />
C B A A B A B B A<br />
64<br />
44<br />
63<br />
62<br />
B<br />
31<br />
32 33<br />
34 35 36 37 38 39 40<br />
45 46<br />
A<br />
1<br />
47<br />
49<br />
50<br />
B C<br />
65<br />
C<br />
D<br />
M<br />
A<br />
E<br />
A<br />
A B<br />
48<br />
76<br />
84 102 73 86 68<br />
51<br />
52 53<br />
58<br />
M<br />
57<br />
C<br />
D<br />
59<br />
B<br />
A<br />
56 54<br />
55<br />
60<br />
61<br />
M<br />
B6E4002W001
30 Calibration resistor No.4<br />
31 Fuel injector No.4<br />
32 CMP sensor<br />
33 CKP sensor<br />
34 EGR solenoid valve (vacuum)<br />
35 EGR solenoid valve (vent)<br />
36 VSC solenoid valve<br />
37 Intake shutter solenoid valve (half)<br />
38 Intake shutter solenoid valve (full)<br />
39 VBC solenoid valve<br />
40 EGR control solenoid valve<br />
41 Boost sensor<br />
42 APP sensor<br />
43 Idle switch<br />
44 Fuel pressure sensor<br />
45 ECT sensor<br />
46 Fuel temperature sensor<br />
47 Suction control valve<br />
48 IAT sensor No.2<br />
49 Cooling fan relay No.2<br />
50 Cooling fan No.1<br />
51 Refrigerant pressure switch (middle)<br />
52 A/C switch<br />
53 A/C amplifier<br />
54 Cooling fan relay No.1<br />
55 Cooling fan No.2<br />
56 A/C relay<br />
57 Refrigerant pressure switch (HI and LO)<br />
58 Magnetic clutch<br />
59 With A/C<br />
60 Glow plug relay<br />
61 Glow plug<br />
62 Vacuum switch<br />
63 Fuel warmer<br />
64 With fuel warmer<br />
65 EGR valve position sensor<br />
End Of Sie<br />
OUTLINE<br />
F2–9<br />
F2
F2–10<br />
CONTROL SYSTEM<br />
CONTROL SYSTEM OUTLINE<br />
B6E404018881101<br />
• The control system is essentially carried over from that of the previous <strong>Mazda6</strong> (GG, GY) MZR-CD (RF Turbo)<br />
engine models. (See <strong>Mazda6</strong> <strong>Workshop</strong> <strong>Manual</strong> <strong>Supplement</strong> 1749-1*-02G.)<br />
Input Device<br />
Item<br />
New<br />
<strong>Mazda6</strong><br />
(GG, GY)<br />
CONTROL SYSTEM<br />
Previous<br />
<strong>Mazda6</strong><br />
(GG, GY)<br />
MZR-CD (RF Turbo)<br />
Battery ×<br />
Starter (starter signal) ×<br />
Starter relay ×<br />
Clutch switch ×<br />
Neutral switch ×<br />
Brake switch ×<br />
Idle switch ×<br />
A/C switch ×<br />
Refrigerant pressure switch ×<br />
Cruise control switch ×<br />
Accelerator position sensor ×<br />
MAF/IAT sensor ×<br />
IAT sensor No.2 ×<br />
ECT sensor ×<br />
Fuel temperature sensor ×<br />
BARO sensor (integrated in PCM) ×<br />
Boost sensor ×<br />
Fuel pressure sensor ×<br />
CMP sensor ×<br />
CKP sensor ×<br />
VSS ×<br />
Calibration resistor ×<br />
Immobilizer unit (integrated in<br />
PCM)<br />
EGR valve position sensor × –<br />
×<br />
×:Applicable –: Not applicable<br />
Remark for new model<br />
Same function as previous <strong>Mazda6</strong> (GG, GY) MZR-CD (RF<br />
Turbo) engine model<br />
Same function as previous <strong>Mazda6</strong> (GG, GY) MZR-CD (RF<br />
Turbo) engine model<br />
Same function as previous <strong>Mazda6</strong> (GG, GY) MZR-CD (RF<br />
Turbo) engine model<br />
Same function as previous <strong>Mazda6</strong> (GG, GY) MZR-CD (RF<br />
Turbo) engine model<br />
Same function as previous <strong>Mazda6</strong> (GG, GY) MZR-CD (RF<br />
Turbo) engine model<br />
Same function as previous <strong>Mazda6</strong> (GG, GY) MZR-CD (RF<br />
Turbo) engine model<br />
Same function as previous <strong>Mazda6</strong> (GG, GY) MZR-CD (RF<br />
Turbo) engine model<br />
Same function as previous <strong>Mazda6</strong> (GG, GY) MZR-CD (RF<br />
Turbo) engine model<br />
Same function as previous <strong>Mazda6</strong> (GG, GY) MZR-CD (RF<br />
Turbo) engine model<br />
Same function as previous <strong>Mazda6</strong> (GG, GY) MZR-CD (RF<br />
Turbo) engine model<br />
Same function as previous <strong>Mazda6</strong> (GG, GY) MZR-CD (RF<br />
Turbo) engine model<br />
Same function as previous <strong>Mazda6</strong> (GG, GY) MZR-CD (RF<br />
Turbo) engine model<br />
Same function as previous <strong>Mazda6</strong> (GG, GY) MZR-CD (RF<br />
Turbo) engine model<br />
Same function as previous <strong>Mazda6</strong> (GG, GY) MZR-CD (RF<br />
Turbo) engine model<br />
Same function as previous <strong>Mazda6</strong> (GG, GY) MZR-CD (RF<br />
Turbo) engine model<br />
Same function as previous <strong>Mazda6</strong> (GG, GY) MZR-CD (RF<br />
Turbo) engine model<br />
Same function as previous <strong>Mazda6</strong> (GG, GY) MZR-CD (RF<br />
Turbo) engine model<br />
Same function as previous <strong>Mazda6</strong> (GG, GY) MZR-CD (RF<br />
Turbo) engine model<br />
Same function as previous <strong>Mazda6</strong> (GG, GY) MZR-CD (RF<br />
Turbo) engine model<br />
Same function as previous <strong>Mazda6</strong> (GG, GY) MZR-CD (RF<br />
Turbo) engine model<br />
Same function as previous <strong>Mazda6</strong> (GG, GY) MZR-CD (RF<br />
Turbo) engine model<br />
Same function as previous <strong>Mazda6</strong> (GG, GY) MZR-CD (RF<br />
Turbo) engine model<br />
Same function as previous <strong>Mazda6</strong> (GG, GY) MZR-CD (RF<br />
Turbo) engine model<br />
Same function as previous Mazda PREMACY (CP) RF Turbo<br />
engine model
Output Device<br />
Item<br />
Control System<br />
New<br />
<strong>Mazda6</strong><br />
(GG, GY)<br />
CONTROL SYSTEM<br />
Previous<br />
<strong>Mazda6</strong><br />
(GG, GY)<br />
MZR-CD (RF Turbo)<br />
Suction control valve ×<br />
IDM ×<br />
VSC solenoid valve ×<br />
VBC solenoid valve ×<br />
EGR control solenoid valve ×<br />
EGR solenoid valve (vacuum) ×<br />
EGR solenoid valve (vent) ×<br />
Intake shutter solenoid valve (half) ×<br />
Intake shutter solenoid valve (full) ×<br />
Glow indicator light ×<br />
Cruise main indicator light ×<br />
Cruise set indicator light ×<br />
Glow plug relay ×<br />
Cooling fan relay No.1 ×<br />
Cooling fan relay No.2 ×<br />
A/C relay ×<br />
Item<br />
New<br />
<strong>Mazda6</strong><br />
(GG, GY)<br />
Previous<br />
<strong>Mazda6</strong><br />
(GG, GY)<br />
MZR-CD (RF Turbo)<br />
Idle speed control ×<br />
Glow control ×<br />
VSC ×<br />
Boost pressure control ×<br />
Fuel injection amount control ×<br />
Fuel injection timing control ×<br />
Multiple fuel injection control ×<br />
Fuel pressure control ×<br />
×:Applicable –: Not applicable<br />
Remark for new model<br />
Same function as previous <strong>Mazda6</strong> (GG, GY) MZR-CD (RF<br />
Turbo) engine model<br />
Same function as previous <strong>Mazda6</strong> (GG, GY) MZR-CD (RF<br />
Turbo) engine model<br />
Same function as previous <strong>Mazda6</strong> (GG, GY) MZR-CD (RF<br />
Turbo) engine model<br />
Same function as previous <strong>Mazda6</strong> (GG, GY) MZR-CD (RF<br />
Turbo) engine model<br />
Same function as previous <strong>Mazda6</strong> (GG, GY) MZR-CD (RF<br />
Turbo) engine model<br />
Same function as previous <strong>Mazda6</strong> (GG, GY) MZR-CD (RF<br />
Turbo) engine model<br />
Same function as previous <strong>Mazda6</strong> (GG, GY) MZR-CD (RF<br />
Turbo) engine model<br />
Same function as previous <strong>Mazda6</strong> (GG, GY) MZR-CD (RF<br />
Turbo) engine model<br />
Same function as previous <strong>Mazda6</strong> (GG, GY) MZR-CD (RF<br />
Turbo) engine model<br />
Same function as previous <strong>Mazda6</strong> (GG, GY) MZR-CD (RF<br />
Turbo) engine model<br />
Same function as previous <strong>Mazda6</strong> (GG, GY) MZR-CD (RF<br />
Turbo) engine model<br />
Same function as previous <strong>Mazda6</strong> (GG, GY) MZR-CD (RF<br />
Turbo) engine model<br />
Same function as previous <strong>Mazda6</strong> (GG, GY) MZR-CD (RF<br />
Turbo) engine model<br />
Same function as previous <strong>Mazda6</strong> (GG, GY) MZR-CD (RF<br />
Turbo) engine model<br />
Same function as previous <strong>Mazda6</strong> (GG, GY) MZR-CD (RF<br />
Turbo) engine model<br />
Same function as previous <strong>Mazda6</strong> (GG, GY) MZR-CD (RF<br />
Turbo) engine model<br />
×:Applicable –: Not applicable<br />
Remark for new model<br />
Same function as previous <strong>Mazda6</strong> (GG, GY) MZR-CD (RF<br />
Turbo) engine model<br />
Same function as previous <strong>Mazda6</strong> (GG, GY) MZR-CD (RF<br />
Turbo) engine model<br />
Same function as previous <strong>Mazda6</strong> (GG, GY) MZR-CD (RF<br />
Turbo) engine model<br />
Same function as previous <strong>Mazda6</strong> (GG, GY) MZR-CD (RF<br />
Turbo) engine model<br />
Same function as previous <strong>Mazda6</strong> (GG, GY) MZR-CD (RF<br />
Turbo) engine model<br />
Same function as previous <strong>Mazda6</strong> (GG, GY) MZR-CD (RF<br />
Turbo) engine model<br />
Same function as previous <strong>Mazda6</strong> (GG, GY) MZR-CD (RF<br />
Turbo) engine model<br />
Same function as previous <strong>Mazda6</strong> (GG, GY) MZR-CD (RF<br />
Turbo) engine model<br />
F2–11<br />
F2
EGR control ×<br />
Cruise control system ×<br />
Electrical fan control ×<br />
A/C cut-off control ×<br />
End Of Sie<br />
F2–12<br />
Item<br />
New<br />
<strong>Mazda6</strong><br />
(GG, GY)<br />
Immobilizer system ×<br />
CONTROL SYSTEM<br />
Previous<br />
<strong>Mazda6</strong><br />
(GG, GY)<br />
MZR-CD (RF Turbo)<br />
Remark for new model<br />
Same function as previous <strong>Mazda6</strong> (GG, GY) MZR-CD (RF<br />
Turbo) engine model<br />
Same function as previous <strong>Mazda6</strong> (GG, GY) MZR-CD (RF<br />
Turbo) engine model<br />
Same function as previous <strong>Mazda6</strong> (GG, GY) MZR-CD (RF<br />
Turbo) engine model<br />
Same function as previous <strong>Mazda6</strong> (GG, GY) MZR-CD (RF<br />
Turbo) engine model<br />
Same function as previous <strong>Mazda6</strong> (GG, GY) MZR-CD (RF<br />
Turbo) engine model
STRUCTURAL VIEW<br />
.<br />
5<br />
1<br />
7 8<br />
3<br />
29<br />
CONTROL SYSTEM<br />
38 31 32 30 19<br />
39<br />
31 32 30<br />
9<br />
10<br />
21<br />
18<br />
PCM (with built-in BARO sensor and immobilizer<br />
1<br />
unit)<br />
2 Battery<br />
3 Starter<br />
16<br />
13<br />
14<br />
26<br />
27<br />
25<br />
40<br />
20<br />
28<br />
22<br />
1<br />
23<br />
17<br />
15<br />
24<br />
33<br />
36<br />
12<br />
4<br />
34<br />
2<br />
6<br />
11<br />
7<br />
19<br />
35<br />
9<br />
5<br />
10<br />
8<br />
B6E404018881102<br />
37<br />
B6E4040W001<br />
F2–13<br />
F2
4 Starter relay<br />
5 Clutch switch<br />
6 Neutral switch<br />
7 Brake switch<br />
8 Idle switch<br />
9 Cruise control switch<br />
10 Accelerator position sensor<br />
11 MAF/IAT sensor<br />
12 IAT sensor No.2<br />
13 ECT sensor<br />
14 Fuel temperature sensor<br />
15 Boost sensor<br />
16 Fuel pressure sensor<br />
17 CMP sensor<br />
18 CKP sensor<br />
19 VSS<br />
20 Calibration resistor<br />
21 Suction control valve<br />
22 IDM<br />
23 VSC solenoid valve<br />
24 VBC solenoid valve<br />
25 EGR control solenoid valve<br />
26 EGR solenoid valve (vacuum)<br />
27 EGR solenoid valve (vent)<br />
28 Intake shutter solenoid valve (half)<br />
29 Intake shutter solenoid valve (full)<br />
30 Glow indicator light<br />
31 Cruise main indicator light<br />
32 Cruise set indicator light<br />
33 Glow plug relay<br />
34 Cooling fan relay No.1<br />
35 Cooling fan relay No.2<br />
36 A/C relay<br />
37 PCM control relay<br />
38 L.H.D.<br />
39 R.H.D.<br />
40 EGR valve position sensor<br />
End Of Sie<br />
F2–14<br />
CONTROL SYSTEM
CONTROL SYSTEM<br />
F2–15<br />
F2<br />
BLOCK DIAGRAM<br />
B6E404018881103<br />
.<br />
1 PCM<br />
2 Idle speed control<br />
CRUISE<br />
MAIN<br />
CRUISE<br />
9<br />
8<br />
7<br />
5<br />
4<br />
3<br />
10<br />
6<br />
1<br />
2<br />
14<br />
13<br />
11<br />
12<br />
19<br />
18<br />
17<br />
15<br />
16<br />
20<br />
29<br />
28<br />
27<br />
25<br />
26<br />
24<br />
23<br />
21<br />
22<br />
30<br />
37<br />
35<br />
36<br />
33<br />
31<br />
32<br />
34<br />
39<br />
38<br />
40<br />
49<br />
48<br />
47<br />
45<br />
46<br />
44<br />
43<br />
41<br />
42<br />
50<br />
51<br />
52<br />
53<br />
54<br />
B6E4040W002
3 Glow control<br />
4 VSC<br />
5 Boost pressure control<br />
6 Fuel injection amount control<br />
7 Fuel injection timing control<br />
8 Multiple fuel injection control<br />
9 Fuel pressure control<br />
10 EGR control<br />
11 Cruise control system<br />
12 Electrical fan control<br />
13 A/C cut-off control<br />
14 Immobilizer system<br />
15 Battery<br />
16 Starter (starter signal)<br />
17 Starter relay<br />
18 Clutch switch<br />
19 Neutral switch<br />
20 Brake switch<br />
21 Idle switch<br />
22 A/C switch<br />
23 Refrigerant pressure switch<br />
24 Cruise control switch<br />
25 Accelerator position sensor<br />
26 MAF/IAT sensor<br />
27 IAT sensor No.2<br />
28 ECT sensor<br />
29 Fuel temperature sensor<br />
30 BARO sensor (integrated in PCM)<br />
31 Boost sensor<br />
32 Fuel pressure sensor<br />
33 CMP sensor<br />
34 CKP sensor<br />
35 VSS<br />
36 Calibration resistor<br />
37 Immobilizer unit (integrated in PCM)<br />
38 Suction control valve<br />
39 IDM<br />
40 VSC solenoid valve<br />
41 VBC solenoid valve<br />
42 EGR control solenoid valve<br />
43 EGR solenoid valve (vacuum)<br />
44 EGR solenoid valve (vent)<br />
45 Intake shutter solenoid valve (half)<br />
46 Intake shutter solenoid valve (full)<br />
47 Glow indicator light<br />
48 Cruise main indicator light<br />
49 Cruise set indicator light<br />
50 Glow plug relay<br />
51 Cooling fan relay No.1<br />
52 Cooling fan relay No.2<br />
53 A/C relay<br />
54 EGR valve position sensor<br />
End Of Sie<br />
F2–16<br />
CONTROL SYSTEM
CONTROL SYSTEM<br />
CONTROL DEVICE AND CONTROL RELATIONSHIP CHART<br />
Item<br />
Idle speed control<br />
Glow control<br />
VSC<br />
Boost pressure control<br />
B6E404018881104<br />
×: Applicable<br />
Input device<br />
Battery × ×<br />
Starter (starter signal) × × × × × × × × × ×<br />
Starter relay × × × × × × × × × ×<br />
Clutch switch × × × × × × × ×<br />
Neutral switch × × × × × × × ×<br />
Brake switch ×<br />
Idle switch × × × × × × ×<br />
A/C switch × × × × ×<br />
Refrigerant pressure switch × × × × ×<br />
Cruise control switch ×<br />
Accelerator position sensor × × × × × × × ×<br />
MAF/IAT sensor × × × × ×<br />
IAT sensor No.2 × ×<br />
ECT sensor × × × × × × × × × ×<br />
Fuel temperature sensor ×<br />
BARO sensor (integrated in PCM) × × ×<br />
Boost sensor × × × ×<br />
Fuel pressure sensor × × × ×<br />
CMP sensor × × × × ×<br />
CKP sensor × × × × × × × × ×<br />
VSS × × × × × × × ×<br />
Calibration resistor × ×<br />
Immobilizer unit (integrated in PCM) ×<br />
EGR valve position sensor<br />
Output device<br />
×<br />
Suction control valve × ×<br />
IDM × × × × × ×<br />
VSC solenoid valve ×<br />
VBC solenoid valve ×<br />
EGR control solenoid valve ×<br />
EGR solenoid valve (vacuum) ×<br />
EGR solenoid valve (vent) ×<br />
Intake shutter solenoid valve (half) ×<br />
Intake shutter solenoid valve (full) ×<br />
Glow indicator light ×<br />
Cruise main indicator light ×<br />
Cruise set indicator light ×<br />
Glow plug relay ×<br />
Cooling fan relay No.1 ×<br />
Cooling fan relay No.2 ×<br />
A/C relay<br />
End Of Sie<br />
×<br />
Fuel injection amount control<br />
Fuel injection timing control<br />
Multiple fuel injection control<br />
Fuel pressure control<br />
EGR control<br />
Cruise control system<br />
Electrical fan control<br />
A/C cut-off control<br />
Immobilizer system<br />
F2–17<br />
F2
ON-BOARD DIAGNOSTIC OUTLINE<br />
Features<br />
Block Diagram<br />
.<br />
End Of Sie<br />
DIAGNOSTIC TEST MODE<br />
F2–18<br />
ON-BOARD DIAGNOSTIC<br />
ON-BOARD DIAGNOSTIC<br />
To meet the EOBD regulations • Diagnostic test modes adopted<br />
Improved serviceability • DTC troubleshooting modified<br />
• PID/DATA monitor items added<br />
• Simulation items added<br />
• OBD drive mode adopted<br />
14<br />
1 PCM<br />
2 OBD system<br />
3 Malfunction indication function<br />
4 MIL<br />
5 Memory function<br />
6 Tester communication function<br />
7 DLC-2<br />
8 CAN<br />
13<br />
5<br />
10<br />
• To meet EOBD regulations, the following diagnostic test modes have been adopted.<br />
1<br />
2<br />
11 12<br />
3<br />
15 16<br />
9 WDS or equivalent<br />
10 Detection function<br />
11 PID data monitor function<br />
12 Simulation test function<br />
13 Fail-safe function<br />
14 Input device<br />
15 Engine control system<br />
16 Output device<br />
6<br />
4<br />
7<br />
8<br />
9<br />
B6E407000102101<br />
BHE0102T001<br />
B6E407000102102
ON-BOARD DIAGNOSTIC<br />
Diagnostic test mode Item<br />
Mode 01 Sending diagnostic data (PID data monitor/On-board system readiness test)<br />
Mode 02 Sending freeze frame data<br />
Mode 03 Sending emission-related malfunction code (DTC)<br />
Mode 04 Clearing/resetting emission-related malfunction information<br />
Mode 07 Sending continuous monitoring system test results (pending code)<br />
Mode 09 Request vehicle information<br />
Sending Diagnostic Data<br />
PID data monitor<br />
• The PID data monitor items are shown below.<br />
PID data monitor table<br />
—: Not applicable<br />
Full names Unit<br />
Monitor status since DTCs cleared —<br />
Calculated LOAD value %<br />
Engine coolant temperature °C °F<br />
Intake manifold absolute pressure kPa<br />
Engine speed rpm<br />
Vehicle speed km/h mph<br />
Intake air temperature °C °F<br />
Air flow rate from mass air flow sensor g/s<br />
OBD requirement according to vehicle design —<br />
Distance travelled while MIL is activated km miles<br />
Fuel rail pressure kPa<br />
Sending Freeze Frame Data<br />
• The Freeze Frame Data monitor items are shown below.<br />
Freeze Frame Data monitor table<br />
Sending Emission-related Malfunction Code<br />
• The DTCs are shown below.<br />
—: Not applicable<br />
Full names Unit<br />
DTC that caused required Freeze Frame Data storage —<br />
Calculated LOAD value %<br />
Engine coolant temperature °C °F<br />
Intake manifold absolute pressure kPa<br />
Engine speed rpm<br />
Vehicle speed km/h mph<br />
Intake air temperature °C °F<br />
Air flow rate from mass air flow sensor g/s<br />
Fuel rail pressure kPa<br />
F2–19<br />
F2
F2–20<br />
ON-BOARD DIAGNOSTIC<br />
DTC Table<br />
DTC No. Condition MIL DC<br />
Memory<br />
function<br />
P0016 Crankshaft position-camshaft position correlation malfunction OFF 2 ×<br />
P0045 Variable boost control (VBC) solenoid valve control circuit low input ON 2 ×<br />
P0088 Fuel pressure system too high — — ×<br />
P0093 Fuel system leak detection ON 1 ×<br />
P0096 Intake air temperature (IAT) sensor No.2 range/performance problem ON 2 ×<br />
P0097 Intake air temperature (IAT) sensor No.2 circuit low input ON 1 ×<br />
P0098 Intake air temperature (IAT) sensor No.2 circuit high input ON 1 ×<br />
P0101 Mass air flow (MAF) sensor range/performance problem ON 2 ×<br />
P0102 Mass air flow (MAF) sensor circuit low input ON 1 ×<br />
P0103 Mass air flow (MAF) sensor circuit high input ON 1 ×<br />
P0106 Boost sensor range/performance problem ON 2 ×<br />
P0107 Boost sensor circuit low input ON 1 ×<br />
P0108 Boost sensor circuit high input ON 1 ×<br />
P0111 Intake air temperature (IAT) sensor No.1 range/performance problem ON 2 ×<br />
P0112 Intake air temperature (IAT) sensor No.1 circuit low input ON 1 ×<br />
P0113 Intake air temperature (IAT) sensor No.1 circuit high input ON 1 ×<br />
P0116 Engine coolant temperature (ECT) sensor range/performance problem ON 2 ×<br />
P0117 Engine coolant temperature (ECT) sensor circuit low input ON 1 ×<br />
P0118 Engine coolant temperature (ECT) sensor circuit high input ON 1 ×<br />
P0122 Accelerator pedal position (APP) sensor No.1 circuit low input ON 1 ×<br />
P0123 Accelerator pedal position (APP) sensor No.1 circuit high input ON 1 ×<br />
P0182 Fuel temperature sensor circuit low input ON 1 ×<br />
P0183 Fuel temperature sensor circuit high input ON 1 ×<br />
P0191 Fuel pressure sensor range/performance problem OFF 2 ×<br />
P0192 Fuel pressure sensor circuit low input ON 1 ×<br />
P0193 Fuel pressure sensor circuit high input ON 1 ×<br />
P0200 Fuel injector operation identified ON 1 ×<br />
P0201 Fuel injector No.1 operation identified ON 1 ×<br />
P0202 Fuel injector No.2 operation identified ON 1 ×<br />
P0203 Fuel injector No.3 operation identified ON 1 ×<br />
P0204 Fuel injector No.4 operation identified ON 1 ×<br />
P0222 Accelerator pedal position (APP) sensor No.2 circuit low input ON 1 ×<br />
P0223 Accelerator pedal position (APP) sensor No.2 circuit high input ON 1 ×<br />
P0225 Idle switch circuit malfunction ON 2 ×<br />
P0301 Cylinder No.1 misfire detection ON 1 ×<br />
P0302 Cylinder No.2 misfire detection ON 1 ×<br />
P0303 Cylinder No.3 misfire detection ON 1 ×<br />
P0304 Cylinder No.4 misfire detection ON 1 ×<br />
P0336 CKP sensor range/performance problem OFF 2 ×<br />
P0337 CKP sensor circuit low input ON 1 ×<br />
P0341 CMP sensor range/performance problem OFF 2 ×<br />
P0342 CMP sensor circuit low input ON 1 ×<br />
P0401 EGR flow insufficient detected ON 2 ×<br />
P0402 EGR flow excessive detected ON 2 ×<br />
P0404 EGR valve stuck ON 2 ×<br />
P0406 EGR valve position sensor circuit high input ON 1 ×<br />
P0489 EGR solenoid valve (vacuum) control circuit low input ON 2 ×<br />
P0490 EGR solenoid valve (vacuum) control circuit high input ON 2 ×<br />
P0500 Vehicle speed signal problem ON 2 ×<br />
P0504 Brake switch signal correlation malfunction OFF 2 ×<br />
P0512 Engine switch circuit high input ON 1 ×<br />
P0562 Battery voltage low input ON 1 ×<br />
P0563 Battery voltage high input ON 1 ×
ON-BOARD DIAGNOSTIC<br />
DTC No. Condition MIL DC<br />
Memory<br />
function<br />
P0564 Cruise control signal malfunction OFF 2 ×<br />
P0602 PCM programming error ON 1 ×<br />
P0606 PCM malfunction ON 1 ×<br />
P0610 Control module vehicle options error ON 1 ×<br />
P0627 Suction control valve circuit open ON 1 ×<br />
P0628 Suction control valve circuit low input ON 1 ×<br />
P0629 Suction control valve circuit high input ON 1 ×<br />
P0661 Intake shutter solenoid valve (half) circuit low input ON 2 ×<br />
P0662 Intake shutter solenoid valve (half) circuit high input ON 2 ×<br />
P0664 Intake shutter solenoid valve (full) circuit voltage low input ON 2 ×<br />
P0665 Intake shutter solenoid valve (full) circuit voltage high input ON 2 ×<br />
P0704 Clutch switch circuit malfunction ON 2 ×<br />
P0850 Neutral switch circuit malfunction ON 2 ×<br />
P1190 Calibration resistor circuit malfunction ON 2 ×<br />
P1211 Fuel pressure higher or lower than desired pressure ON 2 ×<br />
P1391 Glow plug circuit low input OFF 2 ×<br />
P1392 Glow plug circuit high input OFF 2 ×<br />
P2009 Variable swirl control (VSC) solenoid valve circuit high input ON 2 ×<br />
P2010 Variable swirl control (VSC) solenoid valve circuit low input ON 2 ×<br />
P2135 Accelerator pedal position (APP) sensor No.1/No.2 voltage correlation ON 1 ×<br />
P2136 Accelerator pedal position (APP) sensor No.1/idle switch correlation ON 1 ×<br />
P2141 EGR solenoid valve (vent) circuit low input ON 2 ×<br />
P2142 EGR solenoid valve (vent) circuit high input ON 2 ×<br />
P2144 EGR solenoid valve circuit low input ON 2 ×<br />
P2145 EGR solenoid valve circuit high input ON 2 ×<br />
P2146 Fuel injector No.1/No.4 circuit malfunction ON 1 ×<br />
P2149 Fuel injector No.2/No.3 circuit malfunction ON 1 ×<br />
P2227 BARO sensor range/performance problem ON 2 ×<br />
P2228 BARO sensor circuit low input ON 1 ×<br />
P2229 BARO sensor circuit high input ON 1 ×<br />
Sending Continuous Monitoring System Test Results<br />
• These appear when a problem is detected in a monitored system.<br />
1-drive cycle type<br />
• If any problems are detected in the first drive cycle, pending codes will be stored in the PCM memory, as well<br />
as DTCs.<br />
• After pending codes are stored, if the PCM determines that the system is normal in any future drive cycle, the<br />
PCM deletes the pending codes.<br />
2-drive cycle type<br />
• The code for a failed system is stored in the PCM memory in the first drive cycle. If the problem is not found in<br />
the second drive cycle, the PCM determines that the system returned to normal or the problem was mistakenly<br />
detected, and deletes the pending code. If the problem is found in the second drive cycle too, the PCM<br />
determines that the system has failed, and stores the pending codes, and the DTCs.<br />
• After pending codes are stored, if the PCM determines that the system is normal in any future drive cycle, the<br />
PCM deletes the pending codes.<br />
End Of Sie<br />
DTC DETECTION LOGIC AND CONDITIONS<br />
B6E407000102103<br />
P0016 Crankshaft position-camshaft position correlation malfunction<br />
• The PCM monitors the input signals from the CKP sensor and CMP sensor while engine is running. If the input<br />
signals from the CKP sensor and the CMP sensor do not correspond, the PCM determines that there is a<br />
correlation malfunction between crankshaft and camshaft position.<br />
P0045 Variable boost control (VBC) solenoid valve control circuit low input<br />
• The PCM monitors the output signal when the PCM controls the variable boost control solenoid valve between<br />
30 and 70%. If the current of the variable boost control solenoid valve is less than 0.8 A during variable boost<br />
control solenoid valve control, the PCM determines that there is a malfunction in the variable boost control<br />
solenoid valve control circuit.<br />
F2–21<br />
F2
F2–22<br />
ON-BOARD DIAGNOSTIC<br />
P0088 Fuel pressure system too high<br />
• The PCM monitors the fuel pressure in the common rail from the fuel pressure sensor while the engine running.<br />
If the fuel pressure is more than 188 MPa {1,917 kgf/cm 2 , 27,267 psi}, the PCM determines that the fuel<br />
pressure is too high.<br />
P0093 Fuel system leak detection<br />
• The PCM monitors the fuel pressure in the common rail from the fuel pressure sensor while the engine running.<br />
If the fuel pressure is lower after the fuel injection than the preprogrammed criteria, the PCM determines fuel<br />
system leakage.<br />
P0096 Intake air temperature (IAT) sensor No.2 range/performance problem<br />
• The PCM monitors the input signal from intake air temperature sensor No.2. If the difference between the<br />
maximum and minimum value of the intake air temperature sensor No.2 is less than 1 °C {1.8 °F}, the PCM<br />
determines that there is a malfunction in intake air temperature sensor No.2.<br />
P0097 Intake air temperature (IAT) sensor No.2 circuit low input<br />
• The PCM monitors the input signal from intake air temperature sensor No.2. If the voltage from intake air<br />
temperature sensor No.2 is less than 0.14 V, the PCM determines that there is a malfunction in the intake air<br />
temperature sensor No.2 circuit.<br />
P0098 Intake air temperature (IAT) sensor No.2 circuit high input<br />
• The PCM monitors the input signal from intake air temperature sensor No.2. If the voltage from intake air<br />
temperature sensor No.2 is more than 4.92 V, the PCM determines that there is a malfunction in the intake air<br />
temperature sensor No.2 circuit.<br />
P0101 Mass air flow (MAF) sensor range/performance problem<br />
• The PCM monitors the input signal from the mass air flow sensor when the engine speed is between 600 rpm<br />
and 2,100 rpm. If the voltage characteristic of the air flow sensor signal is out of the threshold, the PCM<br />
determines that there is a malfunction in the mass air flow sensor.<br />
P0102 Mass air flow (MAF) sensor circuit low input<br />
• The PCM monitors the input signal from the air flow sensor. If the voltage from the air flow sensor is less than<br />
0.15 V, the PCM determines that there is a malfunction in the air flow sensor circuit.<br />
P0103 Mass air flow (MAF) sensor circuit high input<br />
• The PCM monitors the input signal from the air flow sensor. If the voltage from the air flow sensor is more than<br />
4.9 V, the PCM determines that there is a malfunction in the intake air temperature sensor No. 2 circuit.<br />
P0106 Boost sensor range/performance problem<br />
• The PCM monitors the vacuum inside the intake manifold. If the difference of the vacuum inside the intake<br />
manifold during middle engine speed and low engine speed is less than the threshold, the PCM determines<br />
that there is a malfunction in the manifold absolute pressure sensor characteristic.<br />
P0107 Boost sensor circuit low input<br />
• The PCM monitors the input signal from the manifold absolute pressure. If the voltage from the manifold<br />
absolute pressure sensor is less than 0.4 V, the PCM determines that there is a malfunction in the manifold<br />
absolute pressure sensor circuit.<br />
P0108 Boost sensor circuit high input<br />
• The PCM monitors the input signal from the manifold absolute pressure sensor. If the voltage from the manifold<br />
absolute pressure sensor is more than 4.8 V, the PCM determines that there is a malfunction in the manifold<br />
absolute pressure sensor circuit.<br />
P0111 Intake air temperature (IAT) sensor No.1 range/performance problem<br />
• The PCM monitors the input signal from intake air temperature sensor No.1. If the difference between the<br />
maximum and minimum value of the intake air temperature sensor No.1 is less than 1 °C {1.8 °F}, the PCM<br />
determines that there is a malfunction in intake air temperature sensor No.1.<br />
P0112 Intake air temperature (IAT) sensor No.1 circuit low input<br />
• The PCM monitors the input signal from intake air temperature sensor No.1. If the voltage from intake air<br />
temperature sensor No.1 is less than 0.14 V, the PCM determines that there is a malfunction in the intake air<br />
temperature sensor No.1 circuit.<br />
P0113 Intake air temperature (IAT) sensor No.1 circuit high input<br />
• The PCM monitors the input signal from intake air temperature sensor No.1. If the voltage from intake air<br />
temperature sensor No.1 is more than 4.92 V, the PCM determines that there is a malfunction in the intake air<br />
temperature sensor No.1 circuit.<br />
P0116 Engine coolant temperature (ECT) sensor range/performance problem<br />
• The PCM monitors the input signal from the engine coolant temperature sensor. If the difference between the<br />
maximum and minimum value of the engine coolant temperature is less than 3 °C {5.4 °F}, the PCM<br />
determines that there is a malfunction in the engine coolant temperature sensor characteristic.<br />
P0117 Engine coolant temperature (ECT) sensor circuit low input<br />
• The PCM monitors the input signal from the engine coolant temperature sensor. If the voltage from the engine<br />
coolant temperature sensor is less than 0.14 V, the PCM determines that there is a malfunction in the engine<br />
coolant temperature sensor circuit.<br />
P0118 Engine coolant temperature (ECT) sensor circuit high input<br />
• The PCM monitors the input signal from the engine coolant temperature sensor. If the voltage from the engine<br />
coolant temperature sensor is more than 4.92 V, the PCM determines that there is a malfunction in the engine
ON-BOARD DIAGNOSTIC<br />
coolant temperature sensor circuit.<br />
P0122 Accelerator pedal position (APP) sensor No.1 circuit low input<br />
• The PCM monitors the input signal from accelerator pedal position sensor No.1. If the voltage from accelerator<br />
pedal position sensor No.1 is less than 0.3 V, the PCM determines that there is a malfunction in the<br />
accelerator pedal position sensor No.1 circuit.<br />
P0123 Accelerator pedal position (APP) sensor No.1 circuit high input<br />
• The PCM monitors the input signal from accelerator pedal position sensor No.1. If the voltage from accelerator<br />
pedal position sensor No.1 is more than 4.7 V, the PCM determines that there is a malfunction in the<br />
accelerator pedal position sensor No.1 circuit.<br />
P0182 Fuel temperature sensor circuit low input<br />
• The PCM monitors the input signal from the fuel temperature sensor. If the voltage from the fuel temperature<br />
sensor is less than 0.14 V, the PCM determines that there is a malfunction in the fuel temperature sensor<br />
circuit.<br />
P0183 Fuel temperature sensor circuit high input<br />
• The PCM monitors the input signal from the fuel temperature sensor. If the voltage from the fuel temperature<br />
sensor is more than 4.92 V, the PCM determines that there is a malfunction in the fuel temperature sensor<br />
circuit.<br />
P0191 Fuel pressure sensor range/performance problem<br />
• The PCM monitors the fuel pressure in the common rail and input signal from the fuel pressure sensor while<br />
the engine is running. If any one of the following conditions is met, the PCM determines that there is<br />
malfunction in the fuel pressure sensor range/performance problem.<br />
— The PCM calculates the difference between the actual fuel pressure and the target fuel pressure. If the<br />
pressure difference more than 2 MPa {20 kgf/cm 2 , 290 psi}, the PCM determines that there is a<br />
malfunction in fuel pressure sensor range/performance problem.<br />
— The PCM monitors the input signal from fuel pressure sensor. If the difference between the maximum and<br />
minimum value of the fuel pressure sensor is less than 0.015 V, the PCM determines that there is a<br />
malfunction in fuel pressure sensor range/performance problem.<br />
P0192 Fuel pressure sensor circuit low input<br />
• PCM monitors input voltage from fuel pressure sensor while engine is running. If input voltage from fuel<br />
pressure sensor is less than 0.4 V, PCM determines fuel pressure sensor circuit low input.<br />
P0193 Fuel pressure sensor circuit high input<br />
• PCM monitors input voltage from fuel pressure sensor while engine is running. If input voltage from fuel<br />
pressure sensor is more than 4.86 V, PCM determines fuel pressure sensor circuit high input.<br />
P0200 Fuel injector operation identified<br />
• The PCM monitors each cylinder injection confirmation signal from the IDM while the engine is running. If the<br />
PCM does not receive the injection confirmation signal for unspecified cylinder normally, the PCM determines<br />
that the unspecified cylinder fuel injector operation is not verified.<br />
P0201 Fuel injector No.1 operation identified<br />
• The PCM monitors each cylinder injection confirmation signal from the IDM while the engine is running. If the<br />
PCM does not receive the injection confirmation signal for No.1 cylinder normally, PCM determines that the fuel<br />
injector No.1 operation is not verified.<br />
P0202 Fuel injector No.2 operation identified<br />
• The PCM monitors each cylinder injection confirmation signal from the IDM while the engine is running. If the<br />
PCM does not receive the injection confirmation signal for No.2 cylinder normally, the PCM determines that the<br />
fuel injector No.2 operation is not verified.<br />
P0203 Fuel injector No.3 operation identified<br />
• The PCM monitors each cylinder’s injection confirmation signal from the IDM while the engine is running. If the<br />
PCM does not receive the injection confirmation signal for No.3 cylinder normally, the PCM determines that the<br />
fuel injector No.3 operation is not verified.<br />
P0204 Fuel injector No.4 operation identified<br />
• The PCM monitors each cylinder injection confirmation signal from the IDM while the engine is running. If the<br />
PCM does not receive the injection confirmation signal for No.4 cylinder normally, the PCM determines that the<br />
fuel injector No.4 operation is not verified.<br />
P0222 Accelerator pedal position (APP) sensor No.2 circuit low input<br />
• The PCM monitors the input signal from accelerator pedal position sensor No.2. If the voltage from accelerator<br />
pedal position sensor No.2 is less than 0.3 V, the PCM determines that there is a malfunction in the<br />
accelerator pedal position sensor No.2 circuit.<br />
P0223 Accelerator pedal position (APP) sensor No.2 circuit high input<br />
• The PCM monitors the input signal from accelerator pedal position sensor No.2. If the voltage from accelerator<br />
pedal position sensor No.2 is more than 4.7 V, the PCM determines that there is a malfunction in the<br />
accelerator pedal position sensor No.2 circuit.<br />
P0225 Idle switch circuit malfunction<br />
• The PCM monitors the input signals from the accelerator pedal position sensor and the idle switch. If the idle<br />
switch is off even if the voltage from the accelerator pedal position sensor No.2 is less than 0.75 V, the PCM<br />
determines that there is a malfunction in the idle switch circuit.<br />
F2–23<br />
F2
F2–24<br />
ON-BOARD DIAGNOSTIC<br />
P0301, P0302, P0303, P0304 Cylinder No.1/No.2/No.3/No.4 misfire detection<br />
• The PCM monitors the CKP sensor input signal interval time. The PCM calculates the deviation of the interval<br />
time for each cylinder. If the deviation of interval time exceeds the preprogrammed criteria, the PCM detects a<br />
misfire in the corresponding cylinder. While the engine is running, the PCM counts the number of misfires and<br />
calculates misfire ratio for each crankshaft revolution. If the ratio exceeds the preprogrammed criteria, the PCM<br />
determines that a misfire, which can affect emission performance, has occurred.<br />
P0336 CKP sensor range/performance problem<br />
• The PCM monitors input signal from the CKP sensor while the engine is running. If the input signal from the<br />
CKP sensor does not correspond with the proper pulse number, the PCM determines CKP sensor performance<br />
problem.<br />
P0337 CKP sensor circuit low input<br />
• The PCM monitors the input signal from the CKP sensor and the CMP sensor while the engine is running. If the<br />
input signal from the CKP sensor is not input while the PCM detects 28 pulses from the CMP sensor, the PCM<br />
determines that there is a malfunction in the CKP sensor circuit.<br />
P0341 CMP sensor range/performance problem<br />
• The PCM monitors the input signal from the CMP sensor while the engine is running. If the input signal from the<br />
CMP sensor does not correspond with the proper pulse number, the PCM determines CMP sensor<br />
performance problem.<br />
P0342 CMP sensor circuit low input<br />
• The PCM monitors the input signal from the CMP sensor and the CKP sensor while the engine is running. If the<br />
input signal from the CMP sensor is not input while the PCM detects 255 pulses from the CKP sensor, the<br />
PCM determines that there is a malfunction in the CMP sensor circuit.<br />
P0401 EGR flow insufficient detected<br />
• The PCM monitors the difference between the target air amount and intake air amount while the EGR system is<br />
operating. If the difference between the target air amount and the intake air amount is less than the threshold,<br />
the PCM determines that there is a malfunction in the EGR system.<br />
P0402 EGR flow excessive detected<br />
• The PCM monitors the difference between the target air amount and intake air amount while the EGR system is<br />
operating. If the difference between the target air amount and the intake air amount is more than the threshold,<br />
the PCM determines that there is a malfunction in the EGR system.<br />
P0404 EGR valve stuck<br />
• The PCM monitors the input signal from the EGR valve position sensor while the EGR system is operating. If<br />
the output voltage difference is less than threshold when the EGR flow amount changes, the PCM determines<br />
that there is a malfunction in the EGR valve.<br />
P0406 EGR valve position sensor circuit high input<br />
• The PCM monitors the input signal from the EGR valve position sensor. If the voltage from the EGR valve<br />
position sensor is more than 4.75 V, the PCM determines that there is a malfunction in the EGR valve position<br />
sensor circuit.<br />
P0489 EGR solenoid valve (vacuum) control circuit low input<br />
• The PCM monitors the output signal to the EGR solenoid valve (vacuum). If the EGR solenoid valve (vacuum)<br />
voltage is low even if the EGR solenoid valve (vacuum) is off, the PCM determines that there is a malfunction in<br />
the intake shutter solenoid valve control circuit.<br />
P0490 EGR solenoid valve (vacuum) control circuit high input<br />
• The PCM monitors the output signal to the EGR solenoid valve (vacuum). If the EGR solenoid valve (vacuum)<br />
voltage is high even if the EGR solenoid valve (vacuum) is on, the PCM determines that there is a malfunction<br />
in the EGR solenoid valve (vacuum) control circuit.<br />
P0500 Vehicle speed signal problem<br />
• The PCM monitors the CAN input signal from the DSC HU/CM. If the input signal is not correct, the PCM<br />
determines that there is a CAN input signal.<br />
P0504 Brake switch signal correlation malfunction<br />
• The PCM monitors the input signal from brake switch 1 and brake switch 2 while the engine is running. The<br />
PCM determines the brake switch signal correlation malfunction if the input signal from brake switch 1 brake<br />
switch 2 is as follows:<br />
— Brake switch 1 is on and brake switch 2 is off.<br />
— Brake switch 1 is off and brake switch 2 is on.<br />
P0512 Engine switch circuit high input<br />
• The PCM monitors the engine speed and the starter signal. If the engine speed is more than 700 rpm and the<br />
starter switch ON signal is input, the PCM determines that there is a malfunction in the starter switch circuit.<br />
P0562 Battery voltage low input<br />
• The PCM monitors the battery voltage. If the battery voltage is less than 8 V, the PCM determines that there is<br />
a malfunction in the battery and the battery signal system.<br />
P0563 Battery voltage high input<br />
• The PCM monitors the battery voltage. If the battery voltage is more than 16 V, the PCM determines that there<br />
is a malfunction in the battery charging system.
ON-BOARD DIAGNOSTIC<br />
P0564 Cruise control signal malfunction<br />
• The PCM monitors the input voltage from the cruise control switch while the engine is running. PCM<br />
determines cruise control signal malfunction if the input voltage from the cruise control switch is as follows for<br />
120 s:<br />
— Below 0.1 V.<br />
— 1.4—1.9 V.<br />
— 3.7—3.9 V.<br />
— 4.5—4.6 V.<br />
P0602 PCM programming error<br />
• No configuration data in PCM<br />
P0606 PCM malfunction<br />
• PCM does not read DTC from output devices.<br />
P0610 Control module vehicle options error<br />
• PCM data configuration error<br />
P0627 Suction control valve circuit open<br />
• The PCM monitors the suction control valve operation circuit signal frequency at PCM terminal 94. If the<br />
difference between the suction control valve operation frequency at PCM terminal 93 and the monitored<br />
suction control valve operation circuit signal frequency at PCM terminal 94 exceeds the threshold, the PCM<br />
determines that suction control valve open circuit.<br />
P0628 Suction control valve circuit low input<br />
• The PCM monitors the suction control valve circuit current while the engine is running. If the PCM detects the<br />
circuit current is less than 1 A when the suction control valve is on, the PCM determines that there is a<br />
malfunction in the suction control valve circuit.<br />
P0629 Suction control valve circuit high input<br />
• The PCM monitors the suction control valve circuit current while the engine is running. If the PCM detects<br />
circuit current more than 1 A when the suction control valve is off, the PCM determines that there is am<br />
malfunction in the suction control valve circuit.<br />
P0661 Intake shutter solenoid valve (half) circuit low input<br />
• The PCM monitors the output signal to the intake shutter solenoid valve when the intake shutter solenoid valve<br />
is off. If the intake shutter solenoid valve voltage is less than 7.8 V when the intake shutter solenoid valve off,<br />
the PCM determines that there is a malfunction in the intake shutter solenoid valve control circuit.<br />
P0662 Intake shutter solenoid valve (half) circuit high input<br />
• The PCM monitors the output signal to the intake shutter solenoid valve when the intake shutter solenoid valve<br />
is on. If the intake shutter solenoid valve voltage is more than 7.8 V when the intake shutter solenoid valve on,<br />
the PCM determines that there is a malfunction in the intake shutter solenoid valve control circuit.<br />
P0664 Intake shutter solenoid valve (full) circuit voltage low input<br />
• The PCM monitors the output signal to the intake shutter solenoid valve. If the intake shutter solenoid valve<br />
voltage is less than 7.8 V when the intake shutter solenoid valve is on, the PCM determines that there is a<br />
malfunction in the intake shutter solenoid valve control system.<br />
P0665 intake shutter solenoid valve (full) circuit voltage high input<br />
• The PCM monitors the output signal to the intake shutter solenoid valve when intake shutter solenoid valve is<br />
on. If the intake shutter solenoid valve voltage is more than 7.8 V when the intake shutter solenoid valve is on,<br />
the PCM determines that there is a malfunction in the intake shutter solenoid valve control circuit.<br />
P0704 Clutch switch circuit malfunction<br />
• The PCM monitors input voltage from the clutch pedal position switch while the engine running. If the input<br />
voltage from the clutch pedal position switch does not change when the vehicle stops after accelerating to<br />
more than 30 km/h {18.6 mph} and decelerating to 0 km/h {0 mph}, the PCM determines that clutch pedal<br />
position switch circuit has a malfunction.<br />
P0850 Neutral switch circuit malfunction<br />
• The PCM monitors the input signal from the neutral switch when shifting. If the neutral switch signal is not input<br />
even once even when vehicle speed is more than 10 km/h {6.2 mph} the shift lever is operated more than<br />
five times, the PCM determines that there is a malfunction in the neutral switch circuit.<br />
P1190 Calibration resistor circuit malfunction<br />
• The PCM monitors the input voltage from the calibration resistor. If the PCM detects that the input voltage for<br />
any cylinder is more than 4.8 V or less than 0.2 V, the PCM determines calibration resistor malfunction.<br />
P1211 Fuel pressure higher or lower than desired pressure<br />
• The PCM monitors the fuel pressure and calculates the fuel supply volume to the common rail using the fuel<br />
pressure sensor input signal while the engine is running. If the fuel pressure or fuel supply volume to the<br />
common rail is as follows, the PCM determines that the fuel pressure is higher or lower than the desired<br />
pressure.<br />
— Supply pump actual pressure is higher than threshold.<br />
— Difference between two consecutive fuel supply to common rail volume from supply pump is more than one<br />
fuel injection volume by fuel injector.<br />
P1391 Glow plug circuit low input<br />
• The PCM monitors the output signal to the glow relay when the glow relay is on. If the glow relay voltage is 1.0<br />
F2–25<br />
F2
F2–26<br />
ON-BOARD DIAGNOSTIC<br />
V or less when the glow relay is operating, The PCM determines that there is a malfunction in the glow relay<br />
circuit.<br />
P1392 Glow plug circuit high input<br />
• The PCM monitors the output signal to the glow relay when the glow relay is off. If the glow relay voltage is 4.0<br />
V or more when the glow relay is off, The PCM determines that there is a malfunction in the glow relay circuit.<br />
P2009 Variable swirl control (VSC) solenoid valve circuit high input<br />
• The PCM monitors the output signal to the variable swirl control solenoid valve. If the voltage of the variable<br />
swirl control solenoid valve is high even if the variable swirl control solenoid valve is on, the PCM determines<br />
that there is a malfunction in the variable swirl control solenoid valve control system.<br />
P2010 Variable swirl control (VSC) solenoid valve circuit low input<br />
• The PCM monitors the output signal to the variable swirl control solenoid valve. If the voltage of the variable<br />
swirl control solenoid valve is low even if the variable swirl control solenoid valve is off, the PCM determines<br />
that there is a malfunction in the variable swirl control solenoid valve control system.<br />
P2135 Accelerator pedal position (APP) sensor No.1/No.2 voltage correlation<br />
• The PCM monitors the input signals from accelerator pedal position sensor No.1 and accelerator pedal position<br />
sensor No.2. If the difference between accelerator pedal position sensor No.1 and accelerator pedal position<br />
sensor No.2 is more than 0.9 V, the PCM determines that there is a malfunction in the accelerator pedal<br />
position sensor characteristic.<br />
P2136 Accelerator pedal position (APP) sensor No.1/idle switch correlation<br />
• The PCM monitors the input signal from accelerator pedal position sensor No.1. If the voltage from accelerator<br />
pedal position sensor No.1 is more than 1.25 V during idle, the PCM determines that there is a malfunction in<br />
the accelerator pedal position sensor No.1 characteristic.<br />
P2141 EGR solenoid valve (vent) circuit low input<br />
• The PCM monitors the output signal to the EGR solenoid valve (vent). If the EGR solenoid valve (vent) voltage<br />
is low even if the EGR solenoid valve (vent) is off, the PCM determines that there is a malfunction in the intake<br />
shutter solenoid valve control system.<br />
P2142 EGR solenoid valve (vent) circuit high input<br />
• The PCM monitors the output signal to the EGR solenoid valve (vent). If the EGR solenoid valve (vent) voltage<br />
is high even if the EGR solenoid valve (vent) is on, the PCM determines that there is a malfunction in the EGR<br />
solenoid valve (vent) control system.<br />
P2144 EGR control solenoid valve circuit low input<br />
• The PCM monitors the output signal to the EGR control solenoid valve. If the EGR control solenoid valve<br />
voltage is low even if the EGR control solenoid valve is off, the PCM determines that there is a malfunction in<br />
the EGR control solenoid valve control circuit.<br />
P2145 EGR control solenoid valve circuit high input<br />
• The PCM monitors the output signal to the EGR control solenoid valve. If the EGR control solenoid valve<br />
voltage is high even if the EGR control solenoid valve is on, the PCM determines that there is a malfunction in<br />
the EGR control solenoid valve control circuit.<br />
P2146 Fuel injector No.1/No.4 circuit malfunction<br />
• The PCM monitors each cylinder injection confirmation signal from the IDM while the engine is running. If the<br />
PCM does not receive the injection confirmation signal for No.1 and No.4 cylinder normally, the PCM<br />
determines that the fuel injector No.1 and No.4 operation is not verified.<br />
P2149 Fuel injector No.2/No.3 circuit malfunction<br />
• The PCM monitors each cylinder’s injection confirmation signal from the IDM while the engine is running. If the<br />
PCM does not receive the injection confirmation signal for No.2 and No.3 cylinder normally, the PCM<br />
determines that the fuel injector No.2 and No.3 operation is not verified.<br />
P2227 BARO sensor range/performance problem<br />
• The PCM monitors the input signal from the barometric pressure sensor. If the difference between the<br />
barometric pressure input from the barometric pressure sensor and the manifold absolute pressure is more<br />
than 75 mmHg, the PCM determines that there is a malfunction in the barometric pressure sensor.<br />
P2228 BARO sensor circuit low input<br />
• The PCM monitors the input signal from the barometric pressure sensor. If the voltage from the barometric<br />
pressure sensor is less than 0.4 V, the PCM determines that there is a malfunction in the barometric pressure<br />
sensor signal system.<br />
P2229 BARO sensor circuit high input<br />
• The PCM monitors the input signal from the barometric pressure sensor. If the voltage from the barometric<br />
pressure sensor is more than 4.7 V, the PCM determines that there is a malfunction in the barometric pressure<br />
sensor signal system.<br />
End Of Sie<br />
PID/DATA MONITOR AND RECORD<br />
B6E407000102104<br />
• The PID/DATA monitor items are shown below.
ON-BOARD DIAGNOSTIC<br />
PID/DATA monitor item table<br />
Monitor item Unit/Condition Definition<br />
AC_REQ On/Off A/C request signal.<br />
ACCS On/Off Air conditioning compressor cycling switch<br />
ACR On/Off A/C relay<br />
APS1 V Accelerator position sensor No.1 - voltage<br />
APS2 V Accelerator position sensor No.2 - voltage<br />
ARPMDES RPM Target engine speed<br />
BARO<br />
kPa psi<br />
V<br />
Bar<br />
Barometric pressure<br />
BOO On/Off Brake switch<br />
BOOST_DSD kPa psi Bar Desired boost pressure<br />
CPP On/Off Clutch switch<br />
CPP/PNP Neutral/Drive Neutral switch<br />
CR_1 V Calibration resistor voltage 1<br />
CR_2 V Calibration resistor voltage 2<br />
CR_3 V Calibration resistor voltage 3<br />
CR_4 V Calibration resistor voltage 4<br />
CRUISESW On/Off Cruise control switch<br />
DEC_CMP mm3 par stroke Desired fuel for torque down control<br />
DSC_ACT<br />
Enabled/<br />
Disabled<br />
DSC control enable/disable<br />
DTCCNT — DTC count<br />
ECT<br />
°C<br />
V<br />
°F<br />
Engine coolant temperature<br />
EGRA % Exhaust gas recirculation solenoid valve (vent)<br />
EGRV % Exhaust gas recirculation solenoid valve (vacuum)<br />
EGRV2 On/Off Exhaust gas recirculation control solenoid valve<br />
EGRVP V Exhaust gas recirculation valve position sensor<br />
FAN1 On/Off Cooling fan relay No.2 (Main fan relay)<br />
FAN3 On/Off Cooling fan relay No.1 (Add fan relay)<br />
FFH_STAT Active/Inactive FFH status<br />
FIP_FL<br />
Current<br />
%<br />
FIP flow control<br />
FIP_FL_DSD mm 3 par stroke FIP flow desired<br />
FIP_LRN Current<br />
Normal/Fixed_1/<br />
FIP learning amount<br />
FIP_MODE<br />
Fixed_2/<br />
Disabled<br />
FIP duty control status<br />
FIP_SCV<br />
Current<br />
V<br />
FIP suction control valve<br />
FLT °C °F Fuel temperature<br />
FLTV V FLT signal voltage<br />
FRP<br />
kPa<br />
V<br />
psi Bar<br />
Fuel rail pressure<br />
FRP_A kPa psi Bar FRP after fuel injection<br />
GLWPG V V Glow plugs<br />
GPC On/off Glow plug control<br />
IASV On/Off intake shutter solenoid valve (full) control<br />
IASV2 On/Off intake shutter solenoid valve (full) control<br />
IAT<br />
°C<br />
V<br />
°F<br />
Intake air temperature<br />
IAT2<br />
°C<br />
V<br />
°F<br />
Intake air temperature No.2<br />
ICP kPa psi Bar Injector control pressure<br />
IMRC On/Off VSC solenoid valve control<br />
F2–27<br />
F2
End Of Sie<br />
SIMULATION TEST<br />
• The simulation items are shown below.<br />
Simulation item table<br />
F2–28<br />
ON-BOARD DIAGNOSTIC<br />
INGEAR On/Off Load/no load condition<br />
INJ_LRN_DIS km mile Distance from the last injector learning<br />
INJ_MODE<br />
Normal/<br />
Disabled/<br />
Splitted/Fixed<br />
Fuel injection timing control status<br />
INJ_TIM ° Fuel injection timing<br />
INJ1_CMP<br />
mm3 Injector 1 correction value<br />
INJ2_CMP<br />
INJ3_CMP<br />
par stroke<br />
Injector 2 correction value<br />
Injector 3 correction value<br />
INJ4_CMP Injector 4 correction value<br />
ISC_CMP mm 3 par stroke Fuel correction for idle speed control<br />
IVS Idle/Off Idle Idle switch<br />
MAF<br />
g/s<br />
V<br />
Mass air flow amount<br />
MAF_C g MAF per cylinder<br />
MAF_C_DSD g MAF per cylinder desired<br />
MAF_LRN_DIS km mile Distance from the last MAF learning<br />
MAINRLY On/Off PCM control relay<br />
MAP<br />
kPa psi<br />
V<br />
Bar<br />
Manifold absolute pressure<br />
MIL On/Off Malfunction indicator lamp<br />
MULTI_INJ<br />
1_INJ/2_INJ/<br />
3_INJ/4_INJ/<br />
5_INJ/6_INJ/<br />
Disabled<br />
Multiple fuel injection control status<br />
NUMKEYS — Number of keys stored in module<br />
RPM RPM<br />
On/Off<br />
Engine speed<br />
SC_BOO<br />
Applied/Not<br />
Applied<br />
Brake switch for cruise<br />
SC_CANCEL Active/Inactive Cruise cancel switch<br />
SC_COAST Active/Inactive Cruise coast switch<br />
SC_MAIN Active/Inactive Cruise main switch<br />
SC_RES Active/Inactive Cruise resume switch<br />
START_SW On/Off Starter switch value<br />
TC_CMP mm 3 par stroke Fuel correction when torque down control<br />
VBCV % VBC solenoid valve control<br />
VFDES mm3 Monitor item Unit/Condition Definition<br />
par stroke Volume fuel desired<br />
VPWR V Battery positive voltage<br />
VSS km/h mph Vehicle speed sensor.<br />
B6E407000102105<br />
×: Applicable<br />
—: Not applicable<br />
Item Applicable component Unit/condition<br />
Test condition<br />
KOEO KOER<br />
PCM terminal<br />
ACCS Air conditioning compressor cycling switch ON/OFF × × 73<br />
EGRA EGR solenoid valve (vent) Any Duty (%) × × 72<br />
EGRV EGR solenoid valve (vacuum) Any Duty (%) × × 99<br />
EGRV2 EGR control solenoid valve ON/OFF × × 77<br />
FAN1 Cooling fan relay No.2 (Main fan relay) ON/OFF × × 76<br />
FAN3 Cooling fan relay No.1 (Add fan relay) ON/OFF × × 102<br />
GP_LMP Glow plug lamp ON/OFF × × —
End Of Sie<br />
ON-BOARD DIAGNOSTIC<br />
Item Applicable component Unit/condition<br />
Test condition<br />
KOEO KOER<br />
PCM terminal<br />
FUEL_PRIME Fuel pump priming command ON/--- × × —<br />
GPC Glow plug relay ON/OFF × × 68<br />
IASV Intake shutter solenoid valve (half) ON/OFF × × 74<br />
IASV2 Intake shutter solenoid valve (full) ON/OFF × × 100<br />
IMRC VSC solenoid valve ON/OFF × × 101<br />
VBCV VBC solenoid valve Any Duty (%) × × 67<br />
F2–29<br />
F2
F2–30<br />
OUTLINE<br />
OUTLINE<br />
SUPPLEMENTAL SERVICE INFORMATION<br />
B6E400218881106<br />
• The following changes and/or additions have been made since publication of the <strong>Mazda6</strong> <strong>Workshop</strong> <strong>Manual</strong><br />
(1749-1*-02G).<br />
PCM<br />
• PCM inspection has been modified.<br />
EGR valve position sensor<br />
• Inspection procedure has been added.<br />
On-board diagnostic<br />
• Inspection procedure has been modified.<br />
Troubleshooting<br />
• Inspection procedure has been modified.<br />
End Of Sie
PCM INSPECTION<br />
Using WDS or Equivalent<br />
CONTROL SYSTEM<br />
CONTROL SYSTEM<br />
B6E404018881105<br />
Caution<br />
• The PCM terminal voltage vary with change in measuring conditions and vehicle conditions.<br />
Always carry out a total inspection of the input systems, output systems, and PCM to determine<br />
the cause of trouble. Otherwise, diagnosis will be incorrect.<br />
Note<br />
• For replace the PCM, setup the WDS and perform the following.<br />
— “PCM configuration”<br />
— “Correction after Parts Installation”<br />
1. Connect the WDS or equivalent to the DLC-2. (See F2–38 ON-BOARD DIAGNOSTIC TEST.)<br />
2. Turn the engine switch to ON.<br />
3. Measure the PID value.<br />
• If PID value is not within the specification, follow the instructions in ACTION column.<br />
F2–31<br />
F2
PID Monitor Table<br />
Monitor item<br />
(Definition)<br />
AC_REQ<br />
(A/C request signal)<br />
ACCS<br />
(Air conditioning<br />
compressor cycling<br />
switch)<br />
ACR<br />
(A/C relay)<br />
APS1<br />
(Accelerator position<br />
sensor No.1 - voltage)<br />
APS2<br />
(Accelerator position<br />
sensor No.2 - voltage)<br />
ARPMDES<br />
(Target engine speed)<br />
BARO<br />
(Barometric pressure)<br />
BOO<br />
(Brake switch)<br />
BOOST_DSD<br />
(Desired boost<br />
pressure)<br />
CPP<br />
(Clutch switch)<br />
CPP/PNP<br />
(Neutral switch)<br />
CR_1<br />
(Calibration resistor<br />
voltage 1)<br />
CR_2<br />
(Calibration resistor<br />
voltage 2)<br />
CR_3<br />
(Calibration resistor<br />
voltage 3)<br />
CR_4<br />
(Calibration resistor<br />
voltage 4)<br />
CRUISESW<br />
(Cruise control switch)<br />
DEC_CMP<br />
(Fuel correction for<br />
deceleration)<br />
F2–32<br />
CONTROL SYSTEM<br />
Unit/Condition Condition/Specification (Reference) Inspection item<br />
On/Off KOER<br />
On/Off KOER<br />
On/Off KOER<br />
V<br />
V<br />
RPM<br />
KOEO/<br />
KOER<br />
KOEO/<br />
KOER<br />
KOER<br />
(Idle)<br />
kPa psi Bar<br />
KOEO/<br />
V<br />
KOER<br />
On/Off<br />
KOEO/<br />
KOER<br />
A/C switch ON: On<br />
A/C switch OFF: Off<br />
A/C switch ON and fan<br />
switch ON at idle: On<br />
Other: Off<br />
A/C switch ON and fan<br />
switch ON at idle: On<br />
Other: Off<br />
Accelerator pedal<br />
released: Approx. 0.6 V<br />
Accelerator pedal fully<br />
depressed: Approx. 3.6 V<br />
Accelerator pedal<br />
released: Approx. 0.6 V<br />
Accelerator pedal fully<br />
depressed: Approx. 3.6 V<br />
No load: 725—825 rpm<br />
E/L operating: 725—825<br />
rpm<br />
P/S operating: 725—825<br />
rpm<br />
A/C ON: 725—825 rpm<br />
Indicate Barometric<br />
pressure<br />
BARO 101.3 kPa: Approx.<br />
4 V<br />
Brake pedal released: Off<br />
Brake pedal depressed:<br />
On<br />
kPa psi Bar Desired boost pressure is displayed<br />
On/Off<br />
KOEO/<br />
KOER<br />
Neutral/Drive KOEO/<br />
KOER<br />
V<br />
On/Off<br />
mm 3 per stroke<br />
KOEO/<br />
KOER<br />
KOEO/<br />
KOER<br />
Clutch pedal released: Off<br />
Clutch pedal depressed:<br />
On<br />
Neutral position: Neutral<br />
Others: Drive<br />
Calibration resistor<br />
voltage is displayed<br />
Cruise control switch OFF:<br />
Off<br />
Cruise control switch ON:<br />
On<br />
Fuel correction for deceleration is<br />
displayed.<br />
Inspect following PIDs:<br />
START_SW, CPP, CPP/PNP,<br />
IVS, AC_REQ, APS1, APS2,<br />
ECT, RPM.<br />
Inspect following PIDs:<br />
START_SW, CPP, CPP/PNP,<br />
IVS, AC_REQ, APS1, APS2,<br />
ECT, RPM.<br />
Inspect following PIDs:<br />
START_SW, CPP, CPP/PNP,<br />
IVS, AC_REQ, APS1, APS2,<br />
ECT, RPM.<br />
Inspect A/C relay<br />
Inspect Accelerator position<br />
sensor No.1<br />
Inspect Accelerator position<br />
sensor No.2<br />
Inspect following PIDs:<br />
START_SW, CPP, CPP/PNP,<br />
IVS, AC_REQ, APS1, APS2,<br />
IAT2, ECT, BOOST_DSD, FRP,<br />
FRP_A, RPM, VSS.<br />
PCM<br />
terminal<br />
84<br />
73<br />
73<br />
10<br />
88<br />
—<br />
Inspect BARO sensor. —<br />
Inspect brake switch. 7<br />
Perform applicable DTC<br />
troubleshooting.<br />
—<br />
Inspect clutch switch. 33<br />
Inspect neutral switch. 56<br />
Inspect neutral calibration<br />
resistor.<br />
37<br />
62<br />
89<br />
11<br />
Inspect cruise control switch 64<br />
— —
Monitor item<br />
(Definition)<br />
DSC_ACT<br />
(DSC control enable/<br />
disable)<br />
DTCCNT<br />
(DTC count)<br />
ECT<br />
(Engine coolant<br />
temperature)<br />
EGRA<br />
(Exhaust gas<br />
recirculation solenoid<br />
valve (vent))<br />
EGRV<br />
(Exhaust gas<br />
recirculation solenoid<br />
valve (vacuum))<br />
EGRV2<br />
(Exhaust gas<br />
recirculation control<br />
solenoid valve)<br />
EGRVP<br />
(Exhaust gas<br />
recirculation valve<br />
position sensor)<br />
FAN1<br />
(Cooling fan relay<br />
No.2 (Main fan relay))<br />
FAN3<br />
(Cooling fan relay<br />
No.1 (Add fan relay))<br />
FFH_STAT<br />
(FFH status)<br />
FIP_FL<br />
(FIP flow control)<br />
FIP_FL_DSD<br />
(FIP flow desired)<br />
Enabled/<br />
Disabled<br />
—<br />
°C °F<br />
V<br />
%<br />
%<br />
On/Off<br />
CONTROL SYSTEM<br />
Unit/Condition Condition/Specification (Reference) Inspection item<br />
KOEO Disable<br />
KOER Idle: Enabled<br />
Number of DTCs stored in the PCM is<br />
displayed.<br />
Engine coolant<br />
temperature is displayed<br />
KOEO/<br />
KOER<br />
ECT 25 °C {77 °F}:<br />
Approx. 2.85 V<br />
ECT 80 °C {176 °F}:<br />
Approx. 0.89 V<br />
Perform applicable DTC<br />
troubleshooting.<br />
— —<br />
—<br />
Inspect ECT sensor. 87<br />
KOEO Approx. 0 % Inspect following PIDs:<br />
START_SW, CPP, CPP/PNP,<br />
IVS, AC_REQ, MAF, APS1,<br />
APS2, ECT, BARO,<br />
KOER Idle: Approx. 100 % BOOST_DSD, FRP, FRP_A,<br />
RPM, VSS.<br />
Inspect EGR solenoid valve<br />
(vent).<br />
KOEO Approx. 0 % Inspect following PIDs:<br />
START_SW, CPP, CPP/PNP,<br />
IVS, AC_REQ, MAF, APS1,<br />
APS2, ECT, BARO,<br />
KOER Idle: Approx. 75—79 % BOOST_DSD, FRP, FRP_A,<br />
RPM, VSS.<br />
Inspect EGR solenoid valve<br />
(vacuum).<br />
KOEO Off Inspect following PIDs:<br />
START_SW, CPP, CPP/PNP,<br />
IVS, AC_REQ, MAF, APS1,<br />
KOER Idle: On<br />
APS2, ECT, BARO,<br />
BOOST_DSD, FRP, FRP_A,<br />
RPM, VSS.<br />
Inspect EGR solenoid valve.<br />
V See F2–37 EGR VALVE POSITION SENSOR INSPECTION. 32<br />
On/Off<br />
On/Off<br />
KOER<br />
(Idle)<br />
KOER<br />
(Idle)<br />
ECT below 100 °C {212<br />
°F}: Off<br />
Others: On<br />
ECT below 100 °C {212<br />
°F}: Off<br />
A/C operating, refrigerant<br />
pressure switch (middle)<br />
is ON, and ECT below 108<br />
°C {226 °F}: Off<br />
Other: On<br />
Inspect following PIDs: VPWR,<br />
AC_REQ, APS1, APS2, ECT<br />
Inspect cooling fan relay.<br />
Inspect following PIDs: VPWR,<br />
AC_REQ, APS1, APS2, ECT<br />
Inspect cooling fan relay.<br />
PCM<br />
terminal<br />
Active/Inactive KOER<br />
(Idle)<br />
Inactive — —<br />
Current<br />
Approx. 1.8 A Inspect following PIDs:<br />
START_SW, CPP, CPP/PNP,<br />
%<br />
KOER<br />
(Idle) Approx. 44.4 %<br />
IVS, AC_REQ, APS1, APS2,<br />
IAT2, ECT, BOOST_DSD, FRP,<br />
FRP_A, RPM, VSS.<br />
Inspect IDM.<br />
30<br />
mm 3 KOEO Approx. 0 mm<br />
per stroke<br />
3 /stroke Inspect following PIDs:<br />
START_SW, CPP, CPP/PNP,<br />
KOER<br />
(Idle)<br />
Approx. 55 mm<br />
IVS, AC_REQ, APS1, APS2,<br />
IAT2, ECT, BOOST_DSD, FRP,<br />
FRP_A, RPM, VSS.<br />
—<br />
3 /stroke<br />
72<br />
99<br />
77<br />
76<br />
102<br />
F2–33<br />
F2
Monitor item<br />
(Definition)<br />
FIP_LRN<br />
(FIP learning amount)<br />
FIP_MODE<br />
(FIP duty control<br />
status)<br />
FIP_SCV<br />
(Suction control valve)<br />
FLT<br />
(Fuel temperature)<br />
FLTV<br />
(FLT signal voltage)<br />
FRP<br />
(Fuel pressure sensor)<br />
FRP_A<br />
(FRP after fuel<br />
injection)<br />
GLWPG V<br />
(Glow plugs)<br />
GPC<br />
(Glow plug control)<br />
IASV<br />
(intake shutter<br />
solenoid valve (half)<br />
control)<br />
IASV2<br />
(intake shutter<br />
solenoid valve (full)<br />
control)<br />
IAT<br />
(Intake air<br />
temperature)<br />
IAT2<br />
(Intake air temperature<br />
No.2)<br />
F2–34<br />
Current<br />
Normal/<br />
Fixed_1/<br />
Fixed_2/<br />
Disabled<br />
Current<br />
V<br />
°C °F<br />
V<br />
CONTROL SYSTEM<br />
Unit/Condition Condition/Specification (Reference) Inspection item<br />
KOEO Approx. 64 mA Inspect following PIDs:<br />
KOER<br />
(Idle)<br />
Approx. 77 mA<br />
START_SW, CPP, CPP/PNP,<br />
IVS, AC_REQ, APS1, APS2,<br />
IAT2, ECT, BOOST_DSD, FRP,<br />
FRP_A, RPM, VSS.<br />
KOEO Disabled Inspect following PIDs:<br />
START_SW, CPP, CPP/PNP,<br />
KOER Normal<br />
IVS, AC_REQ, APS1, APS2,<br />
IAT2, ECT, BOOST_DSD, FRP,<br />
FRP_A, RPM, VSS.<br />
KOEO Approx. 24 mA Inspect following PIDs:<br />
KOER<br />
KOEO<br />
1.5—2.2 A<br />
Approx. 0.02 V<br />
START_SW, CPP, CPP/PNP,<br />
IVS, AC_REQ, APS1, APS2,<br />
IAT2, ECT, BOOST_DSD, FRP,<br />
KOER 1.6—2.2 V<br />
FRP_A, RPM, VSS.<br />
KOEO/<br />
KOER<br />
KOEO/<br />
KOER<br />
Fuel temperature is<br />
displayed.<br />
FLT 23 °C {73 °F}:<br />
Approx. 2.23 V<br />
PCM<br />
terminal<br />
—<br />
—<br />
93, 94<br />
Inspect fuel temperature sensor 35<br />
KOEO Approx. 1 V<br />
V<br />
KOER<br />
Idle: Approx. 1.54 V<br />
2,000 rpm: Approx. 1.7 V<br />
KOEO 0 kPa {0 psi, 0 Bar}<br />
Idle: Approx. 34 MPa<br />
kPa psi Bar<br />
KOER<br />
{4,931 psi, 340 Bar}<br />
2,000 rpm: Approx. 43<br />
MPa {6,237 psi, 430 Bar}<br />
Inspect fuel pressure sensor 61<br />
KOEO 0 kPa {0 psi, 0 Bar}<br />
Idle: Approx. 34 MPa<br />
kPa psi Bar<br />
KOER<br />
{4,931 psi, 340 Bar}<br />
2,000 rpm: Aprrox.43 MPa<br />
{6,237 psi, 430 Bar}<br />
KOEO Approx. 0 V<br />
V<br />
On/Off<br />
KOER<br />
KOEO<br />
KOER<br />
Cranking: Approx. 10 V<br />
Idle: Approx. 0 V<br />
Off<br />
Cranking: On<br />
Idle: Off<br />
Inspect following PIDs:<br />
START_SW, ECT,<br />
BOOST_DSD, VSS<br />
86<br />
KOEO Off Inspect following PIDs:<br />
Idle: On<br />
START_SW, CPP, CPP/PNP,<br />
IVS, APS1, APS2, IAT2, MAF,<br />
On/Off<br />
KOER<br />
1,100 rpm or more: On<br />
ECT, BOOST_DSD, RPM,<br />
VSS.<br />
Inspect intake shutter solenoid<br />
valve (half).<br />
74<br />
KOEO Off Inspect following PIDs:<br />
START_SW, CPP, CPP/PNP,<br />
IVS, APS1, APS2, IAT2, MAF,<br />
On/Off<br />
KOER Idle: Off<br />
ECT, BOOST_DSD, RPM,<br />
VSS.<br />
Inspect intake shutter solenoid<br />
valve (full).<br />
100<br />
°C<br />
V<br />
°F<br />
KOEO/<br />
KOER<br />
30°C {86 °F}: Approx. 1.9<br />
V<br />
Intake air temperature is<br />
display<br />
Inspect IAT sensor.No.1 60<br />
°C<br />
V<br />
°F<br />
KOEO/<br />
KOER<br />
23 °C {73 °F}: Approx. 2.2<br />
V<br />
Intake air temperature is<br />
display<br />
Inspect IAT sensor.No.2 8
Monitor item<br />
(Definition)<br />
ICP<br />
(Injector control<br />
pressure)<br />
IMRC<br />
(VSC solenoid valve<br />
control)<br />
INGEAR<br />
(Load/no load<br />
condition)<br />
INJ_LRN_DIS<br />
(Distance from the last<br />
injector learning)<br />
INJ_MODE<br />
(Fuel injection timing<br />
control status)<br />
INJ_TIM<br />
(Fuel injection timing)<br />
INJ1_CMP<br />
(Injector 1 correction<br />
value)<br />
INJ2_CMP<br />
(Injector 2 correction<br />
value)<br />
INJ3_CMP<br />
(Injector 3 correction<br />
value)<br />
INJ4_CMP<br />
(Injector 4 correction<br />
value)<br />
ISC_CMP<br />
(Fuel correction for<br />
idle speed control)<br />
IVS<br />
(Idle switch)<br />
MAF<br />
(Mass air flow amount)<br />
MAF_C<br />
(MAF per cylinder)<br />
MAF_C_DSD<br />
(MAF per cylinder<br />
desired)<br />
MAF_LRN_DIS<br />
(Distance from the last<br />
MAF learning)<br />
MAINRLY<br />
(PCM control relay)<br />
kPa psi Bar<br />
On/Off<br />
On/Off<br />
km mile<br />
Normal/<br />
Disabled/<br />
Splitted/Fixed<br />
°<br />
KOEO<br />
KOER<br />
CONTROL SYSTEM<br />
Unit/Condition Condition/Specification (Reference) Inspection item<br />
35 MPa {5,076 psi, 350<br />
Bar} Inspect following PIDs:<br />
Idle: Approx.35 MPa<br />
{5,076 psi, 350 Bar}<br />
2,000 rpm: Approx.45<br />
MPa {6,526.7 psi, 450<br />
Bar}<br />
START_SW, CPP, CPP/PNP,<br />
IVS, AC_REQ, APS1, APS2,<br />
IAT2, ECT, BOOST_DSD, FRP,<br />
FRP_A, RPM, VSS.<br />
KOEO Off Inspect following PIDs: CPP,<br />
KOER<br />
KOEO/<br />
KOER<br />
KOEO/<br />
KOER<br />
mm 3 per stroke KOEO/<br />
KOER<br />
mm 3 per stroke KOEO/<br />
KOER<br />
Idle/Off Idle<br />
g/s<br />
V<br />
g<br />
g<br />
km mile<br />
On/Off<br />
Idle: On<br />
1,900 rpm or more: Off<br />
CPP or CPP/PNP is on:<br />
On<br />
Others: Off<br />
Distance from the last<br />
injector learning<br />
CPP/PNP, APS1, APS2, IVS,<br />
MAF, ECT, RPM.<br />
Inspect VSC solenoid valve.<br />
Inspect following PIDs: CPP,<br />
CPP/PNP.<br />
Distance from the last injector<br />
learning is display.<br />
KOEO Disabled Inspect following PIDs:<br />
START_SW, CPP, CPP/PNP,<br />
KOER Idle: Normal<br />
IVS, MAF, ECT, FRP, FRP_A,<br />
RPM, VSS.<br />
KOEO Approx. 30° Inspect following PIDs:<br />
KOER<br />
Idle: Approx. 30°<br />
2,000 rpm: Approx. 30°<br />
START_SW, CPP, CPP/PNP,<br />
IVS, MAF, ECT, FRP, FRP_A,<br />
RPM, VSS.<br />
KOEO/<br />
KOER<br />
Injector correction value is<br />
displayed<br />
Fuel correction for idle<br />
speed control is displayed<br />
CTP: Idle<br />
Others: Off Idle<br />
Inspect following PIDs:<br />
START_SW, CPP, CPP/PNP,<br />
IVS, APS1, APS2, IAT2, ECT,<br />
BOOST_DSD, FRP, FRP_A,<br />
RPM, VSS.<br />
—<br />
101<br />
—<br />
—<br />
—<br />
42, 43,<br />
44, 45<br />
42<br />
45<br />
43<br />
44<br />
— —<br />
Inspect Idle switch 31<br />
KOEO 0 g/s<br />
KOER<br />
KOEO<br />
Idle: Approx. 13 g/s<br />
2,000 rpm: Approx. 21 g/s<br />
Less than 1V<br />
Inspect MAF sensor. 9<br />
KOER<br />
Idle: Approx. 2.1 V<br />
2,000 rpm: Approx. 2.4 V<br />
KOEO Approx. 78.44 mg<br />
KOER<br />
Idle: Approx. 590 mg<br />
2,000 rpm: Approx. 400<br />
mg<br />
Inspect MAF sensor. —<br />
KOEO Approx. 1.01 mg<br />
KOER<br />
Idle: Approx. 358 mg<br />
2,000 rpm: Approx. 320<br />
mg<br />
Inspect MAF sensor. —<br />
KOEO/<br />
KOER<br />
KOEO On<br />
KOER Idle: On<br />
Distance from the last<br />
MAF learning is displayed<br />
PCM<br />
terminal<br />
— —<br />
— 69<br />
F2–35<br />
F2
Monitor item<br />
(Definition)<br />
MAP<br />
(Manifold absolute<br />
pressure)<br />
MIL<br />
(Malfunction indicator<br />
lamp)<br />
MULTI_INJ<br />
(Multiple fuel injection<br />
control status)<br />
NUMKEYS<br />
(Number of keys<br />
stored in module)<br />
RPM<br />
(Engine speed)<br />
SC_BOO<br />
(Brake switch for<br />
cruise)<br />
SC_CANCEL<br />
(Cruise cancel switch)<br />
SC_COAST<br />
(Cruise coast switch)<br />
SC_MAIN<br />
(Cruise main switch)<br />
SC_RES<br />
(Cruise resume<br />
switch)<br />
START_SW<br />
(Starter switch value)<br />
TC_CMP<br />
(Fuel correction for<br />
traction control)<br />
VBCV<br />
(VBC solenoid valve<br />
control)<br />
F2–36<br />
CONTROL SYSTEM<br />
Unit/Condition Condition/Specification (Reference) Inspection item<br />
kPa psi Bar KOER<br />
Manifold absolute<br />
pressure is displayed<br />
V KOEO<br />
Approx. 4.1 V (at sea<br />
level)<br />
KOEO On<br />
On/Off KOER<br />
(Idle)<br />
Off<br />
KOEO Disabled<br />
1_INJ/2_INJ/<br />
3_INJ/4_INJ/<br />
5_INJ/6_INJ/<br />
Disabled<br />
—<br />
RPM<br />
On/Off<br />
Applied/Not<br />
Applied<br />
KOER<br />
KOEO/<br />
KOER<br />
Idle: 4_INJ<br />
As increase the engine<br />
speed: 4_INJ→ 3_INJ→<br />
2_INJ→ 1_INJ<br />
Release the accelerator<br />
pedal while the engine<br />
speed is high: Disabled<br />
Number of keys stored in<br />
module<br />
KOER 0 RPM<br />
No load: 725—825 RPM<br />
E/L operating: 725—825<br />
RPM<br />
KOER<br />
P/S operating: 725—825<br />
RPM<br />
A/C ON: 725—825 RPM<br />
KOEO/<br />
KOER<br />
Active/Inactive KOEO/<br />
KOER<br />
Active/Inactive KOEO/<br />
KOER<br />
Active/Inactive KOEO/<br />
KOER<br />
Active/Inactive KOEO/<br />
KOER<br />
On/Off<br />
mm 3 per stroke KOEO/<br />
KOER<br />
%<br />
Brake pedal released: Off<br />
Brake pedal depressed:<br />
On<br />
Brake pedal released: Not<br />
Applied<br />
Brake pedal depressed:<br />
Applied<br />
Cruise cancel switch<br />
released: Inactive<br />
Cruise cancel switch<br />
depressed: Active<br />
Cruise coast switch<br />
released: Inactive<br />
Cruise coast switch<br />
depressed: Active<br />
Cruise control switch OFF:<br />
Inactive<br />
Cruise control switch ON:<br />
Active<br />
Cruise resume switch<br />
released: Inactive<br />
Cruise resume switch<br />
depressed: Active<br />
KOEO Off<br />
KOER<br />
Cranking: On<br />
Idle: Off<br />
Fuel correction for traction<br />
control is display.<br />
Inspect MAP sensor. 36<br />
Perform applicable DTC<br />
troubleshooting.<br />
Inspect following PIDs:<br />
START_SW, CPP, CPP/PNP,<br />
IVS, AC_REQ, APS1, APS2,<br />
MAF, IAT2, ECT, FLT, RPM,<br />
VSS.<br />
—<br />
—<br />
— —<br />
Inspect CKP sensor. 3, 29<br />
Inspect brake switch 34<br />
Inspect cruise cancel switch 64<br />
Inspect cruise cancel switch 64<br />
Inspect cruise cancel switch 64<br />
Inspect cruise cancel switch 64<br />
Inspect cruise cancel switch 57<br />
Inspect following PIDs:<br />
START_SW, CPP, CPP/PNP,<br />
IVS, AC_REQ, APS1, APS2,<br />
IAT2, ECT, BOOST_DSD, FRP,<br />
FRP_A, RPM, VSS.<br />
KOEO 0 % Inspect following PIDs: CPP,<br />
KOER<br />
Idle: Approx. 51 %<br />
2,000 rpm: Approx. 50 %<br />
CPP/PNP, APS1, APS2, IVS,<br />
MAF, ECT, RPM.<br />
Inspect VBC solenoid valve.<br />
PCM<br />
terminal<br />
—<br />
67
End Of Sie<br />
EGR VALVE POSITION SENSOR INSPECTION<br />
CONTROL SYSTEM<br />
B6E404018881106<br />
Voltage Inspection<br />
1. Disconnect the vacuum hose from the EGR valve position sensor and connect the vacuum pump to the EGR<br />
valve.<br />
2. Turn the engine switch to the ON position.<br />
3. Verify that the voltage at terminal B changes while applying the vacuum to the EGR valve as show in the graph.<br />
• If not as specified, replace the EGR valve.<br />
Specification<br />
.<br />
Monitor item<br />
(Definition)<br />
VFDES<br />
(Volume fuel desired) mm3 per stroke KOEO/<br />
KOER<br />
VPWR<br />
(Battery positive<br />
voltage)<br />
VSS<br />
(Vehicle speed)<br />
Resistance Inspection<br />
1. Disconnect the EGR valve position sensor connector.<br />
2. Measure the resistance between terminal A and C.<br />
• If not as specified, replace the EGR valve.<br />
EGR valve position sensor resistance<br />
Approx. 5 kilohms<br />
End Of Sie<br />
Unit/Condition Condition/Specification (Reference) Inspection item<br />
V KOEO<br />
Volume fuel desired is<br />
displayed<br />
Battery positive voltage is<br />
displayed<br />
km/h mph KOER Vehicle speed is displayed<br />
Vacuum Voltage<br />
0— –36.6 kPa {0— –274.5<br />
mmHg, 0— –10.8 inHg} or 4.09—4.59 V<br />
above<br />
–73.3 {-549.8 mmHg, –21.7<br />
Approx. 0.54 V<br />
inHg} or below<br />
(V)<br />
0.54<br />
4.09—4.59<br />
Inspect following PIDs:<br />
START_SW, CPP, CPP/PNP,<br />
IVS, AC_REQ, APS1, APS2,<br />
IAT2, ECT, BOOST_DSD, FRP,<br />
FRP_A, RPM, VSS.<br />
Inspect PCM control relay.<br />
Inspect battery.<br />
Perform applicable DTC<br />
troubleshooting.<br />
-36.6<br />
{-274.5, -10.8}<br />
C<br />
B A<br />
-73.3 (kPa {mmHg, inHg})<br />
{-549.8, -21.7}<br />
PCM<br />
terminal<br />
—<br />
27, 53,<br />
79<br />
—<br />
BPE4040W001<br />
B6E4040W003<br />
F2–37<br />
F2
F2–38<br />
ON-BOARD DIAGNOSTIC<br />
FOREWORD<br />
B6E407018881101<br />
• When the customer reports a vehicle malfunction, check the malfunction indicator light (MIL) indication and<br />
diagnostic trouble code (DTC), then diagnose the malfunction according to following flowchart.<br />
— If the DTC exists, diagnose the applicable DTC inspection. (See F2–40 DTC TABLE.)<br />
— If the DTC does not exist and the MIL does not illuminate or flash, diagnose the applicable symptom<br />
troubleshooting.<br />
WARNING LIGHT*<br />
ON/FLASHING<br />
CHECK FOR<br />
PRIORITIZED DTC<br />
DIAGNOSE BY DTC<br />
(ON-BOARD DIAGNOSTIC)<br />
DTC TABLE<br />
DTC<br />
TROUBLESHOOTING<br />
FLOW<br />
ON-BOARD DIAGNOSTIC<br />
CUSTOMER ARRIVES<br />
DTC<br />
NO WARNING LIGHT*<br />
WITH SYMPTOM<br />
CHECK DTC<br />
IGNITION ON TEST, IDLING TEST<br />
WITHOUT DTC<br />
DIAGNOSE BY SYMPTOM<br />
(SYMPTOM TROUBLESHOOTING)<br />
1. DIAGNOSTIC INDEX<br />
2. QUICK DIAGNOSIS CHART<br />
3. SYMPTOM TROUBLESHOOTING<br />
B6U0102W301<br />
* : Malfunction Indicator Light (MIL), Generator Warning Light, Security Light<br />
End Of Sie<br />
OBD PENDING TROUBLE CODES<br />
B6E407018881102<br />
• These appear when a problem is detected in a monitored system. The MIL is illuminated when a problem is<br />
detected in two consecutive drive cycles. The code for a failed system is stored in the PCM memory in the first<br />
drive cycle. This code is called the pending code. If the problem is not found in the second drive cycle, the PCM<br />
judges that the system returned to normal or the problem was mistakenly detected, and deletes the pending<br />
code. If the problem is found in the second drive cycle too, the PCM judges that the system has failed, deletes<br />
the pending code, illuminates the MIL and stores the DTC.<br />
End Of Sie<br />
OBD FREEZE FRAME DATA<br />
B6E407018881103<br />
• This is the technical data which indicates the engine’s condition at the time of the first malfunction. This data<br />
will remain in the memory even if another emission-related DTC is stored, with the exception of Misfire or Fuel<br />
System DTCs. Once freeze frame data for a Misfire or Fuel System DTC is stored, it will overwrite any previous<br />
data and the freeze frame will not be overwritten again.<br />
End Of Sie<br />
OBD READ/CLEAR DIAGNOSTIC TEST RESULTS<br />
B6E407018881104<br />
• This retrieves all stored DTCs in the PCM and clears the DTC, Freeze Frame Data, On-Board Readiness Test<br />
Results, Diagnostic Monitoring Test Results and Pending Trouble Codes.<br />
End Of Sie<br />
OBD PARAMETER IDENTIFICATION (PID) ACCESS<br />
B6E407018881105<br />
• The PID mode allows access to certain data values, analog and digital inputs and outputs, calculated values<br />
and system status information. Since PID values for output devices are PCM internal data values, inspect each<br />
device to identify which output devices are malfunctioning.<br />
End Of Sie<br />
ON-BOARD DIAGNOSTIC TEST<br />
B6E407018881106<br />
DTCs Retrieving Procedure<br />
1. Perform the necessary vehicle preparation and visual inspection.
2. Connect WDS or equivalent to the vehicle DLC-2<br />
16-pin connector located on the left side of the<br />
steering column.<br />
3. Retrieve DTC using WDS or equivalent.<br />
ON-BOARD DIAGNOSTIC<br />
Pending Trouble Code Access Procedure<br />
1. Perform the necessary vehicle preparation and visual inspection.<br />
2. Connect WDS or equivalent to the vehicle DLC-2<br />
16-pin connector located on the left side of the<br />
steering column.<br />
3. Retrieve pending trouble code using WDS or<br />
equivalent.<br />
Freeze Frame PID Data Access Procedure<br />
1. Perform the necessary vehicle preparation and visual inspection.<br />
2. Connect WDS or equivalent to the vehicle DLC-2<br />
16-pin connector located on the left side of the<br />
steering column.<br />
3. Retrieve FREEZE FRAME PID DATA using WDS<br />
or equivalent.<br />
PID/DATA Monitor and Record Procedure<br />
1. Perform the necessary vehicle preparation and visual inspection.<br />
2. Connect WDS or equivalent to the vehicle DLC-2<br />
16-pin connector located on the left side of the<br />
steering column.<br />
3. Access and monitor PIDs using WDS or<br />
equivalent.<br />
End Of Sie<br />
OBD DRIVE MODE<br />
B6E407018881107<br />
• Performing the Drive Mode inspects the OBD system for proper operation and must be performed to ensure<br />
that no additional DTCs are present.<br />
DLC-2<br />
DLC-2<br />
DLC-2<br />
DLC-2<br />
A6E40702001<br />
A6E40702001<br />
A6E40702001<br />
A6E40702001<br />
F2–39<br />
F2
F2–40<br />
ON-BOARD DIAGNOSTIC<br />
• During Drive Mode, the following systems are inspected:<br />
— P0101 MAF sensor circuit range/performance problem<br />
— P0106 Boost sensor circuit range/performance problem<br />
— P0401 EGR flow insufficient detected<br />
— P0402 EGR flow excessive detected<br />
— P0404 EGR valve stuck<br />
— P2227 BARO sensor circuit range/performance problem<br />
Caution<br />
• While performing the Drive Mode, always operate the vehicle in a safe and lawful manner.<br />
• When the WDS or equivalent is used to observe monitor system status while driving, be sure to<br />
have another technician with you, or record the data in the WDS or equivalent using the PID/DATA<br />
MONITOR AND RECORD function and inspect later.<br />
1. Warm up the engine to normal operating temperature.<br />
2. Verify all accessory loads (A/C, headlights, blower fan, rear window defroster) are off.<br />
3. Drive the vehicle five times in the driving mode<br />
indicated in the figure on a road with a 0%<br />
gradient.<br />
4. Stop the vehicle.<br />
5. Verify no DTCs are available.<br />
End Of Sie<br />
DTC TABLE<br />
VEHICLE<br />
SPEED<br />
Above 35 km/h {21.7<br />
mph}(2nd gear)<br />
0<br />
IDLE IDLE<br />
20sec 25sec 20sec 50sec 20sec<br />
START<br />
ENGINE<br />
Above 50 km/h {31<br />
mph}(3nd gear)<br />
TIME<br />
B6E4070W078<br />
B6E407018881108<br />
DTC No. Condition MIL DC<br />
Memory<br />
function<br />
Page<br />
P0016<br />
Crankshaft position-camshaft position correlation<br />
malfunction<br />
OFF 2 × (See F2–42 DTC P0016.)<br />
P0045<br />
Variable boost control (VBC) solenoid valve control<br />
circuit low input<br />
ON 2 × (See F2–43 DTC P0045.)<br />
P0088 Fuel pressure system too high — — × (See F2–46 DTC P0088.)<br />
P0093 Fuel system leak detection ON 1 × (See F2–47 DTC P0093.)<br />
P0096<br />
Intake air temperature (IAT) sensor No.2 range/<br />
performance problem<br />
ON 2 × (See F2–48 DTC P0096.)<br />
P0097<br />
Intake air temperature (IAT) sensor No.2 circuit low<br />
input<br />
ON 1 × (See F2–49 DTC P0097.)<br />
P0098<br />
Intake air temperature (IAT) sensor No.2 circuit high<br />
input<br />
ON 1 × (See F2–51 DTC P0098.)<br />
P0101 Mass air flow (MAF) sensor range/performance problem ON 2 × (See F2–54 DTC P0101.)<br />
P0102 Mass air flow (MAF) sensor circuit low input ON 1 × (See F2–55 DTC P0102.)<br />
P0103 Mass air flow (MAF) sensor circuit high input ON 1 × (See F2–58 DTC P0103.)<br />
P0106 Boost sensor range/performance problem ON 2 × (See F2–60 DTC P0106.)<br />
P0107 Boost sensor circuit low input ON 1 × (See F2–61 DTC P0107.)<br />
P0108 Boost sensor circuit high input ON 1 × (See F2–64 DTC P0108.)<br />
P0111<br />
Intake air temperature (IAT) sensor No.1 range/<br />
performance problem<br />
ON 2 × (See F2–66 DTC P0111.)<br />
P0112<br />
Intake air temperature (IAT) sensor No.1 circuit low<br />
input<br />
ON 1 × (See F2–67 DTC P0112.)<br />
P0113<br />
Intake air temperature (IAT) sensor No.1 circuit high<br />
input<br />
ON 1 × (See F2–69 DTC P0113.)<br />
P0116<br />
Engine coolant temperature (ECT) sensor range/<br />
performance problem<br />
ON 2 × (See F2–72 DTC P0116.)<br />
P0117<br />
Engine coolant temperature (ECT) sensor circuit low<br />
input<br />
ON 1 × (See F2–74 DTC P0117.)
ON-BOARD DIAGNOSTIC<br />
DTC No. Condition MIL DC<br />
Memory<br />
function<br />
Page<br />
P0118<br />
Engine coolant temperature (ECT) sensor circuit high<br />
input<br />
ON 1 × (See F2–75 DTC P0118.)<br />
P0122<br />
Accelerator pedal position (APP) sensor No.1 circuit low<br />
input<br />
ON 1 × (See F2–78 DTC P0122.)<br />
P0123<br />
Accelerator pedal position (APP) sensor No.1 circuit<br />
high input<br />
ON 1 × (See F2–80 DTC P0123.)<br />
P0182 Fuel temperature sensor circuit low input ON 1 × (See F2–82 DTC P0182.)<br />
P0183 Fuel temperature sensor circuit high input ON 1 × (See F2–84 DTC P0183.)<br />
P0191 Fuel pressure sensor range/performance problem OFF 2 × (See F2–86 DTC P0191.)<br />
P0192 Fuel pressure sensor circuit low input ON 1 × (See F2–87 DTC P0192.)<br />
P0193 Fuel pressure sensor circuit high input ON 1 × (See F2–90 DTC P0193.)<br />
P0200 Fuel injector operation identified ON 1 × (See F2–92 DTC P0200.)<br />
P0201 Fuel injector No.1 operation identified ON 1 × (See F2–95 DTC P0201.)<br />
P0202 Fuel injector No.2 operation identified ON 1 × (See F2–98 DTC P0202.)<br />
P0203 Fuel injector No.3 operation identified ON 1 × (See F2–101 DTC P0203.)<br />
P0204 Fuel injector No.4 operation identified ON 1 × (See F2–104 DTC P0204.)<br />
P0222<br />
Accelerator pedal position (APP) sensor No.2 circuit low<br />
input<br />
ON 1 × (See F2–107 DTC P0222.)<br />
P0223<br />
Accelerator pedal position (APP) sensor No.2 circuit<br />
high input<br />
ON 1 × (See F2–110 DTC P0223.)<br />
P0225 Idle switch circuit malfunction ON 2 × (See F2–112 DTC P0225.)<br />
P0301 Cylinder No.1 misfire detection ON 1 ×<br />
(See F2–114 DTC P0301,<br />
P0302, P0303, P0304.)<br />
P0302 Cylinder No.2 misfire detection ON 1 ×<br />
(See F2–114 DTC P0301,<br />
P0302, P0303, P0304.)<br />
P0303 Cylinder No.3 misfire detection ON 1 ×<br />
(See F2–114 DTC P0301,<br />
P0302, P0303, P0304.)<br />
P0304 Cylinder No.4 misfire detection ON 1 ×<br />
(See F2–114 DTC P0301,<br />
P0302, P0303, P0304.)<br />
P0336 CKP sensor range/performance problem OFF 2 × (See F2–116 DTC P0336.)<br />
P0337 CKP sensor circuit low input ON 1 × (See F2–117 DTC P0337.)<br />
P0341 CMP sensor range/performance problem OFF 2 × (See F2–120 DTC P0341.)<br />
P0342 CMP sensor circuit low input ON 1 × (See F2–121 DTC P0342.)<br />
P0401 EGR flow insufficient detected ON 2 × (See F2–124 DTC P0401.)<br />
P0402 EGR flow excessive detected ON 2 × (See F2–125 DTC P0402.)<br />
P0404 EGR valve stuck ON 2 × (See F2–126 DTC P0404.)<br />
P0406 EGR valve position sensor circuit high input ON 1 × (See F2–127 DTC P0406.)<br />
P0489 EGR solenoid valve (vacuum) control circuit low input ON 2 × (See F2–130 DTC P0489.)<br />
P0490 EGR solenoid valve (vacuum) control circuit high input ON 2 × (See F2–132 DTC P0490.)<br />
P0500 Vehicle speed signal problem ON 2 × (See F2–134 DTC P0500.)<br />
P0504 Brake switch signal correlation malfunction OFF 2 × (See F2–134 DTC P0504.)<br />
P0512 Engine switch circuit high input ON 1 × (See F2–137 DTC P0512.)<br />
P0562 Battery voltage low input ON 1 × (See F2–140 DTC P0562.)<br />
P0563 Battery voltage high input ON 1 × (See F2–141 DTC P0563.)<br />
P0564 Cruise control signal malfunction OFF 2 × (See F2–144 DTC P0564.)<br />
P0602 PCM programming error ON 1 × (See F2–146 DTC P0602.)<br />
P0606 PCM malfunction ON 1 × (See F2–146 DTC P0606.)<br />
P0610 Control module vehicle options error ON 1 × (See F2–147 DTC P0610.)<br />
P0627 Suction control valve circuit open ON 1 × (See F2–147 DTC P0627.)<br />
P0628 Suction control valve circuit low input ON 1 × (See F2–150 DTC P0628.)<br />
P0629 Suction control valve circuit high input ON 1 × (See F2–152 DTC P0629.)<br />
P0661 Intake shutter solenoid valve circuit (half) low input ON 2 × (See F2–154 DTC P0661.)<br />
P0662 Intake shutter solenoid valve circuit (half) high input ON 2 × (See F2–156 DTC P0662.)<br />
P0664<br />
Intake shutter solenoid valve (full) circuit voltage low<br />
input<br />
ON 2 × (See F2–158 DTC P0664.)<br />
F2–41<br />
F2
End Of Sie<br />
DTC P0016<br />
F2–42<br />
ON-BOARD DIAGNOSTIC<br />
DTC No. Condition MIL DC<br />
Memory<br />
function<br />
Page<br />
P0665<br />
Intake shutter solenoid valve (full) circuit voltage high<br />
input<br />
ON 2 × (See F2–160 DTC P0665.)<br />
P0704 Clutch switch circuit malfunction ON 2 × (See F2–162 DTC P0704.)<br />
P0850 Neutral switch circuit malfunction ON 2 × (See F2–164 DTC P0850.)<br />
P1190 Calibration resistor circuit malfunction ON 2 × (See F2–166 DTC P1190.)<br />
P1211 Fuel pressure higher or lower than desired pressure ON 2 × (See F2–169 DTC P1211.)<br />
P1391 Glow plug circuit low input OFF 2 × (See F2–170 DTC P1391.)<br />
P1392 Glow plug circuit high input OFF 2 × (See F2–173 DTC P1392.)<br />
P2009<br />
Variable swirl control (VSC) solenoid valve circuit high<br />
input<br />
ON 2 × (See F2–178 DTC P2010.)<br />
P2010<br />
Variable swirl control (VSC) solenoid valve circuit low<br />
input<br />
ON 2 × (See F2–176 DTC P2009.)<br />
P2135<br />
Accelerator pedal position (APP) sensor No.1/No.2<br />
voltage correlation<br />
ON 1 × (See F2–180 DTC P2135.)<br />
P2136<br />
Accelerator pedal position (APP) sensor No.1/idle<br />
switch correlation<br />
ON 1 × (See F2–180 DTC P2136.)<br />
P2141 EGR solenoid valve (vent) circuit low input ON 2 × (See F2–182 DTC P2141.)<br />
P2142 EGR solenoid valve (vent) circuit high input ON 2 × (See F2–185 DTC P2142.)<br />
P2144 EGR control solenoid valve circuit low input ON 2 × (See F2–187 DTC P2144.)<br />
P2145 EGR control solenoid valve circuit high input ON 2 × (See F2–189 DTC P2145.)<br />
P2146 Fuel injector No.1/No.4 circuit malfunction ON 1 × (See F2–191 DTC P2146.)<br />
P2149 Fuel injector No.2/No.3 circuit malfunction ON 1 × (See F2–194 DTC P2149.)<br />
P2227 BARO sensor range/performance problem ON 2 × (See F2–197 DTC P2227.)<br />
P2228 BARO sensor circuit low input ON 1 × (See F2–197 DTC P2228.)<br />
P2229 BARO sensor circuit high input ON 1 × (See F2–198 DTC P2229.)<br />
DTC P0016 Crankshaft position-camshaft position correlation malfunction<br />
DETECTION<br />
CONDITION<br />
POSSIBLE<br />
CAUSE<br />
B6E407000001101<br />
• The PCM monitors the input signals from the CKP sensor and the CMP sensor while the engine is running.<br />
If the input signals from the CKP sensor and the CMP sensor do not correspond, the PCM determines that<br />
there is a correlation malfunction between crankshaft and camshaft positions.<br />
Diagnostic support note<br />
• The MIL does not illuminates.<br />
• The DTC is stored in the PCM memory.<br />
• CKP sensor malfunction<br />
• CMP sensor malfunction<br />
• Loose timing belt<br />
• PCM malfunction
End Of Sie<br />
DTC P0045<br />
ON-BOARD DIAGNOSTIC<br />
Diagnostic procedure<br />
STEP INSPECTION ACTION<br />
1 VERIFY FREEZE FRAME DATA HAS BEEN Yes Go to the next step.<br />
RECORDED<br />
No Record the FREEZE FRAME DATA on the repair order,<br />
• Has FREEZE FRAME DATA been recorded? then go to the next step.<br />
2 VERIFY RELATED REPAIR INFORMATION Yes Perform repair or diagnosis according to the available<br />
AVAILABILITY<br />
Service Information.<br />
• Verify related service information availability. • If the vehicle is not repaired, go to the next step.<br />
• Is any related repair information available? No Go to the next step.<br />
3 VERIFY CURRENT SIGNAL STATUS: IS Yes Go to the next step.<br />
CONCERN INTERMITTENT OR CONSTANT? No Intermittent concern exists.<br />
• Connect the WDS or equivalent to the DLC-2. Perform the “INTERMITTENT CONCERNS<br />
• Clear the DTC from the PCM memory using<br />
the WDS or equivalent.<br />
TROUBLESHOOTING”.<br />
• Start the engine.<br />
• Is the same DTC present?<br />
4 IDENTIFY TRIGGER DTC FOR FREEZE FRAME Yes Go to the applicable DTC inspection.<br />
DATA<br />
(See F2–40 DTC TABLE)<br />
• Is P0336, P0337, P0341 or P0342 on FREEZE<br />
FRAME DATA?<br />
No Go to the next step.<br />
5 INSPECT CKP SENSOR<br />
Yes Replace the CKP sensor, go to Step 8.<br />
•<br />
•<br />
Inspect the CKP sensor.<br />
Is there any malfunction?<br />
No Go to the next step.<br />
6 INSPECT CMP SENSOR<br />
Yes Replace the CMP sensor, go to Step 8.<br />
•<br />
•<br />
Inspect the CMP sensor.<br />
Is there any malfunction?<br />
No Go to the next step.<br />
7 INSPECT TIMING BELT<br />
Yes Reinstall the timing belt, go to the next step.<br />
•<br />
•<br />
Inspect the timing belt installation.<br />
Is any malfunction?<br />
No Go to the next step.<br />
8 VERIFY TROUBLESHOOTING OF DTC P0016 Yes Replace the PCM, go to the next step.<br />
COMPLETED<br />
No Go to the next step.<br />
• Make sure to reconnect all disconnected<br />
connectors.<br />
• Clear the DTC from the PCM memory using<br />
the WDS or equivalent.<br />
• Start the engine.<br />
• Is the same DTC present?<br />
9 VERIFY AFTER REPAIR PROCEDURE<br />
Yes Go to the applicable DTC inspection.<br />
• Perform the Repair Verification Drive Mode.<br />
(See F2–40 DTC TABLE)<br />
•<br />
(See F2–39 OBD DRIVE MODE.)<br />
Are any DTCs present?<br />
No Troubleshooting completed.<br />
DTC P0045 Variable boost control (VBC) solenoid valve control circuit low input<br />
DETECTION<br />
CONDITION<br />
POSSIBLE<br />
CAUSE<br />
B6E407000001102<br />
• The PCM monitors the output signal when the PCM controls the variable boost control solenoid valve<br />
between 30 and 70%. If the current of the variable boost control solenoid valve is less than 0.8 A during<br />
variable boost control solenoid valve control, the PCM determines that there is a malfunction in the variable<br />
boost control solenoid valve control circuit.<br />
Diagnostic support note<br />
• The MIL illuminates if the PCM detects the above malfunction condition in two consecutive drive cycles or<br />
in one drive cycle while the DTC for the same malfunction has been stored in the PCM.<br />
• PENDING CODE is available if the PCM detects the above malfunction condition during the first drive<br />
cycle.<br />
• FREEZE FRAME DATA is available.<br />
• The DTC is stored in the PCM memory.<br />
• VBC solenoid valve malfunction<br />
• Connector or terminal malfunction<br />
• Open circuit in wiring harness between PCM control relay terminal C and VBC solenoid valve terminal A<br />
• Open circuit in wiring harness between VBC solenoid valve terminal B and PCM terminal 67<br />
• Short to GND in wiring harness between VBC solenoid valve terminal B and PCM terminal 67<br />
• PCM malfunction<br />
F2–43<br />
F2
F2–44<br />
ON-BOARD DIAGNOSTIC<br />
DTC P0045 Variable boost control (VBC) solenoid valve control circuit low input<br />
PCM CONTROL<br />
RELAY WIRING<br />
HARNESS-SIDE<br />
CONNECTOR<br />
A<br />
C<br />
D<br />
PCM CONTROL RELAY<br />
TERMINAL C<br />
E<br />
VBC SOLENOID VALVE PCM<br />
5 4<br />
7<br />
4 6<br />
A<br />
B<br />
VBC SOLENOID VALVE<br />
WIRING HARNESS-SIDE<br />
CONNECTOR<br />
B<br />
A<br />
9 8<br />
26 25 24 23 22 21 20 19 18 17 16 15 14<br />
52 51 50 49 48 47 46 45 44 43 42 41 40<br />
78 77 76 75 74 73 72 71 70 69 68 67 66<br />
104 103 102 101 100 99 98 97 96 95 94 93 92<br />
67<br />
PCM<br />
WIRING HARNESS-SIDE<br />
CONNECTOR<br />
13 12 11 10 9 8 7 6 5 4 3 2 1<br />
39 38 37 36 35 34 33 32 31 30 29 28 27<br />
65 64 63 62 61 60 59 58 57 56 55 54 53<br />
91 90 89 88 87 86 85 84 83 82 81 80 79
ON-BOARD DIAGNOSTIC<br />
Diagnostic procedure<br />
STEP INSPECTION ACTION<br />
1 VERIFY FREEZE FRAME DATA HAS BEEN<br />
RECORDED<br />
• Has FREEZE FRAME DATA been recorded?<br />
2 VERIFY RELATED REPAIR INFORMATION<br />
AVAILABILITY<br />
• Verify related service repair information<br />
availability.<br />
• Is any related repair information available?<br />
3 VERIFY CURRENT SIGNAL STATUS: IS<br />
CONCERN INTERMITTENT OR CONSTANT?<br />
• Connect the WDS or equivalent to the DLC-2.<br />
• Clear the DTC from the PCM memory using<br />
the WDS or equivalent.<br />
• Start the engine.<br />
• Is the PENDING CODE for this DTC present?<br />
4 INSPECT VBC SOLENOID VALVE<br />
CONNECTOR FOR POOR CONNECTION<br />
• Turn the engine switch off.<br />
• Disconnect the VBC solenoid valve connector.<br />
• Inspect for poor connection (such as damaged/<br />
pulled-out pins, corrosion).<br />
• Is there any malfunction?<br />
5 INSPECT VBC SOLENOID VALVE POWER<br />
CIRCUIT FOR OPEN CIRCUIT<br />
• Turn the engine switch to the ON position<br />
(Engine off).<br />
• Measure the voltage between VBC solenoid<br />
valve terminal A (wiring harness-side) and<br />
body GND.<br />
• Is the voltage B+?<br />
6 INSPECT VBC SOLENOID VALVE CONTROL<br />
CIRCUIT FOR SHORT TO GND<br />
• Turn the engine switch off.<br />
• Inspect for continuity between VBC solenoid<br />
valve terminal B (wiring harness-side) and<br />
body GND.<br />
• Is there continuity?<br />
7 INSPECT VBC SOLENOID VALVE<br />
• Inspect the VBC solenoid valve.<br />
• Is there any malfunction?<br />
8 INSPECT PCM CONNECTOR FOR POOR<br />
CONNECTION<br />
• Turn the engine switch off.<br />
• Disconnect the PCM connector.<br />
• Inspect for poor connection (such as damaged/<br />
pulled-out pins, corrosion).<br />
• Is there any malfunction?<br />
9 INSPECT VBC SOLENOID VALVE CONTROL<br />
CIRCUIT FOR OPEN CIRCUIT<br />
• Turn the engine switch off.<br />
• Inspect for continuity between VBC solenoid<br />
valve terminal B (wiring harness-side) and<br />
PCM terminal 67 (wiring harness-side).<br />
• Is there continuity?<br />
10 VERIFY TROUBLESHOOTING OF DTC P0045<br />
COMPLETED<br />
• Make sure to reconnect all disconnected<br />
connectors.<br />
• Clear the DTC from the PCM memory using<br />
the WDS or equivalent.<br />
• Start the engine.<br />
• Is the PENDING CODE for this DTC present?<br />
Yes Go to the next step.<br />
No Record the FREEZE FRAME DATA on the repair order,<br />
then go to the next step.<br />
Yes Perform repair or diagnosis according to the available<br />
repair information.<br />
• If the vehicle is not repaired, go to the next step.<br />
No Go to the next step.<br />
Yes Go to the next step.<br />
No Intermittent concern exists.<br />
Perform the “INTERMITTENT CONCERNS<br />
TROUBLESHOOTING”.<br />
Yes Repair or replace the terminal, then go to Step 10.<br />
No Go to the next step.<br />
Yes Go to the next step.<br />
No Repair or replace the wiring harness for a possible open<br />
circuit or short to GND, then go to Step 10.<br />
Yes Repair or replace the wiring harness for a possible short to<br />
GND, then go to Step 10.<br />
No Go to the next step.<br />
Yes Replace the VBC solenoid valve, then go to Step 10.<br />
No Go to the next step.<br />
Yes Repair or replace the terminal, then go to Step 10.<br />
No Go to the next step.<br />
Yes Go to the next step.<br />
No Repair or replace the wiring harness for a possible open<br />
circuit, then go to the next step.<br />
Yes Replace the PCM, then go to the next step.<br />
No Go to the next step.<br />
F2–45<br />
F2
11 VERIFY AFTER REPAIR PROCEDURE<br />
• Perform the Repair Verification Drive Mode.<br />
(See F2–39 OBD DRIVE MODE.)<br />
• Is any DTCs present?<br />
End Of Sie<br />
DTC P0088<br />
End Of Sie<br />
F2–46<br />
ON-BOARD DIAGNOSTIC<br />
STEP INSPECTION ACTION<br />
DTC P0088 Fuel pressure system too high<br />
DETECTION<br />
CONDITION<br />
POSSIBLE<br />
CAUSE<br />
Yes Go to the applicable DTC inspection.<br />
(See F2–40 DTC TABLE.)<br />
No DTC troubleshooting completed.<br />
B6E407000001103<br />
• The PCM monitors the fuel pressure in the common rail from the fuel pressure sensor while the engine<br />
running. If the fuel pressure is more than 188 MPa {1,917 kgf/cm 2 , 27,267 psi}, the PCM determines that<br />
the fuel pressure is too high.<br />
• Suction control valve malfunction<br />
• Fuel pressure sensor malfunction<br />
• Fuel pressure limiter malfunction<br />
• PCM malfunction<br />
Diagnostic procedure<br />
STEP INSPECTION ACTION<br />
1 VERIFY FREEZE FRAME DATA HAS BEEN Yes Go to the next step.<br />
RECORDED<br />
No Record the FREEZE FRAME DATA on the repair order,<br />
• Has FREEZE FRAME DATA been recorded? then go to the next step.<br />
2 VERIFY RELATED REPAIR INFORMATION Yes Perform repair or diagnosis according to the available<br />
AVAILABILITY<br />
Service Information.<br />
• Verify related service information availability. • If the vehicle is not repaired, go to the next step.<br />
• Is any related repair information available? No Go to the next step.<br />
3 VERIFY CURRENT SIGNAL STATUS: IS Yes Go to the next step.<br />
CONCERN INTERMITTENT OR CONSTANT? No Intermittent concern exists.<br />
• Connect the WDS or equivalent to the DLC-2. Perform the “INTERMITTENT CONCERNS<br />
• Clear the DTC from the PCM memory using<br />
the WDS or equivalent.<br />
TROUBLESHOOTING”.<br />
• Start the engine.<br />
• Is the same DTC present?<br />
4 IDENTIFY TRIGGER DTC FOR FREEZE FRAME Yes Go to the applicable DTC inspection.<br />
DATA<br />
(See F2–40 DTC TABLE)<br />
• Is P0627, P0628, P0629, P0191, P0192 or<br />
P0193 on FREEZE FRAME DATA?<br />
No Go to the next step.<br />
5 INSPECT SUCTION CONTROL VALVE<br />
Yes Repair the supply pump, go to Step 8.<br />
•<br />
•<br />
Inspect the suction control valve.<br />
Is there any malfunction?<br />
No Go to the next step.<br />
6 INSPECT FUEL PRESSURE SENSOR<br />
Yes Replace the common rail, go to Step 8.<br />
•<br />
•<br />
Inspect the fuel pressure sensor.<br />
Is there any malfunction?<br />
No Go to the next step.<br />
7 INSPECT COMMON RAIL<br />
Yes Replace the common rail, go to the next step.<br />
•<br />
•<br />
Inspect the common rail.<br />
Is there any malfunction?<br />
No Go to the next step.<br />
8 VERIFY TROUBLESHOOTING OF DTC P0088 Yes Replace the PCM, go to the next step.<br />
COMPLETED<br />
No Go to the next step.<br />
• Make sure to reconnect all disconnected<br />
connectors.<br />
• Clear the DTC from the PCM memory using<br />
the WDS or equivalent.<br />
• Start the engine.<br />
• Is the same DTC present?<br />
9 VERIFY AFTER REPAIR PROCEDURE<br />
Yes Go to the applicable DTC inspection.<br />
• Perform the Repair Verification Drive Mode.<br />
(See F2–40 DTC TABLE)<br />
•<br />
(See F2–39 OBD DRIVE MODE.)<br />
Are any DTCs present?<br />
No Troubleshooting completed.
DTC P0093<br />
DTC P0093 Fuel system leak detection<br />
DETECTION<br />
CONDITION<br />
POSSIBLE<br />
CAUSE<br />
End Of Sie<br />
ON-BOARD DIAGNOSTIC<br />
B6E407000001104<br />
• The PCM monitors the fuel pressure in the common rail from the fuel pressure sensor while the engine<br />
running. If the fuel pressure is lower after the fuel injection than the preprogrammed criteria, the PCM<br />
determines fuel system leakage.<br />
Diagnostic support note<br />
• The MIL illuminates if the PCM detects the above malfunction condition in the first drive cycle.<br />
• FREEZE FRAME DATA is available.<br />
• The DTC is stored in the PCM memory.<br />
• Fuel leakage or clogged fuel line<br />
• Suction control valve malfunction<br />
• Fuel pressure sensor malfunction<br />
• Fuel injector malfunction<br />
• PCM malfunction<br />
Diagnostic procedure<br />
STEP INSPECTION ACTION<br />
1 VERIFY FREEZE FRAME DATA HAS BEEN Yes Go to the next step.<br />
RECORDED<br />
No Record the FREEZE FRAME DATA on the repair order,<br />
• Has FREEZE FRAME DATA been recorded? then go to the next step.<br />
2 VERIFY RELATED REPAIR INFORMATION Yes Perform repair or diagnosis according to the available<br />
AVAILABILITY<br />
Service Information.<br />
• Verify related Service Information availability. • If the vehicle is not repaired, go to the next step.<br />
• Is any related repair information available? No Go to the next step.<br />
3 VERIFY CURRENT SIGNAL STATUS: IS Yes Go to the next step.<br />
CONCERN INTERMITTENT OR CONSTANT? No Intermittent concern exists.<br />
• Connect the WDS or equivalent to the DLC-2. Perform the “INTERMITTENT CONCERNS<br />
• Clear the DTC from the PCM memory using<br />
the WDS or equivalent.<br />
TROUBLESHOOTING”.<br />
• Start the engine.<br />
• Is the same DTC present?<br />
4 IDENTIFY TRIGGER DTC FOR FREEZE FRAME Yes Go to the applicable DTC inspection.<br />
DATA<br />
(See F2–40 DTC TABLE)<br />
• Is P0192, P0193 or P1190 on FREEZE<br />
FRAME DATA?<br />
No Go to the next step.<br />
5 INSPECT FUEL LINE<br />
Yes Repair or replace the suspected fuel line, go to Step 9.<br />
•<br />
•<br />
Turn the engine switch off.<br />
Inspect for fuel leakage or clogging in the<br />
following fuel lines for each cylinder:<br />
— Supply pump and Common rail.<br />
— Common rail and fuel injector.<br />
No Go to the next step.<br />
• Is there any malfunction?<br />
6 INSPECT SUCTION CONTROL VALVE<br />
Yes Repair the supply pump, go to Step 9.<br />
•<br />
•<br />
Inspect the suction control valve.<br />
Is there any malfunction?<br />
No Go to the next step.<br />
7 INSPECT FUEL PRESSURE SENSOR<br />
Yes Replace the common rail, go to Step 9.<br />
•<br />
•<br />
Inspect the fuel pressure sensor.<br />
Is there any malfunction?<br />
No Go to the next step.<br />
8 INSPECT FUEL INJECTOR<br />
Yes Replace the fuel injector, go to the next step.<br />
•<br />
•<br />
Inspect the fuel injector.<br />
Is there any malfunction?<br />
No Go to the next step.<br />
9 VERIFY TROUBLESHOOTING OF DTC P0093 Yes Replace the PCM, go to the next step.<br />
COMPLETED<br />
No Go to the next step.<br />
• Make sure to reconnect all disconnected<br />
connectors.<br />
• Clear the DTC from the PCM memory using<br />
the WDS or equivalent.<br />
• Start the engine.<br />
• Is the same DTC present?<br />
10 VERIFY AFTER REPAIR PROCEDURE<br />
Yes Go to the applicable DTC inspection.<br />
• Perform the Repair Verification Drive Mode.<br />
(See F2–40 DTC TABLE)<br />
•<br />
(See F2–39 OBD DRIVE MODE.)<br />
Are any DTCs present?<br />
No Troubleshooting completed.<br />
F2–47<br />
F2
DTC P0096<br />
F2–48<br />
ON-BOARD DIAGNOSTIC<br />
DTC P0096 Intake air temperature (IAT) sensor No.2 circuit range/performance problem<br />
DETECTION<br />
CONDITION<br />
POSSIBLE<br />
CAUSE<br />
B6E407000001105<br />
• The PCM monitors the input signal from intake air temperature sensor No.2. If the difference between the<br />
maximum and minimum value of the intake air temperature sensor No.2 is less than 1 °C {1.8 °F}, the<br />
PCM determines that there is a malfunction in intake air temperature sensor No.2.<br />
Diagnostic support note<br />
• The MIL illuminates if the PCM detects the above malfunction condition in two consecutive drive cycles or<br />
in one drive cycle while the DTC for the same malfunction has been stored in the PCM.<br />
• PENDING CODE is available if the PCM detects the above malfunction condition during the first drive<br />
cycle.<br />
• FREEZE FRAME DATA is available.<br />
• The DTC is stored in the PCM memory.<br />
• IAT sensor No.2 malfunction<br />
• Connector or terminal malfunction<br />
• PCM malfunction<br />
IAT SENSOR NO.2 PCM<br />
5<br />
IAT SENSOR NO.2<br />
WIRING HARNESS-SIDE<br />
CONNECTOR<br />
B A<br />
A<br />
B<br />
4<br />
4<br />
91<br />
26 25 24 23 22 21 20 19 18 17 16 15 14<br />
52 51 50 49 48 47 46 45 44 43 42 41 40<br />
78 77 76 75 74 73 72 71 70 69 68 67 66<br />
104 103 102 101 100 99 98 97 96 95 94 93 92<br />
6<br />
6<br />
8<br />
PCM<br />
WIRING HARNESS-SIDE<br />
CONNECTOR<br />
13 12 11 10 9 8 7 6 5 4 3 2 1<br />
39 38 37 36 35 34 33 32 31 30 29 28 27<br />
65 64 63 62 61 60 59 58 57 56 55 54 53<br />
91 90 89 88 87 86 85 84 83 82 81 80 79
End Of Sie<br />
DTC P0097<br />
ON-BOARD DIAGNOSTIC<br />
Diagnostic procedure<br />
STEP INSPECTION ACTION<br />
1 VERIFY FREEZE FRAME DATA HAS BEEN Yes Go to the next step.<br />
RECORDED<br />
No Record the FREEZE FRAME DATA on the repair order,<br />
• Has FREEZE FRAME DATA been recorded? then go to the next step.<br />
2 VERIFY RELATED REPAIR INFORMATION Yes Perform repair or diagnosis according to the available<br />
AVAILABILITY<br />
repair information.<br />
• Verify related service repair information<br />
• If the vehicle is not repaired, go to the next step.<br />
availability.<br />
No Go to the next step.<br />
• Is any related repair information available?<br />
3 VERIFY CURRENT SIGNAL STATUS: IS Yes Go to the next step.<br />
CONCERN INTERMITTENT OR CONSTANT? No Intermittent concern exists.<br />
• Connect the WDS or equivalent to the DLC-2. Perform the “INTERMITTENT CONCERNS<br />
• Clear the DTC from the PCM memory using<br />
the WDS or equivalent.<br />
TROUBLESHOOTING”.<br />
• Start the engine.<br />
• Is the PENDING CODE for this DTC present?<br />
4 INSPECT IAT SENSOR No.2 CONNECTOR FOR Yes Repair or replace the terminal, then go to Step 7.<br />
POOR CONNECTION<br />
No Go to the next step.<br />
• Turn the engine switch off.<br />
• Disconnect the IAT sensor No.2 connector.<br />
• Inspect for poor connection (such as damaged/<br />
pulled-out pins, corrosion).<br />
• Is there any malfunction?<br />
5 INSPECT IAT SENSOR NO.2<br />
Yes Replace the IAT sensor No.2, then go to Step 7.<br />
•<br />
•<br />
Inspect the IAT sensor No.2.<br />
Is there any malfunction?<br />
No Go to the next step.<br />
6 INSPECT PCM CONNECTOR FOR POOR Yes Repair or replace the terminal, then go to the next step.<br />
CONNECTION<br />
No Go to the next step.<br />
• Turn the engine switch off.<br />
• Disconnect the PCM connector.<br />
• Inspect for poor connection (such as damaged/<br />
pulled-out pins, corrosion).<br />
• Is there any malfunction?<br />
7 VERIFY TROUBLESHOOTING OF DTC P0096 Yes Replace the PCM, then go to the next step.<br />
COMPLETED<br />
No Go to the next step.<br />
• Make sure to reconnect all disconnected<br />
connectors.<br />
• Clear the DTC from the PCM memory using<br />
the WDS or equivalent.<br />
• Start the engine.<br />
• Is the PENDING CODE for this DTC present?<br />
8 VERIFY AFTER REPAIR PROCEDURE<br />
Yes Go to the applicable DTC inspection.<br />
• Perform the Repair Verification Drive Mode.<br />
(See F2–40 DTC TABLE.)<br />
•<br />
(See F2–39 OBD DRIVE MODE.)<br />
Are any DTCs present?<br />
No DTC troubleshooting completed.<br />
DTC P0097 Intake air temperature (IAT) sensor No.2 circuit low input<br />
DETECTION<br />
CONDITION<br />
POSSIBLE<br />
CAUSE<br />
B6E407000001106<br />
• The PCM monitors the input signal from intake air temperature sensor No.2. If the voltage from intake air<br />
temperature sensor No.2 is less than 0.14 V, the PCM determines that there is a malfunction in the intake<br />
air temperature sensor No.2 circuit.<br />
Diagnostic support note<br />
• The MIL illuminates if the PCM detects the above malfunction condition in the first drive cycle.<br />
• FREEZE FRAME DATA is available.<br />
• The DTC is stored in the PCM memory.<br />
• IAT sensor No.2 malfunction<br />
• Connector or terminal malfunction<br />
• Short to GND in wiring harness between IAT sensor No.2 terminal A and PCM terminal 8<br />
• PCM malfunction<br />
F2–49<br />
F2
F2–50<br />
ON-BOARD DIAGNOSTIC<br />
DTC P0097 Intake air temperature (IAT) sensor No.2 circuit low input<br />
IAT SENSOR NO.2 PCM<br />
6<br />
IAT SENSOR NO.2<br />
WIRING HARNESS-SIDE<br />
CONNECTOR<br />
B A<br />
A<br />
B<br />
4<br />
4<br />
5<br />
91<br />
26 25 24 23 22 21 20 19 18 17 16 15 14<br />
52 51 50 49 48 47 46 45 44 43 42 41 40<br />
78 77 76 75 74 73 72 71 70 69 68 67 66<br />
104 103 102 101 100 99 98 97 96 95 94 93 92<br />
7<br />
7<br />
8<br />
PCM<br />
WIRING HARNESS-SIDE<br />
CONNECTOR<br />
13 12 11 10 9 8 7 6 5 4 3 2 1<br />
39 38 37 36 35 34 33 32 31 30 29 28 27<br />
65 64 63 62 61 60 59 58 57 56 55 54 53<br />
91 90 89 88 87 86 85 84 83 82 81 80 79
End Of Sie<br />
DTC P0098<br />
ON-BOARD DIAGNOSTIC<br />
Diagnostic procedure<br />
STEP INSPECTION ACTION<br />
1 VERIFY FREEZE FRAME DATA HAS BEEN Yes Go to the next step.<br />
RECORDED<br />
No Record the FREEZE FRAME DATA on the repair order,<br />
• Has FREEZE FRAME DATA been recorded? then go to the next step.<br />
2 VERIFY RELATED REPAIR INFORMATION Yes Perform repair or diagnosis according to the available<br />
AVAILABILITY<br />
repair information.<br />
• Verify related service repair information<br />
• If the vehicle is not repaired, go to the next step.<br />
availability.<br />
No Go to the next step.<br />
• Is any related repair information available?<br />
3 VERIFY CURRENT SIGNAL STATUS: IS Yes Go to the next step.<br />
CONCERN INTERMITTENT OR CONSTANT? No Intermittent concern exists.<br />
• Connect the WDS or equivalent to the DLC-2. Perform the “INTERMITTENT CONCERNS<br />
• Clear the DTC from the PCM memory using<br />
the WDS or equivalent.<br />
TROUBLESHOOTING”.<br />
• Start the engine.<br />
• Is the same DTC present?<br />
4 INSPECT IAT SENSOR NO.2 CONNECTOR FOR Yes Repair or replace the terminal, then go to Step 8.<br />
POOR CONNECTION<br />
No Go to the next step.<br />
• Turn the engine switch off.<br />
• Disconnect the IAT sensor No.2 connector.<br />
• Inspect for poor connection (such as damaged/<br />
pulled-out pins, corrosion).<br />
• Is there any malfunction?<br />
5 INSPECT IAT SENSOR NO.2 SIGNAL CIRCUIT Yes Repair or replace the wiring harness for a possible short to<br />
FOR SHORT TO GND<br />
GND, then go to Step 8.<br />
• Turn the engine switch off.<br />
No Go to the next step.<br />
• Inspect for continuity between IAT sensor No.2<br />
terminal A (wiring harness-side) and body<br />
GND.<br />
• Is there continuity?<br />
6 INSPECT IAT SENSOR NO.2<br />
Yes Replace the IAT sensor No.2, then go to Step 8.<br />
•<br />
•<br />
Inspect the IAT sensor No.2.<br />
Is there any malfunction?<br />
No Go to the next step.<br />
7 INSPECT PCM CONNECTOR FOR POOR Yes Repair or replace the terminal, then go to the next step.<br />
CONNECTION<br />
No Go to the next step.<br />
• Turn the engine switch off.<br />
• Disconnect the PCM connector.<br />
• Inspect for poor connection (such as damaged/<br />
pulled-out pins, corrosion).<br />
• Is there any malfunction?<br />
8 VERIFY TROUBLESHOOTING OF DTC P0097 Yes Replace the PCM, then go to the next step.<br />
COMPLETED<br />
No Go to the next step.<br />
• Make sure to reconnect all disconnected<br />
connectors.<br />
• Clear the DTC from the PCM memory using<br />
the WDS or equivalent.<br />
• Start the engine.<br />
• Is the same DTC present?<br />
9 VERIFY AFTER REPAIR PROCEDURE<br />
Yes Go to the applicable DTC inspection.<br />
• Perform the Repair Verification Drive Mode.<br />
(See F2–40 DTC TABLE.)<br />
•<br />
(See F2–39 OBD DRIVE MODE.)<br />
Are any DTCs present?<br />
No DTC troubleshooting completed.<br />
DTC P0098 IAT sensor No.2 circuit high input<br />
DETECTION<br />
CONDITION<br />
B6E407000001107<br />
• The PCM monitors the input signal from intake air temperature sensor No.2. If the voltage from intake air<br />
temperature sensor No.2 is more than 4.92 V, the PCM determines that there is a malfunction in the intake<br />
air temperature sensor No.2 circuit.<br />
Diagnostic support note<br />
• The MIL illuminates if the PCM detects the above malfunction condition in the first drive cycle.<br />
• FREEZE FRAME DATA is available.<br />
• The DTC is stored in the PCM memory.<br />
F2–51<br />
F2
DTC P0098 IAT sensor No.2 circuit high input<br />
POSSIBLE<br />
CAUSE<br />
F2–52<br />
ON-BOARD DIAGNOSTIC<br />
• IAT sensor No.2 malfunction<br />
• Connector or terminal malfunction<br />
• Open circuit in wiring harness between IAT sensor No.2 terminal A and PCM terminal 8<br />
• Short to power supply in wiring harness between IAT sensor No.2 terminal A and PCM terminal 8<br />
• Open circuit in wiring harness between IAT sensor No.2 terminal B and PCM terminal 91<br />
• PCM malfunction<br />
IAT SENSOR NO.2 PCM<br />
6<br />
IAT SENSOR NO.2<br />
WIRING HARNESS-SIDE<br />
CONNECTOR<br />
B A<br />
A<br />
B<br />
4<br />
5 8<br />
4 8<br />
91<br />
26 25 24 23 22 21 20 19 18 17 16 15 14<br />
52 51 50 49 48 47 46 45 44 43 42 41 40<br />
78 77 76 75 74 73 72 71 70 69 68 67 66<br />
104 103 102 101 100 99 98 97 96 95 94 93 92<br />
7<br />
7<br />
8<br />
PCM<br />
WIRING HARNESS-SIDE<br />
CONNECTOR<br />
13 12 11 10 9 8 7 6 5 4 3 2 1<br />
39 38 37 36 35 34 33 32 31 30 29 28 27<br />
65 64 63 62 61 60 59 58 57 56 55 54 53<br />
91 90 89 88 87 86 85 84 83 82 81 80 79
ON-BOARD DIAGNOSTIC<br />
Diagnostic procedure<br />
STEP INSPECTION ACTION<br />
1 VERIFY FREEZE FRAME DATA HAS BEEN<br />
RECORDED<br />
• Has FREEZE FRAME DATA been recorded?<br />
2 VERIFY RELATED REPAIR INFORMATION<br />
AVAILABILITY<br />
• Verify related service repair information<br />
availability.<br />
• Is any related repair information available?<br />
3 VERIFY CURRENT SIGNAL STATUS: IS<br />
CONCERN INTERMITTENT OR CONSTANT?<br />
• Connect the WDS or equivalent to the DLC-2.<br />
• Clear the DTC from the PCM memory using<br />
the WDS or equivalent.<br />
• Start the engine.<br />
• Is the same DTC present?<br />
4 INSPECT IAT SENSOR NO.2 CONNECTOR FOR<br />
POOR CONNECTION<br />
• Turn the engine switch off.<br />
• Disconnect the IAT sensor No.2 connector.<br />
• Inspect for poor connection (such as damaged/<br />
pulled-out pins, corrosion).<br />
• Is there any malfunction?<br />
5 INSPECT IAT SENSOR NO.2 SIGNAL CIRCUIT<br />
FOR SHORT TO POWER SUPPLY<br />
• Turn the engine switch to the ON position<br />
(Engine off).<br />
• Measure the voltage between IAT sensor No.2<br />
terminal A (wiring harness-side) and body<br />
GND.<br />
• Is the voltage B+?<br />
6 INSPECT IAT SENSOR NO.2<br />
• Inspect the IAT sensor No.2.<br />
• Is there any malfunction?<br />
7 INSPECT PCM CONNECTOR FOR POOR<br />
CONNECTION<br />
• Turn the engine switch off.<br />
• Disconnect the PCM connector.<br />
• Inspect for poor connection (such as damaged/<br />
pulled-out pins, corrosion).<br />
• Is there any malfunction?<br />
8 INSPECT IAT SENSOR NO.2 CIRCUIT FOR<br />
OPEN CIRCUIT<br />
• Turn the engine switch off.<br />
• Inspect for continuity between the following<br />
terminals:<br />
— IAT sensor No.2 terminal A (wiring harnessside)<br />
and PCM terminal 8 (wiring harnessside)<br />
— IAT sensor No.2 terminal B (wiring harnessside)<br />
and PCM terminal 91 (wiring harnessside)<br />
• Is there continuity?<br />
9 VERIFY TROUBLESHOOTING OF DTC P0098<br />
COMPLETED<br />
• Make sure to reconnect all disconnected<br />
connectors.<br />
• Clear the DTC from the PCM memory using<br />
the WDS or equivalent.<br />
• Start the engine.<br />
• Is the same DTC present?<br />
10 VERIFY AFTER REPAIR PROCEDURE<br />
• Perform the Repair Verification Drive Mode.<br />
(See F2–39 OBD DRIVE MODE.)<br />
• Are any DTCs present?<br />
Yes Go to the next step.<br />
No Record the FREEZE FRAME DATA on the repair order,<br />
then go to the next step.<br />
Yes Perform repair or diagnosis according to the available<br />
repair information.<br />
• If the vehicle is not repaired, go to the next step.<br />
No Go to the next step.<br />
Yes Go to the next step.<br />
No Intermittent concern exists.<br />
Perform the “INTERMITTENT CONCERNS<br />
TROUBLESHOOTING”.<br />
Yes Repair or replace the terminal, then go to Step 9.<br />
No Go to the next step.<br />
Yes Repair or replace the wiring harness for a possible short to<br />
power supply, then go to Step 9.<br />
No Go to the next step.<br />
Yes Replace the IAT sensor No.2, then go to Step 9.<br />
No Go to the next step.<br />
Yes Repair or replace the terminal, then go to Step 9.<br />
No Go to the next step.<br />
Yes Go to the next step.<br />
No Repair or replace the wiring harness for a possible open<br />
circuit, then go to the next step.<br />
Yes Replace the PCM, then go to the next step.<br />
No Go to the next step.<br />
Yes Go to the applicable DTC inspection.<br />
(See F2–40 DTC TABLE.)<br />
No DTC troubleshooting completed.<br />
F2–53<br />
F2
End Of Sie<br />
DTC P0101<br />
F2–54<br />
ON-BOARD DIAGNOSTIC<br />
DTC P0101 Mass air flow (MAF) sensor range/performance problem<br />
DETECTION<br />
CONDITION<br />
POSSIBLE<br />
CAUSE<br />
PCM CONTROL<br />
RELAY WIRING<br />
HARNESS-SIDE<br />
CONNECTOR<br />
A<br />
C<br />
D<br />
E<br />
B6E407000100101<br />
• The PCM monitors the input signal from the mass air flow sensor when the engine speed is between 600<br />
rpm and 2,100 rpm. If the voltage characteristic of the air flow sensor signal is out of the threshold, the<br />
PCM determines that there is a malfunction in the mass air flow sensor.<br />
Diagnostic support note<br />
• The MIL illuminates if the PCM detects the above malfunction condition in two consecutive drive cycles or<br />
in one drive cycle while the DTC for the same malfunction has been stored in the PCM.<br />
• PENDING CODE is available if the PCM detects the above malfunction condition during the first drive<br />
cycle.<br />
• FREEZE FRAME DATA is available.<br />
• The DTC is stored in the PCM memory.<br />
• MAF sensor malfunction<br />
• Connector or terminal malfunction<br />
• PCM malfunction<br />
MAF SENSOR<br />
(MAF/IAT SENSOR)<br />
5<br />
MAF/IAT SENSOR<br />
WIRING HARNESS-SIDE<br />
CONNECTOR<br />
E<br />
D<br />
C<br />
B<br />
A<br />
A<br />
C<br />
B<br />
4<br />
4<br />
4<br />
PCM CONTROL RELAY<br />
TERMINAL C<br />
26 25 24 23 22 21 20 19 18 17 16 15 14<br />
52 51 50 49 48 47 46 45 44 43 42 41 40<br />
78 77 76 75 74 73 72 71 70 69 68 67 66<br />
104 103 102 101 100 99 98 97 96 95 94 93 92<br />
6<br />
6<br />
9<br />
14<br />
PCM<br />
PCM<br />
WIRING HARNESS-SIDE<br />
CONNECTOR<br />
13 12 11 10 9 8 7 6 5 4 3 2 1<br />
39 38 37 36 35 34 33 32 31 30 29 28 27<br />
65 64 63 62 61 60 59 58 57 56 55 54 53<br />
91 90 89 88 87 86 85 84 83 82 81 80 79
End Of Sie<br />
DTC P0102<br />
ON-BOARD DIAGNOSTIC<br />
Diagnostic procedure<br />
STEP INSPECTION ACTION<br />
1 VERIFY FREEZE FRAME DATA HAS BEEN Yes Go to the next step.<br />
RECORDED<br />
No Record the FREEZE FRAME DATA on the repair order,<br />
• Has FREEZE FRAME DATA been recorded? then go to the next step.<br />
2 VERIFY RELATED REPAIR INFORMATION Yes Perform repair or diagnosis according to the available<br />
AVAILABILITY<br />
repair information.<br />
• Verify related service repair information<br />
• If the vehicle is not repaired, go to the next step.<br />
availability.<br />
No Go to the next step.<br />
• Is any related repair information available?<br />
3 VERIFY CURRENT SIGNAL STATUS: IS Yes Go to the next step.<br />
CONCERN INTERMITTENT OR CONSTANT? No Intermittent concern exists.<br />
• Connect the WDS or equivalent to the DLC-2. Perform the “INTERMITTENT CONCERNS<br />
• Clear the DTC from the PCM memory using<br />
the WDS or equivalent.<br />
TROUBLESHOOTING”.<br />
• Start the engine.<br />
• Perform the Repair Verification Drive Mode.<br />
(See F2–39 OBD DRIVE MODE.)<br />
• Is the PENDING CODE for this DTC present?<br />
4 INSPECT MAF SENSOR CONNECTOR FOR Yes Repair or replace the terminal, then go to Step 7.<br />
POOR CONNECTION<br />
No Go to the next step.<br />
• Turn the engine switch off.<br />
• Disconnect the MAF sensor connector.<br />
• Inspect for poor connection (such as damaged/<br />
pulled-out pins, corrosion).<br />
• Is there any malfunction?<br />
5 INSPECT MAF SENSOR<br />
Yes Replace the MAF/IAT sensor, then go to Step 7.<br />
•<br />
•<br />
Inspect the MAF sensor.<br />
Is there any malfunction?<br />
No Go to the next step.<br />
6 INSPECT PCM CONNECTOR FOR POOR Yes Repair or replace the terminal, then go to the next step.<br />
CONNECTION<br />
No Go to the next step.<br />
• Turn the engine switch off.<br />
• Disconnect the PCM connector.<br />
• Inspect for poor connection (such as damaged/<br />
pulled-out pins, corrosion).<br />
• Is there any malfunction?<br />
7 VERIFY TROUBLESHOOTING OF DTC P0101 Yes Replace the PCM, then go to the next step.<br />
COMPLETED<br />
No Go to the next step.<br />
• Make sure to reconnect all disconnected<br />
connectors.<br />
• Clear the DTC from the PCM memory using<br />
the WDS or equivalent.<br />
• Perform the Repair Verification Drive Mode.<br />
(See F2–39 OBD DRIVE MODE.)<br />
• Is the PENDING CODE for this DTC present?<br />
8 VERIFY AFTER REPAIR PROCEDURE<br />
Yes Go to the applicable DTC inspection.<br />
• Perform the “AFTER REPAIR PROCEDURE”. (See F2–40 DTC TABLE.)<br />
• Are any DTCs present?<br />
No DTC troubleshooting completed.<br />
DTC P0102 Mass air flow (MAF) sensor circuit low input<br />
DETECTION<br />
CONDITION<br />
POSSIBLE<br />
CAUSE<br />
B6E407000100102<br />
• The PCM monitors the input signal from the air flow sensor. If the voltage from the air flow sensor is less<br />
than 0.15 V, the PCM determines that there is a malfunction in the air flow sensor circuit.<br />
Diagnostic support note<br />
• The MIL illuminates if the PCM detects the above malfunction condition in the first drive cycle.<br />
• FREEZE FRAME DATA is available.<br />
• The DTC is stored in the PCM memory.<br />
• MAF sensor malfunction<br />
• Connector or terminal malfunction<br />
• Open circuit in wiring harness between PCM control relay terminal C and MAF/IAT sensor terminal A<br />
• Open circuit in wiring harness between MAF/IAT sensor terminal C and PCM terminal 9<br />
• Short to GND in wiring harness between MAF/IAT sensor terminal C and PCM terminal 9<br />
• PCM malfunction<br />
F2–55<br />
F2
F2–56<br />
ON-BOARD DIAGNOSTIC<br />
DTC P0102 Mass air flow (MAF) sensor circuit low input<br />
PCM CONTROL<br />
RELAY WIRING<br />
HARNESS-SIDE<br />
CONNECTOR<br />
A<br />
C<br />
D<br />
E<br />
MAF SENSOR<br />
(MAF/IAT SENSOR)<br />
7<br />
MAF/IAT SENSOR<br />
WIRING HARNESS-SIDE<br />
CONNECTOR<br />
E<br />
D<br />
C<br />
B<br />
A<br />
A<br />
C<br />
B<br />
4 5<br />
4 6 9<br />
4<br />
PCM CONTROL<br />
RELAY<br />
TERMINAL C<br />
26 25 24 23 22 21 20 19 18 17 16 15 14<br />
52 51 50 49 48 47 46 45 44 43 42 41 40<br />
78 77 76 75 74 73 72 71 70 69 68 67 66<br />
104 103 102 101 100 99 98 97 96 95 94 93 92<br />
8<br />
8<br />
9<br />
14<br />
PCM<br />
PCM<br />
WIRING HARNESS-SIDE<br />
CONNECTOR<br />
13 12 11 10 9 8 7 6 5 4 3 2 1<br />
39 38 37 36 35 34 33 32 31 30 29 28 27<br />
65 64 63 62 61 60 59 58 57 56 55 54 53<br />
91 90 89 88 87 86 85 84 83 82 81 80 79
ON-BOARD DIAGNOSTIC<br />
Diagnostic procedure<br />
STEP INSPECTION ACTION<br />
1 VERIFY FREEZE FRAME DATA HAS BEEN<br />
RECORDED<br />
• Has FREEZE FRAME DATA been recorded?<br />
2 VERIFY RELATED REPAIR INFORMATION<br />
AVAILABILITY<br />
• Verify related service repair information<br />
availability.<br />
• Is any related repair information available?<br />
3 VERIFY CURRENT SIGNAL STATUS: IS<br />
CONCERN INTERMITTENT OR CONSTANT?<br />
• Connect the WDS or equivalent to the DLC-2.<br />
• Clear the DTC from the PCM memory using<br />
the WDS or equivalent.<br />
• Start the engine.<br />
• Is the same DTC present?<br />
4 INSPECT MAF/IAT SENSOR CONNECTOR FOR<br />
POOR CONNECTION<br />
• Turn the engine switch off.<br />
• Disconnect the MAF/IAT sensor connector.<br />
• Inspect for poor connection (such as damaged/<br />
pulled-out pins, corrosion).<br />
• Is there any malfunction?<br />
5 INSPECT MAF SENSOR POWER CIRCUIT FOR<br />
OPEN CIRCUIT<br />
• Turn the engine switch to the ON position<br />
(Engine off).<br />
• Measure the voltage between MAF/IAT sensor<br />
terminal A (wiring harness-side) and body<br />
GND.<br />
• Is the voltage B+?<br />
6 INSPECT MAF SENSOR SIGNAL CIRCUIT FOR<br />
SHORT TO GND<br />
• Turn the engine switch off.<br />
• Inspect for continuity between MAF/IAT sensor<br />
terminal C (wiring harness-side) and body<br />
GND.<br />
• Is there continuity?<br />
7 INSPECT MAF SENSOR<br />
• Inspect the MAF sensor.<br />
• Is there any malfunction?<br />
8 INSPECT PCM CONNECTOR FOR POOR<br />
CONNECTION<br />
• Turn the engine switch off.<br />
• Disconnect the PCM connector.<br />
• Inspect for poor connection (such as damaged/<br />
pulled-out pins, corrosion).<br />
• Is there any malfunction?<br />
9 INSPECT MAF SENSOR SIGNAL CIRCUIT FOR<br />
OPEN CIRCUIT<br />
• Turn the engine switch off.<br />
• Inspect for continuity between MAF/IAT sensor<br />
terminal C (wiring harness-side) and PCM<br />
terminal 9 (wiring harness-side).<br />
• Is there continuity?<br />
10 VERIFY TROUBLESHOOTING OF DTC P0102<br />
COMPLETED<br />
• Make sure to reconnect all disconnected<br />
connectors.<br />
• Clear the DTC from the PCM memory using<br />
the WDS or equivalent.<br />
• Start the engine.<br />
• Is the same DTC present?<br />
Yes Go to the next step.<br />
No Record the FREEZE FRAME DATA on the repair order,<br />
then go to the next step.<br />
Yes Perform repair or diagnosis according to the available<br />
repair information.<br />
• If the vehicle is not repaired, go to the next step.<br />
No Go to the next step.<br />
Yes Go to the next step.<br />
No Intermittent concern exists.<br />
Perform the “INTERMITTENT CONCERNS<br />
TROUBLESHOOTING”.<br />
Yes Repair or replace the terminal, then go to Step 10.<br />
No Go to the next step.<br />
Yes Go to the next step.<br />
No Repair or replace the wiring harness for a possible open<br />
circuit or short to GND, then go to Step 10.<br />
Yes Repair or replace the wiring harness for a possible short to<br />
GND, then go to Step 10.<br />
No Go to the next step.<br />
Yes Replace the MAF/IAT sensor, then go to Step 10.<br />
No Go to the next step.<br />
Yes Repair or replace the terminal, then go to Step 10.<br />
No Go to the next step.<br />
Yes Go to the next step.<br />
No Repair or replace the wiring harness for a possible open<br />
circuit, then go to the next step.<br />
Yes Replace the PCM, then go to the next step.<br />
No Go to the next step.<br />
F2–57<br />
F2
11 VERIFY AFTER REPAIR PROCEDURE<br />
• Perform the Repair Verification Drive Mode.<br />
(See F2–39 OBD DRIVE MODE.)<br />
• Are any DTCs present?<br />
End Of Sie<br />
DTC P0103<br />
F2–58<br />
ON-BOARD DIAGNOSTIC<br />
STEP INSPECTION ACTION<br />
DTC P0103 Mass air flow (MAF) sensor circuit high input<br />
DETECTION<br />
CONDITION<br />
POSSIBLE<br />
CAUSE<br />
PCM CONTROL<br />
RELAY WIRING<br />
HARNESS-SIDE<br />
CONNECTOR<br />
A<br />
C<br />
D<br />
E<br />
Yes Go to the applicable DTC inspection.<br />
(See F2–40 DTC TABLE.)<br />
No DTC troubleshooting completed.<br />
B6E407000100103<br />
• The PCM monitors the input signal from the air flow sensor. If the voltage from the air flow sensor is more<br />
than 4.9 V, the PCM determines that there is a malfunction in the intake air temperature sensor No. 2<br />
circuit.<br />
Diagnostic support note<br />
• The MIL illuminates if the PCM detects the above malfunction condition in the first drive cycle.<br />
• FREEZE FRAME DATA is available.<br />
• The DTC is stored in the PCM memory.<br />
• MAF sensor malfunction<br />
• Connector or terminal malfunction<br />
• Short to power supply in wiring harness between MAF/IAT sensor terminal C and PCM terminal 9<br />
• Open circuit in wiring harness between MAF/IAT sensor terminal B and PCM terminal 14<br />
• PCM malfunction<br />
MAF SENSOR<br />
(MAF/IAT SENSOR)<br />
6<br />
MAF/IAT SENSOR<br />
WIRING HARNESS-SIDE<br />
CONNECTOR<br />
E<br />
D<br />
C<br />
B<br />
A<br />
A<br />
C<br />
B<br />
4<br />
PCM CONTROL<br />
RELAY<br />
TERMINAL C<br />
4 5<br />
4 8<br />
26 25 24 23 22 21 20 19 18 17 16 15 14<br />
52 51 50 49 48 47 46 45 44 43 42 41 40<br />
78 77 76 75 74 73 72 71 70 69 68 67 66<br />
104 103 102 101 100 99 98 97 96 95 94 93 92<br />
7<br />
7<br />
9<br />
14<br />
PCM<br />
PCM<br />
WIRING HARNESS-SIDE<br />
CONNECTOR<br />
13 12 11 10 9 8 7 6 5 4 3 2 1<br />
39 38 37 36 35 34 33 32 31 30 29 28 27<br />
65 64 63 62 61 60 59 58 57 56 55 54 53<br />
91 90 89 88 87 86 85 84 83 82 81 80 79
End Of Sie<br />
ON-BOARD DIAGNOSTIC<br />
Diagnostic procedure<br />
STEP INSPECTION ACTION<br />
1 VERIFY FREEZE FRAME DATA HAS BEEN Yes Go to the next step.<br />
RECORDED<br />
No Record the FREEZE FRAME DATA on the repair order,<br />
• Has FREEZE FRAME DATA been recorded? then go to the next step.<br />
2 VERIFY RELATED REPAIR INFORMATION Yes Perform repair or diagnosis according to the available<br />
AVAILABILITY<br />
repair information.<br />
• Verify related service repair information<br />
• If the vehicle is not repaired, go to the next step.<br />
availability.<br />
No Go to the next step.<br />
• Is any related repair information available?<br />
3 VERIFY CURRENT SIGNAL STATUS: IS Yes Go to the next step.<br />
CONCERN INTERMITTENT OR CONSTANT? No Intermittent concern exists.<br />
• Connect the WDS or equivalent to the DLC-2. Perform the “INTERMITTENT CONCERNS<br />
• Clear the DTC from the PCM memory using<br />
the WDS or equivalent.<br />
TROUBLESHOOTING”.<br />
• Start the engine.<br />
• Is the same DTC present?<br />
4 INSPECT MAF/IAT SENSOR CONNECTOR FOR Yes Repair or replace the terminal, then go to Step 9.<br />
POOR CONNECTION<br />
No Go to the next step.<br />
• Turn the engine switch off.<br />
• Disconnect the MAF/IAT sensor connector.<br />
• Inspect for poor connection (such as damaged/<br />
pulled-out pins, corrosion).<br />
• Is there any malfunction?<br />
5 INSPECT MAF SENSOR SIGNAL CIRCUIT FOR Yes Repair or replace the wiring harness for a possible short to<br />
SHORT TO POWER SUPPLY<br />
power supply, then go to Step 9.<br />
• Turn the engine switch to the ON position<br />
(Engine off).<br />
No Go to the next step.<br />
• Measure the voltage between MAF/IAT sensor<br />
terminal C (wiring harness-side) and body<br />
GND.<br />
• Is the voltage more than 4.9 V?<br />
6 INSPECT MAF SENSOR<br />
Yes Replace the MAF/IAT sensor, then go to Step 9.<br />
•<br />
•<br />
Inspect the MAF sensor.<br />
Is there any malfunction?<br />
No Go to the next step.<br />
7 INSPECT PCM CONNECTOR FOR POOR Yes Repair or replace the terminal, then go to Step 9.<br />
CONNECTION<br />
No Go to the next step.<br />
• Turn the engine switch off.<br />
• Disconnect the PCM connector.<br />
• Inspect for poor connection (such as damaged/<br />
pulled-out pins, corrosion).<br />
• Is there any malfunction?<br />
8 INSPECT MAF SENSOR GND CIRCUIT FOR Yes Go to the next step.<br />
OPEN CIRCUIT<br />
No Repair or replace the wiring harness for a possible open<br />
• Turn the engine switch off.<br />
circuit, then go to the next step.<br />
• Inspect for continuity between MAF/IAT sensor<br />
terminal B (wiring harness-side) and PCM<br />
terminal 14 (wiring harness-side).<br />
• Is there continuity?<br />
9 VERIFY TROUBLESHOOTING OF DTC P0103 Yes Replace the PCM, then go to the next step.<br />
COMPLETED<br />
No Go to the next step.<br />
• Make sure to reconnect all disconnected<br />
connectors.<br />
• Clear the DTC from the PCM memory using<br />
the WDS or equivalent.<br />
• Start the engine.<br />
• Is the same DTC present?<br />
10 VERIFY AFTER REPAIR PROCEDURE<br />
Yes Go to the applicable DTC inspection.<br />
• Perform the Repair Verification Drive Mode.<br />
(See F2–40 DTC TABLE.)<br />
•<br />
(See F2–39 OBD DRIVE MODE.)<br />
Are any DTCs present?<br />
No DTC troubleshooting completed.<br />
F2–59<br />
F2
DTC P0106<br />
DTC P0106 Boost sensor range/performance problem<br />
DETECTION<br />
CONDITION<br />
POSSIBLE<br />
CAUSE<br />
F2–60<br />
ON-BOARD DIAGNOSTIC<br />
B6E407000100104<br />
• The PCM monitors the vacuum inside the intake manifold. If the difference of the vacuum inside the intake<br />
manifold during middle engine speed and low engine speed is less than the threshold, the PCM determines<br />
that there is a malfunction in the manifold absolute pressure sensor characteristic.<br />
Diagnostic support note<br />
• The MIL illuminates if the PCM detects the above malfunction condition in two consecutive drive cycles or<br />
in one drive cycle while the DTC for the same malfunction has been stored in the PCM.<br />
• PENDING CODE is available if the PCM detects the above malfunction condition.<br />
• FREEZE FRAME DATA is available.<br />
• The DTC is stored in the PCM memory.<br />
• Boost sensor malfunction<br />
• Connector or terminal malfunction<br />
• PCM malfunction<br />
BOOST SENSOR<br />
WIRING HARNESS-SIDE<br />
CONNECTOR<br />
C<br />
B<br />
A<br />
BOOST SENSOR<br />
5<br />
C<br />
B<br />
A<br />
4<br />
4<br />
4<br />
6<br />
6<br />
6<br />
90<br />
36<br />
91<br />
26 25 24 23 22 21 20 19 18 17 16 15 14<br />
52 51 50 49 48 47 46 45 44 43 42 41 40<br />
78 77 76 75 74 73 72 71 70 69 68 67 66<br />
104<br />
103 102 101 100 99 98 97 96 95 94 93 92<br />
PCM<br />
PCM<br />
WIRING HARNESS-SIDE<br />
CONNECTOR<br />
13 12 11 10 9 8 7 6 5 4 3 2 1<br />
39 38 37 36 35 34 33 32 31 30 29 28 27<br />
65 64 63 62 61 60 59 58 57 56 55 54 53<br />
91 90 89 88 87 86 85 84 83 82 81 80 79
End Of Sie<br />
DTC P0107<br />
ON-BOARD DIAGNOSTIC<br />
Diagnostic procedure<br />
STEP INSPECTION ACTION<br />
1 VERIFY FREEZE FRAME DATA HAS BEEN Yes Go to the next step.<br />
RECORDED<br />
No Record the FREEZE FRAME DATA on the repair order,<br />
• Has FREEZE FRAME DATA been recorded? then go to the next step.<br />
2 VERIFY RELATED REPAIR INFORMATION Yes Perform repair or diagnosis according to the available<br />
AVAILABILITY<br />
repair information.<br />
• Verify related service repair information<br />
• If the vehicle is not repaired, go to the next step.<br />
availability.<br />
No Go to the next step.<br />
• Is any related repair information available?<br />
3 VERIFY CURRENT SIGNAL STATUS: IS Yes Go to the next step.<br />
CONCERN INTERMITTENT OR CONSTANT? No Intermittent concern exists.<br />
• Connect the WDS or equivalent to the DLC-2. Perform the “INTERMITTENT CONCERNS<br />
• Clear the DTC from the PCM memory using<br />
the WDS or equivalent.<br />
TROUBLESHOOTING”.<br />
• Start the engine.<br />
• Is the PENDING CODE for this DTC present?<br />
4 INSPECT BOOST SENSOR CONNECTOR FOR Yes Repair or replace the terminal, then go to Step 7.<br />
POOR CONNECTION<br />
No Go to the next step.<br />
• Turn the engine switch off.<br />
• Disconnect the boost sensor connector.<br />
• Inspect for poor connection (such as damaged/<br />
pulled-out pins, corrosion).<br />
• Is there any malfunction?<br />
5 INSPECT BOOST SENSOR<br />
Yes Replace the boost sensor, then go to Step 7.<br />
•<br />
•<br />
Inspect the boost sensor.<br />
Is there any malfunction?<br />
No Go to the next step.<br />
6 INSPECT PCM CONNECTOR FOR POOR Yes Repair or replace the terminal, then go to the next step.<br />
CONNECTION<br />
No Go to the next step.<br />
• Turn the engine switch off.<br />
• Disconnect the PCM connector.<br />
• Inspect for poor connection (such as damaged/<br />
pulled-out pins, corrosion).<br />
• Is there any malfunction?<br />
7 VERIFY TROUBLESHOOTING OF DTC P0106 Yes Replace the PCM, then go to the next step.<br />
COMPLETED<br />
No Go to the next step.<br />
• Make sure to reconnect all disconnected<br />
connectors.<br />
• Clear the DTC from the PCM memory using<br />
the WDS or equivalent.<br />
• Perform the Repair Verification Drive Mode.<br />
(See F2–39 OBD DRIVE MODE.)<br />
• Is the PENDING CODE for this DTC present?<br />
8 VERIFY AFTER REPAIR PROCEDURE<br />
Yes Go to the applicable DTC inspection.<br />
• Are any DTCs present?<br />
(See F2–40 DTC TABLE.)<br />
No DTC troubleshooting completed.<br />
DTC P0107 Boost sensor circuit low input<br />
DETECTION<br />
CONDITION<br />
POSSIBLE<br />
CAUSE<br />
B6E407000100105<br />
• The PCM monitors the input signal from the manifold absolute pressure. If the voltage from the manifold<br />
absolute pressure sensor is less than 0.4 V, the PCM determines that there is a malfunction in the<br />
manifold absolute pressure sensor circuit.<br />
Diagnostic support note<br />
• The MIL illuminates if the PCM detects the above malfunction condition in the first drive cycle.<br />
• FREEZE FRAME DATA is available.<br />
• The DTC is stored in the PCM memory.<br />
• Boost sensor malfunction<br />
• Connector or terminal malfunction<br />
• Short to GND in wiring harness between boost sensor terminal C and PCM terminal 90<br />
• Short to GND in wiring harness between boost sensor terminal B and PCM terminal 36<br />
• PCM malfunction<br />
F2–61<br />
F2
F2–62<br />
ON-BOARD DIAGNOSTIC<br />
DTC P0107 Boost sensor circuit low input<br />
90<br />
36<br />
91<br />
C<br />
B<br />
A<br />
4 5<br />
5<br />
4<br />
4<br />
6<br />
7<br />
7<br />
7<br />
BOOST SENSOR<br />
PCM<br />
BOOST SENSOR<br />
WIRING HARNESS-SIDE<br />
CONNECTOR<br />
PCM<br />
WIRING HARNESS-SIDE<br />
CONNECTOR<br />
A<br />
B<br />
C<br />
1<br />
2<br />
3<br />
4<br />
5<br />
6<br />
7<br />
8<br />
9<br />
10<br />
11<br />
12<br />
13<br />
14<br />
15<br />
16<br />
17<br />
18<br />
19<br />
20<br />
21<br />
22<br />
23<br />
24<br />
25<br />
26<br />
27<br />
28<br />
29<br />
30<br />
53<br />
54<br />
55<br />
56<br />
57<br />
58<br />
59<br />
60<br />
79<br />
80<br />
81<br />
82<br />
83<br />
84<br />
85<br />
86<br />
87<br />
88<br />
89<br />
90<br />
31<br />
32<br />
33<br />
34<br />
35<br />
36<br />
37<br />
38<br />
39<br />
40<br />
61<br />
62<br />
63<br />
64<br />
65<br />
66<br />
67<br />
68<br />
69<br />
70<br />
91<br />
92<br />
94 93<br />
95<br />
96<br />
97<br />
98<br />
99<br />
100<br />
41<br />
42<br />
43<br />
44<br />
45<br />
46<br />
47<br />
48<br />
49<br />
50<br />
71<br />
72<br />
73<br />
74<br />
75<br />
76<br />
77<br />
78<br />
51<br />
52<br />
101<br />
102<br />
103<br />
104
End Of Sie<br />
ON-BOARD DIAGNOSTIC<br />
Diagnostic procedure<br />
STEP INSPECTION ACTION<br />
1 VERIFY FREEZE FRAME DATA HAS BEEN Yes Go to the next step.<br />
RECORDED<br />
No Record the FREEZE FRAME DATA on the repair order,<br />
• Has FREEZE FRAME DATA been recorded? then go to the next step.<br />
2 VERIFY RELATED REPAIR INFORMATION Yes Perform repair or diagnosis according to the available<br />
AVAILABILITY<br />
repair information.<br />
• Verify related service repair information<br />
• If the vehicle is not repaired, go to the next step.<br />
availability.<br />
No Go to the next step.<br />
• Is any related repair information available?<br />
3 VERIFY CURRENT SIGNAL STATUS: IS Yes Go to the next step.<br />
CONCERN INTERMITTENT OR CONSTANT? No Intermittent concern exists.<br />
• Connect the WDS or equivalent to the DLC-2. Perform the “INTERMITTENT CONCERNS<br />
• Clear the DTC from the PCM memory using<br />
the WDS or equivalent.<br />
TROUBLESHOOTING”.<br />
• Start the engine.<br />
• Is the same DTC present?<br />
4 INSPECT BOOST SENSOR CONNECTOR FOR Yes Repair or replace the terminal, then go to Step 8.<br />
POOR CONNECTION<br />
No Go to the next step.<br />
• Turn the engine switch off.<br />
• Disconnect the boost sensor connector.<br />
• Inspect for poor connection (such as damaged/<br />
pulled-out pins, corrosion).<br />
• Is there any malfunction?<br />
5 INSPECT BOOST SENSOR CIRCUIT FOR Yes Repair or replace the wiring harness for a possible short to<br />
SHORT TO GND<br />
GND, then go to Step 8.<br />
• Turn the engine switch off.<br />
No Go to the next step.<br />
• Inspect for continuity between the following<br />
terminals and body GND:<br />
— Boost sensor terminal C (wiring harnessside)<br />
and body GND<br />
— Boost sensor terminal B (wiring harnessside)<br />
and body GND<br />
• Is there continuity?<br />
6 INSPECT BOOST SENSOR<br />
Yes Replace the boost sensor, then go to Step 8.<br />
•<br />
•<br />
Inspect the boost sensor.<br />
Is there any malfunction?<br />
No Go to the next step.<br />
7 INSPECT PCM CONNECTOR FOR POOR Yes Repair or replace the terminal, then go to Step 8.<br />
CONNECTION<br />
No Go to the next step.<br />
• Turn the engine switch off.<br />
• Disconnect the PCM connector.<br />
• Inspect for poor connection (such as damaged/<br />
pulled-out pins, corrosion).<br />
• Is there any malfunction?<br />
8 VERIFY TROUBLESHOOTING OF DTC P0107 Yes Replace the PCM, then go to the next step.<br />
COMPLETED<br />
No Go to the next step.<br />
• Make sure to reconnect all disconnected<br />
connectors.<br />
• Clear the DTC from the PCM memory using<br />
the WDS or equivalent.<br />
• Start the engine.<br />
• Is the same DTC present?<br />
9 VERIFY AFTER REPAIR PROCEDURE<br />
Yes Go to the applicable DTC inspection.<br />
• Perform the Repair Verification Drive Mode.<br />
(See F2–40 DTC TABLE.)<br />
•<br />
(See F2–39 OBD DRIVE MODE.)<br />
Are any DTCs present?<br />
No DTC troubleshooting completed.<br />
F2–63<br />
F2
DTC P0108<br />
DTC P0108 Boost sensor circuit high input<br />
DETECTION<br />
CONDITION<br />
POSSIBLE<br />
CAUSE<br />
F2–64<br />
ON-BOARD DIAGNOSTIC<br />
B6E407000100106<br />
• The PCM monitors the input signal from the manifold absolute pressure sensor. If the voltage from the<br />
manifold absolute pressure sensor is more than 4.8 V, the PCM determines that there is a malfunction in<br />
the manifold absolute pressure sensor circuit.<br />
Diagnostic support note<br />
• The MIL illuminates if the PCM detects the above malfunction condition in the first drive cycle.<br />
• FREEZE FRAME DATA is available.<br />
• The DTC is stored in the PCM memory.<br />
• Boost sensor malfunction<br />
• Connector or terminal malfunction<br />
• Short to power supply in wiring harness between boost sensor terminal B and PCM terminal 36<br />
• Short to power supply in wiring harness between boost sensor terminal C and PCM terminal 90<br />
• Open circuit in wiring harness between boost sensor terminal A and PCM terminal 91<br />
• PCM malfunction<br />
BOOST SENSOR<br />
WIRING HARNESS-SIDE<br />
CONNECTOR<br />
C<br />
B<br />
A<br />
BOOST SENSOR<br />
6<br />
C<br />
B<br />
A<br />
4<br />
4 5<br />
4 8<br />
7<br />
7<br />
7<br />
90<br />
36<br />
91<br />
26 25 24 23 22 21 20 19 18 17 16 15 14<br />
52 51 50 49 48 47 46 45 44 43 42 41 40<br />
78 77 76 75 74 73 72 71 70 69 68 67 66<br />
104<br />
103 102 101 100 99 98 97 96 95 94 93 92<br />
PCM<br />
PCM<br />
WIRING HARNESS-SIDE<br />
CONNECTOR<br />
13 12 11 10 9 8 7 6 5 4 3 2 1<br />
39 38 37 36 35 34 33 32 31 30 29 28 27<br />
65 64 63 62 61 60 59 58 57 56 55 54 53<br />
91 90 89 88 87 86 85 84 83 82 81 80 79
End Of Sie<br />
ON-BOARD DIAGNOSTIC<br />
Diagnostic procedure<br />
STEP INSPECTION ACTION<br />
1 VERIFY FREEZE FRAME DATA HAS BEEN Yes Go to the next step.<br />
RECORDED<br />
No Record the FREEZE FRAME DATA on the repair order,<br />
• Has FREEZE FRAME DATA been recorded? then go to the next step.<br />
2 VERIFY RELATED REPAIR INFORMATION Yes Perform repair or diagnosis according to the available<br />
AVAILABILITY<br />
repair information.<br />
• Verify related service repair information<br />
• If the vehicle is not repaired, go to the next step.<br />
availability.<br />
No Go to the next step.<br />
• Is any related repair information available?<br />
3 VERIFY CURRENT SIGNAL STATUS: IS Yes Go to the next step.<br />
CONCERN INTERMITTENT OR CONSTANT? No Intermittent concern exists.<br />
• Connect the WDS or equivalent to the DLC-2. Perform the “INTERMITTENT CONCERNS<br />
• Clear the DTC from the PCM memory using<br />
the WDS or equivalent.<br />
TROUBLESHOOTING”.<br />
• Start the engine.<br />
• Is the same DTC present?<br />
4 INSPECT BOOST SENSOR CONNECTOR FOR Yes Repair or replace the terminal, then go to Step 9.<br />
POOR CONNECTION<br />
No Go to the next step.<br />
• Turn the engine switch off.<br />
• Disconnect the boost sensor connector.<br />
• Inspect for poor connection (such as damaged/<br />
pulled-out pins, corrosion).<br />
• Is there any malfunction?<br />
5 INSPECT BOOST SENSOR SIGNAL CIRCUIT Yes Repair or replace the wiring harness for a possible short to<br />
FOR SHORT TO POWER SUPPLY<br />
power supply, then go to Step 9.<br />
• Turn the engine switch to the ON position<br />
(Engine off).<br />
No Go to the next step.<br />
• Measure the voltage between the following<br />
terminals:<br />
— Boost sensor terminal B (wiring harnessside)<br />
and body GND<br />
— Boost sensor terminal C (wiring harnessside)<br />
and body GND<br />
• Is the voltage more than 4.8 V?<br />
6 INSPECT BOOST SENSOR<br />
Yes Replace the boost sensor, then go to Step 9.<br />
•<br />
•<br />
Turn the engine switch off.<br />
Inspect the boost sensor.<br />
No Go to the next step.<br />
• Is there any malfunction?<br />
7 INSPECT PCM CONNECTOR FOR POOR Yes Repair or replace the terminal, then go to Step 9.<br />
CONNECTION<br />
No Go to the next step.<br />
• Turn the engine switch off.<br />
• Disconnect the PCM connector.<br />
• Inspect for poor connection (such as damaged/<br />
pulled-out pins, corrosion).<br />
• Is there any malfunction?<br />
8 INSPECT BOOST SENSOR GND CIRCUIT FOR Yes Go to the next step.<br />
OPEN CIRCUIT<br />
No Repair or replace the wiring harness for an open circuit,<br />
• Turn the engine switch off.<br />
then go to the next step.<br />
• Inspect for continuity between boost sensor<br />
terminal A and PCM terminal 91.<br />
• Is there continuity?<br />
9 VERIFY TROUBLESHOOTING OF DTC P0108 Yes Replace the PCM, then go to the next step.<br />
COMPLETED<br />
No Go to the next step.<br />
• Make sure to reconnect all disconnected<br />
connectors.<br />
• Clear the DTC from the PCM memory using<br />
the WDS or equivalent.<br />
• Start the engine.<br />
• Is the same DTC present?<br />
10 VERIFY AFTER REPAIR PROCEDURE<br />
Yes Go to the applicable DTC inspection.<br />
• Perform the Repair Verification Drive Mode.<br />
(See F2–40 DTC TABLE.)<br />
•<br />
(See F2–39 OBD DRIVE MODE.)<br />
Are any DTCs present?<br />
No DTC troubleshooting completed.<br />
F2–65<br />
F2
DTC P0111<br />
F2–66<br />
ON-BOARD DIAGNOSTIC<br />
DTC P0111 Intake air temperature (IAT) sensor No.1 range/performance problem<br />
DETECTION<br />
CONDITION<br />
POSSIBLE<br />
CAUSE<br />
E<br />
D<br />
B6E407000100107<br />
• The PCM monitors the input signal from intake air temperature sensor No.1. If the difference between the<br />
maximum and minimum value of the intake air temperature sensor No.1 is less than 1 °C {1.8 °F}, the<br />
PCM determines that there is a malfunction in intake air temperature sensor No.1.<br />
Diagnostic support note<br />
• The MIL illuminates if the PCM detects the above malfunction condition in two consecutive drive cycles or<br />
in one drive cycle while the DTC for the same malfunction has been stored in the PCM.<br />
• PENDING CODE is available if the PCM detects the above malfunction condition during the first drive<br />
cycle.<br />
• FREEZE FRAME DATA is available.<br />
• The DTC is stored in the PCM memory.<br />
• IAT sensor No.1 malfunction<br />
• Connector or terminal malfunction<br />
• PCM malfunction<br />
MAF/IAT SENSOR<br />
WIRING HARNESS-SIDE<br />
CONNECTOR<br />
C<br />
B<br />
A<br />
IAT SENSOR NO.1<br />
(MAF/IAT SENSOR)<br />
5<br />
D<br />
E<br />
4<br />
4<br />
60<br />
91<br />
26 25 24 23 22 21 20 19 18 17 16 15 14<br />
52 51 50 49 48 47 46 45 44 43 42 41 40<br />
78 77 76 75 74 73 72 71 70 69 68 67 66<br />
104 103 102 101 100 99 98 97 96 95 94 93 92<br />
6<br />
6<br />
PCM<br />
PCM<br />
WIRING HARNESS-SIDE<br />
CONNECTOR<br />
13 12 11 10 9 8 7 6 5 4 3 2 1<br />
39 38 37 36 35 34 33 32 31 30 29 28 27<br />
65 64 63 62 61 60 59 58 57 56 55 54 53<br />
91 90 89 88 87 86 85 84 83 82 81 80 79
End Of Sie<br />
DTC P0112<br />
ON-BOARD DIAGNOSTIC<br />
Diagnostic procedure<br />
STEP INSPECTION ACTION<br />
1 VERIFY FREEZE FRAME DATA HAS BEEN Yes Go to the next step.<br />
RECORDED<br />
No Record the FREEZE FRAME DATA on the repair order,<br />
• Has FREEZE FRAME DATA been recorded? then go to the next step.<br />
2 VERIFY RELATED REPAIR INFORMATION Yes Perform repair or diagnosis according to the available<br />
AVAILABILITY<br />
repair information.<br />
• Verify related service repair information<br />
• If the vehicle is not repaired, go to the next step.<br />
availability.<br />
No Go to the next step.<br />
• Is any related repair information available?<br />
3 VERIFY CURRENT SIGNAL STATUS: IS Yes Go to the next step.<br />
CONCERN INTERMITTENT OR CONSTANT? No Intermittent concern exists.<br />
• Connect the WDS or equivalent to the DLC-2. Perform the “INTERMITTENT CONCERNS<br />
• Clear the DTC from the PCM memory using<br />
the WDS or equivalent.<br />
TROUBLESHOOTING”.<br />
• Start the engine.<br />
• Is the same DTC present?<br />
4 INSPECT MAF/IAT SENSOR CONNECTOR FOR Yes Repair or replace the terminal, then go to Step 7.<br />
POOR CONNECTION<br />
No Go to the next step.<br />
• Turn the engine switch off.<br />
• Disconnect the MAF/IAT sensor connector.<br />
• Inspect for poor connection (such as damaged/<br />
pulled-out pins, corrosion).<br />
• Is there any malfunction?<br />
5 INSPECT IAT SENSOR NO.1<br />
Yes Replace the MAF/IAT sensor, then go to Step 7.<br />
•<br />
•<br />
Inspect the IAT sensor No.1.<br />
Is there any malfunction?<br />
No Go to the next step.<br />
6 INSPECT PCM CONNECTOR FOR POOR Yes Repair or replace the terminal, then go to the next step.<br />
CONNECTION<br />
No Go to the next step.<br />
• Turn the engine switch off.<br />
• Disconnect the PCM connector.<br />
• Inspect for poor connection (such as damaged/<br />
pulled-out pins, corrosion).<br />
• Is there any malfunction?<br />
7 VERIFY TROUBLESHOOTING OF DTC P0111 Yes Replace the PCM, then go to the next step.<br />
COMPLETED<br />
No Go to the next step.<br />
• Make sure to reconnect all disconnected<br />
connectors.<br />
• Clear the DTC from the PCM memory using<br />
the WDS or equivalent.<br />
• Start the engine and warm it up completely.<br />
• Is the PENDING CODE for this DTC present?<br />
8 VERIFY AFTER REPAIR PROCEDURE<br />
Yes Go to the applicable DTC inspection.<br />
• Perform the Repair Verification Drive Mode.<br />
(See F2–40 DTC TABLE.)<br />
•<br />
(See F2–39 OBD DRIVE MODE.)<br />
Are any DTCs present?<br />
No DTC troubleshooting completed.<br />
DTC P0112 Intake air temperature (IAT) sensor No.1 circuit low input<br />
DETECTION<br />
CONDITION<br />
POSSIBLE<br />
CAUSE<br />
B6E407000100108<br />
• The PCM monitors the input signal from intake air temperature sensor No.1. If the voltage from intake air<br />
temperature sensor No.1 is less than 0.14 V, the PCM determines that there is a malfunction in the intake<br />
air temperature sensor No.1 circuit.<br />
Diagnostic support note<br />
• The MIL illuminates if the PCM detects the above malfunction condition in the first drive cycle.<br />
• FREEZE FRAME DATA is available.<br />
• The DTC is stored in the PCM memory.<br />
• IAT sensor No.1 malfunction<br />
• Connector or terminal malfunction<br />
• Short to GND in wiring harness between MAF/IAT sensor terminal D and PCM terminal 60<br />
• PCM malfunction<br />
F2–67<br />
F2
F2–68<br />
ON-BOARD DIAGNOSTIC<br />
DTC P0112 Intake air temperature (IAT) sensor No.1 circuit low input<br />
MAF/IAT SENSOR<br />
WIRING HARNESS-SIDE<br />
CONNECTOR<br />
E<br />
D<br />
C<br />
B<br />
IAT SENSOR NO.1<br />
(MAF/IAT SENSOR)<br />
A<br />
6<br />
D<br />
E<br />
4 5<br />
4<br />
60<br />
91<br />
26 25 24 23 22 21 20 19 18 17 16 15 14<br />
52 51 50 49 48 47 46 45 44 43 42 41 40<br />
78 77 76 75 74 73 72 71 70 69 68 67 66<br />
104 103 102 101 100 99 98 97 96 95 94 93 92<br />
7<br />
7<br />
PCM<br />
PCM<br />
WIRING HARNESS-SIDE<br />
CONNECTOR<br />
13 12 11 10 9 8 7 6 5 4 3 2 1<br />
39 38 37 36 35 34 33 32 31 30 29 28 27<br />
65 64 63 62 61 60 59 58 57 56 55 54 53<br />
91 90 89 88 87 86 85 84 83 82 81 80 79
End Of Sie<br />
DTC P0113<br />
ON-BOARD DIAGNOSTIC<br />
Diagnostic procedure<br />
STEP INSPECTION ACTION<br />
1 VERIFY FREEZE FRAME DATA HAS BEEN Yes Go to the next step.<br />
RECORDED<br />
No Record the FREEZE FRAME DATA on the repair order,<br />
• Has FREEZE FRAME DATA been recorded? then go to the next step.<br />
2 VERIFY RELATED REPAIR INFORMATION Yes Perform repair or diagnosis according to the available<br />
AVAILABILITY<br />
repair information.<br />
• Verify related service repair information<br />
• If the vehicle is not repaired, go to the next step.<br />
availability.<br />
No Go to the next step.<br />
• Is any related repair information available?<br />
3 VERIFY CURRENT SIGNAL STATUS: IS Yes Go to the next step.<br />
CONCERN INTERMITTENT OR CONSTANT? No Intermittent concern exists.<br />
• Connect the WDS or equivalent to the DLC-2. Perform the “INTERMITTENT CONCERNS<br />
• Clear the DTC from the PCM memory using<br />
the WDS or equivalent.<br />
TROUBLESHOOTING”.<br />
• Start the engine.<br />
• Is the same DTC present?<br />
4 INSPECT MAF/IAT SENSOR CONNECTOR FOR Yes Repair or replace the terminal, then go to Step 8.<br />
POOR CONNECTION<br />
No Go to the next step.<br />
• Turn the engine switch off.<br />
• Disconnect the MAF/IAT sensor connector.<br />
• Inspect for poor connection (such as damaged/<br />
pulled-out pins, corrosion).<br />
• Is there any malfunction?<br />
5 INSPECT IAT SENSOR NO.1 SIGNAL CIRCUIT Yes Repair or replace the wiring harness for a possible short to<br />
FOR SHORT TO GND<br />
GND, then go to Step 8.<br />
• Turn the engine switch off.<br />
No Go to the next step.<br />
• Inspect for continuity between MAF/IAT sensor<br />
terminal D (wiring harness-side) and body<br />
GND.<br />
• Is there continuity?<br />
6 INSPECT IAT SENSOR NO.1<br />
Yes Replace the MAF/IAT sensor, then go to Step 8.<br />
•<br />
•<br />
Inspect the IAT sensor No.1.<br />
Is there any malfunction?<br />
No Go to the next step.<br />
7 INSPECT PCM CONNECTOR FOR POOR Yes Repair or replace the terminal, then go to the next step.<br />
CONNECTION<br />
No Go to the next step.<br />
• Turn the engine switch off.<br />
• Disconnect the PCM connector.<br />
• Inspect for poor connection (such as damaged/<br />
pulled-out pins, corrosion).<br />
• Is there any malfunction?<br />
8 VERIFY TROUBLESHOOTING OF DTC P0112 Yes Replace the PCM, then go to the next step.<br />
COMPLETED<br />
No Go to the next step.<br />
• Make sure to reconnect all disconnected<br />
connectors.<br />
• Clear the DTC from the PCM memory using<br />
the WDS or equivalent.<br />
• Start the engine.<br />
• Is the same DTC present?<br />
9 VERIFY AFTER REPAIR PROCEDURE<br />
Yes Go to the applicable DTC inspection.<br />
• Perform the Repair Verification Drive Mode.<br />
(See F2–40 DTC TABLE.)<br />
•<br />
(See F2–39 OBD DRIVE MODE.)<br />
Are any DTCs present?<br />
No DTC troubleshooting completed.<br />
DTC P0113 Intake air temperature (IAT) sensor No.1 circuit high input<br />
DETECTION<br />
CONDITION<br />
B6E407000100109<br />
• The PCM monitors the input signal from intake air temperature sensor No.1. If the voltage from intake air<br />
temperature sensor No.1 is more than 4.92 V, the PCM determines that there is a malfunction in the intake<br />
air temperature sensor No.1 circuit.<br />
Diagnostic support note<br />
• The MIL illuminates if the PCM detects the above malfunction condition in the first drive cycle.<br />
• FREEZE FRAME DATA is available.<br />
• The DTC is stored in the PCM memory.<br />
F2–69<br />
F2
POSSIBLE<br />
CAUSE<br />
F2–70<br />
ON-BOARD DIAGNOSTIC<br />
DTC P0113 Intake air temperature (IAT) sensor No.1 circuit high input<br />
E<br />
D<br />
• IAT sensor No.1 malfunction<br />
• Connector or terminal malfunction<br />
• Open circuit in wiring harness between MAF/IAT sensor terminal D and PCM terminal 60<br />
• Short to power supply in wiring harness between MAF/IAT sensor terminal D and PCM terminal 60<br />
• Open circuit in wiring harness between MAF/IAT sensor terminal E and PCM terminal 91<br />
• PCM malfunction<br />
MAF/IAT SENSOR<br />
WIRING HARNESS-SIDE<br />
CONNECTOR<br />
C<br />
B<br />
IAT SENSOR NO.1<br />
(MAF/IAT SENSOR)<br />
A<br />
6<br />
D<br />
E<br />
4 5 8<br />
4 8<br />
60<br />
91<br />
26 25 24 23 22 21 20 19 18 17 16 15 14<br />
52 51 50 49 48 47 46 45 44 43 42 41 40<br />
78 77 76 75 74 73 72 71 70 69 68 67 66<br />
104 103 102 101 100 99 98 97 96 95 94 93 92<br />
7<br />
7<br />
PCM<br />
PCM<br />
WIRING HARNESS-SIDE<br />
CONNECTOR<br />
13 12 11 10 9 8 7 6 5 4 3 2 1<br />
39 38 37 36 35 34 33 32 31 30 29 28 27<br />
65 64 63 62 61 60 59 58 57 56 55 54 53<br />
91 90 89 88 87 86 85 84 83 82 81 80 79
ON-BOARD DIAGNOSTIC<br />
Diagnostic procedure<br />
STEP INSPECTION ACTION<br />
1 VERIFY FREEZE FRAME DATA HAS BEEN<br />
RECORDED<br />
• Has FREEZE FRAME DATA been recorded?<br />
2 VERIFY RELATED REPAIR INFORMATION<br />
AVAILABILITY<br />
• Verify related service repair information<br />
availability.<br />
• Is any related repair information available?<br />
3 VERIFY CURRENT SIGNAL STATUS: IS<br />
CONCERN INTERMITTENT OR CONSTANT?<br />
• Connect the WDS or equivalent to the DLC-2.<br />
• Clear the DTC from the PCM memory using<br />
the WDS or equivalent.<br />
• Start the engine.<br />
• Is the same DTC present?<br />
4 INSPECT MAF/IAT SENSOR CONNECTOR FOR<br />
POOR CONNECTION<br />
• Turn the engine switch off.<br />
• Disconnect the MAF/IAT sensor connector.<br />
• Inspect for poor connection (such as damaged/<br />
pulled-out pins, corrosion).<br />
• Is there any malfunction?<br />
5 INSPECT IAT SENSOR NO.1 SIGNAL CIRCUIT<br />
FOR SHORT TO POWER SUPPLY<br />
• Turn the engine switch to the ON position<br />
(Engine off).<br />
• Measure the voltage between MAF/IAT sensor<br />
terminal D (wiring harness-side) and body<br />
GND.<br />
• Is the voltage more than 4.92 V?<br />
6 INSPECT IAT SENSOR NO.1<br />
• Inspect the IAT sensor No.1.<br />
• Is there any malfunction?<br />
7 INSPECT PCM CONNECTOR FOR POOR<br />
CONNECTION<br />
• Turn the engine switch off.<br />
• Disconnect the PCM connector.<br />
• Inspect for poor connection (such as damaged/<br />
pulled-out pins, corrosion).<br />
• Is there any malfunction?<br />
8 INSPECT IAT SENSOR NO.1 CIRCUIT FOR<br />
OPEN CIRCUIT<br />
• Turn the engine switch off.<br />
• Inspect for continuity between the following<br />
terminals:<br />
— MAF/IAT sensor terminal D (wiring harnessside)<br />
and PCM terminal 60 (wiring harnessside)<br />
— MAF/IAT sensor terminal E (wiring harnessside)<br />
and PCM terminal 91 (wiring harnessside)<br />
• Is there continuity?<br />
9 VERIFY TROUBLESHOOTING OF DTC P0113<br />
COMPLETED<br />
• Make sure to reconnect all disconnected<br />
connectors.<br />
• Clear the DTC from the PCM memory using<br />
the WDS or equivalent.<br />
• Start the engine.<br />
• Is the same DTC present?<br />
10 VERIFY AFTER REPAIR PROCEDURE<br />
• Perform the Repair Verification Drive Mode.<br />
(See F2–39 OBD DRIVE MODE.)<br />
• Are any DTCs present?<br />
Yes Go to the next step.<br />
No Record the FREEZE FRAME DATA on the repair order,<br />
then go to the next step.<br />
Yes Perform repair or diagnosis according to the available<br />
repair information.<br />
• If the vehicle is not repaired, go to the next step.<br />
No Go to the next step.<br />
Yes Go to the next step.<br />
No Intermittent concern exists.<br />
Perform the “INTERMITTENT CONCERNS<br />
TROUBLESHOOTING”.<br />
Yes Repair or replace the terminal, then go to Step 9.<br />
No Go to the next step.<br />
Yes Repair or replace the wiring harness for a possible short to<br />
power supply, then go to Step 9.<br />
No Go to the next step.<br />
Yes Replace the MAF/IAT sensor, then go to Step 9.<br />
No Go to the next step.<br />
Yes Repair or replace the terminal, then go to Step 9.<br />
No Go to the next step.<br />
Yes Go to the next step.<br />
No Repair or replace the wiring harness for a possible open<br />
circuit, then go to the next step.<br />
Yes Replace the PCM, then go to the next step.<br />
No Go to the next step.<br />
Yes Go to the applicable DTC inspection.<br />
(See F2–40 DTC TABLE.)<br />
No DTC troubleshooting completed.<br />
F2–71<br />
F2
End Of Sie<br />
DTC P0116<br />
F2–72<br />
ON-BOARD DIAGNOSTIC<br />
DTC P0116 Engine coolant temperature (ECT) sensor range/performance problem<br />
DETECTION<br />
CONDITION<br />
POSSIBLE<br />
CAUSE<br />
B6E407000100110<br />
• The PCM monitors the input signal from the engine coolant temperature sensor. If the difference between<br />
the maximum and the minimum value of the ECT is less than 3 °C {5.4 °F}, the PCM determines that there<br />
is a malfunction in the engine coolant temperature sensor characteristic.<br />
Diagnostic support note<br />
• The MIL illuminates if the PCM detects the above malfunction condition in two consecutive drive cycles or<br />
in one drive cycle while the DTC for the same malfunction has been stored in the PCM.<br />
• PENDING CODE is available if the PCM detects the above malfunction condition during the first drive<br />
cycle.<br />
• FREEZE FRAME DATA is available.<br />
• The DTC is stored in the PCM memory.<br />
• ECT sensor malfunction<br />
• Connector or terminal malfunction<br />
• PCM malfunction<br />
ECT SENSOR<br />
WIRING HARNESS-SIDE<br />
CONNECTOR<br />
B<br />
A<br />
ECT SENSOR<br />
5<br />
A<br />
B<br />
4<br />
4<br />
6<br />
6<br />
87<br />
91<br />
26 25 24 23 22 21 20 19 18 17 16 15 14<br />
52 51 50 49 48 47 46 45 44 43 42 41 40<br />
78 77 76 75 74 73 72 71 70 69 68 67 66<br />
104<br />
103 102 101 100 99 98 97 96 95 94 93 92<br />
PCM<br />
PCM<br />
WIRING HARNESS-SIDE<br />
CONNECTOR<br />
13 12 11 10 9 8 7 6 5 4 3 2 1<br />
39 38 37 36 35 34 33 32 31 30 29 28 27<br />
65 64 63 62 61 60 59 58 57 56 55 54 53<br />
91 90 89 88 87 86 85 84 83 82 81 80 79
End Of Sie<br />
ON-BOARD DIAGNOSTIC<br />
Diagnostic procedure<br />
STEP INSPECTION ACTION<br />
1 VERIFY FREEZE FRAME DATA HAS BEEN Yes Go to the next step.<br />
RECORDED<br />
No Record the FREEZE FRAME DATA on the repair order,<br />
• Has FREEZE FRAME DATA been recorded? then go to the next step.<br />
2 VERIFY RELATED REPAIR INFORMATION Yes Perform repair or diagnosis according to the available<br />
AVAILABILITY<br />
repair information.<br />
• Verify related service repair information<br />
• If the vehicle is not repaired, go to the next step.<br />
availability.<br />
No Go to the next step.<br />
• Is any related repair information available?<br />
3 VERIFY CURRENT SIGNAL STATUS: IS Yes Go to the next step.<br />
CONCERN INTERMITTENT OR CONSTANT? No Intermittent concern exists.<br />
• Connect the WDS or equivalent to the DLC-2. Perform the “INTERMITTENT CONCERNS<br />
• Clear the DTC from the PCM memory using<br />
the WDS or equivalent.<br />
TROUBLESHOOTING”.<br />
• Start the engine and warm it up completely.<br />
• Is the same DTC present?<br />
4 INSPECT ECT SENSOR CONNECTOR FOR Yes Repair or replace the terminal, then go to Step 8.<br />
POOR CONNECTION<br />
No Go to the next step.<br />
• Turn the engine switch off.<br />
• Disconnect the ECT sensor connector.<br />
• Inspect for poor connection (such as damaged/<br />
pulled-out pins, corrosion).<br />
• Is there any malfunction?<br />
5 INSPECT ECT SENSOR<br />
Yes Replace the ECT sensor, then go to Step 8.<br />
•<br />
•<br />
Inspect the ECT sensor.<br />
Is there any malfunction?<br />
No Go to the next step.<br />
6 INSPECT PCM CONNECTOR FOR POOR Yes Repair or replace the terminal, then go to Step 8.<br />
CONNECTION<br />
No Go to the next step.<br />
• Turn the engine switch off.<br />
• Disconnect the PCM connector.<br />
• Inspect for poor connection (such as damaged/<br />
pulled-out pins, corrosion).<br />
• Is there any malfunction?<br />
7 COMPARE ECT PID VALUE<br />
Yes Go to the next step.<br />
•<br />
•<br />
•<br />
Prepare a new ECT sensor.<br />
Clear the DTC from the PCM memory using<br />
the WDS or equivalent.<br />
Connect the ECT sensor connector to the new<br />
ECT sensor without installing to the engine.<br />
No Inspect the thermostat.<br />
• If thermostat is normal, go to the next step.<br />
• If thermostat is not normal, replace thermostat, then go<br />
to the next step<br />
• Turn the engine switch to the ON position and<br />
record the ECT PID value.<br />
• Replace the malfunctioning ECT sensor with<br />
new one.<br />
• Start the engine and wait for 5 min.<br />
• Record the ECT PID value.<br />
• Is the difference between ECT PID values<br />
more than 3°C {5.4 °F}?<br />
8 VERIFY TROUBLESHOOTING OF DTC P0116 Yes Replace the PCM, then go to the next step.<br />
COMPLETED<br />
No Go to the next step.<br />
• Make sure to reconnect all disconnected<br />
connectors.<br />
• Clear the DTC from the PCM memory using<br />
the WDS or equivalent.<br />
• Start the engine and warm it up completely.<br />
• Is the PENDING CODE for this DTC present?<br />
9 VERIFY AFTER REPAIR PROCEDURE<br />
Yes Go to the applicable DTC inspection.<br />
• Perform the Repair Verification Drive Mode.<br />
(See F2–40 DTC TABLE.)<br />
•<br />
(See F2–39 OBD DRIVE MODE.)<br />
Are any DTCs present?<br />
No DTC troubleshooting completed.<br />
F2–73<br />
F2
DTC P0117<br />
F2–74<br />
ON-BOARD DIAGNOSTIC<br />
DTC P0117 Engine coolant temperature (ECT) sensor circuit low input<br />
DETECTION<br />
CONDITION<br />
POSSIBLE<br />
CAUSE<br />
B6E407000100111<br />
• The PCM monitors the input signal from the engine coolant temperature sensor. If the voltage from the<br />
engine coolant temperature sensor is less than 0.14 V, the PCM determines that there is a malfunction in<br />
the engine coolant temperature sensor circuit.<br />
Diagnostic support note<br />
• The MIL illuminates if the PCM detects the above malfunction condition in the first drive cycle.<br />
• FREEZE FRAME DATA is available.<br />
• The DTC is stored in the PCM memory.<br />
• ECT sensor malfunction<br />
• Connector or terminal malfunction<br />
• Short to GND in wiring harness between ECT sensor terminal A and PCM terminal 87<br />
• PCM malfunction<br />
ECT SENSOR<br />
WIRING HARNESS-SIDE<br />
CONNECTOR<br />
B<br />
A<br />
ECT SENSOR PCM<br />
6<br />
A<br />
B<br />
4<br />
4<br />
5<br />
7<br />
7<br />
87<br />
91<br />
26 25 24 23 22 21 20 19 18 17 16 15 14<br />
52 51 50 49 48 47 46 45 44 43 42 41 40<br />
78 77 76 75 74 73 72 71 70 69 68 67 66<br />
104<br />
103 102 101 100 99 98 97 96 95 94 93 92<br />
PCM<br />
WIRING HARNESS-SIDE<br />
CONNECTOR<br />
13 12 11 10 9 8 7 6 5 4 3 2 1<br />
39 38 37 36 35 34 33 32 31 30 29 28 27<br />
65 64 63 62 61 60 59 58 57 56 55 54 53<br />
91 90 89 88 87 86 85 84 83 82 81 80 79
End Of Sie<br />
DTC P0118<br />
ON-BOARD DIAGNOSTIC<br />
Diagnostic procedure<br />
STEP INSPECTION ACTION<br />
1 VERIFY FREEZE FRAME DATA HAS BEEN Yes Go to the next step.<br />
RECORDED<br />
No Record the FREEZE FRAME DATA on the repair order,<br />
• Has FREEZE FRAME DATA been recorded? then go to the next step.<br />
2 VERIFY RELATED REPAIR INFORMATION Yes Perform repair or diagnosis according to the available<br />
AVAILABILITY<br />
repair information.<br />
• Verify related service repair information<br />
• If the vehicle is not repaired, go to the next step.<br />
availability.<br />
No Go to the next step.<br />
• Is any related repair information available?<br />
3 VERIFY CURRENT SIGNAL STATUS: IS Yes Go to the next step.<br />
CONCERN INTERMITTENT OR CONSTANT? No Intermittent concern exists.<br />
• Connect the WDS or equivalent to the DLC-2. Perform the “INTERMITTENT CONCERNS<br />
• Clear the DTC from the PCM memory using<br />
the WDS or equivalent.<br />
TROUBLESHOOTING”.<br />
• Start the engine.<br />
• Is the same DTC present?<br />
4 INSPECT ECT SENSOR CONNECTOR FOR Yes Repair or replace the terminal, then go to Step 8.<br />
POOR CONNECTION<br />
No Go to the next step.<br />
• Turn the engine switch off.<br />
• Disconnect the ECT sensor connector.<br />
• Inspect for poor connection (such as damaged/<br />
pulled-out pins, corrosion).<br />
• Is there any malfunction?<br />
5 INSPECT ECT SENSOR SIGNAL CIRCUIT FOR Yes Repair or replace the wiring harness for a possible short to<br />
SHORT TO GND<br />
GND, then go to Step 8.<br />
• Turn the engine switch off.<br />
No Go to the next step.<br />
• Disconnect the ECT sensor connector.<br />
• Inspect for continuity between ECT sensor<br />
terminal A (wiring harness-side) and body<br />
GND.<br />
• Is there continuity?<br />
6 INSPECT ECT SENSOR<br />
Yes Replace the ECT sensor, then go to Step 8.<br />
•<br />
•<br />
Inspect the ECT sensor.<br />
Is there any malfunction?<br />
No Go to the next step.<br />
7 INSPECT PCM CONNECTOR FOR POOR Yes Repair or replace the terminal, then go to the next step.<br />
CONNECTION<br />
No Go to the next step.<br />
• Turn the engine switch off.<br />
• Disconnect the PCM connector.<br />
• Inspect for poor connection (such as damaged/<br />
pulled-out pins, corrosion).<br />
• Is there any malfunction?<br />
8 VERIFY TROUBLESHOOTING OF DTC P0117 Yes Replace the PCM, then go to the next step.<br />
COMPLETED<br />
No Go to the next step.<br />
• Make sure to reconnect all disconnected<br />
connectors.<br />
• Clear the DTC from the PCM memory using<br />
the WDS or equivalent.<br />
• Start the engine.<br />
• Is the same DTC present?<br />
9 VERIFY AFTER REPAIR PROCEDURE<br />
Yes Go to the applicable DTC inspection.<br />
• Perform the Repair Verification Drive Mode.<br />
(See F2–40 DTC TABLE.)<br />
•<br />
(See F2–39 OBD DRIVE MODE.)<br />
Are any DTCs present?<br />
No DTC troubleshooting completed.<br />
DTC P0118 Engine coolant temperature (ECT) sensor circuit high input<br />
DETECTION<br />
CONDITION<br />
B6E407000100112<br />
• The PCM monitors the input signal from the engine coolant temperature sensor. If the voltage from the<br />
engine coolant temperature sensor is more than 4.92 V, the PCM determines that there is a malfunction in<br />
the engine coolant temperature sensor circuit.<br />
Diagnostic support note<br />
• The MIL illuminates if the PCM detects the above malfunction condition in the first drive cycle.<br />
• FREEZE FRAME DATA is available.<br />
• The DTC is stored in the PCM memory.<br />
F2–75<br />
F2
POSSIBLE<br />
CAUSE<br />
F2–76<br />
ON-BOARD DIAGNOSTIC<br />
DTC P0118 Engine coolant temperature (ECT) sensor circuit high input<br />
• ECT sensor malfunction<br />
• Connector or terminal malfunction<br />
• Open circuit in wiring harness between ECT sensor terminal A and PCM terminal 87<br />
• Short to power supply in wiring harness between ECT sensor terminal A and PCM terminal 87<br />
• Open circuit in wiring harness between ECT sensor terminal B and PCM terminal 91<br />
• PCM malfunction<br />
ECT SENSOR<br />
WIRING HARNESS-SIDE<br />
CONNECTOR<br />
B<br />
A<br />
ECT SENSOR PCM<br />
6<br />
A<br />
B<br />
4<br />
5 8<br />
4 8<br />
7<br />
7<br />
87<br />
91<br />
26 25 24 23 22 21 20 19 18 17 16 15 14<br />
52 51 50 49 48 47 46 45 44 43 42 41 40<br />
78 77 76 75 74 73 72 71 70 69 68 67 66<br />
104<br />
103 102 101 100 99 98 97 96 95 94 93 92<br />
PCM<br />
WIRING HARNESS-SIDE<br />
CONNECTOR<br />
13 12 11 10 9 8 7 6 5 4 3 2 1<br />
39 38 37 36 35 34 33 32 31 30 29 28 27<br />
65 64 63 62 61 60 59 58 57 56 55 54 53<br />
91 90 89 88 87 86 85 84 83 82 81 80 79
End Of Sie<br />
ON-BOARD DIAGNOSTIC<br />
Diagnostic procedure<br />
STEP INSPECTION ACTION<br />
1 VERIFY FREEZE FRAME DATA HAS BEEN Yes Go to the next step.<br />
RECORDED<br />
No Record the FREEZE FRAME DATA on the repair order,<br />
• Has FREEZE FRAME DATA been recorded? then go to the next step.<br />
2 VERIFY RELATED REPAIR INFORMATION Yes Perform repair or diagnosis according to the available<br />
AVAILABILITY<br />
repair information.<br />
• Verify related service repair information<br />
• If the vehicle is not repaired, go to the next step.<br />
availability.<br />
No Go to the next step.<br />
• Is any related repair information available?<br />
3 VERIFY CURRENT SIGNAL STATUS: IS Yes Go to the next step.<br />
CONCERN INTERMITTENT OR CONSTANT? No Intermittent concern exists.<br />
• Connect the WDS or equivalent to the DLC-2. Perform the “INTERMITTENT CONCERNS<br />
• Clear the DTC from the PCM memory using<br />
the WDS or equivalent.<br />
TROUBLESHOOTING”.<br />
• Start the engine.<br />
• Is the same DTC present?<br />
4 INSPECT ECT SENSOR CONNECTOR FOR Yes Repair or replace the terminal, then go to Step 9.<br />
POOR CONNECTION<br />
No Go to the next step.<br />
• Turn the engine switch off.<br />
• Disconnect the ECT sensor connector.<br />
• Inspect for poor connection (such as damaged/<br />
pulled-out pins, corrosion).<br />
• Is there any malfunction?<br />
5 INSPECT ECT SENSOR SIGNAL CIRCUIT FOR Yes Repair or replace the wiring harness for a possible short to<br />
SHORT TO POWER SUPPLY<br />
power supply, then go to Step 9.<br />
• Turn the engine switch to the ON position<br />
(Engine off).<br />
No Go to the next step.<br />
• Measure the voltage between ECT sensor<br />
terminal A (wiring harness-side) and body<br />
GND.<br />
• Is the voltage more than 4.92 V?<br />
6 INSPECT ECT SENSOR<br />
Yes Replace the ECT sensor, then go to Step 9.<br />
•<br />
•<br />
Inspect the ECT sensor.<br />
Is there any malfunction?<br />
No Go to the next step.<br />
7 INSPECT PCM CONNECTOR FOR POOR Yes Repair or replace the terminal, then go to Step 9.<br />
CONNECTION<br />
No Go to the next step.<br />
• Turn the engine switch off.<br />
• Disconnect the PCM connector.<br />
• Inspect for poor connection (such as damaged/<br />
pulled-out pins, corrosion).<br />
• Is there any malfunction?<br />
8 INSPECT ECT SENSOR CIRCUIT FOR OPEN Yes Go to the next step.<br />
CIRCUIT<br />
No Repair or replace the wiring harness for a possible open<br />
• Turn the engine switch off.<br />
circuit, then go to the next step.<br />
• Inspect for continuity between the following<br />
terminals:<br />
— ECT sensor terminal A (wiring harness-side)<br />
and PCM terminal 87 (wiring harness-side)<br />
— ECT sensor terminal B (wiring harness-side)<br />
and PCM terminal 91 (wiring harness-side)<br />
• Is there continuity?<br />
9 VERIFY TROUBLESHOOTING OF DTC P0118 Yes Replace the PCM, then go to the next step.<br />
COMPLETED<br />
No Go to the next step.<br />
• Make sure to reconnect all disconnected<br />
connectors.<br />
• Clear the DTC from the PCM memory using<br />
the WDS or equivalent.<br />
• Start the engine.<br />
• Is the same DTC present?<br />
10 VERIFY AFTER REPAIR PROCEDURE<br />
Yes Go to the applicable DTC inspection.<br />
• Perform the Repair Verification Drive Mode.<br />
(See F2–40 DTC TABLE.)<br />
•<br />
(See F2–39 OBD DRIVE MODE.)<br />
Are any DTCs present?<br />
No DTC troubleshooting completed.<br />
F2–77<br />
F2
DTC P0122<br />
F2–78<br />
ON-BOARD DIAGNOSTIC<br />
DTC P0122 Accelerator pedal position (APP) sensor No.1 circuit low input<br />
DETECTION<br />
CONDITION<br />
POSSIBLE<br />
CAUSE<br />
B6E407000100113<br />
• The PCM monitors the input signal from accelerator pedal position sensor No.1. If the voltage from<br />
accelerator pedal position sensor No.1 is less than 0.3 V, the PCM determines that there is a malfunction<br />
in the accelerator pedal position sensor No.1 circuit.<br />
Diagnostic support note<br />
• The MIL illuminates if the PCM detects the above malfunction condition in the first drive cycle.<br />
• FREEZE FRAME DATA is available.<br />
• The DTC is stored in the PCM memory.<br />
• APP sensor No.1 malfunction<br />
• Connector or terminal malfunction<br />
• Open circuit in wiring harness between APP sensor terminal A and PCM terminal 90<br />
• Short to GND in wiring harness between APP sensor terminal A and PCM terminal 90<br />
• Open circuit in wiring harness between APP sensor terminal B and PCM terminal 10<br />
• Short to GND in wiring harness between APP sensor terminal B and PCM terminal 10<br />
• PCM malfunction<br />
APP SENSOR<br />
WIRING HARNESS-SIDE<br />
CONNECTOR<br />
D<br />
C<br />
B<br />
APP SENSOR NO.1<br />
(APP SENSOR) PCM<br />
6<br />
A<br />
A<br />
B<br />
D<br />
4 5<br />
4<br />
4<br />
8<br />
7<br />
5 8 7<br />
7<br />
90<br />
10<br />
91<br />
26 25 24 23 22 21 20 19 18 17 16 15 14<br />
52 51 50 49 48 47 46 45 44 43 42 41 40<br />
78 77 76 75 74 73 72 71 70 69 68 67 66<br />
104 103 102 101 100 99 98 97 96 95 94 93 92<br />
PCM<br />
WIRING HARNESS-SIDE<br />
CONNECTOR<br />
13 12 11 10 9 8 7 6 5 4 3 2 1<br />
39 38 37 36 35 34 33 32 31 30 29 28 27<br />
65 64 63 62 61 60 59 58 57 56 55 54 53<br />
91 90 89 88 87 86 85 84 83 82 81 80 79
ON-BOARD DIAGNOSTIC<br />
Diagnostic procedure<br />
STEP INSPECTION ACTION<br />
1 VERIFY FREEZE FRAME DATA HAS BEEN<br />
RECORDED<br />
• Has FREEZE FRAME DATA been recorded?<br />
2 VERIFY RELATED REPAIR INFORMATION<br />
AVAILABILITY<br />
• Verify related service repair information<br />
availability.<br />
• Is any related repair information available?<br />
3 VERIFY CURRENT SIGNAL STATUS: IS<br />
CONCERN INTERMITTENT OR CONSTANT?<br />
• Connect the WDS or equivalent to the DLC-2.<br />
• Clear the DTC from the PCM memory using<br />
the WDS or equivalent.<br />
• Start the engine.<br />
• Is the same DTC present?<br />
4 INSPECT APP SENSOR CONNECTOR FOR<br />
POOR CONNECTION<br />
• Turn the engine switch off.<br />
• Disconnect the APP sensor connector.<br />
• Inspect for poor connection (such as damaged/<br />
pulled-out pins, corrosion).<br />
• Is there any malfunction?<br />
5 INSPECT APP SENSOR NO.1 CIRCUIT FOR<br />
SHORT TO GND<br />
• Turn the engine switch off.<br />
• Inspect for continuity between the following<br />
terminals and body GND:<br />
— APP sensor terminal A (wiring harness-side)<br />
and body GND<br />
— APP sensor terminal B (wiring harness-side)<br />
and body GND<br />
• Is there continuity?<br />
6 INSPECT APP SENSOR NO.1<br />
• Inspect the APP sensor No.1.<br />
• Is there any malfunction?<br />
7 INSPECT PCM CONNECTOR FOR POOR<br />
CONNECTION<br />
• Turn the engine switch off.<br />
• Disconnect the PCM connector.<br />
• Inspect for poor connection (such as damaged/<br />
pulled-out pins, corrosion).<br />
• Is there any malfunction?<br />
8 INSPECT APP SENSOR NO.1 CIRCUIT FOR<br />
OPEN CIRCUIT<br />
• Turn the engine switch off.<br />
• Inspect for continuity between the following<br />
terminals:<br />
— APP sensor terminal A (wiring harness-side)<br />
and PCM terminal 90 (wiring harness-side)<br />
— APP sensor terminal B (wiring harness-side)<br />
and PCM terminal 10 (wiring harness-side)<br />
• Is there continuity?<br />
9 VERIFY TROUBLESHOOTING OF DTC P0122<br />
COMPLETED<br />
• Make sure to reconnect all disconnected<br />
connectors.<br />
• Clear the DTC from the PCM memory using<br />
the WDS or equivalent.<br />
• Start the engine.<br />
• Is the same DTC present?<br />
10 VERIFY AFTER REPAIR PROCEDURE<br />
• Perform the Repair Verification Drive Mode.<br />
(See F2–39 OBD DRIVE MODE.)<br />
• Are any DTCs present?<br />
Yes Go to the next step.<br />
No Record the FREEZE FRAME DATA on the repair order,<br />
then go to the next step.<br />
Yes Perform repair or diagnosis according to the available<br />
repair information.<br />
• If the vehicle is not repaired, go to the next step.<br />
No Go to the next step.<br />
Yes Go to the next step.<br />
No Intermittent concern exists.<br />
Perform the “INTERMITTENT CONCERNS<br />
TROUBLESHOOTING”.<br />
Yes Repair or replace the terminal, then go to Step 9.<br />
No Go to the next step.<br />
Yes Repair or replace the wiring harness for a possible short to<br />
GND, then go to Step 9.<br />
No Go to the next step.<br />
Yes Replace the APP sensor, then go to Step 9.<br />
No Go to the next step.<br />
Yes Repair or replace the terminal, then go to Step 9.<br />
No Go to the next step.<br />
Yes Go to the next step.<br />
No Repair or replace the wiring harness for a possible open<br />
circuit, then go to the next step.<br />
Yes Replace the PCM, then go to the next step.<br />
No Go to the next step.<br />
Yes Go to the applicable DTC inspection.<br />
(See F2–40 DTC TABLE.)<br />
No DTC troubleshooting completed.<br />
F2–79<br />
F2
End Of Sie<br />
DTC P0123<br />
F2–80<br />
ON-BOARD DIAGNOSTIC<br />
DTC P0123 Accelerator pedal position (APP) sensor No.1 circuit high input<br />
DETECTION<br />
CONDITION<br />
POSSIBLE<br />
CAUSE<br />
B6E407000100114<br />
• The PCM monitors the input signal from accelerator pedal position sensor No.1. If the voltage from<br />
accelerator pedal position sensor No.1 is more than 4.7 V, the PCM determines that there is a malfunction<br />
in the accelerator pedal position sensor No.1 circuit.<br />
Diagnostic support note<br />
• The MIL illuminates if the PCM detects the above malfunction condition in the first drive cycle.<br />
• FREEZE FRAME DATA is available.<br />
• The DTC is stored in the PCM memory.<br />
• APP sensor No.1 malfunction<br />
• Connector or terminal malfunction<br />
• Short to power supply in wiring harness between APP sensor terminal B and PCM terminal 10<br />
• Open circuit in wiring harness between APP sensor terminal D and PCM terminal 91<br />
• PCM malfunction<br />
APP SENSOR<br />
WIRING HARNESS-SIDE<br />
CONNECTOR<br />
D<br />
C<br />
APP SENSOR NO.2<br />
(APP SENSOR) PCM<br />
B<br />
6<br />
A<br />
A<br />
B<br />
D<br />
4<br />
4<br />
4<br />
7<br />
5 7<br />
8<br />
7<br />
90<br />
10<br />
91<br />
26 25 24 23 22 21 20 19 18 17 16 15 14<br />
52 51 50 49 48 47 46 45 44 43 42 41 40<br />
78 77 76 75 74 73 72 71 70 69 68 67 66<br />
104 103 102 101 100 99 98 97 96 95 94 93 92<br />
PCM<br />
WIRING HARNESS-SIDE<br />
CONNECTOR<br />
13 12 11 10 9 8 7 6 5 4 3 2 1<br />
39 38 37 36 35 34 33 32 31 30 29 28 27<br />
65 64 63 62 61 60 59 58 57 56 55 54 53<br />
91 90 89 88 87 86 85 84 83 82 81 80 79
End Of Sie<br />
ON-BOARD DIAGNOSTIC<br />
Diagnostic procedure<br />
STEP INSPECTION ACTION<br />
1 VERIFY FREEZE FRAME DATA HAS BEEN Yes Go to the next step.<br />
RECORDED<br />
No Record the FREEZE FRAME DATA on the repair order,<br />
• Has FREEZE FRAME DATA been recorded? then go to the next step.<br />
2 VERIFY RELATED REPAIR INFORMATION Yes Perform repair or diagnosis according to the available<br />
AVAILABILITY<br />
repair information.<br />
• Verify related service repair information<br />
• If the vehicle is not repaired, go to the next step.<br />
availability.<br />
No Go to the next step.<br />
• Is any related repair information available?<br />
3 VERIFY CURRENT SIGNAL STATUS: IS Yes Go to the next step.<br />
CONCERN INTERMITTENT OR CONSTANT? No Intermittent concern exists.<br />
• Connect the WDS or equivalent to the DLC-2. Perform the “INTERMITTENT CONCERNS<br />
• Clear the DTC from the PCM memory using<br />
the WDS or equivalent.<br />
TROUBLESHOOTING”.<br />
• Start the engine.<br />
• Is the same DTC present?<br />
4 INSPECT APP SENSOR CONNECTOR FOR Yes Repair or replace the terminal, then go to Step 9.<br />
POOR CONNECTION<br />
No Go to the next step.<br />
• Turn the engine switch off.<br />
• Disconnect the APP sensor connector.<br />
• Inspect for poor connection (such as damaged/<br />
pulled-out pins, corrosion).<br />
• Is there any malfunction?<br />
5 INSPECT APP SENSOR NO.1 SIGNAL CIRCUIT Yes Repair or replace the wiring harness for a possible short to<br />
FOR SHORT TO POWER SUPPLY<br />
power supply, then go to Step 9.<br />
• Turn the engine switch to the ON position<br />
(Engine off).<br />
No Go to the next step.<br />
• Measure the voltage between APP sensor<br />
terminal B (wiring harness-side) and body<br />
GND.<br />
• Is the voltage more than 4.7 V?<br />
6 INSPECT APP SENSOR NO.1<br />
Yes Replace the APP sensor, then go to Step 9.<br />
•<br />
•<br />
Inspect the APP sensor No.1.<br />
Is there any malfunction?<br />
No Go to the next step.<br />
7 INSPECT PCM CONNECTOR FOR POOR Yes Repair or replace the terminal, then go to Step 9.<br />
CONNECTION<br />
No Go to the next step.<br />
• Turn the engine switch off.<br />
• Disconnect the PCM connector.<br />
• Inspect for poor connection (such as damaged/<br />
pulled-out pins, corrosion).<br />
• Is there any malfunction?<br />
8 INSPECT APP SENSOR NO.1 GND CIRCUIT Yes Go to the next step.<br />
FOR OPEN CIRCUIT<br />
No Repair or replace the wiring harness for a possible open<br />
• Turn the engine switch off.<br />
circuit, then go to the next step.<br />
• Inspect for continuity between APP sensor<br />
terminal D (wiring harness-side) and PCM<br />
terminal 91 (wiring harness-side).<br />
• Is there continuity?<br />
9 VERIFY TROUBLESHOOTING OF DTC P0123 Yes Replace the PCM, then go to the next step.<br />
COMPLETED<br />
No Go to the next step.<br />
• Make sure to reconnect all disconnected<br />
connectors.<br />
• Clear the DTC from the PCM memory using<br />
the WDS or equivalent.<br />
• Start the engine.<br />
• Is the same DTC present?<br />
10 VERIFY AFTER REPAIR PROCEDURE<br />
Yes Go to the applicable DTC inspection.<br />
• Perform the Repair Verification Drive Mode.<br />
(See F2–40 DTC TABLE.)<br />
•<br />
(See F2–39 OBD DRIVE MODE.)<br />
Are any DTCs present?<br />
No DTC troubleshooting completed.<br />
F2–81<br />
F2
DTC P0182<br />
DTC P0182 Fuel temperature sensor circuit low input<br />
DETECTION<br />
CONDITION<br />
POSSIBLE<br />
CAUSE<br />
F2–82<br />
ON-BOARD DIAGNOSTIC<br />
• The PCM monitors the input signal from the fuel temperature sensor. If the voltage from the fuel<br />
temperature sensor is less than 0.14 V, the PCM determines that there is a malfunction in the fuel<br />
temperature sensor circuit.<br />
Diagnostic support note<br />
• The MIL illuminates if the PCM detects the above malfunction condition in the first drive cycle.<br />
• FREEZE FRAME DATA is available.<br />
• The DTC is stored in the PCM memory.<br />
• Fuel temperature sensor malfunction<br />
• Connector or terminal malfunction<br />
• Short to GND in wiring harness between fuel temperature sensor terminal A and PCM terminal 35<br />
• PCM malfunction<br />
FUEL TEMPERATURE SENSOR<br />
FUEL TEMPERATURE SENSOR<br />
WIRING HARNESS-SIDE<br />
CONNECTOR<br />
B<br />
A<br />
6<br />
A<br />
B<br />
4 5<br />
4<br />
7<br />
7<br />
35<br />
91<br />
26 25 24 23 22 21 20 19 18 17 16 15 14<br />
52 51 50 49 48 47 46 45 44 43 42 41 40<br />
78 77 76 75 74 73 72 71 70 69 68 67 66<br />
104 103 102 101 100 99 98 97 96 95 94 93 92<br />
PCM<br />
PCM<br />
WIRING HARNESS-SIDE<br />
CONNECTOR<br />
B6E407000100115<br />
13 12 11 10 9 8 7 6 5 4 3 2 1<br />
39 38 37 36 35 34 33 32 31 30 29 28 27<br />
65 64 63 62 61 60 59 58 57 56 55 54 53<br />
91 90 89 88 87 86 85 84 83 82 81 80 79
End Of Sie<br />
ON-BOARD DIAGNOSTIC<br />
Diagnostic procedure<br />
STEP INSPECTION ACTION<br />
1 VERIFY FREEZE FRAME DATA HAS BEEN Yes Go to the next step.<br />
RECORDED<br />
No Record the FREEZE FRAME DATA on the repair order,<br />
• Has FREEZE FRAME DATA been recorded? then go to the next step.<br />
2 VERIFY RELATED REPAIR INFORMATION Yes Perform repair or diagnosis according to the available<br />
AVAILABILITY<br />
repair information.<br />
• Verify related service repair information<br />
• If the vehicle is not repaired, go to the next step.<br />
availability.<br />
No Go to the next step.<br />
• Is any related repair information available?<br />
3 VERIFY CURRENT SIGNAL STATUS: IS Yes Go to the next step.<br />
CONCERN INTERMITTENT OR CONSTANT? No Intermittent concern exists.<br />
• Connect the WDS or equivalent to the DLC-2. Perform the “INTERMITTENT CONCERNS<br />
• Clear the DTC from the PCM memory using<br />
the WDS or equivalent.<br />
TROUBLESHOOTING”.<br />
• Start the engine.<br />
• Is the same DTC present?<br />
4 INSPECT FUEL TEMPERATURE SENSOR Yes Repair or replace the terminal, then go to Step 8.<br />
CONNECTOR FOR POOR CONNECTION No Go to the next step.<br />
• Turn the engine switch off.<br />
• Disconnect the fuel temperature sensor<br />
connector.<br />
• Inspect for poor connection (such as damaged/<br />
pulled-out pins, corrosion).<br />
• Is there any malfunction?<br />
5 INSPECT FUEL TEMPERATURE SENSOR Yes Repair or replace the wiring harness for a possible short to<br />
SIGNAL CIRCUIT FOR SHORT TO GND<br />
GND, then go to Step 8.<br />
• Turn the engine switch off.<br />
No Go to the next step.<br />
• Disconnect the fuel temperature sensor<br />
connector.<br />
• Inspect for continuity between fuel temperature<br />
sensor terminal A (wiring harness-side) and<br />
body GND.<br />
• Is there continuity?<br />
6 INSPECT FUEL TEMPERATURE SENSOR Yes Replace the fuel temperature sensor, then go to Step 8.<br />
•<br />
•<br />
Inspect the fuel temperature sensor.<br />
Is there any malfunction?<br />
No Go to the next step.<br />
7 INSPECT PCM CONNECTOR FOR POOR Yes Repair or replace the terminal, then go to the next step.<br />
CONNECTION<br />
No Go to the next step.<br />
• Turn the engine switch off.<br />
• Disconnect the PCM connector.<br />
• Inspect for poor connection (such as damaged/<br />
pulled-out pins, corrosion).<br />
• Is there any malfunction?<br />
8 VERIFY TROUBLESHOOTING OF DTC P0182 Yes Replace the PCM, then go to the next step.<br />
COMPLETED<br />
No Go to the next step.<br />
• Make sure to reconnect all disconnected<br />
connectors.<br />
• Clear the DTC from the PCM memory using<br />
the WDS or equivalent.<br />
• Start the engine.<br />
• Is the same DTC present?<br />
9 VERIFY AFTER REPAIR PROCEDURE<br />
Yes Go to the applicable DTC inspection.<br />
• Perform the Repair Verification Drive Mode.<br />
(See F2–40 DTC TABLE.)<br />
•<br />
(See F2–39 OBD DRIVE MODE.)<br />
Are any DTCs present?<br />
No DTC troubleshooting completed.<br />
F2–83<br />
F2
DTC P0183<br />
DTC P0183 Fuel temperature sensor circuit high input<br />
DETECTION<br />
CONDITION<br />
POSSIBLE<br />
CAUSE<br />
F2–84<br />
ON-BOARD DIAGNOSTIC<br />
B6E407000100116<br />
• The PCM monitors the input signal from the fuel temperature sensor. If the voltage from the fuel<br />
temperature sensor is more than 4.92 V, the PCM determines that there is a malfunction in the fuel<br />
temperature sensor circuit.<br />
Diagnostic support note<br />
• The MIL illuminates if the PCM detects the above malfunction condition in the first drive cycle.<br />
• FREEZE FRAME DATA is available.<br />
• The DTC is stored in the PCM memory.<br />
• Fuel temperature sensor malfunction<br />
• Connector or terminal malfunction<br />
• Open circuit in wiring harness between fuel temperature sensor terminal A and PCM terminal 35<br />
• Short to power supply in wiring harness between fuel temperature sensor terminal A and PCM terminal 35<br />
• Open circuit in wiring harness between fuel temperature sensor terminal B and PCM terminal 91<br />
• PCM malfunction<br />
FUEL TEMPERATURE SENSOR<br />
FUEL TEMPERATURE SENSOR<br />
WIRING HARNESS-SIDE<br />
CONNECTOR<br />
B<br />
A<br />
6<br />
A<br />
B<br />
4 5 8<br />
4<br />
8<br />
7<br />
7<br />
35<br />
91<br />
26 25 24 23 22 21 20 19 18 17 16 15 14<br />
52 51 50 49 48 47 46 45 44 43 42 41 40<br />
78 77 76 75 74 73 72 71 70 69 68 67 66<br />
104<br />
103 102 101 100 99 98 97 96 95 94 93 92<br />
PCM<br />
PCM<br />
WIRING HARNESS-SIDE<br />
CONNECTOR<br />
13 12 11 10 9 8 7 6 5 4 3 2 1<br />
39 38 37 36 35 34 33 32 31 30 29 28 27<br />
65 64 63 62 61 60 59 58 57 56 55 54 53<br />
91 90 89 88 87 86 85 84 83 82 81 80 79
ON-BOARD DIAGNOSTIC<br />
Diagnostic procedure<br />
STEP INSPECTION ACTION<br />
1 VERIFY FREEZE FRAME DATA HAS BEEN<br />
RECORDED<br />
• Has FREEZE FRAME DATA been recorded?<br />
2 VERIFY RELATED REPAIR INFORMATION<br />
AVAILABILITY<br />
• Verify related service repair information<br />
availability.<br />
• Is any related repair information available?<br />
3 VERIFY CURRENT SIGNAL STATUS: IS<br />
CONCERN INTERMITTENT OR CONSTANT?<br />
• Connect the WDS or equivalent to the DLC-2.<br />
• Clear the DTC from the PCM memory using<br />
the WDS or equivalent.<br />
• Start the engine.<br />
• Is the same DTC present?<br />
4 INSPECT FUEL TEMPERATURE SENSOR<br />
CONNECTOR FOR POOR CONNECTION<br />
• Turn the engine switch off.<br />
• Disconnect the fuel temperature sensor<br />
connector.<br />
• Inspect for poor connection (such as damaged/<br />
pulled-out pins, corrosion).<br />
• Is there any malfunction?<br />
5 INSPECT FUEL TEMPERATURE SENSOR<br />
SIGNAL CIRCUIT FOR SHORT TO POWER<br />
SUPPLY<br />
• Turn the engine switch to the ON position<br />
(Engine off).<br />
• Measure the voltage between fuel temperature<br />
sensor terminal A (wiring harness-side) and<br />
body GND.<br />
• Is the voltage more than 4.92 V?<br />
6 INSPECT FUEL TEMPERATURE SENSOR<br />
• Inspect the fuel temperature sensor.<br />
• Is there any malfunction?<br />
7 INSPECT PCM CONNECTOR FOR POOR<br />
CONNECTION<br />
• Turn the engine switch off.<br />
• Disconnect the PCM connector.<br />
• Inspect for poor connection (such as damaged/<br />
pulled-out pins, corrosion).<br />
• Is there any malfunction?<br />
8 INSPECT FUEL TEMPERATURE SENSOR<br />
CIRCUIT FOR OPEN CIRCUIT<br />
• Turn the engine switch off.<br />
• Inspect for continuity between the following<br />
terminals:<br />
— Fuel temperature sensor terminal A (wiring<br />
harness-side) and PCM terminal 35 (wiring<br />
harness-side)<br />
— Fuel temperature sensor terminal B (wiring<br />
harness-side) and PCM terminal 91 (wiring<br />
harness-side)<br />
• Is there continuity?<br />
9 VERIFY TROUBLESHOOTING OF DTC P0183<br />
COMPLETED<br />
• Make sure to reconnect all disconnected<br />
connectors.<br />
• Clear the DTC from the PCM memory using<br />
the WDS or equivalent.<br />
• Start the engine.<br />
• Is the same DTC present?<br />
Yes Go to the next step.<br />
No Record the FREEZE FRAME DATA on the repair order,<br />
then go to the next step.<br />
Yes Perform repair or diagnosis according to the available<br />
repair information.<br />
• If the vehicle is not repaired, go to the next step.<br />
No Go to the next step.<br />
Yes Go to the next step.<br />
No Intermittent concern exists.<br />
Perform the “INTERMITTENT CONCERNS<br />
TROUBLESHOOTING”.<br />
Yes Repair or replace the terminal, then go to Step 9.<br />
No Go to the next step.<br />
Yes Repair or replace the wiring harness for a possible short to<br />
power supply, then go to Step 9.<br />
No Go to the next step.<br />
Yes Replace the fuel temperature sensor, then go to Step 9.<br />
No Go to the next step.<br />
Yes Repair or replace the terminal, then go to Step 9.<br />
No Go to the next step.<br />
Yes Go to the next step.<br />
No Repair or replace the wiring harness for a possible open<br />
circuit, then go to the next step.<br />
Yes Replace the PCM, then go to the next step.<br />
No Go to the next step.<br />
F2–85<br />
F2
10 VERIFY AFTER REPAIR PROCEDURE<br />
• Perform the Repair Verification Drive Mode.<br />
(See F2–39 OBD DRIVE MODE.)<br />
• Are any DTCs present?<br />
End Of Sie<br />
DTC P0191<br />
F2–86<br />
ON-BOARD DIAGNOSTIC<br />
STEP INSPECTION ACTION<br />
DTC P0191 Fuel pressure sensor range/performance problem<br />
DETECTION<br />
CONDITION<br />
POSSIBLE<br />
CAUSE<br />
Yes Go to the applicable DTC inspection.<br />
(See F2–40 DTC TABLE.)<br />
No DTC troubleshooting completed.<br />
B6E407000100117<br />
• The PCM monitors the fuel pressure in the common rail and input signal from the fuel pressure sensor<br />
while the engine is running. If any one of the following conditions is met, the PCM determines that there is<br />
malfunction in the fuel pressure sensor range/performance problem.<br />
— The PCM calculates the difference between the actual fuel pressure and the target fuel pressure. If the<br />
pressure difference more than 2 MPa {20 kgf/cm 2 , 290 psi}, the PCM determines that there is a<br />
malfunction in fuel pressure sensor range/performance problem.<br />
— The PCM monitors the input signal from fuel pressure sensor. If the difference between the maximum<br />
and minimum voltage of the fuel pressure sensor is less than 0.015 V, the PCM determines that there is<br />
a malfunction in fuel pressure sensor range/performance problem.<br />
Diagnostic support note<br />
• The MIL does not illuminates.<br />
• The DTC is stored in the PCM memory.<br />
• Fuel pressure sensor malfunction<br />
• Suction control valve malfunction<br />
• Clogged fuel line<br />
• PCM malfunction
End Of Sie<br />
DTC P0192<br />
ON-BOARD DIAGNOSTIC<br />
Diagnostic procedure<br />
STEP INSPECTION ACTION<br />
1 VERIFY FREEZE FRAME DATA HAS BEEN Yes Go to the next step.<br />
RECORDED<br />
No Record the FREEZE FRAME DATA on the repair order,<br />
• Has FREEZE FRAME DATA been recorded? then go to the next step.<br />
2 VERIFY RELATED REPAIR INFORMATION Yes Perform repair or diagnosis according to the available<br />
AVAILABILITY<br />
Service Information.<br />
• Verify related Service Information availability. • If the vehicle is not repaired, go to the next step.<br />
• Is any related repair information available? No Go to the next step.<br />
3 VERIFY CURRENT SIGNAL STATUS: IS Yes Go to the next step.<br />
CONCERN INTERMITTENT OR CONSTANT? No Intermittent concern exists.<br />
• Connect the WDS or equivalent to the DLC-2. Perform the “INTERMITTENT CONCERNS<br />
• Clear the DTC from the PCM memory using<br />
the WDS or equivalent.<br />
TROUBLESHOOTING”.<br />
• Start the engine.<br />
• Is the same DTC present?<br />
4 INSPECT FUEL PRESSURE SENSOR<br />
Yes Replace the common rail, go to Step 7.<br />
•<br />
•<br />
Inspect the fuel pressure sensor.<br />
Is there any malfunction?<br />
No Go to the next step.<br />
5 INSPECT SUCTION CONTROL VALVE<br />
Yes Repair the supply pump, go to Step 7.<br />
•<br />
•<br />
Inspect the suction control valve.<br />
Is there any malfunction?<br />
No Go to the next step.<br />
6 INSPECT FUEL LINE<br />
Yes Repair or replace the suspected fuel line, go to the next<br />
• Turn the engine switch off.<br />
step.<br />
• Inspect for clogging in the following fuel lines<br />
for each cylinder:<br />
— Common rail and fuel injector.<br />
— Common rail and fuel tank.<br />
No Go to the next step.<br />
• Is there any malfunction?<br />
7 VERIFY TROUBLESHOOTING OF DTC P0191 Yes Replace the PCM, go to the next step.<br />
COMPLETED<br />
No Go to the next step.<br />
• Make sure to reconnect all disconnected<br />
connectors.<br />
• Start the engine.<br />
• Is the same DTC present?<br />
8 VERIFY AFTER REPAIR PROCEDURE<br />
Yes Go to the applicable DTC inspection.<br />
• Perform the Repair Verification Drive Mode.<br />
(See F2–40 DTC TABLE)<br />
•<br />
(See F2–39 OBD DRIVE MODE.)<br />
Are any DTCs present?<br />
No Troubleshooting completed.<br />
DTC P0192 Fuel pressure sensor circuit low input<br />
DETECTION<br />
CONDITION<br />
POSSIBLE<br />
CAUSE<br />
B6E407000100118<br />
• The PCM monitors the input voltage from the fuel pressure sensor while the engine is running. If the input<br />
voltage from the fuel pressure sensor is less than 0.4 V, the PCM determines there is a malfunction in the<br />
fuel pressure sensor circuit.<br />
Diagnostic support note<br />
• The MIL illuminates if the PCM detects the above malfunction condition in the first drive cycle.<br />
• FREEZE FRAME DATA is available.<br />
• The DTC is stored in the PCM memory.<br />
• Fuel pressure sensor malfunction<br />
• Connector or terminal malfunction<br />
• Short to GND in wiring harness between fuel pressure sensor terminal C and PCM terminal 90<br />
• Open circuit in wiring harness between fuel pressure sensor terminal C and PCM terminal 90<br />
• Short to GND in wiring harness between fuel pressure sensor terminal B and PCM terminal 61<br />
• Fuel pressure sensor signal and GND circuits are shorted each other.<br />
• PCM malfunction<br />
F2–87<br />
F2
DTC P0192 Fuel pressure sensor circuit low input<br />
F2–88<br />
FUEL PRESSURE SENSOR<br />
WIRING HARNESS-SIDE<br />
CONNECTOR<br />
C<br />
B<br />
A<br />
FUEL PRESSURE SENSOR<br />
8<br />
ON-BOARD DIAGNOSTIC<br />
C<br />
B<br />
A<br />
4<br />
4<br />
4<br />
5<br />
6<br />
10<br />
5 7<br />
9<br />
90<br />
61<br />
91<br />
26 25 24 23 22 21 20 19 18 17 16 15 14<br />
52 51 50 49 48 47 46 45 44 43 42 41 40<br />
78 77 76 75 74 73 72 71 70 69 68 67 66<br />
104 103 102 101 100 99 98 97 96 95 94 93 92<br />
7<br />
9<br />
9<br />
PCM<br />
PCM<br />
WIRING HARNESS-SIDE CONNECTOR<br />
13 12 11 10 9 8 7 6 5 4 3 2 1<br />
39 38 37 36 35 34 33 32 31 30 29 28 27<br />
65 64 63 62 61 60 59 58 57 56 55 54 53<br />
91 90 89 88 87 86 85 84 83 82 81 80 79
ON-BOARD DIAGNOSTIC<br />
Diagnostic procedure<br />
STEP INSPECTION ACTION<br />
1 VERIFY FREEZE FRAME DATA HAS BEEN<br />
RECORDED<br />
• Has FREEZE FRAME DATA been recorded?<br />
2 VERIFY RELATED REPAIR INFORMATION<br />
AVAILABILITY<br />
• Verify related Service Information availability.<br />
• Is any related repair information available?<br />
3 VERIFY CURRENT SIGNAL STATUS: IS<br />
CONCERN INTERMITTENT OR CONSTANT?<br />
• Connect the WDS or equivalent to the DLC-2.<br />
• Clear the DTC from the PCM memory using<br />
the WDS or equivalent.<br />
• Start the engine.<br />
• Is the same DTC present?<br />
4 INSPECT FUEL PRESSURE SENSOR<br />
CONNECTOR FOR POOR CONNECTION<br />
• Turn the engine switch off.<br />
• Inspect for poor connection (such as damaged/<br />
pulled-out terminals, corrosion).<br />
• Is there any malfunction?<br />
5 INSPECT FUEL PRESSURE SENSOR SIGNAL<br />
CIRCUIT FOR SHORT TO GND<br />
• Turn the engine switch off.<br />
• Inspect for continuity between the following<br />
terminals and body GND:<br />
— Fuel pressure sensor terminal C<br />
— Fuel pressure sensor terminal B<br />
• Is there continuity?<br />
6 INSPECT FUEL PRESSURE SENSOR POWER<br />
CIRCUIT FOR OPEN CIRCUIT<br />
• Turn the engine switch to the ON position.<br />
(Engine off)<br />
• Inspect the voltage at fuel pressure sensor<br />
terminal C (wiring harness side).<br />
• Is the voltage below 1.0 V?<br />
7 INSPECT FUEL PRESSURE SENSOR CIRCUIT<br />
FOR SHORT<br />
• Turn the engine switch off.<br />
• Inspect for continuity between fuel pressure<br />
sensor terminals B and A.<br />
• Is there continuity?<br />
8 INSPECT FUEL TEMPERATURE SENSOR<br />
• Inspect the fuel temperature sensor.<br />
• Is there any malfunction?<br />
9 INSPECT PCM CONNECTOR FOR POOR<br />
CONNECTION<br />
• Turn the engine switch off.<br />
• Inspect for poor connection (such as damaged/<br />
pulled-out terminals, corrosion).<br />
• Is there any malfunction?<br />
10 INSPECT FUEL PRESSURE SENSOR CIRCUIT<br />
FOR OPEN<br />
• Turn the ignition switch off.<br />
• Inspect continuity between fuel pressure<br />
sensor terminal B and PCM terminal 61.<br />
• Is there continuity?<br />
11 VERIFY TROUBLESHOOTING OF DTC P0192<br />
COMPLETED<br />
• Make sure to reconnect all disconnected<br />
connectors.<br />
• Clear the DTC from the PCM memory using<br />
the WDS or equivalent.<br />
• Start the engine.<br />
• Is the same DTC present?<br />
Yes Go to the next step.<br />
No Record the FREEZE FRAME DATA on the repair order,<br />
then go to the next step.<br />
Yes Perform repair or diagnosis according to the available<br />
Service Information.<br />
• If the vehicle is not repaired, go to the next step.<br />
No Go to the next step.<br />
Yes Go to the next step.<br />
No Intermittent concern exists.<br />
Perform the “INTERMITTENT CONCERNS<br />
TROUBLESHOOTING”.<br />
Yes Repair or replace the suspected terminal, go to Step 11.<br />
No Go to the next step.<br />
Yes Repair or replace the wiring harness for a short to GND, go<br />
to Step 11.<br />
No Go to the next step.<br />
Yes Repair or replace the wiring harness for an open circuit, go<br />
to Step 11.<br />
No Go to the next step.<br />
Yes Repair or replace wiring harness for a short, go to Step 11.<br />
No Go to the next step.<br />
Yes Repair the supply pump, go to Step 11.<br />
No Go to the next step.<br />
Yes Repair or replace the suspected terminal, go to Step 11.<br />
No Go to the next step.<br />
Yes Repair or replace suspected terminal, go to the next step.<br />
No Go to the next step.<br />
Yes Replace the PCM, go to the next step.<br />
No Go to the next step.<br />
F2–89<br />
F2
12 VERIFY AFTER REPAIR PROCEDURE<br />
• Perform the Repair Verification Drive Mode.<br />
(See F2–39 OBD DRIVE MODE.)<br />
• Are any DTCs present?<br />
End Of Sie<br />
DTC P0193<br />
F2–90<br />
ON-BOARD DIAGNOSTIC<br />
STEP INSPECTION ACTION<br />
DTC P0193 Fuel pressure sensor circuit high input<br />
DETECTION<br />
CONDITION<br />
POSSIBLE<br />
CAUSE<br />
Yes Go to the applicable DTC inspection.<br />
(See F2–40 DTC TABLE.)<br />
No Troubleshooting completed.<br />
B6E407000100119<br />
• The PCM monitors the input voltage from the fuel pressure sensor while the engine is running. If the input<br />
voltage from the fuel pressure sensor is more than 4.86 V, the PCM determines that there is a malfunction<br />
in the fuel pressure sensor circuit.<br />
Diagnostic support note<br />
• The MIL illuminates if the PCM detects the above malfunction condition in the first drive cycle.<br />
• FREEZE FRAME DATA is available.<br />
• The DTC is stored in the PCM memory.<br />
• Fuel pressure sensor malfunction<br />
• Connector or terminal malfunction<br />
• Fuel pressure sensor power and signal circuits are shorted to each other.<br />
• Short to power supply in wiring between fuel pressure sensor terminal B and PCM terminal 61<br />
• Open circuit in wiring between fuel pressure sensor terminal A and PCM terminal 91<br />
• PCM malfunction<br />
FUEL PRESSURE SENSOR<br />
WIRING HARNESS-SIDE<br />
CONNECTOR<br />
C<br />
B<br />
A<br />
FUEL PRESSURE SENSOR<br />
6<br />
C<br />
B<br />
A<br />
4<br />
4<br />
4<br />
90<br />
61<br />
91<br />
26 25 24 23 22 21 20 19 18 17 16 15 14<br />
52 51 50 49 48 47 46 45 44 43 42 41 40<br />
78 77 76 75 74 73 72 71 70 69 68 67 66<br />
104 103 102 101 100 99 98 97 96 95 94 93 92<br />
5<br />
8<br />
7<br />
7<br />
7<br />
PCM<br />
PCM<br />
WIRING HARNESS-SIDE CONNECTOR<br />
13 12 11 10 9 8 7 6 5 4 3 2 1<br />
39 38 37 36 35 34 33 32 31 30 29 28 27<br />
65 64 63 62 61 60 59 58 57 56 55 54 53<br />
91 90 89 88 87 86 85 84 83 82 81 80 79
End Of Sie<br />
ON-BOARD DIAGNOSTIC<br />
Diagnostic procedure<br />
STEP INSPECTION ACTION<br />
1 VERIFY FREEZE FRAME DATA HAS BEEN Yes Go to the next step.<br />
RECORDED<br />
No Record the FREEZE FRAME DATA on the repair order,<br />
• Has FREEZE FRAME DATA been recorded? then go to the next step.<br />
2 VERIFY RELATED REPAIR INFORMATION Yes Perform repair or diagnosis according to the available<br />
AVAILABILITY<br />
Service Information.<br />
• Verify related Service Information availability. • If the vehicle is not repaired, go to the next step.<br />
• Is any related repair information available? No Go to the next step.<br />
3 VERIFY CURRENT SIGNAL STATUS: IS Yes Go to the next step.<br />
CONCERN INTERMITTENT OR CONSTANT? No Intermittent concern exists.<br />
• Connect the WDS or equivalent to the DLC-2. Perform the “INTERMITTENT CONCERNS<br />
• Clear the DTC from the PCM memory using<br />
the WDS or equivalent.<br />
TROUBLESHOOTING”.<br />
• Start the engine.<br />
• Is the same DTC present?<br />
4 INSPECT FUEL PRESSURE SENSOR<br />
Yes Repair or replace the suspected terminal, go to Step 9.<br />
CONNECTOR FOR POOR CONNECTION No Go to the next step.<br />
• Turn the engine switch off.<br />
• Inspect for poor connection (such as damaged/<br />
pulled-out terminals, corrosion).<br />
• Is there any malfunction?<br />
5 INSPECT FUEL PRESSURE SENSOR SIGNAL Yes Repair or replace harness for short with each other, go to<br />
CIRCUIT FOR SHORT TO POWER SUPPLY<br />
Step 9.<br />
• Turn the engine switch to the ON position<br />
(Engine off).<br />
No Go to the next step.<br />
• Measure the voltage between fuel pressure<br />
sensor terminal B (wiring harness-side) and<br />
body GND<br />
• Is the voltage more than 4.86 V<br />
6 INSPECT FUEL TEMPERATURE SENSOR Yes Repair the supply pump, go to Step 9.<br />
•<br />
•<br />
Inspect the fuel temperature sensor.<br />
Is there any malfunction?<br />
No Go to the next step.<br />
7 INSPECT PCM CONNECTOR FOR POOR Yes Repair or replace the suspected terminal, go to Step 9.<br />
CONNECTION<br />
No Go to the next step.<br />
• Turn the engine switch off.<br />
• Inspect for poor connection (such as damaged/<br />
pulled-out terminals, corrosion).<br />
• Is there any malfunction?<br />
8 INSPECT FUEL PRESSURE SENSOR FOR Yes Go to the next step.<br />
OPEN CIRCUIT<br />
No Repair or replace the wiring harness for an open circuit, go<br />
• Turn the engine switch off.<br />
to the next step.<br />
• Inspect for continuity between fuel pressure<br />
sensor terminal A and PCM terminal 91.<br />
• Is there continuity?<br />
9 VERIFY TROUBLESHOOTING OF DTC P0193 Yes Replace the PCM, go to the next step.<br />
COMPLETED<br />
No Go to the next step.<br />
• Make sure to reconnect all disconnected<br />
connectors.<br />
• Clear the DTC from the PCM memory using<br />
the WDS or equivalent.<br />
• Start the engine.<br />
• Is the same DTC present?<br />
10 VERIFY AFTER REPAIR PROCEDURE<br />
Yes Go to the applicable DTC inspection.<br />
• Perform the Repair Verification Drive Mode.<br />
(See F2–40 DTC TABLE.)<br />
•<br />
(See F2–39 OBD DRIVE MODE.)<br />
Are any DTCs present?<br />
No Troubleshooting completed.<br />
F2–91<br />
F2
DTC P0200<br />
DTC P0200 Fuel injector operation identified<br />
DETECTION<br />
CONDITION<br />
POSSIBLE<br />
CAUSE<br />
F2–92<br />
ON-BOARD DIAGNOSTIC<br />
B6E407000200101<br />
• The PCM monitors each cylinder injection confirmation signal from the IDM while the engine is running. If<br />
the PCM does not receive the injection confirmation signal for unspecified cylinder normally, the PCM<br />
determines that the unspecified cylinder fuel injector operation is not verified.<br />
Diagnostic support note<br />
• The MIL illuminates if the PCM detects the above malfunction condition in the first drive cycle.<br />
• FREEZE FRAME DATA is available.<br />
• The DTC is stored in the PCM memory.<br />
• IDM malfunction<br />
• Connector or terminal malfunction<br />
• Short to GND in wiring harness between IDM terminal 2B and PCM terminal 30<br />
• Short to GND in wiring harness between IDM terminal 2C and PCM terminal 42<br />
• Short to GND in wiring harness between IDM terminal 2D and PCM terminal 44<br />
• Short to GND in wiring harness between IDM terminal 2E and PCM terminal 45<br />
• Short to GND in wiring harness between IDM terminal 2F and PCM terminal 43<br />
• Short to GND in wiring harness between fuel injector No.1 or No.4 terminal D and IDM terminal 1D<br />
• Short to GND in wiring harness between fuel injector No.2 or No.3 terminal D and IDM terminal 1C<br />
• Short to power supply in wiring harness between IDM terminal 2B and PCM terminal 30<br />
• Short to power supply in wiring harness between IDM terminal 2C and PCM terminal 42<br />
• Short to power supply in wiring harness between IDM terminal 2D and PCM terminal 44<br />
• Short to power supply in wiring harness between IDM terminal 2E and PCM terminal 45<br />
• Short to power supply in wiring harness between IDM terminal 2F and PCM terminal 43<br />
• Open circuit in wiring harness between IDM terminal 2B and PCM terminal 30<br />
• Open circuit in wiring harness between IDM terminal 2C and PCM terminal 42<br />
• Open circuit in wiring harness between IDM terminal 2D and PCM terminal 44<br />
• Open circuit in wiring harness between IDM terminal 2E and PCM terminal 45<br />
• Open circuit in wiring harness between IDM terminal 2F and PCM terminal 43<br />
• Open circuit in wiring harness between fuel injector No.1 or No.4 terminal D and IDM terminal 1D<br />
• Open circuit in wiring harness between fuel injector No.2 or No.3 terminal D and IDM terminal 1C<br />
• PCM malfunction
DTC P0200 Fuel injector operation identified<br />
8<br />
IDM<br />
1A<br />
2B<br />
2C<br />
2D<br />
2E<br />
2F<br />
1E<br />
1D<br />
1G<br />
1C<br />
1H<br />
1F<br />
2H<br />
5<br />
5<br />
5<br />
5<br />
5<br />
5<br />
5<br />
5<br />
5<br />
5<br />
5<br />
5<br />
5<br />
6<br />
6<br />
IDM<br />
WIRING HARNESS-SIDE CONNECTOR<br />
1H 1G 1F 1E 1D 1C<br />
2H 2G 2F 2E 2D 2C<br />
ON-BOARD DIAGNOSTIC<br />
1B 1A<br />
2B 2A<br />
26 25 24 23 22 21 20 19 18 17 16 15 14<br />
52 51 50 49 48 47 46 45 44 43 42 41 40<br />
78 77 76 75 74 73 72 71 70 69 68 67 66<br />
104 103 102 101 100 99 98 97 96 95 94 93 92<br />
10<br />
PCM CONTROL RELAY<br />
TERMINAL C<br />
10<br />
10<br />
10<br />
10<br />
6<br />
6<br />
6<br />
6<br />
6<br />
7 10<br />
7 10<br />
7 10<br />
7 10<br />
7 10<br />
CALIBRATION RESISTOR NO.1<br />
B<br />
D<br />
B<br />
D<br />
B<br />
B<br />
A<br />
C<br />
CALIBRATION RESISTOR NO.2<br />
A<br />
C<br />
CALIBRATION RESISTOR NO.3<br />
D A<br />
C<br />
CALIBRATION RESISTOR NO.4<br />
D A<br />
PCM<br />
WIRING HARNESS-SIDE CONNECTOR<br />
C<br />
CALIBRATION RESISTOR<br />
NO.1, NO.2, NO.3, NO.4<br />
WIRING HARNESS-SIDE<br />
CONNECTOR<br />
C<br />
D<br />
A<br />
B<br />
13 12 11 10 9 8 7 6 5 4 3 2 1<br />
39 38 37 36 35 34 33 32 31 30 29 28 27<br />
65 64 63 62 61 60 59 58 57 56 55 54 53<br />
91 90 89 88 87 86 85 84 83 82 81 80 79<br />
9<br />
9<br />
9<br />
9<br />
9<br />
9<br />
9<br />
9<br />
9<br />
9<br />
30<br />
42<br />
44<br />
45<br />
43<br />
37<br />
62<br />
89<br />
11<br />
91<br />
PCM<br />
F2–93<br />
F2
F2–94<br />
ON-BOARD DIAGNOSTIC<br />
Diagnostic procedure<br />
STEP INSPECTION ACTION<br />
1 VERIFY FREEZE FRAME DATA HAS BEEN<br />
RECORDED<br />
• Has FREEZE FRAME DATA been recorded?<br />
2 VERIFY RELATED REPAIR INFORMATION<br />
AVAILABILITY<br />
• Verify related Service Information availability.<br />
• Is any related repair information available?<br />
3 VERIFY CURRENT SIGNAL STATUS: IS<br />
CONCERN INTERMITTENT OR CONSTANT?<br />
• Connect the WDS or equivalent to the DLC-2.<br />
• Clear the DTC from the PCM memory using<br />
the WDS or equivalent.<br />
• Start the engine.<br />
• Is the same DTC present?<br />
4 IDENTIFY TRIGGER DTC FOR FREEZE FRAME<br />
DATA<br />
• Is DTC P0200 on the FREEZE FRAME DATA?<br />
5 INSPECT IDM CONNECTOR FOR POOR<br />
CONNECTION<br />
• Turn the engine switch off.<br />
• Inspect for poor connection (such as damaged/<br />
pulled-out terminals, corrosion).<br />
• Is there any malfunction?<br />
6 INSPECT IDM CIRCUIT FOR SHORT TO GND<br />
• Turn the engine switch off.<br />
• Inspect for continuity between the following<br />
terminals and body GND:<br />
— IDM terminal 2B (wiring harness-side)<br />
— IDM terminal 2C (wiring harness-side)<br />
— IDM terminal 2D (wiring harness-side)<br />
— IDM terminal 2E (wiring harness-side)<br />
— IDM terminal 2F (wiring harness-side)<br />
— IDM terminal 1D (wiring harness-side)<br />
— IDM terminal 1C (wiring harness-side)<br />
• Is there continuity?<br />
7 INSPECT IDM FOR SHORT TO POWER<br />
SUPPLY<br />
• Turn the engine switch off.<br />
• Inspect the voltage between following<br />
harnesses and body GND:<br />
— IDM terminal 2B (wiring harness-side)<br />
— IDM terminal 2C (wiring harness-side)<br />
— IDM terminal 2D (wiring harness-side)<br />
— IDM terminal 2E (wiring harness-side)<br />
— IDM terminal 2F (wiring harness-side)<br />
• Is voltage B+?<br />
8 INSPECT IDM<br />
• Inspect the IDM.<br />
• Is there any malfunction?<br />
9 INSPECT PCM CONNECTOR FOR POOR<br />
CONNECTION<br />
• Turn the engine switch off.<br />
• Inspect for poor connection (such as damaged/<br />
pulled-out terminals, corrosion).<br />
• Is there any malfunction?<br />
Yes Go to the next step.<br />
No Record the FREEZE FRAME DATA on the repair order,<br />
then go to the next step.<br />
Yes Perform repair or diagnosis according to the available<br />
Service Information.<br />
• If the vehicle is not repaired, go to the next step.<br />
No Go to the next step.<br />
Yes Go to the next step.<br />
No Intermittent concern exists.<br />
Perform the “INTERMITTENT CONCERNS<br />
TROUBLESHOOTING”.<br />
Yes Go to the next step.<br />
No Go to troubleshooting procedures for the DTC in the<br />
FREEZE FRAME DATA.<br />
Yes Repair or replace the suspected terminal, then go to Step<br />
11.<br />
No Go to the next step.<br />
Yes Repair or replace the wiring harness for a short to GND,<br />
then go to Step 11.<br />
No Go to the next step.<br />
Yes Repair or replace the wiring harness for a short to GND,<br />
then go to Step 11.<br />
No Go to the next step.<br />
Yes Replace the IDM, then go to Step 11.<br />
No Go to the next step.<br />
Yes Repair or replace the suspected terminal, then go to Step<br />
11.<br />
No Go to the next step.
10 INSPECT IDM FOR OPEN CIRCUIT<br />
• Turn the engine switch off.<br />
• Inspect for continuity between the following<br />
terminals:<br />
— IDM terminal 2B and PCM terminal 30<br />
— IDM terminal 2C and PCM terminal 42<br />
— IDM terminal 2D and PCM terminal 44<br />
— IDM terminal 2E and PCM terminal 45<br />
— IDM terminal 2F and PCM terminal 43<br />
— IDM terminal 1D and fuel injector No.1 and<br />
No.4 terminal D<br />
— IDM terminal 1C and fuel injector terminal<br />
No.2 and No.3 terminal D<br />
• Is there continuity?<br />
11 VERIFY TROUBLESHOOTING OF DTC P0200<br />
COMPLETED<br />
• Make sure to reconnect all disconnected<br />
connectors.<br />
• Clear the DTC from the PCM memory using<br />
the WDS or equivalent.<br />
• Start the engine.<br />
• Is the same DTC present?<br />
12 VERIFY AFTER REPAIR PROCEDURE<br />
• Perform the Repair Verification Drive Mode.<br />
(See F2–39 OBD DRIVE MODE.)<br />
• Are any DTCs present?<br />
End Of Sie<br />
DTC P0201<br />
ON-BOARD DIAGNOSTIC<br />
STEP INSPECTION ACTION<br />
DTC P0201 Fuel injector No.1 operation identified<br />
DETECTION<br />
CONDITION<br />
POSSIBLE<br />
CAUSE<br />
Yes Go to the next step.<br />
No Repair or replace the wiring harness for an open circuit,<br />
then go to the next step.<br />
Yes Replace the PCM, then go to the next step.<br />
No Go to the next step.<br />
Yes Go to the applicable DTC troubleshooting.<br />
(See F2–40 DTC TABLE.)<br />
No Troubleshooting completed.<br />
B6E407000200102<br />
• The PCM monitors each cylinder injection confirmation signal from the IDM while the engine is running. If<br />
the PCM does not receive the injection confirmation signal for No.1 cylinder normally, PCM determines that<br />
the fuel injector No.1 operation is not verified.<br />
Diagnostic support note<br />
• The MIL illuminates if the PCM detects the above malfunction condition in the first drive cycle.<br />
• FREEZE FRAME DATA is available.<br />
• The DTC is stored in the PCM memory.<br />
• IDM malfunction<br />
• Connector or terminal malfunction<br />
• Short to GND in wiring harness between IDM terminal 2C and PCM terminal 42<br />
• Short to power supply in wiring harness between IDM terminal 2C and PCM terminal 42<br />
• Open circuit in wiring harness between IDM terminal 2C and PCM terminal 42<br />
• Fuel injector No.1 malfunction<br />
• Short to GND in wiring harness between fuel injector No.1 terminal B and IDM terminal 1E<br />
• Short to power supply in wiring harness between fuel injector No.1 terminal B and IDM terminal 1E<br />
• Open circuit in wiring harness between fuel injector No.1 terminal B and IDM terminal 1E<br />
• PCM malfunction<br />
F2–95<br />
F2
DTC P0201 Fuel injector No.1 operation identified<br />
F2–96<br />
11<br />
IDM<br />
1A<br />
2B<br />
2C<br />
2D<br />
2E<br />
2F<br />
1E<br />
1D<br />
1G<br />
1C<br />
1H<br />
1F<br />
2H<br />
5<br />
5<br />
IDM<br />
WIRING HARNESS-SIDE CONNECTOR<br />
6<br />
1H 1G 1F 1E 1D 1C<br />
2H 2G 2F 2E 2D 2C<br />
ON-BOARD DIAGNOSTIC<br />
7<br />
1B 1A<br />
2B 2A<br />
26 25 24 23 22 21 20 19 18 17 16 15 14<br />
52 51 50 49 48 47 46 45 44 43 42 41 40<br />
78 77 76 75 74 73 72 71 70 69 68 67 66<br />
104 103 102 101 100 99 98 97 96 95 94 93 92<br />
9<br />
PCM CONTROL RELAY<br />
TERMINAL C<br />
CALIBRATION RESISTOR NO.1<br />
8<br />
8<br />
B<br />
D<br />
B<br />
D<br />
B<br />
B<br />
A<br />
C<br />
CALIBRATION RESISTOR NO.2<br />
A<br />
C<br />
CALIBRATION RESISTOR NO.3<br />
D A<br />
C<br />
CALIBRATION RESISTOR NO.4<br />
D A<br />
PCM<br />
WIRING HARNESS-SIDE CONNECTOR<br />
6<br />
7 13<br />
10<br />
C<br />
8<br />
8<br />
CALIBRATION RESISTOR<br />
WIRING HARNESS-SIDE<br />
CONNECTOR<br />
C<br />
D<br />
A<br />
B<br />
13 12 11 10 9 8 7 6 5 4 3 2 1<br />
39 38 37 36 35 34 33 32 31 30 29 28 27<br />
65 64 63 62 61 60 59 58 57 56 55 54 53<br />
91 90 89 88 87 86 85 84 83 82 81 80 79<br />
12<br />
30<br />
42<br />
44<br />
45<br />
43<br />
37<br />
62<br />
89<br />
11<br />
91<br />
PCM
ON-BOARD DIAGNOSTIC<br />
Diagnostic procedure<br />
STEP INSPECTION ACTION<br />
1 VERIFY FREEZE FRAME DATA HAS BEEN<br />
RECORDED<br />
• Has FREEZE FRAME DATA been recorded?<br />
2 VERIFY RELATED REPAIR INFORMATION<br />
AVAILABILITY<br />
• Verify related Service Bulletins and/or on-line<br />
repair information availability.<br />
• Is any related repair information available?<br />
3 VERIFY CURRENT SIGNAL STATUS: IS<br />
CONCERN INTERMITTENT OR CONSTANT?<br />
• Connect the WDS or equivalent to the DLC-2.<br />
• Clear the DTC from the PCM memory using<br />
the WDS or equivalent.<br />
• Start the engine.<br />
• Is the same DTC present?<br />
4 IDENTIFY TRIGGER DTC FOR FREEZE FRAME<br />
DATA<br />
• Is DTC P0201 on FREEZE FRAME DATA?<br />
5 INSPECT IDM CONNECTOR FOR POOR<br />
CONNECTION<br />
• Turn the engine switch off.<br />
• Inspect for poor connection (such as damaged/<br />
pulled-out terminals, corrosion).<br />
• Is there any malfunction?<br />
6 INSPECT IDM FOR SHORT TO GND<br />
• Turn the engine switch off.<br />
• Inspect continuity between the following<br />
connector terminals and body GND.<br />
— IDM terminal 2C (wiring harness-side)<br />
— IDM terminal 1E (wiring harness-side)<br />
• Is there continuity?<br />
7 INSPECT IDM FOR SHORT TO POWER<br />
SUPPLY<br />
• Turn the engine switch to the ON position<br />
(Engine off).<br />
• Inspect the voltage between following<br />
terminals and body GND.<br />
— IDM terminal 2C (wiring harness-side)<br />
— IDM terminal 1E (wiring harness-side)<br />
• Is the voltage B+?<br />
8 INSPECT FUEL INJECTOR NO.1 CONNECTOR<br />
FOR POOR CONNECTION<br />
• Turn the engine switch off.<br />
• Inspect for poor connection (such as damaged/<br />
pulled-out terminals, corrosion).<br />
• Is there any malfunction?<br />
9 INSPECT FOR OPEN CIRCUIT BETWEEN IDM<br />
AND FUEL INJECTOR NO.1<br />
• Turn the engine switch off.<br />
• Inspect for continuity between IDM terminal 1E<br />
(wiring harness-side) and fuel injector No.1<br />
terminal B (wiring harness-side).<br />
• Is there continuity?<br />
10 INSPECT FUEL INJECTOR<br />
• Inspect fuel injector No.1.<br />
• Is there any malfunction?<br />
11 INSPECT IDM<br />
• Inspect the IDM.<br />
• Is there any malfunction?<br />
Yes Go to the next step.<br />
No Record the FREEZE FRAME DATA on the repair order,<br />
then go to the next step.<br />
Yes Perform repair or diagnosis according to the available<br />
repair information.<br />
• If the vehicle is not repaired, go to the next step.<br />
No Go to the next step.<br />
Yes Go to the next step.<br />
No Intermittent concern exists.<br />
Perform the “INTERMITTENT CONCERNS<br />
TROUBLESHOOTING”.<br />
Yes Go to the next step.<br />
No Go to troubleshooting procedures for the DTC in FREEZE<br />
FRAME DATA.<br />
Yes Repair or replace the suspected terminal, then go to Step<br />
14.<br />
No Go to the next step.<br />
Yes Repair or replace the wiring harness for a short to GND,<br />
then go to Step 14.<br />
No Go to the next step.<br />
Yes Repair or replace the wiring harness for a short to power<br />
supply, then go to Step 14.<br />
No Go to the next step.<br />
Yes Repair or replace the suspected terminal, then go to Step<br />
14.<br />
No Go to the next step.<br />
Yes Go to the next step.<br />
No Repair or replace the wiring harness for an open circuit,<br />
then go to Step 14.<br />
Yes Replace fuel injector No.1, then go to Step 14.<br />
No Go to the next step.<br />
Yes Replace the IDM, then go to step 14.<br />
No Go to the next step.<br />
F2–97<br />
F2
12 INSPECT PCM CONNECTOR FOR POOR<br />
CONNECTION<br />
• Turn the engine switch off.<br />
• Inspect for poor connection (such as damaged/<br />
pulled-out terminals, corrosion).<br />
• Is there any malfunction?<br />
13 INSPECT FOR OPEN CIRCUIT BETWEEN IDM<br />
AND PCM<br />
• Turn the engine switch off.<br />
• Inspect for continuity between IDM terminal 2C<br />
(wiring harness-side) and PCM terminal 42<br />
(wiring harness-side).<br />
• Is there continuity?<br />
14 VERIFY TROUBLESHOOTING OF DTC P0201<br />
COMPLETED<br />
• Make sure to reconnect all disconnected<br />
connectors.<br />
• Clear the DTC using the WDS or equivalent.<br />
• Start the engine.<br />
• Is the same DTC present?<br />
15 VERIFY AFTER REPAIR PROCEDURE<br />
• Perform the Repair Verification Drive Mode.<br />
(See F2–39 OBD DRIVE MODE.)<br />
• Are any DTCs present?<br />
End Of Sie<br />
DTC P0202<br />
F2–98<br />
ON-BOARD DIAGNOSTIC<br />
STEP INSPECTION ACTION<br />
DTC P0202 Fuel injector No.2 operation identified<br />
DETECTION<br />
CONDITION<br />
POSSIBLE<br />
CAUSE<br />
Yes Repair or replace the suspected terminal, then go to Step<br />
14.<br />
No Go to the next step.<br />
Yes Go to the next step.<br />
No Repair or replace the wiring harness for an open circuit,<br />
then go to the next step.<br />
Yes Replace the PCM, then go to the next step.<br />
No Go to the next step.<br />
Yes Go to the applicable DTC troubleshooting.<br />
(See F2–40 DTC TABLE.)<br />
No Troubleshooting completed.<br />
B6E407000200103<br />
• The PCM monitors each cylinder injection confirmation signal from the IDM while the engine is running. If<br />
the PCM does not receive the injection confirmation signal for No.2 cylinder normally, the PCM determines<br />
that the fuel injector No.2 operation is not verified.<br />
Diagnostic support note<br />
• The MIL illuminates if the PCM detects the above malfunction condition in the first drive cycle.<br />
• FREEZE FRAME DATA is available.<br />
• The DTC is stored in the PCM memory.<br />
• IDM malfunction<br />
• Connector or terminal malfunction<br />
• Short to GND in wiring harness between IDM terminal 2F and PCM terminal 43<br />
• Short to power supply in wiring harness between IDM terminal 2F and PCM terminal 43<br />
• Open circuit in wiring harness between IDM terminal 2F and PCM terminal 43<br />
• Fuel injector No.2 malfunction<br />
• Short to GND in wiring harness between fuel injector No.2 terminal B and IDM terminal 1G<br />
• Short to power supply in wiring harness between fuel injector No.2 terminal B and IDM terminal 1G<br />
• Open circuit in wiring harness between fuel injector No.2 terminal B and IDM terminal 1G<br />
• PCM malfunction
DTC P0202 Fuel injector No.2 operation identified<br />
11<br />
IDM<br />
1A<br />
2B<br />
2C<br />
2D<br />
2E<br />
2F<br />
1E<br />
1D<br />
1G<br />
1C<br />
1H<br />
1F<br />
2H<br />
5<br />
5<br />
IDM<br />
WIRING HARNESS-SIDE CONNECTOR<br />
1H 1G 1F 1E 1D 1C<br />
2H 2G 2F 2E 2D 2C<br />
ON-BOARD DIAGNOSTIC<br />
1B 1A<br />
2B 2A<br />
26 25 24 23 22 21 20 19 18 17 16 15 14<br />
52 51 50 49 48 47 46 45 44 43 42 41 40<br />
78 77 76 75 74 73 72 71 70 69 68 67 66<br />
104 103 102 101 100 99 98 97 96 95 94 93 92<br />
6<br />
7<br />
9<br />
PCM CONTROL RELAY<br />
TERMINAL C<br />
CALIBRATION RESISTOR NO.1<br />
B<br />
D<br />
B<br />
D<br />
B<br />
B<br />
A<br />
C<br />
CALIBRATION RESISTOR NO.2<br />
8<br />
8<br />
A<br />
C<br />
CALIBRATION RESISTOR NO.3<br />
D A<br />
C<br />
CALIBRATION RESISTOR NO.4<br />
D A<br />
PCM<br />
WIRING HARNESS-SIDE CONNECTOR<br />
6<br />
7 13<br />
10<br />
C<br />
8<br />
8<br />
CALIBRATION RESISTOR<br />
WIRING HARNESS-SIDE<br />
CONNECTOR<br />
C<br />
D<br />
A<br />
B<br />
13 12 11 10 9 8 7 6 5 4 3 2 1<br />
39 38 37 36 35 34 33 32 31 30 29 28 27<br />
65 64 63 62 61 60 59 58 57 56 55 54 53<br />
91 90 89 88 87 86 85 84 83 82 81 80 79<br />
12<br />
30<br />
42<br />
44<br />
45<br />
43<br />
37<br />
62<br />
89<br />
11<br />
91<br />
PCM<br />
F2–99<br />
F2
F2–100<br />
ON-BOARD DIAGNOSTIC<br />
Diagnostic procedure<br />
STEP INSPECTION ACTION<br />
1 VERIFY FREEZE FRAME DATA HAS BEEN<br />
RECORDED<br />
• Has FREEZE FRAME DATA been recorded?<br />
2 VERIFY RELATED REPAIR INFORMATION<br />
AVAILABILITY<br />
• Verify related Service Bulletins and/or on-line<br />
repair information availability.<br />
• Is any related repair information available?<br />
3 VERIFY CURRENT SIGNAL STATUS: IS<br />
CONCERN INTERMITTENT OR CONSTANT?<br />
• Connect the WDS or equivalent to the DLC-2.<br />
• Clear the DTC from the PCM memory using<br />
the WDS or equivalent.<br />
• Start the engine.<br />
• Is the same DTC present?<br />
4 IDENTIFY TRIGGER DTC FOR FREEZE FRAME<br />
DATA<br />
• Is DTC P0202 on FREEZE FRAME DATA?<br />
5 INSPECT IDM CONNECTOR FOR POOR<br />
CONNECTION<br />
• Turn the engine switch off.<br />
• Inspect for poor connection (such as damaged/<br />
pulled-out terminals, corrosion).<br />
• Is there any malfunction?<br />
6 INSPECT IDM FOR SHORT TO GND<br />
• Turn the engine switch off.<br />
• Inspect the continuity between the following<br />
terminals and body GND.<br />
— IDM terminal 2F (wiring harness-side)<br />
— IDM terminal 1G (wiring harness-side)<br />
• Is there continuity?<br />
7 INSPECT IDM FOR SHORT TO POWER<br />
• Turn the engine switch to the ON position<br />
(Engine off).<br />
• Inspect the voltage between the following<br />
terminals and body GND.<br />
— IDM terminal 2F (wiring harness-side)<br />
— IDM terminal 1G (wiring harness-side)<br />
• Is the voltage B+?<br />
8 INSPECT FUEL INJECTOR NO.2 CONNECTOR<br />
FOR POOR CONNECTION<br />
• Turn the engine switch off.<br />
• Inspect for poor connection (such as damaged/<br />
pulled-out terminals, corrosion).<br />
• Is there any malfunction?<br />
9 INSPECT FOR OPEN CIRCUIT BETWEEN IDM<br />
AND FUEL INJECTOR NO.2<br />
• Turn the engine switch off.<br />
• Inspect for continuity between IDM terminal 1G<br />
(wiring harness-side) and fuel injector No.2<br />
terminal B (wiring harness-side).<br />
• Is there continuity?<br />
10 INSPECT FUEL INJECTOR<br />
• Inspect fuel injector No.2.<br />
• Is there any malfunction?<br />
11 INSPECT IDM<br />
• Inspect the IDM.<br />
• Is there any malfunction?<br />
12 INSPECT PCM CONNECTOR FOR POOR<br />
CONNECTION<br />
• Turn the engine switch off.<br />
• Inspect for poor connection (such as damaged/<br />
pulled-out terminals, corrosion).<br />
• Is there any malfunction?<br />
Yes Go to the next step.<br />
No Record the FREEZE FRAME DATA on the repair order,<br />
then go to the next step.<br />
Yes Perform repair or diagnosis according to the available<br />
repair information.<br />
• If the vehicle is not repaired, go to the next step.<br />
No Go to the next step.<br />
Yes Go to the next step.<br />
No Intermittent concern exists.<br />
Perform the “INTERMITTENT CONCERNS<br />
TROUBLESHOOTING”.<br />
Yes Go to the next step.<br />
No Go to the troubleshooting procedures for the DTC in the<br />
FREEZE FRAME DATA.<br />
Yes Repair or replace the suspected terminal, then go to Step<br />
14.<br />
No Go to the next step.<br />
Yes Repair or replace the wiring harness for a short to GND,<br />
then go to Step 14.<br />
No Go to the next step.<br />
Yes Repair or replace the wiring harness for a short to power,<br />
then go to Step 14.<br />
No Go to the next step.<br />
Yes Repair or replace the suspected terminal, then go to Step<br />
14.<br />
No Go to the next step.<br />
Yes Go to the next step.<br />
No Repair or replace the wiring harness for an open circuit<br />
then go to Step 14.<br />
Yes Replace fuel injector No.2, then go to Step 14.<br />
No Go to the next step.<br />
Yes Replace the IDM, then go to step 14.<br />
No Go to the next step.<br />
Yes Repair or replace the suspected terminal, then go to Step<br />
14.<br />
No Go to the next step.
13 INSPECT FOR OPEN CIRCUIT BETWEEN IDM<br />
AND PCM<br />
• Turn the engine switch off.<br />
• Inspect the continuity between IDM terminal 2F<br />
(wiring harness-side) and PCM terminal 43<br />
(wiring harness-side).<br />
• Is there continuity?<br />
14 VERIFY TROUBLESHOOTING OF DTC P0202<br />
COMPLETED<br />
• Make sure to reconnect all disconnected<br />
connectors.<br />
• Clear the DTC using the WDS or equivalent.<br />
• Start the engine.<br />
• Is the same DTC present?<br />
15 VERIFY AFTER REPAIR PROCEDURE<br />
• Perform the Repair Verification Drive Mode.<br />
(See F2–39 OBD DRIVE MODE.)<br />
• Are any DTCs present?<br />
End Of Sie<br />
DTC P0203<br />
ON-BOARD DIAGNOSTIC<br />
STEP INSPECTION ACTION<br />
DTC P0203 Fuel injector No.3 operation identified<br />
DETECTION<br />
CONDITION<br />
POSSIBLE<br />
CAUSE<br />
Yes Go to the next step.<br />
No Repair or replace the wiring harness for an open circuit,<br />
then go to the next step.<br />
Yes Replace the PCM, then go to the next step.<br />
No Go to the next step.<br />
Yes Go to the applicable DTC troubleshooting.<br />
(See F2–40 DTC TABLE.)<br />
No Troubleshooting completed.<br />
B6E407000200104<br />
• The PCM monitors each cylinder’s injection confirmation signal from the IDM while the engine is running. If<br />
the PCM does not receive the injection confirmation signal for No.3 cylinder normally, the PCM determines<br />
that the fuel injector No.3 operation is not verified.<br />
Diagnostic support note<br />
• The MIL illuminates if the PCM detects the above malfunction condition in the first drive cycle.<br />
• FREEZE FRAME DATA is available.<br />
• The DTC is stored in the PCM memory.<br />
• IDM malfunction<br />
• Connector or terminal malfunction<br />
• Short to GND in wiring harness between IDM terminal 2D and PCM terminal 44<br />
• Short to power supply in wiring harness between IDM terminal 2D and PCM terminal 44<br />
• Open circuit in wiring harness between IDM terminal 2D and PCM terminal 44<br />
• Fuel injector No.3 malfunction<br />
• Short to GND in wiring harness between fuel injector No.3 terminal B and IDM terminal 1H<br />
• Short to power supply in wiring harness between fuel injector No.3 terminal B and IDM terminal 1H<br />
• Open circuit in wiring harness between fuel injector No.3 terminal B and IDM terminal 1H<br />
• PCM malfunction<br />
F2–101<br />
F2
DTC P0203 Fuel injector No.3 operation identified<br />
F2–102<br />
11<br />
IDM<br />
1A<br />
2B<br />
2C<br />
2D<br />
2E<br />
2F<br />
1E<br />
1D<br />
1G<br />
1C<br />
1H<br />
1F<br />
2H<br />
5<br />
5<br />
IDM<br />
WIRING HARNESS-SIDE CONNECTOR<br />
1H 1G 1F 1E 1D 1C<br />
2H 2G 2F 2E 2D 2C<br />
ON-BOARD DIAGNOSTIC<br />
1B 1A<br />
2B 2A<br />
26 25 24 23 22 21 20 19 18 17 16 15 14<br />
52 51 50 49 48 47 46 45 44 43 42 41 40<br />
78 77 76 75 74 73 72 71 70 69 68 67 66<br />
104 103 102 101 100 99 98 97 96 95 94 93 92<br />
6<br />
7<br />
9<br />
PCM CONTROL RELAY<br />
TERMINAL C<br />
CALIBRATION RESISTOR NO.1<br />
B<br />
D<br />
B<br />
D<br />
B<br />
A<br />
C<br />
CALIBRATION RESISTOR NO.2<br />
A<br />
C<br />
CALIBRATION RESISTOR NO.3<br />
8<br />
8<br />
D A<br />
10<br />
B C<br />
CALIBRATION RESISTOR NO.4<br />
D A<br />
PCM<br />
WIRING HARNESS-SIDE CONNECTOR<br />
6<br />
7 13<br />
C<br />
8<br />
8<br />
CALIBRATION RESISTOR<br />
WIRING HARNESS-SIDE<br />
CONNECTOR<br />
C<br />
D<br />
A<br />
B<br />
13 12 11 10 9 8 7 6 5 4 3 2 1<br />
39 38 37 36 35 34 33 32 31 30 29 28 27<br />
65 64 63 62 61 60 59 58 57 56 55 54 53<br />
91 90 89 88 87 86 85 84 83 82 81 80 79<br />
12<br />
30<br />
42<br />
44<br />
45<br />
43<br />
37<br />
62<br />
89<br />
11<br />
91<br />
PCM
ON-BOARD DIAGNOSTIC<br />
Diagnostic procedure<br />
STEP INSPECTION ACTION<br />
1 VERIFY FREEZE FRAME DATA HAS BEEN<br />
RECORDED<br />
• Has FREEZE FRAME DATA been recorded?<br />
2 VERIFY RELATED REPAIR INFORMATION<br />
AVAILABILITY<br />
• Verify related Service Bulletins and/or on-line<br />
repair information availability.<br />
• Is any related repair information available?<br />
3 VERIFY CURRENT SIGNAL STATUS: IS<br />
CONCERN INTERMITTENT OR CONSTANT?<br />
• Connect the WDS or equivalent to the DLC-2.<br />
• Clear the DTC from the PCM memory using<br />
the WDS or equivalent.<br />
• Start the engine.<br />
• Is the same DTC present?<br />
4 IDENTIFY TRIGGER DTC FOR FREEZE FRAME<br />
DATA<br />
• Is DTC P0203 on the FREEZE FRAME DATA?<br />
5 INSPECT IDM CONNECTOR FOR POOR<br />
CONNECTION<br />
• Turn the engine switch off.<br />
• Inspect for poor connection (such as damaged/<br />
pulled-out terminals, corrosion).<br />
• Is there any malfunction?<br />
6 INSPECT IDM FOR SHORT TO GND<br />
• Turn the engine switch off.<br />
• Inspect the continuity between the following<br />
terminals and body GND:<br />
— IDM terminal 2D (wiring harness-side)<br />
— IDM terminal 1H (wiring harness-side)<br />
• Is there continuity?<br />
7 INSPECT IDM FOR SHORT TO POWER<br />
• Turn the engine switch to the ON position<br />
(Engine off).<br />
• Inspect the voltage between the following<br />
terminals and body GND:<br />
— IDM terminal 2D (wiring harness-side)<br />
— IDM terminal 1H (wiring harness-side)<br />
• Is voltage B+?<br />
8 INSPECT FUEL INJECTOR NO.3 CONNECTOR<br />
FOR POOR CONNECTION<br />
• Turn the engine switch off.<br />
• Inspect for poor connection (such as damaged/<br />
pulled-out terminals, corrosion).<br />
• Is there any malfunction?<br />
9 INSPECT FOR OPEN CIRCUIT BETWEEN IDM<br />
AND FUEL INJECTOR NO.3<br />
• Turn the engine switch off.<br />
• Inspect for continuity between IDM terminal 1H<br />
(wiring harness-side) and fuel injector No.3<br />
terminal B (wiring harness-side).<br />
• Is there continuity?<br />
10 INSPECT FUEL INJECTOR<br />
• Inspect fuel injector No.3.<br />
• Is there any malfunction?<br />
11 INSPECT IDM<br />
• Inspect the IDM.<br />
• Is there any malfunction?<br />
12 INSPECT PCM CONNECTOR FOR POOR<br />
CONNECTION<br />
• Turn the engine switch off.<br />
• Inspect for poor connection (such as damaged/<br />
pulled-out terminals, corrosion).<br />
• Is there any malfunction?<br />
Yes Go to the next step.<br />
No Record the FREEZE FRAME DATA on the repair order,<br />
then go to the next step.<br />
Yes Perform repair or diagnosis according to the available<br />
repair information.<br />
• If the vehicle is not repaired, go to the next step.<br />
No Go to the next step.<br />
Yes Go to the next step.<br />
No Intermittent concern exists.<br />
Perform the “INTERMITTENT CONCERNS<br />
TROUBLESHOOTING”.<br />
Yes Go to the next step.<br />
No Go to the troubleshooting procedures for the DTC in the<br />
FREEZE FRAME DATA.<br />
Yes Repair or replace the suspected terminal, then go to Step<br />
14.<br />
No Go to the next step.<br />
Yes Repair or replace the wiring harness for a short to GND,<br />
then go to Step 14.<br />
No Go to the next step.<br />
Yes Repair or replace the wiring harness for a short to power,<br />
then go to Step 14.<br />
No Go to the next step.<br />
Yes Repair or replace the suspected terminal, then go to Step<br />
14.<br />
No Go to the next step.<br />
Yes Go to the next step.<br />
No Repair or replace the wiring harness for an open circuit,<br />
then go to Step 14.<br />
Yes Replace fuel injector No.3, then go to Step 14.<br />
No Go to the next step.<br />
Yes Replace the IDM, then go to step 14.<br />
No Go to the next step.<br />
Yes Repair or replace the suspected terminal, then go to Step<br />
14.<br />
No Go to the next step.<br />
F2–103<br />
F2
13 INSPECT FOR OPEN CIRCUIT BETWEEN IDM<br />
AND PCM<br />
• Turn the engine switch off.<br />
• Inspect for continuity between IDM terminal 2D<br />
(wiring harness-side) and PCM terminal 44<br />
(wiring harness-side).<br />
• Is there continuity?<br />
14 VERIFY TROUBLESHOOTING OF DTC P0203<br />
COMPLETED<br />
• Make sure to reconnect all disconnected<br />
connectors.<br />
• Clear the DTC using the WDS or equivalent.<br />
• Start the engine.<br />
• Is the same DTC present?<br />
15 VERIFY AFTER REPAIR PROCEDURE<br />
• Perform the Repair Verification Drive Mode.<br />
(See F2–39 OBD DRIVE MODE.)<br />
• Are any DTCs present?<br />
End Of Sie<br />
DTC P0204<br />
F2–104<br />
ON-BOARD DIAGNOSTIC<br />
STEP INSPECTION ACTION<br />
DTC P0204 Fuel injector No.4 operation identified<br />
DETECTION<br />
CONDITION<br />
POSSIBLE<br />
CAUSE<br />
Yes Go to the next step.<br />
No Repair or replace the wiring harness for an open circuit,<br />
then go to the next step.<br />
Yes Replace the PCM, then go to the next step.<br />
No Go to the next step.<br />
Yes Go to the applicable DTC troubleshooting.<br />
(See F2–40 DTC TABLE.)<br />
No Troubleshooting completed.<br />
B6E407000200105<br />
• The PCM monitors each cylinder injection confirmation signal from the IDM while the engine is running. If<br />
the PCM does not receive the injection confirmation signal for No.4 cylinder normally, the PCM determines<br />
that the fuel injector No.4 operation is not verified.<br />
Diagnostic support note<br />
• The MIL illuminates if the PCM detects the above malfunction condition in the first drive cycle.<br />
• FREEZE FRAME DATA is available.<br />
• The DTC is stored in the PCM memory.<br />
• IDM malfunction<br />
• Connector or terminal malfunction<br />
• Short to GND in wiring harness between IDM terminal 2E and PCM terminal 45<br />
• Short to power supply in wiring harness between IDM terminal 2E and PCM terminal 45<br />
• Open circuit in wiring harness between IDM terminal 2E and PCM terminal 45<br />
• Fuel injector No.4 malfunction<br />
• Short to GND in wiring harness between fuel injector No.4 terminal B and IDM terminal 1F<br />
• Short to power supply in wiring harness between fuel injector No.4 terminal B and IDM terminal 1F<br />
• Open circuit in wiring harness between fuel injector No.4 terminal B and IDM terminal 1F<br />
• PCM malfunction
DTC P0204 Fuel injector No.4 operation identified<br />
11<br />
IDM<br />
1A<br />
2B<br />
2C<br />
2D<br />
2E<br />
2F<br />
1E<br />
1D<br />
1G<br />
1C<br />
1H<br />
1F<br />
2H<br />
5<br />
5<br />
IDM<br />
WIRING HARNESS-SIDE CONNECTOR<br />
1H 1G 1F 1E 1D 1C<br />
2H 2G 2F 2E 2D 2C<br />
ON-BOARD DIAGNOSTIC<br />
PCM CONTROL RELAY<br />
TERMINAL C<br />
CALIBRATION RESISTOR NO.1<br />
D A<br />
8<br />
9<br />
10<br />
8<br />
6 8<br />
8<br />
B C<br />
1B 1A<br />
2B 2A<br />
26 25 24 23 22 21 20 19 18 17 16 15 14<br />
52 51 50 49 48 47 46 45 44 43 42 41 40<br />
78 77 76 75 74 73 72 71 70 69 68 67 66<br />
104 103 102 101 100 99 98 97 96 95 94 93 92<br />
7<br />
B<br />
D<br />
B<br />
D<br />
B<br />
A<br />
C<br />
CALIBRATION RESISTOR NO.2<br />
A<br />
C<br />
CALIBRATION RESISTOR NO.3<br />
D A<br />
C<br />
CALIBRATION RESISTOR NO.4<br />
PCM<br />
WIRING HARNESS-SIDE CONNECTOR<br />
6<br />
7 13<br />
CALIBRATION RESISTOR<br />
WIRING HARNESS-SIDE<br />
CONNECTOR<br />
C<br />
D<br />
A<br />
B<br />
13 12 11 10 9 8 7 6 5 4 3 2 1<br />
39 38 37 36 35 34 33 32 31 30 29 28 27<br />
65 64 63 62 61 60 59 58 57 56 55 54 53<br />
91 90 89 88 87 86 85 84 83 82 81 80 79<br />
12<br />
30<br />
42<br />
44<br />
45<br />
43<br />
37<br />
62<br />
89<br />
11<br />
91<br />
PCM<br />
F2–105<br />
F2
F2–106<br />
ON-BOARD DIAGNOSTIC<br />
Diagnostic procedure<br />
STEP INSPECTION ACTION<br />
1 VERIFY FREEZE FRAME DATA HAS BEEN<br />
RECORDED<br />
• Has FREEZE FRAME DATA been recorded?<br />
2 VERIFY RELATED REPAIR INFORMATION<br />
AVAILABILITY<br />
• Verify related Service Bulletins and/or on-line<br />
repair information availability.<br />
• Is any related repair information available?<br />
3 VERIFY CURRENT SIGNAL STATUS: IS<br />
CONCERN INTERMITTENT OR CONSTANT?<br />
• Connect the WDS or equivalent to the DLC-2.<br />
• Clear the DTC from the PCM memory using<br />
the WDS or equivalent.<br />
• Start the engine.<br />
• Is the same DTC present?<br />
4 IDENTIFY TRIGGER DTC FOR FREEZE FRAME<br />
DATA<br />
• Is DTC P0204 on FREEZE FRAME DATA?<br />
5 INSPECT IDM CONNECTOR FOR POOR<br />
CONNECTION<br />
• Turn the engine switch off.<br />
• Inspect for poor connection (such as damaged/<br />
pulled-out terminals, corrosion).<br />
• Is there any malfunction?<br />
6 INSPECT IDM FOR SHORT TO GND<br />
• Turn the engine switch off.<br />
• Inspect the continuity between the following<br />
terminals and body GND.<br />
— IDM terminal 2E (wiring harness-side)<br />
— IDM terminal 1F (wiring harness-side)<br />
• Is there continuity?<br />
7 INSPECT IDM FOR SHORT TO POWER<br />
• Turn the engine switch to the ON position<br />
(Engine off).<br />
• Inspect the voltage between the following<br />
terminals and body GND.<br />
— IDM terminal 2E (wiring harness-side)<br />
— IDM terminal 1F (wiring harness-side)<br />
• Is the voltage B+?<br />
8 INSPECT FUEL INJECTOR NO.4 CONNECTOR<br />
FOR POOR CONNECTION<br />
• Turn the engine switch off.<br />
• Inspect for poor connection (such as damaged/<br />
pulled-out terminals, corrosion).<br />
• Is there any malfunction?<br />
9 INSPECT FOR OPEN CIRCUIT BETWEEN IDM<br />
AND FUEL INJECTOR NO.4<br />
• Turn the engine switch off.<br />
• Inspect for continuity between IDM terminal 1F<br />
(wiring harness-side) and fuel injector terminal<br />
B (wiring harness-side).<br />
• Is there continuity?<br />
10 INSPECT FUEL INJECTOR<br />
• Inspect fuel injector No.4.<br />
• Is there any malfunction?<br />
11 INSPECT IDM<br />
• Inspect the IDM.<br />
• Is there any malfunction?<br />
12 INSPECT PCM CONNECTOR FOR POOR<br />
CONNECTION<br />
• Turn the engine switch off.<br />
• Inspect for poor connection (such as damaged/<br />
pulled-out terminals, corrosion).<br />
• Is there any malfunction?<br />
Yes Go to the next step.<br />
No Record the FREEZE FRAME DATA on the repair order,<br />
then go to the next step.<br />
Yes Perform repair or diagnosis according to the available<br />
repair information.<br />
• If the vehicle is not repaired, go to the next step.<br />
No Go to the next step.<br />
Yes Go to the next step.<br />
No Intermittent concern exists.<br />
Perform the “INTERMITTENT CONCERNS<br />
TROUBLESHOOTING”.<br />
Yes Go to the next step.<br />
No Go to the troubleshooting procedures for the DTC in the<br />
FREEZE FRAME DATA.<br />
Yes Repair or replace the suspected terminal, then go to Step<br />
14.<br />
No Go to the next step.<br />
Yes Repair or replace the wiring harness for a short to GND,<br />
then go to Step 14.<br />
No Go to the next step.<br />
Yes Repair or replace the wiring harness for a short to power,<br />
then go to Step 14.<br />
No Go to the next step.<br />
Yes Repair or replace the suspected terminal, then go to Step<br />
14.<br />
No Go to the next step.<br />
Yes Go to the next step.<br />
No Repair or replace the wiring harness for an open circuit,<br />
then go to Step 14.<br />
Yes Replace fuel injector No.4, then go to Step 14.<br />
No Go to the next step.<br />
Yes Replace the IDM, then go to step 14.<br />
No Go to the next step.<br />
Yes Repair or replace the suspected terminal, then go to Step<br />
14.<br />
No Go to the next step.
13 INSPECT FOR OPEN CIRCUIT BETWEEN IDM<br />
AND PCM<br />
• Turn the engine switch off.<br />
• Inspect for continuity between IDM terminal 2E<br />
(wiring harness-side) and PCM terminal 45<br />
(wiring harness-side).<br />
• Is there continuity?<br />
14 VERIFY TROUBLESHOOTING OF DTC P0204<br />
COMPLETED<br />
• Make sure to reconnect all disconnected<br />
connectors.<br />
• Clear the DTC using the WDS or equivalent.<br />
• Start the engine.<br />
• Is the same DTC present?<br />
15 VERIFY AFTER REPAIR PROCEDURE<br />
• Perform the Repair Verification Drive Mode.<br />
(See F2–39 OBD DRIVE MODE.)<br />
• Are any DTCs present?<br />
End Of Sie<br />
DTC P0222<br />
ON-BOARD DIAGNOSTIC<br />
STEP INSPECTION ACTION<br />
DTC P0222 Accelerator pedal position (APP) sensor No.2 circuit low input<br />
DETECTION<br />
CONDITION<br />
POSSIBLE<br />
CAUSE<br />
Yes Go to the next step.<br />
No Repair or replace the wiring harness for an open circuit,<br />
then go to the next step.<br />
Yes Replace the PCM, then go to the next step.<br />
No Go to the next step.<br />
Yes Go to the applicable DTC troubleshooting.<br />
(See F2–40 DTC TABLE.)<br />
No Troubleshooting completed.<br />
B6E407000200106<br />
• The PCM monitors the input signal from accelerator pedal position sensor No.2. If the voltage from<br />
accelerator pedal position sensor No.2 is less than 0.3 V, the PCM determines that there is a malfunction<br />
in the accelerator pedal position sensor No.2 circuit.<br />
Diagnostic support note<br />
• The MIL illuminates if the PCM detects the above malfunction condition in the first drive cycle.<br />
• FREEZE FRAME DATA is available.<br />
• The DTC is stored in the PCM memory.<br />
• APP sensor No.2 malfunction<br />
• Connector or terminal malfunction<br />
• Open circuit in wiring harness between APP sensor terminal A and PCM terminal 90<br />
• Short to GND in wiring harness between APP sensor terminal A and PCM terminal 90<br />
• Open circuit in wiring harness between APP sensor terminal C and PCM terminal 88<br />
• Short to GND in wiring harness between APP sensor terminal C and PCM terminal 88<br />
• PCM malfunction<br />
F2–107<br />
F2
F2–108<br />
ON-BOARD DIAGNOSTIC<br />
DTC P0222 Accelerator pedal position (APP) sensor No.2 circuit low input<br />
APP SENSOR<br />
WIRING HARNESS-SIDE<br />
CONNECTOR<br />
D<br />
C<br />
APP SENSOR NO.2<br />
(APP SENSOR) PCM<br />
B<br />
6<br />
A<br />
A<br />
C<br />
D<br />
4<br />
4<br />
4<br />
5<br />
8<br />
5 8<br />
7<br />
7<br />
7<br />
90<br />
88<br />
91<br />
26 25 24 23 22 21 20 19 18 17 16 15 14<br />
52 51 50 49 48 47 46 45 44 43 42 41 40<br />
78 77 76 75 74 73 72 71 70 69 68 67 66<br />
104 103 102 101 100 99 98 97 96 95 94 93 92<br />
PCM<br />
WIRING HARNESS-SIDE<br />
CONNECTOR<br />
13 12 11 10 9 8 7 6 5 4 3 2 1<br />
39 38 37 36 35 34 33 32 31 30 29 28 27<br />
65 64 63 62 61 60 59 58 57 56 55 54 53<br />
91 90 89 88 87 86 85 84 83 82 81 80 79
ON-BOARD DIAGNOSTIC<br />
Diagnostic procedure<br />
STEP INSPECTION ACTION<br />
1 VERIFY FREEZE FRAME DATA HAS BEEN<br />
RECORDED<br />
• Has FREEZE FRAME DATA been recorded?<br />
2 VERIFY RELATED REPAIR INFORMATION<br />
AVAILABILITY<br />
• Verify related service repair information<br />
availability.<br />
• Is any related repair information available?<br />
3 VERIFY CURRENT SIGNAL STATUS: IS<br />
CONCERN INTERMITTENT OR CONSTANT?<br />
• Connect the WDS or equivalent to the DLC-2.<br />
• Clear the DTC from the PCM memory using<br />
the WDS or equivalent.<br />
• Start the engine.<br />
• Is the same DTC present?<br />
4 INSPECT APP SENSOR CONNECTOR FOR<br />
POOR CONNECTION<br />
• Turn the engine switch off.<br />
• Disconnect the APP sensor connector.<br />
• Inspect for poor connection (such as damaged/<br />
pulled-out pins, corrosion).<br />
• Is there any malfunction?<br />
5 INSPECT APP SENSOR NO.2 CIRCUIT FOR<br />
SHORT TO GND<br />
• Turn the engine switch off.<br />
• Inspect for continuity between the following<br />
terminals and body GND:<br />
— APP sensor terminal A (wiring harness-side)<br />
and body GND<br />
— APP sensor terminal C (wiring harness-side)<br />
and body GND<br />
• Is there continuity?<br />
6 INSPECT APP SENSOR NO.2<br />
• Inspect the APP sensor No.2.<br />
• Is there any malfunction?<br />
7 INSPECT PCM CONNECTOR FOR POOR<br />
CONNECTION<br />
• Turn the engine switch off.<br />
• Disconnect the PCM connector.<br />
• Inspect for poor connection (such as damaged/<br />
pulled-out pins, corrosion).<br />
• Is there any malfunction?<br />
8 INSPECT APP SENSOR NO.2 CIRCUIT FOR<br />
OPEN CIRCUIT<br />
• Turn the engine switch off.<br />
• Inspect for continuity between the following<br />
terminals:<br />
— APP sensor terminal A (wiring harness-side)<br />
and PCM terminal 90 (wiring harness-side)<br />
— APP sensor terminal C (wiring harness-side)<br />
and PCM terminal 88 (wiring harness-side)<br />
• Is there continuity?<br />
9 VERIFY TROUBLESHOOTING OF DTC P0222<br />
COMPLETED<br />
• Make sure to reconnect all disconnected<br />
connectors.<br />
• Clear the DTC from the PCM memory using<br />
the WDS or equivalent.<br />
• Start the engine.<br />
• Is the same DTC present?<br />
10 VERIFY AFTER REPAIR PROCEDURE<br />
• Perform the Repair Verification Drive Mode.<br />
(See F2–39 OBD DRIVE MODE.)<br />
• Are any DTCs present?<br />
Yes Go to the next step.<br />
No Record the FREEZE FRAME DATA on the repair order,<br />
then go to the next step.<br />
Yes Perform repair or diagnosis according to the available<br />
repair information.<br />
• If the vehicle is not repaired, go to the next step.<br />
No Go to the next step.<br />
Yes Go to the next step.<br />
No Intermittent concern exists.<br />
Perform the “INTERMITTENT CONCERNS<br />
TROUBLESHOOTING”.<br />
Yes Repair or replace the terminal, then go to Step 9.<br />
No Go to the next step.<br />
Yes Repair or replace the wiring harness for a possible short to<br />
GND, then go to Step 9.<br />
No Go to the next step.<br />
Yes Replace the APP sensor, then go to Step 9.<br />
No Go to the next step.<br />
Yes Repair or replace the terminal, then go to Step 9.<br />
No Go to the next step.<br />
Yes Go to the next step.<br />
No Repair or replace the wiring harness for a possible open<br />
circuit, then go to the next step.<br />
Yes Replace the PCM, then go to the next step.<br />
No Go to the next step.<br />
Yes Go to the applicable DTC inspection.<br />
(See F2–40 DTC TABLE.)<br />
No DTC troubleshooting completed.<br />
F2–109<br />
F2
End Of Sie<br />
DTC P0223<br />
F2–110<br />
ON-BOARD DIAGNOSTIC<br />
DTC P0223 Accelerator pedal position (APP) sensor No.2 circuit high input<br />
DETECTION<br />
CONDITION<br />
POSSIBLE<br />
CAUSE<br />
B6E407000200107<br />
• The PCM monitors the input signal from accelerator pedal position sensor No.2. If the voltage from<br />
accelerator pedal position sensor No.2 is more than 4.7 V, the PCM determines that there is a malfunction<br />
in the accelerator pedal position sensor No.2 circuit.<br />
Diagnostic support note<br />
• The MIL illuminates if the PCM detects the above malfunction condition in the first drive cycle.<br />
• FREEZE FRAME DATA is available.<br />
• The DTC is stored in the PCM memory.<br />
• APP sensor No.2 malfunction<br />
• Connector or terminal malfunction<br />
• Short to power supply in wiring harness between APP sensor terminal C and PCM terminal 88<br />
• Open circuit in wiring harness between APP sensor terminal D and PCM terminal 91<br />
• PCM malfunction<br />
APP SENSOR<br />
WIRING HARNESS-SIDE<br />
CONNECTOR<br />
D<br />
C<br />
APP SENSOR NO.2<br />
(APP SENSOR) PCM<br />
B<br />
6<br />
A<br />
A<br />
C<br />
D<br />
4<br />
4<br />
5<br />
4 8<br />
7<br />
7<br />
7<br />
90<br />
88<br />
91<br />
26 25 24 23 22 21 20 19 18 17 16 15 14<br />
52 51 50 49 48 47 46 45 44 43 42 41 40<br />
78 77 76 75 74 73 72 71 70 69 68 67 66<br />
104 103 102 101 100 99 98 97 96 95 94 93 92<br />
PCM<br />
WIRING HARNESS-SIDE<br />
CONNECTOR<br />
13 12 11 10 9 8 7 6 5 4 3 2 1<br />
39 38 37 36 35 34 33 32 31 30 29 28 27<br />
65 64 63 62 61 60 59 58 57 56 55 54 53<br />
91 90 89 88 87 86 85 84 83 82 81 80 79
End Of Sie<br />
ON-BOARD DIAGNOSTIC<br />
Diagnostic procedure<br />
STEP INSPECTION ACTION<br />
1 VERIFY FREEZE FRAME DATA HAS BEEN Yes Go to the next step.<br />
RECORDED<br />
No Record the FREEZE FRAME DATA on the repair order,<br />
• Has FREEZE FRAME DATA been recorded? then go to the next step.<br />
2 VERIFY RELATED REPAIR INFORMATION Yes Perform repair or diagnosis according to the available<br />
AVAILABILITY<br />
repair information.<br />
• Verify related service repair information<br />
• If the vehicle is not repaired, go to the next step.<br />
availability.<br />
No Go to the next step.<br />
• Is any related repair information available?<br />
3 VERIFY CURRENT SIGNAL STATUS: IS Yes Go to the next step.<br />
CONCERN INTERMITTENT OR CONSTANT? No Intermittent concern exists.<br />
• Connect the WDS or equivalent to the DLC-2. Perform the “INTERMITTENT CONCERNS<br />
• Clear the DTC from the PCM memory using<br />
the WDS or equivalent.<br />
TROUBLESHOOTING”.<br />
• Start the engine.<br />
• Is the same DTC present?<br />
4 INSPECT APP SENSOR CONNECTOR FOR Yes Repair or replace the terminal, then go to Step 9.<br />
POOR CONNECTION<br />
No Go to the next step.<br />
• Turn the engine switch off.<br />
• Disconnect the APP sensor connector.<br />
• Inspect for poor connection (such as damaged/<br />
pulled-out pins, corrosion).<br />
• Is there any malfunction?<br />
5 INSPECT APP SENSOR NO.2 SIGNAL CIRCUIT Yes Repair or replace the wiring harness for a possible short to<br />
FOR SHORT TO POWER SUPPLY<br />
power supply, then go to Step 9.<br />
• Turn the engine switch to the ON position<br />
(Engine off).<br />
No Go to the next step.<br />
• Measure the voltage between APP sensor<br />
terminal C (wiring harness-side) and body<br />
GND.<br />
• Is the voltage more than 4.7 V?<br />
6 INSPECT APP SENSOR NO.2<br />
Yes Replace the APP sensor, then go to Step 9.<br />
•<br />
•<br />
Inspect the APP sensor.<br />
Is there any malfunction?<br />
No Go to the next step.<br />
7 INSPECT PCM CONNECTOR FOR POOR Yes Repair or replace the terminal, then go to Step 9.<br />
CONNECTION<br />
No Go to the next step.<br />
• Turn the engine switch off.<br />
• Disconnect the PCM connector.<br />
• Inspect for poor connection (such as damaged/<br />
pulled-out pins, corrosion).<br />
• Is there any malfunction?<br />
8 INSPECT APP SENSOR NO.2 GND CIRCUIT Yes Go to the next step.<br />
FOR OPEN CIRCUIT<br />
No Repair or replace the wiring harness for a possible open<br />
• Turn the engine switch off.<br />
circuit, then go to the next step.<br />
• Inspect for continuity between APP sensor<br />
terminal D (wiring harness-side) and PCM<br />
terminal 91 (wiring harness-side).<br />
• Is there continuity?<br />
9 VERIFY TROUBLESHOOTING OF DTC P0223 Yes Replace the PCM, then go to the next step.<br />
COMPLETED<br />
No Go to the next step.<br />
• Make sure to reconnect all disconnected<br />
connectors.<br />
• Clear the DTC from the PCM memory using<br />
the WDS or equivalent.<br />
• Start the engine.<br />
• Is the same DTC present?<br />
10 VERIFY AFTER REPAIR PROCEDURE<br />
Yes Go to the applicable DTC inspection.<br />
• Perform the Repair Verification Drive Mode.<br />
(See F2–40 DTC TABLE.)<br />
•<br />
(See F2–39 OBD DRIVE MODE.)<br />
Are any DTCs present?<br />
No DTC troubleshooting completed.<br />
F2–111<br />
F2
DTC P0225<br />
DTC P0225 Idle switch circuit malfunction<br />
DETECTION<br />
CONDITION<br />
POSSIBLE<br />
CAUSE<br />
F2–112<br />
ON-BOARD DIAGNOSTIC<br />
B6E407000200108<br />
• The PCM monitors the input signals from the accelerator pedal position sensor and the idle switch. If the<br />
idle switch is off even if the voltage from the accelerator pedal position sensor is less than 0.75 V, the PCM<br />
determines that there is a malfunction in the idle switch circuit.<br />
Diagnostic support note<br />
• The MIL illuminates if the PCM detects the above malfunction condition in two consecutive drive cycles or<br />
in one drive cycle while the DTC for the same malfunction has been stored in the PCM.<br />
• PENDING CODE is available if PCM detects the above malfunction condition during the first drive cycle.<br />
• FREEZE FRAME DATA is available.<br />
• DTC is stored in the PCM memory.<br />
• Idle switch malfunction<br />
• Connector or terminal malfunction<br />
• Open circuit in wiring harness between idle switch terminal B and GND<br />
• Open circuit in wiring harness between idle switch terminal A and PCM terminal 31<br />
• PCM malfunction<br />
IDLE SWITCH PCM<br />
6<br />
IDLE SWITCH WIRING<br />
HARNESS-SIDE<br />
CONNECTOR<br />
B<br />
A<br />
A<br />
B<br />
4<br />
4 5<br />
8<br />
7<br />
31<br />
26 25 24 23 22 21 20 19 18 17 16 15 14<br />
52 51 50 49 48 47 46 45 44 43 42 41 40<br />
78 77 76 75 74 73 72 71 70 69 68 67 66<br />
104<br />
103 102 101 100 99 98 97 96 95 94 93 92<br />
PCM<br />
WIRING HARNESS-SIDE<br />
CONNECTOR<br />
13 12 11 10 9 8 7 6 5 4 3 2 1<br />
39 38 37 36 35 34 33 32 31 30 29 28 27<br />
65 64 63 62 61 60 59 58 57 56 55 54 53<br />
91 90 89 88 87 86 85 84 83 82 81 80 79
End Of Sie<br />
ON-BOARD DIAGNOSTIC<br />
Diagnostic procedure<br />
STEP INSPECTION ACTION<br />
1 VERIFY FREEZE FRAME DATA HAS BEEN Yes Go to the next step.<br />
RECORDED<br />
No Record the FREEZE FRAME DATA on the repair order,<br />
• Has FREEZE FRAME DATA been recorded? then go to the next step.<br />
2 VERIFY RELATED REPAIR INFORMATION Yes Perform repair or diagnosis according to the available<br />
AVAILABILITY<br />
repair information.<br />
• Verify related service repair information<br />
• If the vehicle is not repaired, go to the next step.<br />
availability.<br />
No Go to the next step.<br />
• Is any related repair information available?<br />
3 VERIFY CURRENT SIGNAL STATUS: IS Yes Go to the next step.<br />
CONCERN INTERMITTENT OR CONSTANT? No Intermittent concern exists.<br />
• Connect the WDS or equivalent to the DLC-2. Perform the “INTERMITTENT CONCERNS<br />
• Clear the DTC from the PCM memory using<br />
the WDS or equivalent.<br />
TROUBLESHOOTING”.<br />
• Start the engine.<br />
• Is the PENDING CODE for this DTC present?<br />
4 INSPECT IDLE SWITCH CONNECTOR FOR Yes Repair or replace the terminal, then go to Step 9.<br />
POOR CONNECTION<br />
No Go to the next step.<br />
• Turn the engine switch off.<br />
• Inspect for poor connection (such as damaged/<br />
pulled-out terminals, corrosion).<br />
• Is there any malfunction?<br />
5 INSPECT IDLE SWITCH GND CIRCUIT FOR Yes Go to the next step.<br />
OPEN CIRCUIT<br />
No Repair or replace the wiring harness for an open circuit,<br />
• Turn the engine switch off.<br />
then go to Step 9.<br />
• Inspect for continuity between idle switch<br />
terminal B and body GND.<br />
• Is there continuity?<br />
6 INSPECT IDLE SWITCH<br />
Yes Replace the accelerator pedal component, then go to Step<br />
• Inspect the idle switch.<br />
9.<br />
• Is there any malfunction?<br />
No Go to the next step.<br />
7 INSPECT PCM CONNECTOR FOR POOR Yes Repair or replace the terminal, then go to Step 9.<br />
CONNECTION<br />
No Go to the next step.<br />
• Turn the engine switch off.<br />
• Inspect for poor connection (such as damaged/<br />
pulled-out terminals, corrosion).<br />
• Is there any malfunction?<br />
8 INSPECT IDLE SWITCH SIGNAL CIRCUIT FOR Yes Go to the next step.<br />
OPEN CIRCUIT<br />
No Repair or replace the wiring harness for an open circuit,<br />
• Turn the engine switch off.<br />
then go to the next step.<br />
• Inspect for continuity between idle switch<br />
terminal A and PCM terminal 31.<br />
• Is there continuity?<br />
9 VERIFY TROUBLESHOOTING OF DTC P0225 Yes Replace the PCM, then go to the next step.<br />
COMPLETED<br />
No Go to the next step.<br />
• Make sure to reconnect all disconnected<br />
connectors.<br />
• Clear the DTC from the PCM memory using<br />
the WDS or equivalent.<br />
• Start the engine.<br />
• Is the PENDING CODE for this DTC present?<br />
10 VERIFY AFTER REPAIR PROCEDURE<br />
Yes Go to the applicable DTC inspection.<br />
• Perform the Repair Verification Drive Mode.<br />
(See F2–40 DTC TABLE.)<br />
•<br />
(See F2–39 OBD DRIVE MODE.)<br />
Are any DTCs present?<br />
No Troubleshooting completed.<br />
F2–113<br />
F2
DTC P0301, P0302, P0303, P0304<br />
DTC P0301<br />
DTC P0302<br />
DTC P0303<br />
DTC P0304<br />
DETECTION<br />
CONDITION<br />
POSSIBLE<br />
CAUSE<br />
F2–114<br />
ON-BOARD DIAGNOSTIC<br />
B6E407000300101<br />
Cylinder No.1 misfire detection<br />
Cylinder No.2 misfire detection<br />
Cylinder No.3 misfire detection<br />
Cylinder No.4 misfire detection<br />
• The PCM monitors the CKP sensor input signal interval time. The PCM calculates the deviation of the<br />
interval time for each cylinder. If the deviation of the interval time exceeds the preprogrammed criteria, the<br />
PCM detects a misfire in the corresponding cylinder. While the engine is running, the PCM counts the<br />
number of misfires and calculates misfire ratio for each crankshaft revolution. If the ratio exceeds the<br />
preprogrammed criteria, the PCM determines that a misfire, which can affect emission performance, has<br />
occurred.<br />
Diagnostic support note<br />
• The MIL illuminates if the PCM detects the above malfunction condition in the first drive cycle.<br />
• FREEZE FRAME DATA is available.<br />
• The DTC is stored in the PCM memory.<br />
• Fuel injector malfunction<br />
• CKP sensor malfunction<br />
• CMP sensor malfunction<br />
• Inadequate engine compression due to engine internal malfunction<br />
• Related connector or terminal malfunction<br />
• Related wiring harness malfunction
ON-BOARD DIAGNOSTIC<br />
Diagnostic procedure<br />
STEP INSPECTION ACTION<br />
1 VERIFY FREEZE FRAME DATA HAS BEEN<br />
RECORDED<br />
• Has FREEZE FRAME DATA been recorded?<br />
2 VERIFY RELATED REPAIR INFORMATION<br />
AVAILABILITY<br />
• Verify related Service Bulletins and/or on-line<br />
repair information availability.<br />
• Is any related repair information available?<br />
3 VERIFY CURRENT SIGNAL STATUS: IS<br />
CONCERN INTERMITTENT OR CONSTANT?<br />
• Connect the WDS or equivalent to the DLC-2.<br />
• Clear the DTC from the PCM memory using<br />
the WDS or equivalent.<br />
• Start the engine.<br />
• Is the same DTC present?<br />
4 IDENTIFY TRIGGER DTC FOR FREEZE FRAME<br />
DATA<br />
• Is DTC P0301, P0302, P0303 or P0304 on<br />
FREEZE FRAME DATA?<br />
5 INSPECT FUEL LINE<br />
• Turn the engine switch off.<br />
• Inspect the fuel lines of the suspected cylinder<br />
for fuel leakage or clogging.<br />
6 VERIFY CURRENT INPUT SIGNAL STATUS<br />
UNDER TROUBLESHOOTING CONDITION<br />
• Access the BOO, ECT, IAT, MAF, RPM, APP,<br />
EGR PS and VSS PIDs using the WDS or<br />
equivalent.<br />
• Is any signal that is far out of specification<br />
when the engine switch is at the ON position<br />
and the engine idles?<br />
7 VERIFY CURRENT INPUT SIGNAL STATUS<br />
UNDER TROUBLE CONDITION<br />
• Inspect the same PIDs as in Step 6 while<br />
simulating the FREEZE FRAME DATA<br />
condition.<br />
• Is there any signal which cause drastic<br />
changes?<br />
8 INSPECT CKP SENSOR<br />
• Inspect the CKP sensor and the pulse wheel.<br />
• Is there any malfunction?<br />
9 INSPECT CMP SENSOR<br />
• Inspect the CMP sensor.<br />
• Is there any malfunction?<br />
10 INSPECT ENGINE COOLANT PASSAGE FOR<br />
ENGINE COOLANT LEAKAGE<br />
• Perform the engine coolant leakage inspection.<br />
• Is there any malfunction?<br />
11 INSPECT ENGINE COMPRESSION<br />
• Inspect the engine compression for the<br />
suspected cylinder.<br />
• Is the engine compression normal?<br />
12 INSPECT FUEL INJECTOR<br />
• Inspect the fuel injector and the related circuit<br />
for the suspected cylinder.<br />
• Is there any malfunction?<br />
Yes Go to the next step.<br />
No Record the FREEZE FRAME DATA on the repair order,<br />
then go to the next step.<br />
Yes Perform repair or diagnosis according to the available<br />
repair information.<br />
• If the vehicle is not repaired, go to the next step.<br />
No Go to the next step.<br />
Yes Go to the next step.<br />
No Intermittent concern exists.<br />
Perform the “INTERMITTENT CONCERNS<br />
TROUBLESHOOTING”.<br />
Yes Go to the next step.<br />
No Go to troubleshooting procedures for the DTC on the<br />
FREEZE FRAME DATA.<br />
Yes Repair or replace the suspected fuel line, then go to Step<br />
13.<br />
No Go to the next step.<br />
Yes Inspect the suspected circuit or part or both according to<br />
the inspection results.<br />
Then go to Step 13.<br />
No Go to the next step.<br />
Yes Inspect suspected circuit or part or both according to the<br />
inspection results.<br />
Then go to Step 13.<br />
No Go to the next step.<br />
Yes Repair or replace the suspected part according to the<br />
inspection results, then go to Step 13.<br />
No Go to the next step.<br />
Yes Repair or replace the suspected part according to the<br />
inspection results, then go to Step 13.<br />
No Go to the next step.<br />
Yes Repair or replace the malfunctioning part according to the<br />
inspection results.<br />
Then go to Step 13.<br />
No Go to the next step.<br />
Yes Go to the next step.<br />
No Overhaul the engine, then go to Step 13.<br />
Yes Repair or replace the suspected part according to the<br />
inspection results, then go to the next step.<br />
No Go to the next step.<br />
F2–115<br />
F2
13 VERIFY TROUBLESHOOTING OF MISFIRE DTC<br />
COMPLETED<br />
• Make sure to reconnect all disconnected<br />
connectors.<br />
• Clear the DTC from the PCM memory using<br />
the WDS or equivalent.<br />
• Start the engine.<br />
• Is the same DTC present?<br />
14 VERIFY AFTER REPAIR PROCEDURE<br />
• Perform the Repair Verification Drive Mode.<br />
(See F2–39 OBD DRIVE MODE.)<br />
• Are any DTCs present?<br />
End Of Sie<br />
DTC P0336<br />
F2–116<br />
ON-BOARD DIAGNOSTIC<br />
STEP INSPECTION ACTION<br />
DTC P0336 CKP sensor range/performance problem<br />
DETECTION<br />
CONDITION<br />
POSSIBLE<br />
CAUSE<br />
Yes Replace the PCM, then go to the next step.<br />
No Go to the next step.<br />
Yes Go to the applicable DTC troubleshooting.<br />
(See F2–40 DTC TABLE.)<br />
No Troubleshooting completed.<br />
B6E407000300102<br />
• The PCM monitors the input signal from the CKP sensor while the engine is running. If the input signal from<br />
the CKP sensor does not correspond with the proper pulse number, the PCM determines CKP sensor<br />
performance problem.<br />
Diagnostic support note<br />
• The MIL does not illuminates.<br />
• The DTC is stored in the PCM memory.<br />
• CKP sensor malfunction<br />
• Connector or terminal malfunction<br />
• CKP sensor pulsar malfunction<br />
• PCM malfunction
End Of Sie<br />
DTC P0337<br />
ON-BOARD DIAGNOSTIC<br />
Diagnostic procedure<br />
STEP INSPECTION ACTION<br />
1 VERIFY FREEZE FRAME DATA HAS BEEN Yes Go to the next step.<br />
RECORDED<br />
No Record the FREEZE FRAME DATA on the repair order,<br />
• Has FREEZE FRAME DATA been recorded? then go to the next step.<br />
2 VERIFY RELATED REPAIR INFORMATION Yes Perform repair or diagnosis according to the available<br />
AVAILABILITY<br />
Service Information.<br />
• Verify related Service Information availability. • If the vehicle is not repaired, go to the next step.<br />
• Is any related repair information available? No Go to the next step.<br />
3 VERIFY CURRENT SIGNAL STATUS: IS Yes Go to the next step.<br />
CONCERN INTERMITTENT OR CONSTANT? No Intermittent concern exists.<br />
• Connect the WDS or equivalent to the DLC-2. Perform the “INTERMITTENT CONCERNS<br />
• Clear the DTC from the PCM memory using<br />
the WDS or equivalent.<br />
TROUBLESHOOTING”.<br />
• Start the engine.<br />
• Is the same DTC present?<br />
4 INSPECT CKP SENSOR PULSAR<br />
Yes Replace the CKP sensor pulsar, then go to Step 8.<br />
• Inspect the CKP sensor pulsar for damage<br />
and/or cracks.<br />
No Go to the next step.<br />
• Is there any malfunction?<br />
5 INSPECT CKP SENSOR CONNECTOR FOR Yes Repair or replace the suspected terminal, go to Step 8.<br />
POOR CONNECTION<br />
No Go to the next step.<br />
• Turn the engine switch off.<br />
• Inspect for poor connection (such as damaged/<br />
pulled-out terminals, corrosion).<br />
• Is there any malfunction?<br />
6 INSPECT CKP SENSOR<br />
Yes Replace the CKP sensor, go to Step 8.<br />
•<br />
•<br />
Inspect the CKP sensor.<br />
Is there any malfunction?<br />
No Go to the next step.<br />
7 INSPECT PCM CONNECTOR FOR POOR Yes Repair or replace the suspected terminal, go to the next<br />
CONNECTION<br />
step.<br />
• Turn the engine switch off.<br />
No Go to the next step.<br />
• Inspect for poor connection (such as damaged/<br />
pulled-out terminals, corrosion).<br />
• Is there any malfunction?<br />
8 VERIFY TROUBLESHOOTING OF DTC P0336 Yes Replace the PCM, go to the next step.<br />
COMPLETED<br />
No Go to the next step.<br />
• Make sure to reconnect all disconnected<br />
connectors.<br />
• Clear the DTC from the PCM memory using<br />
the WDS or equivalent.<br />
• Start the engine.<br />
• Is the same DTC present?<br />
9 VERIFY AFTER REPAIR PROCEDURE<br />
Yes Go to the applicable DTC inspection.<br />
• Perform the Repair Verification Drive Mode.<br />
(See F2–40 DTC TABLE.)<br />
•<br />
(See F2–39 OBD DRIVE MODE.)<br />
Are any DTCs present?<br />
No Troubleshooting completed.<br />
DTC P0337 CKP sensor circuit low input<br />
DETECTION<br />
CONDITION<br />
B6E407000300103<br />
• The PCM monitors the input signal from the CKP sensor and the CMP sensor while the engine is running.<br />
If the input signal from the CKP sensor is not input while the PCM detects 28 pulses from the CMP sensor,<br />
the PCM determines that there is a malfunction in the CKP sensor circuit.<br />
Diagnostic support note<br />
• The MIL illuminates if the PCM detects the above malfunction condition in the first drive cycle.<br />
• FREEZE FRAME DATA is available.<br />
• The DTC is stored in the PCM memory.<br />
F2–117<br />
F2
DTC P0337 CKP sensor circuit low input<br />
POSSIBLE<br />
CAUSE<br />
F2–118<br />
ON-BOARD DIAGNOSTIC<br />
• CKP sensor malfunction<br />
• Connector or terminal malfunction<br />
• Short to GND in wiring harness between CKP sensor terminal C and PCM terminal 29<br />
• Short to GND in wiring harness between CKP sensor terminal B and PCM terminal 3<br />
• Open circuit in wiring harness between CKP sensor terminal C and PCM terminal 29<br />
• Open circuit in wiring harness between CKP sensor terminal B and PCM terminal 3<br />
• Improper CKP sensor air gap<br />
• CKP sensor pulsar malfunction<br />
• PCM malfunction<br />
C<br />
B<br />
A<br />
CKP SENSOR<br />
CKP SENSOR<br />
WIRING HARNESS-SIDE CONNECTOR<br />
5<br />
8<br />
B<br />
6<br />
7<br />
10<br />
6 9<br />
C<br />
7 10<br />
29<br />
9<br />
3<br />
PCM<br />
26 25 24 23 22 21 20 19 18 17 16 15 14<br />
52 51 50 49 48 47 46 45 44 43 42 41 40<br />
78 77 76 75 74 73 72 71 70 69 68 67 66<br />
104<br />
103 102 101 100 99 98 97 96 95 94 93 92<br />
PCM<br />
WIRING HARNESS-SIDE CONNECTOR<br />
13 12 11 10 9 8 7 6 5 4 3 2 1<br />
39 38 37 36 35 34 33 32 31 30 29 28 27<br />
65 64 63 62 61 60 59 58 57 56 55 54 53<br />
91 90 89 88 87 86 85 84 83 82 81 80 79
ON-BOARD DIAGNOSTIC<br />
Diagnostic procedure<br />
STEP INSPECTION ACTION<br />
1 VERIFY FREEZE FRAME DATA HAS BEEN<br />
RECORDED<br />
• Has FREEZE FRAME DATA been recorded?<br />
2 VERIFY RELATED REPAIR INFORMATION<br />
AVAILABILITY<br />
• Verify related Service Information availability.<br />
• Is any related repair information available?<br />
3 VERIFY CURRENT SIGNAL STATUS: IS<br />
CONCERN INTERMITTENT OR CONSTANT?<br />
• Connect the WDS or equivalent to the DLC-2.<br />
• Clear the DTC from the PCM memory using<br />
the WDS or equivalent.<br />
• Start the engine.<br />
• Is the same DTC present?<br />
4 INSPECT CKP SENSOR AIR GAP<br />
• Measure the CKP sensor air gap.<br />
• Is the CKP sensor air gap normal?<br />
Specification<br />
1.5—2.5 mm {0.059—0.098 in}<br />
5 INSPECT CKP SENSOR PULSAR<br />
• Inspect the CKP sensor pulsar for damage<br />
and/or cracks.<br />
• Is there any malfunction?<br />
6 INSPECT CKP SENSOR CONNECTOR FOR<br />
POOR CONNECTION<br />
• Turn the engine switch off.<br />
• Inspect for poor connection (such as damaged/<br />
pulled-out terminals, corrosion).<br />
• Is there any malfunction?<br />
7 INSPECT CKP SENSOR FOR SHORT TO GND<br />
• Turn the engine switch off.<br />
• Inspect for continuity between the following<br />
terminals and body GND:<br />
— CKP sensor terminal B and body GND<br />
— CKP sensor terminal C and body GND<br />
• Is there continuity?<br />
8 INSPECT CKP SENSOR<br />
• Inspect the CKP sensor.<br />
• Is there any malfunction?<br />
9 INSPECT PCM CONNECTOR FOR POOR<br />
CONNECTION<br />
• Turn the engine switch off.<br />
• Inspect for poor connection (such as damaged/<br />
pulled-out terminals, corrosion).<br />
• Is there any malfunction?<br />
10 INSPECT CKP SENSOR FOR OPEN CIRCUIT<br />
• Turn the engine switch off.<br />
• Inspect for continuity between the following<br />
terminals:<br />
— CKP sensor terminal B and PCM terminal 3<br />
— CKP sensor terminal C and PCM terminal<br />
29<br />
• Is there continuity?<br />
11 VERIFY TROUBLESHOOTING OF DTC P0337<br />
COMPLETED<br />
• Make sure to reconnect all disconnected<br />
connectors.<br />
• Clear the DTC from the PCM memory using<br />
the WDS or equivalent.<br />
• Start the engine and idle it.<br />
• Is the same DTC present?<br />
Yes Go to the next step.<br />
No Record the FREEZE FRAME DATA on the repair order,<br />
then go to the next step.<br />
Yes Perform repair or diagnosis according to the available<br />
Service Information.<br />
• If the vehicle is not repaired, go to the next step.<br />
No Go to the next step.<br />
Yes Go to the next step.<br />
No Intermittent concern exists.<br />
Perform the “INTERMITTENT CONCERNS<br />
TROUBLESHOOTING”.<br />
Yes Go to the next step.<br />
No Replace the CKP sensor, then go to Step 11.<br />
Yes Replace the CKP sensor pulsar, then go to Step 11.<br />
No Go to the next step.<br />
Yes Repair or replace the suspected terminal, go to Step 11.<br />
No Go to the next step.<br />
Yes Repair or replace the wiring harness for a short to GND, go<br />
to Step 11.<br />
No Go to the next step.<br />
Yes Replace the CKP sensor, go to Step 11.<br />
No Go to the next step.<br />
Yes Repair or replace the suspected terminal, go to Step 11.<br />
No Go to the next step.<br />
Yes Go to the next step.<br />
No Repair or replace the wiring harness for an open circuit, go<br />
to the next step.<br />
Yes Replace the PCM, go to the next step.<br />
No Go to the next step.<br />
F2–119<br />
F2
12 VERIFY AFTER REPAIR PROCEDURE<br />
• Perform the Repair Verification Drive Mode.<br />
(See F2–39 OBD DRIVE MODE.)<br />
• Are any DTCs present?<br />
End Of Sie<br />
DTC P0341<br />
F2–120<br />
ON-BOARD DIAGNOSTIC<br />
STEP INSPECTION ACTION<br />
DTC P0341 CMP sensor range/performance problem<br />
DETECTION<br />
CONDITION<br />
POSSIBLE<br />
CAUSE<br />
Yes Go to the applicable DTC inspection.<br />
(See F2–40 DTC TABLE)<br />
No Troubleshooting completed.<br />
B6E407000300104<br />
• The PCM monitors the input signal from the CMP sensor while the engine is running. If the input signal<br />
from the CMP sensor does not correspond with the proper pulse number, the PCM determines CMP<br />
sensor performance problem.<br />
Diagnostic support note<br />
• The MIL does not illuminates.<br />
• The DTC is stored in the PCM memory.<br />
• CMP sensor malfunction<br />
• Connector or terminal malfunction<br />
• CMP sensor pulsar malfunction<br />
• PCM malfunction
End Of Sie<br />
DTC P0342<br />
ON-BOARD DIAGNOSTIC<br />
Diagnostic procedure<br />
STEP INSPECTION ACTION<br />
1 VERIFY FREEZE FRAME DATA HAS BEEN Yes Go to the next step.<br />
RECORDED<br />
No Record the FREEZE FRAME DATA on the repair order,<br />
• Has FREEZE FRAME DATA been recorded? then go to the next step.<br />
2 VERIFY RELATED REPAIR INFORMATION Yes Perform repair or diagnosis according to the available<br />
AVAILABILITY<br />
Service Information.<br />
• Verify related Service Information availability. • If the vehicle is not repaired, go to the next step.<br />
• Is any related repair information available? No Go to the next step.<br />
3 VERIFY CURRENT SIGNAL STATUS: IS Yes Go to the next step.<br />
CONCERN INTERMITTENT OR CONSTANT? No Intermittent concern exists.<br />
• Connect the WDS or equivalent to the DLC-2. Perform the “INTERMITTENT CONCERNS<br />
• Clear the DTC from the PCM memory using<br />
the WDS or equivalent.<br />
TROUBLESHOOTING”.<br />
• Start the engine.<br />
• Is the same DTC present?<br />
4 INSPECT CMP SENSOR CONNECTOR FOR Yes Repair or replace the suspected terminal, go to Step 8.<br />
POOR CONNECTION<br />
No Go to the next step.<br />
• Turn the engine switch off.<br />
• Inspect for poor connection (such as damaged/<br />
pulled-out terminals, corrosion).<br />
• Is there any malfunction?<br />
5 INSPECT CMP SENSOR<br />
Yes Replace the CMP sensor, go to Step 8.<br />
•<br />
•<br />
Inspect the CMP sensor.<br />
Is there any malfunction?<br />
No Go to the next step.<br />
6 INSPECT CMP SENSOR PULSAR<br />
Yes Replace the camshaft, then go to Step 8.<br />
• Inspect the CMP sensor pulsar for damage<br />
and/or cracks.<br />
No Go to the next step.<br />
• Is there any malfunction?<br />
7 INSPECT PCM CONNECTOR FOR POOR Yes Repair or replace the suspected terminal, go to the next<br />
CONNECTION<br />
step.<br />
• Turn the engine switch off.<br />
No Go to the next step.<br />
• Inspect for poor connection (such as damaged/<br />
pulled-out terminals, corrosion).<br />
• Is there any malfunction?<br />
8 VERIFY TROUBLESHOOTING OF DTC P0341 Yes Replace the PCM, go to the next step.<br />
COMPLETED<br />
No Go to the next step.<br />
• Make sure to reconnect all disconnected<br />
connectors.<br />
• Clear the DTC from the PCM memory using<br />
the WDS or equivalent.<br />
• Start the engine.<br />
• Is the same DTC present?<br />
9 VERIFY AFTER REPAIR PROCEDURE<br />
Yes Go to the applicable DTC inspection.<br />
• Perform the Repair Verification Drive Mode.<br />
(See F2–40 DTC TABLE.)<br />
•<br />
(See F2–39 OBD DRIVE MODE.)<br />
Are any DTCs present?<br />
No Troubleshooting completed.<br />
DTC P0342 CMP sensor circuit low input<br />
DETECTION<br />
CONDITION<br />
B6E407000300105<br />
• The PCM monitors the input signal from the CMP sensor and the CKP sensor while the engine is running.<br />
If the input signal from the CMP sensor is not input while the PCM detects 255 pulses from the CKP<br />
sensor, the PCM determines that there is a malfunction in the CMP sensor circuit.<br />
Diagnostic support note<br />
• The MIL illuminates if the PCM detects the above malfunction condition in the first drive cycle.<br />
• FREEZE FRAME DATA is available.<br />
• The DTC is stored in the PCM memory.<br />
F2–121<br />
F2
DTC P0342 CMP sensor circuit low input<br />
POSSIBLE<br />
CAUSE<br />
F2–122<br />
ON-BOARD DIAGNOSTIC<br />
• CMP sensor malfunction<br />
• Connector or terminal malfunction<br />
• Short to GND in wiring harness between CMP sensor terminal A and PCM terminal 81<br />
• Short to GND in wiring harness between CMP sensor terminal B and PCM terminal 55<br />
• Open circuit in wiring harness between CMP sensor terminal A and PCM terminal 81<br />
• Open circuit in wiring harness between CMP sensor terminal B and PCM terminal 55<br />
• Improper CMP sensor air gap<br />
• CMP sensor pulsar malfunction<br />
• PCM malfunction<br />
B<br />
A<br />
CMP SENSOR<br />
CMP SENSOR<br />
WIRING HARNESS-SIDE CONNECTOR<br />
6<br />
A<br />
4<br />
5<br />
10<br />
81<br />
4<br />
5 10 9<br />
B 55<br />
9<br />
PCM<br />
26 25 24 23 22 21 20 19 18 17 16 15 14<br />
52 51 50 49 48 47 46 45 44 43 42 41 40<br />
78 77 76 75 74 73 72 71 70 69 68 67 66<br />
104<br />
103 102 101 100 99 98 97 96 95 94 93 92<br />
PCM<br />
WIRING HARNESS-SIDE CONNECTOR<br />
13 12 11 10 9 8 7 6 5 4 3 2 1<br />
39 38 37 36 35 34 33 32 31 30 29 28 27<br />
65 64 63 62 61 60 59 58 57 56 55 54 53<br />
91 90 89 88 87 86 85 84 83 82 81 80 79
ON-BOARD DIAGNOSTIC<br />
Diagnostic procedure<br />
STEP INSPECTION ACTION<br />
1 VERIFY FREEZE FRAME DATA HAS BEEN<br />
RECORDED<br />
• Has FREEZE FRAME DATA been recorded?<br />
2 VERIFY RELATED REPAIR INFORMATION<br />
AVAILABILITY<br />
• Verify related Service Information availability.<br />
• Is any related repair information available?<br />
3 VERIFY CURRENT SIGNAL STATUS: IS<br />
CONCERN INTERMITTENT OR CONSTANT?<br />
• Connect the WDS or equivalent to the DLC-2.<br />
• Clear the DTC from the PCM memory using<br />
the WDS or equivalent.<br />
• Start the engine.<br />
• Is the same DTC present?<br />
4 INSPECT CMP SENSOR CONNECTOR FOR<br />
POOR CONNECTION<br />
• Turn the engine switch off.<br />
• Inspect for poor connection (such as damaged/<br />
pulled-out terminals, corrosion).<br />
• Is there any malfunction?<br />
5 INSPECT CMP SENSOR CIRCUIT FOR SHORT<br />
TO GND<br />
• Turn the engine switch off.<br />
• Inspect for continuity between the following<br />
terminals and body GND:<br />
— CMP sensor terminal A and body GND.<br />
— CMP sensor terminal B and body GND.<br />
• Is there continuity?<br />
6 INSPECT CMP SENSOR<br />
• Inspect the CMP sensor.<br />
• Is there any malfunction?<br />
7 INSPECT CMP SENSOR AIR GAP<br />
• Measure the CMP sensor air gap.<br />
• Is the CMP sensor air gap normal?<br />
Specification<br />
0.5—1.5 mm {0.020—0.059 in}<br />
8 INSPECT CMP SENSOR PULSAR<br />
• Inspect the CMP sensor pulsar for damage<br />
and/or cracks.<br />
• Is there any malfunction?<br />
9 INSPECT PCM CONNECTOR FOR POOR<br />
CONNECTION<br />
• Turn the engine switch off.<br />
• Inspect for poor connection (such as damaged/<br />
pulled-out terminals, corrosion).<br />
• Is there any malfunction?<br />
10 INSPECT CMP SENSOR FOR OPEN CIRCUIT<br />
• Turn the engine switch off.<br />
• Inspect for continuity between the following<br />
terminals:<br />
— CMP sensor terminal A and PCM terminal<br />
81.<br />
— CMP sensor terminal B and PCM terminal<br />
55.<br />
• Is there continuity?<br />
11 VERIFY TROUBLESHOOTING OF DTC P0342<br />
COMPLETED<br />
• Make sure to reconnect all disconnected<br />
connectors.<br />
• Clear the DTC from the PCM memory using<br />
the WDS or equivalent.<br />
• Start the engine and idle it.<br />
• Is the same DTC present?<br />
Yes Go to the next step.<br />
No Record the FREEZE FRAME DATA on the repair order,<br />
then go to the next step.<br />
Yes Perform repair or diagnosis according to the available<br />
Service Information.<br />
• If the vehicle is not repaired, go to the next step.<br />
No Go to the next step.<br />
Yes Go to the next step.<br />
No Intermittent concern exists.<br />
Perform the “INTERMITTENT CONCERNS<br />
TROUBLESHOOTING”.<br />
Yes Repair or replace the suspected terminal, go to Step 11.<br />
No Go to the next step.<br />
Yes Repair or replace the wiring harness for a short to GND, go<br />
to Step 11.<br />
No Go to the next step.<br />
Yes Replace the CMP sensor, go to Step 11.<br />
No Go to the next step.<br />
Yes Go to the next step.<br />
No Replace the CMP sensor, then go to Step 11.<br />
Yes Replace the camshaft, then go to Step 11.<br />
No Go to the next step.<br />
Yes Repair or replace the suspected terminal, go to Step 11.<br />
No Go to the next step.<br />
Yes Go to the next step.<br />
No Repair or replace the wiring harness for an open circuit, go<br />
to the next step.<br />
Yes Replace the PCM, go to the next step.<br />
No Go to the next step.<br />
F2–123<br />
F2
12 VERIFY AFTER REPAIR PROCEDURE<br />
• Perform the Repair Verification Drive Mode.<br />
(See F2–39 OBD DRIVE MODE.)<br />
• Are any DTCs present?<br />
End Of Sie<br />
DTC P0401<br />
F2–124<br />
ON-BOARD DIAGNOSTIC<br />
STEP INSPECTION ACTION<br />
DTC P0401 EGR flow insufficient detected<br />
DETECTION<br />
CONDITION<br />
POSSIBLE<br />
CAUSE<br />
Yes Go to the applicable DTC inspection.<br />
(See F2–40 DTC TABLE.)<br />
No Troubleshooting completed.<br />
B6E407000400101<br />
• The PCM monitors the difference between the target air amount and intake air amount while the EGR<br />
system is operating. If the difference between the target air amount and the intake air amount is less than<br />
the threshold, the PCM determines that there is a malfunction in the EGR system.<br />
Diagnostic support note<br />
• MIL illuminates if PCM detects above malfunction condition in two consecutive drive cycles or in one drive<br />
cycle while DTC for the same malfunction has been stored in PCM.<br />
• PENDING CODE is available if PCM detects the above malfunction condition during first drive cycle.<br />
• FREEZE FRAME DATA is available.<br />
• DTC is stored in the PCM memory.<br />
• Vacuum hose malfunction<br />
• EGR valve malfunction<br />
• EGR boost sensor malfunction<br />
• EGR gasket malfunction<br />
• PCM malfunction
End Of Sie<br />
DTC P0402<br />
ON-BOARD DIAGNOSTIC<br />
Diagnostic procedure<br />
STEP INSPECTION ACTION<br />
1 VERIFY FREEZE FRAME DATA HAS BEEN Yes Go to the next step.<br />
RECORDED<br />
No Record FREEZE FRAME DATA on repair order, then go to<br />
• Has FREEZE FRAME DATA been recorded? the next step.<br />
2 VERIFY RELATED REPAIR INFORMATION Yes Perform repair or diagnosis according to the available<br />
AVAILABILITY<br />
repair information.<br />
• Verify related service bulletins and/or on-line • If the vehicle is not repaired, go to the next step.<br />
repair information availability.<br />
No Go to the next step.<br />
• Is any related repair information available?<br />
3 INSPECT FOR OTHER DTCS<br />
Yes Repair the circuit malfunction for the applicable DTCs.<br />
•<br />
•<br />
Connect the WDS or equivalent to the DLC-2.<br />
Clear the DTC from the PCM memory using<br />
the WDS or equivalent.<br />
No Go to the next step.<br />
• Turn the engine switch to the ON position.<br />
(Engine off).<br />
• Have other DTCs been stored?<br />
4 INSPECT VACUUM HOSE CONDITION<br />
Yes Replace the vacuum hoses, then go to Step 8.<br />
• Inspect the vacuum hoses for clogging,<br />
damage, freezing, or vacuum leakage.<br />
No Go to the next step.<br />
• Is there any malfunction?<br />
5 INSPECT EGR VALVE MALFUNCTION<br />
Yes Go to the next step.<br />
•<br />
•<br />
Inspect the EGR valve.<br />
Is the EGR valve okay?<br />
No Replace the EGR valve, then go to Step 8.<br />
6 INSPECT EGR BOOST SENSOR<br />
Yes Go to the next step.<br />
MALFUNCTION<br />
No Replace the EGR boost sensor, then go to Step 8.<br />
• Inspect the EGR boost sensor.<br />
• Is the EGR boost sensor okay?<br />
7 INSPECT EGR VALVE PASSAGE<br />
Yes Go to the next step.<br />
•<br />
•<br />
Turn the engine switch off.<br />
Remove the EGR valve.<br />
No Install the gasket correctly, then go to the next step.<br />
• Is gasket installation normal?<br />
8 VERIFY TROUBLESHOOTING OF DTC P0401 Yes Go to the next step.<br />
COMPLETED<br />
No Replace the PCM, then go to the next step.<br />
• Make sure to reconnect all disconnected<br />
connectors.<br />
• Connect the WDS or equivalent to the DLC-2.<br />
• Clear the DTC from the PCM memory using<br />
the WDS or equivalent.<br />
• Perform the Repair Verification Drive Mode.<br />
(See F2–39 OBD DRIVE MODE.)<br />
• Is the PENDING CODE for this DTC present?<br />
9 VERIFY AFTER REPAIR PROCEDURE<br />
Yes Go to the applicable DTC inspection.<br />
• Are any DTCs present?<br />
(See F2–40 DTC TABLE.)<br />
No Troubleshooting completed.<br />
DTC P0402 EGR flow excessive detected<br />
DETECTION<br />
CONDITION<br />
POSSIBLE<br />
CAUSE<br />
B6E407000400102<br />
• The PCM monitors the difference between the target air amount and intake air amount while the EGR<br />
system is operating. If the difference between the target air amount and the intake air amount is more than<br />
the threshold, the PCM determines that there is a malfunction in the EGR system.<br />
Diagnostic support note<br />
• The MIL illuminates if the PCM detects above malfunction condition in two consecutive drive cycles or in<br />
one drive cycle while the DTC for the same malfunction has been stored in the PCM.<br />
• PENDING CODE is available if the PCM detects the above malfunction condition during the first drive<br />
cycle.<br />
• FREEZE FRAME DATA is available.<br />
• The DTC is stored in the PCM memory.<br />
• The EGR valve gasket is not installed.<br />
• The EGR valve gasket has been damaged.<br />
• PCM malfunction<br />
F2–125<br />
F2
End Of Sie<br />
DTC P0404<br />
F2–126<br />
ON-BOARD DIAGNOSTIC<br />
Diagnostic procedure<br />
STEP INSPECTION ACTION<br />
1 VERIFY FREEZE FRAME DATA HAS BEEN Yes Go to the next step.<br />
RECORDED<br />
No Record the FREEZE FRAME DATA on the repair order,<br />
• Has FREEZE FRAME DATA been recorded? then go to the next step.<br />
2 VERIFY RELATED REPAIR INFORMATION Yes Perform repair or diagnosis according to the available<br />
AVAILABILITY<br />
repair information.<br />
• Verify related service bulletins and/or on-line • If the vehicle is not repaired, go to the next step.<br />
repair information availability.<br />
No Go to the next step.<br />
• Is any related repair information available?<br />
3 INSPECT FOR OTHER DTCS<br />
Yes Repair circuit malfunction for the applicable DTCs.<br />
• Turn the engine switch to the ON position.<br />
(Engine off).<br />
No Go to the next step.<br />
• Have other DTCs been stored?<br />
4 INSPECT EGR VALVE GASKET HAS<br />
Yes Go to the next step.<br />
INSTALLED<br />
No Install the EGR valve gasket, then go to Step 6.<br />
• Turn the engine switch off.<br />
• Remove the EGR valve.<br />
• Is the EGR valve gasket installed?<br />
5 INSPECT EGR VALVE GASKET MALFUNCTION Yes Replace the EGR valve gasket, then next step.<br />
• Inspect if there is any crack or damage on the<br />
EGR valve gasket?<br />
No Go to the next step.<br />
6 VERIFY TROUBLESHOOTING OF DTC P0402 Yes Go to the next step.<br />
COMPLETED<br />
No Replace the PCM, then go to the next step.<br />
• Make sure to reconnect all disconnected<br />
connectors.<br />
• Connect the WDS or equivalent to the DLC-2.<br />
• Clear the DTC from the PCM memory using<br />
the WDS or equivalent.<br />
• Perform the Repair Verification Drive Mode.<br />
(See F2–39 OBD DRIVE MODE.)<br />
• Is the PENDING CODE for this DTC present?<br />
7 VERIFY AFTER REPAIR PROCEDURE<br />
Yes Go to the applicable DTC inspection.<br />
• Are any DTCs present?<br />
(See F2–40 DTC TABLE.)<br />
No Troubleshooting completed.<br />
DTC P0404 EGR valve stuck<br />
DETECTION<br />
CONDITION<br />
POSSIBLE<br />
CAUSE<br />
B6E407000400103<br />
• The PCM monitors the input signal from the EGR valve position sensor while the EGR system is operating.<br />
If the output voltage difference is less than threshold when the EGR flow amount changes, the PCM<br />
determines that there is a malfunction in the EGR valve.<br />
Diagnostic support note<br />
• The MIL illuminates if the PCM detects the above malfunction condition in two consecutive drive cycles or<br />
in one drive cycle while the DTC for the same malfunction has been stored in the PCM.<br />
• PENDING CODE is available if the PCM detects the above malfunction condition during the first drive<br />
cycle.<br />
• FREEZE FRAME DATA is available.<br />
• The DTC is stored in the PCM memory.<br />
• EGR valve malfunction
End Of Sie<br />
DTC P0406<br />
ON-BOARD DIAGNOSTIC<br />
Diagnostic procedure<br />
STEP INSPECTION ACTION<br />
1 VERIFY FREEZE FRAME DATA HAS BEEN Yes Go to the next step.<br />
RECORDED<br />
No Record the FREEZE FRAME DATA on the repair order,<br />
• Has FREEZE FRAME DATA been recorded? then go to the next step.<br />
2 VERIFY RELATED REPAIR INFORMATION Yes Perform repair or diagnosis according to the available<br />
AVAILABILITY<br />
repair information.<br />
• Verify related service repair information<br />
• If the vehicle is not repaired, go to the next step.<br />
availability.<br />
No Go to the next step.<br />
• Is any related repair information available?<br />
3 VERIFY CURRENT SIGNAL STATUS: IS Yes Go to the next step.<br />
CONCERN INTERMITTENT OR CONSTANT? No Intermittent concern exists.<br />
• Connect the WDS or equivalent to the DLC-2. Perform the “INTERMITTENT CONCERNS<br />
• Clear the DTC from the PCM memory using<br />
the WDS or equivalent.<br />
TROUBLESHOOTING”.<br />
• Perform the Drive Mode.<br />
(See F2–39 OBD DRIVE MODE.)<br />
• Is the PENDING CODE for this DTC present?<br />
4 INSPECT EGR VALVE<br />
Yes Replace the EGR valve, then go to Step the next step.<br />
•<br />
•<br />
Inspect the EGR valve.<br />
Is there any malfunction?<br />
No Go to the next step.<br />
5 VERIFY TROUBLESHOOTING OF DTC P0404 Yes Replace the PCM, then go to the next step.<br />
COMPLETED<br />
No Go to the next step.<br />
• Make sure to reconnect all disconnected<br />
connectors.<br />
• Clear the DTC from the PCM memory using<br />
the WDS or equivalent.<br />
• Perform the Repair Verification Drive Mode.<br />
(See F2–39 OBD DRIVE MODE.)<br />
• Is the PENDING CODE for this DTC present?<br />
6 VERIFY AFTER REPAIR PROCEDURE<br />
Yes Go to the applicable DTC inspection.<br />
• Are any DTCs present?<br />
(See F2–40 DTC TABLE.)<br />
No DTC troubleshooting completed.<br />
DTC P0406 EGR valve position sensor circuit high input<br />
DETECTION<br />
CONDITION<br />
POSSIBLE<br />
CAUSE<br />
B6E407000400104<br />
• The PCM monitors the input signal from the EGR valve position sensor. If the voltage from the EGR valve<br />
position sensor is more than 4.75 V, the PCM determines that there is a malfunction in the EGR valve<br />
position sensor circuit.<br />
Diagnostic support note<br />
• The MIL illuminates if the PCM detects the above malfunction condition in the first drive cycle.<br />
• FREEZE FRAME DATA is available.<br />
• The DTC is stored in the PCM memory.<br />
• EGR valve position sensor malfunction<br />
• Connector or terminal malfunction<br />
• Short to power supply in wiring harness between EGR valve position sensor terminal C and PCM terminal<br />
32<br />
• Open circuit in wiring harness between EGR valve position sensor terminal A and PCM terminal 91<br />
• PCM malfunction<br />
F2–127<br />
F2
F2–128<br />
ON-BOARD DIAGNOSTIC<br />
DTC P0406 EGR valve position sensor circuit high input<br />
EGR POSITION<br />
SENSOR<br />
6<br />
B<br />
C<br />
A<br />
EGR POSITION SENSOR<br />
WIRING HARNESS-SIDE<br />
CONNECTOR<br />
C<br />
B A<br />
4<br />
4<br />
4<br />
5<br />
8<br />
7<br />
7<br />
7<br />
90<br />
32<br />
91<br />
PCM<br />
PCM<br />
WIRING HARNESS-SIDE<br />
CONNECTOR<br />
2O 2M 2K<br />
2P 2N 2L<br />
2I 2G 2E 2C 2A<br />
2J 2H 2F 2D 2B
End Of Sie<br />
ON-BOARD DIAGNOSTIC<br />
Diagnostic procedure<br />
STEP INSPECTION ACTION<br />
1 VERIFY FREEZE FRAME DATA HAS BEEN Yes Go to the next step.<br />
RECORDED<br />
No Record the FREEZE FRAME DATA on the repair order,<br />
• Has FREEZE FRAME DATA been recorded? then go to the next step.<br />
2 VERIFY RELATED REPAIR INFORMATION Yes Perform repair or diagnosis according to the available<br />
AVAILABILITY<br />
repair information.<br />
• Verify related service repair information<br />
• If the vehicle is not repaired, go to the next step.<br />
availability.<br />
No Go to the next step.<br />
• Is any related repair information available?<br />
3 VERIFY CURRENT SIGNAL STATUS: IS Yes Go to the next step.<br />
CONCERN INTERMITTENT OR CONSTANT? No Intermittent concern exists.<br />
• Connect the WDS or equivalent to the DLC-2. Perform the “INTERMITTENT CONCERNS<br />
• Clear the DTC from the PCM memory using<br />
the WDS or equivalent.<br />
TROUBLESHOOTING”.<br />
• Start the engine.<br />
• Is the same DTC present?<br />
4 INSPECT EGR VALVE POSITION SENSOR Yes Repair or replace the terminal, then go to Step 9.<br />
CONNECTOR FOR POOR CONNECTION No Go to the next step.<br />
• Turn the engine switch off.<br />
• Disconnect the EGR valve position sensor<br />
connector.<br />
• Inspect for poor connection (such as damaged/<br />
pulled-out pins, corrosion).<br />
• Is there any malfunction?<br />
5 INSPECT EGR VALVE POSITION SENSOR Yes Repair or replace the wiring harness for a possible short to<br />
SIGNAL CIRCUIT FOR SHORT TO POWER<br />
power supply, then go to Step 9.<br />
SUPPLY<br />
No Go to the next step.<br />
• Turn the engine switch to the ON position<br />
(Engine off).<br />
• Measure the voltage between EGR valve<br />
position sensor terminal C (wiring harnessside)<br />
and body GND.<br />
• Is the voltage more than 4.75 V?<br />
6 INSPECT EGR VALVE POSITION SENSOR Yes Replace the EGR valve position sensor, then go to Step 9.<br />
•<br />
•<br />
Inspect the EGR valve position sensor.<br />
Is there any malfunction?<br />
No Go to the next step.<br />
7 INSPECT PCM CONNECTOR FOR POOR Yes Repair or replace the terminal, then go to Step 9.<br />
CONNECTION<br />
No Go to the next step.<br />
• Turn the engine switch off.<br />
• Disconnect the PCM connector.<br />
• Inspect for poor connection (such as damaged/<br />
pulled-out pins, corrosion).<br />
• Is there any malfunction?<br />
8 INSPECT EGR VALVE POSITION SENSOR GND Yes Go to the next step.<br />
CIRCUIT FOR OPEN CIRCUIT<br />
No Repair or replace the wiring harness for a possible open<br />
• Turn the engine switch off.<br />
circuit, then go to the next step.<br />
• Inspect for continuity between EGR valve<br />
position sensor terminal A (wiring harnessside)<br />
and PCM terminal 91 (wiring harnessside).<br />
• Is there continuity?<br />
9 VERIFY TROUBLESHOOTING OF DTC P0406 Yes Replace the PCM, then go to the next step.<br />
COMPLETED<br />
No Go to the next step.<br />
• Make sure to reconnect all disconnected<br />
connectors.<br />
• Clear the DTC from the PCM memory using<br />
the WDS or equivalent.<br />
• Start the engine.<br />
• Is the same DTC present?<br />
10 VERIFY AFTER REPAIR PROCEDURE<br />
Yes Go to the applicable DTC inspection.<br />
• Are any DTCs present?<br />
(See F2–40 DTC TABLE.)<br />
No DTC troubleshooting completed.<br />
F2–129<br />
F2
DTC P0489<br />
F2–130<br />
ON-BOARD DIAGNOSTIC<br />
DTC P0489 EGR solenoid valve (vacuum) control circuit low input<br />
DETECTION<br />
CONDITION<br />
POSSIBLE<br />
CAUSE<br />
PCM CONTROL<br />
RELAY WIRING<br />
HARNESS-SIDE<br />
CONNECTOR<br />
A<br />
C<br />
D<br />
E<br />
B6E407000400105<br />
• The PCM monitors the output signal to the EGR solenoid valve (vacuum). If the EGR solenoid valve<br />
(vacuum) voltage is low even if the EGR solenoid valve (vacuum) is off, the PCM determines that there is a<br />
malfunction in the intake shutter solenoid valve control circuit.<br />
Diagnostic support note<br />
• The MIL illuminates if the PCM detects the above malfunction condition in two consecutive drive cycles or<br />
in one drive cycle while the DTC for the same malfunction has been stored in the PCM.<br />
• PENDING CODE is available if the PCM detects the above malfunction condition during the first drive<br />
cycle.<br />
• FREEZE FRAME DATA is available.<br />
• The DTC is stored in the PCM memory.<br />
• EGR solenoid valve (vacuum) malfunction<br />
• Connector or terminal malfunction<br />
• Open circuit in wiring harness between PCM control relay terminal C and EGR solenoid valve (vacuum)<br />
terminal A<br />
• Open circuit in wiring harness between EGR solenoid valve (vacuum) terminal B and PCM terminal 99<br />
• Short to GND in wiring harness between EGR solenoid valve (vacuum) terminal B and PCM terminal 99<br />
• PCM malfunction<br />
PCM CONTROL RELAY<br />
TERMINAL C<br />
EGR SOLENOID<br />
VALVE (VACUUM)<br />
5 4<br />
7<br />
4 6<br />
A<br />
B<br />
EGR SOLENOID<br />
VALVE (VACUUM)<br />
WIRING HARNESS-SIDE<br />
CONNECTOR<br />
B A<br />
9 8<br />
26 25 24 23 22 21 20 19 18 17 16 15 14<br />
52 51 50 49 48 47 46 45 44 43 42 41 40<br />
78 77 76 75 74 73 72 71 70 69 68 67 66<br />
104 103 102 101 100 99 98 97 96 95 94 93 92<br />
99<br />
PCM<br />
WIRING HARNESS-SIDE<br />
CONNECTOR<br />
PCM<br />
13 12 11 10 9 8 7 6 5 4 3 2 1<br />
39 38 37 36 35 34 33 32 31 30 29 28 27<br />
65 64 63 62 61 60 59 58 57 56 55 54 53<br />
91 90 89 88 87 86 85 84 83 82 81 80 79
ON-BOARD DIAGNOSTIC<br />
Diagnostic procedure<br />
STEP INSPECTION ACTION<br />
1 VERIFY FREEZE FRAME DATA HAS BEEN<br />
RECORDED<br />
• Has FREEZE FRAME DATA been recorded?<br />
2 VERIFY RELATED REPAIR INFORMATION<br />
AVAILABILITY<br />
• Verify related service repair information<br />
availability.<br />
• Is any related repair information available?<br />
3 VERIFY CURRENT SIGNAL STATUS: IS<br />
CONCERN INTERMITTENT OR CONSTANT?<br />
• Connect the WDS or equivalent to the DLC-2.<br />
• Clear the DTC from the PCM memory using<br />
the WDS or equivalent.<br />
• Perform the Drive Mode.<br />
(See F2–39 OBD DRIVE MODE.)<br />
• Is the PENDING CODE for this DTC present?<br />
4 INSPECT EGR SOLENOID VALVE (VACUUM)<br />
CONNECTOR FOR POOR CONNECTION<br />
• Turn the engine switch off.<br />
• Disconnect the EGR solenoid valve (vacuum)<br />
connector.<br />
• Inspect for poor connection (such as damaged/<br />
pulled-out pins, corrosion).<br />
• Is there any malfunction?<br />
5 INSPECT EGR SOLENOID VALVE (VACUUM)<br />
POWER CIRCUIT FOR OPEN CIRCUIT<br />
• Turn the engine switch to the ON position<br />
(Engine off).<br />
• Measure the voltage between EGR solenoid<br />
valve (vacuum) terminal A (wiring harnessside)<br />
and body GND.<br />
• Is the voltage B+?<br />
6 INSPECT EGR SOLENOID VALVE (VACUUM)<br />
CONTROL CIRCUIT FOR SHORT TO GND<br />
• Turn the engine switch off.<br />
• Inspect for continuity between EGR solenoid<br />
valve (vacuum) terminal B (wiring harnessside)<br />
and body GND.<br />
• Is there continuity?<br />
7 INSPECT EGR SOLENOID VALVE (VACUUM)<br />
• Inspect the EGR solenoid valve (vacuum).<br />
• Is there any malfunction?<br />
8 INSPECT PCM CONNECTOR FOR POOR<br />
CONNECTION<br />
• Turn the engine switch off.<br />
• Disconnect the PCM connector.<br />
• Inspect for poor connection (such as damaged/<br />
pulled-out pins, corrosion).<br />
• Is there any malfunction?<br />
9 INSPECT EGR SOLENOID VALVE (VACUUM)<br />
CONTROL CIRCUIT FOR OPEN CIRCUIT<br />
• Turn the engine switch off.<br />
• Inspect for continuity between EGR solenoid<br />
valve (vacuum) terminal B (wiring harnessside)<br />
and PCM terminal 99 (wiring harnessside).<br />
• Is there continuity?<br />
Yes Go to the next step.<br />
No Record the FREEZE FRAME DATA on the repair order,<br />
then go to the next step.<br />
Yes Perform repair or diagnosis according to the available<br />
repair information.<br />
• If the vehicle is not repaired, go to the next step.<br />
No Go to the next step.<br />
Yes Go to the next step.<br />
No Intermittent concern exists.<br />
Perform the “INTERMITTENT CONCERNS<br />
TROUBLESHOOTING”.<br />
Yes Repair or replace the terminal, then go to Step 10.<br />
No Go to the next step.<br />
Yes Go to the next step.<br />
No Repair or replace the wiring harness for a possible open<br />
circuit or short to GND, then go to Step 10.<br />
Yes Repair or replace the wiring harness for a possible short to<br />
GND, then go to Step 10.<br />
No Go to the next step.<br />
Yes Replace the EGR solenoid valve (vacuum), then go to Step<br />
10.<br />
No Go to the next step.<br />
Yes Repair or replace the terminal, then go to Step 10.<br />
No Go to the next step.<br />
Yes Go to the next step.<br />
No Repair or replace the wiring harness for a possible open<br />
circuit, then go to the next step.<br />
F2–131<br />
F2
10 VERIFY TROUBLESHOOTING OF DTC P0489<br />
COMPLETED<br />
• Make sure to reconnect all disconnected<br />
connectors.<br />
• Clear the DTC from the PCM memory using<br />
the WDS or equivalent.<br />
• Perform the Repair Verification Drive Mode.<br />
(See F2–39 OBD DRIVE MODE.)<br />
• Is the PENDING CODE for this DTC present?<br />
11 VERIFY AFTER REPAIR PROCEDURE<br />
• Are any DTCs present?<br />
End Of Sie<br />
DTC P0490<br />
F2–132<br />
ON-BOARD DIAGNOSTIC<br />
STEP INSPECTION ACTION<br />
DTC P0490 EGR solenoid valve (vacuum) control circuit high input<br />
DETECTION<br />
CONDITION<br />
POSSIBLE<br />
CAUSE<br />
PCM CONTROL<br />
RELAY WIRING<br />
HARNESS-SIDE<br />
CONNECTOR<br />
A<br />
C<br />
D<br />
Yes Replace the PCM, then go to the next step.<br />
No Go to the next step.<br />
Yes Go to the applicable DTC inspection.<br />
(See F2–40 DTC TABLE.)<br />
No DTC troubleshooting completed.<br />
B6E407000400106<br />
• The PCM monitors the output signal to the EGR solenoid valve (vacuum). If the EGR solenoid valve<br />
(vacuum) voltage is high even if the EGR solenoid valve (vacuum) is on, the PCM determines that there is<br />
a malfunction in the EGR solenoid valve (vacuum) control circuit.<br />
Diagnostic support note<br />
• The MIL illuminates if the PCM detects the above malfunction condition in two consecutive drive cycles or<br />
in one drive cycle while the DTC for the same malfunction has been stored in the PCM.<br />
• PENDING CODE is available if the PCM detects the above malfunction condition during the first drive<br />
cycle.<br />
• FREEZE FRAME DATA is available.<br />
• The DTC is stored in the PCM memory.<br />
• EGR solenoid valve (vacuum) malfunction<br />
• Connector or terminal malfunction<br />
• Short to power supply in wiring harness between EGR solenoid valve (vacuum) terminal B and PCM<br />
terminal 99<br />
• PCM malfunction<br />
PCM CONTROL RELAY<br />
TERMINAL C<br />
E<br />
EGR SOLENOID<br />
VALVE (VACUUM)<br />
WIRING HARNESS-SIDE<br />
CONNECTOR<br />
B A<br />
EGR SOLENOID<br />
VALVE (VACUUM)<br />
4<br />
6<br />
4<br />
5<br />
A<br />
B<br />
26 25 24 23 22 21 20 19 18 17 16 15 14<br />
52 51 50 49 48 47 46 45 44 43 42 41 40<br />
78 77 76 75 74 73 72 71 70 69 68 67 66<br />
104 103 102 101 100 99 98 97 96 95 94 93 92<br />
7<br />
99<br />
PCM<br />
WIRING HARNESS-SIDE<br />
CONNECTOR<br />
PCM<br />
13 12 11 10 9 8 7 6 5 4 3 2 1<br />
39 38 37 36 35 34 33 32 31 30 29 28 27<br />
65 64 63 62 61 60 59 58 57 56 55 54 53<br />
91 90 89 88 87 86 85 84 83 82 81 80 79
End Of Sie<br />
ON-BOARD DIAGNOSTIC<br />
Diagnostic procedure<br />
STEP INSPECTION ACTION<br />
1 VERIFY FREEZE FRAME DATA HAS BEEN Yes Go to the next step.<br />
RECORDED<br />
No Record the FREEZE FRAME DATA on the repair order,<br />
• Has FREEZE FRAME DATA been recorded? then go to the next step.<br />
2 VERIFY RELATED REPAIR INFORMATION Yes Perform repair or diagnosis according to the available<br />
AVAILABILITY<br />
repair information.<br />
• Verify related service repair information<br />
• If the vehicle is not repaired, go to the next step.<br />
availability.<br />
No Go to the next step.<br />
• Is any related repair information available?<br />
3 VERIFY CURRENT SIGNAL STATUS: IS Yes Go to the next step.<br />
CONCERN INTERMITTENT OR CONSTANT? No Intermittent concern exists.<br />
• Connect the WDS or equivalent to the DLC-2. Perform the “INTERMITTENT CONCERNS<br />
• Clear the DTC from the PCM memory using<br />
the WDS or equivalent.<br />
TROUBLESHOOTING”.<br />
• Perform the Drive Mode.<br />
(See F2–39 OBD DRIVE MODE.)<br />
• Is the PENDING CODE for this DTC present?<br />
4 INSPECT EGR SOLENOID VALVE (VACUUM) Yes Repair or replace the terminal, then go to Step 8.<br />
CONNECTOR FOR POOR CONNECTION No Go to the next step.<br />
• Turn the engine switch off.<br />
• Disconnect the EGR solenoid valve (vacuum)<br />
connector.<br />
• Inspect for poor connection (such as damaged/<br />
pulled-out pins, corrosion).<br />
• Is there any malfunction?<br />
5 INSPECT EGR SOLENOID VALVE (VACUUM) Yes Repair or replace the wiring harness for a possible short to<br />
CONTROL CIRCUIT FOR SHORT TO POWER power supply, then go to Step 8.<br />
SUPPLY<br />
No Go to the next step.<br />
• Turn the engine switch to the ON position<br />
(Engine off).<br />
• Measure the voltage between EGR solenoid<br />
valve (vacuum) terminal B (wiring harnessside)<br />
and body GND.<br />
• Is the voltage B+?<br />
6 INSPECT EGR SOLENOID VALVE (VACUUM) Yes Replace the EGR solenoid valve (vacuum), then go to Step<br />
• Inspect the EGR solenoid valve (vacuum).<br />
8.<br />
• Is there any malfunction?<br />
No Go to the next step.<br />
7 INSPECT PCM CONNECTOR FOR POOR Yes Repair or replace the terminal, then go to the next step.<br />
CONNECTION<br />
No Go to the next step.<br />
• Turn the engine switch off.<br />
• Disconnect the PCM connector.<br />
• Inspect for poor connection (such as damaged/<br />
pulled-out pins, corrosion).<br />
• Is there any malfunction?<br />
8 VERIFY TROUBLESHOOTING OF DTC P0490 Yes Replace the PCM, then go to the next step.<br />
COMPLETED<br />
No Go to the next step.<br />
• Make sure to reconnect all disconnected<br />
connectors.<br />
• Clear the DTC from the PCM memory using<br />
the WDS or equivalent.<br />
• Perform the Repair Verification Drive Mode.<br />
(See F2–39 OBD DRIVE MODE.)<br />
• Is the PENDING CODE for this DTC present?<br />
9 VERIFY AFTER REPAIR PROCEDURE<br />
Yes Go to the applicable DTC inspection.<br />
• Are any DTCs present?<br />
(See F2–40 DTC TABLE.)<br />
No DTC troubleshooting completed.<br />
F2–133<br />
F2
DTC P0500<br />
DTC P0500 Vehicle speed signal<br />
DETECTION<br />
CONDITION<br />
POSSIBLE<br />
CAUSE<br />
End Of Sie<br />
DTC P0504<br />
F2–134<br />
ON-BOARD DIAGNOSTIC<br />
B6E407000500101<br />
• The PCM monitors the CAN input signal from DSC HU/CM. If the input signal is not correct, the PCM<br />
determines that there is a CAN input signal.<br />
Diagnostic support note<br />
• The MIL illuminates if the PCM detects the above malfunction condition in two consecutive drive cycles or<br />
in one drive cycle while the DTC for the same malfunction has been stored in the PCM.<br />
• PENDING CODE is available if the PCM detects the above malfunction condition during the first drive<br />
cycle.<br />
• FREEZE FRAME DATA is available.<br />
• The DTC is stored in the PCM memory.<br />
• DSC HU/CM malfunction<br />
• PCM malfunction<br />
Diagnostic procedure<br />
STEP INSPECTION ACTION<br />
1 VERIFY FREEZE FRAME DATA HAS BEEN Yes Go to the next step.<br />
RECORDED<br />
No Record the FREEZE FRAME DATA on the repair order,<br />
• Has FREEZE FRAME DATA been recorded? then go to the next step.<br />
2 VERIFY RELATED REPAIR INFORMATION Yes Perform repair or diagnosis according to the available<br />
AVAILABILITY<br />
repair information.<br />
• Verify related service repair information<br />
• If the vehicle is not repaired, go to the next step.<br />
availability.<br />
No Go to the next step.<br />
• Is any related repair information available?<br />
3 VERIFY CURRENT INPUT SIGNAL STATUS: IS Yes Intermittent concern exists.<br />
CONCERN INTERMITTENT OR CONSTANT?<br />
Perform the “INTERMITTENT CONCERNS<br />
• Connect the WDS or equivalent to the DLC-2. TROUBLESHOOTING”.<br />
• Clear the DTC from the PCM memory using<br />
the WDS or equivalent.<br />
No Go to the next step.<br />
• Start the engine.<br />
• Is the PENDING CODE for this DTC present?<br />
4 INSPECT DSC HU/CM<br />
Yes Repair or replace the malfunctioning part, then go to the<br />
• Inspect the DSC HU/CM.<br />
next step.<br />
• Is there any malfunction?<br />
No Go to the next step.<br />
5 VERIFY TROUBLESHOOTING OF DTC P0500 Yes Replace the PCM, then go to the next step.<br />
COMPLETED<br />
No Go to the next step.<br />
• Make sure to reconnect all disconnected<br />
connectors.<br />
• Clear the DTC from the PCM memory using<br />
the WDS or equivalent.<br />
• Start the engine.<br />
• Is the PENDING CODE same as the DTC<br />
present?<br />
6 VERIFY AFTER REPAIR PROCEDURE<br />
Yes Go to the applicable DTC inspection.<br />
• Perform the Repair Verification Drive Mode. (See F2–40 DTC TABLE.)<br />
•<br />
(See F2–39 OBD DRIVE MODE.)<br />
Are any DTCs present?<br />
No DTC troubleshooting completed.<br />
DTC P0504 Brake switch signal correlation malfunction<br />
DETECTION<br />
CONDITION<br />
B6E407000500102<br />
• The PCM monitors the input signal from brake switch 1 and brake switch 2 while the engine is running. The<br />
PCM determines the brake switch signal correlation malfunction if the input signal from brake switch 1<br />
brake switch 2 is as follows:<br />
— Brake switch 1 is on and brake switch 2 is off.<br />
— Brake switch 1 is off and brake switch 2 is on.<br />
Diagnostic support note<br />
• The MIL does not illuminates.<br />
• The DTC is stored in the PCM memory.
DTC P0504 Brake switch signal correlation malfunction<br />
POSSIBLE<br />
CAUSE<br />
ON-BOARD DIAGNOSTIC<br />
• Brake switch malfunction<br />
• Connector or terminal malfunction<br />
• Open circuit in wiring harness between main fuse and brake switch terminal B<br />
• Open circuit in wiring harness between brake switch terminal D and PCM terminal 7<br />
• Short to power circuit in wiring harness between brake switch terminal D and PCM terminal 7<br />
• Open circuit in wiring harness between brake switch terminal C and GND<br />
• Short to GND in wiring harness between brake switch terminal A and PCM terminal 34<br />
• Open circuit in wiring harness between brake switch terminal A and PCM terminal 34<br />
• Short to GND in wiring harness between brake switch terminal D and PCM terminal 7<br />
• Short to power circuit in wiring harness between brake switch terminal A and PCM terminal 34<br />
• PCM malfunction<br />
MAIN FUSE PCM<br />
5<br />
6<br />
4<br />
4<br />
BRAKE SWITCH<br />
BRAKE SWITCH 1<br />
C<br />
D<br />
B D<br />
8 14<br />
BRAKE SWITCH 2<br />
C A<br />
19<br />
BRAKE SWITCH<br />
WIRING HARNESS-SIDE CONNECTOR<br />
A<br />
B<br />
4<br />
4<br />
7 12 13<br />
8 9 14<br />
11<br />
11<br />
7<br />
34<br />
PCM<br />
WIRING HARNESS-SIDE CONNECTOR<br />
26 25 24 23 22 21 20 19 18 17 16 15 14 13 12 11 10 9 8 7 6 5 4 3 2 1<br />
52 51 50 49 48 47 46 45 44 43 42 41 40 39 38 37 36 35 34 33 32 31 30 29 28 27<br />
78 77 76 75 74 73 72 71 70 69 68 67 66 65 64 63 62 61 60 59 58 57 56 55 54 53<br />
104 103 102 101 100 99 98 97 96 95 94 93 92 91 90 89 88 87 86 85 84 83 82 81 80 79<br />
F2–135<br />
F2
F2–136<br />
ON-BOARD DIAGNOSTIC<br />
Diagnostic procedure<br />
STEP INSPECTION ACTION<br />
1 VERIFY FREEZE FRAME DATA HAS BEEN<br />
RECORDED<br />
• Has FREEZE FRAME DATA been recorded?<br />
2 VERIFY RELATED REPAIR INFORMATION<br />
AVAILABILITY<br />
• Check for related Service Information<br />
availability.<br />
• Is any related repair information available?<br />
3 VERIFY CURRENT SIGNAL STATUS: IS<br />
CONCERN INTERMITTENT OR CONSTANT?<br />
• Connect the WDS or equivalent to the DLC-2.<br />
• Clear the DTC from the PCM memory using<br />
the WDS or equivalent.<br />
• Start the engine.<br />
• Is the same DTC present?<br />
4 INSPECT BRAKE SWITCH CONNECTOR FOR<br />
POOR CONNECTION<br />
• Turn the engine switch off.<br />
• Inspect for poor connection (such as damaged/<br />
pulled-out terminals, corrosion).<br />
• Is there any malfunction?<br />
5 INSPECT BRAKE SWITCH 1 POWER SUPPLY<br />
CIRCUIT FOR OPEN<br />
• Turn the engine switch to the ON position<br />
(Engine off).<br />
• Inspect the voltage between brake switch<br />
terminal B and body GND.<br />
• Is the voltage B+?<br />
6 INSPECT BRAKE SWITCH 2 GND CIRCUIT FOR<br />
OPEN<br />
• Turn the engine switch off.<br />
• Inspect for continuity between brake switch<br />
terminal C and body GND.<br />
• Is there continuity?<br />
7 INSPECT BRAKE SWITCH 1 SIGNAL CIRCUIT<br />
FOR SHORT TO POWER<br />
• Turn the engine switch to the ON position<br />
(Engine off).<br />
• Inspect the voltage between brake switch<br />
terminal D and body GND.<br />
• Is the voltage less than 1.0 V?<br />
8 INSPECT BRAKE SWITCH 2 SIGNAL CIRCUIT<br />
FOR OPEN<br />
• Turn the engine switch to the ON position<br />
(Engine off).<br />
• Inspect the voltage between brake switch<br />
terminal A and body GND.<br />
• Is the voltage less than 1.0 V?<br />
9 INSPECT BRAKE SWITCH 2 SIGNAL CIRCUIT<br />
FOR SHORT TO GND<br />
• Turn the engine switch off.<br />
• Inspect for continuity between brake switch<br />
terminal A and body GND.<br />
• Is there continuity?<br />
10 INSPECT BRAKE SWITCH<br />
• Inspect brake switch.<br />
• Is there any malfunction?<br />
11 INSPECT PCM CONNECTOR FOR POOR<br />
CONNECTION<br />
• Turn the engine switch off.<br />
• Inspect for poor connection (such as damaged/<br />
pulled-out terminals, corrosion).<br />
• Is there any malfunction?<br />
Yes Go to the next step.<br />
No Record the FREEZE FRAME DATA on the repair order,<br />
then go to the next step.<br />
Yes Perform repair or diagnosis according to the available<br />
Service Information.<br />
• If the vehicle is not repaired, go to the next step.<br />
No Go to the next step.<br />
Yes Go to the next step.<br />
No Intermittent concern exists.<br />
Perform the “INTERMITTENT CONCERNS<br />
TROUBLESHOOTING”.<br />
Yes Repair or replace the suspected terminal, go to Step 15.<br />
No Go to the next step.<br />
Yes Go to the next step.<br />
No Repair or replace the wiring harness for an open, go to<br />
Step 15.<br />
Yes Go to the next step.<br />
No Repair or replace the wiring harness for an open, go to<br />
Step 15.<br />
Yes Go to the next step.<br />
No Repair or replace the wiring harness for a short to power<br />
supply, go to Step 15.<br />
Yes Repair or replace the wiring harness for an open circuit, go<br />
to Step 15.<br />
No Go to the next step.<br />
Yes Repair or replace the wiring harness for a short to GND, go<br />
to Step 15.<br />
No Go to the next step.<br />
Yes Replace the brake switch, go to Step 15.<br />
No Go to the next step.<br />
Yes Repair or replace the suspected terminal, go to Step 15.<br />
No Go to the next step.
12 INSPECT BRAKE SWITCH 1 SIGNAL CIRCUIT<br />
FOR SHORT TO GND<br />
• Turn the engine switch off.<br />
• Inspect for continuity between brake switch<br />
terminal D and body GND.<br />
• Is there continuity?<br />
13 INSPECT BRAKE SWITCH 1 SIGNAL CIRCUIT<br />
FOR OPEN CIRCUIT<br />
• Turn the engine switch off.<br />
• Inspect for continuity between brake switch<br />
terminal D and PCM terminal 7.<br />
• Is there continuity?<br />
14 INSPECT BRAKE SWITCH 2 SIGNAL CIRCUIT<br />
FOR SHORT TO POWER<br />
• Turn the engine switch to the ON position<br />
(Engine off).<br />
• Inspect the voltage between brake switch<br />
terminal D and body GND.<br />
• Is the voltage B+?<br />
15 VERIFY TROUBLESHOOTING OF DTC P0504<br />
COMPLETED<br />
• Make sure to reconnect all disconnected<br />
connectors.<br />
• Clear the DTC from the PCM memory using<br />
the WDS or equivalent.<br />
• Start the engine.<br />
• Depress and release the brake pedal for 10<br />
times.<br />
• Is the same DTC present?<br />
16 VERIFY AFTER REPAIR PROCEDURE<br />
• Perform the Repair Verification Drive Mode.<br />
(See F2–39 OBD DRIVE MODE.)<br />
• Are any DTCs present?<br />
End Of Sie<br />
DTC P0512<br />
ON-BOARD DIAGNOSTIC<br />
STEP INSPECTION ACTION<br />
DTC P0512 Engine switch circuit high input<br />
DETECTION<br />
CONDITION<br />
POSSIBLE<br />
CAUSE<br />
Yes Repair or replace the wiring harness for a short to GND, go<br />
to Step 15.<br />
No Go to the next step.<br />
Yes Go to the next step.<br />
No Repair or replace the wiring harness for an open circuit, go<br />
to Step 15.<br />
Yes Repair or replace the wiring harness for a short to power<br />
supply, go to the next step.<br />
No Go to the next step.<br />
Yes Replace the PCM, go to the next step.<br />
No Go to the next step.<br />
Yes Go to the applicable DTC inspection.<br />
(See F2–40 DTC TABLE.)<br />
No Troubleshooting completed.<br />
B6E407000500103<br />
• The PCM monitors the engine speed and the starter signal. If the engine speed is more than 700 rpm and<br />
the starter switch ON signal is input, the PCM determines that there is a malfunction in the starter switch<br />
circuit.<br />
Diagnostic support note<br />
• The MIL illuminates if the PCM detects the above malfunction condition in the first drive cycle.<br />
• FREEZE FRAME DATA is available.<br />
• The DTC is stored in the PCM memory.<br />
• Engine switch malfunction<br />
• Starter relay malfunction<br />
• Connector or terminal malfunction<br />
• Short to power supply in wiring harness between starter relay terminal A and PCM terminal 78<br />
• Short to power supply in wiring harness between engine switch terminal A and starter relay terminal B<br />
• PCM malfunction<br />
F2–137<br />
F2
DTC P0512 Engine switch circuit high input<br />
STARTER<br />
RELAY WIRING<br />
HARNESS-SIDE<br />
CONNECTOR<br />
D<br />
C<br />
F2–138<br />
FUSE<br />
A<br />
B<br />
ENGINE SWITCH<br />
7<br />
F A<br />
ENGINE SWITCH<br />
WIRING<br />
HARNESS-SIDE<br />
CONNECTOR<br />
E<br />
F<br />
C A<br />
D B<br />
7 8 5<br />
ON-BOARD DIAGNOSTIC<br />
4<br />
4<br />
STARTER RELAY<br />
C<br />
D<br />
B A<br />
26 25 24 23 22 21 20 19 18 17 16 15 14<br />
52 51 50 49 48 47 46 45 44 43 42 41 40<br />
78 77 76 75 74 73 72 71 70 69 68 67 66<br />
104 103 102 101 100 99 98 97 96 95 94 93 92<br />
4<br />
4<br />
PCM<br />
WIRING HARNESS-SIDE<br />
CONNECTOR<br />
6<br />
9<br />
78<br />
PCM<br />
13 12 11 10 9 8 7 6 5 4 3 2 1<br />
39 38 37 36 35 34 33 32 31 30 29 28 27<br />
65 64 63 62 61 60 59 58 57 56 55 54 53<br />
91 90 89 88 87 86 85 84 83 82 81 80 79
ON-BOARD DIAGNOSTIC<br />
Diagnostic procedure<br />
STEP INSPECTION ACTION<br />
1 VERIFY FREEZE FRAME DATA HAS BEEN<br />
RECORDED<br />
• Has FREEZE FRAME DATA been recorded?<br />
2 VERIFY RELATED REPAIR INFORMATION<br />
AVAILABILITY<br />
• Verify related service repair information<br />
availability.<br />
• Is any related repair information available?<br />
3 VERIFY CURRENT SIGNAL STATUS: IS<br />
CONCERN INTERMITTENT OR CONSTANT?<br />
• Connect the WDS or equivalent to the DLC-2.<br />
• Clear the DTC from the PCM memory using<br />
the WDS or equivalent.<br />
• Start the engine.<br />
• Is the same DTC present?<br />
4 INSPECT STARTER RELAY CONNECTOR FOR<br />
POOR CONNECTION<br />
• Turn the engine switch off.<br />
• Inspect for poor connection (such as damaged/<br />
pulled-out terminals, corrosion).<br />
• Is there any malfunction?<br />
5 DETERMINE IF MALFUNCTION IS IN ENGINE<br />
SWITCH SIDE OR STARTER RELAY SIDE<br />
• Turn the engine switch to the ON position<br />
(Engine off).<br />
• Measure the voltage between starter relay<br />
terminal B and body GND.<br />
• Is the voltage B+?<br />
6 DETERMINE IF MALFUNCTION IS IN STARTER<br />
RELAY OR PCM SIDE<br />
• Turn the engine switch to the ON position<br />
(Engine off).<br />
• Measure the voltage between starter relay<br />
terminal A and body GND.<br />
• Is the voltage B+?<br />
7 INSPECT ENGINE SWITCH CONNECTOR FOR<br />
POOR CONNECTION<br />
• Turn the engine switch off.<br />
• Inspect for poor connection (such as damaged/<br />
pulled-out terminals, corrosion).<br />
• Is there any malfunction?<br />
8 INSPECT ENGINE SWITCH SIGNAL CIRCUIT<br />
FOR SHORT TO POWER SUPPLY<br />
• Turn the engine switch to the ON position<br />
(Engine off).<br />
• Measure the voltage between engine switch<br />
terminal A and body GND.<br />
• Is the voltage B+?<br />
9 INSPECT PCM CONNECTOR FOR POOR<br />
CONNECTION<br />
• Turn the engine switch off.<br />
• Inspect for poor connection (such as damaged/<br />
pulled-out terminals, corrosion).<br />
• Is there any malfunction?<br />
10 VERIFY TROUBLESHOOTING OF DTC P0512<br />
COMPLETED<br />
• Make sure to reconnect all disconnected<br />
connectors.<br />
• Clear the DTC from the PCM memory using<br />
the WDS or equivalent.<br />
• Start the engine.<br />
• Is the same DTC present?<br />
Yes Go to the next step.<br />
No Record the FREEZE FRAME DATA on the repair order,<br />
then go to the next step.<br />
Yes Perform repair or diagnosis according to the available<br />
repair information.<br />
• If the vehicle is not repaired, go to the next step.<br />
No Go to the next step.<br />
Yes Go to the next step.<br />
No Intermittent concern exists.<br />
Perform the “INTERMITTENT CONCERNS<br />
TROUBLESHOOTING”.<br />
Yes Repair or replace the terminal, then go to Step 10.<br />
No Go to the next step.<br />
Yes Go to Step 7.<br />
No Go to the next step.<br />
Yes Go to Step 9.<br />
No Inspect the starter relay, then go to Step 10.<br />
Yes Repair or replace the terminal, then go to Step 10.<br />
No Go to the next step.<br />
Yes Repair or replace the wiring harness for a short to power<br />
supply, then go to Step 10.<br />
No Inspect engine switch, then go to Step 10.<br />
Yes Repair or replace the terminal, then go to the next step.<br />
No Repair or replace the wiring harness for a short to power<br />
supply between starter relay terminal A and PCM terminal<br />
78, then go to the next step.<br />
Yes Replace the PCM, then go to the next step.<br />
No Go to the next step.<br />
F2–139<br />
F2
11 VERIFY AFTER REPAIR PROCEDURE<br />
• Perform the Repair Verification Drive Mode.<br />
(See F2–39 OBD DRIVE MODE.)<br />
• Is there any DTC present?<br />
End Of Sie<br />
DTC P0562<br />
F2–140<br />
ON-BOARD DIAGNOSTIC<br />
STEP INSPECTION ACTION<br />
DTC P0562 Battery voltage low input<br />
DETECTION<br />
CONDITION<br />
POSSIBLE<br />
CAUSE<br />
Yes Go to the applicable DTC inspection.<br />
(See F2–40 DTC TABLE.)<br />
No Troubleshooting completed.<br />
B6E407000500104<br />
• The PCM monitors the battery voltage. If the battery voltage is less than 8 V, the PCM determines that<br />
there is a malfunction in the battery and the battery signal system.<br />
Diagnostic support note<br />
• The MIL illuminates if the PCM detects the above malfunction condition in the first drive cycle.<br />
• FREEZE FRAME DATA is available.<br />
• The DTC is stored in the PCM memory.<br />
• Generator malfunction<br />
• Terminal malfunction<br />
• PCM malfunction<br />
GENERATOR<br />
GENERATOR<br />
WIRING HARNESS-SIDE<br />
CONNECTOR<br />
B<br />
5<br />
4<br />
B 27<br />
-<br />
BATTERY<br />
+<br />
26 25 24 23 22 21 20 19 18 17 16 15 14<br />
52 51 50 49 48 47 46 45 44 43 42 41 40<br />
78 77 76 75 74 73 72 71 70 69 68 67 66<br />
104 103 102 101 100 99 98 97 96 95 94 93 92<br />
PCM<br />
WIRING HARNESS-SIDE<br />
CONNECTOR<br />
PCM<br />
13 12 11 10 9 8 7 6 5 4 3 2 1<br />
39 38 37 36 35 34 33 32 31 30 29 28 27<br />
65 64 63 62 61 60 59 58 57 56 55 54 53<br />
91 90 89 88 87 86 85 84 83 82 81 80 79
End Of Sie<br />
DTC P0563<br />
ON-BOARD DIAGNOSTIC<br />
Diagnostic procedure<br />
STEP INSPECTION ACTION<br />
1 VERIFY FREEZE FRAME DATA HAS BEEN Yes Go to the next step.<br />
RECORDED<br />
No Record the FREEZE FRAME DATA on the repair order,<br />
• Has FREEZE FRAME DATA been recorded? then go to the next step.<br />
2 VERIFY RELATED REPAIR INFORMATION Yes Perform repair or diagnosis according to the available<br />
AVAILABILITY<br />
repair information.<br />
• Verify related service repair information<br />
• If the vehicle is not repaired, go to the next step.<br />
availability.<br />
No Go to the next step.<br />
• Is any related repair information available?<br />
3 VERIFY CURRENT SIGNAL STATUS: IS Yes Go to the next step.<br />
CONCERN INTERMITTENT OR CONSTANT? No Intermittent concern exists.<br />
• Connect the WDS or equivalent to the DLC-2. Perform the “INTERMITTENT CONCERNS<br />
• Clear the DTC from the PCM memory using<br />
the WDS or equivalent.<br />
TROUBLESHOOTING”.<br />
• Start the engine.<br />
• Is the same DTC present?<br />
4 INSPECT GENERATOR TERMINAL FOR POOR Yes Connect generator terminal B correctly, then go to Step 6.<br />
INSTALLATION<br />
No Go to the next step.<br />
• Turn the engine switch off.<br />
• Inspect generator terminal B for looseness.<br />
• Is there any malfunction?<br />
5 INSPECT GENERATOR<br />
Yes Replace the generator, then go to the next step.<br />
•<br />
•<br />
Inspect the generator.<br />
Is there any malfunction?<br />
No Go to the next step.<br />
6 VERIFY TROUBLESHOOTING OF DTC P0562 Yes Replace the PCM, then go to the next step.<br />
COMPLETED<br />
No Go to the next step.<br />
• Make sure to reconnect all disconnected<br />
connectors.<br />
• Clear the DTC from the PCM memory using<br />
the WDS or equivalent.<br />
• Start the engine.<br />
• Is the same DTC present?<br />
7 VERIFY AFTER REPAIR PROCEDURE<br />
Yes Go to the applicable DTC inspection.<br />
• Perform the Repair Verification Drive Mode.<br />
(See F2–40 DTC TABLE.)<br />
•<br />
(See F2–39 OBD DRIVE MODE.)<br />
Are any DTCs present?<br />
No DTC troubleshooting completed.<br />
DTC P0563 Battery voltage high input<br />
DETECTION<br />
CONDITION<br />
POSSIBLE<br />
CAUSE<br />
B6E407000500105<br />
• The PCM monitors the battery voltage. If the battery voltage is more than 16 V, the PCM determines that<br />
there is a malfunction in the battery charging system.<br />
Diagnostic support note<br />
• The MIL illuminates if the PCM detects the above malfunction condition in the first drive cycle.<br />
• FREEZE FRAME DATA is available.<br />
• The DTC is stored in the PCM memory.<br />
• Generator malfunction<br />
• Battery malfunction<br />
• Connector or terminal malfunction<br />
• Open circuit in wiring harness between battery positive terminal, generator terminal B and PCM terminal 27<br />
• PCM malfunction<br />
F2–141<br />
F2
F2–142<br />
ON-BOARD DIAGNOSTIC<br />
DTC P0563 Battery voltage high input<br />
1<br />
2<br />
3<br />
4<br />
5<br />
6<br />
7<br />
8<br />
9<br />
10<br />
11<br />
12<br />
13<br />
14<br />
15<br />
16<br />
17<br />
18<br />
19<br />
20<br />
21<br />
22<br />
23<br />
24<br />
25<br />
26<br />
27<br />
28<br />
29<br />
30<br />
53<br />
54<br />
55<br />
56<br />
57<br />
58<br />
59<br />
60<br />
79<br />
80<br />
81<br />
82<br />
83<br />
84<br />
85<br />
86<br />
87<br />
88<br />
89<br />
90<br />
31<br />
32<br />
33<br />
34<br />
35<br />
36<br />
37<br />
38<br />
39<br />
40<br />
61<br />
62<br />
63<br />
64<br />
65<br />
66<br />
67<br />
68<br />
69<br />
70<br />
91<br />
92<br />
94 93<br />
95<br />
96<br />
97<br />
98<br />
99<br />
100<br />
41<br />
42<br />
43<br />
44<br />
45<br />
46<br />
47<br />
48<br />
49<br />
50<br />
71<br />
72<br />
73<br />
74<br />
75<br />
76<br />
77<br />
78<br />
51<br />
52<br />
101<br />
102<br />
103<br />
104<br />
B 27<br />
+<br />
-<br />
4<br />
9<br />
7<br />
6<br />
8<br />
5<br />
B<br />
GENERATOR<br />
BATTERY<br />
PCM<br />
PCM<br />
WIRING HARNESS-SIDE<br />
CONNECTOR<br />
GENERATOR<br />
WIRING HARNESS-SIDE<br />
CONNECTOR
End Of Sie<br />
ON-BOARD DIAGNOSTIC<br />
Diagnostic procedure<br />
STEP INSPECTION ACTION<br />
1 VERIFY FREEZE FRAME DATA HAS BEEN Yes Go to the next step.<br />
RECORDED<br />
No Record the FREEZE FRAME DATA on the repair order,<br />
• Has FREEZE FRAME DATA been recorded? then go to the next step.<br />
2 VERIFY RELATED REPAIR INFORMATION Yes Perform repair or diagnosis according to the available<br />
AVAILABILITY<br />
repair information.<br />
• Verify related service repair information<br />
• If the vehicle is not repaired, go to the next step.<br />
availability.<br />
No Go to the next step.<br />
• Is any related repair information available?<br />
3 VERIFY CURRENT SIGNAL STATUS: IS Yes Go to the next step.<br />
CONCERN INTERMITTENT OR CONSTANT? No Intermittent concern exists.<br />
• Connect the WDS or equivalent to the DLC-2. Perform the “INTERMITTENT CONCERNS<br />
• Clear the DTC from the PCM memory using<br />
the WDS or equivalent.<br />
TROUBLESHOOTING”.<br />
• Start the engine.<br />
• Is the same DTC present?<br />
4 INSPECT GENERATOR TERMINAL FOR POOR Yes Connect generator terminal B correctly, then go to Step 10.<br />
INSTALLATION<br />
No Go to the next step.<br />
• Turn the engine switch off.<br />
• Inspect generator terminal B for looseness.<br />
• Is there any malfunction?<br />
5 INSPECT GENERATOR<br />
Yes Replace the generator, then go to Step 10.<br />
•<br />
•<br />
Inspect the generator.<br />
Is there any malfunction?<br />
No Go to the next step.<br />
6 INSPECT BATTERY POSITIVE TERMINAL FOR Yes Connect the battery positive terminal correctly, then go to<br />
POOR INSTALLATION<br />
Step 10.<br />
• Turn the engine switch off.<br />
No Go to the next step.<br />
• Inspect the battery positive terminal for<br />
looseness.<br />
• Is there any malfunction?<br />
7 INSPECT BATTERY<br />
Yes Replace the battery, then go to Step 10.<br />
•<br />
•<br />
Inspect the battery.<br />
Is there any malfunction?<br />
No Go to the next step.<br />
8 INSPECT PCM CONNECTOR FOR POOR Yes Repair or replace the terminal, then go to Step 6.<br />
CONNECTION<br />
No Go to the next step.<br />
• Turn the engine switch off.<br />
• Inspect for poor connection (such as damaged/<br />
pulled-out terminals, corrosion).<br />
• Is there any malfunction?<br />
9 INSPECT CHARGING CIRCUIT FOR OPEN Yes Repair or replace the wiring harness for a possible open<br />
CIRCUIT<br />
circuit, then go to the next step.<br />
• Turn the engine switch off.<br />
No Go to the next step.<br />
• Inspect for continuity between generator<br />
terminal B (wiring harness-side), PCM terminal<br />
27 and the battery positive terminal (wiring<br />
harness-side).<br />
• Is there continuity?<br />
10 VERIFY TROUBLESHOOTING OF DTC P0563 Yes Replace the PCM, then go to the next step.<br />
COMPLETED<br />
No Go to the next step.<br />
• Make sure to reconnect all disconnected<br />
connectors.<br />
• Clear the DTC from the PCM memory using<br />
the WDS or equivalent.<br />
• Start the engine.<br />
• Is the same DTC present?<br />
11 VERIFY AFTER REPAIR PROCEDURE<br />
Yes Go to the applicable DTC inspection.<br />
• Perform the Repair Verification Drive Mode.<br />
(See F2–40 DTC TABLE.)<br />
•<br />
(See F2–39 OBD DRIVE MODE.)<br />
Are any DTCs present?<br />
No DTC troubleshooting completed.<br />
F2–143<br />
F2
DTC P0564<br />
DTC P0564 Cruise control signal malfunction<br />
DETECTION<br />
CONDITION<br />
POSSIBLE<br />
CAUSE<br />
F2–144<br />
ON-BOARD DIAGNOSTIC<br />
B6E407000500106<br />
• The PCM monitors the input voltage from the cruise control switch while the engine is running. The PCM<br />
determines cruise control signal malfunction if the input voltage from the cruise control switch is as follows<br />
for 120 s:<br />
— Less Than 0.1 V.<br />
— 1.4—1.9 V.<br />
— 3.7—3.9 V.<br />
— 4.5—4.6 V.<br />
Diagnostic support note<br />
• The MIL does not illuminates.<br />
• The DTC is stored in the PCM memory.<br />
• Cruise control switch malfunction<br />
• Connector or terminal malfunction<br />
• Short to GND in wiring harness between cruise control switch terminal B and PCM terminal 64<br />
• Cruise control switch signal and GND circuits short each other<br />
• Open circuit in wiring harness between cruise control switch terminal B and PCM terminal 64<br />
• Open circuit in wiring harness between cruise control switch terminal C and PCM terminal 91<br />
• PCM malfunction<br />
B C<br />
CRUISE CONTROL SWITCH PCM<br />
8<br />
CRUISE CONTROL SWITCH<br />
WIRING HARNESS-SIDE CONNECTOR<br />
B<br />
C<br />
4 6 5 7<br />
4 6 10<br />
26 25 24 23 22 21 20 19 18 17 16 15 14<br />
52 51 50 49 48 47 46 45 44 43 42 41 40<br />
78 77 76 75 74 73 72 71 70 69 68 67 66<br />
104 103 102 101 100 99 98 97 96 95 94 93 92<br />
9<br />
9<br />
64<br />
91<br />
PCM<br />
WIRING HARNESS-SIDE CONNECTOR<br />
13 12 11 10 9 8 7 6 5 4 3 2 1<br />
39 38 37 36 35 34 33 32 31 30 29 28 27<br />
65 64 63 62 61 60 59 58 57 56 55 54 53<br />
91 90 89 88 87 86 85 84 83 82 81 80 79
ON-BOARD DIAGNOSTIC<br />
Diagnostic procedure<br />
STEP INSPECTION ACTION<br />
1 VERIFY FREEZE FRAME DATA HAS BEEN<br />
RECORDED<br />
• Has FREEZE FRAME DATA been recorded?<br />
2 VERIFY RELATED REPAIR INFORMATION<br />
AVAILABILITY<br />
• Verify related Service Information availability.<br />
• Is any related repair information available?<br />
3 VERIFY CURRENT SIGNAL STATUS: IS<br />
CONCERN INTERMITTENT OR CONSTANT?<br />
• Connect the WDS or equivalent to the DLC-2.<br />
• Clear the DTC from the PCM memory using<br />
the WDS or equivalent.<br />
• Start the engine.<br />
• Is the PENDING CODE for this DTC present?<br />
4 INSPECT CRUISE CONTROL SWITCH<br />
CONNECTOR FOR POOR CONNECTION<br />
• Turn the engine switch off.<br />
• Inspect for poor connection (such as damaged/<br />
pulled-out terminals, corrosion).<br />
• Is there any malfunction?<br />
5 INSPECT CRUISE CONTROL SWITCH SIGNAL<br />
CIRCUIT FOR SHORT TO GND<br />
• Turn the engine switch off.<br />
• Inspect for continuity between cruise control<br />
switch terminal B and body GND.<br />
• Is there continuity?<br />
6 INSPECT CRUISE CONTROL SWITCH WIRING<br />
HARNESSES FOR SHORT WITH EACH OTHER<br />
• Turn the engine switch off.<br />
• Inspect for continuity between cruise control<br />
switch terminals B and C.<br />
• Is there continuity?<br />
7 INSPECT CRUISE CONTROL SWITCH SIGNAL<br />
CIRCUIT FOR OPEN CIRCUIT<br />
• Turn the engine switch to the ON position.<br />
(Engine off)<br />
• Inspect the voltage at cruise control switch<br />
terminal B (harness side).<br />
• Is the voltage below 1.0 V?<br />
8 INSPECT CRUISE CONTROL SWITCH<br />
• Inspect the cruise control switch.<br />
• Is there any malfunction?<br />
9 INSPECT PCM CONNECTOR FOR POOR<br />
CONNECTION<br />
• Turn the engine switch off.<br />
• Inspect for poor connection (such as damaged/<br />
pulled-out terminals, corrosion).<br />
• Is there any malfunction?<br />
10 INSPECT CRUISE CONTROL SWITCH GND<br />
CIRCUIT FOR OPEN CIRCUIT<br />
• Turn the engine switch off.<br />
• Inspect for continuity between cruise control<br />
switch terminal C and PCM terminal 91.<br />
• Is there continuity?<br />
11 VERIFY TROUBLESHOOTING OF DTC P0564<br />
COMPLETED<br />
• Make sure to reconnect all disconnected<br />
connectors.<br />
• Clear the DTC from the PCM memory using<br />
the WDS or equivalent.<br />
• Start the engine and idle it for 120 s or more.<br />
• Is the same DTC present?<br />
Yes Go to the next step.<br />
No Record the FREEZE FRAME DATA on the repair order,<br />
then go to the next step.<br />
Yes Perform repair or diagnosis according to the available<br />
Service Information.<br />
• If vehicle is not repaired, go to the next step.<br />
No Go to the next step.<br />
Yes Go to the next step.<br />
No Intermittent concern exists.<br />
Perform the “INTERMITTENT CONCERNS<br />
TROUBLESHOOTING”.<br />
Yes Repair or replace the suspected terminal, go to Step 11.<br />
No Go to the next step.<br />
Yes Repair or replace the wiring harness for a short to GND, go<br />
to Step 11.<br />
No Go to the next step.<br />
Yes Repair or replace the wiring harness for a short with each<br />
other, go to Step 11.<br />
No Go to the next step.<br />
Yes Repair or replace the wiring harness for an open circuit, go<br />
to Step 11.<br />
No Go to the next step.<br />
Yes Replace the cruise control switch, go to Step 11.<br />
No Go to the next step.<br />
Yes Repair or replace the suspected terminal, go to Step 11.<br />
No Go to the next step.<br />
Yes Go to the next step.<br />
No Repair or replace the wiring harness for an open circuit, go<br />
to the next step.<br />
Yes Replace the PCM, go to the next step.<br />
No Go to the next step.<br />
F2–145<br />
F2
12 VERIFY AFTER REPAIR PROCEDURE<br />
• Perform the Repair Verification Drive Mode.<br />
(See F2–39 OBD DRIVE MODE.)<br />
• Are any DTCs present?<br />
End Of Sie<br />
DTC P0602<br />
End Of Sie<br />
DTC P0606<br />
F2–146<br />
ON-BOARD DIAGNOSTIC<br />
STEP INSPECTION ACTION<br />
DTC P0602 PCM programming error<br />
• No configuration data in PCM<br />
DETECTION<br />
CONDITION<br />
POSSIBLE<br />
CAUSE<br />
Diagnostic procedure<br />
STEP INSPECTION ACTION<br />
1 – – Replace PCM.<br />
End Of Sie<br />
Yes Go to the applicable DTC inspection.<br />
(See F2–40 DTC TABLE.)<br />
No Troubleshooting completed.<br />
B6E407000600101<br />
Note<br />
• If “PCM CONFIGURATION” is successful, the PCM stored DTC P0602 and illuminates the MIL<br />
(System i s normal). Clear the DTC P0602 using WDS or equivalent after “PCM CONFIGURATION”.<br />
• MIL goes off after three drive cycles with no failure (DTCs remain in PCM).<br />
Diagnostic support note<br />
• The MIL illuminates if the PCM detects the above malfunction condition in the first drive cycle.<br />
• FREEZE FRAME DATA is available.<br />
• The DTC is stored in the PCM memory.<br />
• Complete configuration has not been completed.<br />
• PCM malfunction<br />
Diagnostic procedure<br />
STEP INSPECTION ACTION<br />
1 VERIFY CURRENT SIGNAL STATUS: IS Yes Perform “PCM Configuration Procedure”, then go to the<br />
CONCERN INTERMITTENT OR CONSTANT?<br />
next step.<br />
• Connect the WDS or equivalent to the DLC-2. No Intermittent concern exists.<br />
• Clear the DTC from the PCM memory using Perform the “INTERMITTENT CONCERNS<br />
the WDS or equivalent.<br />
TROUBLESHOOTING”.<br />
• Start the engine.<br />
• Is the same DTC present?<br />
2 VERIFY TROUBLESHOOTING OF DTC P0602 Yes Replace PCM, go to the next step.<br />
COMPLETED<br />
No Go to the next step.<br />
• Make sure to reconnect all disconnected<br />
connectors.<br />
• Clear the DTC from the PCM memory using<br />
the WDS or equivalent.<br />
• Start the engine.<br />
• Is the same DTC present?<br />
3 VERIFY AFTER REPAIR PROCEDURE<br />
Yes Go to applicable DTC inspection.<br />
• Perform “After Repair Procedure”.<br />
(See F2–40 DTC TABLE.)<br />
• Are any DTCs present?<br />
No Troubleshooting completed.<br />
DTC P0606 PCM malfunction<br />
DETECTION<br />
CONDITION<br />
POSSIBLE<br />
CAUSE<br />
• PCM does not read DTC from output devices.<br />
Diagnostic support note<br />
• The MIL illuminates if the PCM detects the above malfunction condition in the first drive cycle.<br />
• FREEZE FRAME DATA is available.<br />
• The DTC is stored in the PCM memory.<br />
• PCM internal malfunction<br />
B6E407000600102
DTC P0610<br />
DTC P0610 Control module vehicle options error<br />
DETECTION<br />
CONDITION<br />
POSSIBLE<br />
CAUSE<br />
End Of Sie<br />
DTC P0627<br />
ON-BOARD DIAGNOSTIC<br />
• PCM data configuration error<br />
Diagnostic support note<br />
• The MIL illuminates if the PCM detects the above malfunction condition in the first drive cycle.<br />
• FREEZE FRAME DATA is available.<br />
• The DTC is stored in the PCM memory.<br />
• Configuration procedure has not been completed<br />
• PCM malfunction<br />
B6E407000600103<br />
Diagnostic procedure<br />
STEP INSPECTION ACTION<br />
1 VERIFY CURRENT SIGNAL STATUS: IS Yes Perform “PCM Configuration Procedure”, then go to the<br />
CONCERN INTERMITTENT OR CONSTANT? next step.<br />
• Connect the WDS or equivalent to the DLC-2. No Intermittent concern exists.<br />
• Clear the DTC from the PCM memory using Perform the “INTERMITTENT CONCERNS<br />
the WDS or equivalent.<br />
TROUBLESHOOTING”.<br />
• Start the engine.<br />
• Is the same DTC present?<br />
2 VERIFY TROUBLESHOOTING OF DTC P0610 Yes Replace the PCM, go to the next step.<br />
COMPLETED<br />
No Go to the next step.<br />
• Make sure to reconnect all disconnected<br />
connectors.<br />
• Clear the DTC from the PCM memory using<br />
the WDS or equivalent.<br />
• Start the engine.<br />
• Is the same DTC present?<br />
3 VERIFY AFTER REPAIR PROCEDURE<br />
Yes Go to applicable DTC inspection.<br />
• Perform “After Repair Procedure”.<br />
(See F2–40 DTC TABLE.)<br />
• Are any DTCs present?<br />
No Troubleshooting completed.<br />
DTC P0627 Suction control valve circuit open<br />
DETECTION<br />
CONDITION<br />
POSSIBLE<br />
CAUSE<br />
B6E407000600104<br />
• The PCM monitors the suction control valve operation circuit signal frequency at PCM terminal 94. If the<br />
difference between the suction control valve operation frequency at PCM terminal 93 and the monitored<br />
suction control valve operation circuit signal frequency at PCM terminal 94 exceeds the threshold, the PCM<br />
determines that suction control valve open circuit.<br />
Diagnostic support note<br />
• The MIL illuminates if the PCM detects the above malfunction condition in the first drive cycle.<br />
• FREEZE FRAME DATA is available.<br />
• The DTC is stored in the PCM memory.<br />
• Suction control valve malfunction<br />
• Connector or terminal malfunction<br />
• Short circuit in wiring harness between suction control valve terminal A and B<br />
• PCM malfunction<br />
F2–147<br />
F2
DTC P0627 Suction control valve circuit open<br />
F2–148<br />
SUCTION CONTROL VALVE<br />
6<br />
SUCTION CONTROL VALVE<br />
WIRING HARNESS-SIDE CONNECTOR<br />
B<br />
A<br />
A<br />
5<br />
ON-BOARD DIAGNOSTIC<br />
7<br />
5<br />
7<br />
8<br />
B 94<br />
8<br />
93<br />
PCM<br />
26 25 24 23 22 21 20 19 18 17 16 15 14<br />
52 51 50 49 48 47 46 45 44 43 42 41 40<br />
78 77 76 75 74 73 72 71 70 69 68 67 66<br />
104<br />
103 102 101 100 99 98 97 96 95 94 93 92<br />
PCM<br />
WIRING HARNESS-SIDE CONNECTOR<br />
13 12 11 10 9 8 7 6 5 4 3 2 1<br />
39 38 37 36 35 34 33 32 31 30 29 28 27<br />
65 64 63 62 61 60 59 58 57 56 55 54 53<br />
91 90 89 88 87 86 85 84 83 82 81 80 79
End Of Sie<br />
ON-BOARD DIAGNOSTIC<br />
Diagnostic procedure<br />
STEP INSPECTION ACTION<br />
1 VERIFY FREEZE FRAME DATA HAS BEEN Yes Go to the next step.<br />
RECORDED<br />
No Record the FREEZE FRAME DATA on the repair order,<br />
• Has FREEZE FRAME DATA been recorded? then go to the next step.<br />
2 VERIFY RELATED REPAIR INFORMATION Yes Perform repair or diagnosis according to the available<br />
AVAILABILITY<br />
repair information.<br />
• Verify related Service Bulletins and/or on-line • If the vehicle is not repaired, go to the next step.<br />
repair information availability.<br />
No Go to the next step.<br />
• Is any related repair information available?<br />
3 VERIFY CURRENT SIGNAL STATUS: IS Yes Go to the next step.<br />
CONCERN INTERMITTENT OR CONSTANT? No Intermittent concern exists.<br />
• Connect the WDS or equivalent to the DLC-2. Perform the “INTERMITTENT CONCERNS<br />
• Clear the DTC from the PCM memory using<br />
the WDS or equivalent.<br />
TROUBLESHOOTING”.<br />
• Start the engine.<br />
• Is the same DTC present?<br />
4 IDENTIFY TRIGGER DTC FOR FREEZE FRAME Yes Go to the next step.<br />
DATA<br />
No Go to the troubleshooting procedures for the DTC in the<br />
• Is DTC P0627 on the FREEZE FRAME DATA? FREEZE FRAME DATA.<br />
5 INSPECT SUCTION CONTROL VALVE<br />
Yes Repair or replace the suspected terminal, then go to Step<br />
CONNECTOR FOR POOR CONNECTION<br />
9.<br />
• Turn the engine switch off.<br />
No Go to the next step.<br />
• Inspect for poor connection (such as damaged/<br />
pulled-out terminals, corrosion).<br />
• Is there any malfunction?<br />
6 INSPECT SUCTION CONTROL VALVE<br />
Yes Go to the next step.<br />
•<br />
•<br />
Inspect the suction control valve.<br />
Is the suction control valve normal?<br />
No Replace the supply pump, then go to Step 9.<br />
7 INSPECT SUCTION CONTROL VALVE FOR Yes Repair or replace for a short, then go to Step 9.<br />
SHORT CIRCUIT<br />
No Go to the next step.<br />
• Turn the engine switch off.<br />
• Disconnect the PCM and the suction control<br />
valve connectors.<br />
• Inspect for continuity between suction control<br />
valve terminal A and B while slightly shaking<br />
each connectors and harnesses between the<br />
suction control valve and the PCM (including<br />
short wiring harness).<br />
• Is there continuity?<br />
8 INSPECT PCM CONNECTOR FOR POOR Yes Repair or replace the suspected terminal, then go to the<br />
CONNECTION<br />
next step.<br />
• Turn the engine switch to off.<br />
No Go to the next step.<br />
• Inspect for poor connection (such as damaged/<br />
pulled-out terminals, corrosion).<br />
• Is there any malfunction?<br />
9 VERIFY TROUBLESHOOTING OF MISFIRE DTC Yes Replace the PCM, then go to the next step.<br />
COMPLETED<br />
No Go to the next step.<br />
• Make sure to reconnect all disconnected<br />
connectors.<br />
• Clear the DTC using the WDS or equivalent.<br />
• Start the engine.<br />
• Is the same DTC present?<br />
10 VERIFY AFTER REPAIR PROCEDURE<br />
Yes Go to the applicable DTC troubleshooting.<br />
• Perform the Repair Verification Drive Mode. (See F2–40 DTC TABLE.)<br />
•<br />
(See F2–39 OBD DRIVE MODE.)<br />
Are any DTCs present?<br />
No Troubleshooting completed.<br />
F2–149<br />
F2
DTC P0628<br />
DTC P0628 Suction control valve circuit low input<br />
DETECTION<br />
CONDITION<br />
POSSIBLE<br />
CAUSE<br />
F2–150<br />
ON-BOARD DIAGNOSTIC<br />
B6E407000600105<br />
• The PCM monitors the suction control valve circuit current while the engine is running. If the PCM detects<br />
the circuit current is less than 1 A when the suction control valve is on, the PCM determines that there is a<br />
malfunction in the suction control valve circuit.<br />
Diagnostic support note<br />
• The MIL illuminates if the PCM detects the above malfunction condition in the first drive cycle.<br />
• FREEZE FRAME DATA is available.<br />
• The DTC is stored in the PCM memory.<br />
• Suction control valve malfunction<br />
• Connector or terminal malfunction<br />
• Short to GND in wiring harness between suction control valve terminal A and PCM terminal 93<br />
• Short to GND in wiring harness between suction control valve terminal B and PCM terminal 94<br />
• Open circuit in wiring harness between suction control valve terminal A and PCM terminal 93<br />
• Open circuit in wiring harness between suction control valve terminal B and PCM terminal 94<br />
• PCM malfunction<br />
SUCTION CONTROL VALVE<br />
6<br />
SUCTION CONTROL VALVE<br />
WIRING HARNESS-SIDE CONNECTOR<br />
B<br />
A<br />
A<br />
4<br />
5<br />
8<br />
4<br />
5 8<br />
7<br />
B 94<br />
7<br />
93<br />
PCM<br />
26 25 24 23 22 21 20 19 18 17 16 15 14<br />
52 51 50 49 48 47 46 45 44 43 42 41 40<br />
78 77 76 75 74 73 72 71 70 69 68 67 66<br />
104<br />
103 102 101 100 99 98 97 96 95 94 93 92<br />
PCM<br />
WIRING HARNESS-SIDE CONNECTOR<br />
13 12 11 10 9 8 7 6 5 4 3 2 1<br />
39 38 37 36 35 34 33 32 31 30 29 28 27<br />
65 64 63 62 61 60 59 58 57 56 55 54 53<br />
91 90 89 88 87 86 85 84 83 82 81 80 79
End Of Sie<br />
ON-BOARD DIAGNOSTIC<br />
Diagnostic procedure<br />
STEP INSPECTION ACTION<br />
1 VERIFY FREEZE FRAME DATA HAS BEEN Yes Go to the next step.<br />
RECORDED<br />
No Record the FREEZE FRAME DATA on the repair order,<br />
• Has FREEZE FRAME DATA been recorded? then go to the next step.<br />
2 VERIFY RELATED REPAIR INFORMATION Yes Perform repair or diagnosis according to the available<br />
AVAILABILITY<br />
Service Information.<br />
• Verify related Service Information availability. • If the vehicle is not repaired, go to the next step.<br />
• Is any related repair information available? No Go to the next step.<br />
3 VERIFY CURRENT SIGNAL STATUS: IS Yes Go to the next step.<br />
CONCERN INTERMITTENT OR CONSTANT? No Intermittent concern exists.<br />
• Connect the WDS or equivalent to the DLC-2. Perform the “INTERMITTENT CONCERNS<br />
• Clear the DTC from the PCM memory using<br />
the WDS or equivalent.<br />
TROUBLESHOOTING”.<br />
• Start the engine.<br />
• Is the same DTC present?<br />
4 INSPECT POOR CONNECTION OF SUCTION Yes Repair or replace the suspected terminal, go to Step 9.<br />
CONTROL VALVE CONNECTOR<br />
No Go to the next step.<br />
• Turn the engine switch off.<br />
• Inspect for poor connection (such as damaged/<br />
pulled-out terminals, corrosion).<br />
• Is there any malfunction?<br />
5 INSPECT SUCTION CONTROL VALVE CIRCUIT Yes Repair or replace the wiring harness for a short to GND, go<br />
FOR A SHORT TO GND<br />
to Step 9.<br />
• Turn the engine switch off.<br />
No Go to the next step.<br />
• Inspect for continuity between the following<br />
terminals and body GND:<br />
— Suction control valve terminal A and body<br />
GND.<br />
— Suction control valve terminal B and body<br />
GND.<br />
• Is there continuity?<br />
6 INSPECT SUCTION CONTROL VALVE<br />
Yes Repair the supply pump, go to Step 9.<br />
•<br />
•<br />
Inspect the suction control valve.<br />
Is there any malfunction?<br />
No Go to the next step.<br />
7 INSPECT PCM CONNECTOR FOR POOR Yes Repair or replace the suspected terminal, go to Step 9.<br />
CONNECTION<br />
No Go to the next step.<br />
• Turn the engine switch off.<br />
• Inspect for poor connection (such as damaged/<br />
pulled-out terminals, corrosion).<br />
• Is there any malfunction?<br />
8 INSPECT SUCTION CONTROL VALVE CIRCUIT Yes Go to the next step.<br />
FOR OPEN CIRCUIT<br />
No Repair or replace the wiring harness for an open circuit, go<br />
• Turn the engine switch off.<br />
to the next step.<br />
• Inspect for continuity between the following<br />
terminals:<br />
— Suction control valve terminal A and PCM<br />
terminal 93.<br />
— Suction control valve terminal B and PCM<br />
terminal 94.<br />
• Is there continuity?<br />
9 VERIFY TROUBLESHOOTING OF DTC P0628 Yes Replace the PCM, go to the next step.<br />
COMPLETED<br />
No Go to the next step.<br />
• Make sure to reconnect all disconnected<br />
connectors.<br />
• Clear the DTC from the PCM memory using<br />
the WDS or equivalent.<br />
• Start the engine.<br />
• Is the same DTC present?<br />
10 VERIFY AFTER REPAIR PROCEDURE<br />
Yes Go to the applicable DTC inspection.<br />
• Perform the Repair Verification Drive Mode.<br />
(See F2–40 DTC TABLE.)<br />
•<br />
(See F2–39 OBD DRIVE MODE.)<br />
Are any DTCs present?<br />
No Troubleshooting completed.<br />
F2–151<br />
F2
DTC P0629<br />
DTC P0629 Suction control valve circuit high input<br />
DETECTION<br />
CONDITION<br />
POSSIBLE<br />
CAUSE<br />
F2–152<br />
ON-BOARD DIAGNOSTIC<br />
B6E407000600106<br />
• The PCM monitors the suction control valve circuit current while the engine is running. If the PCM detects<br />
circuit current is more than 1 A when the suction control valve is off, the PCM determines that there is the<br />
malfunction in the suction control valve circuit.<br />
Diagnostic support note<br />
• The MIL illuminates if the PCM detects the above malfunction condition in the first drive cycle.<br />
• FREEZE FRAME DATA is available.<br />
• The DTC is stored in the PCM memory.<br />
• Suction control valve malfunction<br />
• Connector or terminal malfunction<br />
• Short to power supply in wiring harness between suction control valve terminal A and PCM terminal 93<br />
• Short to power supply in wiring harness between suction control valve terminal B and PCM terminal 94<br />
• PCM malfunction<br />
SUCTION CONTROL VALVE<br />
6<br />
SUCTION CONTROL VALVE<br />
WIRING HARNESS-SIDE CONNECTOR<br />
B<br />
A<br />
A<br />
4<br />
5<br />
4<br />
5<br />
7<br />
B 94<br />
7<br />
93<br />
PCM<br />
26 25 24 23 22 21 20 19 18 17 16 15 14<br />
52 51 50 49 48 47 46 45 44 43 42 41 40<br />
78 77 76 75 74 73 72 71 70 69 68 67 66<br />
104<br />
103 102 101 100 99 98 97 96 95 94 93 92<br />
PCM<br />
WIRING HARNESS-SIDE CONNECTOR<br />
13 12 11 10 9 8 7 6 5 4 3 2 1<br />
39 38 37 36 35 34 33 32 31 30 29 28 27<br />
65 64 63 62 61 60 59 58 57 56 55 54 53<br />
91 90 89 88 87 86 85 84 83 82 81 80 79
End Of Sie<br />
ON-BOARD DIAGNOSTIC<br />
Diagnostic procedure<br />
STEP INSPECTION ACTION<br />
1 VERIFY FREEZE FRAME DATA HAS BEEN Yes Go to the next step.<br />
RECORDED<br />
No Record the FREEZE FRAME DATA on the repair order,<br />
• Has FREEZE FRAME DATA been recorded? then go to the next step.<br />
2 VERIFY RELATED REPAIR INFORMATION Yes Perform repair or diagnosis according to the available<br />
AVAILABILITY<br />
Service Information.<br />
• Verify related Service Information availability. • If the vehicle is not repaired, go to the next step.<br />
• Is any related repair information available? No Go to the next step.<br />
3 VERIFY CURRENT SIGNAL STATUS: IS Yes Go to the next step.<br />
CONCERN INTERMITTENT OR CONSTANT? No Intermittent concern exists.<br />
• Connect the WDS or equivalent to the DLC-2. Perform the “INTERMITTENT CONCERNS<br />
• Clear the DTC from the PCM memory using<br />
the WDS or equivalent.<br />
TROUBLESHOOTING”.<br />
• Start the engine.<br />
• Is the same DTC present?<br />
4 INSPECT SUCTION CONTROL VALVE<br />
Yes Repair or replace the suspected terminal, go to Step 8.<br />
CONNECTOR FOR POOR CONNECTION No Go to the next step.<br />
• Turn the engine switch off.<br />
• Inspect for poor connection (such as damaged/<br />
pulled-out terminals, corrosion).<br />
• Is there any malfunction?<br />
5 INSPECT SUCTION CONTROL VALVE CIRCUIT Yes Go to the next step.<br />
FOR SHORT TO POWER SUPPLY<br />
No Repair or replace the wiring harness for a short to power<br />
• Turn the engine switch to the ON position<br />
(Engine off).<br />
supply, go to Step 8.<br />
• Inspected the voltage between the following<br />
terminals and body GND:<br />
— Suction control valve terminal A and body<br />
GND.<br />
— Suction control valve terminal B and body<br />
GND.<br />
• Is the voltage below 1.0 V?<br />
6 INSPECT SUCTION CONTROL VALVE<br />
Yes Repair the supply pump, go to Step 8.<br />
•<br />
•<br />
Inspect the suction control valve.<br />
Is there any malfunction?<br />
No Go to the next step.<br />
7 INSPECT PCM CONNECTOR FOR POOR Yes Repair or replace the suspected terminal, go to Step 8.<br />
CONNECTION<br />
No Go to the next step.<br />
• Turn the engine switch off.<br />
• Inspect for poor connection (such as damaged/<br />
pulled-out terminals, corrosion).<br />
• Is there any malfunction?<br />
8 VERIFY TROUBLESHOOTING OF DTC P0629 Yes Replace the PCM, go to the next step.<br />
COMPLETED<br />
No Go to the next step.<br />
• Make sure to reconnect all disconnected<br />
connectors.<br />
• Start the engine.<br />
• Is the same DTC present?<br />
9 VERIFY AFTER REPAIR PROCEDURE<br />
Yes Go to the applicable DTC inspection.<br />
• Perform the Repair Verification Drive Mode.<br />
(See F2–40 DTC TABLE.)<br />
•<br />
(See F2–39 OBD DRIVE MODE.)<br />
Are any DTCs present?<br />
No Troubleshooting completed.<br />
F2–153<br />
F2
DTC P0661<br />
F2–154<br />
ON-BOARD DIAGNOSTIC<br />
DTC P0661 Intake shutter solenoid valve (half) circuit low input<br />
DETECTION<br />
CONDITION<br />
POSSIBLE<br />
CAUSE<br />
B6E407000600107<br />
• The PCM monitors the output signal to the intake shutter solenoid valve (half) when the intake shutter<br />
solenoid valve (half) is off. If the intake shutter solenoid valve (half) voltage is less than 7.8 V when the<br />
intake shutter solenoid valve (half) off, the PCM determines that there is a malfunction in the intake shutter<br />
solenoid valve control circuit.<br />
Diagnostic support note<br />
• The MIL illuminates if the PCM detects the above malfunction condition in two consecutive drive cycles or<br />
in one drive cycle while the DTC for the same malfunction has been stored in the PCM.<br />
• PENDING CODE is available if the PCM detects the above malfunction condition during the first drive<br />
cycle.<br />
• FREEZE FRAME DATA is available.<br />
• The DTC is stored in the PCM memory.<br />
• Intake shutter solenoid valve malfunction<br />
• Connector or terminal malfunction<br />
• Short to GND in wiring harness between intake shutter solenoid valve (half) terminal B and PCM terminal<br />
74<br />
• Open circuit in wiring harness between intake shutter solenoid valve (half) terminal A and PCM control<br />
relay terminal C<br />
• Open circuit in wiring harness between intake shutter solenoid valve (half) terminal B and PCM terminal 74<br />
• PCM malfunction<br />
INTAKE SHUTTER<br />
SOLENOID VALVE<br />
(FULL)<br />
INTAKE SHUTTER<br />
SOLENOID VALVE (FULL)<br />
WIRING HARNESS-SIDE<br />
CONNECTOR<br />
B A<br />
7<br />
A<br />
4<br />
PCM CONTROL RELAY<br />
TERMINAL C<br />
5<br />
4<br />
6 9 8<br />
B 74<br />
26 25 24 23 22 21 20 19 18 17 16 15 14<br />
52 51 50 49 48 47 46 45 44 43 42 41 40<br />
78 77 76 75 74 73 72 71 70 69 68 67 66<br />
104<br />
103 102 101 100 99 98 97 96 95 94 93 92<br />
PCM<br />
PCM<br />
WIRING HARNESS-SIDE<br />
CONNECTOR<br />
13 12 11 10 9 8 7 6 5 4 3 2 1<br />
39 38 37 36 35 34 33 32 31 30 29 28 27<br />
65 64 63 62 61 60 59 58 57 56 55 54 53<br />
91 90 89 88 87 86 85 84 83 82 81 80 79
ON-BOARD DIAGNOSTIC<br />
Diagnostic procedure<br />
STEP INSPECTION ACTION<br />
1 VERIFY FREEZE FRAME DATA HAS BEEN<br />
RECORDED<br />
• Has FREEZE FRAME DATA been recorded?<br />
2 VERIFY RELATED REPAIR INFORMATION<br />
AVAILABILITY<br />
• Verify related service repair information<br />
availability.<br />
• Is any related repair information available?<br />
3 VERIFY CURRENT SIGNAL STATUS: IS<br />
CONCERN INTERMITTENT OR CONSTANT?<br />
• Connect the WDS or equivalent to the DLC-2.<br />
• Clear the DTC from the PCM memory using<br />
the WDS or equivalent.<br />
• Start the engine.<br />
• Is the PENDING CODE for this DTC present?<br />
4 INSPECT INTAKE SHUTTER SOLENOID VALVE<br />
(HALF) CONNECTOR FOR POOR<br />
CONNECTION<br />
• Turn the engine switch to the ON position.<br />
• Inspect for poor connection (such as damaged/<br />
pulled-out terminals, corrosion).<br />
• Is the voltage B+?<br />
5 INSPECT INTAKE SHUTTER SOLENOID VALVE<br />
(HALF) POWER SUPPLY CIRCUIT FOR OPEN<br />
CIRCUIT<br />
• Turn the engine switch off.<br />
• Measure the voltage at intake shutter solenoid<br />
valve (half) terminal A.<br />
• Is the voltage B+?<br />
6 INSPECT INTAKE SHUTTER SOLENOID VALVE<br />
(HALF) CIRCUIT FOR SHORT TO GND<br />
• Turn the engine switch off.<br />
• Inspect for continuity between Intake shutter<br />
solenoid valve (half) terminal B and GND.<br />
• Is there continuity?<br />
7 INSPECT INTAKE SHUTTER SOLENOID VALVE<br />
(HALF)<br />
• Inspect the intake shutter solenoid valve (half).<br />
• Is there any malfunction?<br />
8 INSPECT PCM CONNECTOR FOR POOR<br />
CONNECTION<br />
• Turn the engine switch off.<br />
• Inspect for poor connection (such as damaged/<br />
pulled-out terminals, corrosion).<br />
• Is there any malfunction?<br />
9 INSPECT INTAKE SHUTTER SOLENOID VALVE<br />
CIRCUIT FOR OPEN CIRCUIT<br />
• Turn the engine switch off.<br />
• Inspect for continuity between intake shutter<br />
solenoid valve (half) terminal B and PCM<br />
terminal 74.<br />
• Is there continuity?<br />
10 VERIFY TROUBLESHOOTING OF DTC P0661<br />
COMPLETED<br />
• Make sure to reconnect all disconnected<br />
connectors.<br />
• Clear the DTC from the PCM memory using<br />
the WDS or equivalent.<br />
• Start the engine.<br />
• Is the PENDING CODE for this DTC present?<br />
11 VERIFY AFTER REPAIR PROCEDURE<br />
• Perform the Repair Verification Drive Mode.<br />
(See F2–39 OBD DRIVE MODE.)<br />
• Are any DTCs present?<br />
Yes Go to the next step.<br />
No Record the FREEZE FRAME DATA on the repair order,<br />
then go to the next step.<br />
Yes Perform repair or diagnosis according to the available<br />
repair information.<br />
• If the vehicle is not repaired, go to the next step.<br />
No Go to the next step.<br />
Yes Go to the next step.<br />
No Intermittent concern exists.<br />
Perform the “INTERMITTENT CONCERNS<br />
TROUBLESHOOTING”.<br />
Yes Go to the next step.<br />
No Repair or replace the terminal, then go to Step 10.<br />
Yes Go to the next step.<br />
No Repair or replace wiring harness for an open circuit, then<br />
go to the next step.<br />
Yes Repair or replace wiring harness for a short to GND, then<br />
go to Step 10.<br />
No Go to the next step.<br />
Yes Replace the intake shutter solenoid valve, then go to Step<br />
10.<br />
No Go to the next step.<br />
Yes Repair or replace the terminal, then go to Step 10.<br />
No Go to the next step.<br />
Yes Go to the next step.<br />
No Repair or replace wiring harness for an open circuit, then<br />
go to the next step.<br />
Yes Replace the PCM, then go to the next step.<br />
No Go to the next step.<br />
Yes Go to the applicable DTC inspection.<br />
(See F2–40 DTC TABLE.)<br />
No Troubleshooting completed.<br />
F2–155<br />
F2
End Of Sie<br />
DTC P0662<br />
F2–156<br />
ON-BOARD DIAGNOSTIC<br />
DTC P0662 Intake shutter solenoid valve (half) circuit high input<br />
DETECTION<br />
CONDITION<br />
POSSIBLE<br />
CAUSE<br />
B6E407000600108<br />
• The PCM monitors the output signal to the intake shutter solenoid valve (half) when the intake shutter<br />
solenoid valve (half) is on. If the intake shutter solenoid valve (half) voltage is more than 7.8 V when the<br />
intake shutter solenoid valve (half) on, the PCM determines that there is a malfunction in the intake shutter<br />
solenoid valve (half) control circuit.<br />
Diagnostic support note<br />
• The MIL illuminates if the PCM detects the above malfunction condition in two consecutive drive cycles or<br />
in one drive cycle while the DTC for the same malfunction has been stored in the PCM.<br />
• PENDING CODE is available if the PCM detects the above malfunction condition during the first drive<br />
cycle.<br />
• FREEZE FRAME DATA is available.<br />
• The DTC is stored in the PCM memory.<br />
• Intake shutter solenoid valve (half) malfunction<br />
• Connector or terminal malfunction<br />
• Short to power circuit in wiring between intake shutter solenoid valve (half) terminal B and PCM terminal 74<br />
• PCM malfunction<br />
INTAKE SHUTTER<br />
SOLENOID VALVE<br />
(FULL)<br />
INTAKE SHUTTER<br />
SOLENOID VALVE (FULL)<br />
WIRING HARNESS-SIDE<br />
CONNECTOR<br />
B A<br />
6<br />
A<br />
4<br />
PCM CONTROL RELAY<br />
TERMINAL C<br />
4<br />
5<br />
7<br />
B 74<br />
26 25 24 23 22 21 20 19 18 17 16 15 14<br />
52 51 50 49 48 47 46 45 44 43 42 41 40<br />
78 77 76 75 74 73 72 71 70 69 68 67 66<br />
104<br />
103 102 101 100 99 98 97 96 95 94 93 92<br />
PCM<br />
PCM<br />
WIRING HARNESS-SIDE<br />
CONNECTOR<br />
13 12 11 10 9 8 7 6 5 4 3 2 1<br />
39 38 37 36 35 34 33 32 31 30 29 28 27<br />
65 64 63 62 61 60 59 58 57 56 55 54 53<br />
91 90 89 88 87 86 85 84 83 82 81 80 79
End Of Sie<br />
ON-BOARD DIAGNOSTIC<br />
Diagnostic procedure<br />
STEP INSPECTION ACTION<br />
1 VERIFY FREEZE FRAME DATA HAS BEEN Yes Go to the next step.<br />
RECORDED<br />
No Record the FREEZE FRAME DATA on the repair order,<br />
• Has FREEZE FRAME DATA been recorded? then go to the next step.<br />
2 VERIFY RELATED REPAIR INFORMATION Yes Perform repair or diagnosis according to the available<br />
AVAILABILITY<br />
repair information.<br />
• Verify related service repair information<br />
• If the vehicle is not repaired, go to the next step.<br />
availability.<br />
No Go to the next step.<br />
• Is any related repair information available?<br />
3 VERIFY CURRENT SIGNAL STATUS: IS Yes Go to the next step.<br />
CONCERN INTERMITTENT OR CONSTANT? No Intermittent concern exists.<br />
• Connect the WDS or equivalent to the DLC-2. Perform the “INTERMITTENT CONCERNS<br />
• Clear the DTC from the PCM memory using<br />
the WDS or equivalent.<br />
TROUBLESHOOTING”.<br />
• Start the engine.<br />
• Is the PENDING CODE for this DTC present?<br />
4 INSPECT INTAKE SHUTTER SOLENOID VALVE Yes Repair or replace the terminal, then go to Step 8.<br />
(HALF) CONNECTOR FOR POOR<br />
CONNECTION<br />
No Go to the next step.<br />
• Turn the engine switch off.<br />
• Inspect for poor connection (such as damaged/<br />
pulled-out terminals, corrosion).<br />
• Is there any malfunction?<br />
5 INSPECT INTAKE SHUTTER SOLENOID VALVE Yes Repair or replace the wiring harness for a short to power<br />
(HALF) CIRCUIT FOR SHORT TO POWER<br />
supply, then go to Step 8.<br />
• Turn the engine switch off.<br />
No Go to the next step.<br />
• Inspect the voltage between intake shutter<br />
solenoid valve (half) terminal B and body GND.<br />
• Is the voltage B+?<br />
6 INSPECT INTAKE SHUTTER SOLENOID VALVE Yes Replace the intake shutter solenoid valve, then go to Step<br />
(HALF)<br />
8.<br />
• Inspect the intake shutter solenoid valve (half). No Go to the next step.<br />
• Is there any malfunction?<br />
7 INSPECT PCM CONNECTOR FOR POOR Yes Repair or replace the terminal, then go to the next step.<br />
CONNECTION<br />
No Go to the next step.<br />
• Turn the engine switch off.<br />
• Inspect for poor connection (such as damaged/<br />
pulled-out terminals, corrosion).<br />
• Is there any malfunction?<br />
8 VERIFY TROUBLESHOOTING OF DTC P0662 Yes Replace the PCM, then go to the next step.<br />
COMPLETED<br />
No Go to the next step.<br />
• Make sure to reconnect all disconnected<br />
connectors.<br />
• Clear the DTC from the PCM memory using<br />
the WDS or equivalent.<br />
• Start the engine.<br />
• Is the PENDING CODE for this DTC present?<br />
9 VERIFY AFTER REPAIR PROCEDURE<br />
Yes Go to the applicable DTC inspection.<br />
• Perform the Repair Verification Drive Mode.<br />
(See F2–40 DTC TABLE.)<br />
•<br />
(See F2–39 OBD DRIVE MODE.)<br />
Are any DTCs present?<br />
No Troubleshooting completed.<br />
F2–157<br />
F2
DTC P0664<br />
F2–158<br />
ON-BOARD DIAGNOSTIC<br />
DTC P0664 Intake shutter solenoid valve (full) circuit voltage low input<br />
DETECTION<br />
CONDITION<br />
POSSIBLE<br />
CAUSE<br />
B6E407000600109<br />
• The PCM monitors the output signal to the intake shutter solenoid valve (full). If the intake shutter solenoid<br />
valve (full) voltage is less than 7.8 V when the intake shutter solenoid valve (full) is off, the PCM<br />
determines that there is a malfunction in the intake shutter solenoid valve (full) control circuit.<br />
Diagnostic support note<br />
• The MIL illuminates if the PCM detects the above malfunction condition in two consecutive drive cycles or<br />
in one drive cycle while the DTC for the same malfunction has been stored in the PCM.<br />
• PENDING CODE is available if the PCM detects the above malfunction condition during the first drive<br />
cycle.<br />
• FREEZE FRAME DATA is available.<br />
• The DTC is stored in the PCM memory.<br />
• Intake shutter solenoid valve (full) malfunction<br />
• Connector or terminal malfunction<br />
• Short to GND in wiring harness between intake shutter solenoid valve (full) terminal B and PCM terminal 74<br />
• Open circuit in wiring harness between intake shutter solenoid valve (full) terminal A and PCM control relay<br />
terminal C<br />
• Open circuit in wiring harness between intake shutter solenoid valve (full) terminal B and PCM terminal 74<br />
• PCM malfunction<br />
INTAKE SHUTTER<br />
SOLENOID VALVE<br />
(FULL)<br />
INTAKE SHUTTER<br />
SOLENOID VALVE (FULL)<br />
WIRING HARNESS-SIDE<br />
CONNECTOR<br />
B A<br />
7<br />
A<br />
4<br />
PCM CONTROL RELAY<br />
TERMINAL C<br />
5<br />
4<br />
6 9 8<br />
B 74<br />
26 25 24 23 22 21 20 19 18 17 16 15 14<br />
52 51 50 49 48 47 46 45 44 43 42 41 40<br />
78 77 76 75 74 73 72 71 70 69 68 67 66<br />
104<br />
103 102 101 100 99 98 97 96 95 94 93 92<br />
PCM<br />
PCM<br />
WIRING HARNESS-SIDE<br />
CONNECTOR<br />
13 12 11 10 9 8 7 6 5 4 3 2 1<br />
39 38 37 36 35 34 33 32 31 30 29 28 27<br />
65 64 63 62 61 60 59 58 57 56 55 54 53<br />
91 90 89 88 87 86 85 84 83 82 81 80 79
ON-BOARD DIAGNOSTIC<br />
Diagnostic procedure<br />
STEP INSPECTION ACTION<br />
1 VERIFY FREEZE FRAME DATA HAS BEEN<br />
RECORDED<br />
• Has FREEZE FRAME DATA been recorded?<br />
2 VERIFY RELATED REPAIR INFORMATION<br />
AVAILABILITY<br />
• Verify related service repair information<br />
availability.<br />
• Is any related repair information available?<br />
3 VERIFY CURRENT SIGNAL STATUS: IS<br />
CONCERN INTERMITTENT OR CONSTANT?<br />
• Connect the WDS or equivalent to the DLC-2.<br />
• Clear the DTC from the PCM memory using<br />
the WDS or equivalent.<br />
• Start the engine.<br />
• Is the PENDING CODE for this DTC present?<br />
4 INSPECT INTAKE SHUTTER SOLENOID VALVE<br />
(FULL) CONNECTOR FOR POOR<br />
CONNECTION<br />
• Turn the engine switch to the ON position.<br />
• Inspect for poor connection (such as damaged/<br />
pulled-out terminals, corrosion).<br />
• Is the voltage B+?<br />
5 INSPECT INTAKE SHUTTER SOLENOID VALVE<br />
(FULL) POWER SUPPLY CIRCUIT FOR OPEN<br />
CIRCUIT<br />
• Turn the engine switch off.<br />
• Measure the voltage at intake shutter solenoid<br />
valve (full) terminal A.<br />
• Is the voltage B+?<br />
6 INSPECT INTAKE SHUTTER SOLENOID VALVE<br />
(FULL) CIRCUIT FOR SHORT TO GND<br />
• Turn the engine switch off.<br />
• Inspect for continuity between Intake shutter<br />
solenoid valve (full) terminal B and GND.<br />
• Is there continuity?<br />
7 INSPECT INTAKE SHUTTER SOLENOID VALVE<br />
(FULL)<br />
• Inspect the intake shutter solenoid valve (full).<br />
• Is there any malfunction?<br />
8 INSPECT PCM CONNECTOR FOR POOR<br />
CONNECTION<br />
• Turn the engine switch off.<br />
• Inspect for poor connection (such as damaged/<br />
pulled-out terminals, corrosion).<br />
• Is there any malfunction?<br />
9 INSPECT INTAKE SHUTTER SOLENOID VALVE<br />
(FULL) CIRCUIT FOR OPEN CIRCUIT<br />
• Turn the engine switch off.<br />
• Inspect for continuity between intake shutter<br />
solenoid valve terminal B and PCM terminal<br />
74.<br />
• Is there continuity?<br />
10 VERIFY TROUBLESHOOTING OF DTC P0664<br />
COMPLETED<br />
• Make sure to reconnect all disconnected<br />
connectors.<br />
• Clear the DTC from the PCM memory using<br />
the WDS or equivalent.<br />
• Start the engine.<br />
• Is the PENDING CODE for this DTC present?<br />
11 VERIFY AFTER REPAIR PROCEDURE<br />
• Perform the Repair Verification Drive Mode.<br />
(See F2–39 OBD DRIVE MODE.)<br />
• Are any DTCs present?<br />
Yes Go to the next step.<br />
No Record the FREEZE FRAME DATA on the repair order,<br />
then go to the next step.<br />
Yes Perform repair or diagnosis according to the available<br />
repair information.<br />
• If the vehicle is not repaired, go to the next step.<br />
No Go to the next step.<br />
Yes Go to the next step.<br />
No Intermittent concern exists.<br />
Perform the “INTERMITTENT CONCERNS<br />
TROUBLESHOOTING”.<br />
Yes Go to the next step.<br />
No Repair or replace the terminal, then go to Step 10.<br />
Yes Go to the next step.<br />
No Repair or replace the wiring harness for an open circuit,<br />
then go to the next step.<br />
Yes Repair or replace wiring harness for a short to GND, then<br />
go to Step 10.<br />
No Go to the next step.<br />
Yes Replace the intake shutter solenoid valve, then go to Step<br />
10.<br />
No Go to the next step.<br />
Yes Repair or replace the terminal, then go to Step 10.<br />
No Go to the next step.<br />
Yes Go to the next step.<br />
No Repair or replace wiring harness for an open circuit, then<br />
go to the next step.<br />
Yes Replace the PCM, then go to the next step.<br />
No Go to the next step.<br />
Yes Go to the applicable DTC inspection.<br />
(See F2–40 DTC TABLE.)<br />
No Troubleshooting completed.<br />
F2–159<br />
F2
End Of Sie<br />
DTC P0665<br />
F2–160<br />
ON-BOARD DIAGNOSTIC<br />
DTC P0665 Intake shutter solenoid valve (full) circuit voltage high input<br />
DETECTION<br />
CONDITION<br />
POSSIBLE<br />
CAUSE<br />
B6E407000600110<br />
• The PCM monitors the output signal to the intake shutter solenoid valve (full) when intake shutter solenoid<br />
valve (full) is on. If the intake shutter solenoid valve (full) voltage is more than 7.8 V when the intake<br />
shutter solenoid valve (full) is on, the PCM determines that there is a malfunction in the intake shutter<br />
solenoid valve (full) control circuit.<br />
Diagnostic support note<br />
• The MIL illuminates if the PCM detects the above malfunction condition in two consecutive drive cycles or<br />
in one drive cycle while the DTC for the same malfunction has been stored in the PCM.<br />
• PENDING CODE is available if the PCM detects the above malfunction condition during the first drive<br />
cycle.<br />
• FREEZE FRAME DATA is available.<br />
• The DTC is stored in the PCM memory.<br />
• Intake shutter solenoid valve (full) malfunction<br />
• Connector or terminal malfunction<br />
• Short to power circuit in wiring harness between intake shutter solenoid valve (full) terminal B and PCM<br />
terminal 74<br />
• PCM malfunction<br />
INTAKE SHUTTER<br />
SOLENOID VALVE<br />
(FULL)<br />
INTAKE SHUTTER<br />
SOLENOID VALVE (FULL)<br />
WIRING HARNESS-SIDE<br />
CONNECTOR<br />
B A<br />
6<br />
A<br />
4<br />
PCM CONTROL RELAY<br />
TERMINAL C<br />
4<br />
5<br />
7<br />
B 74<br />
26 25 24 23 22 21 20 19 18 17 16 15 14<br />
52 51 50 49 48 47 46 45 44 43 42 41 40<br />
78 77 76 75 74 73 72 71 70 69 68 67 66<br />
104<br />
103 102 101 100 99 98 97 96 95 94 93 92<br />
PCM<br />
PCM<br />
WIRING HARNESS-SIDE<br />
CONNECTOR<br />
13 12 11 10 9 8 7 6 5 4 3 2 1<br />
39 38 37 36 35 34 33 32 31 30 29 28 27<br />
65 64 63 62 61 60 59 58 57 56 55 54 53<br />
91 90 89 88 87 86 85 84 83 82 81 80 79
End Of Sie<br />
ON-BOARD DIAGNOSTIC<br />
Diagnostic procedure<br />
STEP INSPECTION ACTION<br />
1 VERIFY FREEZE FRAME DATA HAS BEEN Yes Go to the next step.<br />
RECORDED<br />
No Record the FREEZE FRAME DATA on the repair order,<br />
• Has FREEZE FRAME DATA been recorded? then go to the next step.<br />
2 VERIFY RELATED REPAIR INFORMATION Yes Perform repair or diagnosis according to the available<br />
AVAILABILITY<br />
repair information.<br />
• Verify related service repair information<br />
• If the vehicle is not repaired, go to the next step.<br />
availability.<br />
No Go to the next step.<br />
• Is any related repair information available?<br />
3 VERIFY CURRENT SIGNAL STATUS: IS Yes Go to the next step.<br />
CONCERN INTERMITTENT OR CONSTANT? No Intermittent concern exists.<br />
• Connect the WDS or equivalent to the DLC-2. Perform the “INTERMITTENT CONCERNS<br />
• Clear the DTC from the PCM memory using<br />
the WDS or equivalent.<br />
TROUBLESHOOTING”.<br />
• Start the engine.<br />
• Is the same DTC present?<br />
4 INSPECT INTAKE SHUTTER SOLENOID VALVE Yes Repair or replace the terminal, then go to Step 8.<br />
(FULL) CONNECTOR FOR POOR<br />
CONNECTION<br />
No Go to the next step.<br />
• Turn the engine switch off.<br />
• Inspect for poor connection (such as damaged/<br />
pulled-out terminals, corrosion).<br />
• Is there any malfunction?<br />
5 INSPECT INTAKE SHUTTER SOLENOID VALVE Yes Repair or replace wiring harness for a short to power<br />
(FULL) CIRCUIT FOR SHORT TO POWER<br />
supply, then go to Step 8.<br />
• Turn the engine switch off.<br />
No Go to the next step.<br />
• Inspect the voltage between intake shutter<br />
solenoid valve (full) terminal B and body GND.<br />
• Is the voltage B+?<br />
6 INSPECT INTAKE SHUTTER SOLENOID VALVE Yes Replace the intake shutter solenoid valve, then go to Step<br />
(FULL)<br />
8.<br />
• Inspect the intake shutter solenoid valve (full). No Go to the next step.<br />
• Is there any malfunction?<br />
7 INSPECT PCM CONNECTOR FOR POOR Yes Repair or replace the terminal, then go to the next step.<br />
CONNECTION<br />
No Go to the next step.<br />
• Turn the engine switch off.<br />
• Inspect for poor connection (such as damaged/<br />
pulled-out terminals, corrosion).<br />
• Is there any malfunction?<br />
8 VERIFY TROUBLESHOOTING OF DTC P0665 Yes Replace the PCM, then go to the next step.<br />
COMPLETED<br />
No Go to the next step.<br />
• Make sure to reconnect all disconnected<br />
connectors.<br />
• Clear the DTC from the PCM memory using<br />
the WDS or equivalent.<br />
• Start the engine.<br />
• Is the PENDING CODE for this DTC present?<br />
9 VERIFY AFTER REPAIR PROCEDURE<br />
Yes Go to the applicable DTC inspection.<br />
• Perform the Repair Verification Drive Mode.<br />
(See F2–40 DTC TABLE.)<br />
•<br />
(See F2–39 OBD DRIVE MODE.)<br />
Are any DTCs present?<br />
No Troubleshooting completed.<br />
F2–161<br />
F2
DTC P0704<br />
DTC P0704 Clutch switch circuit malfunction<br />
DETECTION<br />
CONDITION<br />
POSSIBLE<br />
CAUSE<br />
F2–162<br />
7<br />
CLUTCH<br />
PEDAL<br />
POSITION<br />
SWITCH<br />
ON-BOARD DIAGNOSTIC<br />
B6E407000700101<br />
• The PCM monitors input voltage from the clutch pedal position switch while the engine running. If the input<br />
voltage from the clutch pedal position switch does not change when the vehicle stops after accelerating to<br />
more than 30 km/h {18.6 mph} and decelerating to 0 km/h {0 mph}, the PCM determines that the clutch<br />
pedal position switch circuit has a malfunction.<br />
Diagnostic support note<br />
• The MIL illuminates if the PCM detects the above malfunction condition in two consecutive drive cycles or<br />
in one drive cycle while the DTC for the same malfunction has been stored in the PCM.<br />
• PENDING CODE is available if the PCM detects the above malfunctioning condition.<br />
• FREEZE FRAME DATA is available.<br />
• The DTC is stored in the PCM memory.<br />
• Clutch switch malfunction<br />
• Connector or terminal malfunction<br />
• Short to GND in wiring harness between clutch pedal position switch terminal B and PCM terminal 33<br />
• Open circuit in wiring harness between clutch pedal position switch terminal D and GND<br />
• Open circuit in wiring harness between neutral switch terminal B and PCM terminal 33<br />
• PCM malfunction<br />
4<br />
4<br />
B<br />
D<br />
6<br />
5<br />
9<br />
8<br />
33<br />
PCM<br />
CLUTCH PEDAL POSITION SWITCH<br />
WIRING HARNESS-SIDE CONNECTOR<br />
PCM<br />
WIRING HARNESS-SIDE CONNECTOR<br />
D B<br />
26 25 24 23 22 21 20 19 18 17 16 15 14<br />
52 51 50 49 48 47 46 45 44 43 42 41 40<br />
13 12 11 10 9 8 7 6 5 4 3 2 1<br />
39 38 37 36 35 34 33 32 31 30 29 28 27<br />
78 77 76 75 74 73 72 71 70 69 68 67 66 65 64 63 62 61 60 59 58 57 56 55 54 53<br />
104 103 102 101 100 99 98 97 96 95 94 93 92 91 90 89 88 87 86 85 84 83 82 81 80 79
ON-BOARD DIAGNOSTIC<br />
Diagnostic procedure<br />
STEP INSPECTION ACTION<br />
1 VERIFY FREEZE FRAME DATA HAS BEEN<br />
RECORDED<br />
• Has FREEZE FRAME DATA been recorded?<br />
2 VERIFY RELATED REPAIR INFORMATION<br />
AVAILABILITY<br />
• Verify related Service Bulletins and/or on-line<br />
repair information availability.<br />
• Is any related repair information available?<br />
3 VERIFY CURRENT INPUT SIGNAL STATUS: IS<br />
CONCERN INTERMITTENT OR CONSTANT<br />
• Connect the WDS or equivalent to the DLC-2.<br />
• Clear the DTC from the PCM memory using<br />
the WDS or equivalent.<br />
• Start the engine.<br />
• Is the PENDING CODE for this DTC present?<br />
4 INSPECT CLUTCH PEDAL POSITION SWITCH<br />
CONNECTOR FOR POOR CONNECTION<br />
• Turn the engine switch off.<br />
• Inspect the clutch pedal position switch<br />
connector for poor connection (such as<br />
damaged/pulled-out pins, corrosion).<br />
• Is there any malfunction?<br />
5 INSPECT CLUTCH PEDAL POSITION SWITCH<br />
SIGNAL CIRCUIT FOR OPEN CIRCUIT<br />
• Turn the engine switch to the ON position<br />
(Engine off).<br />
• Inspect the voltage at clutch pedal position<br />
switch terminal B (wiring harness-side).<br />
• Is the voltage below 1.0 V?<br />
6 INSPECT CLUTCH PEDAL POSITION SWITCH<br />
GND FOR OPEN CIRCUIT<br />
• Turn the engine switch off.<br />
• Inspect continuity between clutch pedal<br />
position switch terminal D (wiring harness-side)<br />
and body GND.<br />
• Is there continuity?<br />
7 INSPECT CLUTCH PEDAL POSITION SWITCH<br />
• Inspect the clutch pedal position switch.<br />
• Is there any malfunction?<br />
8 INSPECT PCM CONNECTOR FOR POOR<br />
CONNECTION<br />
• Turn the engine switch off.<br />
• Inspect the PCM connector for poor connection<br />
(such as damaged/pulled-out pins, corrosion).<br />
• Is there any malfunction?<br />
9 INSPECT CLUTCH PEDAL POSITION SWITCH<br />
SIGNAL CIRCUIT FOR OPEN CIRCUIT<br />
• Turn the engine switch off.<br />
• Inspect continuity between clutch pedal<br />
position switch terminal B (wiring harness-side)<br />
and PCM terminal 33 (wiring harness-side).<br />
• Is there continuity?<br />
10 VERIFY TROUBLESHOOTING OF DTC P0704<br />
COMPLETED<br />
• Make sure to reconnect all disconnected<br />
connectors.<br />
• Clear the DTC using the WDS or equivalent.<br />
• Start the engine.<br />
• Is the PENDING CODE for this DTC present?<br />
11 VERIFY AFTER REPAIR PROCEDURE<br />
• Perform the Repair Verification Drive Mode.<br />
(See F2–39 OBD DRIVE MODE.)<br />
• Are any DTCs present?<br />
Yes Go to the next step.<br />
No Record the FREEZE FRAME DATA on the repair order,<br />
then go to the next step.<br />
Yes Perform repair or diagnostic according to the available<br />
repair information.<br />
• If the vehicle is not repaired, then go to the next step.<br />
No Go to the next step.<br />
Yes Go to the next step.<br />
No Intermittent concern exists.<br />
Perform the “INTERMITTENT CONCERNS<br />
TROUBLESHOOTING”.<br />
Yes Repair or replace the suspected terminal, then go to Step<br />
10.<br />
No Go to the next step.<br />
Yes Repair or replace the suspected terminal, then go to Step<br />
10.<br />
No Go to the next step.<br />
Yes Go to the next step.<br />
No Repair or replace the wiring harness for an open circuit,<br />
then go to Step 10.<br />
Yes Replace the clutch pedal position switch, then go to Step<br />
10.<br />
No Go to the next step.<br />
Yes Repair or replace the clutch pedal position switch, then go<br />
to Step 10.<br />
No Go to the next step.<br />
Yes Go to the next step.<br />
No Repair or replace the wiring harness for an open circuit,<br />
then go to the next step.<br />
Yes Replace the PCM, then go to the next step.<br />
No Go to the next step.<br />
Yes Go to the applicable DTC inspection.<br />
(See F2–40 DTC TABLE.)<br />
No Troubleshooting completed.<br />
F2–163<br />
F2
End Of Sie<br />
DTC P0850<br />
DTC P0850 Neutral switch circuit malfunction<br />
DETECTION<br />
CONDITION<br />
POSSIBLE<br />
CAUSE<br />
F2–164<br />
ON-BOARD DIAGNOSTIC<br />
B6E407000800101<br />
• The PCM monitors the input signal from the neutral switch when shifting. If the neutral switch signal is not<br />
input even once even when vehicle speed is more than 10 km/h {6.2 mph} the shift lever is operated<br />
more than five times, the PCM determines that there is a malfunction in the neutral switch circuit.<br />
Diagnostic support note<br />
• The MIL illuminates if the PCM detects the above malfunction condition in two consecutive drive cycles or<br />
in one drive cycle while the DTC for the same malfunction has been stored in the PCM.<br />
• PENDING CODE is available if the PCM detects the above malfunction condition.<br />
• FREEZE FRAME DATA is available.<br />
• The DTC is stored in the PCM memory.<br />
• Neutral switch malfunction<br />
• Connector or terminal malfunction<br />
• Short to GND in wiring harness between neutral switch terminal A and PCM terminal 56<br />
• Open circuit in wiring harness between neutral switch terminal B and GND<br />
• Open circuit in wiring harness between neutral switch terminal A and PCM terminal 56<br />
• PCM malfunction<br />
NEUTRAL SWITCH<br />
WIRING HARNESS-SIDE<br />
CONNECTOR<br />
B A<br />
NEUTRAL SWITCH<br />
7<br />
4 5 9 8<br />
A 56<br />
B<br />
4 6<br />
26 25 24 23 22 21 20 19 18 17 16 15 14<br />
52 51 50 49 48 47 46 45 44 43 42 41 40<br />
78 77 76 75 74 73 72 71 70 69 68 67 66<br />
104 103 102 101 100 99 98 97 96 95 94 93 92<br />
PCM<br />
PCM<br />
WIRING HARNESS-SIDE<br />
CONNECTOR<br />
13 12 11 10 9 8 7 6 5 4 3 2 1<br />
39 38 37 36 35 34 33 32 31 30 29 28 27<br />
65 64 63 62 61 60 59 58 57 56 55 54 53<br />
91 90 89 88 87 86 85 84 83 82 81 80 79
End Of Sie<br />
ON-BOARD DIAGNOSTIC<br />
Diagnostic procedure<br />
STEP INSPECTION ACTION<br />
1 VERIFY FREEZE FRAME DATA HAS BEEN Yes Go to the next step.<br />
RECORDED<br />
No Record the FREEZE FRAME DATA on the repair order,<br />
• Has FREEZE FRAME DATA been recorded? then go to the next step.<br />
2 VERIFY RELATED REPAIR INFORMATION Yes Perform repair or diagnosis according to the available<br />
AVAILABILITY<br />
repair information.<br />
• Verify related service repair information<br />
• If the vehicle is not repaired, go to the next step.<br />
availability.<br />
No Go to the next step.<br />
• Is any related repair information available?<br />
3 VERIFY CURRENT SIGNAL STATUS: IS Yes Go to the next step.<br />
CONCERN INTERMITTENT OR CONSTANT? No Intermittent concern exists.<br />
• Connect the WDS or equivalent to the DLC-2. Perform the “INTERMITTENT CONCERNS<br />
• Clear the DTC from the PCM memory using<br />
the WDS or equivalent.<br />
TROUBLESHOOTING”.<br />
• Start the engine.<br />
• Is the same DTC present?<br />
4 INSPECT NEUTRAL SWITCH CONNECTOR Yes Repair or replace the terminal, then go to Step 10.<br />
FOR POOR CONNECTION<br />
No Go to the next step.<br />
• Turn the engine switch off.<br />
• Inspect for poor connection (such as damaged/<br />
pulled-out terminals, corrosion).<br />
• Is there any malfunction?<br />
5 INSPECT NEUTRAL SWITCH SIGNAL CIRCUIT Yes Repair or replace the wiring harness for a short to GND,<br />
FOR SHORT TO GND<br />
then go to Step 10.<br />
• Turn the engine switch off.<br />
No Go to the next step.<br />
• Inspect for continuity between neutral switch<br />
terminal A and body GND.<br />
• Is there continuity?<br />
6 INSPECT NEUTRAL SWITCH GND CIRCUIT Yes Go to the next step.<br />
FOR OPEN CIRCUIT<br />
No Repair or replace the wiring harness for an open circuit,<br />
• Turn the engine switch off.<br />
then go to Step 10.<br />
• Inspect for continuity between neutral switch<br />
terminal B and body GND.<br />
• Is there continuity?<br />
7 INSPECT NEUTRAL SWITCH<br />
Yes Replace the neutral switch, then go to Step 10.<br />
•<br />
•<br />
Inspect the neutral switch.<br />
Is there any malfunction?<br />
No Go to the next step.<br />
8 INSPECT PCM CONNECTO FOR POOR Yes Repair or replace the terminal, then go to Step 10.<br />
CONNECTION<br />
No Go to the next step.<br />
• Turn the engine switch off.<br />
• Inspect for poor connection (such as damaged/<br />
pulled-out terminals, corrosion).<br />
• Is there any malfunction?<br />
9 INSPECT NEUTRAL SWITCH SIGNAL CIRCUIT Yes Go to the next step.<br />
FOR OPEN CIRCUIT<br />
No Repair or replace the wiring harness for an open circuit,<br />
• Turn the engine switch off.<br />
then go to the next step.<br />
• Inspect for continuity between neutral switch<br />
terminal A and PCM terminal 56.<br />
• Is there continuity?<br />
10 VERIFY TROUBLESHOOTING OF DTC P0850 Yes Replace the PCM, then go to the next step.<br />
COMPLETED<br />
No Go to the next step.<br />
• Make sure to reconnect all disconnected<br />
connectors.<br />
• Clear the DTC from the PCM memory using<br />
the WDS or equivalent.<br />
• Start the engine.<br />
• Is the same DTC present?<br />
11 VERIFY AFTER REPAIR PROCEDURE<br />
Yes Go to the applicable DTC inspection.<br />
• Perform the Repair Verification Drive Mode.<br />
(See F2–40 DTC TABLE.)<br />
•<br />
(See F2–39 OBD DRIVE MODE.)<br />
Are any DTCs present?<br />
No Troubleshooting completed.<br />
F2–165<br />
F2
DTC P1190<br />
DTC P1190 Calibration resistor circuit malfunction<br />
DETECTION<br />
CONDITION<br />
POSSIBLE<br />
CAUSE<br />
F2–166<br />
ON-BOARD DIAGNOSTIC<br />
B6E407001100101<br />
• The PCM monitors the input voltage from the calibration resistor of each cylinder. If the PCM detects that<br />
the input voltage for any cylinder is more than 4.8 V or less than 0.2 V, the PCM determines calibration<br />
resistor malfunction.<br />
Diagnostic support note<br />
• The MIL illuminates if the PCM detects the above malfunction condition in two consecutive drive cycles or<br />
in one drive cycle while the DTC for the same malfunction has been stored in the PCM.<br />
• PENDING CODE is available if the PCM detects the above malfunction condition.<br />
• FREEZE FRAME DATA is available.<br />
• The DTC is stored in the PCM memory.<br />
• Calibration resistor malfunction<br />
• Connector or terminal malfunction<br />
• Short to power supply in wiring harness between each cylinder calibration resistor terminal A and PCM<br />
terminal 37, 62, 89, 11<br />
• Open circuit in wiring harness between each cylinder calibration resistor terminal A and PCM terminal 37,<br />
62, 89, 11<br />
• Open circuit in wiring harness between each cylinder calibration resistor terminal C and PCM terminal 91
DTC P1190 Calibration resistor circuit malfunction<br />
INJECTOR DRIVER MODULE<br />
1E<br />
1D<br />
1G<br />
1C<br />
1H<br />
1F<br />
2H<br />
INJECTOR DRIVER MODULE<br />
WIRING HARNESS-SIDE CONNECTOR<br />
1H 1G 1F 1E 1D 1C<br />
2H 2G 2F 2E 2D 2C<br />
ON-BOARD DIAGNOSTIC<br />
1B 1A<br />
2B 2A<br />
26 25 24 23 22 21 20 19 18 17 16 15 14<br />
52 51 50 49 48 47 46 45 44 43 42 41 40<br />
78 77 76 75 74 73 72 71 70 69 68 67 66<br />
104 103 102 101 100 99 98 97 96 95 94 93 92<br />
CALIBRATION<br />
RESISTOR NO.1<br />
4<br />
B A<br />
4<br />
4 6 4<br />
D C<br />
CALIBRATION<br />
RESISTOR NO.2<br />
4 4<br />
4<br />
B<br />
D<br />
6<br />
A<br />
C<br />
4<br />
CALIBRATION<br />
RESISTOR NO.3<br />
4<br />
D A<br />
4<br />
4 6 4<br />
B C<br />
CALIBRATION<br />
RESISTOR NO.4<br />
4 4<br />
D A<br />
4 6 4<br />
B C<br />
PCM<br />
WIRING HARNESS-SIDE CONNECTOR<br />
CALIBRATION RESISTOR<br />
WIRING HARNESS-SIDE<br />
CONNECTOR<br />
C<br />
D<br />
A<br />
B<br />
13 12 11 10 9 8 7 6 5 4 3 2 1<br />
39 38 37 36 35 34 33 32 31 30 29 28 27<br />
65 64 63 62 61 60 59 58 57 56 55 54 53<br />
91 90 89 88 87 86 85 84 83 82 81 80 79<br />
8<br />
5<br />
7<br />
8 5 7<br />
8 5 7<br />
8 5 7<br />
8<br />
7<br />
37<br />
62<br />
89<br />
11<br />
91<br />
PCM<br />
F2–167<br />
F2
F2–168<br />
ON-BOARD DIAGNOSTIC<br />
Diagnostic procedure<br />
STEP INSPECTION ACTION<br />
1 VERIFY FREEZE FRAME DATA HAS BEEN<br />
RECORDED<br />
• Has FREEZE FRAME DATA been recorded?<br />
2 VERIFY RELATED REPAIR INFORMATION<br />
AVAILABILITY<br />
• Verify related Service Information availability.<br />
• Is any related repair information available?<br />
3 VERIFY CURRENT SIGNAL STATUS: IS<br />
CONCERN INTERMITTENT OR CONSTANT?<br />
• Connect the WDS or equivalent to the DLC-2.<br />
• Clear the DTC from the PCM memory using<br />
the WDS or equivalent.<br />
• Start the engine.<br />
• Is the PENDING CODE for this DTC present?<br />
4 INSPECT CALIBRATION RESISTOR<br />
CONNECTOR FOR POOR CONNECTION<br />
• Turn the engine switch off.<br />
• Inspect for poor connection calibration resistor<br />
connector for each cylinder (such as damaged/<br />
pulled-out terminals, corrosion).<br />
• Is there any malfunction?<br />
5 INSPECT CALIBRATION RESISTOR SIGNAL<br />
CIRCUIT FOR SHORT TO POWER SUPPLY<br />
• Turn the engine switch to the ON position<br />
(Engine off).<br />
• Disconnect all cylinder’s calibration resistor<br />
connectors.<br />
• Inspect the voltage at calibration resister<br />
terminal A for each cylinder (wiring harnessside)<br />
and body GND.<br />
• Is the voltage B+?<br />
6 INSPECT CALIBRATION RESISTOR<br />
• Inspect the calibration resistor.<br />
• Is there any malfunction?<br />
7 INSPECT PCM CONNECTOR FOR POOR<br />
CONNECTION<br />
• Turn the engine switch off.<br />
• Inspect for poor connection (such as damaged/<br />
pulled-out terminals, corrosion).<br />
• Is there any malfunction?<br />
8 INSPECT CALIBRATION RESISTOR FOR OPEN<br />
CIRCUIT<br />
• Turn the engine switch off.<br />
• Inspect for continuity between following<br />
terminals (wiring harness-side harness):<br />
— No.1 cylinder calibration resistor terminal A<br />
and PCM terminal 37<br />
— No.2 cylinder calibration resistor terminal A<br />
and PCM terminal 62<br />
— No.3 cylinder calibration resistor terminal A<br />
and PCM terminal 89<br />
— No.4 cylinder calibration resistor terminal A<br />
and PCM terminal 11<br />
— Each cylinder calibration resistor terminal C<br />
and PCM terminal 91<br />
• Is there continuity?<br />
9 VERIFY TROUBLESHOOTING OF DTC P1190<br />
COMPLETED<br />
• Make sure to reconnect all disconnected<br />
connectors.<br />
• Clear the DTC using the WDS or equivalent.<br />
• Start the engine.<br />
• Is the PENDING CODE for this DTC present?<br />
Yes Go to the next step.<br />
No Record the FREEZE FRAME DATA on the repair order,<br />
then go to the next step.<br />
Yes Perform repair or diagnosis according to the available<br />
Service Information.<br />
• If the vehicle is not repaired, go to the next step.<br />
No Go to the next step.<br />
Yes Go to the next step.<br />
No Intermittent concern exists.<br />
Perform the “INTERMITTENT CONCERNS<br />
TROUBLESHOOTING”.<br />
Yes Repair or replace the suspected terminal, go to Step 9.<br />
No Go to the next step.<br />
Yes Repair or replace the wiring harness for a short to power<br />
supply for the suspected cylinder, then go to Step 9.<br />
No Go to the next step.<br />
Yes Replace the calibration resistor, then go to Step 9.<br />
No Go to the next step.<br />
Yes Repair or replace the suspected terminal, then go to Step<br />
9.<br />
No Go to the next step.<br />
Yes Go to the next step.<br />
No Repair or replace the wiring harness for the suspected<br />
circuit, then go to the next step.<br />
Yes Replace the PCM, then go to the next step.<br />
No Go to the next step.
ON-BOARD DIAGNOSTIC<br />
STEP INSPECTION ACTION<br />
10 VERIFY AFTER REPAIR PROCEDURE<br />
• Perform the Repair Verification Drive Mode.<br />
(See F2–39 OBD DRIVE MODE.)<br />
• Are any DTCs present?<br />
End Of Sie<br />
DTC P1211<br />
DTC P1211 Fuel pressure higher or lower than desired pressure<br />
DETECTION<br />
CONDITION<br />
POSSIBLE<br />
CAUSE<br />
Yes Go to the applicable DTC troubleshooting.<br />
(See F2–40 DTC TABLE.)<br />
No Troubleshooting completed.<br />
B6E407001200101<br />
• The PCM monitors the fuel pressure and calculates the fuel supply volume to the common rail using the<br />
fuel pressure sensor input signal while the engine is running. If the fuel pressure or fuel supply volume to<br />
the common rail is as follows, the PCM determines that the fuel pressure is higher or lower than the desired<br />
pressure.<br />
— Supply pump actual pressure is higher than threshold.<br />
— Difference between two consecutive fuel supply to common rail volume from supply pump is more than<br />
one fuel injection volume by fuel injector.<br />
Diagnostic support note<br />
• The MIL illuminates if the PCM detects the above malfunction condition in two consecutive drive cycles or<br />
in one drive cycle while the DTC for the same malfunction has been stored in the PCM.<br />
• PENDING CODE is available if the PCM detects the above malfunction condition.<br />
• FREEZE FRAME DATA is available.<br />
• The DTC is stored in the PCM memory.<br />
• Suction control valve malfunction<br />
• Fuel pressure sensor characteristic malfunction<br />
• Fuel pressure limiter malfunction<br />
• Supply pump malfunction<br />
• PCM malfunction<br />
F2–169<br />
F2
End Of Sie<br />
DTC P1391<br />
F2–170<br />
ON-BOARD DIAGNOSTIC<br />
Diagnostic procedure<br />
STEP INSPECTION ACTION<br />
1 VERIFY FREEZE FRAME DATA HAS BEEN Yes Go to the next step.<br />
RECORDED<br />
No Record the FREEZE FRAME DATA on the repair order,<br />
• Has FREEZE FRAME DATA been recorded? then go to the next step.<br />
2 VERIFY RELATED REPAIR INFORMATION Yes Perform repair or diagnosis according to the available<br />
AVAILABILITY<br />
repair information.<br />
• Verify related Service Bulletins and/or on-line • If the vehicle is not repaired, go to the next step.<br />
repair information availability.<br />
No Go to the next step.<br />
• Is any related repair information available?<br />
3 VERIFY CURRENT SIGNAL STATUS: IS Yes Go to the next step.<br />
CONCERN INTERMITTENT OR CONSTANT? No Intermittent concern exists.<br />
• Connect the WDS or equivalent to the DLC-2. Perform the “INTERMITTENT CONCERNS<br />
• Clear the DTC from the PCM memory using<br />
the WDS or equivalent.<br />
TROUBLESHOOTING”.<br />
• Start the engine.<br />
• Is the PENDING CODE for this DTC present?<br />
4 IDENTIFY TRIGGER DTC FOR FREEZE FRAME Yes Go to the next step.<br />
DATA<br />
No Go to the troubleshooting procedures for the DTC in the<br />
• Is DTC P0627 on the FREEZE FRAME DATA? FREEZE FRAME DATA.<br />
5 INSPECT FUEL PRESSURE SENSOR<br />
Yes Go to the next step.<br />
•<br />
•<br />
Inspect the fuel pressure sensor.<br />
Is the fuel pressure sensor normal?<br />
No Replace the common rail, then go to Step 9.<br />
6 INSPECT SUCTION CONTROL VALVE<br />
Yes Go to the next step.<br />
•<br />
•<br />
Inspect the suction control valve.<br />
Is the suction control valve normal?<br />
No Replace the supply pump, then go to Step 9.<br />
7 VERIFY FUEL PRESSURE LIMITER<br />
Yes Go to the next step.<br />
MALFUNCTION<br />
No This DTC cause is fuel pressure limiter malfunction, then<br />
• Replace the common rail.<br />
go to Step 9.<br />
• Make sure to reconnect all disconnected<br />
connectors.<br />
• Clear the DTC using the WDS or equivalent.<br />
• Start the engine.<br />
• Is the PENDING CODE for this DTC present?<br />
8 VERIFY SUPPLY PUMP MALFUNCTION Yes Go to the next step.<br />
•<br />
•<br />
Replace the supply pump.<br />
Make sure to reconnect all disconnected<br />
connectors.<br />
No The cause for this DTC is a supply pump malfunction, then<br />
go to the next step.<br />
• Clear the DTC using the WDS or equivalent.<br />
• Start the engine.<br />
• Is the PENDING CODE for this DTC present?<br />
9 VERIFY TROUBLESHOOTING OF DTC P1211 Yes Replace the PCM, then go to the next step.<br />
COMPLETED<br />
No Go to the next step.<br />
• Make sure to reconnect all disconnected<br />
connectors.<br />
• Clear the DTC using the WDS or equivalent.<br />
• Start the engine.<br />
• Is the PENDING CODE for this DTC present?<br />
10 VERIFY AFTER REPAIR PROCEDURE<br />
Yes Go to the applicable DTC troubleshooting.<br />
• Perform the Repair Verification Drive Mode. (See F2–40 DTC TABLE.)<br />
•<br />
(See F2–39 OBD DRIVE MODE.)<br />
Are any DTCs present?<br />
No Troubleshooting completed.<br />
DTC P1391 Glow plug circuit low input<br />
DETECTION<br />
CONDITION<br />
B6E407001300101<br />
• The PCM monitors the output signal to the glow relay when the glow relay is on. If the glow relay voltage is<br />
1.0 V or less when the glow relay is operating, The PCM determines that there is a malfunction in the glow<br />
relay circuit.<br />
Diagnostic support note<br />
• The MIL does not illuminates.<br />
• The DTC is stored in the PCM memory.
DTC P1391 Glow plug circuit low input<br />
POSSIBLE<br />
CAUSE<br />
GLOW FUSE<br />
ON-BOARD DIAGNOSTIC<br />
• Glow plug relay malfunction<br />
• Melt or burnt glow fuse<br />
• PCM malfunction<br />
• Glow plug malfunction<br />
• Connector or terminal malfunction<br />
• Open circuit in wiring harness between glow plug relay terminal A and PCM terminal 86<br />
• Open circuit in wiring harness between glow plug relay terminal C and PCM terminal 68<br />
• Open circuit in wiring harness between glow plug relay terminal B and body GND<br />
• Open circuit in wiring harness between glow plug relay terminal D and GLOW FUSE<br />
• Short to GND circuit in wiring harness between glow plug relay terminal A and PCM terminal 86<br />
• Short to GND circuit in wiring harness between glow plug relay terminal C and PCM terminal 68<br />
7<br />
6<br />
4<br />
5<br />
5<br />
GLOW PLUG RELAY<br />
GLOW PLUG RELAY<br />
WIRING HARNESS-SIDE CONNECTOR<br />
D<br />
B<br />
C<br />
A<br />
D<br />
B<br />
10<br />
A<br />
5<br />
5<br />
GLOW<br />
PLUG<br />
12<br />
13<br />
86<br />
11<br />
C 68<br />
8 9<br />
26 25 24 23 22 21 20 19 18 17 16 15 14<br />
52 51 50 49 48 47 46 45 44 43 42 41 40<br />
78 77 76 75 74 73 72 71 70 69 68 67 66<br />
104 103 102 101 100 99 98 97 96 95 94 93 92<br />
11<br />
PCM<br />
PCM<br />
WIRING HARNESS-SIDE CONNECTOR<br />
13 12 11 10 9 8 7 6 5 4 3 2 1<br />
39 38 37 36 35 34 33 32 31 30 29 28 27<br />
65 64 63 62 61 60 59 58 57 56 55 54 53<br />
91 90 89 88 87 86 85 84 83 82 81 80 79<br />
F2–171<br />
F2
F2–172<br />
ON-BOARD DIAGNOSTIC<br />
Diagnostic procedure<br />
STEP INSPECTION ACTION<br />
1 VERIFY FREEZE FRAME DATA HAS BEEN<br />
RECORDED<br />
• Has FREEZE FRAME DATA been recorded?<br />
2 VERIFY RELATED REPAIR INFORMATION<br />
AVAILABILITY<br />
• Verify related service repair information<br />
availability.<br />
• Is any related repair information available?<br />
3 VERIFY CURRENT SIGNAL STATUS: IS<br />
CONCERN INTERMITTENT OR CONSTANT?<br />
• Connect the WDS or equivalent to the DLC-2.<br />
• Clear the DTC from the PCM memory using<br />
the WDS or equivalent.<br />
• Start the engine.<br />
• Is the same DTC present?<br />
4 CHECK FUSE CONDITION<br />
• Turn the engine switch off.<br />
• Verify glow fuse conditions.<br />
• Is there any melt or burnt?<br />
5 INSPECT GLOW PLUG RELAY CONNECTOR<br />
FOR POOR CONNECTION<br />
• Turn the engine switch off.<br />
• Disconnect the glow plug relay connector.<br />
• Inspect for poor connection (such as damaged/<br />
pulled-out pins, corrosion).<br />
• Is there any malfunction?<br />
6 INSPECT GLOW PLUG RELAY POWER<br />
SUPPLY FOR OPEN CIRCUIT<br />
• Turn the engine switch off.<br />
• Measure the voltage between glow plug relay<br />
terminal D and body GND.<br />
• Is the voltage B+?<br />
7 INSPECT GLOW PLUG RELAY GRAND FOR<br />
OPEN CIRCUIT<br />
• Turn the engine switch off.<br />
• Remove the glow plug relay.<br />
• Inspect for continuity between glow plug relay<br />
terminal B and GND.<br />
• Is there continuity?<br />
8 INSPECT GLOW PLUG RELAY SIGNAL FOR<br />
OPEN CIRCUIT<br />
• Turn the engine switch to the ON position<br />
(Engine off).<br />
• Measure the voltage between glow plug relay<br />
terminal C.<br />
• Is voltage less than 1.0 V?<br />
9 INSPECT GLOW PLUG RELAY SIGNAL<br />
CIRCUIT FOR SHORT TO GND<br />
• Turn the engine switch off.<br />
• Inspect for continuity between glow plug relay<br />
terminal C and body GND.<br />
• Is there continuity?<br />
10 INSPECT GLOW PLUG RELAY<br />
• Inspect the glow plug relay.<br />
• Is there any malfunction?<br />
11 INSPECT POOR CONNECTION OF PCM<br />
CONNECTOR<br />
• Turn the engine switch off.<br />
• Inspect for poor connection (such as damaged/<br />
pulled-out terminals, corrosion).<br />
• Is there any malfunction?<br />
Yes Go to the next step.<br />
No Record the FREEZE FRAME DATA on the repair order,<br />
then go to the next step.<br />
Yes Perform repair or diagnosis according to the available<br />
repair information.<br />
• If the vehicle is not repaired, go to the next step.<br />
No Go to the next step.<br />
Yes Go to the next step.<br />
No Intermittent concern exists.<br />
Perform the “INTERMITTENT CONCERNS<br />
TROUBLESHOOTING”.<br />
Yes Go to symptom troubleshooting NO.1 MELTING OF MAIN<br />
OR OTHER FUSES.<br />
No Go to the next step.<br />
Yes Repair or replace the terminal, then go to the next step.<br />
No Go to the next step.<br />
Yes Go to the next step.<br />
No Repair or replace the wiring harness for an open circuit, go<br />
to Step 14.<br />
Yes Go to the next step.<br />
No Repair or replace the wiring harness for an open circuit, go<br />
to Step 14.<br />
Yes Repair or replace the wiring harness for an open circuit, go<br />
to Step 14.<br />
No Go to the next step.<br />
Yes Repair or replace the wiring harness for a short to GND, go<br />
to Step 14.<br />
No Go to the next step.<br />
Yes Go to the next step.<br />
No Replace the glow plug relay, go to Step 14.<br />
Yes Repair or replace the suspected terminal, go to Step 14.<br />
No Go to the next step.
12 INSPECT GLOW PLUG RELAY SIGNAL<br />
CIRCUIT FOR SHORT TO GRAND<br />
• Turn the engine switch off.<br />
• Remove the glow plug connector.<br />
• Inspect for continuity between glow plug relay<br />
terminal A and body GND.<br />
• Is there continuity?<br />
13 INSPECT GLOW PLUG RELAY SIGNAL<br />
CIRCUIT FOR OPEN CIRCUIT<br />
• Turn the engine switch off.<br />
• Inspect for continuity between glow plug relay<br />
terminal A and PCM terminal 86.<br />
• Is there continuity?<br />
14 VERIFY TROUBLESHOOTING OF DTC P1391<br />
COMPLETED<br />
• Make sure to reconnect all disconnected<br />
connectors.<br />
• Clear DTC from PCM memory using WDS or<br />
equivalent.<br />
• Start the engine.<br />
• Is the same DTC present?<br />
15 VERIFY AFTER REPAIR PROCEDURE<br />
• Perform the Repair Verification Drive Mode.<br />
(See F2–39 OBD DRIVE MODE.)<br />
• Are any DTCs present?<br />
End Of Sie<br />
DTC P1392<br />
ON-BOARD DIAGNOSTIC<br />
STEP INSPECTION ACTION<br />
DTC P1392 Glow plug circuit high input<br />
DETECTION<br />
CONDITION<br />
POSSIBLE<br />
CAUSE<br />
Yes Repair or replace the wiring harness for a short to GND,<br />
then go to Step 12.<br />
No Go to the next step<br />
Yes Go to the next step<br />
No Repair or replace the wiring harness for an open circuit,<br />
then go to the next step.<br />
Yes Replace the PCM, go to the next step.<br />
No Go to the next step.<br />
Yes Go to the applicable DTC inspection.<br />
(See F2–40 DTC TABLE.)<br />
No Troubleshooting completed.<br />
B6E407001300102<br />
• The PCM monitors the output signal to the glow relay when the glow relay is off. If the glow relay voltage is<br />
4.0 V or more when the glow relay is off, The PCM determines that there is a malfunction in the glow relay<br />
control circuit.<br />
Diagnostic support note<br />
• The MIL does not illuminates.<br />
• The DTC is stored in the PCM memory.<br />
• Glow plug relay malfunction<br />
• Glow plug malfunction<br />
• PCM malfunction<br />
• Connector or terminal malfunction<br />
• Short to power supply in wiring harness between glow plug relay terminal C and PCM terminal 68<br />
• Short to power supply in wiring harness between glow plug relay terminal A and PCM terminal 86<br />
F2–173<br />
F2
DTC P1392 Glow plug circuit high input<br />
F2–174<br />
GLOW FUSE<br />
4<br />
GLOW PLUG RELAY<br />
GLOW PLUG RELAY<br />
WIRING HARNESS-SIDE CONNECTOR<br />
D<br />
B<br />
C<br />
D<br />
ON-BOARD DIAGNOSTIC<br />
A<br />
4<br />
GLOW<br />
PLUG<br />
4 4<br />
8<br />
B<br />
C 68<br />
9<br />
5<br />
A<br />
26 25 24 23 22 21 20 19 18 17 16 15 14<br />
52 51 50 49 48 47 46 45 44 43 42 41 40<br />
78 77 76 75 74 73 72 71 70 69 68 67 66<br />
104 103 102 101 100 99 98 97 96 95 94 93 92<br />
6<br />
7<br />
8<br />
86<br />
PCM<br />
PCM<br />
WIRING HARNESS-SIDE CONNECTOR<br />
13 12 11 10 9 8 7 6 5 4 3 2 1<br />
39 38 37 36 35 34 33 32 31 30 29 28 27<br />
65 64 63 62 61 60 59 58 57 56 55 54 53<br />
91 90 89 88 87 86 85 84 83 82 81 80 79
End Of Sie<br />
ON-BOARD DIAGNOSTIC<br />
Diagnostic procedure<br />
STEP INSPECTION ACTION<br />
1 VERIFY FREEZE FRAME DATA HAS BEEN Yes Go to the next step.<br />
RECORDED<br />
No Record the FREEZE FRAME DATA on the repair order,<br />
• Has FREEZE FRAME DATA been recorded? then go to the next step.<br />
2 VERIFY RELATED REPAIR INFORMATION Yes Perform repair or diagnosis according to the available<br />
AVAILABILITY<br />
repair information.<br />
• Verify related service repair information<br />
• If the vehicle is not repaired, go to the next step.<br />
availability.<br />
No Go to the next step.<br />
• Is any related repair information available?<br />
3 VERIFY CURRENT SIGNAL STATUS: IS Yes Go to the next step.<br />
CONCERN INTERMITTENT OR CONSTANT? No Intermittent concern exists.<br />
• Connect the WDS or equivalent to the DLC-2. Perform the “INTERMITTENT CONCERNS<br />
• Clear the DTC from the PCM memory using<br />
the WDS or equivalent.<br />
TROUBLESHOOTING”.<br />
• Start the engine.<br />
• Is the same DTC present?<br />
4 INSPECT GLOW PLUG RELAY CONNECTOR Yes Repair or replace the terminal, then go to the next step.<br />
FOR POOR CONNECTION<br />
No Go to the next step.<br />
• Turn the engine switch off.<br />
• Disconnect the glow plug relay connector.<br />
• Inspect for poor connection (such as damaged/<br />
pulled-out pins, corrosion).<br />
• Is there any malfunction?<br />
5 INSPECT GLOW PLUG RELAY<br />
Yes Replace glow plug relay, go to Step 9.<br />
•<br />
•<br />
Inspect glow plug relay.<br />
Is there any malfunction?<br />
No Go to the next step.<br />
6 INSPECT GLOW PLUG RELAY SIGNAL Yes Repair or replace the wiring harness for a short to power<br />
CIRCUIT FOR SHORT TO POWER<br />
supply, then go to Step 9.<br />
• Turn the engine switch to the ON position<br />
(Engine off).<br />
No Go to the next step<br />
• Disconnect the PCM connector.<br />
• Measure the voltage between glow plug<br />
terminal A and body GND.<br />
• Is the voltage more than 4.0 V?<br />
7 INSPECT GLOW PLUG<br />
Yes Replace glow plug relay, go to Step 9.<br />
•<br />
•<br />
Inspect glow plug.<br />
Is there any malfunction?<br />
No Go to the next step.<br />
8 INSPECT POOR CONNECTION OF PCM Yes Repair or replace the suspected terminal, go to the Step<br />
CONNECTOR<br />
10.<br />
• Turn the engine switch off.<br />
No Go to the next step.<br />
• Inspect for poor connection (such as damaged/<br />
pulled-out terminals, corrosion).<br />
• Is there any malfunction?<br />
9 INSPECT GLOW PLUG RELAY GRAND Yes Repair or replace the wiring harness for a short to power<br />
CIRCUIT FOR SHORT TO POWER<br />
supply, then go to the next step.<br />
• Turn the engine switch to off.<br />
No Go to the next step<br />
• Remove the glow plug relay.<br />
• Measure the voltage between glow plug relay<br />
terminal C and body GND.<br />
• Is the voltage B+?<br />
10 VERIFY TROUBLESHOOTING OF DTC P1392 Yes Replace the PCM, go to the next step.<br />
COMPLETED<br />
No Go to the next step.<br />
• Make sure to reconnect all disconnected<br />
connectors.<br />
• Clear the DTC from the PCM memory using<br />
the WDS or equivalent.<br />
• Start the engine and warm it up to the normal<br />
operating temperature.<br />
• Is the same DTC present?<br />
11 VERIFY AFTER REPAIR PROCEDURE<br />
Yes Go to the applicable DTC inspection.<br />
• Perform the Repair Verification Drive Mode.<br />
(See F2–40 DTC TABLE.)<br />
•<br />
(See F2–39 OBD DRIVE MODE.)<br />
Is any DTC present?<br />
No Troubleshooting completed.<br />
F2–175<br />
F2
DTC P2009<br />
F2–176<br />
ON-BOARD DIAGNOSTIC<br />
DTC P2009 Variable swirl control (VSC) solenoid valve circuit high input<br />
DETECTION<br />
CONDITION<br />
POSSIBLE<br />
CAUSE<br />
B6E407002000101<br />
• The PCM monitors the output signal to the variable swirl control solenoid valve. If the voltage of the<br />
variable swirl control solenoid valve is high even if the variable swirl control solenoid valve is on, the PCM<br />
determines that there is a malfunction in the variable swirl control solenoid valve control circuit.<br />
Diagnostic support note<br />
• The MIL illuminates if the PCM detects the above malfunction condition in two consecutive drive cycles or<br />
in one drive cycle while the DTC for the same malfunction has been stored in the PCM.<br />
• PENDING CODE is available if the PCM detects the above malfunction condition.<br />
• FREEZE FRAME DATA is available.<br />
• The DTC is stored in the PCM memory.<br />
• VSC solenoid valve malfunction<br />
• Short to power supply between VSC solenoid valve terminal B and PCM terminal 101<br />
• Connector or terminal malfunction<br />
• PCM malfunction<br />
VSC SOLENOID VALVE<br />
WIRING HARNESS-SIDE<br />
CONNECTOR<br />
B<br />
VSC SOLENOID VALVE<br />
A<br />
5<br />
A<br />
4<br />
PCM CONTROL RELAY<br />
TERMINAL C<br />
4<br />
6<br />
7<br />
B 101<br />
26 25 24 23 22 21 20 19 18 17 16 15 14<br />
52 51 50 49 48 47 46 45 44 43 42 41 40<br />
78 77 76 75 74 73 72 71 70 69 68 67 66<br />
104 103 102 101 100 99 98 97 96 95 94 93 92<br />
PCM<br />
PCM<br />
WIRING HARNESS-SIDE<br />
CONNECTOR<br />
13 12 11 10 9 8 7 6 5 4 3 2 1<br />
39 38 37 36 35 34 33 32 31 30 29 28 27<br />
65 64 63 62 61 60 59 58 57 56 55 54 53<br />
91 90 89 88 87 86 85 84 83 82 81 80 79
End Of Sie<br />
ON-BOARD DIAGNOSTIC<br />
Diagnostic procedure<br />
STEP INSPECTION ACTION<br />
1 VERIFY FREEZE FRAME DATA HAS BEEN Yes Go to the next step.<br />
RECORDED<br />
No Record the FREEZE FRAME DATA on the repair order,<br />
• Has FREEZE FRAME DATA been recorded? then go to the next step.<br />
2 VERIFY RELATED REPAIR INFORMATION Yes Perform repair or diagnosis according to the available<br />
AVAILABILITY<br />
repair information.<br />
• Verify related service repair information<br />
• If the vehicle is not repaired, go to the next step.<br />
availability.<br />
No Go to the next step.<br />
• Is any related repair information available?<br />
3 VERIFY CURRENT SIGNAL STATUS: IS Yes Go to the next step.<br />
CONCERN INTERMITTENT OR CONSTANT? No Intermittent concern exists.<br />
• Connect the WDS or equivalent to the DLC-2. Perform the “INTERMITTENT CONCERNS<br />
• Clear the DTC from the PCM memory using<br />
the WDS or equivalent.<br />
TROUBLESHOOTING”.<br />
• Start the engine.<br />
• Is the PENDING CODE for this DTC present?<br />
4 INSPECT POOR CONNECTION OF VSC Yes Repair or replace the suspected terminal, go to Step 8.<br />
SOLENOID VALVE CONNECTOR<br />
No Go to the next step.<br />
• Turn the engine switch off.<br />
• Disconnect the VSC solenoid valve connector.<br />
• Inspect for poor connection (such as damaged/<br />
pulled-out terminals, corrosion).<br />
• Is there any malfunction?<br />
5 INSPECT VSC SOLENOID VALVE<br />
Yes Go to the next step.<br />
•<br />
•<br />
Inspect the VSC solenoid valve.<br />
Is the VSC solenoid valve normal?<br />
No Replace the VSC solenoid valve, go to Step 8.<br />
6 INSPECT VSC SOLENOID VALVE FOR SHORT Yes Repair or replace the wiring harness for a short to power<br />
TO POWER<br />
supply, go to Step 8.<br />
• Turn the engine switch to the ON position<br />
(Engine off).<br />
No Go to the next step.<br />
• Measure the voltage between VSC solenoid<br />
valve terminal B (wiring harness-side) and<br />
body ground.<br />
• Is the voltage B+?<br />
7 INSPECT POOR CONNECTION OF PCM Yes Repair or replace the suspected terminal, go to the next<br />
CONNECTOR<br />
step.<br />
• Turn the engine switch off.<br />
No Go to the next step.<br />
• Inspect for poor connection (such as damaged/<br />
pulled-out terminals, corrosion).<br />
• Is there any malfunction?<br />
8 VERIFY TROUBLESHOOTING OF DTC P2009 Yes Replace the PCM, go to the next step.<br />
COMPLETED<br />
No Go to the next step.<br />
• Make sure to reconnect all disconnected<br />
connectors.<br />
• Clear the DTC from the PCM memory using<br />
the WDS or equivalent.<br />
• Start the engine.<br />
• Is the PENDING CODE for this DTC present?<br />
9 VERIFY AFTER REPAIR PROCEDURE<br />
Yes Go to the applicable DTC inspection.<br />
• Perform the Repair Verification Drive Mode.<br />
(See F2–40 DTC TABLE)<br />
•<br />
(See F2–39 OBD DRIVE MODE.)<br />
Are any DTCs present?<br />
No Troubleshooting completed.<br />
F2–177<br />
F2
DTC P2010<br />
F2–178<br />
ON-BOARD DIAGNOSTIC<br />
DTC P2010 Variable swirl control (VSC) solenoid valve circuit low input<br />
DETECTION<br />
CONDITION<br />
POSSIBLE<br />
CAUSE<br />
B6E407002000102<br />
• The PCM monitors the output signal to the variable swirl control solenoid valve. If the voltage of the<br />
variable swirl control solenoid valve is low even if the variable swirl control solenoid valve is off, the PCM<br />
determines that there is a malfunction in the variable swirl control solenoid valve control system.<br />
Diagnostic support note<br />
• The MIL illuminates if the PCM detects the above malfunction condition in two consecutive drive cycles or<br />
in one drive cycle while the DTC for the same malfunction has been stored in the PCM.<br />
• PENDING CODE is available if the PCM detects the above malfunction condition.<br />
• FREEZE FRAME DATA is available.<br />
• The DTC is stored in the PCM memory.<br />
• VSC solenoid valve malfunction<br />
• Open circuit in wiring harness between VSC solenoid valve terminal A and PCM control relay terminal C<br />
• Open circuit in wiring harness between VSC solenoid valve terminal B and PCM terminal 101<br />
• Short to GND in wiring harness between VSC solenoid valve terminal B and PCM terminal 101<br />
• Connector or terminal malfunction<br />
• PCM malfunction<br />
VSC SOLENOID VALVE<br />
WIRING HARNESS-SIDE<br />
CONNECTOR<br />
B<br />
VSC SOLENOID VALVE<br />
A<br />
7<br />
A<br />
4<br />
PCM CONTROL RELAY<br />
TERMINAL C<br />
5<br />
4<br />
6 9 8<br />
B 101<br />
26 25 24 23 22 21 20 19 18 17 16 15 14<br />
52 51 50 49 48 47 46 45 44 43 42 41 40<br />
78 77 76 75 74 73 72 71 70 69 68 67 66<br />
104 103 102 101 100 99 98 97 96 95 94 93 92<br />
PCM<br />
PCM<br />
WIRING HARNESS-SIDE<br />
CONNECTOR<br />
13 12 11 10 9 8 7 6 5 4 3 2 1<br />
39 38 37 36 35 34 33 32 31 30 29 28 27<br />
65 64 63 62 61 60 59 58 57 56 55 54 53<br />
91 90 89 88 87 86 85 84 83 82 81 80 79
ON-BOARD DIAGNOSTIC<br />
Diagnostic procedure<br />
STEP INSPECTION ACTION<br />
1 VERIFY FREEZE FRAME DATA HAS BEEN<br />
RECORDED<br />
• Has FREEZE FRAME DATA been recorded?<br />
2 VERIFY RELATED REPAIR INFORMATION<br />
AVAILABILITY<br />
• Verify related service repair information<br />
availability.<br />
• Is any related repair information available?<br />
3 VERIFY CURRENT SIGNAL STATUS: IS<br />
CONCERN INTERMITTENT OR CONSTANT?<br />
• Connect the WDS or equivalent to the DLC-2.<br />
• Clear the DTC from the PCM memory using<br />
the WDS or equivalent.<br />
• Start the engine.<br />
• Is the PENDING CODE for this DTC present?<br />
4 INSPECT POOR CONNECTION OF VSC<br />
SOLENOID VALVE CONNECTOR<br />
• Turn engine switch to off.<br />
• Disconnect the VSC solenoid valve connector.<br />
• Inspect for poor connection (such as damaged/<br />
pulled-out terminals, corrosion).<br />
• Is there any malfunction?<br />
5 INSPECT VSC SOLENOID VALVE POWER<br />
SUPPLY FOR OPEN CIRCUIT<br />
• Turn the engine switch to the ON position<br />
(Engine off).<br />
• Measure the voltage between VSC solenoid<br />
valve terminal A (harness-side) and body<br />
ground<br />
• Is the voltage B+?<br />
6 INSPECT VSC SOLENOID VALVE CONTROL<br />
FOR SHORT TO GROUND<br />
• Turn the engine switch off.<br />
• Inspect for continuity between VSC solenoid<br />
valve terminal B (wiring harness-side) and<br />
body ground.<br />
• Is there continuity?<br />
7 INSPECT VSC SOLENOID VALVE<br />
• Inspect the VSC solenoid valve.<br />
• Is there any malfunction?<br />
8 INSPECT POOR CONNECTION OF PCM<br />
CONNECTOR<br />
• Turn the engine switch off.<br />
• Disconnect PCM connector.<br />
• Inspect for poor connection (such as damaged/<br />
pulled-out terminals, corrosion).<br />
• Is there any malfunction?<br />
9 INSPECT VSC SOLENOID VALVE CONTROL<br />
FOR OPEN CIRCUIT<br />
• Turn the engine switch off.<br />
• Inspect for continuity between VSC solenoid<br />
valve terminal B (wiring harness-side) and<br />
PCM terminal 101 (wiring harness-side).<br />
• Is there continuity?<br />
10 VERIFY TROUBLESHOOTING OF DTC P2010<br />
COMPLETED<br />
• Make sure to reconnect all disconnected<br />
connectors.<br />
• Clear the DTC from the PCM memory using<br />
the WDS or equivalent.<br />
• Start the engine.<br />
• Is the PENDING CODE for this DTC present?<br />
Yes Go to the next step.<br />
No Record the FREEZE FRAME DATA on the repair order,<br />
then go to the next step.<br />
Yes Perform repair or diagnosis according to the available<br />
repair information.<br />
• If the vehicle is not repaired, go to the next step.<br />
No Go to the next step.<br />
Yes Go to the next step.<br />
No Intermittent concern exists.<br />
Perform the “INTERMITTENT CONCERNS<br />
TROUBLESHOOTING”.<br />
Yes Go to the next step.<br />
No Repair or replace the suspected terminal, go to Step 10.<br />
Yes Go to the next step.<br />
No Repair or replace the wiring harness for an open circuit, go<br />
to Step 10.<br />
Yes Repair or replace the wiring harness for a short to GND, go<br />
to Step 10.<br />
No Go to the next step.<br />
Yes Replace the VSC solenoid valve, go to Step 10.<br />
No Go to the next step.<br />
Yes Repair or replace the suspected terminal, go to Step 10.<br />
No Go to the next step.<br />
Yes Go to the next step.<br />
No Repair or replace the wiring harness for a short to GND, go<br />
to the next step.<br />
Yes Replace the PCM, them go to the next step.<br />
No Go to the next step.<br />
F2–179<br />
F2
11 VERIFY AFTER REPAIR PROCEDURE<br />
• Perform the Repair Verification Drive Mode.<br />
(See F2–39 OBD DRIVE MODE.)<br />
• Are any DTCs present?<br />
End Of Sie<br />
DTC P2135<br />
End Of Sie<br />
DTC P2136<br />
F2–180<br />
ON-BOARD DIAGNOSTIC<br />
STEP INSPECTION ACTION<br />
Yes Go to the applicable DTC inspection.<br />
(See F2–40 DTC TABLE.)<br />
No Troubleshooting completed.<br />
DTC P2135 Accelerator pedal position (APP) sensor No.1/No.2 voltage correlation<br />
DETECTION<br />
CONDITION<br />
POSSIBLE<br />
CAUSE<br />
B6E407002100101<br />
• The PCM monitors the input signals from accelerator pedal position sensor No.1 and accelerator pedal<br />
position sensor No.2. If the difference between accelerator pedal position sensor No.1 and accelerator<br />
pedal position sensor No.2 is more than 0.9 V, the PCM determines that there is a malfunction in the<br />
accelerator pedal position sensor characteristic.<br />
Diagnostic support note<br />
• The MIL illuminates if the PCM detects the above malfunction condition in the first drive cycle.<br />
• FREEZE FRAME DATA is available.<br />
• The DTC is stored in the PCM memory.<br />
• APP sensor No.1 malfunction<br />
• APP sensor No.2 malfunction<br />
• PCM malfunction<br />
Diagnostic procedure<br />
STEP INSPECTION ACTION<br />
1 VERIFY FREEZE FRAME DATA HAS BEEN Yes Go to the next step.<br />
RECORDED<br />
No Record the FREEZE FRAME DATA on the repair order,<br />
• Has FREEZE FRAME DATA been recorded? then go to the next step.<br />
2 VERIFY RELATED REPAIR INFORMATION Yes Perform repair or diagnosis according to the available<br />
AVAILABILITY<br />
repair information.<br />
• Verify related service repair information<br />
• If the vehicle is not repaired, go to the next step.<br />
availability.<br />
No Go to the next step.<br />
• Is any related repair information available?<br />
3 VERIFY CURRENT SIGNAL STATUS: IS Yes Go to the next step.<br />
CONCERN INTERMITTENT OR CONSTANT? No Intermittent concern exists.<br />
• Connect the WDS or equivalent to the DLC-2. Perform the “INTERMITTENT CONCERNS<br />
• Clear the DTC from the PCM memory using<br />
the WDS or equivalent.<br />
TROUBLESHOOTING”.<br />
• Start the engine.<br />
• Is the same DTC present?<br />
4 INSPECT APP SENSOR<br />
Yes Replace the APP sensor, then go to Step 5.<br />
•<br />
•<br />
Inspect the APP sensor.<br />
Is there any malfunction?<br />
No Go to the next step.<br />
5 VERIFY TROUBLESHOOTING OF DTC P2135 Yes Replace the PCM, then go to the next step.<br />
COMPLETED<br />
No Go to the next step.<br />
• Make sure to reconnect all disconnected<br />
connectors.<br />
• Clear the DTC from the PCM memory using<br />
the WDS or equivalent.<br />
• Start the engine.<br />
• Is the same DTC present?<br />
6 VERIFY AFTER REPAIR PROCEDURE<br />
Yes Go to the applicable DTC inspection.<br />
• Perform the Repair Verification Drive Mode.<br />
(See F2–40 DTC TABLE.)<br />
•<br />
(See F2–39 OBD DRIVE MODE.)<br />
Are any DTCs present?<br />
No DTC troubleshooting completed.<br />
DTC P2136 Accelerator pedal position (APP) sensor No.1/idle switch correlation<br />
DETECTION<br />
CONDITION<br />
B6E407002100102<br />
• The PCM monitors the input signal from accelerator pedal position sensor No.1. If the voltage from<br />
accelerator pedal position sensor No.1 is more than 1.25 V during idle switch is on, the PCM determines<br />
that there is a malfunction in the accelerator pedal position sensor No.1 characteristic.<br />
Diagnostic support note<br />
• The MIL illuminates if the PCM detects the above malfunction condition in the first drive cycle.<br />
• FREEZE FRAME DATA is available.<br />
• The DTC is stored in the PCM memory.
POSSIBLE<br />
CAUSE<br />
• APP sensor No.1 malfunction<br />
• Connector or terminal malfunction<br />
• PCM malfunction<br />
ON-BOARD DIAGNOSTIC<br />
DTC P2136 Accelerator pedal position (APP) sensor No.1/idle switch correlation<br />
APP SENSOR<br />
WIRING HARNESS-SIDE<br />
CONNECTOR<br />
D<br />
C<br />
B<br />
APP SENSOR NO.1<br />
(APP SENSOR) PCM<br />
A<br />
5<br />
A<br />
B<br />
D<br />
4<br />
4<br />
4<br />
6<br />
6<br />
6<br />
90<br />
10<br />
91<br />
26 25 24 23 22 21 20 19 18 17 16 15 14<br />
52 51 50 49 48 47 46 45 44 43 42 41 40<br />
78 77 76 75 74 73 72 71 70 69 68 67 66<br />
104 103 102 101 100 99 98 97 96 95 94 93 92<br />
PCM<br />
WIRING HARNESS-SIDE<br />
CONNECTOR<br />
13 12 11 10 9 8 7 6 5 4 3 2 1<br />
39 38 37 36 35 34 33 32 31 30 29 28 27<br />
65 64 63 62 61 60 59 58 57 56 55 54 53<br />
91 90 89 88 87 86 85 84 83 82 81 80 79<br />
F2–181<br />
F2
End Of Sie<br />
DTC P2141<br />
F2–182<br />
ON-BOARD DIAGNOSTIC<br />
Diagnostic procedure<br />
STEP INSPECTION ACTION<br />
1 VERIFY FREEZE FRAME DATA HAS BEEN Yes Go to the next step.<br />
RECORDED<br />
No Record the FREEZE FRAME DATA on the repair order,<br />
• Has FREEZE FRAME DATA been recorded? then go to the next step.<br />
2 VERIFY RELATED REPAIR INFORMATION Yes Perform repair or diagnosis according to the available<br />
AVAILABILITY<br />
repair information.<br />
• Verify related service repair information<br />
• If the vehicle is not repaired, go to the next step.<br />
availability.<br />
No Go to the next step.<br />
• Is any related repair information available?<br />
3 VERIFY CURRENT SIGNAL STATUS: IS Yes Go to the next step.<br />
CONCERN INTERMITTENT OR CONSTANT? No Intermittent concern exists.<br />
• Connect the WDS or equivalent to the DLC-2. Perform the “INTERMITTENT CONCERNS<br />
• Clear the DTC from the PCM memory using<br />
the WDS or equivalent.<br />
TROUBLESHOOTING”.<br />
• Start the engine.<br />
• Is the same DTC present?<br />
4 INSPECT APP SENSOR CONNECTOR FOR Yes Repair or replace the terminal, then go to Step 7.<br />
POOR CONNECTION<br />
No Go to the next step.<br />
• Turn the engine switch off.<br />
• Disconnect the APP sensor connector.<br />
• Inspect for poor connection (such as damaged/<br />
pulled-out pins, corrosion).<br />
• Is there any malfunction?<br />
5 INSPECT APP SENSOR<br />
Yes Replace the APP sensor, then go to Step 7.<br />
•<br />
•<br />
Inspect the APP sensor.<br />
Is there any malfunction?<br />
No Go to the next step.<br />
6 INSPECT PCM CONNECTOR FOR POOR Yes Repair or replace the terminal, then go to the next step.<br />
CONNECTION<br />
No Go to the next step.<br />
• Turn the engine switch off.<br />
• Disconnect the PCM connector.<br />
• Inspect for poor connection (such as damaged/<br />
pulled-out pins, corrosion).<br />
• Is there any malfunction?<br />
7 VERIFY TROUBLESHOOTING OF DTC P2136 Yes Replace the PCM, then go to the next step.<br />
COMPLETED<br />
No Go to the next step.<br />
• Make sure to reconnect all disconnected<br />
connectors.<br />
• Clear the DTC from the PCM memory using<br />
the WDS or equivalent.<br />
• Start the engine.<br />
• Is the same DTC present?<br />
8 VERIFY AFTER REPAIR PROCEDURE<br />
Yes Go to the applicable DTC inspection.<br />
• Perform the Repair Verification Drive Mode.<br />
(See F2–40 DTC TABLE.)<br />
•<br />
(See F2–39 OBD DRIVE MODE.)<br />
Are any DTCs present?<br />
No DTC troubleshooting completed.<br />
DTC P2141 EGR solenoid valve (vent) circuit low input<br />
DETECTION<br />
CONDITION<br />
B6E407002100103<br />
• The PCM monitors the output signal to the EGR solenoid valve (vent). If the EGR solenoid valve (vent)<br />
voltage is low even if the EGR solenoid valve (vent) is off, the PCM determines that there is a malfunction<br />
in the intake shutter solenoid valve control system.<br />
Diagnostic support note<br />
• The MIL illuminates if the PCM detects the above malfunction condition in two consecutive drive cycles or<br />
in one drive cycle while the DTC for the same malfunction has been stored in the PCM.<br />
• PENDING CODE is available if the PCM detects the above malfunction condition during the first drive<br />
cycle.<br />
• FREEZE FRAME DATA is available.<br />
• The DTC is stored in the PCM memory.
DTC P2141 EGR solenoid valve (vent) circuit low input<br />
POSSIBLE<br />
CAUSE<br />
PCM CONTROL<br />
RELAY WIRING<br />
HARNESS-SIDE<br />
CONNECTOR<br />
A<br />
C<br />
D<br />
E<br />
ON-BOARD DIAGNOSTIC<br />
• EGR solenoid valve (vent) malfunction<br />
• Open circuit in wiring harness between PCM control relay terminal C and EGR solenoid valve (vent)<br />
terminal A<br />
• Open circuit in wiring harness between EGR solenoid valve (vent) terminal B and PCM terminal 72<br />
• Short to ground in wiring harness between EGR solenoid valve (vent) terminal B and PCM terminal 72<br />
• Connector or terminal malfunction<br />
• PCM malfunction<br />
PCM CONTROL RELAY<br />
TERMINAL C<br />
5<br />
4<br />
A<br />
EGR SOLENOID<br />
VALVE (VENT)<br />
WIRING HARNESS-SIDE<br />
CONNECTOR<br />
B A<br />
EGR SOLENOID<br />
VALVE (VENT)<br />
7<br />
B<br />
4<br />
6 9<br />
26 25 24 23 22 21 20 19 18 17 16 15 14<br />
52 51 50 49 48 47 46 45 44 43 42 41 40<br />
78 77 76 75 74 73 72 71 70 69 68 67 66<br />
104 103 102 101 100 99 98 97 96 95 94 93 92<br />
8<br />
72<br />
PCM<br />
WIRING HARNESS-SIDE<br />
CONNECTOR<br />
PCM<br />
13 12 11 10 9 8 7 6 5 4 3 2 1<br />
39 38 37 36 35 34 33 32 31 30 29 28 27<br />
65 64 63 62 61 60 59 58 57 56 55 54 53<br />
91 90 89 88 87 86 85 84 83 82 81 80 79<br />
F2–183<br />
F2
F2–184<br />
ON-BOARD DIAGNOSTIC<br />
Diagnostic procedure<br />
STEP INSPECTION ACTION<br />
1 VERIFY FREEZE FRAME DATA HAS BEEN<br />
RECORDED<br />
• Has FREEZE FRAME DATA been recorded?<br />
2 VERIFY RELATED REPAIR INFORMATION<br />
AVAILABILITY<br />
• Verify related service repair information<br />
availability.<br />
• Is any related repair information available?<br />
3 VERIFY CURRENT SIGNAL STATUS: IS<br />
CONCERN INTERMITTENT OR CONSTANT?<br />
• Connect the WDS or equivalent to the DLC-2.<br />
• Clear the DTC from the PCM memory using<br />
the WDS or equivalent.<br />
• Start the engine.<br />
• Is the PENDING CODE for this DTC present?<br />
4 INSPECT EGR SOLENOID VALVE (VENT)<br />
CONNECTOR FOR POOR CONNECTION<br />
• Turn the engine switch off.<br />
• Disconnect the EGR solenoid valve (vent)<br />
connector.<br />
• Inspect for poor connection (such as damaged/<br />
pulled-out pins, corrosion).<br />
• Is there any malfunction?<br />
5 INSPECT EGR SOLENOID VALVE (VENT)<br />
POWER SUPPLY FOR OPEN CIRCUIT<br />
• Turn the engine switch to the ON position<br />
(Engine off).<br />
• Measure the voltage between EGR solenoid<br />
valve (vent) terminal A (wiring harness-side)<br />
and body GND.<br />
• Is the voltage B+?<br />
6 INSPECT EGR SOLENOID VALVE (VENT)<br />
CONTROL CIRCUIT FOR SHORT TO GROUND<br />
• Inspect continuity between EGR solenoid valve<br />
(vent) terminal B (wiring harness-side) and<br />
body ground.<br />
• Is there continuity<br />
7 INSPECT EGR SOLENOID VALVE (VENT)<br />
• Inspect the EGR solenoid valve (vent).<br />
• Is there any malfunction?<br />
8 INSPECT PCM CONNECTOR FOR POOR<br />
CONNECTION<br />
• Turn the engine switch off.<br />
• Disconnect the PCM connector.<br />
• Inspect for poor connection (such as damaged/<br />
pulled-out pins, corrosion).<br />
• Is there any malfunction?<br />
9 INSPECT EGR SOLENOID VALVE (VENT)<br />
CONTROL FOR OPEN CIRCUIT<br />
• Inspect continuity between EGR solenoid valve<br />
(vent) terminal B (wiring harness-side) and<br />
PCM terminal 72 (wiring harness-side).<br />
• Is there continuity<br />
10 VERIFY TROUBLESHOOTING OF DTC P2141<br />
COMPLETED<br />
• Make sure to reconnect all disconnected<br />
connectors.<br />
• Clear the DTC from the PCM memory using<br />
the WDS or equivalent.<br />
• Start the engine.<br />
• Is the PENDING CODE for this DTC present?<br />
Yes Go to the next step.<br />
No Record the FREEZE FRAME DATA on the repair order,<br />
then go to the next step.<br />
Yes Perform repair or diagnosis according to the available<br />
repair information.<br />
• If the vehicle is not repaired, go to the next step.<br />
No Go to the next step.<br />
Yes Go to the next step.<br />
No Intermittent concern exists.<br />
Perform the “INTERMITTENT CONCERNS<br />
TROUBLESHOOTING”.<br />
Yes Repair or replace the terminal, then go to Step 10.<br />
No Go to the next step.<br />
Yes Go to the next step.<br />
No Repair or replace the wiring harness for an open circuit,<br />
then go to Step 10.<br />
Yes Repair or replace the wiring harness for a possible short to<br />
ground, then go to Step 10.<br />
No Go to the next step.<br />
Yes Replace the EGR solenoid valve (vent), then go to Step 10.<br />
No Go to the next step.<br />
Yes Repair or replace the terminal, then go to Step 10.<br />
No Go to the next step.<br />
Yes Go to the next step.<br />
No Repair or replace the wiring harness for an open circuit,<br />
then go to the next step.<br />
Yes Replace the PCM, then go to the next step.<br />
No Go to the next step.
11 VERIFY AFTER REPAIR PROCEDURE<br />
• Perform the Repair Verification Drive Mode.<br />
(See F2–39 OBD DRIVE MODE.)<br />
• Are any DTCs present?<br />
End Of Sie<br />
DTC P2142<br />
ON-BOARD DIAGNOSTIC<br />
STEP INSPECTION ACTION<br />
DTC P2142 EGR solenoid valve (vent) circuit high input<br />
DETECTION<br />
CONDITION<br />
POSSIBLE<br />
CAUSE<br />
PCM CONTROL<br />
RELAY WIRING<br />
HARNESS-SIDE<br />
CONNECTOR<br />
A<br />
C<br />
D<br />
E<br />
Yes Go to the applicable DTC inspection.<br />
(See F2–40 DTC TABLE.)<br />
No DTC troubleshooting completed.<br />
B6E407002100104<br />
• The PCM monitors the output signal to the EGR solenoid valve (vent). If the EGR solenoid valve (vent)<br />
voltage is high even if the EGR solenoid valve (vent) is on, the PCM determines that there is a malfunction<br />
in the EGR solenoid valve (vent) control system.<br />
Diagnostic support note<br />
• The MIL illuminates if the PCM detects the above malfunction condition in two consecutive drive cycles or<br />
in one drive cycle while the DTC for the same malfunction has been stored in the PCM.<br />
• PENDING CODE is available if the PCM detects the above malfunction condition during the first drive<br />
cycle.<br />
• FREEZE FRAME DATA is available.<br />
• The DTC is stored in the PCM memory.<br />
• EGR solenoid valve (vent) malfunction<br />
• Short to power supply between EGR solenoid valve (vent) terminal B and PCM terminal 72<br />
• Connector or terminal malfunction<br />
• PCM malfunction<br />
PCM CONTROL RELAY<br />
TERMINAL C<br />
EGR SOLENOID VALVE (VENT)<br />
WIRING HARNESS-SIDE<br />
CONNECTOR<br />
4<br />
B A<br />
A<br />
EGR SOLENOID<br />
VALVE (VENT)<br />
6<br />
B<br />
4<br />
26 25 24 23 22 21 20 19 18 17 16 15 14<br />
52 51 50 49 48 47 46 45 44 43 42 41 40<br />
78 77 76 75 74 73 72 71 70 69 68 67 66<br />
104 103 102 101 100 99 98 97 96 95 94 93 92<br />
5<br />
7<br />
72<br />
PCM<br />
WIRING HARNESS-SIDE<br />
CONNECTOR<br />
PCM<br />
13 12 11 10 9 8 7 6 5 4 3 2 1<br />
39 38 37 36 35 34 33 32 31 30 29 28 27<br />
65 64 63 62 61 60 59 58 57 56 55 54 53<br />
91 90 89 88 87 86 85 84 83 82 81 80 79<br />
F2–185<br />
F2
End Of Sie<br />
F2–186<br />
ON-BOARD DIAGNOSTIC<br />
Diagnostic procedure<br />
STEP INSPECTION ACTION<br />
1 VERIFY FREEZE FRAME DATA HAS BEEN Yes Go to the next step.<br />
RECORDED<br />
No Record the FREEZE FRAME DATA on the repair order,<br />
• Has FREEZE FRAME DATA been recorded? then go to the next step.<br />
2 VERIFY RELATED REPAIR INFORMATION Yes Perform repair or diagnosis according to the available<br />
AVAILABILITY<br />
repair information.<br />
• Verify related service repair information<br />
• If the vehicle is not repaired, go to the next step.<br />
availability.<br />
No Go to the next step.<br />
• Is any related repair information available?<br />
3 VERIFY CURRENT SIGNAL STATUS: IS Yes Go to the next step.<br />
CONCERN INTERMITTENT OR CONSTANT? No Intermittent concern exists.<br />
• Connect the WDS or equivalent to the DLC-2. Perform the “INTERMITTENT CONCERNS<br />
• Clear the DTC from the PCM memory using<br />
the WDS or equivalent.<br />
TROUBLESHOOTING”.<br />
• Start the engine.<br />
• Is the PENDING CODE for this DTC present?<br />
4 INSPECT EGR SOLENOID VALVE (VENT) Yes Repair or replace the terminal, then go to Step 8.<br />
CONNECTOR FOR POOR CONNECTION No Go to the next step.<br />
• Turn the engine switch off.<br />
• Disconnect the EGR solenoid valve (vent)<br />
connector.<br />
• Inspect for poor connection (such as damaged/<br />
pulled-out pins, corrosion).<br />
• Is there any malfunction?<br />
5 INSPECT EGR SOLENOID VALVE (VENT) Yes Go to the next step.<br />
POWER CIRCUIT FOR SHORT TO POWER No Repair or replace the wiring harness for a short to power,<br />
• Turn the engine switch to the ON position<br />
(Engine off).<br />
then go to Step 8.<br />
• Measure the voltage between EGR solenoid<br />
valve (vent) terminal B (wiring harness-side)<br />
and body GND.<br />
• Is the voltage B+?<br />
6 INSPECT EGR SOLENOID VALVE (VENT) Yes Replace the EGR solenoid valve (vent), then go to Step 8.<br />
•<br />
•<br />
Inspect the EGR solenoid valve (vent).<br />
Is there any malfunction?<br />
No Go to the next step.<br />
7 INSPECT PCM CONNECTOR FOR POOR Yes Repair or replace the terminal, then go to the next step.<br />
CONNECTION<br />
No Go to the next step.<br />
• Turn the engine switch off.<br />
• Disconnect the PCM connector.<br />
• Inspect for poor connection (such as damaged/<br />
pulled-out pins, corrosion).<br />
• Is there any malfunction?<br />
8 VERIFY TROUBLESHOOTING OF DTC P2142 Yes Replace the PCM, then go to the next step.<br />
COMPLETED<br />
No Go to the next step.<br />
• Make sure to reconnect all disconnected<br />
connectors.<br />
• Clear the DTC from the PCM memory using<br />
the WDS or equivalent.<br />
• Start the engine.<br />
• Is the PENDING CODE for this DTC present?<br />
9 VERIFY AFTER REPAIR PROCEDURE<br />
Yes Go to the applicable DTC inspection.<br />
• Perform the Repair Verification Drive Mode.<br />
(See F2–40 DTC TABLE.)<br />
•<br />
(See F2–39 OBD DRIVE MODE.)<br />
Are any DTCs present?<br />
No DTC troubleshooting completed.
DTC P2144<br />
ON-BOARD DIAGNOSTIC<br />
DTC P2144 EGR control solenoid valve control circuit low input<br />
DETECTION<br />
CONDITION<br />
POSSIBLE<br />
CAUSE<br />
PCM CONTROL<br />
RELAY WIRING<br />
HARNESS-SIDE<br />
CONNECTOR<br />
A<br />
C<br />
D<br />
E<br />
B6E407002100105<br />
• The PCM monitors the output signal to the EGR control solenoid valve. If the EGR control solenoid valve<br />
voltage is low even if the EGR control solenoid valve is off, the PCM determines that there is a malfunction<br />
in the EGR control solenoid valve control system.<br />
Diagnostic support note<br />
• The MIL illuminates if the PCM detects the above malfunction condition in two consecutive drive cycles or<br />
in one drive cycle while the DTC for the same malfunction has been stored in the PCM.<br />
• PENDING CODE is available if the PCM detects the above malfunction condition during the first drive<br />
cycle.<br />
• FREEZE FRAME DATA is available.<br />
• The DTC is stored in the PCM memory.<br />
• EGR control solenoid valve malfunction<br />
• Open circuit in wiring harness between PCM control relay terminal C and EGR control solenoid valve<br />
terminal A<br />
• Open circuit in wiring harness between EGR control solenoid valve terminal B and PCM terminal 77<br />
• Short to ground circuit in wiring harness between EGR control solenoid valve terminal B and PCM terminal<br />
77<br />
• Connector or terminal malfunction<br />
• PCM malfunction<br />
PCM CONTROL RELAY<br />
TERMINAL C<br />
5<br />
4<br />
EGR CONTROL<br />
SOLENOID<br />
VALVE WIRING<br />
HARNESS-SIDE<br />
CONNECTOR<br />
B A<br />
A<br />
EGR CONTROL<br />
SOLENOID VALVE<br />
7<br />
B<br />
4<br />
6 9<br />
26 25 24 23 22 21 20 19 18 17 16 15 14<br />
52 51 50 49 48 47 46 45 44 43 42 41 40<br />
78 77 76 75 74 73 72 71 70 69 68 67 66<br />
104 103 102 101 100 99 98 97 96 95 94 93 92<br />
8<br />
77<br />
PCM<br />
WIRING HARNESS-SIDE<br />
CONNECTOR<br />
PCM<br />
13 12 11 10 9 8 7 6 5 4 3 2 1<br />
39 38 37 36 35 34 33 32 31 30 29 28 27<br />
65 64 63 62 61 60 59 58 57 56 55 54 53<br />
91 90 89 88 87 86 85 84 83 82 81 80 79<br />
F2–187<br />
F2
F2–188<br />
ON-BOARD DIAGNOSTIC<br />
Diagnostic procedure<br />
STEP INSPECTION ACTION<br />
1 VERIFY FREEZE FRAME DATA HAS BEEN<br />
RECORDED<br />
• Has FREEZE FRAME DATA been recorded?<br />
2 VERIFY RELATED REPAIR INFORMATION<br />
AVAILABILITY<br />
• Verify related service repair information<br />
availability.<br />
• Is any related repair information available?<br />
3 VERIFY CURRENT SIGNAL STATUS: IS<br />
CONCERN INTERMITTENT OR CONSTANT?<br />
• Connect the WDS or equivalent to the DLC-2.<br />
• Clear the DTC from the PCM memory using<br />
the WDS or equivalent.<br />
• Start the engine.<br />
• Is the PENDING CODE for this DTC present?<br />
4 INSPECT EGR CONTROL SOLENOID VALVE<br />
CONNECTOR FOR POOR CONNECTION<br />
• Turn the engine switch off.<br />
• Disconnect the EGR control solenoid valve<br />
connector.<br />
• Inspect for poor connection (such as damaged/<br />
pulled-out pins, corrosion).<br />
• Is there any malfunction?<br />
5 INSPECT EGR CONTROL SOLENOID VALVE<br />
POWER SUPPLY CIRCUIT FOR OPEN<br />
• Turn the engine switch to the ON position<br />
(Engine off).<br />
• Measure the voltage between EGR control<br />
solenoid valve terminal A (wiring harness-side)<br />
and body GND.<br />
• Is the voltage B+?<br />
6 INSPECT EGR CONTROL SOLENOID VALVE<br />
CONTROL CIRCUIT FOR SHORT TO GROUND<br />
• Inspect continuity between EGR control<br />
solenoid valve terminal B (wiring harness-side)<br />
and body ground.<br />
• Is there continuity<br />
7 INSPECT EGR CONTROL SOLENOID VALVE<br />
• Inspect the EGR control solenoid valve.<br />
• Is there any malfunction?<br />
8 INSPECT PCM CONNECTOR FOR POOR<br />
CONNECTION<br />
• Turn the engine switch off.<br />
• Disconnect the PCM connector.<br />
• Inspect for poor connection (such as damaged/<br />
pulled-out pins, corrosion).<br />
• Is there any malfunction?<br />
9 INSPECT EGR CONTROL SOLENOID VALVE<br />
CONTROL CIRCUIT FOR OPEN<br />
• Inspect continuity between EGR control<br />
solenoid valve terminal B (wiring harness-side)<br />
and PCM terminal 77 (wiring harness-side).<br />
• Is there continuity<br />
10 VERIFY TROUBLESHOOTING OF DTC P2144<br />
COMPLETED<br />
• Make sure to reconnect all disconnected<br />
connectors.<br />
• Clear the DTC from the PCM memory using<br />
the WDS or equivalent.<br />
• Start the engine.<br />
• Is the PENDING CODE for this DTC present?<br />
Yes Go to the next step.<br />
No Record the FREEZE FRAME DATA on the repair order,<br />
then go to the next step.<br />
Yes Perform repair or diagnosis according to the available<br />
repair information.<br />
• If the vehicle is not repaired, go to the next step.<br />
No Go to the next step.<br />
Yes Go to the next step.<br />
No Intermittent concern exists.<br />
Perform the “INTERMITTENT CONCERNS<br />
TROUBLESHOOTING”.<br />
Yes Repair or replace the terminal, then go to Step 10.<br />
No Go to the next step.<br />
Yes Go to the next step.<br />
No Repair or replace the wiring harness for an open circuit,<br />
then go to Step 10.<br />
Yes Repair or replace the wiring harness for a possible short to<br />
ground, then go to Step 10.<br />
No Go to the next step.<br />
Yes Replace the EGR control solenoid valve, then go to Step<br />
10.<br />
No Go to the next step.<br />
Yes Repair or replace the terminal, then go to Step 10.<br />
No Go to the next step.<br />
Yes Go to the next step.<br />
No Repair or replace the wiring harness for an open circuit,<br />
then go to the next step.<br />
Yes Replace the PCM, then go to the next step.<br />
No Go to the next step.
11 VERIFY AFTER REPAIR PROCEDURE<br />
• Perform the Repair Verification Drive Mode.<br />
(See F2–39 OBD DRIVE MODE.)<br />
• Are any DTCs present?<br />
End Of Sie<br />
DTC P2145<br />
ON-BOARD DIAGNOSTIC<br />
STEP INSPECTION ACTION<br />
DTC P2145 EGR control solenoid valve circuit high input<br />
DETECTION<br />
CONDITION<br />
POSSIBLE<br />
CAUSE<br />
PCM CONTROL<br />
RELAY WIRING<br />
HARNESS-SIDE<br />
CONNECTOR<br />
A<br />
C<br />
D<br />
E<br />
Yes Go to the applicable DTC inspection.<br />
(See F2–40 DTC TABLE.)<br />
No DTC troubleshooting completed.<br />
B6E407002100106<br />
• The PCM monitors the output signal to the EGR control solenoid valve. If the EGR control solenoid valve<br />
voltage is high even if the EGR control solenoid valve is on, the PCM determines that there is a malfunction<br />
in the EGR control solenoid valve control system.<br />
Diagnostic support note<br />
• The MIL illuminates if the PCM detects the above malfunction condition in two consecutive drive cycles or<br />
in one drive cycle while the DTC for the same malfunction has been stored in the PCM.<br />
• PENDING CODE is available if the PCM detects the above malfunction condition during the first drive<br />
cycle.<br />
• FREEZE FRAME DATA is available.<br />
• The DTC is stored in the PCM memory.<br />
• EGR control solenoid valve malfunction<br />
• Short to power circuit between EGR control solenoid valve terminal B and PCM terminal 77<br />
• Short to EGR control solenoid valve or PCM connector<br />
• PCM malfunction<br />
PCM CONTROL RELAY<br />
TERMINAL C<br />
4<br />
EGR CONTROL<br />
SOLENOID<br />
VALVE WIRING<br />
HARNESS-SIDE<br />
CONNECTOR<br />
B A<br />
A<br />
EGR CONTROL<br />
SOLENOID VALVE<br />
6<br />
B<br />
4<br />
26 25 24 23 22 21 20 19 18 17 16 15 14<br />
52 51 50 49 48 47 46 45 44 43 42 41 40<br />
78 77 76 75 74 73 72 71 70 69 68 67 66<br />
104 103 102 101 100 99 98 97 96 95 94 93 92<br />
5<br />
7<br />
77<br />
PCM<br />
WIRING HARNESS-SIDE<br />
CONNECTOR<br />
PCM<br />
13 12 11 10 9 8 7 6 5 4 3 2 1<br />
39 38 37 36 35 34 33 32 31 30 29 28 27<br />
65 64 63 62 61 60 59 58 57 56 55 54 53<br />
91 90 89 88 87 86 85 84 83 82 81 80 79<br />
F2–189<br />
F2
End Of Sie<br />
F2–190<br />
ON-BOARD DIAGNOSTIC<br />
Diagnostic procedure<br />
STEP INSPECTION ACTION<br />
1 VERIFY FREEZE FRAME DATA HAS BEEN Yes Go to the next step.<br />
RECORDED<br />
No Record the FREEZE FRAME DATA on the repair order,<br />
• Has FREEZE FRAME DATA been recorded? then go to the next step.<br />
2 VERIFY RELATED REPAIR INFORMATION Yes Perform repair or diagnosis according to the available<br />
AVAILABILITY<br />
repair information.<br />
• Verify related service repair information<br />
• If the vehicle is not repaired, go to the next step.<br />
availability.<br />
No Go to the next step.<br />
• Is any related repair information available?<br />
3 VERIFY CURRENT SIGNAL STATUS: IS Yes Go to the next step.<br />
CONCERN INTERMITTENT OR CONSTANT? No Intermittent concern exists.<br />
• Connect the WDS or equivalent to the DLC-2. Perform the “INTERMITTENT CONCERNS<br />
• Clear the DTC from the PCM memory using<br />
the WDS or equivalent.<br />
TROUBLESHOOTING”.<br />
• Start the engine.<br />
• Is the PENDING CODE for this DTC present?<br />
4 INSPECT EGR CONTROL SOLENOID VALVE Yes Repair or replace the terminal, then go to Step 8.<br />
CONNECTOR FOR POOR CONNECTION No Go to the next step.<br />
• Turn the engine switch off.<br />
• Disconnect the EGR control solenoid valve<br />
connector.<br />
• Inspect for poor connection (such as damaged/<br />
pulled-out pins, corrosion).<br />
• Is there any malfunction?<br />
5 INSPECT EGR CONTROL SOLENOID VALVE Yes Go to the next step.<br />
POWER CIRCUIT FOR SHORT TO POWER No Repair or replace the wiring harness for a short to power,<br />
• Turn the engine switch to the ON position<br />
(Engine off).<br />
then go to Step 8.<br />
• Measure the voltage between EGR control<br />
solenoid valve terminal B (wiring harness-side)<br />
and body GND.<br />
• Is the voltage B+?<br />
6 INSPECT EGR CONTROL SOLENOID VALVE Yes Replace the EGR control solenoid valve, then go to Step 8.<br />
•<br />
•<br />
Inspect the EGR control solenoid valve.<br />
Is there any malfunction?<br />
No Go to the next step.<br />
7 INSPECT PCM CONNECTOR FOR POOR Yes Repair or replace the terminal, then go to the next step.<br />
CONNECTION<br />
No Go to the next step.<br />
• Turn the engine switch off.<br />
• Disconnect the PCM connector.<br />
• Inspect for poor connection (such as damaged/<br />
pulled-out pins, corrosion).<br />
• Is there any malfunction?<br />
8 VERIFY TROUBLESHOOTING OF DTC P2145 Yes Replace the PCM, then go to the next step.<br />
COMPLETED<br />
No Go to the next step.<br />
• Make sure to reconnect all disconnected<br />
connectors.<br />
• Clear the DTC from the PCM memory using<br />
the WDS or equivalent.<br />
• Start the engine.<br />
• Is the PENDING CODE for this DTC present?<br />
9 VERIFY AFTER REPAIR PROCEDURE<br />
Yes Go to the applicable DTC inspection.<br />
• Perform the Repair Verification Drive Mode.<br />
(See F2–40 DTC TABLE.)<br />
•<br />
(See F2–39 OBD DRIVE MODE.)<br />
Are any DTCs present?<br />
No DTC troubleshooting completed.
DTC P2146<br />
DTC P2146 Fuel injector No.1/No.4 circuit malfunction<br />
DETECTION<br />
CONDITION<br />
POSSIBLE<br />
CAUSE<br />
ON-BOARD DIAGNOSTIC<br />
B6E407002100107<br />
• The PCM monitors each cylinder injection confirmation signal from the IDM while the engine is running. If<br />
the PCM does not receive the injection confirmation signal for No.1 and No.4 cylinder normally, the PCM<br />
determines that the fuel injector No.1 and No.4 operation is not verified.<br />
Diagnostic support note<br />
• The MIL illuminates if the PCM detects the above malfunction condition in the first drive cycle.<br />
• FREEZE FRAME DATA is available.<br />
• The DTC is stored in the PCM memory.<br />
• IDM malfunction<br />
• Connector or terminal malfunction<br />
• Short to GND in wiring harness between IDM terminal 1D and fuel injector No.1 terminal D<br />
• Short to power supply in wiring harness between IDM terminal 1D and fuel injector No.1 terminal D<br />
• Open circuit in wiring harness between IDM terminal 1D and fuel injector No.1 terminal D<br />
• Short to GND in wiring harness between fuel injector No.4 terminal D and IDM terminal 1D<br />
• Short to power supply in wiring harness between fuel injector No.4 terminal D and IDM terminal 1D<br />
• Open circuit in wiring harness between fuel injector No.4 terminal D and IDM terminal 1D<br />
• PCM malfunction<br />
F2–191<br />
F2
DTC P2146 Fuel injector No.1/No.4 circuit malfunction<br />
F2–192<br />
INJECTOR DRIVER MODULE<br />
8<br />
1A<br />
2B<br />
2C<br />
2D<br />
2E<br />
2F<br />
1E<br />
1D<br />
1G<br />
1C<br />
1H<br />
1F<br />
2H<br />
INJECTOR DRIVER MODULE<br />
WIRING HARNESS-SIDE CONNECTOR<br />
1H 1G 1F 1E 1D 1C<br />
2H 2G 2F 2E 2D 2C<br />
ON-BOARD DIAGNOSTIC<br />
4 5 6 7<br />
1B 1A<br />
2B 2A<br />
26 25 24 23 22 21 20 19 18 17 16 15 14<br />
52 51 50 49 48 47 46 45 44 43 42 41 40<br />
78 77 76 75 74 73 72 71 70 69 68 67 66<br />
104 103 102 101 100 99 98 97 96 95 94 93 92<br />
PCM CONTROL RELAY<br />
TERMINAL C<br />
7<br />
CALIBRATION RESISTOR NO.1<br />
B<br />
D<br />
B<br />
D<br />
B<br />
B<br />
A<br />
C<br />
CALIBRATION RESISTOR NO.2<br />
A<br />
C<br />
CALIBRATION RESISTOR NO.3<br />
D A<br />
C<br />
CALIBRATION RESISTOR NO.4<br />
D A<br />
PCM<br />
WIRING HARNESS-SIDE CONNECTOR<br />
C<br />
CALIBRATION RESISTOR<br />
WIRING HARNESS-SIDE<br />
CONNECTOR<br />
C<br />
D<br />
A<br />
B<br />
13 12 11 10 9 8 7 6 5 4 3 2 1<br />
39 38 37 36 35 34 33 32 31 30 29 28 27<br />
65 64 63 62 61 60 59 58 57 56 55 54 53<br />
91 90 89 88 87 86 85 84 83 82 81 80 79<br />
30<br />
42<br />
44<br />
45<br />
43<br />
37<br />
62<br />
89<br />
11<br />
91<br />
PCM
End Of Sie<br />
ON-BOARD DIAGNOSTIC<br />
Diagnostic procedure<br />
STEP INSPECTION ACTION<br />
1 VERIFY FREEZE FRAME DATA HAS BEEN Yes Go to the next step.<br />
RECORDED<br />
No Record the FREEZE FRAME DATA on the repair order,<br />
• Has FREEZE FRAME DATA been recorded? then go to the next step.<br />
2 VERIFY RELATED REPAIR INFORMATION Yes Perform repair or diagnosis according to the available<br />
AVAILABILITY<br />
repair information.<br />
• Verify related Service Bulletins and/or on-line • If the vehicle is not repaired, go to the next step.<br />
repair information availability.<br />
No Go to the next step.<br />
• Is any related repair information available?<br />
3 VERIFY CURRENT SIGNAL STATUS: IS Yes Go to the next step.<br />
CONCERN INTERMITTENT OR CONSTANT? No Intermittent concern exists.<br />
• Connect the WDS or equivalent to the DLC-2. Perform the “INTERMITTENT CONCERNS<br />
• Clear the DTC from the PCM memory using<br />
the WDS or equivalent.<br />
TROUBLESHOOTING”.<br />
• Start the engine.<br />
• Is the same DTC present?<br />
4 INSPECT IDM CONNECTOR FOR POOR Yes Repair or replace the suspected terminal, then go to Step<br />
CONNECTION<br />
9.<br />
• Turn the engine switch off.<br />
No Go to the next step.<br />
• Inspect for poor connection (such as damaged/<br />
pulled-out terminals, corrosion).<br />
• Is there any malfunction?<br />
5 INSPECT IDM FOR SHORT TO GND<br />
Yes Repair or replace the wiring harness for a short to GND,<br />
• Turn the engine switch off.<br />
then go to Step 9.<br />
• Inspect continuity between IDM terminal 1D<br />
and body GND.<br />
No Go to the next step.<br />
• Is there continuity?<br />
6 INSPECT IDM FOR SHORT TO POWER Yes Repair or replace the wiring harness for a short to power,<br />
• Turn the engine switch off.<br />
then go to Step 9.<br />
• Inspect the voltage between IDM terminal 1D<br />
and body GND.<br />
No Go to the next step.<br />
• Is the voltage B+?<br />
7 INSPECT FOR OPEN CIRCUIT BETWEEN IDM Yes Go to the next step.<br />
AND FUEL INJECTOR NO.1/NO.4<br />
No Repair or replace the wiring harness for an open circuit,<br />
• Turn the engine switch off.<br />
then go to Step 9.<br />
• Inspect continuity between following wiring<br />
harnesses.<br />
— IDM terminal 1D and fuel injector No.1<br />
terminal D<br />
— IDM terminal 1D and fuel injector No.4<br />
terminal D<br />
• Is there continuity?<br />
8 INSPECT IDM<br />
Yes Replace the IDM, then go to step 9.<br />
•<br />
•<br />
Inspect the IDM.<br />
Is there any malfunction?<br />
No Go to the next step.<br />
9 VERIFY TROUBLESHOOTING OF DTC P2146 Yes Replace the PCM, then go to the next step.<br />
COMPLETED<br />
No Go to the next step.<br />
• Make sure to reconnect all disconnected<br />
connectors.<br />
• Clear the DTC using the WDS or equivalent.<br />
• Start the engine.<br />
• Is the same DTC present?<br />
10 VERIFY AFTER REPAIR PROCEDURE<br />
Yes Go to the applicable DTC troubleshooting.<br />
• Perform the Repair Verification Drive Mode.<br />
(See F2–40 DTC TABLE.)<br />
•<br />
(See F2–39 OBD DRIVE MODE.)<br />
Are any DTCs present?<br />
No Troubleshooting completed.<br />
F2–193<br />
F2
DTC P2149<br />
DTC P2149 Fuel injector No.2/No.3 circuit malfunction<br />
DETECTION<br />
CONDITION<br />
POSSIBLE<br />
CAUSE<br />
F2–194<br />
ON-BOARD DIAGNOSTIC<br />
B6E407002100108<br />
• The PCM monitors each cylinder’s injection confirmation signal from the IDM while the engine is running. If<br />
the PCM does not receive the injection confirmation signal for No.2 and No.3 cylinder normally, the PCM<br />
determines that the fuel injector No.2 and No.3 operation is not verified.<br />
Diagnostic support note<br />
• The MIL illuminates if the PCM detects the above malfunction condition in the first drive cycle.<br />
• FREEZE FRAME DATA is available.<br />
• The DTC is stored in the PCM memory.<br />
• IDM malfunction<br />
• Connector or terminal malfunction<br />
• Short to GND in wiring harness between IDM terminal 1C and fuel injector No.2 terminal D<br />
• Short to power supply in wiring harness between IDM terminal 1C and fuel injector No.2 terminal D<br />
• Open circuit in wiring harness between IDM terminal 1C and fuel injector No.2 terminal D<br />
• Fuel injector No.3 malfunction<br />
• Short to GND in wiring harness between fuel injector No.3 terminal D and IDM terminal 1C<br />
• Short to power supply in wiring harness between fuel injector No.3 terminal D and IDM terminal 1C<br />
• Open circuit in wiring harness between fuel injector No.3 terminal D and IDM terminal 1C<br />
• PCM malfunction
DTC P2149 Fuel injector No.2/No.3 circuit malfunction<br />
INJECTOR DRIVER MODULE<br />
8<br />
1A<br />
2B<br />
2C<br />
2D<br />
2E<br />
2F<br />
1E<br />
1D<br />
1G<br />
1C<br />
1H<br />
1F<br />
2H<br />
INJECTOR DRIVER MODULE<br />
WIRING HARNESS-SIDE CONNECTOR<br />
1H 1G 1F 1E 1D 1C<br />
2H 2G 2F 2E 2D 2C<br />
ON-BOARD DIAGNOSTIC<br />
4 5 6 7<br />
1B 1A<br />
2B 2A<br />
26 25 24 23 22 21 20 19 18 17 16 15 14<br />
52 51 50 49 48 47 46 45 44 43 42 41 40<br />
78 77 76 75 74 73 72 71 70 69 68 67 66<br />
104 103 102 101 100 99 98 97 96 95 94 93 92<br />
PCM CONTROL RELAY<br />
TERMINAL C<br />
7<br />
CALIBRATION RESISTOR NO.1<br />
B<br />
D<br />
B<br />
D<br />
B<br />
B<br />
A<br />
C<br />
CALIBRATION RESISTOR NO.2<br />
A<br />
C<br />
CALIBRATION RESISTOR NO.3<br />
D A<br />
C<br />
CALIBRATION RESISTOR NO.4<br />
D A<br />
PCM<br />
WIRING HARNESS-SIDE CONNECTOR<br />
C<br />
CALIBRATION RESISTOR<br />
WIRING HARNESS-SIDE<br />
CONNECTOR<br />
C<br />
D<br />
A<br />
B<br />
13 12 11 10 9 8 7 6 5 4 3 2 1<br />
39 38 37 36 35 34 33 32 31 30 29 28 27<br />
65 64 63 62 61 60 59 58 57 56 55 54 53<br />
91 90 89 88 87 86 85 84 83 82 81 80 79<br />
30<br />
42<br />
44<br />
45<br />
43<br />
37<br />
62<br />
89<br />
11<br />
91<br />
PCM<br />
F2–195<br />
F2
End Of Sie<br />
F2–196<br />
ON-BOARD DIAGNOSTIC<br />
Diagnostic procedure<br />
STEP INSPECTION ACTION<br />
1 VERIFY FREEZE FRAME DATA HAS BEEN Yes Go to the next step.<br />
RECORDED<br />
No Record the FREEZE FRAME DATA on repair order, then<br />
• Has FREEZE FRAME DATA been recorded? go to the next step.<br />
2 VERIFY RELATED REPAIR INFORMATION Yes Perform repair or diagnosis according to the available<br />
AVAILABILITY<br />
repair information.<br />
• Verify related Service Bulletins and/or on-line • If the vehicle is not repaired, go to the next step.<br />
repair information availability.<br />
No Go to the next step.<br />
• Is any related repair information available?<br />
3 VERIFY CURRENT SIGNAL STATUS: IS Yes Go to the next step.<br />
CONCERN INTERMITTENT OR CONSTANT? No Intermittent concern exists.<br />
• Connect the WDS or equivalent to the DLC-2. Perform the “INTERMITTENT CONCERNS<br />
• Clear the DTC from the PCM memory using<br />
the WDS or equivalent.<br />
TROUBLESHOOTING”.<br />
• Start the engine.<br />
• Is the same DTC present?<br />
4 INSPECT IDM CONNECTOR FOR POOR Yes Repair or replace the suspected terminal, then go to Step<br />
CONNECTION<br />
9.<br />
• Turn the engine switch off.<br />
No Go to the next step.<br />
• Inspect for poor connection (such as damaged/<br />
pulled-out terminals, corrosion).<br />
• Is there any malfunction?<br />
5 INSPECT IDM FOR SHORT TO GND<br />
Yes Repair or replace the wiring harness for a short to GND,<br />
• Turn the engine switch off.<br />
then go to Step 9.<br />
• Inspect continuity between IDM terminal 1C<br />
and body GND.<br />
— IDM terminal 1C and fuel injector No.2<br />
terminal D<br />
— IDM terminal 1C and fuel injector No.3<br />
terminal D<br />
No Go to the next step.<br />
• Is there continuity?<br />
6 INSPECT IDM FOR SHORT TO POWER Yes Repair or replace the wiring harness for a short to power,<br />
• Turn the engine switch off.<br />
then go to Step 9.<br />
• Inspect voltage between IDM terminal 1C and<br />
body GND.<br />
No Go to the next step.<br />
• Is voltage B+?<br />
7 INSPECT FOR OPEN CIRCUIT BETWEEN IDM Yes Go to the next step.<br />
AND FUEL INJECTOR NO.2/NO.3<br />
No Repair or replace the wiring harness for an open circuit,<br />
• Turn the engine switch off.<br />
then go to Step 9.<br />
• Inspect continuity between following wiring<br />
harness:<br />
— IDM terminal 1C and fuel injector No.2<br />
terminal D<br />
— IDM terminal 1C and fuel injector No.3<br />
terminal D<br />
• Is there continuity?<br />
8 INSPECT IDM<br />
Yes Replace the IDM, then go to step 9.<br />
•<br />
•<br />
Inspect the IDM.<br />
Is there any malfunction?<br />
No Go to the next step.<br />
9 VERIFY TROUBLESHOOTING OF DTC P2149 Yes Replace the PCM, then go to the next step.<br />
COMPLETED<br />
No Go to the next step.<br />
• Make sure to reconnect all disconnected<br />
connectors.<br />
• Clear the DTC using the WDS or equivalent.<br />
• Start the engine.<br />
• Is the same DTC present?<br />
10 VERIFY AFTER REPAIR PROCEDURE<br />
Yes Go to the applicable DTC troubleshooting.<br />
• Perform the Repair Verification Drive Mode.<br />
(See F2–40 DTC TABLE.)<br />
•<br />
(See F2–39 OBD DRIVE MODE.)<br />
Are any DTCs present?<br />
No Troubleshooting completed.
DTC P2227<br />
DTC P2227 BARO sensor range/performance problem<br />
DETECTION<br />
CONDITION<br />
POSSIBLE<br />
CAUSE<br />
End Of Sie<br />
DTC P2228<br />
ON-BOARD DIAGNOSTIC<br />
B6E407002200101<br />
• The PCM monitors the input signal from the barometric pressure sensor. If the difference between the<br />
barometric pressure input from the barometric pressure sensor and the manifold absolute pressure is more<br />
than 75 mmHg, the PCM determines that there is a malfunction in the barometric pressure sensor.<br />
Diagnostic support note<br />
• The MIL illuminates if the PCM detects the above malfunction condition in two consecutive drive cycles or<br />
in one drive cycle while the DTC for the same malfunction has been stored in the PCM.<br />
• PENDING CODE is available if the PCM detects the above malfunction condition.<br />
• FREEZE FRAME DATA is available.<br />
• DTC is stored in the PCM memory.<br />
• BARO sensor (integrated in PCM) malfunction<br />
Diagnostic procedure<br />
STEP INSPECTION ACTION<br />
1 VERIFY FREEZE FRAME DATA HAS BEEN Yes Go to the next step.<br />
RECORDED<br />
No Record the FREEZE FRAME DATA on the repair order,<br />
• Has FREEZE FRAME DATA been recorded? then go to the next step.<br />
2 VERIFY RELATED REPAIR INFORMATION Yes Perform repair or diagnosis according to the available<br />
AVAILABILITY<br />
repair information.<br />
• Verify related service repair information<br />
• If the vehicle is not repaired, go to the next step.<br />
availability.<br />
No Go to the next step.<br />
• Is any related repair information available?<br />
3 VERIFY CURRENT SIGNAL STATUS: IS Yes Go to the next step.<br />
CONCERN INTERMITTENT OR CONSTANT? No Intermittent concern exists.<br />
• Connect the WDS or equivalent to the DLC-2. Perform the “INTERMITTENT CONCERNS<br />
• Clear the DTC from the PCM memory using<br />
the WDS or equivalent.<br />
TROUBLESHOOTING”.<br />
• Start the engine.<br />
• Is the PENDING CODE for this DTC present?<br />
4 VERIFY TROUBLESHOOTING OF DTC P2227 Yes Replace the PCM, then go to the next step.<br />
COMPLETED<br />
No No concern is detected. Go to the next step.<br />
• Make sure to reconnect all disconnected<br />
connectors.<br />
• Turn the engine switch to the ON position<br />
(Engine off).<br />
• Clear the DTC from the memory using the<br />
WDS or equivalent.<br />
• Perform the Repair Verification Drive Mode.<br />
(See F2–39 OBD DRIVE MODE.)<br />
• Is the PENDING CODE for this DTC present?<br />
6 VERIFY AFTER REPAIR PROCEDURE<br />
Yes Go to the applicable DTC inspection.<br />
• Are any DTCs present?<br />
(See F2–40 DTC TABLE.)<br />
No Troubleshooting completed.<br />
DTC P2228 BARO sensor circuit low input<br />
DETECTION<br />
CONDITION<br />
POSSIBLE<br />
CAUSE<br />
B6E407002200102<br />
• The PCM monitors the input signal from the barometric pressure sensor. If the voltage from the barometric<br />
pressure sensor is less than 0.4 V, the PCM determines that there is a malfunction in the barometric<br />
pressure sensor signal system.<br />
Diagnostic support note<br />
• The MIL illuminates if the PCM detects the above malfunction condition during the first drive cycle.<br />
• FREEZE FRAME DATA is available.<br />
• The DTC is stored in the PCM memory.<br />
• BARO sensor (integrated in PCM) malfunction<br />
F2–197<br />
F2
End Of Sie<br />
DTC P2229<br />
F2–198<br />
ON-BOARD DIAGNOSTIC<br />
Diagnostic procedure<br />
STEP INSPECTION ACTION<br />
1 VERIFY FREEZE FRAME DATA HAS BEEN Yes Go to the next step.<br />
RECORDED<br />
No Record the FREEZE FRAME DATA on the repair order,<br />
• Has FREEZE FRAME DATA been recorded? then go to the next step.<br />
2 VERIFY RELATED REPAIR INFORMATION Yes Perform repair or diagnosis according to the available<br />
AVAILABILITY<br />
repair information.<br />
• Verify related service repair information<br />
• If the vehicle is not repaired, go to the next step.<br />
availability.<br />
No Go to the next step.<br />
• Is any related repair information available?<br />
3 VERIFY CURRENT SIGNAL STATUS: IS Yes Go to the next step.<br />
CONCERN INTERMITTENT OR CONSTANT? No Intermittent concern exists.<br />
• Connect the WDS or equivalent to the DLC-2. Perform the “INTERMITTENT CONCERNS<br />
• Clear the DTC from the PCM memory using<br />
the WDS or equivalent.<br />
TROUBLESHOOTING”.<br />
• Start the engine.<br />
• Is the same DTC present?<br />
4 VERIFY TROUBLESHOOTING OF DTC P2228 Yes Replace PCM, then go to the next step.<br />
COMPLETED<br />
No No concern is detected. Go to the next step.<br />
• Make sure to reconnect all disconnected<br />
connectors.<br />
• Turn the engine switch to the ON position<br />
(Engine off).<br />
• Clear the DTC from the memory using the<br />
WDS or equivalent.<br />
• Start the engine.<br />
• Is same DTC present?<br />
5 VERIFY AFTER REPAIR PROCEDURE<br />
Yes Go to the applicable DTC inspection.<br />
• Perform the Repair Verification Drive Mode.<br />
(See F2–40 DTC TABLE.)<br />
•<br />
(See F2–39 OBD DRIVE MODE.)<br />
Are any DTCs present?<br />
No Troubleshooting completed.<br />
DTC P2229 BARO sensor circuit high input<br />
DETECTION<br />
CONDITION<br />
POSSIBLE<br />
CAUSE<br />
B6E407002200103<br />
• The PCM monitors the input signal from the barometric pressure sensor. If the voltage from the barometric<br />
pressure sensor is more than 4.7 V, the PCM determines that there is a malfunction in the barometric<br />
pressure sensor signal system.<br />
Diagnostic support note<br />
• The MIL illuminates if the PCM detects the above malfunction condition during the first drive cycle.<br />
• FREEZE FRAME DATA is available.<br />
• The DTC is stored in the PCM memory.<br />
• BARO sensor (integrated in PCM) malfunction
End Of Sie<br />
ON-BOARD DIAGNOSTIC<br />
Diagnostic procedure<br />
STEP INSPECTION ACTION<br />
1 VERIFY FREEZE FRAME DATA HAS BEEN Yes Go to the next step.<br />
RECORDED<br />
No Record the FREEZE FRAME DATA on the repair order,<br />
• Has FREEZE FRAME DATA been recorded? then go to the next step.<br />
2 VERIFY RELATED REPAIR INFORMATION Yes Perform repair or diagnosis according to the available<br />
AVAILABILITY<br />
repair information.<br />
• Verify related service repair information<br />
• If the vehicle is not repaired, go to the next step.<br />
availability.<br />
No Go to the next step.<br />
• Is any related repair information available?<br />
3 VERIFY CURRENT SIGNAL STATUS: IS Yes Go to the next step.<br />
CONCERN INTERMITTENT OR CONSTANT? No Intermittent concern exists.<br />
• Connect the WDS or equivalent to the DLC-2. Perform the “INTERMITTENT CONCERNS<br />
• Clear the DTC from the PCM memory using<br />
the WDS or equivalent.<br />
TROUBLESHOOTING”.<br />
• Start the engine.<br />
• Is the same DTC present?<br />
4 VERIFY TROUBLESHOOTING OF DTC P2229 Yes Replace the PCM, then go to the next step.<br />
COMPLETED<br />
No No concern is detected. Go to the next step.<br />
• Make sure to reconnect all disconnected<br />
connectors.<br />
• Turn the engine switch to the ON position<br />
(Engine off).<br />
• Clear the DTC from the memory using the<br />
WDS or equivalent.<br />
• Start the engine.<br />
• Is the same DTC present?<br />
5 VERIFY AFTER REPAIR PROCEDURE<br />
Yes Go to the applicable DTC inspection.<br />
• Perform the Repair Verification Drive Mode.<br />
(See F2–40 DTC TABLE.)<br />
•<br />
(See F2–39 OBD DRIVE MODE.)<br />
Are any DTCs present?<br />
No Troubleshooting completed.<br />
F2–199<br />
F2
SYMPTOM QUICK DIAGNOSIS CHART<br />
F2–200<br />
Troubleshooting item<br />
TROUBLESHOOTING<br />
TROUBLESHOOTING<br />
B6E408018881101<br />
×: Applicable<br />
1 Melting of main or other fuses<br />
2 MIL illuminates<br />
3 Will not crank × × × × × ×<br />
4 Hard start/long crank/erratic start/erratic crank × × ×<br />
5 Engine stalls After start/at idle × ×<br />
6 Cranks normally but will not start × ×<br />
7 Slow return to idle<br />
8 Engine runs rough/rolling idle × ×<br />
9 Fast idle/runs on<br />
10 Low idle/stalls during deceleration × ×<br />
Engine stalls/quits Acceleration/cruise × ×<br />
Engine runs rough Acceleration/cruise × ×<br />
11<br />
Misses<br />
Buck/jerk<br />
Acceleration/cruise<br />
Acceleration/cruise/deceleration<br />
×<br />
×<br />
×<br />
×<br />
Hesitation/stumble Acceleration × ×<br />
Surges Acceleration/cruise × ×<br />
12 Lack/loss of power Acceleration/cruise × ×<br />
13 Knocking/pinging × ×<br />
14 Poor fuel economy × ×<br />
15 Emissions compliance × × ×<br />
16 High oil consumption/leakage × × × ×<br />
17<br />
Cooling system<br />
concerns<br />
Overheating × ×<br />
18<br />
Cooling system<br />
concerns<br />
Runs cold<br />
19 Excessive black smoke ×<br />
20 Fuel odor (in engine compartment)<br />
21 Engine noise × × × ×<br />
22 Vibration concerns (engine) ×<br />
23 A/C does not work sufficiently<br />
24 A/C always on or A/C compressor runs continuously<br />
25 A/C does not cut off under wide open throttle conditions<br />
26 Constant voltage<br />
Starter motor malfunction (Mechanical or electrical)<br />
Starter circuit including engine switch is open<br />
Improper engine oil level<br />
Low or dead batery<br />
Charging system malfunction<br />
Low engine compression<br />
Improper valve timing<br />
Hydrolocked egine<br />
Improper engine oil viscosity<br />
Improper dipstick<br />
Base engine malfunction<br />
Seized flywheel<br />
Improper tension or damaged drivebelts
Troubleshooting item<br />
TROUBLESHOOTING<br />
×: Applicable<br />
1 Melting of main or other fuses<br />
2 MIL illuminates<br />
3 Will not crank<br />
4 Hard start/long crank/erratic start/erratic crank × × ×<br />
5 Engine stalls After start/at idle × × ×<br />
6 Cranks normally but will not start × ×<br />
7 Slow return to idle ×<br />
8 Engine runs rough/rolling idle × × × ×<br />
9 Fast idle/runs on ×<br />
10 Low idle/stalls during deceleration × ×<br />
Engine stalls/quits Acceleration/cruise × × × ×<br />
Engine runs rough Acceleration/cruise × × × × ×<br />
11<br />
Misses<br />
Buck/jerk<br />
Acceleration/cruise<br />
Acceleration/cruise/deceleration<br />
×<br />
×<br />
×<br />
×<br />
×<br />
×<br />
×<br />
×<br />
×<br />
×<br />
×<br />
×<br />
Hesitation/stumble Acceleration × × × × × ×<br />
Surges Acceleration/cruise × × × × × ×<br />
12 Lack/loss of power Acceleration/cruise × × × × × × ×<br />
13 Knocking/pinging × × × × ×<br />
14 Poor fuel economy × × × ×<br />
15 Emissions compliance × × × × × × ×<br />
16 High oil consumption/leakage<br />
17<br />
Cooling system<br />
concerns<br />
Overheating × × × ×<br />
18<br />
Cooling system<br />
concerns<br />
Runs cold × ×<br />
19 Excessive black smoke × × × ×<br />
20 Fuel odor (in engine compartment)<br />
21 Engine noise × ×<br />
22 Vibration concerns (engine) × × ×<br />
23 A/C does not work sufficiently<br />
24 A/C always on or A/C compressor runs continuously<br />
25 A/C does not cut off under wide open throttle conditions<br />
26 Constant voltage<br />
Improper engine coolant level<br />
Water and anti-freeze mixture is improper<br />
Cooling system malfunction (Such as radiator, hose,<br />
over-flow system, thermostat)<br />
Cooling fan system malfunction<br />
Engine or transaxle mounts are improperly installed<br />
Cooling fan No.1 or No.2 seat are improper<br />
Fuel quality<br />
Engine overheating<br />
Intake-air system clogging or restriction<br />
Air leakage from intake-air system<br />
VSC system malfunction<br />
Vacuum leakage<br />
F2–201<br />
F2
F2–202<br />
Troubleshooting item<br />
TROUBLESHOOTING<br />
×: Applicable<br />
1 Melting of main or other fuses<br />
2 MIL illuminates × × × ×<br />
3 Will not crank<br />
4 Hard start/long crank/erratic start/erratic crank × × × × × × × × ×<br />
5 Engine stalls After start/at idle × × × × × × × × ×<br />
6 Cranks normally but will not start × × × × × × × × ×<br />
7 Slow return to idle × × × × × × × ×<br />
8 Engine runs rough/rolling idle × × × × × × × × ×<br />
9 Fast idle/runs on ×<br />
10 Low idle/stalls during deceleration × × × × × × × × × ×<br />
Engine stalls/quits Acceleration/cruise × × × × × × × × ×<br />
Engine runs rough Acceleration/cruise × × × × × × × × × × ×<br />
11<br />
Misses<br />
Buck/jerk<br />
Acceleration/cruise<br />
Acceleration/cruise/deceleration<br />
×<br />
×<br />
×<br />
×<br />
×<br />
×<br />
×<br />
×<br />
×<br />
×<br />
×<br />
×<br />
×<br />
×<br />
×<br />
×<br />
×<br />
×<br />
×<br />
×<br />
×<br />
×<br />
Hesitation/stumble Acceleration × × × × × × × × × × ×<br />
Surges Acceleration/cruise × × × × × × × × × ×<br />
12 Lack/loss of power Acceleration/cruise × × × × × × × × × × × ×<br />
13 Knocking/pinging × × × × × × × × × ×<br />
14 Poor fuel economy × × × × × × × × × ×<br />
15 Emissions compliance × × × × × × × × × × × × ×<br />
16 High oil consumption/leakage ×<br />
17 Cooling system concerns Overheating ×<br />
18 Cooling system concerns Runs cold<br />
19 Excessive black smoke × × × × × × × × × ×<br />
20 Fuel odor (in engine compartment) × ×<br />
21 Engine noise × × × × ×<br />
22 Vibration concerns (engine)<br />
23 A/C does not work sufficiently<br />
24 A/C always on or A/C compressor runs continuously<br />
25 A/C does not cut off under wide open throttle conditions<br />
26 Constant voltage<br />
Turbocharger malfunction<br />
Carge air cooler malfunction<br />
VBC system malfunction<br />
Glow system malfunction<br />
Incorrect fuel injection timing<br />
Incorrect idle speed<br />
CKP sensor is damaged (such as open or short circuits)<br />
CKP sensor pulse wheel is damaged<br />
Improper gap between CKP sensor and pulse wheel<br />
Supply pump malfunction<br />
Suction control valve malfunction<br />
Fuel pressure limiter malfunction<br />
Fuel line restriction or clogging
Troubleshooting item<br />
TROUBLESHOOTING<br />
Fuel injectors malfunction (Leakage or clogging,<br />
inoperative)<br />
×: Applicable<br />
1 Melting of main or other fuses<br />
2 MIL illuminates × ×<br />
3 Will not crank<br />
4 Hard start/long crank/erratic start/erratic crank × × × × × × × ×<br />
5 Engine stalls After start/at idle × × × × × × × × × ×<br />
6 Cranks normally but will not start × × × × × × × × ×<br />
7 Slow return to idle × × × ×<br />
8 Engine runs rough/rolling idle × × × × × × × × ×<br />
9 Fast idle/runs on × ×<br />
10 Low idle/stalls during deceleration × × × × × × × ×<br />
Engine stalls/quits Acceleration/cruise × × × × × × × ×<br />
Engine runs rough Acceleration/cruise × × × × × × × ×<br />
Misses Acceleration/cruise × × × × × × × ×<br />
11<br />
Buck/jerk<br />
Acceleration/cruise/<br />
deceleration<br />
× × × × × × × ×<br />
Hesitation/stumble Acceleration × × × × × × × ×<br />
Surges Acceleration/cruise × × × × × × × ×<br />
12 Lack/loss of power Acceleration/cruise × × × × × × × ×<br />
13 Knocking/pinging × × × ×<br />
14 Poor fuel economy × × × × × × ×<br />
15 Emissions compliance × × × × × × × × ×<br />
16 High oil consumption/leakage<br />
17<br />
Cooling system<br />
concerns<br />
Overheating ×<br />
18<br />
Cooling system<br />
concerns<br />
Runs cold<br />
19 Excessive black smoke × × × × ×<br />
20 Fuel odor (in engine compartment) ×<br />
21 Engine noise × × × ×<br />
22 Vibration concerns (engine) × × ×<br />
23 A/C does not work sufficiently<br />
24 A/C always on or A/C compressor runs continuously<br />
25<br />
A/C does not cut off under wide open throttle<br />
conditions<br />
26 Constant voltage ×<br />
Fuel leakage from fuel system (including insulator,<br />
fuel injector)<br />
Fuel filter restriction or clogging<br />
CMP sensor is damaged (such as open or short circuit)<br />
CMP sensor pulse wheel is damaged<br />
IDM or related circuit malfunction<br />
Exhaust system restriction or clogging<br />
Catalyst converter malfunction<br />
EGR system malfunction<br />
EGR water cooler malfunction<br />
EGR valve position sensor malfunction<br />
V-reference voltage supply circuit malfunction<br />
F2–203<br />
F2
F2–204<br />
Troubleshooting item<br />
TROUBLESHOOTING<br />
×: Applicable<br />
1 Melting of main or other fuses<br />
2 MIL illuminates × × × × × × × × × ×<br />
3 Will not crank<br />
4 Hard start/long crank/erratic start/erratic crank × × × × ×<br />
5 Engine stalls After start/at idle × × × × × × ×<br />
6 Cranks normally but will not start × × ×<br />
7 Slow return to idle × × × × × × × ×<br />
8 Engine runs rough/rolling idle × × × × × × × × ×<br />
9 Fast idle/runs on × × ×<br />
10 Low idle/stalls during deceleration × × × × × × × × ×<br />
Engine stalls/quits Acceleration/cruise × × × × × × × ×<br />
Engine runs rough Acceleration/cruise × × × × × × × × ×<br />
11<br />
Misses<br />
Buck/jerk<br />
Acceleration/cruise<br />
Acceleration/cruise/deceleration<br />
×<br />
×<br />
×<br />
× × ×<br />
×<br />
×<br />
×<br />
×<br />
×<br />
×<br />
×<br />
×<br />
×<br />
×<br />
×<br />
×<br />
Hesitation/stumble Acceleration × × × × × × × × × ×<br />
Surges Acceleration/cruise × × × × × × × × × ×<br />
12 Lack/loss of power Acceleration/cruise × × × × × × × × × ×<br />
13 Knocking/pinging × × × × × ×<br />
14 Poor fuel economy × × × × × × × ×<br />
15 Emissions compliance × × × × × × × × × ×<br />
16 High oil consumption/leakage<br />
17 Cooling system concerns Overheating ×<br />
18 Cooling system concerns Runs cold<br />
19 Excessive black smoke × × ×<br />
20 Fuel odor (in engine compartment) ×<br />
21 Engine noise × × × × × ×<br />
22 Vibration concerns (engine) × × × × × ×<br />
23 A/C does not work sufficiently ×<br />
24 A/C always on or A/C compressor runs continuously<br />
25 A/C does not cut off under wide open throttle conditions × ×<br />
26 Constant voltage × × × × × ×<br />
PCM control relay malfunction<br />
ECT sensor or related circuit malfunction<br />
Neutral switch or related circuit malfunction<br />
MAF/IAT sensor or related circuit malfunction<br />
IAT sensor No.2 or related circuit malfunction<br />
Boost sensor or related circuit malfunction<br />
Accelerator position sensor or related circuit malfunction<br />
Accelerator position sensor misadjustment<br />
(including looseness)<br />
Idle switch or related circuit malfunction<br />
Idle switch misadjustment (including looseness)<br />
Fuel pressure sensor or related circuit malfunction<br />
Improper refrigerant charging amount
Troubleshooting item<br />
End Of Sie<br />
NO.5 ENGINE STALLS-AFTER START/AT IDLE<br />
TROUBLESHOOTING<br />
×: Applicable<br />
1 Melting of main or other fuses<br />
2 MIL illuminates<br />
3 Will not crank ×<br />
4 Hard start/long crank/erratic start/erratic crank<br />
5 Engine stalls After start/at idle × × ×<br />
6 Cranks normally but will not start ×<br />
7 Slow return to idle<br />
8 Engine runs rough/rolling idle × × ×<br />
9 Fast idle/runs on<br />
10 Low idle/stalls during deceleration × ×<br />
Engine stalls/quits Acceleration/cruise × × × ×<br />
Engine runs rough Acceleration/cruise × × × ×<br />
11<br />
Misses<br />
Buck/jerk<br />
Acceleration/cruise<br />
Acceleration/cruise/deceleration<br />
×<br />
×<br />
×<br />
×<br />
×<br />
×<br />
×<br />
×<br />
Hesitation/stumble Acceleration × × × ×<br />
Surges Acceleration/cruise × × × ×<br />
12 Lack/loss of power Acceleration/cruise × × × ×<br />
13 Knocking/pinging<br />
14 Poor fuel economy × × × × × ×<br />
15 Emissions compliance ×<br />
16 High oil consumption/leakage<br />
17 Cooling system concerns Overheating × × × ×<br />
18 Cooling system concerns Runs cold × ×<br />
19 Excessive black smoke<br />
20 Fuel odor (in engine compartment)<br />
21 Engine noise × ×<br />
22 Vibration concerns (engine) × × × ×<br />
23 A/C does not work sufficiently × ×<br />
24 A/C always on or A/C compressor runs continuously × ×<br />
25 A/C does not cut off under wide open throttle conditions<br />
26 Constant voltage<br />
5 ENGINE STALLS-AFTER START/AT IDLE<br />
DESCRIPTION • Engine stops unexpectedly.<br />
A/C relay (A/C control siganl) circuit malfunction<br />
A/C magnetic clutch or related circuit malfunction<br />
Cooling fan No.1 system malfunction<br />
Clutch slippage<br />
Air in power steering fuluid line<br />
VSS or related circuit malfunction<br />
Brake dragging<br />
Loose parts<br />
Improper balance of wheel or tires<br />
Driveline malfunction<br />
Suspension malfunction<br />
Immobilizer system and/or circuit malfunction<br />
Coolant heater system malfunction<br />
B6E408018881102<br />
F2–205<br />
F2
POSSIBLE<br />
CAUSE<br />
F2–206<br />
TROUBLESHOOTING<br />
5 ENGINE STALLS-AFTER START/AT IDLE<br />
• Poor fuel quality<br />
• Intake-air system restriction or clogging<br />
• Engine overheating<br />
• A/C system improper operation<br />
• Immobilizer system and/or circuit malfunction (if equipped)<br />
• PCM control relay malfunction<br />
• Glow system malfunction<br />
• Inadequate fuel pressure<br />
• Fuel pressure sensor related circuit malfunction<br />
• Suction control valve malfunction (built-in supply pump)<br />
• Fuel pressure limiter malfunction (built-in common rail)<br />
• Fuel leakage<br />
• Fuel line clogging or restriction<br />
• Fuel filter clogging or restriction<br />
• Incorrect fuel injection timing<br />
• Erratic signal from CKP sensor<br />
• Erratic signal from CMP sensor<br />
• Supply pump malfunction<br />
• Fuel injector malfunction<br />
• Low engine compression<br />
• Improper valve timing<br />
• Exhaust system and/or catalyst converter restriction or clogging<br />
• EGR system malfunction<br />
• EGR valve position sensor malfunction<br />
• ECT sensor or related circuit malfunction<br />
• Accelerator positions sensor or related circuit malfunction<br />
• Accelerator positions sensor misadjustment<br />
• MAF/IAT sensor or related circuit malfunction<br />
• V-reference voltage supply circuit malfunction<br />
• IDM or related circuit malfunction<br />
Warning<br />
The following troubleshooting flow chart contains the fuel system diagnosis and repair<br />
procedures. Read the following warnings before performing the fuel system services:<br />
• Fuel vapor is hazardous. It can easily ignite, causing serious injury and damage. Always keep<br />
sparks and flames away from fuel.<br />
• Fuel line spills and leakage are dangerous. Fuel can ignite and cause serious injury or death<br />
and damage. Fuel can also irritate skin and eyes. To prevent this, always complete “BEFORE<br />
REPAIR PROCEDURE” and “AFTER REPAIR PROCEDURE” described in this manual.
TROUBLESHOOTING<br />
Diagnostic Procedure<br />
STEP INSPECTION RESULTS ACTION<br />
1 Note<br />
• The following test should be performed for<br />
vehicles with immobilizer system. Go to<br />
Step 10 for vehicles without immobilizer<br />
system.<br />
Connect the WDS or equivalent to the DLC-2.<br />
Do the following conditions appear?<br />
• The engine is not completely started.<br />
• DTC B1681 is displayed.<br />
2 Is the coil connector securely connected to the<br />
coil?<br />
Yes Both conditions appear:<br />
Go to Step 4.<br />
No Either or other condition appears:<br />
Go to the next step.<br />
Yes Go to the next step.<br />
No Connect the coil connector securely.<br />
Return to Step 1.<br />
3 Does the security light illuminate? Yes Go to the next step.<br />
No Inspect the instrument cluster and the wiring harness.<br />
4 Connect the WDS or equivalent to the DLC-2<br />
and retrieve the DTC.<br />
DTC<br />
B1213, B1342, B1600, B1601, B1602, B1681,<br />
B2103, B2431<br />
5 Is there continuity between PCM GND terminals<br />
65, 85, 103, 104 and GND?<br />
6 Measure the voltage between PCM GND<br />
terminals 65, 85, 103, 104 and coil terminal C.<br />
Is the voltage below 1.0?<br />
7 Turn the engine switch to the ON position.<br />
Access the VPWR PID.<br />
Is the VPWR PID normal?<br />
Specification<br />
Battery voltage<br />
8 Disconnect the coil connector.<br />
Turn the engine switch to the ON position.<br />
Is there the battery voltage at coil connector<br />
terminal D (harness-side)?<br />
9 Is there continuity between PCM terminal 57 and<br />
the starter relay?<br />
10 Inspect for the following:<br />
• Fuel quality (such as include water<br />
contamination, winter/summer blend)<br />
• Fuel line/fuel filter clogging<br />
• Intake-air system restriction<br />
Are all items normal?<br />
Yes Go to the appropriate DTC test.<br />
No Go to the next step.<br />
Yes Go to the next step.<br />
No Repair or replace the wiring harness.<br />
Yes Go to the next step.<br />
No Repair or replace the wiring harness.<br />
Yes Go to the next step.<br />
No Repair or replace the wiring harness.<br />
Yes Inspect for the following:<br />
• Open or short circuit between coil terminal A and<br />
PCM terminal 80<br />
• Open or short circuit between coil terminal B and<br />
PCM terminal 28<br />
No Repair or replace the wiring harness between coil<br />
connector terminal D and the fuse panel.<br />
Yes Go to the next step.<br />
No Repair replace the wiring harness.<br />
Yes Go to the next step.<br />
No Service if necessary.<br />
Repeat Step 10.<br />
11 Is the engine overheating? Yes Go to symptom troubleshooting “NO.17 COOLING<br />
SYSTEM CONCERNS-OVERHEATING”.<br />
No Go to the next step.<br />
12 Note<br />
• Ignore DTC P0122, P0123, P0222 or<br />
P0223 while performing this test.<br />
Disconnect the accelerator position sensor<br />
connector.<br />
Measure the voltage at the accelerator position<br />
sensor connector VREF terminal (terminal D)<br />
with the engine switch at the ON position.<br />
Specification<br />
4.5—5.5 V<br />
Is the voltage normal?<br />
Yes Go to the next step.<br />
No Go to the symptom troubleshooting “NO.26<br />
CONSTANT VOLTAGE”.<br />
F2–207<br />
F2
13 Connect the WDS or equivalent to the DLC-2.<br />
Turn the engine switch to the ON position.<br />
Retrieve any DTC.<br />
Is the DTC displayed?<br />
F2–208<br />
TROUBLESHOOTING<br />
STEP INSPECTION RESULTS ACTION<br />
Yes DTC is displayed:<br />
Go to the appropriate DTC test.<br />
Communication error message is displayed:<br />
Inspect for the following:<br />
• Open circuit between the PCM control relay and<br />
PCM terminal 53 or 79<br />
• Open circuit between the PCM control relay and<br />
PCM terminal 69<br />
• Stuck open PCM control relay<br />
• Open or poor GND circuit (PCM terminal 65, 85,<br />
103 or 104)<br />
• Poor connection at vehicle body GND<br />
No No DTC is displayed:<br />
Go to the next step.<br />
14 Does the engine start normally after warm-up? Yes Inspect the glow system operation.<br />
Replace any malfunctioning part if necessary.<br />
If the glow system is normal, go to the next step.<br />
No Go to the next step.<br />
15 Is there any restriction in the exhaust system or<br />
the catalyst converter?<br />
16 Access the RPM PID.<br />
Is the RPM PID indicating the engine speed<br />
while cranking the engine?<br />
17 Note<br />
• The following test should be performed on<br />
the vehicles with A/C system. If the<br />
following test cannot be performed due to<br />
the engine stall, go to the next step.<br />
• Go to next step for the vehicle without A/C<br />
system.<br />
Connect the pressure gauge to the A/C line.<br />
Turn the blower and A/C switches on.<br />
Is the pressure within specifications?<br />
18 Inspect the adjustment of the accelerator<br />
position sensor and the idle switch.<br />
Are the accelerator position sensor and the idle<br />
switch adjusted correctly?<br />
19 Depress the accelerator pedal slightly.<br />
Crank the engine.<br />
Does the engine start now?<br />
20 Inspect the fuel pipe for fuel leakage.<br />
Is any fuel leakage found on the fuel pipe?<br />
21 Visually inspect the CKP sensor and the pulse<br />
wheel teeth.<br />
Are CKP sensor and the pulse wheel teeth<br />
normal?<br />
22 Measure the gap between the CKP sensor and<br />
the pulse wheel teeth.<br />
Specification<br />
1.5—2.5 mm {0.059—0.098 in}<br />
Is the gap within the specification?<br />
23 Visually inspect the CMP sensor and the pulse<br />
wheel teeth.<br />
Are the CMP sensor and the pulse wheel teeth<br />
normal?<br />
24 Inspect the fuel pressure sensor.<br />
Is the fuel pressure normal?<br />
25 Inspect the suction control valve.<br />
Is the suction control valve normal?<br />
Yes Repair or replace if necessary.<br />
No Go to the next step.<br />
Yes Go to the next step.<br />
No Go to Step 19.<br />
Yes Go to the next step.<br />
No A/C is always on:<br />
Go to the symptom troubleshooting “NO.24 A/C<br />
ALWAYS ON OR A/C COMPRESSOR RUNS<br />
CONTINUOUSLY”.<br />
Other symptoms:<br />
Inspect the following:<br />
• Refrigerant charging amount<br />
• Cooling fan No.1 and/or cooling fan No.2 operation<br />
Yes Go to the next step.<br />
No Adjust the accelerator position sensor and the idle<br />
switch correctly.<br />
Yes Inspect the idle speed.<br />
No Go to the next step.<br />
Yes Repair or replace if necessary.<br />
No Go to the next step.<br />
Yes Go to the next step.<br />
No Replace the malfunctioning parts.<br />
Yes Go to the next step.<br />
No Adjust the CKP sensor position.<br />
Yes Inspect the following PIDs:<br />
• ECT<br />
• IAT<br />
• MAF<br />
• RPM<br />
No<br />
If the PID value is not as specified, repair or replace<br />
the malfunctioning parts.<br />
If the PID value is normal, go to the next step.<br />
Replace the malfunctioning parts.<br />
Yes Go to the next step.<br />
No Replace the common rail.<br />
Yes Go to the next step.<br />
No Repair the supply pump.
End Of Sie<br />
NO.6 CRANKS NORMALLY BUT WILL NOT START<br />
TROUBLESHOOTING<br />
STEP INSPECTION RESULTS ACTION<br />
26 Is the engine compression correct? Yes Go to the next step.<br />
No Inspect for the following:<br />
• Damaged valve seat<br />
• Worn valve stem and valve guide<br />
• Worn or stuck piston ring<br />
• Worn piston, piston ring or cylinder<br />
• Improper valve timing<br />
Service if necessary.<br />
27 Inspect the fuel injector.<br />
Is the fuel injector normal?<br />
28 Inspect the IDM.<br />
Is the IDM normal?<br />
29 Inspect EGR system operation.<br />
Is EGR system operation normal?<br />
30 Verify the test results.<br />
• If normal, return to the diagnostic index to service any additional symptoms.<br />
• If the malfunction remains, replace the PCM.<br />
Yes Go to the next step.<br />
No Repair or replace if necessary.<br />
Yes Go to the next step.<br />
No Repair or replace if necessary.<br />
Yes Remove and inspect the supply pump and the<br />
common rail.<br />
No Repair or replace the malfunctioning part according to<br />
the EGR control system inspection results.<br />
B6E408018881103<br />
6 CRANKS NORMALLY BUT WILL NOT START<br />
• The starter cranks the engine at normal speed but the engine will not run.<br />
DESCRIPTION<br />
•<br />
•<br />
Refer to the symptom troubleshooting “No.5 Engine stalls” if this symptom appears after engine stall.<br />
Fuel is in the fuel tank.<br />
• Battery is in normal condition.<br />
• Poor fuel quality<br />
• Intake-air system restriction<br />
• Fuel line restriction<br />
• EGR system malfunction<br />
• EGR valve position sensor malfunction<br />
• Glow system malfunction<br />
• Fuel pressure sensor or related circuit malfunction<br />
• Suction control valve malfunction (built-in supply pump)<br />
• Fuel pressure limiter malfunction (built-in common rail)<br />
• Fuel leakage<br />
• Fuel filter clogging<br />
• Incorrect fuel injection timing<br />
• Erratic signal from CKP sensor<br />
• Erratic signal from CMP sensor<br />
• V-reference supply circuit malfunction<br />
POSSIBLE • ECT sensor or related circuit malfunction<br />
CAUSE • Supply pump malfunction<br />
• Fuel injector malfunction<br />
• Immobilizer system and/or circuit malfunction (if equipped)<br />
• Low engine compression<br />
• Improper valve timing<br />
• IDM or related circuit malfunction<br />
• PCM control repay malfunction<br />
Warning<br />
The following troubleshooting flow chart contains the fuel system diagnosis and repair<br />
procedures. Read the following warnings before performing the fuel system services:<br />
• Fuel vapor is hazardous. It can easily ignite, causing serious injury and damage. Always keep<br />
sparks and flames away from fuel.<br />
• Fuel line spills and leakage are dangerous. Fuel can ignite and cause serious injury or death<br />
and damage. Fuel can also irritate skin and eyes. To prevent this, always complete “BEFORE<br />
REPAIR PROCEDURE” and “AFTER REPAIR PROCEDURE” described in this manual.<br />
F2–209<br />
F2
F2–210<br />
TROUBLESHOOTING<br />
Diagnostic Procedure<br />
STEP INSPECTION RESULTS ACTION<br />
1 Note<br />
• The following test should be performed for<br />
the vehicles with immobilizer system. Go<br />
to Step 10 for the vehicles without<br />
immobilizer system.<br />
Connect the WDS or equivalent to the DLC-2.<br />
Do the following conditions appear?<br />
• The engine is not completely started.<br />
• DTC B1681 is displayed.<br />
2 Is the coil connector securely connected to the<br />
coil?<br />
Yes Both conditions appear:<br />
Go to Step 4.<br />
No Either or other condition appears:<br />
Go to the next step.<br />
Yes Go to the next step.<br />
No Connect the coil connector securely.<br />
Return to Step 1.<br />
3 Does the security light illuminate? Yes Go to the next step.<br />
No Inspect the instrument cluster and the wiring harness.<br />
4 Connect the WDS or equivalent to the DLC-2<br />
and retrieve the DTC.<br />
DTC<br />
B1213, B1342, B1600, B1601, B1602, B1681,<br />
B2103, B2431<br />
5 Is there continuity between PCM GND terminals<br />
65, 85, 103, 104 and GND?<br />
6 Measure the voltage between PCM GND<br />
terminals 65, 85, 103, 104 and coil terminal C.<br />
Is the voltage below 1.0?<br />
7 Turn the engine switch to the ON position.<br />
Access the VPWR PID.<br />
Is the VPWR PID normal?<br />
Specification<br />
Battery voltage<br />
8 Disconnect the coil connector.<br />
Turn the engine switch to the ON position.<br />
Is there battery voltage at coil connector terminal<br />
D (harness-side)?<br />
9 Is there continuity between PCM terminal 57 and<br />
the starter relay?<br />
10 Inspect for the following:<br />
• Fuel quality (such as water contamination,<br />
winter/summer blend)<br />
• Fuel line/fuel filter clogging<br />
• Intake-air system restriction<br />
Are all items normal?<br />
11 Note<br />
• Ignore DTC P0122, P0123, P0222 or<br />
P0223 while performing this test.<br />
Disconnect the accelerator position sensor<br />
connector.<br />
Measure the voltage at the accelerator position<br />
sensor connector VREF terminal (terminal D)<br />
with the engine switch at ON position.<br />
Specification<br />
4.5—5.5 V<br />
Is the voltage normal?<br />
Yes Go to the appropriate DTC test.<br />
No Go to the next step.<br />
Yes Go to the next step.<br />
No Repair or replace the wiring harness.<br />
Yes Go to the next step.<br />
No Repair or replace the wiring harness.<br />
Yes Go to the next step.<br />
No Repair or replace the wiring harness.<br />
Yes Inspect for the following:<br />
• Open or short circuit between coil terminal A and<br />
PCM terminal 80<br />
• Open or short circuit between coil terminal B and<br />
PCM terminal 28<br />
No Repair or replace the wiring harness between coil<br />
connector terminal D and the fuse panel.<br />
Yes Go to the next step.<br />
No Repair or replace the wiring harness.<br />
Yes Go to the next step.<br />
No Service if necessary.<br />
Repeat Step 10.<br />
Yes Go to the next step.<br />
No Go to the symptom troubleshooting “NO.26<br />
CONSTANT VOLTAGE”.
12 Connect the WDS or equivalent to the DLC-2.<br />
Turn the engine switch to the ON position.<br />
Retrieve any DTC.<br />
Is the DTC displayed?<br />
13 Inspect glow system operation.<br />
Is glow system operation normal?<br />
14 Inspect the fuel pipe for fuel leakage.<br />
Is any fuel leakage found on the fuel pipe?<br />
15 Visually inspect the CKP sensor and the pulse<br />
wheel teeth.<br />
Are the CKP sensor and the pulse wheel teeth<br />
normal?<br />
16 Measure the gap between the CKP sensor and<br />
the pulse wheel teeth.<br />
Specification<br />
1.5—2.5 mm {0.059—0.098 in}<br />
Is the gap within the specification?<br />
17 Visually inspect the CMP sensor and the pulse<br />
wheel teeth.<br />
Are the CMP sensor and the pulse wheel teeth<br />
normal?<br />
18 Inspect the fuel pressure sensor.<br />
Is the fuel pressure normal?<br />
19 Inspect the suction control valve.<br />
Is the suction control valve normal?<br />
End Of Sie<br />
TROUBLESHOOTING<br />
STEP INSPECTION RESULTS ACTION<br />
Yes DTC is displayed:<br />
Go to appropriate DTC test.<br />
Communication error message is displayed:<br />
Inspect for the following:<br />
• Open circuit between the PCM control relay and<br />
PCM terminal 53 or 79<br />
• Open circuit between the PCM control relay and<br />
PCM terminal 69<br />
• Stuck open PCM control relay<br />
• Open or poor GND circuit (PCM terminal 65, 85,<br />
103 or 104)<br />
• Poor connection at vehicle body GND<br />
No No DTC is displayed:<br />
Go to the next step.<br />
Yes Go to the next step.<br />
No Repair or replace the malfunctioning part according to<br />
glow system operation.<br />
Yes Repair or replace as necessary.<br />
No Go to the next step.<br />
Yes Go to the next step.<br />
No Replace the malfunctioning parts.<br />
Yes Go to the next step.<br />
No Adjust the CKP sensor position.<br />
Yes Inspect the following PIDs:<br />
(See F2–31 PCM INSPECTION.)<br />
• ECT<br />
• RPM<br />
If the PID value is not as specified, repair or replace<br />
the malfunctioning parts.<br />
If the PID value is normal, go to the next step.<br />
No Replace the malfunctioning parts.<br />
Yes Go to the next step.<br />
No Replace the common rail.<br />
Yes Go to the next step.<br />
No Repair the supply pump.<br />
20 Is the engine compression correct? Yes Go to the next step.<br />
No Inspect for the following:<br />
• Damaged valve seat<br />
• Worn valve stem and valve guide<br />
• Worn or stuck piston ring<br />
• Worn piston, piston ring or cylinder<br />
• Improper valve timing<br />
Service if necessary.<br />
21 Inspect the fuel injector.<br />
Is the fuel injector normal?<br />
22 Inspect the IDM.<br />
Is the IDM normal?<br />
23 Inspect the EGR system operation.<br />
(See F2–232 EGR Control System Inspection.)<br />
Is the EGR system operation normal?<br />
24 Verify test results.<br />
• If normal, return to the diagnostic index to service any additional symptoms.<br />
• If the malfunction remains, replace the PCM.<br />
Yes Go to the next step.<br />
No Repair or replace if necessary.<br />
Yes Go to the next step.<br />
No Repair or replace if necessary.<br />
Yes Remove and inspect the supply pump and the<br />
common rail.<br />
No Repair or replace the malfunctioning part according to<br />
the EGR control system inspection results.<br />
F2–211<br />
F2
NO.8 ENGINE RUNS ROUGH/ROLLING IDLE<br />
F2–212<br />
TROUBLESHOOTING<br />
B6E408018881104<br />
8 ENGINE RUNS ROUGH/ROLLING IDLE<br />
• The engine speed fluctuates between the specified idle speed and the lower speed and the engine<br />
DESCRIPTION shakes excessively.<br />
• The idle speed is too slow and the engine shakes excessively.<br />
• Poor fuel quality<br />
• Air leakage from intake-air system<br />
• Intake-air system restriction<br />
• Incorrect idle speed<br />
• Engine overheating<br />
• Cooling fan No.1 system malfunction<br />
• A/C system improper operation<br />
• EGR system improper operation<br />
• EGR valve position sensor malfunction<br />
• EGR water cooler malfunction<br />
• Fuel leakage<br />
• Inadequate fuel pressure<br />
• Fuel pressure sensor or related circuit malfunction<br />
• Suction control valve malfunction (built-in supply pump)<br />
• Fuel pressure limiter malfunction (built-in common rail)<br />
• Fuel filter clogging<br />
• Fuel line restriction<br />
• Incorrect fuel injection timing<br />
• Erratic signal from CKP sensor<br />
• Erratic signal from CMP sensor<br />
POSSIBLE<br />
CAUSE<br />
•<br />
•<br />
•<br />
ECT sensor or related circuit malfunction<br />
Idle switch misadjustment<br />
Idle switch or related circuit malfunction<br />
• Accelerator position sensor misadjustment<br />
• Accelerator position sensor or related circuit malfunction<br />
• MAF/IAT sensor malfunction<br />
• Neutral switch or related circuit malfunction<br />
• Supply pump malfunction<br />
• Fuel injector malfunction<br />
• Low engine compression<br />
• Improper valve timing<br />
• Engine compression excessive unbalance for each cylinder<br />
• Unbalanced fuel injection amount for each cylinder<br />
• IDM or related circuit malfunction<br />
Warning<br />
The following troubleshooting flow chart contains the fuel system diagnosis and repair<br />
procedures. Read the following warnings before performing the fuel system services:<br />
• Fuel vapor is hazardous. It can easily ignite, causing serious injury and damage. Always keep<br />
sparks and flames away from fuel.<br />
• Fuel line spills and leakage are dangerous. Fuel can ignite and cause serious injury or death<br />
and damage. Fuel can also irritate skin and eyes. To prevent this, always complete “BEFORE<br />
REPAIR PROCEDURE” and “AFTER REPAIR PROCEDURE” described in this manual.
TROUBLESHOOTING<br />
Diagnostic Procedure<br />
STEP INSPECTION RESULTS ACTION<br />
1 Inspect for the following:<br />
• Fuel quality (such as water contamination,<br />
winter/summer blend)<br />
• Fuel line/fuel filter clogging<br />
• Loose bands on intake-air system<br />
• Cracks on intake-air system parts<br />
• Intake-air system restriction<br />
• Vacuum leakage<br />
• Cooling fan No.1 system operation<br />
Are all items normal?<br />
Yes Go to the next step.<br />
No Service if necessary<br />
Repeat Step 1.<br />
2 Is the engine overheating? Yes Go to the symptom troubleshooting “NO.17 COOLING<br />
SYSTEM CONCERNS—OVERHEATING.”<br />
No Go to the next step.<br />
3 Connect the WDS or equivalent to the DLC-2.<br />
Turn the engine switch to the ON position.<br />
Retrieve any DTC.<br />
Is the DTC displayed?<br />
4 Note<br />
• The following test should be performed on<br />
the vehicles with A/C system. If the<br />
following test cannot be performed due to<br />
the engine stall, go to the next step.<br />
• Go to the next step for the vehicle without<br />
A/C system.<br />
Connect the pressure gauge to the A/C line.<br />
Turn the blower and the A/C switches on.<br />
Is the pressure within specifications?<br />
5 Depress the accelerator pedal slightly.<br />
Crank the engine.<br />
Does the engine start now?<br />
6 Inspect the adjustment of the accelerator<br />
position sensor and idle switch.<br />
Are the accelerator position sensor and the idle<br />
switch adjusted correctly?<br />
7 Inspect the fuel pipe for fuel leakage.<br />
Is any fuel leakage found on fuel pipe?<br />
8 Visually inspect the CKP sensor and the pulse<br />
wheel teeth.<br />
Are the CKP sensor and the pulse wheel teeth<br />
normal?<br />
9 Measure the gap between the CKP sensor and<br />
the pulse wheel teeth.<br />
Specification<br />
1.5—2.5 mm {0.059—0.098 in}<br />
Is the gap within the specification?<br />
Yes DTC is displayed:<br />
Go to the appropriate DTC test.<br />
Communication error message is displayed:<br />
Inspect for the following:<br />
• Open circuit between the PCM control relay and<br />
PCM terminal 53 or 79<br />
• Open circuit between the PCM control relay and<br />
PCM terminal 69<br />
• Stuck open PCM control relay<br />
• Open or poor GND circuit (PCM terminal 65, 85,<br />
103 or 104)<br />
• Poor connection at vehicle body GND<br />
No No DTC is displayed:<br />
Go to the next step.<br />
Yes Go to the next step.<br />
No A/C is always on:<br />
Go to the symptom troubleshooting “NO.24 A/C<br />
ALWAYS ON OR A/C COMPRESSOR RUNS<br />
CONTINUOUSLY”.<br />
Other symptoms:<br />
Inspect for the following:<br />
• Refrigerant charging amount<br />
• Cooling fan No.1 and/or cooling fan No.2 operation<br />
Yes Inspect the idle speed.<br />
No Go to the next step.<br />
Yes Go to the next step.<br />
No Adjust the accelerator position sensor and the idle<br />
switch correctly.<br />
Yes Repair or replace if necessary.<br />
No Go to the next step.<br />
Yes Go to the next step.<br />
No Replace the malfunctioning parts.<br />
Yes Go to the next step.<br />
No Adjust the CKP sensor position.<br />
F2–213<br />
F2
10 Visually inspect the CMP sensor and the pulse<br />
wheel teeth.<br />
Are the CMP sensor and the pulse wheel teeth<br />
normal?<br />
11 Inspect the fuel pressure sensor.<br />
Is the fuel pressure normal?<br />
12 Inspect the suction control valve.<br />
Is the suction control valve normal?<br />
End Of Sie<br />
NO.10 LOW IDLE/STALLS DURING DECELERATION<br />
F2–214<br />
TROUBLESHOOTING<br />
STEP INSPECTION RESULTS ACTION<br />
Yes Inspect the following PIDs:<br />
(See F2–31 PCM INSPECTION.)<br />
• ECT<br />
• IAT<br />
• MAF<br />
• RPM<br />
No<br />
If the PID value is not as specified, repair or replace<br />
the malfunctioning parts.<br />
If the PID value is normal, go to the next step.<br />
Replace the malfunctioning parts.<br />
Yes Go to the next step.<br />
No Replace the common rail.<br />
Yes Go to the next step.<br />
No Repair the supply pump.<br />
13 Is the engine compression correct? Yes Go to the next step.<br />
No Inspect for the following:<br />
• Damaged valve seat<br />
• Worn valve stem and valve guide<br />
• Worn or stuck piston ring<br />
• Worn piston, piston ring or cylinder<br />
• Improper valve timing<br />
Service if necessary.<br />
14 Inspect the fuel injector.<br />
Is fuel injector normal?<br />
15 Inspect the EGR system operation.<br />
(See F2–232 EGR Control System Inspection.)<br />
Is the EGR system operation normal?<br />
16 Inspect the EGR water cooler for the following:<br />
• Coolant passage clogging/restriction<br />
• Exhaust gas clogging/restriction<br />
Is the EGR water cooler normal?<br />
17 Inspect the IDM.<br />
Is the IDM normal?<br />
18 Verify the test results.<br />
• If normal, return to the diagnostic index to service any additional symptoms.<br />
• If the malfunction remains, replace the PCM.<br />
Yes Go to the next step.<br />
No Repair or replace if necessary.<br />
Yes Go to the next step.<br />
No Repair or replace the malfunctioning part according to<br />
the EGR control system inspection results.<br />
Yes Go to the next step.<br />
No Service if necessary.<br />
Yes Remove and inspect the supply pump and the<br />
common rail.<br />
No Repair or replace if necessary.<br />
10 LOW IDLE/STALLS DURING DECELERATION<br />
DESCRIPTION • The engine stops unexpectedly at the beginning of deceleration or recovery from deceleration.<br />
B6E408018881105
TROUBLESHOOTING<br />
10 LOW IDLE/STALLS DURING DECELERATION<br />
POSSIBLE<br />
CAUSE<br />
• Intake-air system restriction or clogging<br />
• Poor fuel quality<br />
• A/C system improper operation<br />
• Inadequate fuel pressure<br />
• Suction control valve malfunction (built-in supply pump)<br />
• Fuel pressure limiter malfunction (built-in common rail)<br />
• Fuel leakage<br />
• Fuel line restriction or clogging<br />
• Fuel filter restriction or clogging<br />
• Incorrect fuel injection timing<br />
• Incorrect idle speed<br />
• Erratic signal from CKP sensor<br />
• Erratic signal from CMP sensor<br />
• Supply pump malfunction<br />
• Fuel injector malfunction<br />
• Low engine compression<br />
• Improper valve timing<br />
• Glow system malfunction<br />
• EGR system malfunction<br />
• EGR valve position sensor malfunction<br />
• MAF/IAT sensor or related circuit malfunction<br />
• ECT sensor or related circuit malfunction<br />
• Fuel pressure sensor or related circuit malfunction<br />
• Neutral switch malfunction or related circuit malfunction<br />
• Accelerator position sensor or related circuit malfunction<br />
• Idle switch or related circuit malfunction<br />
• Incorrect adjustment accelerator position sensor and/or idle switch<br />
• IDM or related circuit malfunction<br />
Warning<br />
The following troubleshooting flow chart contains the fuel system diagnosis and repair<br />
procedures. Read the following warnings before performing the fuel system services:<br />
• Fuel vapor is hazardous. It can easily ignite, causing serious injury and damage. Always keep<br />
sparks and flames away from fuel.<br />
• Fuel line spills and leakage are dangerous. Fuel can ignite and cause serious injury or death<br />
and damage. Fuel can also irritate skin and eyes. To prevent this, always complete “BEFORE<br />
REPAIR PROCEDURE” and “AFTER REPAIR PROCEDURE” described in this manual.<br />
F2–215<br />
F2
F2–216<br />
TROUBLESHOOTING<br />
Diagnostic Procedure<br />
STEP INSPECTION RESULTS ACTION<br />
1 Does the engine idle rough? Yes Go to the symptom troubleshooting “NO.8 ENGINE<br />
RUNS ROUGH/ROLLING IDLE”.<br />
No Go to the next step.<br />
2 Inspect for the following:<br />
• Fuel line/fuel filter clogging or restriction<br />
• Intake-air system restriction or clogging<br />
• Fuel quality (such as water contamination,<br />
winter/summer blend)<br />
Are all the items normal?<br />
3 Perform the self-test function using the WDS or<br />
equivalent.<br />
Turn the engine switch to the ON position.<br />
Retrieve any DTC.<br />
Is the DTC displayed?<br />
4 Inspect the idle speed.<br />
Is the idle speed correct?<br />
5 Inspect adjustment of the accelerator position<br />
sensor and the idle switch.<br />
Are the accelerator position sensor and the idle<br />
switch adjusted correctly?<br />
6 Measure the voltage PCM terminal 33 and 56.<br />
Is the voltage normal?<br />
7 Visually inspect the CKP sensor and the pulse<br />
wheel teeth.<br />
Are the CKP sensor and the pulse wheel teeth<br />
normal?<br />
8 Measure gap between CKP sensor and the<br />
pulse wheel teeth.<br />
Specification<br />
1.5—2.5 mm {0.059—0.098 in}<br />
Is gap within specification?<br />
9 Visually inspect the CMP sensor and the pulse<br />
wheel teeth.<br />
Are the CMP sensor and the pulse wheel teeth<br />
normal?<br />
10 Inspect the fuel pressure sensor.<br />
Is the fuel pressure normal?<br />
11 Inspect the suction control valve.<br />
Is the suction control valve normal?<br />
Yes Go to the next step.<br />
No Service if necessary.<br />
Repeat Step 2.<br />
Yes DTC is displayed:<br />
Go to the appropriate DTC test.<br />
Communication error message is displayed:<br />
Inspect for the following:<br />
• Open circuit between the PCM control relay and<br />
PCM terminal 53 or 79<br />
• Open circuit between the PCM control relay and<br />
PCM terminal 69<br />
• Stuck open PCM control relay<br />
• Open or poor GND circuit (PCM terminal 65, 85,<br />
103 or 104)<br />
• Poor connection at vehicle body GND<br />
No No DTC is displayed:<br />
Go to the next step.<br />
Yes Go to the next step.<br />
No Repair or replace the malfunctioning part according to<br />
the idle speed inspection results.<br />
Yes Go to the next step.<br />
No Adjust the accelerator position sensor and the idle<br />
switch correctly.<br />
Yes Go to the next step.<br />
No PCM terminal 33 does not specified:<br />
Inspect the clutch pedal position switch and the<br />
related wiring harness.<br />
PCM terminal 56 does not specified:<br />
Inspect the neutral switch and the related wiring<br />
harness.<br />
Yes Go to the next step.<br />
No Replace the malfunctioning parts.<br />
Yes Go to the next step.<br />
No Adjust the CKP sensor position.<br />
Yes Inspect the following PIDs:<br />
(See F2–31 PCM INSPECTION.)<br />
• ECT<br />
• IAT<br />
• MAF<br />
• RPM<br />
No<br />
If the PID value is not as specified, repair or replace<br />
the malfunctioning parts.<br />
If the PID value is normal, go to the next step.<br />
Replace the malfunctioning parts.<br />
Yes Go to the next step.<br />
No Replace the common rail.<br />
Yes Go to the next step.<br />
No Repair the supply pump.
TROUBLESHOOTING<br />
STEP INSPECTION RESULTS ACTION<br />
12 Is the engine compression correct? Yes Go to the next step.<br />
No Inspect for the following:<br />
• Damaged valve seat<br />
• Worn valve stem and valve guide<br />
• Worn or stuck piston ring<br />
• Worn piston, piston ring or cylinder<br />
• Improper valve timing<br />
Service if necessary.<br />
13 Inspect the fuel injector.<br />
Is the fuel injector normal?<br />
14 Note<br />
• The following test should be performed on<br />
the vehicles with A/C system. If the<br />
following test cannot be performed due to<br />
the engine stall, go to the next step.<br />
• Go to the next step for the vehicle without<br />
A/C system.<br />
Connect the pressure gauge to the A/C line.<br />
Turn the blower and the A/C switches on.<br />
Is the pressure within the specifications?<br />
15 Inspect the EGR system operation.<br />
(See F2–232 EGR Control System Inspection.)<br />
Is the EGR system operation normal?<br />
16 Inspect the glow system operation.<br />
Is the glow system operation normal?<br />
17 Inspect the IDM.<br />
Is the IDM normal?<br />
18 Verify the test results.<br />
• If normal, return to the diagnostic index to service any additional symptoms.<br />
• If the malfunction remains, replace the PCM.<br />
Yes Go to the next step.<br />
No Repair or replace if necessary.<br />
Yes Go to the next step.<br />
No A/C is always on:<br />
Go to the symptom troubleshooting “NO.24 A/C<br />
ALWAYS ON OR A/C COMPRESSOR RUNS<br />
CONTINUOUSLY”.<br />
Other symptoms:<br />
Inspect the following:<br />
• Refrigerant charging amount<br />
• Cooling fan No.1 and/or cooling fan No.2 operation<br />
Yes Go to the next step.<br />
No Repair or replace the malfunctioning part according to<br />
the EGR control system inspection results.<br />
Yes Go to the next step.<br />
No Service if necessary.<br />
Yes Remove and inspect the supply pump and the<br />
common rail.<br />
No Repair or replace if necessary.<br />
End Of Sie<br />
NO.11 ENGINE STALLS/QUITS, ENGINE RUNS ROUGH, MISSES, BUCK/LERK, HESITATION/STUMBLE<br />
B6E408018881106<br />
11<br />
DESCRIPTION<br />
ENGINE STALLS/QUITS, ENGINE RUNS ROUGH, MISSES, BUCK/JERK, HESITATION/STUMBLE,<br />
SURGES<br />
• The engine stops unexpectedly at the beginning of acceleration or during cruising.<br />
• The engine stops unexpectedly while cruising.<br />
• The engine speed fluctuates during acceleration or cruising.<br />
• The engine misses during acceleration or cruising.<br />
• The vehicle bucks/jerks during acceleration or deceleration.<br />
• Momentary pause at the beginning of acceleration or during acceleration.<br />
• Momentary minor irregularity in the engine output.<br />
F2–217<br />
F2
POSSIBLE<br />
CAUSE<br />
F2–218<br />
TROUBLESHOOTING<br />
• Poor fuel quality<br />
• Glow system malfunction<br />
• Air leakage from intake-air system<br />
• Intake-air system restriction or clogging<br />
• Engine overheating<br />
• A/C system improper operation<br />
• Turbocharger malfunction<br />
• Variable swirl control (VSC) system malfunction<br />
• EGR system malfunction<br />
• EGR valve position sensor malfunction<br />
• Neutral switch or related circuit malfunction<br />
• Improper cooling fan No.1 or cooling fan No.2 seat<br />
• Fuel line clogging or restriction<br />
• Fuel filter clogging or restriction<br />
• Incorrect fuel injection timing<br />
• Erratic signal from CKP sensor<br />
• Erratic signal from CMP sensor<br />
• ECT sensor or related circuit malfunction<br />
• Boost sensor or related circuit malfunction<br />
• Accelerator position sensor or related circuit malfunction<br />
• Idle switch or related circuit malfunction<br />
• MAF/IAT sensor or related circuit malfunction<br />
• IAT sensor No.2 or related circuit malfunction<br />
• VSS or related circuit malfunction<br />
• Incorrect adjustment accelerator position sensor and/or idle switch<br />
• Incorrect idle speed<br />
• Inadequate fuel pressure<br />
• Fuel pressure sensor or related circuit malfunction<br />
• Suction control valve malfunction (built-in supply pump)<br />
• Fuel pressure limiter malfunction (built-in common rail)<br />
• Supply pump malfunction<br />
• Fuel injector malfunction<br />
• Low engine compression<br />
• Improper valve timing<br />
• Exhaust system and/or catalyst converter restriction<br />
• Clutch slippage<br />
• IDM or related circuit malfunction<br />
Warning<br />
The following troubleshooting flow chart contains the fuel system diagnosis and repair<br />
procedures. Read the following warnings before performing the fuel system services:<br />
• Fuel vapor is hazardous. It can easily ignite, causing serious injury and damage. Always keep<br />
sparks and flames away from fuel.<br />
• Fuel line spills and leakage are dangerous. Fuel can ignite and cause serious injury or death<br />
and damage. Fuel can also irritate skin and eyes. To prevent this, always complete “BEFORE<br />
REPAIR PROCEDURE” and “AFTER REPAIR PROCEDURE” described in this manual.
TROUBLESHOOTING<br />
Diagnostic Procedure<br />
STEP INSPECTION RESULTS ACTION<br />
1 Is the idle speed stable? Yes Go to the next step.<br />
No Go to the symptom troubleshooting “NO.8 ENGINE<br />
RUNS ROUGH/ROLLING IDLE”.<br />
2 Is the engine overheating? Yes Go to symptom troubleshooting “NO.17 COOLING<br />
SYSTEM CONCERNS—OVERHEATING”.<br />
No Go to the next step.<br />
3 Perform the self-test function using the WDS or<br />
equivalent.<br />
Turn the engine switch to the ON position.<br />
Retrieve any DTC.<br />
Is the DTC displayed?<br />
4 Inspect for the following:<br />
• Fuel quality (such as water contamination,<br />
winter/summer blend)<br />
• Fuel line/fuel filter clogging and/or restriction<br />
• Intake-air system restriction or clogging<br />
• Exhaust system and/or catalyst converter<br />
restriction<br />
• Cooling fan No.1 or cooling fan No.2 seat<br />
Are all the items normal?<br />
Yes DTC is displayed:<br />
Go to the appropriate DTC test.<br />
Communication error message is displayed:<br />
Inspect for the following:<br />
• Open circuit between the PCM control relay and<br />
PCM terminal 53 or 79<br />
• Open circuit between the PCM control relay and<br />
PCM terminal 69<br />
• Stuck open PCM control relay<br />
• Open or poor GND circuit (PCM terminal 65, 85,<br />
103 or 104)<br />
• Poor connection at vehicle body GND<br />
No No DTC is displayed:<br />
Go to the next step.<br />
Yes Go to the next step.<br />
No Service if necessary.<br />
Repeat Step 4.<br />
5 Does the engine run normal after warm-up? Yes Inspect the glow system operation.<br />
Replace the any malfunctioning part if necessary.<br />
If the glow system is normal, go to the next step.<br />
No Go to the next step.<br />
6 Note<br />
• The following test should be performed on<br />
the vehicles with A/C system. If the<br />
following test cannot be performed due to<br />
the engine stalling, go to the next step.<br />
• Go to next step for the vehicle without A/C<br />
system.<br />
Connect the pressure gauge to the A/C line.<br />
Turn the blower and the A/C switches on.<br />
Is the pressure within the specifications?<br />
7 Inspect the hose bands between the following<br />
parts:<br />
• Turbocharger compressor housing and air<br />
cleaner<br />
• Turbocharger compressor housing and<br />
charge air cooler<br />
Are the hose bands loose?<br />
8 Inspect for improper operation, kinks, clogging<br />
or disconnection on the guide blade actuator.<br />
Is the guide blade actuator normal?<br />
9 Inspect the EGR system operation.<br />
(See F2–232 EGR Control System Inspection.)<br />
Is the EGR system operation normal?<br />
10 Inspect the idle speed.<br />
Is the idle speed correct?<br />
Yes Go to the next step.<br />
No A/C is always on:<br />
Go to the symptom troubleshooting “NO.24 A/C<br />
ALWAYS ON OR A/C COMPRESSOR RUNS<br />
CONTINUITY”.<br />
Other symptoms:<br />
Inspect the following:<br />
• Refrigerant charging amount<br />
• Cooling fan No.1 and/or cooling fan No.2 operation<br />
Yes Retighten the hose bands.<br />
If the concern is resolved, complete the inspection.<br />
If the concern still exists, go to the next step.<br />
No Go to the next step.<br />
Yes Turbocharger is normal.<br />
Go to the next step.<br />
No Repair or replace if necessary.<br />
If the concern is resolved, complete the inspection.<br />
If the concern still exists, turbocharger is normal.<br />
Go to the next step.<br />
Yes Go to the next step.<br />
No Repair or replace the malfunctioning part according to<br />
the EGR control system inspection results.<br />
Yes Go to the next step.<br />
No Repair or replace the malfunctioning part according to<br />
the idle speed inspection results.<br />
F2–219<br />
F2
11 Inspect the adjustment of the accelerator<br />
position sensor and the idle switch.<br />
Are the accelerator position sensor and the idle<br />
switch adjusted correctly?<br />
12 Inspect the neutral switch adjustment.<br />
Is the neutral switch adjusted correctly?<br />
13 Visually inspect the CKP sensor and the pulse<br />
wheel teeth.<br />
Are the CKP sensor and the pulse wheel teeth<br />
normal?<br />
14 Measure the gap between the CKP sensor and<br />
the pulse wheel teeth.<br />
Specification<br />
1.5—2.5 mm {0.059—0.098 in}<br />
Is the gap within the specification?<br />
15 Visually inspect the CMP sensor and the pulse<br />
wheel teeth.<br />
Are the CMP sensor and the pulse wheel teeth<br />
normal?<br />
16 Inspect the fuel pressure sensor.<br />
Is the fuel pressure normal?<br />
17 Inspect the suction control valve.<br />
Is the suction control valve normal?<br />
F2–220<br />
TROUBLESHOOTING<br />
STEP INSPECTION RESULTS ACTION<br />
End Of Sie<br />
NO.12 LACK/LOSS OF POWER-ACCELERATION/CRUISE<br />
Yes Go to the next step.<br />
No Adjust the accelerator position sensor and the idle<br />
switch correctly.<br />
Yes Go to the next step.<br />
No Adjust the neutral switch correctly.<br />
Yes Go to the next step.<br />
No Replace the malfunctioning parts.<br />
Yes Go to the next step.<br />
No Adjust the CKP sensor position.<br />
Yes Inspect the following PIDs:<br />
(See F2–31 PCM INSPECTION.)<br />
• ECT<br />
• IAT<br />
• MAF<br />
• RPM<br />
No<br />
If the PID value is not as specified, repair or replace<br />
the malfunctioning parts.<br />
If the PID value is normal, go to the next step.<br />
Replace the malfunctioning parts.<br />
Yes Go to the next step.<br />
No Replace the common rail.<br />
Yes Go to the next step.<br />
No Repair the supply pump.<br />
18 Is the engine compression correct? Yes Go to the next step.<br />
No Inspect for the following:<br />
• Damaged valve seat<br />
• Worn valve stem and valve guide<br />
• Worn or stuck piston ring<br />
• Worn piston, piston ring or cylinder<br />
• Improper valve timing<br />
Service if necessary.<br />
19 Inspect the fuel injector.<br />
Is fuel injector normal?<br />
20 Inspect the IDM.<br />
Is the IDM normal?<br />
21 Inspect the timing belt for the following:<br />
• Gear teeth chipping<br />
• Low tension<br />
• Breakage damage or cracks<br />
Is the timing belt normal?<br />
22 Verify the test results.<br />
• If normal, return to the diagnostic index to service any additional symptoms.<br />
• If the malfunction remains, replace the PCM.<br />
Yes Go to the next step.<br />
No Repair or replace if necessary.<br />
Yes Go to the next step.<br />
No Repair or replace if necessary.<br />
Yes Inspect the following:<br />
• Clutch slippage<br />
• CKP sensor<br />
• VSS<br />
No<br />
If normal, remove and inspect the supply pump and<br />
the common rail.<br />
If the timing is incorrect, adjust the valve timing.<br />
If the timing belt is not normal, replace the timing belt.<br />
12 LACK/LOSS OF POWER-ACCELERATION CRUISE<br />
DESCRIPTION • Performance is poor under load (such as power down when climbing hills).<br />
B6E408018881107
TROUBLESHOOTING<br />
12 LACK/LOSS OF POWER-ACCELERATION CRUISE<br />
POSSIBLE<br />
CAUSE<br />
• Poor fuel quality<br />
• Air leakage from intake-air system<br />
• Intake-air system restriction or clogging<br />
• Engine overheating<br />
• A/C system improper operation<br />
• Improper operation of A/C cut-off control<br />
• Variable boost control (VBC) system malfunction<br />
• Variable swirl control (VSC) system malfunction<br />
• EGR system malfunction<br />
• EGR valve position sensor malfunction<br />
• Vacuum leakage<br />
• Clutch slippage<br />
• Exhaust system and/or catalyst converter restriction<br />
• Fuel line or clogging or restriction<br />
• Fuel filter clogging or restriction<br />
• Incorrect fuel injection timing<br />
• Erratic signal from CKP sensor<br />
• Erratic signal from CMP sensor<br />
• ECT sensor or related circuit malfunction<br />
• Boost sensor or related circuit malfunction<br />
• Accelerator position sensor or related circuit malfunction<br />
• Idle switch or related circuit malfunction<br />
• MAF/IAT sensor or related circuit malfunction<br />
• IAT sensor No.2 or related circuit malfunction<br />
• Incorrect adjustment accelerator position sensor and/or idle switch<br />
• Incorrect idle speed<br />
• Inadequate fuel pressure<br />
• Fuel pressure sensor or related circuit malfunction<br />
• Suction control valve malfunction (built-in supply pump)<br />
• Fuel pressure limiter malfunction (built-in common rail)<br />
• Supply pump malfunction<br />
• Fuel injector malfunction<br />
• Low engine compression<br />
• Improper valve timing<br />
• Cooling fan No.1 or cooling fan No.2 seat are improper<br />
• Turbocharger malfunction<br />
• Charge air cooler malfunction<br />
• Brake system dragging<br />
• Intake shutter valve malfunction<br />
• Guide blade valve malfunction<br />
• IDM or related circuit malfunction<br />
Warning<br />
The following troubleshooting flow chart contains the fuel system diagnosis and repair<br />
procedures. Read the following warnings before performing the fuel system services:<br />
• Fuel vapor is hazardous. It can easily ignite, causing serious injury and damage. Always keep<br />
sparks and flames away from fuel.<br />
• Fuel line spills and leakage are dangerous. Fuel can ignite and cause serious injury or death<br />
and damage. Fuel can also irritate skin and eyes. To prevent this, always complete “BEFORE<br />
REPAIR PROCEDURE” and “AFTER REPAIR PROCEDURE” described in this manual.<br />
F2–221<br />
F2
F2–222<br />
TROUBLESHOOTING<br />
Diagnostic Procedure<br />
STEP INSPECTION RESULTS ACTION<br />
1 Is the idle speed stable? Yes Go to the next step.<br />
No Go to the symptom troubleshooting “NO.8 ENGINE<br />
RUNS ROUGH/ROLLING IDLE”.<br />
2 Is the engine overheating? Yes Go to the symptom troubleshooting “NO.17 COOLING<br />
SYSTEM CONCERNS—OVERHEATING”.<br />
No Go to the next step.<br />
3 Perform the self-test function using the WDS or<br />
equivalent.<br />
Turn the engine switch to the ON position.<br />
Retrieve any DTC.<br />
Is the DTC displayed?<br />
4 Inspect for the following:<br />
• Fuel quality (such as water contamination,<br />
winter/summer blend)<br />
• Fuel line/fuel filter clogging and/or restriction<br />
• Intake-air system restriction<br />
• Exhaust system and/or catalyst converter<br />
restriction<br />
• Charge air cooler condition (restriction or<br />
damaged)<br />
• Vacuum leakage<br />
• Cooling fan No.1 and cooling fan No.2 seat<br />
Are all the items normal?<br />
5 Inspect the intake shutter valve and VSC valve<br />
operations.<br />
Is there any problem?<br />
6 Inspect the guide blade valve operation.<br />
Is there any problem?<br />
7 Inspect the A/C cut-off operation.<br />
Does the A/C cut-off work properly?<br />
8 Inspect the hose bands between the following<br />
parts:<br />
• Turbocharger compressor housing and air<br />
cleaner<br />
• Turbocharger compressor housing and<br />
charge air cooler<br />
Are hose bands loose?<br />
9 Inspect improper operation, kinks, clogging or<br />
disconnection on guide blade actuator.<br />
Is the actuator normal?<br />
10 Remove the parts necessary to inspect the<br />
turbocharger.<br />
Do not remove the turbocharger.<br />
Inspect if the turbocharger compressor wheel is<br />
bent, damaged, or interfering with the housing<br />
on the vehicle.<br />
Is there any problem?<br />
11 Inspect if the turbocharger compressor wheel<br />
locknut is loose or has fallen into the<br />
turbocharger.<br />
Is there any problem?<br />
Yes DTC is displayed:<br />
Go to the appropriate DTC test.<br />
Communication error message is displayed:<br />
Inspect for the following:<br />
• Open circuit between the PCM control relay and<br />
PCM terminal 53 or 79<br />
• Open circuit between the PCM control relay and<br />
PCM terminal 69<br />
• Stuck open PCM control relay<br />
• Open or poor GND circuit (PCM terminal 65, 85,<br />
103 or 104)<br />
• Poor connection at vehicle body GND<br />
No No DTC is displayed:<br />
Go to the next step.<br />
Yes Go to the next step.<br />
No Service if necessary.<br />
Repeat Step 4.<br />
Yes Repair or replace if necessary.<br />
No Go to the next step.<br />
Yes Repair or replace if necessary.<br />
No Go to the next step.<br />
Yes Go to the next step.<br />
No Repair or replace the malfunctioning part according to<br />
the A/C cut-off system inspection results.<br />
Yes Retighten the hose bands.<br />
If the concern is resolved, complete the inspection.<br />
If the concern still exists, go to the next step.<br />
No Go to the next step.<br />
Yes Go to the next step.<br />
No Repair or replace if necessary.<br />
If the concern is resolved, complete the inspection.<br />
If the concern still exists, the turbocharger is normal.<br />
Go to the next step.<br />
Yes Replace the turbocharger.<br />
No Go to the next step.<br />
Yes Replace the turbocharger.<br />
No Go to the next step.
12 Inspect if the turbocharger compressor wheel by<br />
hand.<br />
Does the wheel turn easily and smoothly?<br />
13 Inspect if the turbocharger turbine wheel is<br />
damaged, cracked or interfering with the<br />
housing on the vehicle.<br />
Note<br />
• Inspect all the fins on each turbine wheel.<br />
Is there any problem?<br />
14 Is any engine oil found inside the turbocharger<br />
turbine housing?<br />
15 Is any engine oil found inside the turbocharger<br />
compressor housing?<br />
16 Inspect the EGR system operation.<br />
(See F2–232 EGR Control System Inspection.)<br />
Is the EGR system operation normal?<br />
17 Inspect the idle speed.<br />
Is the idle speed correct?<br />
18 Inspect adjustment of the accelerator position<br />
sensor and the idle switch.<br />
Are the accelerator position sensor and the idle<br />
switch adjusted correctly?<br />
19 Visually inspect the CKP sensor and the pulse<br />
wheel teeth.<br />
Are the CKP sensor and the pulse wheel teeth<br />
normal?<br />
20 Measure the gap between the CKP sensor and<br />
the pulse wheel teeth.<br />
Specification<br />
1.5—2.5 mm {0.059—0.098 in}<br />
Is the gap within the specification?<br />
21 Visually inspect the CMP sensor and the pulse<br />
wheel teeth.<br />
Are the CMP sensor and the pulse wheel teeth<br />
normal?<br />
TROUBLESHOOTING<br />
STEP INSPECTION RESULTS ACTION<br />
22 Inspect the fuel pressure sensor.<br />
Is the fuel pressure normal?<br />
23 Inspect the suction control valve.<br />
Is the suction control valve normal?<br />
Yes Go to the next step.<br />
No Replace the turbocharger.<br />
Yes Replace the turbocharger.<br />
No Go to the next step.<br />
Yes Excessive amount of oil is found:<br />
Replace the turbocharger.<br />
Small amount of oil is found:<br />
Wipe oil off vehicle, then go to the next step.<br />
No Go to the next step.<br />
Yes Wipe oil off vehicle and install all the removed parts in<br />
Step 10. Then, go to the next step.<br />
No Turbocharger is normal.<br />
Install all the removed parts in Step 10.<br />
Then, go to the next step.<br />
Yes Go to the next step.<br />
No Repair or replace the malfunctioning part according to<br />
the EGR control system inspection results.<br />
Yes Go to the next step.<br />
No Repair or replace the malfunctioning part according to<br />
the idle speed inspection results.<br />
Yes Go to the next step.<br />
No Adjust the accelerator position sensor and the idle<br />
switch correctly.<br />
Yes Go to the next step.<br />
No Replace the malfunctioning parts.<br />
Yes Go to the next step.<br />
No Adjust the CKP sensor position.<br />
Yes Inspect the following PIDs:<br />
(See F2–31 PCM INSPECTION.)<br />
• ECT<br />
• IAT<br />
• MAF<br />
• MAP<br />
• RPM<br />
No<br />
If the PID value is not as specified, repair or replace<br />
the malfunctioning parts.<br />
If the PID value is normal, go to the next step.<br />
Replace the malfunctioning parts.<br />
Yes Go to the next step.<br />
No Replace the common rail.<br />
Yes Go to the next step.<br />
No Repair the supply pump.<br />
24 Is the engine compression correct? Yes Go to the next step.<br />
No Inspect for the following:<br />
• Damaged valve seat<br />
• Worn valve stem and valve guide<br />
• Worn or stuck piston ring<br />
• Worn piston, piston ring or cylinder<br />
• Improper valve timing<br />
Service if necessary.<br />
F2–223<br />
F2
25 Inspect the fuel injector.<br />
Is the fuel injector normal?<br />
26 Inspect the IDM.<br />
Is the IDM normal?<br />
27 Inspect the timing belt for the following:<br />
• Gear teeth chipping<br />
• Low tension<br />
• Breakage damage or cracks<br />
Is the timing belt normal?<br />
End Of Sie<br />
NO.13 KNOCKING/PINGING<br />
F2–224<br />
TROUBLESHOOTING<br />
STEP INSPECTION RESULTS ACTION<br />
28 Verify the test results.<br />
• If normal, return to the diagnostic index to service any additional symptoms.<br />
• If the malfunction remains, replace the PCM.<br />
13 KNOCKING/PINGING<br />
DESCRIPTION • Excessive shrilly knocking sound from the engine<br />
POSSIBLE<br />
CAUSE<br />
• Poor fuel quality<br />
• Air leakage from intake-air system<br />
• Intake-air system restriction or clogging<br />
• Variable swirl control (VSC) system malfunction<br />
• Variable boost control (VBC) system malfunction<br />
• Intake shutter valve stuck close<br />
• VSC valve stuck close<br />
• Glow system malfunction<br />
• Low engine compression<br />
• Improper valve timing<br />
• Low coolant temperature<br />
• Incorrect fuel injection timing<br />
• Erratic signal from CKP sensor<br />
• Erratic signal from CMP sensor<br />
• ECT sensor or related circuit malfunction<br />
• MAF/IAT sensor or related circuit malfunction<br />
• IAT sensor No.2 or related circuit malfunction<br />
• Boost sensor or related malfunction<br />
• Fuel pressure sensor or related circuit malfunction<br />
• Accelerator position sensor or related circuit malfunction<br />
• Excessive fuel pressure<br />
• Fuel return line clogging or restriction<br />
• EGR system malfunction<br />
• EGR valve position sensor malfunction<br />
• Exhaust system and/or catalyst converter restriction<br />
• Turbocharger malfunction<br />
• Charge air cooler malfunction<br />
• Suction control valve malfunction (built-in supply pump)<br />
Yes Go to the next step.<br />
No Repair or replace if necessary.<br />
Yes Go to the next step.<br />
No Repair or replace if necessary.<br />
Yes Inspect following:<br />
• Clutch slippage<br />
• CKP sensor<br />
• Boost sensor and related circuit<br />
• Brake system for dragging<br />
No<br />
If normal, remove and inspect the supply pump and<br />
the common rail.<br />
If the valve timing is incorrect, adjust the valve timing.<br />
If the timing belt is not normal, replace the timing belt.<br />
B6E408018881108<br />
Warning<br />
The following troubleshooting flow chart contains the fuel system diagnosis and repair<br />
procedures. Read the following warnings before performing the fuel system services:<br />
• Fuel vapor is hazardous. It can easily ignite, causing serious injury and damage. Always keep<br />
sparks and flames away from fuel.<br />
• Fuel line spills and leakage are dangerous. Fuel can ignite and cause serious injury or death<br />
and damage. Fuel can also irritate skin and eyes. To prevent this, always complete “BEFORE<br />
REPAIR PROCEDURE” and “AFTER REPAIR PROCEDURE” described in this manual.
TROUBLESHOOTING<br />
Diagnostic Procedure<br />
STEP INSPECTION RESULTS ACTION<br />
1 Does the engine run cold? Yes Go to the symptom troubleshooting “NO.18 COOLING<br />
SYSTEM CONCERNS—RUNS COLD”.<br />
No Go to the next step.<br />
2 Inspect for the following:<br />
• Fuel quality (such as water contamination,<br />
winter/summer blend)<br />
• Fuel return line clogging and/or restriction<br />
• Intake-air system restriction or clogging<br />
• Exhaust system and/or catalyst converter<br />
restriction or clogging<br />
• Charge air cooler condition (restriction or<br />
damaged)<br />
Are all the items normal?<br />
3 Connect the WDS or equivalent to the DLC-2.<br />
Access the ECT PID.<br />
Verify the ECT PID is above 80 °C {176 °F}?<br />
4 Perform the self-test function using the WDS or<br />
equivalent.<br />
Turn the engine switch to the ON position.<br />
Retrieve any DTC.<br />
Is the DTC displayed?<br />
5 Inspect the intake shutter valve and the VSC<br />
valve operations.<br />
Is there any problem?<br />
6 Inspect the guide blade valve operation.<br />
Is there any problem?<br />
7 Inspect the hose bands between the following<br />
parts:<br />
• Turbocharger compressor housing and air<br />
cleaner<br />
• Turbocharger compressor housing and<br />
charge air cooler<br />
Are the hose bands loose?<br />
8 Inspect for improper operation, kinks, clogging<br />
or disconnection on guide blade actuator.<br />
Is the actuator normal?<br />
9 Remove the parts necessary to inspect the<br />
turbocharger.<br />
Do not remove the turbocharger.<br />
Inspect if the turbocharger compressor wheel is<br />
bent, damaged, or interfering with the housing<br />
on the vehicle.<br />
Is there any problem?<br />
10 Inspect if the turbocharger compressor wheel<br />
locknut is loose or has fallen into the<br />
turbocharger.<br />
Is there any problem?<br />
11 Inspect the turbocharger compressor wheel by<br />
hand.<br />
Does the wheel turn easily and smoothly?<br />
Yes Go to the next step.<br />
No Service if necessary.<br />
Repeat Step 2.<br />
Yes Go to the next step.<br />
No Inspect the ECT PID.<br />
Yes DTC is displayed:<br />
Go to the appropriate DTC test.<br />
Communication error message is displayed:<br />
Inspect for the following:<br />
• Open circuit between the PCM control relay and<br />
PCM terminal 53 or 79<br />
• Open circuit between the PCM control relay and<br />
PCM terminal 69<br />
• Stuck open PCM control relay<br />
• Open or poor GND circuit (PCM terminal 65, 85,<br />
103 or 104)<br />
• Poor connection at vehicle body GND<br />
No No DTC is displayed:<br />
Go to the next step.<br />
Yes Repair or replace if necessary.<br />
No Go to the next step.<br />
Yes Repair or replace if necessary.<br />
No Go to the next step.<br />
Yes Retighten the hose bands.<br />
If the concern is resolved, complete the inspection.<br />
If the concern still exists, go to the next step.<br />
No Go to the next step.<br />
Yes Go to the next step.<br />
No Repair or replace if necessary.<br />
If the concern is resolved, complete the inspection.<br />
If the concern still exists, the turbocharger is normal.<br />
Go to the next step.<br />
Yes Replace the turbocharger.<br />
No Go to the next step.<br />
Yes Replace the turbocharger.<br />
No Go to the next step.<br />
Yes Go to the next step.<br />
No Replace the turbocharger.<br />
F2–225<br />
F2
12 Inspect if the turbocharger turbine wheel is<br />
damaged, cracked or interfering with the<br />
housing on the vehicle.<br />
End Of Sie<br />
F2–226<br />
Note<br />
• Inspect all the fins on each turbine wheel.<br />
Is there any problem?<br />
13 Is any engine oil found inside the turbocharger<br />
turbine housing?<br />
14 Is any engine oil found inside the turbocharger<br />
compressor housing?<br />
15 Inspect the EGR system operation.<br />
(See F2–232 EGR Control System Inspection.)<br />
Is the EGR system operation normal?<br />
16 Inspect the glow system operation.<br />
Is the glow system operation normal?<br />
17 Visually inspect the CKP sensor and the pulse<br />
wheel teeth.<br />
Are the CKP sensor and the pulse wheel teeth<br />
normal?<br />
18 Measure the gap between the CKP sensor and<br />
the pulse wheel teeth.<br />
Specification<br />
1.5—2.5 mm {0.059—0.098 in}<br />
Is the gap within the specification?<br />
19 Visually inspect the CMP sensor and the pulse<br />
wheel teeth.<br />
Are the CMP sensor and the pulse wheel teeth<br />
normal?<br />
TROUBLESHOOTING<br />
STEP INSPECTION RESULTS ACTION<br />
Yes Replace the turbocharger.<br />
No Go to the next step.<br />
Yes Excessive amount of oil is found:<br />
Replace the turbocharger.<br />
Small amount of oil is found:<br />
Wipe oil off the vehicle, then go to the next step.<br />
No Go to the next step.<br />
Yes Wipe oil off vehicle and install all the removed parts in<br />
Step 10. Then, go to the next step.<br />
No The turbocharger is normal.<br />
Install all the removed parts in Step 10.<br />
Then, go to the next step.<br />
Yes Go to the next step.<br />
No Repair or replace the malfunctioning part according to<br />
the EGR control system inspection results.<br />
Yes Go to the next step.<br />
No Repair or replace the malfunctioning part according to<br />
the glow system operation results.<br />
Yes Go to the next step.<br />
No Replace the malfunctioning parts.<br />
Yes Go to the next step.<br />
No Adjust the CKP sensor position.<br />
Yes Inspect the following PIDs:<br />
(See F2–31 PCM INSPECTION.)<br />
• ECT<br />
• IAT<br />
• MAF<br />
• MAP<br />
• RPM<br />
If the PID value is not as specified, repair or replace<br />
the malfunctioning parts.<br />
If the PID value is normal, go to the next step.<br />
No Replace the malfunctioning parts.<br />
20 Is the engine compression correct? Yes Go to the next step.<br />
No Inspect for the following:<br />
• Damaged valve seat<br />
• Worn valve stem and valve guide<br />
• Worn or stuck piston ring<br />
• Worn piston, piston ring or cylinder<br />
• Improper valve timing<br />
Service if necessary.<br />
21 Inspect the suction control valve.<br />
Is the suction control valve normal?<br />
Yes Inspect the following:<br />
• Boost sensor<br />
• MAF/IAT sensor<br />
• IAT sensor No.2<br />
• Fuel pressure sensor<br />
• Accelerator position sensor<br />
No Repair the supply pump.<br />
22 Verify the test results.<br />
• If normal, return to the diagnostic index to service any additional symptoms.<br />
• If the malfunction remains, replace the PCM.
NO.15 EMISSION COMPLIANCE<br />
15 EMISSION COMPLIANCE<br />
DESCRIPTION • Fails emissions test.<br />
POSSIBLE<br />
CAUSE<br />
TROUBLESHOOTING<br />
• Poor fuel quality<br />
• Vacuum leakage<br />
• Air leakage from intake-air system<br />
• Intake-air system restriction or clogging<br />
• Variable swirl control (VSC) system malfunction<br />
• Variable boost control (VBC) system malfunction<br />
• Stuck closed intake shutter valve<br />
• Stuck closed VSC valve<br />
• Turbocharger malfunction<br />
• Guide blade valve malfunction<br />
• Charge air cooler malfunction<br />
• Glow system malfunction<br />
• EGR system malfunction<br />
• EGR valve position sensor malfunction<br />
• EGR water cooler malfunction<br />
• Low coolant temperature<br />
• Engine overheating<br />
• Inadequate fuel pressure<br />
• Fuel pressure limiter malfunction (built-in common rail)<br />
• Suction control valve inspection (built-in supply pump)<br />
• ECT sensor or related circuit malfunction<br />
• MAF/IAT sensor related circuit malfunction<br />
• IAT sensor No.2 or related circuit malfunction<br />
• Fuel pressure sensor or related circuit malfunction<br />
• Incorrect adjustment accelerator position sensor and/or idle switch<br />
• Accelerator position sensor or related circuit malfunction<br />
• Idle switch or related circuit malfunction<br />
• Fuel line clogging or restriction<br />
• Supply pump malfunction<br />
• Fuel injector malfunction<br />
• Incorrect fuel injection timing<br />
• Incorrect idle speed<br />
• Erratic signal from CKP sensor<br />
• Erratic signal from CMP sensor<br />
• Boost sensor or related circuit malfunction<br />
• Neutral switch or related circuit malfunction<br />
• VSS or related circuit malfunction<br />
• Low engine compression<br />
• Improper valve timing<br />
• Base engine malfunction<br />
• Exhaust system and/or catalyst converter restriction<br />
• Catalyst converter malfunction<br />
• IDM or related circuit malfunction<br />
B6E408018881109<br />
Warning<br />
The following troubleshooting flow chart contains the fuel system diagnosis and repair<br />
procedures. Read the following warnings before performing the fuel system services:<br />
• Fuel vapor is hazardous. It can easily ignite, causing serious injury and damage. Always keep<br />
sparks and flames away from fuel.<br />
• Fuel line spills and leakage are dangerous. Fuel can ignite and cause serious injury or death<br />
and damage. Fuel can also irritate skin and eyes. To prevent this, always complete “BEFORE<br />
REPAIR PROCEDURE” and “AFTER REPAIR PROCEDURE” described in this manual.<br />
F2–227<br />
F2
F2–228<br />
TROUBLESHOOTING<br />
Diagnostic Procedure<br />
STEP INSPECTION RESULTS ACTION<br />
1 Is the engine overheating? Yes Go to the symptom troubleshooting “NO.17 COOLING<br />
SYSTEM CONCERNS—OVERHEATING”.<br />
No Go to the next step.<br />
2 Does the engine run cold? Yes Go to the symptom troubleshooting “NO.18 COOLING<br />
SYSTEM CONCERNS—RUNS COLD”.<br />
No Go to the next step.<br />
3 Connect the WDS or equivalent to the DLC-2.<br />
Perform the self-test function using the WDS or<br />
equivalent.<br />
Turn the engine switch to the ON position.<br />
Retrieve any DTC.<br />
Is the DTC displayed?<br />
4 Inspect for the following:<br />
• Fuel quality (such as including water<br />
contamination, winter/summer blend)<br />
• Fuel return line clogging and/or restriction<br />
• Charge air cooler condition (restriction or<br />
damaged)<br />
• Intake-air system restriction<br />
• Exhaust system and/or catalyst converter<br />
restriction<br />
• Vacuum leakage<br />
Are all the items normal?<br />
5 Inspect the adjustment of the accelerator<br />
position sensor and the idle switch.<br />
Are the accelerator position sensor and the idle<br />
switch adjusted correctly?<br />
6 Inspect the neutral switch adjustment.<br />
Is the neutral switch adjusted correctly?<br />
7 Inspect the intake shutter valve and the VSC<br />
valve operations.<br />
Is there any problem?<br />
8 Inspect the guide blade valve operation.<br />
Is there any problem?<br />
9 Inspect the hose bands between following parts:<br />
• Turbocharger compressor housing and air<br />
cleaner<br />
• Turbocharger compressor housing and<br />
charge air cooler<br />
Are the hose bands loose?<br />
10 Inspect for improper operation, kinks, clogging<br />
or disconnection on the guide blade actuator.<br />
Is the actuator normal?<br />
11 Remove the parts necessary to inspect the<br />
turbocharger.<br />
Do not remove the turbocharger.<br />
Inspect if the turbocharger compressor wheel is<br />
bent, damaged, or interfering with the housing<br />
on the vehicle.<br />
Is there any problem?<br />
12 Inspect if the turbocharger compressor wheel<br />
locknut is loose or has fallen into the<br />
turbocharger.<br />
Is there any problem?<br />
Yes DTC is displayed:<br />
Go to appropriate DTC test.<br />
Communication error message is displayed:<br />
Inspect for the following:<br />
• Open circuit between PCM control relay and PCM<br />
terminal 53 or 79<br />
• Open circuit PCM control relay and PCM terminal<br />
69<br />
• PCM control relay stuck open<br />
• Open or poor GND circuit (PCM terminal 65, 85,<br />
103 or 104)<br />
• Poor connection vehicle body GND<br />
No No DTC is displayed:<br />
Go to the next step.<br />
Yes Go to the next step.<br />
No Service if necessary.<br />
Repeat Step 4.<br />
Yes Go to the next step.<br />
No Adjust the accelerator position sensor and the idle<br />
switch correctly.<br />
Yes Go to the next step.<br />
No Adjust the neutral switch correctly.<br />
Yes Repair or replace if necessary.<br />
No Go to the next step.<br />
Yes Repair or replace if necessary.<br />
No Go to the next step.<br />
Yes Retighten the hose bands.<br />
If the concern is resolved, complete the inspection.<br />
If the concern still exists, go to the next step.<br />
No Go to the next step.<br />
Yes Go to the next step.<br />
No Repair or replace if necessary.<br />
If the concern is resolved, complete the inspection.<br />
If the concern still exists, the turbocharger is normal.<br />
Go to the next step.<br />
Yes Replace the turbocharger.<br />
No Go to the next step.<br />
Yes Replace the turbocharger.<br />
No Go to the next step.
13 Inspect the turbocharger compressor wheel by<br />
hand.<br />
Does the wheel turn easily and smoothly?<br />
14 Inspect if the turbocharger turbine wheel is<br />
damaged, cracked or interfering with the<br />
housing on vehicle.<br />
Note<br />
• Inspect all the fins on each turbine wheel.<br />
Is there any problem?<br />
15 Is any engine oil found inside the turbocharger<br />
turbine housing?<br />
16 Is any engine oil found inside the turbocharger<br />
compressor housing?<br />
17 Inspect the EGR system operation.<br />
(See F2–232 EGR Control System Inspection.)<br />
Is the EGR system operation normal?<br />
18 Inspect the EGR water cooler for the following:<br />
• Coolant passage clogging/restriction<br />
• Exhaust gas clogging/restriction<br />
Is the EGR water cooler normal?<br />
19 Inspect the glow system operation.<br />
Is the glow system operation normal?<br />
20 Visually inspect the CKP sensor and the pulse<br />
wheel teeth.<br />
Are CKP sensor and the pulse wheel teeth<br />
normal?<br />
21 Measure the gap between the CKP sensor and<br />
the pulse wheel teeth.<br />
Specification<br />
1.5—2.5 mm {0.059—0.098 in}<br />
Is the gap within the specification?<br />
22 Visually inspect the CMP sensor and the pulse<br />
wheel teeth.<br />
Are the CMP sensor and the pulse wheel teeth<br />
normal?<br />
TROUBLESHOOTING<br />
STEP INSPECTION RESULTS ACTION<br />
23 Inspect the fuel pressure sensor.<br />
Is the fuel pressure normal?<br />
24 Inspect the suction control valve.<br />
Is the suction control valve normal?<br />
Yes Go to the next step.<br />
No Replace the turbocharger.<br />
Yes Replace the turbocharger.<br />
No Go to the next step.<br />
Yes Excessive amount of oil is found:<br />
Replace the turbocharger.<br />
Small amount of oil is found:<br />
Wipe oil off vehicle, then go to the next step.<br />
No Go to the next step.<br />
Yes Wipe oil off vehicle and install all the removed parts in<br />
Step 10. Then, go to the next step.<br />
No The turbocharger is normal.<br />
Install all the parts removed in Step 10.<br />
Then, go to the next step.<br />
Yes Go to the next step.<br />
No Repair or replace the malfunctioning part according to<br />
the EGR control system inspection results.<br />
Yes Go to the next step.<br />
No Service if necessary.<br />
Yes Go to the next step.<br />
No Repair or replace the malfunctioning part according to<br />
the glow system operation results.<br />
Yes Go to the next step.<br />
No Replace the malfunctioning parts.<br />
Yes Go to the next step.<br />
No Adjust the CKP sensor position.<br />
Yes Inspect the following PIDs:<br />
(See F2–31 PCM INSPECTION.)<br />
• ECT<br />
• IAT<br />
• MAF<br />
• MAP<br />
• RPM<br />
• VSS<br />
No<br />
If the PID value is not as specified, repair or replace<br />
the malfunctioning parts.<br />
If the PID value is normal, go to the next step.<br />
Replace the malfunctioning parts.<br />
Yes Go to the next step.<br />
No Replace the common rail.<br />
Yes Go to the next step.<br />
No Repair the supply pump.<br />
25 Is the engine compression correct? Yes Go to the next step.<br />
No Inspect for the following:<br />
• Damaged valve seat<br />
• Worn valve stem and valve guide<br />
• Worn or stuck piston ring<br />
• Worn piston, piston ring or cylinder<br />
• Improper valve timing<br />
Service if necessary.<br />
F2–229<br />
F2
26 Inspect the fuel injector.<br />
Is the fuel injector normal?<br />
27 Inspect the IDM.<br />
Is the IDM normal?<br />
28 Inspect the timing belt for followings:<br />
• Gear teeth chipping<br />
• Low tension<br />
• Breakage damage or cracks<br />
Is the timing belt normal?<br />
End Of Sie<br />
NO.19 EXCESSIVE BLACK SMOKE<br />
F2–230<br />
TROUBLESHOOTING<br />
STEP INSPECTION RESULTS ACTION<br />
29 Verify the test results.<br />
• If normal, return to the diagnostic index to service any additional symptoms.<br />
• If the malfunction remains, replace the PCM.<br />
19 EXCESSIVE BLACK SMOKE<br />
DESCRIPTION • Excessive black smoke is observed in exhaust gas.<br />
POSSIBLE<br />
CAUSE<br />
• Intake-air system clogging or restriction<br />
• Air leakage from Intake-air system<br />
• Incorrect fuel injection timing<br />
• Erratic signal from CKP sensor<br />
• Fuel pressure sensor or related circuit malfunction<br />
• Boost sensor or related circuit malfunction<br />
• IAT sensor No.2 or related circuit malfunction<br />
• Fuel injector malfunction<br />
• Excessive fuel pressure<br />
• Suction control valve malfunction (built-in supply pump)<br />
• Fuel line clogging or restriction<br />
• Fuel pressure limiter malfunction (built-in common rail)<br />
• Low engine compression<br />
• Improper valve timing<br />
• Base engine malfunction<br />
• EGR system malfunction<br />
• EGR valve position sensor malfunction<br />
• Variable boost control (VBC) system malfunction<br />
• Vacuum leakage<br />
• Turbocharger malfunction<br />
• Charge air cooler malfunction<br />
• Intake shutter valve malfunction<br />
• Variable swirl control (VSC) system malfunction<br />
• VSC valve malfunction<br />
• IDM or related circuit malfunction<br />
• Exhaust system and/or catalyst converter restriction or clogging<br />
Yes Go to the next step.<br />
No Repair or replace if necessary.<br />
Yes Go to the next step.<br />
No Repair or replace if necessary.<br />
Yes Inspect the following:<br />
• ECT sensor<br />
• Boost sensor<br />
• MAF/IAT sensor<br />
• Catalyst converter<br />
No<br />
If normal, remove and inspect the supply pump and<br />
the common rail.<br />
If the timing is incorrect, adjust the valve timing.<br />
If the timing belt is not normal, replace timing belt.<br />
B6E408018881110<br />
Warning<br />
The following troubleshooting flow chart contains the fuel system diagnosis and repair<br />
procedures. Read the following warnings before performing the fuel system services:<br />
• Fuel vapor is hazardous. It can easily ignite, causing serious injury and damage. Always keep<br />
sparks and flames away from fuel.<br />
• Fuel line spills and leakage are dangerous. Fuel can ignite and cause serious injury or death<br />
and damage. Fuel can also irritate skin and eyes. To prevent this, always complete “BEFORE<br />
REPAIR PROCEDURE” and “AFTER REPAIR PROCEDURE” described in this manual.
TROUBLESHOOTING<br />
Diagnostic Procedure<br />
STEP INSPECTION RESULTS ACTION<br />
1 Inspect for the following:<br />
• Intake-air system clogging or restriction<br />
• Exhaust system and/or catalyst converter<br />
restriction or clogging<br />
• Charge air cooler condition (restriction or<br />
damaged)<br />
Are all the items normal?<br />
2 Perform the self-test function using the WDS or<br />
equivalent.<br />
Turn the engine switch to the ON position.<br />
Retrieve any DTC.<br />
Is the DTC displayed?<br />
Yes Go to the next step.<br />
No Service if necessary.<br />
Repeat Step 1.<br />
Yes DTC is displayed:<br />
Go to the appropriate DTC test.<br />
Communication error message is displayed:<br />
Inspect for the following:<br />
• Open circuit between the PCM control relay and<br />
PCM terminal 53 or 79<br />
• Open circuit between the PCM control relay and<br />
PCM terminal 69<br />
• Stuck open PCM control relay<br />
• Open or poor GND circuit (PCM terminal 65, 85,<br />
103 or 104)<br />
• Poor connection at vehicle body GND<br />
No No DTC is displayed:<br />
Go to the next step.<br />
3 Does any other symptom exist? Yes Go to the appropriate flowchart.<br />
No Go to the next step.<br />
4 Inspect the air cleaner element for clogging.<br />
Is the air cleaner element normal?<br />
5 Inspect the intake shutter valve and the VSC<br />
valve operations.<br />
Is there any problem?<br />
6 Inspect the guide blade valve operation.<br />
Is there any problem?<br />
7 Visually inspect the CKP sensor and the pulse<br />
wheel teeth.<br />
Are the CKP sensor and the pulse wheel teeth<br />
normal?<br />
8 Measure the gap between the CKP sensor and<br />
the pulse wheel teeth.<br />
Specification<br />
1.5—2.5 mm {0.059—0.098 in}<br />
Is the gap within the specification?<br />
9 Visually inspect the CMP sensor and the pulse<br />
wheel teeth.<br />
Are the CMP sensor and the pulse wheel teeth<br />
normal?<br />
10 Inspect the EGR system operation.<br />
(See F2–232 EGR Control System Inspection.)<br />
Is the EGR system operation normal?<br />
11 Inspect the VSC system operation.<br />
Does the VSC system operate properly?<br />
12 Inspect the hose bands between the following<br />
parts:<br />
• Turbocharger compressor housing and air<br />
cleaner<br />
• Turbocharger compressor housing and<br />
charge air cooler<br />
Are the hose bands loose?<br />
Yes Go to the next step.<br />
No Repair or replace the air cleaner element.<br />
Yes Repair or replace if necessary.<br />
No Go to the next step.<br />
Yes Repair or replace if necessary.<br />
No Go to the next step.<br />
Yes Go to the next step.<br />
No Replace the malfunctioning parts.<br />
Yes Go to the next step.<br />
No Adjust the CKP sensor position.<br />
Yes Inspect the following PIDs:<br />
(See F2–31 PCM INSPECTION.)<br />
• IAT<br />
• MAP<br />
• RPM<br />
If the PID value is not as specified, repair or replace<br />
the malfunctioning parts.<br />
If PID value is normal, go to the next step.<br />
No Replace the malfunctioning parts.<br />
Yes Go to the next step.<br />
No Repair or replace the malfunctioning part according to<br />
the EGR control system inspection results.<br />
Yes Go to the next step.<br />
No Repair or replace the malfunctioning part according to<br />
the VSC system operation inspection results.<br />
Yes Retighten the hose bands.<br />
If the concern is resolved, complete the inspection.<br />
If the concern still exists, go to the next step.<br />
No Go to the next step.<br />
F2–231<br />
F2
13 Inspect for improper operation, kinks, clogging<br />
or disconnection on guide blade actuator.<br />
Is the actuator normal?<br />
14 Remove the parts necessary to inspect the<br />
turbocharger.<br />
Do not remove the turbocharger.<br />
Inspect if the turbocharger compressor wheel is<br />
bent, damaged, or interfering with housing on<br />
the vehicle.<br />
Is there any problem?<br />
15 Inspect if the turbocharger compressor wheel<br />
locknut is loose or has fallen into the<br />
turbocharger.<br />
Is there any problem?<br />
16 Inspect if the turbocharger compressor wheel by<br />
hand.<br />
Does the wheel turn easily and smoothly?<br />
17 Inspect if the turbocharger turbine wheel is<br />
damaged, cracked or interfering with the<br />
housing on the vehicle.<br />
F2–232<br />
TROUBLESHOOTING<br />
STEP INSPECTION RESULTS ACTION<br />
Note<br />
• Inspect all the fins on each turbine wheel.<br />
Is there any problem?<br />
18 Is any engine oil found inside the turbocharger<br />
compressor housing?<br />
19 Inspect the suction control valve.<br />
Is the suction control valve normal?<br />
End Of Sie<br />
ENGINE CONTROL SYSTEM OPERATION INSPECTION<br />
EGR Control System Inspection<br />
1. Perform the “Intake Shutter Valve Operation Inspection”.<br />
2. Make sure that all the hoses are securely connected in the proper position.<br />
3. Connect the WDS or equivalent to the DLC-2.<br />
4. Turn the engine switch to the ON position.<br />
5. Access the EGRVP PID.<br />
6. Verify that the PID value is within specification.<br />
Yes Go to the next step.<br />
No Repair or replace if necessary.<br />
If the concern is resolved, complete the inspection.<br />
If the concern still exists, the turbocharger is normal.<br />
Go to the next step.<br />
Yes Replace the turbocharger.<br />
No Go to the next step.<br />
Yes Replace the turbocharger.<br />
No Go to the next step.<br />
Yes Go to the next step.<br />
No Replace the turbocharger.<br />
Yes Replace the turbocharger.<br />
No Go to the next step.<br />
Yes Wipe oil off vehicle and install all the removed parts in<br />
Step 15. Then, go to the next step.<br />
No The turbocharger is normal.<br />
Install all the parts removed is Step 15. Then, go to the<br />
next step.<br />
Yes Go to the next step.<br />
No Repair the supply pump.<br />
20 Is the engine compression correct? Yes Go to the next step.<br />
No Inspect for the following:<br />
• Damaged valve seat<br />
• Worn valve stem and valve guide<br />
• Worn or stuck piston ring<br />
• Worn piston, piston ring or cylinder<br />
• Improper valve timing<br />
Service if necessary.<br />
21 Inspect the IDM.<br />
Is the IDM normal?<br />
22 Inspect the fuel injector.<br />
Is the fuel injector normal?<br />
23 Verify the test results.<br />
• If normal, return to the diagnostic index to service any additional symptoms.<br />
• If the malfunction remains, replace the PCM.<br />
Yes Go to the next step.<br />
No Repair or replace if necessary.<br />
Yes Inspect following:<br />
• Boost sensor<br />
• Fuel pressure limiter (built-in common rail)<br />
• Fuel pressure sensor<br />
• Fuel return line restriction or clogging<br />
No<br />
Service if necessary.<br />
Repair or replace if necessary.<br />
B6E408018881111
TROUBLESHOOTING<br />
• If not as specified, inspect the following.<br />
— EGR valve (stuck open)<br />
— EGR valve position sensor (See F2–37 EGR VALVE POSITION SENSOR INSPECTION.)<br />
Specification:<br />
0.4—0.6 V<br />
7. Start the engine and run it at idle speed.<br />
8. Verify that the EGRVP PID is within the specifications.<br />
• If not as specified, inspect the following:<br />
— EGR solenoid valve (vacuum)<br />
— EGR solenoid valve (vent)<br />
— EGR control solenoid valve<br />
— EGR valve position sensor (See F2–37 EGR VALVE POSITION SENSOR INSPECTION.)<br />
Specification:<br />
1.3—1.6 V<br />
9. Disconnect the vacuum hose from the EGR valve.<br />
10. Connect the vacuum pump to the EGR valve.<br />
11. Apply vacuum to the EGR valve and inspect if the engine speed becomes unstable or the engine stalls.<br />
• If the engine speed does not change, stop the engine and inspect the EGR valve.<br />
End Of Sie<br />
F2–233<br />
F2
STSPECIAL TOOLS<br />
SPECIAL TOOLS .................................................ST-2<br />
FUEL AND EMISSION CONTROL<br />
SYSTEMS.......................................................ST-2<br />
ST–1<br />
ST
FUEL AND EMISSION CONTROL SYSTEMS<br />
WDS<br />
End Of Sie<br />
ST–2<br />
SPECIAL TOOLS<br />
SPECIAL TOOLS<br />
– –<br />
B6E941001001102