Setting Fires With Electrical Timers
Setting Fires With Electrical Timers
Setting Fires With Electrical Timers

Create successful ePaper yourself
Turn your PDF publications into a flip-book with our unique Google optimized e-Paper software.
Bullet Connectors versus Alligator Clips<br />
Two options are presented below for connecting the firing wires of the timer to the igniter. This may seem<br />
like a trivial matter until you find yourself fumbling around in the dark with small wires and thick gloves and a<br />
pounding heart. It is imperative that a good connection be made quickly with no chance of error. We strongly<br />
recommend bullet connectors because they are the easiest to use in low light situations. Information on alligator<br />
clips is included in case you don't like bullet connectors or can't find good quality ones. (SIDENOTE: Alligator<br />
clips are perfect for one special application: the ends of the wires on a testing-bulb.) Other types of connectors are<br />
available but they don't offer any advantages.<br />
12<br />
WARNING: Merely twisting the wires together with your fingers is not reliable and should<br />
not be done.<br />
• Bullet connectors are called “snap on” connectors at Radio Shack. Bullet connectors are also sold at auto<br />
parts stores, although you may not find the right size. Look on the package for what gauge of wire they are<br />
designed to handle. Each timer needs two male connectors and each igniter needs two female connectors.<br />
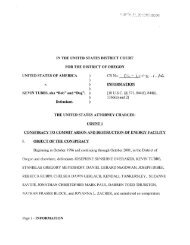
A bullet connector is designed to be<br />
crimped to a wire, but you will get a better<br />
electrical connection and a stronger physical<br />
connection if you solder them together instead.<br />
We urge you to solder whenever possible. On<br />
some types of bullet connectors, the sheath<br />
cannot be separated from the metal, so<br />
crimping is the only option. These types<br />
usually have a translucent sheath.<br />
To solder: Detach the plastic sheath that covers the bullet connector. Insert a small jeweler’s screwdriver<br />
to push the sheath off the metal part. Slide the sheath onto the wire (slide it far enough down the wire to be<br />
out of the way). Insert the wire into the bullet connector and solder it in place. Return the sheath to its original<br />
position. Wrap electrical tape around the sheath and down onto the wire for an inch or two.<br />
To crimp: You need to make two crimps per bullet connector. The first crimp, in the middle of the bullet<br />
connector, crushes the metal against the exposed portion of wire and creates the electrical connection. The<br />
second crimp, on the outer end of the bullet connector, crushes the metal against the insulated portion of wire<br />
and makes the connection stronger. When stripping the end of the wire, you must carefully judge how much<br />
insulation to remove in order to make a crimp on both exposed and insulated portions of wire. Don’t use<br />
pliers to make crimps. Strong crimps can only be made using an actual crimper. Most wirestrippers have a<br />
crimper built in – the position varies from model to model – ask someone to show you where it is if you don’t<br />
know. Some wirestrippers have toothed jaws for use as pliers – don’t mistake them for crimpers. If the crimp<br />
doesn’t hold when you tug on the wire, check that the bullet connector is the right size for that gauge of wire.<br />
Always wrap electrical tape around the bullet connector and down the wire for an inch or two.<br />
Additional notes: To separate a male/female pair of connectors that have been snapped together, grasp<br />
only the bullet connectors, not the wires, to safely pull them apart. Pulling on the wire puts unnecessary stress<br />
on the crimp and may cause it to fail. If bullet connectors receive a lot of use during testing, the female<br />
connector may get loose as the barrel spreads out slightly (especially if you removed the plastic sheath and<br />
couldn’t replace it for whatever reason). If this happens, use pliers to squeeze the barrel back together.<br />
• Alligator clips look just like the jaws of an<br />
alligator with a long row of interlocking<br />
teeth. Get the small size. Some brands have a<br />
hood of insulating plastic that covers a large<br />
portion of the alligator clip. This is a very<br />
beneficial feature because it reduces the<br />
chance of a short circuit.<br />
To attach an alligator clip to a wire,<br />
remove the hood (if there is one) and slide the<br />
Figure C: Bullet Connectors<br />
Figure D: An Alligator Clip<br />
Tabs