Installation Instructions - Klaxon Signals Ltd.
Installation Instructions - Klaxon Signals Ltd.
Installation Instructions - Klaxon Signals Ltd.

You also want an ePaper? Increase the reach of your titles
YUMPU automatically turns print PDFs into web optimized ePapers that Google loves.
EN<br />
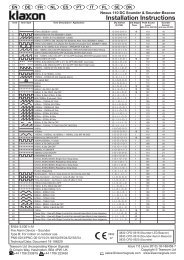
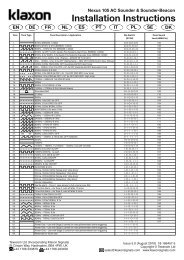
Low Voltage AC Sounder & Sounder-Beacon<br />
<strong>Installation</strong> <strong>Instructions</strong><br />
Tone Tone Type Tone Description / Application Dip Switch 3rd Stage Peak Sound<br />
(S1/S2) Tone Level (dBA@1m)<br />
1. 970Hz (BS5839-1:2002) O-O-O-O-O-O 18 110<br />
2. 800Hz/970Hz @ 2Hz (BS5839-1:2002) O-O-O-O-O-I 1 110<br />
3. 800Hz – 970Hz @ 1Hz (BS5839-1:2002) O-O-O-O-I-O 1 110<br />
4. 970Hz 1s OFF/1s ON (Apollo Fire Systems Alert Tone, BS5839-1:2002) O-O-O-O-I-I 1 110<br />
5. 970Hz, 0.5s/ 630Hz, 0.5s (Apollo Fire Systems Evacuate Tone, BS5839-1:2002) O-O-O-I-O-O 1 110<br />
6. 554Hz, 0.1s/ 440Hz, 0.4s (France – AFNOR NF S 32 001 ) O-O-O-I-O-I 1 107<br />
7. 500 – 1200Hz, 3.5s/ 0.5s OFF (Netherlands – NEN 2575:2000) Dutch Slow Whoop O-O-O-I-I-O 1 110<br />
8. 420Hz 0.625s ON/0.625s OFF (Australia AS1670 Alert tone) O - O - O - I - I - I 1 105<br />
9. 500 – 1200Hz, 0.5s/ 0.5s OFF x 3/1.5s OFF (Australia AS1670 Evacuation tone) O-O-I-O-O-O 1 110<br />
10. 550Hz/440Hz @ 0.5Hz O-O-I-O-O-I 19 107<br />
11. 970Hz, 0.5s ON/0.5s OFF x 3/ 1.5s OFF (ISO 8201 Low tone) O-O-I-O-I-O 1 110<br />
12. 2850Hz, 0.5s ON/0.5s OFF x 3/1.5s OFF (ISO 8201 High tone) O - O - I - O - I - I 1 112<br />
13. 1200Hz – 500Hz @ 1Hz (DIN 33 404) O-O-I-I-O-O 1 110<br />
14. 400Hz O - O - I - I - O - I 18 105<br />
15. 550Hz, 0.7s/1000Hz, 0.33s O - O - I - I - I - O 1 111<br />
16. 1500Hz – 2700Hz @ 3Hz (Vandal Alarm) O - O - I - I - I - I 1 116<br />
17. Simulated Bell O-I-O-O-O-O 1 112<br />
18. 2130Hz O-I-O-O-O-I 1 113<br />
19. 660Hz O-I-O-O-I-O 10 109<br />
20. 660Hz 1.8s ON/1.8s OFF O - I - O - O - I - I 19 108<br />
21. 660Hz 0.15s ON/0.15s OFF O-I-O-I-O-O 19 107<br />
22. 510Hz, 0.25s/ 610Hz, 0.25s O - I - O - I - O - I 1 107<br />
23. 800/1000Hz 0.5s each (1Hz) O - I - O - I - I - O 1 111<br />
24. 250Hz – 1200Hz @ 12Hz O - I - O - I - I - I 1 105<br />
25. 500Hz – 1200Hz @ 0.33Hz. O-I-I-O-O-O 1 110<br />
26. 2400Hz – 2900Hz @ 9Hz O - I - I - O - O - I 1 116<br />
27. 2400Hz – 2900Hz @ 3Hz O - I - I - O - I - O 1 116<br />
28. 800Hz – 970Hz @ 100Hz O - I - I - O - I - I 1 110<br />
29. 800Hz – 970Hz @ 9Hz O - I - I - I - O - O 1 110<br />
30. 800Hz – 970Hz @ 3Hz O - I - I - I - O - I 1 110<br />
31. 800Hz, 0.25s ON/1s OFF O - I - I - I - I - O 1 108<br />
32. 500Hz – 1200Hz, 3.75s/0.25s OFF (AS2220) O - I - I - I - I - I 1 110<br />
33. 340Hz I-O-O-O-O-O 1 106<br />
34. 1000Hz I-O-O-O-O-I 18 111<br />
35. 1400Hz – 1600Hz, 1s/1600Hz – 1400Hz, 0.5s (NF 48-265) I-O-O-O-I-O 1 110<br />
36. 660Hz 6.5s ON/13s OFF I - O - O - O - I - I 19 108<br />
37. 1000Hz/2000Hz, 1s each I-O-O-I-O-O 1 113<br />
38. 720Hz, 0.7s ON/0.3s OFF I - O - O - I - O - I 1 106<br />
39. 970Hz, 0.25s ON/OFF I - O - O - I - I - O 1 110<br />
40. 2800Hz, 1s ON/OFF I - O - O - I - I - I 1 113<br />
41. 2800Hz 0.25s ON/OFF I-O-I-O-O-O 1 113<br />
42. 2400/2900 @ 2Hz I - O - I - O - O - I 1 115<br />
43. Chime, 554Hz/440Hz Single shot ‘ding dong’ I - O - I - O - I - O 1 104<br />
44. Chime, 554Hz/440Hz Repeating ‘ding dong’ I - O - I - O - I - I 1 107<br />
45. Chime, 970Hz/800Hz Single shot ‘ding dong’ I- O - I - I - O - O 1 106<br />
46. Chime, 970Hz/800Hz Repeating ‘ding dong’ I - O - I - I - O - I 1 106<br />
47. Hooter, Repeating I - O - I - I - I - O 1 107<br />
48. Gentle alarm - Tone 2, rises slowly to full volume over 30s I - O - I - I - I - I 1 109<br />
49. Time-Out Alarm – As Tone 2, cuts off after 10 mins I-I-O-O-O-O 1 109<br />
50. Time-Out Alarm – As Tone 2, cuts off after 2 mins I - I - O - O - O - I 1 109<br />
51. 750Hz 0.33s ON/0.51s OFF I - I - O - O - I - O 1 106<br />
52. 750Hz 0.51s ON/0.33s OFF I - I - O - O - I - I 1 107<br />
53. 550Hz, 0.33s/1000Hz, 0.7s I - I - O - I - O - O 1 111<br />
54. 600Hz – 900Hz/ 0.9s I - I - O - I - O - I 1 109<br />
55. 660Hz – 680Hz/ 0.9s I - I - O - I - I - O 1 105<br />
56. 670Hz – 725Hz/ 0.9s I - I - O - I - I - I 1 107<br />
57. 920Hz – 750Hz/ 0.9s I - I - I - O - O - O 1 110<br />
58. 700Hz - 900Hz, 0.3s/0.6s OFF I - I - I - O - O - I 1 109<br />
59. 900Hz - 760Hz, 0.6s/0.3s OFF I - I - I - O - I - O 1 110<br />
60. 750Hz I - I - I - O - I - I 18 107<br />
61. Power Only – Use with Stage 3 control for manual/intermittent chime triggering I - I - I - I - O - O 43<br />
62. Power Only – Use with Stage 3 control for manual/intermittent chime triggering I - I - I - I - O - I 43<br />
63. Power Only – Use with Stage 3 control for manual/intermittent horn triggering I - I - I - I - I - O 47<br />
64. Reserved for future use I - I - I - I - I - I<br />
Texecom <strong>Ltd</strong> (Incorporating <strong>Klaxon</strong> <strong>Signals</strong>)<br />
St Crispin Way, Haslingden, BB4 4PW, UK<br />
+44 1706 233879 +44 1706 223450<br />
Issue 6.0 (August 2010) 18-186508<br />
Copyright © Texecom <strong>Ltd</strong><br />
sales@klaxonsignals.com www.klaxonsignals.com
Low Voltage AC Sounder & Sounder-Beacon<br />
<strong>Installation</strong> <strong>Instructions</strong><br />
EN<br />
<strong>Installation</strong> Manual<br />
<strong>Installation</strong><br />
a. The sounder is installed by first mounting the base unit and making the<br />
external wring connections to the base. The head unit then automatically<br />
connects when it is attached to the base.<br />
b. The sounder head is separated from the base by unlocking the four<br />
¼-turn fasteners in the corners of the sounder. (Recommended<br />
screwdriver: Philips No. 2, min 100mm long).<br />
c. Note that the head only fits onto the base one way around.<br />
Wiring<br />
a. Power<br />
Device Common (Neutral) 20 -50V AC<br />
Sounder<br />
AC1<br />
AC2<br />
Each power terminal is duplicated to enable simple ‘daisy-chain’<br />
connection of multiple units.<br />
b. Remote Tone Switching (If required): Externally link control terminals<br />
as shown below.<br />
Alarm Stage Example Signal Activation<br />
Stage 1 ‘Alert’ No Connection (Default)<br />
Stage 2 ‘Evacuate’ Link Terminal S2 to terminal<br />
Stage 3 ‘All Clear’ Link Terminal to terminal<br />
S3<br />
Technical Specification:<br />
Supply Voltage Range 20-53V AC 50/60Hz<br />
Current (Sounder)<br />
10-50mA* max.<br />
(Typ. 45mA @ 24V, Tone 1)<br />
(Sounder-Beacon) ..<br />
30-100mA*Max<br />
(Typ. 65mA @ 24V, Tone 1)<br />
Peak Sound Level 104-116 dBA at 1m*<br />
(Typ. 110dBA @ 24V, Tone 1)<br />
Number of Tones 64<br />
Frequency Range<br />
340 - 2900 Hz*<br />
Volume Control<br />
20 dBA typical<br />
Remote Tone Switching Provision for 3 volt-free contact<br />
activated alarm stages<br />
Operating Temperature - 25°C to +55°C<br />
Casing<br />
High Impact Polycarbonate/ABS<br />
IP Rating<br />
IP66 with suitable cable glands<br />
Synchronisation<br />
Automatic with <strong>Klaxon</strong> Nexus and<br />
Sonos Sounders<br />
*depends on selected tone and supply voltage<br />
Controls<br />
a. Tone Selection<br />
The first and second stage alarm tones are independently set using<br />
6-way dipswitches S1 and S2 respectively. The required settings are<br />
shown in the table overleaf. The third stage alarm tone is pre-set to<br />
complement the selected first stage tone as shown in the table.<br />
b. Volume Control<br />
The sound output of the unit can be reduced by up to 20dBA by<br />
adjusting the potentiometer. At low sound levels the sound may take<br />
a few seconds to decay away after power is removed from the<br />
sounder.<br />
The European directive “Waste Electrical and Electronic Equipment” (WEEE)<br />
aims to minimise the impact of electrical and electronic equipment waste on<br />
the environment and human health. To conform with this directive, electrical<br />
equipment marked with this symbol must not be disposed of in European public<br />
disposal systems. European users of electrical equipment must now return<br />
end-of-life equipment for disposal. Further information can be found on the<br />
following website: http://www.recyclethis.info/.