Download the latest Jets vacuum piping guide - Marine Plant Systems
Download the latest Jets vacuum piping guide - Marine Plant Systems
Download the latest Jets vacuum piping guide - Marine Plant Systems

Create successful ePaper yourself
Turn your PDF publications into a flip-book with our unique Google optimized e-Paper software.
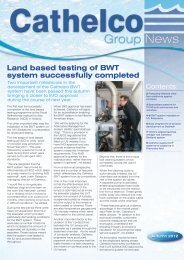
Sanitary systems<br />
- made to please<br />
45<br />
45<br />
45<br />
BRANCH PIPE<br />
45<br />
ISSUE A 2011<br />
www.jetsgroup.com<br />
Myravegen 1, N-6060 Hareid, Norway. Tel. + 47 70 03 91 00. Fax + 47 70 03 91 01. E-mail: post@jets.no
User Manual<br />
Table of Contents<br />
1 INTRODUCTION 5<br />
1.0 Terms and Conditions 6<br />
1.1 Introduction 6<br />
1.2 Standard and Regulations 6<br />
1.3 Support 6<br />
2 SYSTEM DESCRIPTION 7<br />
2.0 Vacuum Toilet System 8<br />
3 TEST PROCEDURE AND ACCEPTANCE CRETERIAS 9<br />
3.0 Vacuum Pipes Only 10<br />
3.1 Complete Vacuum System 10<br />
4 DESIGN AND INSTALLATION GUIDELINES - DOWNWARD PIPE CONFIGURATION 11<br />
4.0 Vacuum System Layout, Downward 12<br />
4.1 The Optimal Vacuum System Layout 13<br />
4.2 Choice of Piping Layout 14<br />
4.2.1 Location of Vacuum Unit in Different Types of Ships 14<br />
4.2.2 Vacuum Reservoir Calculationt 15<br />
4.2.3 Vacuum Reservoir Balance 15<br />
4.2.4 Choice of Branches 15<br />
4.2.5 Sectioning and Shut-Off of Valves for Service 16<br />
4.3 Horizontal Pipes 17<br />
4.3.1 Transport in Horizontal Pipes 17<br />
4.3.2 Transport Pockets 17<br />
4.4 Pipe Connections 19<br />
4.4.1 Rodding Points 19<br />
4.4.2 Bends 20<br />
4.4.3 Branches 20<br />
5 DESIGN AND INSTALLATION GUIDELINES - UPWARD PIPE CONFIGURATION 21<br />
5.0 System with Lift From Toilets 22<br />
5.1 Vacuum System Layout, Upward 23<br />
5.1.1 Mounting of Vacuum Pipes in Ceilings 25<br />
5.2 Connection to Vacuum Main Branch 25<br />
5.2.1 Rising Pipes from Toilets 25<br />
5.2.2 Gooseneck 26<br />
5.2.3 Connection to Horizontal Branch Pipe 26<br />
5.2.4 Mounting of Horizontal Branch Pipes in Paneled Ceilings 27<br />
5.2.5 Joining of Pipes With Different Dimensions 27<br />
www.jetsgroup.com<br />
Myravegen 1, N-6060 Hareid, Norway. Tel. + 47 70 03 91 00. Fax + 47 70 03 91 01. E-mail: post@jets.no<br />
TM<br />
2
User Manual<br />
Table of Contents<br />
6 GENERAL PIPING INSTALLATION GUIDELINES 29<br />
6.0 Toilet Connections 30<br />
6.0.1 Alignment of Pipe to Toilet Valve 30<br />
6.0.2 Connection to Toilet Valve 30<br />
6.0.3 Flexible Hose 30<br />
6.1 Pipe Clamps 31<br />
6.2 Vacuum Accumulating Tank 31<br />
6.3 Grey Water Interface Unit 32<br />
6.3.1 Grey Water Interface Unit, Piping 32<br />
6.3.2 Grey Water Interface Unit 32<br />
6.4 Pipe Tables 33<br />
Table 1 - Materials 33<br />
Table 2 - Number of Vacuum Toilets 33<br />
7 DESCALING AND CLEANING OF VACUUM SEWAGE PIPELINES 35<br />
7.0 <strong>Jets</strong> Descale 36<br />
Data sheet 8020 37<br />
7.1 <strong>Jets</strong> Toilet Clean 38<br />
7.2. <strong>Jets</strong> Dosing Unit 38<br />
7.2.1 Dosing directly into <strong>the</strong> main branch via an automatic dosing unit. 38<br />
www.jetsgroup.com<br />
Myravegen 1, N-6060 Hareid, Norway. Tel. + 47 70 03 91 00. Fax + 47 70 03 91 01. E-mail: post@jets.no<br />
TM<br />
3
User Manual<br />
Dictionary<br />
Accumulating tank<br />
Atmospheric pressure<br />
<br />
Branches<br />
Black water<br />
Collecting tank<br />
Discharge pumps<br />
Gooseneck<br />
Grey water interface unit<br />
For small systems with short distance <strong>piping</strong>, a <strong>vacuum</strong> accumulating tank<br />
may be needed. An accumulating tank is recommended if <strong>the</strong> total pipe<br />
volume is less than 160 litres ( approx. 85 metres of DN50 pipe ).<br />
Air pressure at sea level<br />
<br />
toilet.<br />
Branches are connected to main pipes. We recommend system design with<br />
short horizontal branches. In larger systems we recommend shut-off valves<br />
for each branch.<br />
Industry name for sewage, normally from toilets and urinals. The name is used<br />
to distinguish from grey water.<br />
Tank for collecting black water, and sometimes grey water, from a <strong>vacuum</strong><br />
system.<br />
Discharge pumps are mainly used for overboard discharge of content from<br />
collecting tanks. They can be supplied in different types and capacities.<br />
<br />
Also known as a grey water interface tank. A tank used to interface grey<br />
water outlets from showers, wash basins etc. with a <strong>vacuum</strong> system.<br />
Fitted with a CD or ED valve and level sensor for valve activation and tank<br />
discharge. Normal sizes are 8, 12 and 16 liters..<br />
Holding tank<br />
Tank for holding (storing) blackwater, and greywater, from a <strong>vacuum</strong> system.<br />
Rodding point<br />
Sewage treatment plant -<br />
STP<br />
Slope<br />
Slug<br />
Transport pocket<br />
Vacuum<br />
Vacuum system<br />
Vacuumarator pump<br />
<br />
stretches of pipes install in connection with transport pockets.<br />
<strong>Plant</strong> for treatment of black water, and grey water, prior to overboard<br />
discharge ( from ships ) or release back into <strong>the</strong> ecosystem ( on land ).<br />
Horizontal pipe with a downward angle.<br />
<br />
<br />
<strong>the</strong> pressure difference in front of and at <strong>the</strong> back of <strong>the</strong> pocket will push <strong>the</strong><br />
slug on to <strong>the</strong> next pocket.<br />
Any air pressure below atmospheric pressure, often described in percentages<br />
of total <strong>vacuum</strong>. Our CVS systems generally operate between 40 - 55%<br />
<strong>vacuum</strong>.<br />
A complete system consisting of <strong>vacuum</strong> pipes, <strong>vacuum</strong> unit, <strong>vacuum</strong> toilets<br />
and in some cases also interface units for grey water and urinals.<br />
A <strong>vacuum</strong> generator developed by <strong>Jets</strong>. Generates <strong>vacuum</strong> and macerates<br />
and transports sewage in a single-pass operation. The Vacuumarator pump<br />
is a purpose-built design based on <strong>the</strong> Helivac pump principle.<br />
www.jetsgroup.com<br />
Myravegen 1, N-6060 Hareid, Norway. Tel. + 47 70 03 91 00. Fax + 47 70 03 91 01. E-mail: post@jets.no<br />
TM<br />
4
User Manual<br />
1<br />
Introduction<br />
TM<br />
Sanitary <strong>Systems</strong><br />
– made to please
User Manual<br />
Introduction<br />
1.0 Terms and Conditions<br />
The <strong>Jets</strong> <strong>vacuum</strong> <strong>piping</strong> <strong>guide</strong> is considered a <strong>guide</strong>line only, and is intended to<br />
assist pipeline designers to avoid design errors. It is not to be used as a complete<br />
instruction. Pipelines are <strong>the</strong> building yard/installer`s responsibility, and <strong>Jets</strong> AS<br />
can not be held responsible for any malfunction of <strong>the</strong> system due to incorrect<br />
pipeline design or construction. This is a <strong>guide</strong>line for all ships with <strong>the</strong> exception of<br />
cruise-ships.<br />
1.1 Introduction<br />
This <strong>vacuum</strong> <strong>piping</strong> <strong>guide</strong> provides information on <strong>piping</strong> for <strong>vacuum</strong> sewage as well as waste water<br />
pipes connected to such systems. The <strong>vacuum</strong> <strong>piping</strong> must be in accordance with <strong>vacuum</strong> sewage<br />
system transportation principles. During transport through <strong>the</strong> <strong>piping</strong> system, <strong>the</strong> slug is affected by<br />
gravity and will level out when <strong>the</strong> toilet valve closes. For this reason it is necessary to have transport<br />
pockets in <strong>the</strong> pipe system where <strong>the</strong> slug can re-form. Pipes are to be secured by clamps, and rodding<br />
points are to be made where convenient.<br />
1.2 Standards and Regulations<br />
See national shipyard standards for <strong>vacuum</strong> toilet systems. This manual is our recommendation<br />
for pipe installations. Each country follows its own national standards and regulations.<br />
1.3 Support<br />
Please contact:<br />
<strong>Jets</strong> AS<br />
Myravegen 1<br />
N-6060 Hareid<br />
Tel.: +47 700 39 100<br />
Fax.: +47 700 39 101<br />
E-mail: post@jets.no<br />
www.jetsgroup.com<br />
Myravegen 1, N-6060 Hareid, Norway. Tel. + 47 70 03 91 00. Fax + 47 70 03 91 01. E-mail: post@jets.no<br />
TM<br />
6
User Manual<br />
2<br />
System Description<br />
TM<br />
Sanitary <strong>Systems</strong><br />
– made to please
User Manual<br />
System Description<br />
2.0 Vacuum Toilet System<br />
A <strong>Jets</strong> AS <strong>vacuum</strong> toilet system consists of:<br />
1. A <strong>vacuum</strong> generating unit for producing <strong>vacuum</strong>.<br />
2. A <strong>piping</strong> system for transport of sewage.<br />
3. Toilets, urinals, grey water interface units etc. to let <strong>the</strong> sewage into <strong>the</strong> <strong>piping</strong> system.<br />
Difference in air pressure is used to transport<br />
sewage from toilets to a <strong>vacuum</strong> unit. In idle<br />
position <strong>the</strong>re is 40 - 55% <strong>vacuum</strong> in <strong>the</strong> <strong>piping</strong><br />
system. When flushing a toilet, air is let into<br />
<strong>the</strong> system. The content in <strong>the</strong> bowl is sucked<br />
into <strong>the</strong> <strong>piping</strong> toge<strong>the</strong>r with 60 -80 liters of<br />
air. Water and effluent will form a slug. This<br />
slug will be sucked about 5 to 15 meter into<br />
<strong>the</strong> pipeline. The exact distance depends on<br />
<strong>the</strong> level of <strong>vacuum</strong>, dimension of <strong>the</strong> pipe,<br />
direction of flow, bends and o<strong>the</strong>r restrictions<br />
in <strong>the</strong> <strong>piping</strong>. When <strong>the</strong> toilet valve closes,<br />
<strong>the</strong> movement of <strong>the</strong> slug will stop, and <strong>the</strong><br />
sewage will flow by gravity to <strong>the</strong> lowest point<br />
in <strong>the</strong> pipe. In order to have fur<strong>the</strong>r transport,<br />
<strong>the</strong> slug must be re-formed.<br />
By building transport pockets in <strong>the</strong> pipelines,<br />
<strong>the</strong> sewage will flow into <strong>the</strong> closest transport<br />
pocket. When next flushing of <strong>the</strong> toilet takes<br />
place, <strong>the</strong> sewage from one transport pocket<br />
will move to <strong>the</strong> next transport pocket<br />
simultaneous with emptying of <strong>the</strong> toilet, until<br />
reaching <strong>the</strong> <strong>vacuum</strong> generating unit. As a<br />
result of each toilet flushing, <strong>the</strong> <strong>vacuum</strong><br />
level in <strong>the</strong> pipe system will decrease,<br />
and <strong>the</strong> <strong>vacuum</strong> generating unit will start<br />
and maintain <strong>the</strong> <strong>vacuum</strong> level in <strong>the</strong> pipe<br />
system.<br />
When a toilet is flushed, 1 - 1,2 liters of<br />
sewage and 60 - 80 liters of air are sucked<br />
into <strong>the</strong> pipe. A perfectly installed pipe<br />
system will allow sewage to form slug in<br />
<strong>the</strong> transport pockets. The remaining part of<br />
<strong>the</strong> pipe will be empty and act as a <strong>vacuum</strong><br />
reservoir.<br />
During running, <strong>the</strong> Vacuumarator pump<br />
will macerate <strong>the</strong> sewage, generate <strong>vacuum</strong><br />
and pump <strong>the</strong> sewage to <strong>the</strong> sewage<br />
treatment plant, collecting tank or elsewhere,<br />
all in one process.<br />
www.jetsgroup.com<br />
Myravegen 1, N-6060 Hareid, Norway. Tel. + 47 70 03 91 00. Fax + 47 70 03 91 01. E-mail: post@jets.no<br />
TM<br />
8
User Manual<br />
3<br />
Test Procedure<br />
and<br />
Acceptance Criteria<br />
TM<br />
Sanitary <strong>Systems</strong><br />
– made to please
User Manual<br />
Test Procedure Acceptance Criteria<br />
3.0 Vacuum Pipes Only<br />
Leakage test to be carried out of complete <strong>vacuum</strong> pipes, without any component, ( toilets,<br />
grey water interfaces, <strong>vacuum</strong> unit etc. ) connected.<br />
All pipe ends to be blinded.<br />
The maximum accepted leakage is: Vacuum drop from -0.55 bar to -0.45 bar during one hour.<br />
3.1 Complete Vacuum System<br />
Leakage test to be carried out of complete <strong>vacuum</strong> system, with all components ( toilets, grey water<br />
interfaces, <strong>vacuum</strong> unit etc. ) connected.<br />
The maximum accepted leakage is: Vacuum drop from -0.55 bar to -0.4 bar over 20 minutes.<br />
www.jetsgroup.com<br />
Myravegen 1, N-6060 Hareid, Norway. Tel. + 47 70 03 91 00. Fax + 47 70 03 91 01. E-mail: post@jets.no<br />
TM<br />
10
User Manual<br />
4<br />
Design and Installation Guidelines-<br />
<br />
TM<br />
Sanitary <strong>Systems</strong><br />
– made to please
User Manual<br />
<br />
4.0 Vacuum System Layout Downward<br />
Outlet pipes from toilets should point downwards i.e. collecting pipes and branches should<br />
<br />
mounted ) is installed, <strong>the</strong> outlet should be connected to a horizontal branch beneath <strong>the</strong><br />
deck.<br />
<br />
outlet pipe from toilets to <strong>the</strong> collecting pipe branch will, in resting position, contain only air<br />
under <strong>vacuum</strong> and <strong>the</strong>reby ensure safe operation of <strong>the</strong> toilets. Sewage aggregated in <strong>the</strong><br />
horizontal pipes due to change in trim or list, will not give any impact regarding <strong>the</strong> function<br />
of <strong>the</strong> toilet valves.<br />
As a general rule however, each horizontal pipe should be as short as possible and connect<br />
to as few toilets as possible on each branch to maximize reliable function.<br />
NOTE<br />
Important to remember:<br />
Trim of <strong>the</strong> ship.<br />
Total length of <strong>the</strong> pipe branch.<br />
Slope.<br />
www.jetsgroup.com<br />
Myravegen 1, N-6060 Hareid, Norway. Tel. + 47 70 03 91 00. Fax + 47 70 03 91 01. E-mail: post@jets.no<br />
TM<br />
12
User Manual<br />
<br />
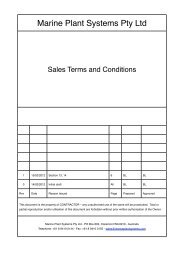
4.1 The Optimal Vacuum System Layout<br />
Reference Name Page<br />
1 Toilet Connection 30<br />
2 Transport Pocket 17<br />
3 Grey Water Interface Unit 32<br />
4 Pipelines Passing Obstructions 18<br />
5 Bends 20<br />
www.jetsgroup.com<br />
Myravegen 1, N-6060 Hareid, Norway. Tel. + 47 70 03 91 00. Fax + 47 70 03 91 01. E-mail: post@jets.no<br />
TM<br />
13
User Manual<br />
<br />
4.2 Choice of Piping Layout<br />
4.2.1 Location of Vacuum Unit in Different Types of Ships<br />
As a main rule <strong>the</strong> <strong>vacuum</strong> generating unit should always be located at <strong>the</strong> absolutely lowest point of<br />
<strong>the</strong> <strong>vacuum</strong> system. In addition, it should be located in such a way that main pipes and branches are<br />
as short as possible. Branch pipes from toilets should be routed in a downward direction towards <strong>the</strong><br />
<strong>vacuum</strong> generating unit. In addition, <strong>the</strong> following must be considered when installing a <strong>vacuum</strong> <strong>piping</strong><br />
system:<br />
The size of <strong>the</strong> ship.<br />
The risk of varying trim and list of <strong>the</strong> ship.<br />
www.jetsgroup.com<br />
Myravegen 1, N-6060 Hareid, Norway. Tel. + 47 70 03 91 00. Fax + 47 70 03 91 01. E-mail: post@jets.no<br />
TM<br />
14
User Manual<br />
<br />
4.2.2 Vacuum Reservoir Calculation<br />
The total <strong>vacuum</strong> reservoir is a result of <strong>the</strong> total<br />
<br />
liters of air is let into <strong>the</strong> pipes. When <strong>the</strong> <strong>vacuum</strong><br />
<br />
generating unit will start to rebuild <strong>the</strong> <strong>vacuum</strong>.<br />
How far <strong>the</strong> <strong>vacuum</strong> level will drop and how often<br />
<strong>the</strong> <strong>vacuum</strong> generating unit will start is dependent<br />
on <strong>the</strong> total pipe volume.<br />
To rebuild <strong>the</strong> <strong>vacuum</strong> will take anywhere from a few<br />
seconds to several minutes, depending on <strong>the</strong> pipe<br />
volume and capacity of <strong>the</strong> <strong>vacuum</strong> generating unit.<br />
<br />
toilets (i.e. peak load on passenger vessels,<br />
ferries, etc.) <strong>the</strong> total pipe volume must be large<br />
enough support <strong>the</strong> systems function.<br />
In vessels with a total pipe volume of less than<br />
160 litres, we recommend increasing <strong>the</strong> <strong>vacuum</strong><br />
reservoir by installing an accumulatingtank.<br />
4.2.3 Vacuum Reservoir Balance<br />
When a toilet is flushed, air is sucked into <strong>the</strong> pipe by <strong>the</strong> <strong>vacuum</strong> in <strong>the</strong> pipe system. From a<br />
toilet at <strong>the</strong> end of <strong>the</strong> pipe, <strong>the</strong> effluent will move towards <strong>the</strong> <strong>vacuum</strong> generator. However,<br />
when a toilet in <strong>the</strong> middle of <strong>the</strong> pipe is flushed, <strong>the</strong> <strong>vacuum</strong> reservoir towards <strong>the</strong> end of <strong>the</strong><br />
pipe will cause some of <strong>the</strong> effluent to be sucked in <strong>the</strong> “wrong” direction. To minimize such<br />
problems, we recommend designing <strong>the</strong> system with short horizontal branches and reducing<br />
<strong>the</strong> number of toilets connected to each branch.<br />
4.2.4 Choice of Branches<br />
An optimally constructed <strong>piping</strong> system is designed to contain as little water as possible during<br />
ordinary operation. This is obtained by making horizontal pipes as short as possible and with<br />
as few bends as possible. Horizontal collecting pipes/main pipes should be located in a way<br />
that branches will be as short as possible.<br />
www.jetsgroup.com<br />
Myravegen 1, N-6060 Hareid, Norway. Tel. + 47 70 03 91 00. Fax + 47 70 03 91 01. E-mail: post@jets.no<br />
TM<br />
15
User Manual<br />
<br />
4.2.5 Sectioning and Shut-off of Valves for Service<br />
When deciding <strong>the</strong> number of main pipes<br />
from <strong>the</strong> <strong>vacuum</strong> generating unit to <strong>the</strong> branch<br />
points, <strong>the</strong> number of toilets, number of decks<br />
and <strong>the</strong> need for shutting-off service should<br />
be considered. If blockage or leakage in <strong>the</strong><br />
<strong>vacuum</strong> pipes should occur, it is important to<br />
ensure that <strong>the</strong> remaining part of <strong>the</strong> system<br />
can still be utilized.<br />
We recommend to install a minimum of two<br />
branch pipes from <strong>the</strong> <strong>vacuum</strong> unit manifold<br />
to <strong>the</strong> toilets. Each branch pipe should be<br />
installed with a shut-off valve for isolation in<br />
case of failure.<br />
www.jetsgroup.com<br />
Myravegen 1, N-6060 Hareid, Norway. Tel. + 47 70 03 91 00. Fax + 47 70 03 91 01. E-mail: post@jets.no<br />
TM<br />
16
User Manual<br />
<br />
For passenger ships with public toilets, separate pipes should be installed to both ladies`and gentlemen`s<br />
toilets. The purpose is to maintain operation ( of ladies` or gentlemen`s ) toilets in case of blocking or<br />
leakage in one line.<br />
4.3 Horizontal Pipes<br />
4.3.1 Transport in Horizontal Pipes<br />
Downward directed outlet pipes from toilets:<br />
The pipes may be mounted horizontally between <strong>the</strong> transport pockets, provided that <strong>the</strong> outlet<br />
<br />
4.3.2 Transport Pocket<br />
Transport pockets are made to re-form<br />
slugs. When a toilet on <strong>the</strong> same pipeline is<br />
<br />
and at <strong>the</strong> back of <strong>the</strong> pocket will “push” <strong>the</strong><br />
slug on to <strong>the</strong> next pocket.<br />
www.jetsgroup.com<br />
Myravegen 1, N-6060 Hareid, Norway. Tel. + 47 70 03 91 00. Fax + 47 70 03 91 01. E-mail: post@jets.no<br />
TM<br />
17
User Manual<br />
<br />
When passing obstructions ( ie. crossing ventilation ducts, crossing pipes and etc. ), it is advantageous<br />
to construct <strong>the</strong> passing as a transport pocket.<br />
The distance between transport pockets should be decided considering <strong>the</strong> risk of change in trim<br />
and list of <strong>the</strong> vessel, and <strong>the</strong> ship’s movement due to sea conditions.<br />
Recommended Distances Between Transport Pockets:<br />
Vessel type<br />
Distance<br />
Fishing vessels 5 meters<br />
O<strong>the</strong>r vessels: cargo ships, container vessels and <strong>the</strong> like<br />
Large passenger vessels<br />
10 meters<br />
15 meters<br />
For systems with downward directed outlet pipes from toilets to horizontal pipe branches, <strong>the</strong> distance<br />
between transport pockets should not exceed 25 meters.<br />
If <strong>the</strong> <strong>vacuum</strong> pipe must to be placed<br />
above obstructions, it is important to<br />
place a transport pocket in front of <strong>the</strong><br />
rising pipe. In this way maximum speed<br />
of <strong>the</strong> transported sewage is obtained in<br />
<strong>the</strong> rising pipe.<br />
If <strong>the</strong> horizontal pipe at <strong>the</strong> higher<br />
level exceeds 2000mm a gooseneck<br />
<br />
www.jetsgroup.com<br />
Myravegen 1, N-6060 Hareid, Norway. Tel. + 47 70 03 91 00. Fax + 47 70 03 91 01. E-mail: post@jets.no<br />
TM<br />
18
User Manual<br />
<br />
4.4 Pipe Connections<br />
The number of toilets connected to<br />
branches and collecting pipes will<br />
decide <strong>the</strong> pipe dimensions. The most<br />
commonly used dimension for pipes<br />
from toilets, and also from branches is<br />
DN50 for multiple of toilets (up to 20-25<br />
toilets ). For collecting pipes exceeding<br />
25 toilet connections, DN65 is to be used.<br />
Connection of horizontal branches to<br />
downward carried out collecting pipes<br />
should always be done with a downward<br />
45º bend connection. In larger systems<br />
we recommend shut-off valves for each<br />
<br />
access to shut-off valves.<br />
4.4.1 Rodding Points<br />
<br />
of pipe, installation of <strong>the</strong> rodding points can occur in connection with transport pockets.<br />
www.jetsgroup.com<br />
Myravegen 1, N-6060 Hareid, Norway. Tel. + 47 70 03 91 00. Fax + 47 70 03 91 01. E-mail: post@jets.no<br />
TM<br />
19
User Manual<br />
<br />
4.4.2 Bends<br />
Bends are to be made with a large radius of curvature.<br />
<br />
minimum radius is to be 2 x D, or a 90 o bend<br />
made of two 45 o bend pieces.<br />
For welded steel pipes, <strong>the</strong> minimum bend radius<br />
<br />
is to be smooth and without obstructions to avoid<br />
clogging.<br />
4.4.3 Branches<br />
Connecting of pipes is to be made at a maximum<br />
angle of 45º in <strong>the</strong> direction of transport. T-pipes<br />
are not to be used. Branch pipes are always to<br />
be connected to horizontal main pipes from<br />
above. Branch pipes are always to be connected<br />
to vertical main pipes at an angle of 45º.<br />
www.jetsgroup.com<br />
Myravegen 1, N-6060 Hareid, Norway. Tel. + 47 70 03 91 00. Fax + 47 70 03 91 01. E-mail: post@jets.no<br />
TM<br />
20
User Manual<br />
5<br />
Design and Installation Guidelines-<br />
<br />
TM<br />
Sanitary <strong>Systems</strong><br />
– made to please
User Manual<br />
<br />
5.0 System with Lift from Toilets<br />
Our general recommendation is ( as stated in 4.0 ) is that toilets should be installed above pipework<br />
in <strong>the</strong> toilet system. On occasion this is not possible. One of <strong>the</strong> advantages with a <strong>vacuum</strong> system, is<br />
<br />
<strong>vacuum</strong> waste upward ( one deck ) from a toilet to a from a toilet to a horizontal pipe located below<br />
<strong>the</strong> deck above. When installing in this manner correct pipe installation layout are vital. This is due<br />
<br />
strain on <strong>the</strong> system in general.<br />
NOTE<br />
Important to remember:<br />
Trim of <strong>the</strong> ship.<br />
Total length of <strong>the</strong> pipe branch.<br />
Slope.<br />
www.jetsgroup.com<br />
Myravegen 1, N-6060 Hareid, Norway. Tel. + 47 70 03 91 00. Fax + 47 70 03 91 01. E-mail: post@jets.no<br />
TM<br />
22
User Manual<br />
<br />
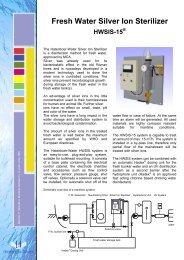
5.1 Vacuum System Layout, Upward<br />
Reference Name Page<br />
1 Toilet Connection 30<br />
2 Gooseneck 26<br />
3 Transport Pocket 17<br />
4 Grey Water Interface Unit 32<br />
5 Pipelines Passing Obstructions 18<br />
6 Bends 20<br />
www.jetsgroup.com<br />
Myravegen 1, N-6060 Hareid, Norway. Tel. + 47 70 03 91 00. Fax + 47 70 03 91 01. E-mail: post@jets.no<br />
TM<br />
23
User Manual<br />
<br />
If a downward layout of outlet pipes from <strong>the</strong> toilets is not possible, each toilet may be connected<br />
to horizontal pipes in <strong>the</strong> ceiling. If this solution is chosen, correct layout of <strong>the</strong> <strong>vacuum</strong> <strong>piping</strong> is<br />
vital.<br />
This is achieved by:<br />
1. Horizontal pipes are to be installed with a minimum number of bends, and <strong>the</strong> number of<br />
transport pockets as recommended for <strong>the</strong> type of ship.<br />
2. Horizontal branch pipes are to be as short as possible.<br />
3. Vertical collection pipes must be installed so as to avoid undesired waterlocks<br />
towards <strong>the</strong> <strong>vacuum</strong> generating unit.<br />
4. The <strong>vacuum</strong> generating unit is to be located at <strong>the</strong> lowest point of <strong>the</strong> <strong>vacuum</strong><br />
system, and also in a central position in relation to <strong>the</strong> <strong>piping</strong> system.<br />
It is preferable that <strong>vacuum</strong> pipes be mounted with a slope between <strong>the</strong> transport pockets in <strong>the</strong><br />
<br />
At transverse sections of <strong>vacuum</strong> <strong>piping</strong>,<br />
distance between transport pockets should be<br />
considered separately. Even for large vessels,<br />
length of transverse sections may require<br />
reduced distance between transport pockets.<br />
Bends in pipe lines will always obstruct <strong>the</strong><br />
<br />
accumulation of sewage just after <strong>the</strong> bend.<br />
It is <strong>the</strong>refore recommended to install a<br />
transport pocket just after such a bend to collect<br />
<br />
speed at <strong>the</strong> next straight section. When several<br />
bends are located close to each o<strong>the</strong>r, a transport<br />
pocket should be located just after <strong>the</strong> last<br />
<br />
to install transport pockets just after branch<br />
.<br />
www.jetsgroup.com<br />
Myravegen 1, N-6060 Hareid, Norway. Tel. + 47 70 03 91 00. Fax + 47 70 03 91 01. E-mail: post@jets.no<br />
TM<br />
24
User Manual<br />
<br />
5.1.1 Mounting of Vacuum Pipes in Ceilings<br />
In many installations <strong>the</strong> horizontal branch pipes are<br />
mounted in <strong>the</strong> ceiling between <strong>the</strong> overlaying deck and<br />
<strong>the</strong> paneled ceiling. As a consequence, toilet outlets are<br />
connected to a vertical pipe, which in turn is connected<br />
to a horizontal branch pipe in <strong>the</strong> ceiling.<br />
The greatest challenge in such cases is to avoid back-<br />
<br />
<br />
<br />
discharge function, and in <strong>the</strong> worst case, cause sewage<br />
<br />
5.2 Connection to Vacuum Main Branch<br />
5.2.1 Rising Pipes from Toilets<br />
NOTE<br />
Bends are not allowed on rising pipes.<br />
Vertical pipe connections are to be straight running with no<br />
bends, to obtain <strong>the</strong> best possible transport out from <strong>the</strong> toilet.<br />
If <strong>the</strong>re is an obstruction behind <strong>the</strong> toilet, <strong>the</strong> rising pipe can be a maximum of 1500mm from <strong>the</strong> toilet.<br />
A transport pocket must be located just before <strong>the</strong> rising pipe.<br />
www.jetsgroup.com<br />
Myravegen 1, N-6060 Hareid, Norway. Tel. + 47 70 03 91 00. Fax + 47 70 03 91 01. E-mail: post@jets.no<br />
TM<br />
25
User Manual<br />
<br />
5.2.2 Gooseneck<br />
The rising pipe is to be connected to <strong>the</strong><br />
upper side of <strong>the</strong> horizontal branch pipe with a<br />
gooseneck at an angle of 45° in <strong>the</strong> direction<br />
<br />
minimum height of 3 x <strong>the</strong> diameter of <strong>the</strong> pipe.<br />
5.2.3 Connection to <strong>the</strong> Horizontal Branch Pipe<br />
The rising pipe from a toilet must never be connected to a point on a horizontal branch pipe that may<br />
<br />
The reason for this is that in case of low <strong>vacuum</strong> in <strong>the</strong> horizontal branch pipes, water may be sucked<br />
<br />
In corridors where rising pipes from toilets on both sides are connected to a common branch pipe, <strong>the</strong><br />
rising pipe should go as high up as possible and <strong>the</strong>n point downwards towards <strong>the</strong> branch pipe.<br />
www.jetsgroup.com<br />
Myravegen 1, N-6060 Hareid, Norway. Tel. + 47 70 03 91 00. Fax + 47 70 03 91 01. E-mail: post@jets.no<br />
TM<br />
26
User Manual<br />
<br />
5.2.4 Mounting of Horizontal Branch Pipes in Paneled Ceilings<br />
Horizontal branch pipes between overlaying decks and paneleds ceiling are to be placed as close<br />
to <strong>the</strong> paneled ceiling as possible, i.e. transport pockets are to form lower boundary layers towards<br />
<strong>the</strong> ceiling. In this way, maximum space for <strong>the</strong> gooseneck in <strong>the</strong> joint between <strong>the</strong> rising pipe from<br />
toilet to <strong>the</strong> horizontal pipe is obtained.<br />
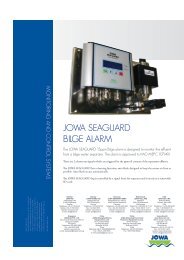
5.2.5 Joining of Pipes with Different Dimensions<br />
The number of toilets connected to branches and<br />
collecting pipes will decide <strong>the</strong> pipe dimension.<br />
The most commonly used dimension for pipes<br />
from toilets, and also from branches is DN50 for<br />
multiple toilets (up to 20- 25 toilets).<br />
For collecting pipes exceeding 25 toilet connections,<br />
DN 65 is used.<br />
Important note: rising pipes with <strong>vacuum</strong> transport<br />
from lower to higher levels must never be installed<br />
with transitions to larger dimensions of pipe.<br />
Correct<br />
Incorrect<br />
The reason for this is that larger dimensions of pipe create less speed of air and consequently<br />
slower transport and shorter distances of transport. The consequences of this are increased risk of<br />
<br />
www.jetsgroup.com<br />
Myravegen 1, N-6060 Hareid, Norway. Tel. + 47 70 03 91 00. Fax + 47 70 03 91 01. E-mail: post@jets.no<br />
TM<br />
27
User Manual<br />
TM<br />
Sanitary systems<br />
- made to please<br />
www.jetsgroup.com<br />
Myravegen 1, N-6060 Hareid, Norway. Tel. + 47 70 03 91 00. Fax + 47 70 03 91 01. E-mail: post@jets.no<br />
TM<br />
28
User Manual<br />
6<br />
General Piping Installation<br />
Guidelines<br />
TM<br />
Sanitary <strong>Systems</strong><br />
– made to please
User Manual<br />
General Piping Installation Guidelines<br />
6.0 Toilet Connections<br />
6.0.1 Alignment of Pipe to Toilet Valve<br />
To avoid leakage between <strong>the</strong> toilet valve and <strong>the</strong><br />
toilet bowl, it is important that <strong>the</strong> pipe is properly<br />
aligned.<br />
6.0.2 Connection to <strong>the</strong> Toilet Valve<br />
The rubber sleeve and elbow are to be secured with hose clamps.<br />
6.0.3 Flexible Hose<br />
<br />
<br />
should be as short as possible.<br />
The distance between <strong>the</strong> toilet outlet<br />
and <strong>the</strong> pipe system must not exceed<br />
70% of <strong>the</strong> total length of <strong>the</strong> hose.<br />
<br />
hose clamps.<br />
www.jetsgroup.com<br />
Myravegen 1, N-6060 Hareid, Norway. Tel. + 47 70 03 91 00. Fax + 47 70 03 91 01. E-mail: post@jets.no<br />
TM<br />
30
User Manual<br />
General Piping Installation Guidelines<br />
6.1 Pipe Clamps<br />
The followint pipes are to with<br />
secured according to clamps by<br />
recommendation from <strong>the</strong> pipe<br />
supplier:<br />
Change of direction<br />
Vertical <strong>piping</strong><br />
After connection of a toilet or<br />
o<strong>the</strong>r equipment<br />
Every 1,5 m or every 2nd. frame<br />
for plastic pipes.<br />
Every 2,0 m for DN 40 steel pipe<br />
Every 2,3 m for DN 50 steel pipe<br />
Every 2,7 m for DN 65 steel pipe<br />
6.2 Vacuum Accumulating Tank<br />
For small <strong>vacuum</strong> systems ( up to approx.10 toilets ), a <strong>vacuum</strong> accumulating tank must be considered.<br />
An accumulating tank is recommended if <strong>the</strong> total pipe<br />
volume is less than 160 L<br />
( equal to approx.85 m pipe length DN50 ).<br />
www.jetsgroup.com<br />
Myravegen 1, N-6060 Hareid, Norway. Tel. + 47 70 03 91 00. Fax + 47 70 03 91 01. E-mail: post@jets.no<br />
TM<br />
31
User Manual<br />
General Piping Installation Guidelines<br />
6.3 Grey Water Interface Unit<br />
6.3.1 Grey Water in Vacuum Sewage <strong>Systems</strong>.<br />
<br />
system. This is because <strong>the</strong> volume of grey water is normally much higher than black water, and it is<br />
treated separately or collected in separate collecting tanks. However, in special situations, it might<br />
be desired that grey water be fed into <strong>the</strong> black water system.<br />
Reasons may include<br />
circumstances where it<br />
is impossible to install<br />
gravity pipes in a spe-<br />
<br />
water volume is so limited<br />
that feeding into <strong>the</strong> black<br />
water system is accepted.<br />
When grey water fed into<br />
<strong>the</strong> black water system<br />
is considered, <strong>the</strong> risk<br />
of negative aspects of<br />
cleaning detergents must<br />
be acknowledged.<br />
Soapy water may create<br />
foaming in <strong>vacuum</strong> pumps<br />
and disinfection detergents<br />
such as chlorine etc. may<br />
harm <strong>the</strong> sewage treatment<br />
process. To feed grey water<br />
into a <strong>vacuum</strong> system, a<br />
grey water interface unit must be installed. The grey water interface unit ( typical size 8,16 liter ) includes an<br />
interface valve (ED valve) built on <strong>the</strong> tank. The valve is automatically operated by a level sensor in <strong>the</strong> tank<br />
which activates <strong>the</strong> ED valve to feed <strong>the</strong> grey water into <strong>the</strong> <strong>vacuum</strong> pipe.<br />
6.3.2 Grey Water Interface Unit<br />
Normally, grey water is be led in separate gravity pipe lines to a sewage treatment plant<br />
or collecting tank.<br />
However, in cases where <strong>the</strong> grey water must be connected to <strong>the</strong> ship’s <strong>vacuum</strong> system, this can<br />
be done by installing a grey water unit with interface (ED valve) to <strong>the</strong> <strong>vacuum</strong> system.<br />
www.jetsgroup.com<br />
Myravegen 1, N-6060 Hareid, Norway. Tel. + 47 70 03 91 00. Fax + 47 70 03 91 01. E-mail: post@jets.no<br />
TM<br />
32
User Manual<br />
General Piping Installation Guidelines<br />
6.4 Pipe tables<br />
Table 1 - Materials<br />
Material: PEH PVC Steel Stainless steel<br />
Use:<br />
Minimum Pressure<br />
Rating:<br />
Accomodation<br />
up to 75 mm<br />
(DN 65)<br />
Accomodation<br />
up to 75 mm<br />
(DN 65)<br />
In engine room<br />
or o<strong>the</strong>r heat -<br />
producing areas.<br />
Sizes above DN<br />
65/80 to be used*<br />
PN 10 PN 10 PN 10 PN 10<br />
In accomodation<br />
and<br />
engine room<br />
PEH = High Density Polyethylene. PVC = Polyvinylchlorine, e.g. DIN 86013.<br />
NOTE<br />
Plastic pipes do not resist temperatures above 60 o C under <strong>vacuum</strong> conditions.<br />
Steel pipes are to be galvanized.<br />
<br />
Table 2 – Number of Vacuum Toilets<br />
Number<br />
of <strong>vacuum</strong><br />
toilets<br />
Connection<br />
DN<br />
PEH<br />
d x s (mm)<br />
Minimum pipe size<br />
PVC<br />
d x s (mm)<br />
Steel<br />
d x s (mm)<br />
Stainless<br />
steel<br />
d x s (mm)<br />
0 - 3 40 50 x 3.0 50 x 2.4 48.3 x 2.6 50 x 1.0<br />
4 - 25 50 63 x 5.8 63 x 3.0 60.3 x 2.9 50 x 1.0<br />
26 - 100 65 75 x 6.9 75 x 3.6 76.1 x 2.9 75 x 1<br />
For installations exceeding 100 toilets, <strong>Jets</strong> AS is to be contacted.<br />
d = outside diameter. s = wall thickness.<br />
www.jetsgroup.com<br />
Myravegen 1, N-6060 Hareid, Norway. Tel. + 47 70 03 91 00. Fax + 47 70 03 91 01. E-mail: post@jets.no<br />
TM<br />
33
User Manual<br />
TM<br />
Sanitary systems<br />
- made to please<br />
www.jetsgroup.com<br />
Myravegen 1, N-6060 Hareid, Norway. Tel. + 47 70 03 91 00. Fax + 47 70 03 91 01. E-mail: post@jets.no<br />
TM<br />
34
User Manual<br />
7<br />
Descaling and Cleaning<br />
of<br />
Vacuum Sewage Pipelines<br />
TM<br />
Sanitary <strong>Systems</strong><br />
– made to please
User Manual<br />
Descaling and Cleaning of Vacuum Sewage Pipelines<br />
7.0 <strong>Jets</strong> Descale<br />
It is recommended to start with <strong>Jets</strong> Descale / Toilet Clean on all new buildings.<br />
Urine scale is a hard substance that arises due to chemical reaction between <strong>the</strong> calcium in <strong>the</strong><br />
water and <strong>the</strong> urine. Without any action taken a<br />
build-up of scale in <strong>the</strong> <strong>vacuum</strong> pipes will sooner<br />
or later occur depending on several factors.<br />
The temperature, <strong>the</strong> content of calcium in <strong>the</strong> fresh<br />
water and <strong>the</strong> frequency of use of <strong>the</strong> toilets are<br />
factors which decide <strong>the</strong> rapidity of <strong>the</strong> scale build-up.<br />
In order to avoid scale build-up, it is recommended<br />
to follow <strong>the</strong> <strong>Jets</strong> descaling program. The <strong>Jets</strong><br />
descaling program provides treatment for 4 different<br />
scenarios:<br />
1<br />
2<br />
3<br />
4<br />
The <strong>Jets</strong> descale maintenance program offers treatment to clean pipes in<br />
order to avoid new scale build-up.<br />
The <strong>Jets</strong> descale program offers treatment to minor scale build-up and is carried out over a<br />
longer period of time.<br />
The <strong>Jets</strong> descale boosting programme offers treatment to severe scale build-up where<br />
immediate action is necessary ( see datasheet 813398 ).<br />
Strong acid treatment is recommended to remove extremely severe scale build-up. This requires<br />
that <strong>the</strong> toilets be disconnected and <strong>the</strong> pipes plugged ( can be carried out in <strong>the</strong> repair yard ).<br />
a<br />
b<br />
c<br />
Fill up <strong>the</strong> pipe line with a liquid mixture of phosphoric acid and water ( 10% acid and 90% water).<br />
Arrange circulation of <strong>the</strong> mixture if possible. Keep <strong>the</strong> circulation running for 24 hours<br />
Flush out with water.<br />
The <strong>Jets</strong> descaling programmes allow running toilets during processes 1-3. It is <strong>the</strong>refore not<br />
necessary to disconnect <strong>the</strong> toilets or plug <strong>the</strong> pipes during <strong>the</strong> descaling process.<br />
<strong>Jets</strong> AS recommend 2 options:<br />
1<br />
2<br />
Manual dosing: Poor <strong>the</strong> <strong>Jets</strong> descaling liquid directly into <strong>the</strong> toilets according to <strong>Jets</strong><br />
recommended dosing program.<br />
Automatic dosing: Dosing units to be installed in <strong>the</strong> vessel according to <strong>Jets</strong><br />
recommendations.<br />
It is highly recommended to follow <strong>Jets</strong> recommendations accurately in order to obtain<br />
maximum effect.<br />
<br />
www.jetsgroup.com<br />
Myravegen 1, N-6060 Hareid, Norway. Tel. + 47 70 03 91 00. Fax + 47 70 03 91 01. E-mail: post@jets.no<br />
TM<br />
36
User Manual<br />
<strong>Jets</strong> Toilet Clean / <strong>Jets</strong> Descale<br />
DATA SHEET NO. 813398 - 18.11.2010 Page 1 of 1<br />
Principle<br />
& Function<br />
Use of <strong>Jets</strong>TM Toilet Clean in New Toilet <strong>Systems</strong><br />
<strong>Jets</strong>TM Toilet Clean may be used like any ordinary cleansing agent for cleaning <strong>the</strong> toilet bowl. If desired,<br />
<br />
<br />
new toilet systems. <strong>Jets</strong>TM recommend using one (1) liter of Toilet Clean per 70 to 100 toilets, depending<br />
on <strong>the</strong> amount of cleaning required.<br />
Dosing Directly into <strong>the</strong> Main Branch via an Automatic<br />
Dosing Unit<br />
For automatic dosing, it is necessary to determine <strong>the</strong> number of toilets covered by <strong>the</strong> dosing unit. Calculate 1cl<br />
<strong>Jets</strong>TM Descale per toilet, twice during a 24 hour period. If <strong>the</strong> dosing unit covers 50 toilets <strong>the</strong> calculation<br />
will be as follows: 50cl (½ liter) x 2 = 1 liter per 24 hours. Using this information, <strong>the</strong> system may be set to<br />
automatic dosing for a period of 24 hours with dosing occurring at regular intervals as frequently as deemed<br />
necessary (i.e. 1dl 10 times per 24 hours or 4,2cl every hour or 0,5 liter twice per 24 hours). Dosing at<br />
frequent intervals with small doses is preferable and <strong>the</strong> most effective means of cleaning.<br />
We recommend 4,2cl per hour.<br />
Dosing by Adding <strong>Jets</strong>TM Descale Directly into <strong>the</strong> Toilet<br />
To calculate dosing requirements when dosing directly into <strong>the</strong> toilet, apply <strong>the</strong> same recommendations<br />
as when using an automatic dosing unit. In addition, 2cl of Descale may be added when cleaning <strong>the</strong><br />
toilet. If dosing in a multiple toilet system, and Descale is to be added via one toilet only, select <strong>the</strong> toilet<br />
with <strong>the</strong> longest distance from <strong>the</strong> <strong>vacuum</strong>arator. Calculate <strong>the</strong> quantity of Descale required using <strong>the</strong><br />
previous recommendations (i.e. if <strong>the</strong>re are 50 toilets in <strong>the</strong> system, <strong>the</strong> total amount of <strong>Jets</strong>TM Toilet<br />
Clean will be 1 liter per 24 hours). Remember that by using a dosing unit or by dosing directly into one<br />
toilet, only <strong>the</strong> main branch will be cleaned and not <strong>the</strong> outlet pipes from each toilet (as when applying<br />
Toilet Clean to each individual toilet). We recommend that <strong>Jets</strong>TM Toilet Clean be used for all installations<br />
(both new and old toilet systems).<br />
Shutdown and Cleaning by Circulating <strong>Jets</strong> Descale<br />
(Boosting Program)<br />
<br />
solutions. For our boosting program, special pumps, parts and tools are required. If desired, <strong>Jets</strong> AS can arrange<br />
training courses for maintenance personnel.<br />
The optimal effect of <strong>Jets</strong>TM Descale is obtained by dosing so as to ensure that <strong>the</strong> cleansing agent remains<br />
in <strong>the</strong> pipes for as long as possible. Applying Descale directly into <strong>the</strong> toilet should be carried out at times when<br />
toilet use is infrequent (e.g. at night). By applying a dosing unit, <strong>the</strong> effects of <strong>Jets</strong>TM Descale are optimized.<br />
By dosing a small amount once every hour <strong>the</strong> effect is maximized.<br />
Note: Changes without prior notice<br />
www.jetsgroup.com<br />
Myravegen 1, N-6060 Hareid, Norway. Tel. + 47 70 03 91 00. Fax + 47 70 03 91 01. E-mail: post@jets.no<br />
TM<br />
37
User Manual<br />
Descaling and Cleaning of Vacuum Sewage Pipelines<br />
7.1 <strong>Jets</strong> Toilet Clean<br />
7.1.1 Use of <strong>Jets</strong> Toilet Clean for New <strong>Systems</strong><br />
For cleaning and disinfection of toilets, urinals and wash basins. Toilet Clean may be used like any<br />
ordinary cleansing agent for cleaning of <strong>the</strong> toilet bowl. If desired all bathroom equipment may be cleaned<br />
<br />
<br />
resolve exisiting layer or prevent accumulation of<br />
layers in new systems. Normally 1 liter will be suf-<br />
<br />
of cleaner applied. It is designed to work over time<br />
to prevent scale build-up or remove scale that is<br />
just starting to form. At <strong>the</strong> same time it effectively<br />
disinfects <strong>the</strong> sanitary system. See safety sheet.<br />
7.2 <strong>Jets</strong> Dosing Unit<br />
<br />
smaller and for more frequent dosages, <strong>the</strong> automatic<br />
dosing pump <strong>Jets</strong> Dosing Unit is a good solution. The<br />
<br />
canister. It gives <strong>the</strong> precise amount of <strong>Jets</strong> Descale<br />
every time. Easy to adjust for numbers of toilets. We<br />
recommend one pump at <strong>the</strong> end of each pipeline.<br />
For large passenger vessels we have pumps with<br />
multiple outlets.<br />
7.2.1 Dosing directly into <strong>the</strong> main branch via an automatic dosing unit.<br />
Determine <strong>the</strong> number of toilets covered by <strong>the</strong> dosing unit.<br />
Calculate 1cl. <strong>Jets</strong> Descale per. toilet twice during 24 hours.<br />
If <strong>the</strong> dosing unit covers 50 toilets this will be 50cl.<br />
(½ liter) x 2 = 1 liter per 24 hours.<br />
In principle you may now set <strong>the</strong> dosing for 24 hours as often as<br />
desired.<br />
E.g. 1dl 10 times per 24 hours or 4,2cl. every hour or 0,5 liter<br />
twice per 24 hours. As many small dosages will be most<br />
efficient, we recommend 4,2cl. per hour.<br />
www.jetsgroup.com<br />
Myravegen 1, N-6060 Hareid, Norway. Tel. + 47 70 03 91 00. Fax + 47 70 03 91 01. E-mail: post@jets.no<br />
TM<br />
38