Winnie The Pooh Cake Pops Recipe - Vacation Field Guides
Winnie The Pooh Cake Pops Recipe - Vacation Field Guides
Winnie The Pooh Cake Pops Recipe - Vacation Field Guides

Create successful ePaper yourself
Turn your PDF publications into a flip-book with our unique Google optimized e-Paper software.
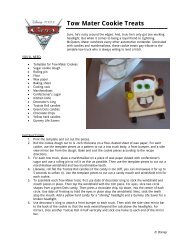
<strong>Cake</strong> <strong>Pops</strong> <strong>Recipe</strong><br />
from our provider, Bakerella<br />
With this recipe, everyone's favorite tubby little cubby<br />
is no longer stuffed with fluff: He's a tasty cake pop.<br />
And since <strong>Winnie</strong> the <strong>Pooh</strong> can't go long without his<br />
"hunny," you can use extra cake to make delectable<br />
Hunny Pot <strong>Cake</strong> <strong>Pops</strong>, too.<br />
Materials:<br />
- 1 box cake mix (bake as directed on box for<br />
13 X 9 cake)<br />
- 1 16 oz can of ready-made frosting<br />
- Wax paper<br />
- Baking sheets<br />
- Yellow candy coating<br />
- Red candy coating (optional for shirt collar)<br />
- Chocolate coated sunflower seeds in yellow,<br />
white or another light color (nose)<br />
- Black non-pareils (eyes)<br />
- Brown rainbow chip sprinkles<br />
- Pink confetti sprinkles (tongue)<br />
- Black edible ink pen (eyebrows, mouth)<br />
- Red edible ink pen (mouth)<br />
- Toothpicks<br />
- Paper lollipop sticks<br />
- Styrofoam block<br />
*Note: one cake makes about 48 cake pops. If<br />
you don't need that many, then cut the cake in<br />
quarters and freeze any cake sections for<br />
another day. If you're using the whole cake, you<br />
can make 24 <strong>Pooh</strong> cake pops and 24 Hunny Pot<br />
cake pops. You'll need at least one ounce of<br />
candy coating for each generic <strong>Winnie</strong> the <strong>Pooh</strong><br />
or Hunny Pot cake pop you plan on dipping and<br />
more for any extra decorating.<br />
Instructions:<br />
1. After cake is cooked and cooled completely,<br />
crumble into a large bowl.<br />
2. With a large spoon, mix thoroughly with about<br />
3/4 of the can of frosting. You won't need the<br />
rest.<br />
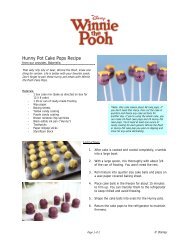
3. Roll mixture into quarter size cake balls and<br />
place on a wax paper covered baking sheet.<br />
4. Place cake balls in the freezer for about 15 minutes to firm up. You can transfer them to the<br />
refrigerator to keep chilled and avoid freezing.<br />
5. When they are firm, shape half of the cake balls to resemble <strong>Winnie</strong>'s head. <strong>The</strong> top of the<br />
ball should be smaller than the bottom. Try to shape them so the nose protrudes in the front.<br />
Page 1 of 3<br />
© Disney
<strong>Cake</strong> <strong>Pops</strong> <strong>Recipe</strong> from our provider, Bakerella<br />
Instructions (cont.):<br />
6. To practice getting the shape right, place candies in position for ears and nose and use a<br />
lollipop stick to mark the eyes to see if the shape is looking right.<br />
7. You can use a picture of <strong>Winnie</strong> as a guide<br />
to shape the cake ball. You can also use a<br />
lollipop stick to help shape the nose.<br />
8. Return the cake pops to the refrigerator to<br />
maintain firmness.<br />
9. Melt yellow candy coating in a heat-proof<br />
plastic bowl so that the coating is at three<br />
to four inches deep for easier dipping.<br />
Melt in the microwave in 30 second<br />
intervals on low, stirring in between.<br />
Repeat until melted and smooth.<br />
10. Remove a couple of cake balls from the refrigerator at a time to work with.<br />
11. Dip the tip of a lollipop stick into the melted coating and insert into the bottom of <strong>Winnie</strong>'s<br />
head. <strong>The</strong>n, grab two sunflower seed ears and dip the pointed side into the melted candy<br />
coating. Attach the ears to the top/back of the cake pop and the coating will set like glue.<br />
12. Place in a styrofoam block to dry.<br />
13. After a few minutes you can carefully dip the<br />
entire cake pop with ears attached into the bowl<br />
of melted candy coating. Dip and remove in one<br />
motion without stirring. Make sure the entire cake<br />
ball is covered. Using a deep bowl is helpful here.<br />
If your coating is too thick, you can add a few<br />
drops of vegetable oil or shortening to help thin it<br />
and make it easier to work with.<br />
14. Remove and allow any excess coating to fall off<br />
the pop and back into the bowl.<br />
15. Before the coating sets, attach one brown rainbow<br />
chip sprinkle in position for the nose. Repeat with<br />
the remaining <strong>Winnie</strong> the <strong>Pooh</strong> <strong>Pops</strong>.<br />
Page 2 of 3<br />
© Disney
<strong>Cake</strong> <strong>Pops</strong> <strong>Recipe</strong> from our provider, Bakerella<br />
Instructions (cont.):<br />
16. Place in a styrofoam block to dry.<br />
17. When dry, use a toothpick to dot a tiny<br />
amount of coating in position for the eyes<br />
and attach one black non-pareil sprinkle for<br />
each eye. It's best to attach one eye at a<br />
time so the coating doesn't dry before you<br />
can attach the sprinkle.<br />
18. Use a black edible ink pen to draw eyebrows<br />
and a cute smile. <strong>The</strong>n finish the bottom of<br />
the mouth using a red edible ink pen.<br />
19. For the tongues, cut a pink confetti sprinkle<br />
in half and use a toothpick to dot a small<br />
amount of coating in position and attach the<br />
tongue.<br />
20. You can stop here or you can give <strong>Winnie</strong> a<br />
hint of his red shirt.<br />
21. To do so, melt red candy coating and let sit<br />
for a few minutes to thicken a bit. If it is too<br />
hot it can be runny. <strong>The</strong>n carefully, twist<br />
and remove the lollipop stick. Once<br />
removed, you can hold <strong>Winnie</strong>'s head and<br />
dip the bottom in two diagonal directions to<br />
form the collar of his red shirt. Immediately<br />
reinsert the lollipop stick and place back in<br />
the styrofoam block to dry.<br />
22. You can wrap them in treat bags tied with a<br />
ribbon and/or store them on the counter or<br />
in an airtight container.<br />
For more Disney crafts, recipes, and printables, visit family.com/Disney.<br />
ABOUT THE MOVIE<br />
Walt Disney Animation Studios returns to the Hundred Acre Wood with “<strong>Winnie</strong> the <strong>Pooh</strong>,” the first big-screen <strong>Pooh</strong><br />
adventure from Disney animation in more than 35 years. With the charm, wit and whimsy of the original featurettes,<br />
this all-new movie reunites audiences with the philosophical “bear of very little brain” and friends Tigger, Rabbit,<br />
Piglet, Kanga, Roo—and last, but certainly not least, Eeyore, who has lost his tail. “Ever have one of those days<br />
where you just can’t win, Eeyore?” asks <strong>Pooh</strong>. Owl sends the whole gang on a wild quest to save Christopher Robin<br />
from an imaginary culprit. It turns out to be a very busy day for a bear who simply set out to find some honey.<br />
Inspired by three stories from A.A. Milne’s books in Disney’s classic, hand-drawn art style, “<strong>Winnie</strong> the <strong>Pooh</strong>” hits<br />
theaters in Europe and Latin America in Spring 2011; the U.S. release date is July 15, 2011.<br />
Page 3 of 3<br />
© Disney