Teaching Portfolio - artCORE
Teaching Portfolio - artCORE
Teaching Portfolio - artCORE

You also want an ePaper? Increase the reach of your titles
YUMPU automatically turns print PDFs into web optimized ePapers that Google loves.
<strong>Teaching</strong><br />
<strong>Portfolio</strong><br />
Kelsey Viola Wiskirchen<br />
Instructor: 3D Design<br />
<strong>Teaching</strong> Philosophy<br />
Curriculum Vitae<br />
Syllabus: 3D Design<br />
2<br />
3-4<br />
5-8<br />
Project Descriptions & Images<br />
Unit 1: Structures<br />
Unit 2: 2D to 3D<br />
Unit 3: Relief & Modularity<br />
Unit 4: Scale & Material<br />
Unit 5: Scale & Context<br />
Unit 6: Mass & Form<br />
Unit 7: Dynamics & Kinetics<br />
9-10<br />
11-12<br />
13-15<br />
16-19<br />
20-23<br />
24-26<br />
27-29<br />
<strong>Teaching</strong> <strong>Portfolio</strong> - 1<br />
CORE 3D Design, Fall 2011, K.V. Wiskirchen
Kelsey Viola Wiskirchen<br />
<strong>Teaching</strong> Philosophy<br />
I believe that education is like the building of a sphere. Rather than a linear progression or a ripple in a<br />
pond which weakens as it expands, I imagine the development of my students as being like the solid<br />
accumulation of a snowball or the forming of layers on a pearl. These layers are comprised of technical<br />
information, conversations, experiences, and the discovery of connections. My goal as an art educator is<br />
to guide my students through the fundamental course information while encouraging self-reflection,<br />
theoretical and conceptual development, experimentation, and an open class dialogue which will prepare<br />
them for experiences and art making beyond my classroom.<br />
In a foundations art class, a priority is fostering student understanding of design principles, technique,<br />
and intentional craft. I encourage risk-taking in my students, and believe that they must have an<br />
understanding of the formal principles before knowing how to effectively break these “rules”. Enabling<br />
them to effectively articulate their formal decisions, I stress a dialogue that utilizes design vocabulary. I<br />
expose my students to multiple historical, contemporary, and visual cultural reference points so that they<br />
have a broad sense of context. I present information in a variety of ways to solidify concepts and make<br />
the information accessible to all types of learners. This includes presentations, readings, worksheets, inclass<br />
exercises, projects, quizzes, and most importantly, conversations. These formal aspects of my<br />
teaching prepare students for future experiences in looking at, discussing, and making art.<br />
As preparation for a future not only in art-making, but in all of their endeavors, I want my students to<br />
have confidence in their abilities and their ideas. I hope for them to push boundaries and experience<br />
success, growth, and comfort with self-expression. I begin the semester by breaking projects down into<br />
manageable developmental stages from initial brainstorming, research, material exploration, concept<br />
development, and sketching to the creation and revision of a final work. As the semester progresses I<br />
encourage students to pull away from this rigid structure and develop their own working process.<br />
One of my primary roles is to be a positive and encouraging guide for my students. By taking my<br />
students, their work, and their ideas seriously, I encourage them to be invested in their own projects.<br />
Through a consistent, open dialogue I also encourage my students to become active participants in the<br />
development of their classmates’ work. I structure my class in a way to encourage a strong sense of<br />
community by facilitating diverse forms of interaction and collaboration among the students. I see this<br />
environment of community, enthusiasm, and energy as vital for healthy development in any classroom.<br />
This methodology instills confidence in the students and enables them to develop their work to the<br />
highest degree.<br />
My goal in teaching is to not only present students with relevant course information, but to stimulate<br />
excitement and thoughtfulness. I approach teaching in a flexible way that will foster ambition. In<br />
keeping with the spherical concept of education, I encourage my students to consider the relationship<br />
between my class and their other interests. For me, the most rewarding aspect of teaching is when<br />
students begin to make connections between their artistic process, their conceptual pursuits, and their<br />
place within our greater community.<br />
<strong>Teaching</strong> <strong>Portfolio</strong> - 2<br />
CORE 3D Design, Fall 2011, K.V. Wiskirchen
Kelsey Viola Wiskirchen<br />
Curriculum Vitae<br />
Education<br />
Arizona State University, 2009-2012<br />
MFA Candidate (Fibers Concentration)<br />
Truman State University, 2005-2009<br />
BFA (Fibers Concentration)<br />
Professional Experience<br />
Instructor Of Record – 3D Design<br />
Arizona State University, Tempe, AZ<br />
Summer & Fall 2011<br />
Cyanotype/Embroidery Workshop Instructor Xavier<br />
High School, Phoenix, AZ<br />
Spring 2011<br />
Instructor Of Record – Fibers 1<br />
Arizona State University, Tempe, AZ<br />
Spring 2011<br />
Instructor Of Record – Color<br />
Arizona State University, Tempe, AZ<br />
Fall 2010<br />
Shibori Workshop Instructor<br />
Truman State University, Kirksville, MO<br />
Spring 2010<br />
Fiber Reactive Dyes &<br />
Silkscreen Workshop Instructor<br />
Kirksville Arts Association, MO<br />
Summer 2009<br />
<strong>Teaching</strong>/Studio Assistant<br />
Truman State University Fiber Art<br />
Department, Kirksville, MO<br />
Fall 2007- Spring 2009<br />
“Art in the Park” Instructor<br />
Kirksville Arts Association, Kirksville Parks and<br />
Recreation & Missouri Council for the Arts<br />
Summers 2008, 2009<br />
Joseph Baldwin Academy Preceptor<br />
Truman State University<br />
Summer 2007<br />
Volunteer Experience<br />
Projecto Artesania Zona Andina, Sewing Instructor<br />
Independencia, Bolivia, January 2011<br />
Sojourner Center, Sewing Instructor<br />
Shelter for victims of domestic violence<br />
Phoenix, AZ, Spring 2011<br />
Tempe Foundation for Senior Living,<br />
Weaving Instructor, Tempe, AZ, Spring 2011<br />
Awards<br />
Selma Sigesmund Memorial Scholarship,<br />
Spring 2012<br />
Nathan Cummings Travel Award, Summer 2011<br />
Student Scholarship for Attendance of Surface<br />
Design Association Conference, Summer 2011<br />
Arizona Artists’ Guild Scholarship, Spring 2011<br />
Graduate Professional Student Association Research<br />
Grant, Spring 2011<br />
ArtCORE Special Project Funding<br />
Arizona State University, Fall 2010<br />
Eirene Peggy Lamb Scholarship<br />
Arizona State University, 2010<br />
X-Square Interdisciplinary Team Design/Build<br />
Competition Winner, ASU, Spring 2010<br />
Alice Brown Memorial Scholarship, Weave a<br />
Real Peace (WARP), 2010<br />
<strong>Teaching</strong> <strong>Portfolio</strong> - 3<br />
CORE 3D Design, Fall 2011, K.V. Wiskirchen
Special Talent Award Scholarship, Arizona<br />
State University, 2009, 2010, 2011<br />
Most Outstanding Undergraduate Student in<br />
Studio Art, Truman State University, 2009<br />
Professional Organizations<br />
Arizona Artists Guild<br />
(Scholarship Chair), 2011<br />
Surface Design Association, 2008-Present<br />
Weave a Real Peace (WARP), 2010-Present<br />
Fiber Art Network of Arizona State University<br />
2009-Present, Treasurer (2010)<br />
Truman State University Fiber Art Club<br />
2005-2009, Treasurer (2007), President (2008,<br />
2009)<br />
Exhibitions<br />
Nowness, Invitational Exhibition, Eye Lounge,<br />
Phoenix, AZ, 2011<br />
Arizona Artist’s Biennial, Tucson Museum of Art,<br />
Tucson, AZ, 2011<br />
Return of the Cornmothers, Arizona State<br />
University Museum of Anthropology<br />
Tempe, AZ, 2010<br />
Systems, Ecology, Art, Global Institute of<br />
Sustainability, Tempe, Arizona, 2010<br />
Monochrome in Neutral: Shades of Gray, Artlink A.<br />
E. England Gallery, Phoenix, Arizona, 2010<br />
Art Detour, Westwind Studios<br />
Phoenix, AZ, 2010<br />
Mapping and Connections, Fiber Art Network<br />
Members, STEP Gallery, Phoenix, AZ, 2010<br />
Grand Delusions, Bragg’s Pie Factory<br />
Phoenix, Arizona, 2009<br />
New Graduates, Harry Wood Gallery<br />
Arizona State University, 2009<br />
Juried Student Art Exhibition<br />
Truman State University, 2009<br />
ARTSEnvironmental Earth Week Juried Art<br />
Exhibition, Kirksville Arts Association,<br />
2008.<br />
Juried Student Art Exhibition<br />
Truman State University, 2007<br />
Arizona Artists’ Guild 2011 Scholarship Exhibition<br />
Willo North Gallery, Phoenix, AZ, 2011<br />
Needling, Fiber Art Network Members Show<br />
STEP Gallery, Tempe, AZ, 2011<br />
10 Cameras Project, Artspace Gallery<br />
Scottsdale, AZ, 2011<br />
Mixed Emotions, Starke Gallery<br />
Phoenix, Arizona, 2010<br />
<strong>Teaching</strong> <strong>Portfolio</strong> - 4<br />
CORE 3D Design, Fall 2011, K.V. Wiskirchen
Instructor<br />
3D Design Syllabus<br />
Fall 2011<br />
Kelsey Viola Wiskirchen<br />
Email: kelsey.wiskirchen@asu.edu<br />
Office Hours: Tues/Thurs 3:30-4:30, and by appointment<br />
Class Meets: Tues/Thurs 4:40-7:30, Tower A, Room 121<br />
Course Information & Objectives<br />
The 3D studio (ART 115) is dedicated to exploring the basics of three-dimensional design with an<br />
emphasis on spatial awareness, problem-solving, and the many varieties of sculptural form. Using a<br />
variety of methods and materials including paper, cardboard, plaster, wire, and wood, students will<br />
create artworks which relate to design principles covered in class. Topics include relief sculpture, spatial<br />
construction, form and mass, scale and context, structures, and kinetics. Students will be exposed to the<br />
range of three-dimensional form as found in contemporary art and design as well as different cultural<br />
and historical contexts. The structure of the course will include slide lectures, critiques, formal and<br />
informal discussion, quizzes, in-class exercises, and projects. Beyond the concepts and skills essential to<br />
good design practice, it is hoped that the course will open a window towards self-expression and<br />
awareness.<br />
Required Text<br />
Launching the Imagination, by Mary Stewart, 4th ed.<br />
Unit Overview<br />
For each unit, you will receive handouts with project information, and due dates.<br />
Structures<br />
2D to 3D<br />
Relief and Modularity<br />
Mass and Form<br />
Scale and Context<br />
Kinetics<br />
Attendance<br />
Roll will be taken at the beginning of each class. 2 absences will be allowed during the semester. Being<br />
late, leaving early, extra long break time, or inappropriate class activity (sleeping, studying for other<br />
classes, no supplies) will equal a ½ absence. There will be one 15 minute break midway through the class<br />
period. It would be wise to save your allowed absences for unexpected situations (illness, personal<br />
crisis). It is your responsibility to ask for information/handouts that you missed if you are absent. Your<br />
final grade will be reduced by 5% for each absence beyond the 2 allowed.<br />
Academic Honesty<br />
All necessary and appropriate sanctions will be issued to all parties involved with plagiarizing any and<br />
all course work. Plagiarism and any other form of academic dishonesty that is in violation with the<br />
Student Code of Conduct will not be tolerated. For more information, please see the ASU Student<br />
Academic Integrity Policy:<br />
http://www.asu.edu/studentaffairs/studentlife/judicial/academic_integrity.htm<br />
<strong>Teaching</strong> <strong>Portfolio</strong> - 5<br />
CORE 3D Design, Fall 2011, K.V. Wiskirchen
Syllabus (Continued)<br />
Special Accommodations<br />
To request academic accommodations due to a disability, please contact the ASU Disability Resource<br />
Center (http://www.asu.edu/studentaffairs/ed/drc/#); Phone: (480) 965-1234. This is a very important step<br />
as accommodations may be difficult to make retroactively. If you have a letter from their office<br />
indicating that you have a disability which requires academic accommodations, in order to assure that<br />
you receive your accommodations in a timely manner, please present this documentation to me no later<br />
than the end of the first week of the semester so that your needs can be addressed effectively.<br />
Student Code of Conduct and Student Disciplinary Procedures<br />
The ABOR Student Code of Conduct is designed to promote and protect an environment that encourages<br />
reasoned discourse, intellectual honesty, openness to constructive change and respect for the rights of all<br />
individuals. In keeping with this mission, the Office of Student Rights and Responsibilities staff seeks to<br />
balance the rights and needs of the individual with responsibility of the individual to meet the needs of<br />
the community. In addition, it reviews allegations of student misconduct, determines whether a violation<br />
has occurred and if applicable, imposes appropriate sanctions. Students are expected to adhere to the<br />
ABOR Student Code of Conduct. Student Rights and Responsibilities: http://students.asu.edu/srr/code<br />
Health & Safety Module<br />
It is now required that all 100 level classes pass a Health and Safety Module. Access the module in<br />
Blackboard and watch the video before taking the quiz. You must pass with an 80% to receive credit. You<br />
must repeat the test in additional CORE classes until you receive a 100%. Please note that this in an<br />
introduction to safety at ASU and other training sessions will be required in upper division classes as<br />
necessary to the studio you will be working in under faculty supervision. So, even though some of the<br />
material covered in this module may not seem immediately important it WILL become important as you<br />
matriculate though your BFA program.<br />
Instructions for students:<br />
1. From the Blackboard homepage, click the COURSES tab 2<br />
2. Type "SOA" into the Course Search box on the upper left<br />
3. Choose “Health and Safety Module” from the list. Click the Course ID link.<br />
4. Immediately, you will be asked if you want to enroll in this course.<br />
5. Bingo. Self-enrollment done. Proceed with task.<br />
6. Email me your score when you have completed the quiz.<br />
<strong>Teaching</strong> <strong>Portfolio</strong> - 6<br />
CORE 3D Design, Fall 2011, K.V. Wiskirchen
Expectations/Grading:<br />
Syllabus (Continued)<br />
Participation (10%)<br />
Each student will be expected to participate fully in the activities of the class. This means regular attendance, a sense<br />
of studio etiquette, participation in class discussion and critiques, and having assignments finished on time. Class<br />
workdays will be provided, and are expected to be fully used. Projects must be seen in progress.<br />
Critiques (5%)<br />
Each assignment grade includes a portion that is composed of critique participation, which includes participating in<br />
the critique and having a finished project. It is disrespectful to me, to your fellow students, and to yourself to miss a<br />
critique, and there will be no opportunity to regain critique participation points. Critiques provide the best<br />
opportunity for aspiring artists to give and receive feedback, and to learn how to speak articulately about their work.<br />
Sketchbook (5%)<br />
You will need to keep a sketchbook / journal for use in developing project ideas. Use the sketchbook in and out of<br />
class to document your entire design process for each project including assignment sheets, concept brainstorms,<br />
sketches, notes, and photos. This may be in the form of a notebook or binder. You will be turning these in on each<br />
critique day.<br />
Exhibition Reviews (5%)<br />
You will write 5 exhibition reviews during the semester. Each of these will be a typed 1 page response to an oncampus<br />
exhibition. A more detailed handout will outline the specific requirements.<br />
Quizzes (5%)<br />
You will have five quizzes. The information covered on these quizzes will be from the assigned readings. Prior to<br />
the quizzes, we will also discuss and review the concepts in class.<br />
Projects (70%)<br />
Project grades will be determined based on technical, aesthetic, and conceptual merit. Original designs and<br />
images are expected to be part of your project development. More specific grading guidelines will be outlined<br />
in unit assignment handouts. Projects that have been approved and have been seen in progress but are incomplete,<br />
turned in late or not presented at the critique will receive a lower grade. Projects which have not been approved or<br />
seen in progress will not be accepted for credit.<br />
Project Grading Criteria<br />
technical<br />
satisfaction of project requirements<br />
overall level of craftsmanship<br />
technique/skill with materials<br />
conceptual<br />
commitment to an idea/follow-through on idea<br />
intent, depth of thought<br />
ability to communicate non-verbally through the piece<br />
interesting solution to proposed problem<br />
aesthetic<br />
composition, organization of formal elements<br />
character, individual personality, style, quality<br />
gestalt, unity, impact<br />
<strong>Teaching</strong> <strong>Portfolio</strong> - 7<br />
CORE 3D Design, Fall 2011, K.V. Wiskirchen
Supply List<br />
Syllabus (Continued)<br />
Minimum required materials:<br />
* Metal straight edge/ruler (24")<br />
* Tape measure<br />
* #11 Exacto knife and extra blades<br />
* Utility knife (with extra blades)<br />
* Graphite pencils (2B and 4H minimum)<br />
* Pencil sharpener<br />
* Erasers (white plastic, hard pink)<br />
* 1 technical ink pen—sizes .25 – .5 will do. Disposable pens are fine.<br />
* Masking tape<br />
* Protractor with degrees<br />
* Sketchbook or 3-ring binder with pocket folders and dividers for filing handouts, notes, sketches,<br />
collages, etc.<br />
* Eye protection (hi impact plastic googles)<br />
* Ear protection (foam ear plugs)<br />
* Dust protection (personal dust mask)<br />
* Tackle box (to carry your supplies)<br />
* Sandpaper<br />
* Plastic (old shopping bags, saran wrap, etc)<br />
Materials provided by lab fee:<br />
* Corrugated cardboard<br />
* Wire<br />
* Replacement blades and belts for power tools<br />
* Various fasteners (nails, bolts, pop-rivets)<br />
* Casting plaster<br />
* Masking/packing tape<br />
<strong>Teaching</strong> <strong>Portfolio</strong> - 8<br />
CORE 3D Design, Fall 2011, K.V. Wiskirchen
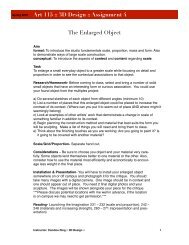
Assignment 1: Structures<br />
Day 1: Introduction to 3D Design, Team Project<br />
Objectives<br />
Studio Fundamentals: To understand and experiment with the relationship of form and function<br />
as applied to three-dimensional structures.<br />
Concept/Theme: To work as a team and develop a design that encompasses the talents of all<br />
team members.<br />
Project Description<br />
In many disciplines, it becomes necessary to work with a team in order to create the desired art object(s).<br />
For this project, you will divide into teams to design & build a structure using only cardboard - no tape,<br />
no glue. Consider aesthetic decisions as well as functional ones - does your form reflect the function<br />
chosen for it?<br />
Process<br />
Introduce yourself to the members of your team—at the end of the project, you will be<br />
introducing your team members to the rest of the class.<br />
Brainstorm/Sketch—Work together as a team to develop your concept<br />
Using one sheet of cardboard (4’ X 8’), build a chair that will support the weight of one person in<br />
the class for 5 minutes.<br />
Do not use tape, glue, or other attachment devices.<br />
Make aesthetic decisions - is it interesting? attractive? off-putting? uncomfortable? tall? short?<br />
geometric? organic? dynamic? arte-nouveau? steampunk? prehistoric…?<br />
Utilize the talents and input of all members of the team to come to the most successful design.<br />
Bonus prize for most creative successful design! Critique at the end of class today.<br />
Thoughts on the Design<br />
While developing your idea, consider objects of structure, objects that require structure, and<br />
different methods of achieving structure.<br />
Your team may be inspired by an object that already exists - a suspension bridge, a beehive, a<br />
haystack - which requires particular considerations in how you approach building. Can you<br />
recreate a support structure from science or nature in these materials without losing the integrity of<br />
construction?<br />
Consider also proximity & geometry. What types of shapes and forms will provide the most<br />
rigidity & support?<br />
What size will your modules/spaces/openings be? How dense should it be relevant to the design<br />
you choose? How can you interlock shapes to create strength?<br />
Which direction is the cardboard naturally stronger? How can you exploit this? What types of<br />
pressure points will you be exerting on the object? Is all of the weight in one point, or spread out<br />
across the object?<br />
How can you use all of this to your advantage?<br />
Grading<br />
Functionality: Does it meet the requirements? Go above and beyond?<br />
Aesthetic: Is it attractive? Neat and crisp, or sloppy?<br />
Participation: Did each group member engage fully as an active team member?<br />
<strong>Teaching</strong> <strong>Portfolio</strong> - 9<br />
CORE 3D Design, Fall 2011, K.V. Wiskirchen
Assignment 1: Structures<br />
Student Projects<br />
<strong>Teaching</strong> <strong>Portfolio</strong> - 10<br />
CORE 3D Design, Fall 2011, K.V. Wiskirchen
Assignment 2: 2D to 3D<br />
Self Portrait<br />
Objectives<br />
Studio Fundamentals: To construct a three-dimensional form out of a flat, two-dimensional<br />
paper material as an introduction to 3D Design.<br />
Concept/Theme: To express an aspect of your personal identity through non-representational<br />
self-portrait.<br />
Project Description<br />
Your challenge is to create a non-representational paper sculpture that expresses an aspect of your<br />
personality or identity. You will explore the potential of paper as a building material to construct a<br />
dimensional form that serves as a self-portrait.<br />
Considerations<br />
How do you identify yourself? How does society at large identify you?<br />
How do other societies or cultures or groups identify their members?<br />
What graphic elements or marks can artists use to express their own identity in a work of art?<br />
How can you use, replicate, combine, or transform these elements in your own artwork?<br />
Vocabulary<br />
representational, non-representational, relief, three-quarter works, freestanding works, balance,<br />
symmetrical, asymmetrical, radial, dominant, subordinate, template, orthographic projection<br />
Materials<br />
Bristol Board<br />
Rubber Cement or Gluestick<br />
X-acto Knife (with SHARP blades)<br />
<br />
<br />
<br />
Ruler & Pencil<br />
Fine tipped-Sharpie or black pen<br />
NO TAPE. NO HOT GLUE.<br />
Process<br />
1. Experiment with the paper. Make 6 samples total, each utilizing 1/6 th of a Bristol Sheet. See how<br />
many different ways you can find to alter the flat surface to create three-dimensionality. Think of<br />
ways to create texture. How can you cut, fold, and re-attach the paper to create a dimensional<br />
form?<br />
2. Make a brainstorm list in your sketchbook. List at least 15 personal characteristics. This list will<br />
be the basis for your project. From this list, choose an idea you wish to express. Are there two<br />
opposing traits that you will represent? Is there something on the list that you struggle with? A<br />
trait that you feel glad to have?<br />
3. After choosing a concept, make at least 5 sketches of your idea. Try to avoid cliché imagery.<br />
You absolutely may not represent human imagery in your piece. Think of a self-portrait in<br />
symbolism.<br />
4. Make your first trial of your project. These we will look at during the in-progress critique. You<br />
will receive feedback from your peers and then edit and make a second, final project. (This will<br />
be infinitely better than the first!)<br />
5. With this project, you will also turn in a “template” of your design. This will be on Bristol Board,<br />
with your pieces outlined in ink, with clear, simple directions for re-creating your project. Think<br />
about how you can present this in a professional, clear way: tabs with labeled matching letters?<br />
<strong>Teaching</strong> <strong>Portfolio</strong> - 11<br />
CORE 3D Design, Fall 2011, K.V. Wiskirchen
Assignment 2: 2D to 3D<br />
Student Projects<br />
<strong>Teaching</strong> <strong>Portfolio</strong> - 12<br />
CORE 3D Design, Fall 2011, K.V. Wiskirchen
Assignment 3: Relief & Modularity<br />
Fabric Relief: Rhythm, Repetition, and Balance<br />
Studio Objective<br />
To construct a relief surface out of a single repeated unit. This will be an exercise in creating rhythm,<br />
repetition, and balance in three-dimensional form.<br />
Project Description<br />
Using cotton fabric, you will create a relief to be hung from the wall. From 100 individual fabric units,<br />
you will organize and construct a continuous surface. Consider how you can create a specific sense of<br />
rhythm and balance through repetition of the same form.<br />
Materials<br />
White cotton fabric (1 yard provided)<br />
Needle<br />
Scissors<br />
White thread<br />
Process<br />
1. Using the white fabric provided, create 15 different small sample units. Each one should be<br />
approximately 1 inch. These samples are your “sketching” process for this assignment.<br />
Experiment with different ways of stitching, wrapping, & folding your fabric.<br />
2. Select one of these fabric units as the basis for your project. For your project, you will make 100<br />
of them total. (You may make more if you want!)<br />
3. Consider different ways that you can combine these units to form a larger unit of 4 or 5<br />
individual pieces. Will you connect them in an organized way with a grid or rows, or will<br />
you connect them in an organic, free-form fashion?<br />
4. Create a relief to hang on the wall utilizing all 100 of your fabric units. The overall dimensions<br />
should be approximately 1’ square. Consider the overall format that you chose: Will it be square?<br />
Rectangular? Amorphous?<br />
<strong>Teaching</strong> <strong>Portfolio</strong> - 13<br />
CORE 3D Design, Fall 2011, K.V. Wiskirchen
Assignment 3: Relief & Modularity<br />
Student Projects<br />
<strong>Teaching</strong> <strong>Portfolio</strong> - 14<br />
CORE 3D Design, Fall 2011, K.V. Wiskirchen
Assignment 3: Relief & Modularity<br />
<strong>Teaching</strong> <strong>Portfolio</strong> - 15<br />
CORE 3D Design, Fall 2011, K.V. Wiskirchen
Assignment 4: Scale & Material Choice<br />
Three of a Kind<br />
Objectives<br />
<br />
<br />
Studio Fundamentals: To shift scale and replicate an object in multiple media while still<br />
maintaining the integrity of the original object.<br />
Concept/Theme: To consider how an object can be embedded with history (personal, familial, or<br />
community). To consider how the material an object is made of informs our understanding of its<br />
function, form, and meaning.<br />
Project Description<br />
For this assignment, you will create a series of three sculptures based on an object that has historical<br />
significance. The root of this project is the idea of variations on a theme. The individual sculptures will all<br />
be similar in form but utilize different materials. Consider how a shift in material changes the impact,<br />
and often the meaning, of an object.<br />
Materials:<br />
Graph paper<br />
Ruler<br />
Schissors/x-acto knife<br />
Glue/rubber cement<br />
Three surface materials of your choice (for example: cardboard, newspaper, plastic bags, vinyl,<br />
fabric, bubble wrap, wire mesh… explore different materials. For some materials you may need<br />
to first glue them to a stiffer backing for them to hold their form.)<br />
Process<br />
1. Consider a 3D object that has historical significance. It can be historical to you (an object that is<br />
connected to your childhood, for instance), to your family, or it can relate to the history of a<br />
country or community.<br />
2. In your sketchbook, make a list of at least 10 material choices. Think of materials that either<br />
relate to the history of your object or challenge/alter the idea of the object’s history. From this list,<br />
you will choose 3 for your project.<br />
3. Following the instructions given in class, make a drawing on graph paper of the “unfolded”<br />
surfaces of your chosen object. This will be the 1:1 pattern of your original object.<br />
4. Using graph paper, enlarge your pattern so that it is 4 times the size of the original.<br />
5. Using the enlarged pattern, re-create your object 3 times, each with a different surface material.<br />
<strong>Teaching</strong> <strong>Portfolio</strong> - 16<br />
CORE 3D Design, Fall 2011, K.V. Wiskirchen
Assignment 4: Scale & Material Choice<br />
Process Photos<br />
<strong>Teaching</strong> <strong>Portfolio</strong> - 17<br />
CORE 3D Design, Fall 2011, K.V. Wiskirchen
Assignment 4: Scale & Material Choice<br />
Student Projects<br />
<strong>Teaching</strong> <strong>Portfolio</strong> - 18<br />
CORE 3D Design, Fall 2011, K.V. Wiskirchen
Assignment 4: Scale & Material Choice<br />
<strong>Teaching</strong> <strong>Portfolio</strong> - 19<br />
CORE 3D Design, Fall 2011, K.V. Wiskirchen
Assignment 5: Scale & Context<br />
Site Specific Word<br />
Objectives<br />
Studio Fundamentals: To build a site-specific sculpture with consideration for scale, context, and<br />
material choice.<br />
Concept/Theme: To protest, propose, or persuade the public.<br />
Project Description<br />
When people are not satisfied with the way things are, they sometimes protest or try to persuade others<br />
to change their ideas. For this assignment, your challenge is to create a site-specific public sculpture from<br />
a word. Our visual culture is full of written information. Consider some of the functions of public text:<br />
Advertisement<br />
Stating rules and regulations<br />
Warning of danger<br />
Social/Political propaganda<br />
Protesting/Persuading<br />
Inspirational<br />
Affirmation<br />
Considerations<br />
What visual elements are important for you to use in a work seeking to protest, persuade, or<br />
provoke thought in a viewer?<br />
What historical or cultural references would be helpful to you in researching this kind of work?<br />
Will your work have an obvious or not-so-obvious function (for example, propaganda has an<br />
obvious function.)<br />
Will you use symbols to reinforce a message? If so, list them.<br />
What tools, materials and processes would be most effective for this project?<br />
How is the meaning of the artwork affected by the choice of medium? (reinforced/enhanced)<br />
What context would be the most effective for the display of your finished work?<br />
How does the scale of your sculpture contribute to the meaning?<br />
Materials: Your choice, related to your concept.<br />
<strong>Teaching</strong> <strong>Portfolio</strong> - 20<br />
CORE 3D Design, Fall 2011, K.V. Wiskirchen
Assignment 5: Scale & Context<br />
Process<br />
1. Consider individual sites that hold some interest for you. Make a list of 5 possible sites<br />
for a "site-specific sculpture." Try to visit the site at different times of day. Observe how<br />
people use the site. You might interview people and get their reactions to the site. Try to<br />
find out something about the history and uses of the site. Record all of this information<br />
in your sketchbook.<br />
2. Using your description as a source, generate a list of words that somehow relate to the<br />
site. Consider how the idea of "protesting or persuading" may be utilized in this project.<br />
3. Select one word as the basis for your project. This word should relate in some way to<br />
your selected site--as a label or sign, as historical reference, commentary, etc.<br />
4. Analyze the formal properties of your word. Evaluate its potential for being transformed<br />
into a 3D object. How would the choice of different commercial fonts --or, alternatively, a<br />
letter of your own design--effect the meaning or formal properties of the word?<br />
5. Consider the scale and proportions of your sculpture. How will the scale and character<br />
of your object relate to your chosen context? Are tall, thin letters appropriate or are<br />
short, wide letters? How will its meaning change at different scales or in relation to<br />
different aspects of your site?<br />
6. Consider different materials. How do certain materials amplify or undermine your<br />
intent? How could the use of particular materials help in creating a site -specific<br />
sculpture that would convey a particular meaning?<br />
7. Create a scale model of your word. Paint and finish it as if it is the real thing.<br />
8. Build the actual sculpture. Insert the reduced or enlarged version of your word into the<br />
site. Integrate it into its new context in such a way that the whole setting is transformed.<br />
Consider the difference between displaying the object prominently versus disguising the<br />
object.<br />
9. Photograph your word sculpture from various angles. Consider photographing at<br />
different times of day, photographing people interacting with/ responding to the<br />
sculpture, returning later and re-photographing. Bring at least 5 photographs on a flash<br />
drive or emailed for the critique.<br />
<strong>Teaching</strong> <strong>Portfolio</strong> - 21<br />
CORE 3D Design, Fall 2011, K.V. Wiskirchen
Assignment 5: Scale & Context<br />
Student Projects<br />
<strong>Teaching</strong> <strong>Portfolio</strong> - 22<br />
CORE 3D Design, Fall 2011, K.V. Wiskirchen
Assignment 5: Scale & Context<br />
<strong>Teaching</strong> <strong>Portfolio</strong> - 23<br />
CORE 3D Design, Fall 2011, K.V. Wiskirchen
Assignment 6: Mass and Form<br />
Environmental Observations<br />
Objectives<br />
Studio Fundamentals: To introduce the concepts of mass, line, and volume as applied to threedimensional<br />
form.<br />
Concept/Theme: To consider your relationship to the natural world by responding to the<br />
environment in which you live.<br />
Project Description<br />
Your challenge is to create a sculpture in two parts (plaster and wire) that expresses the ideas of mass and<br />
volume and represents your relationship to the natural world.<br />
Considerations<br />
How do you personally define the "natural world"? Do you consider yourself part of the natural<br />
world?<br />
How have artists represented or utilized the natural world in the past?<br />
How have artists interacted with other disciplines to understand the natural world?<br />
What would be some ways of exploring the theme of the natural world in your own artwork?<br />
Vocabulary<br />
line, volume, negative space, positive space, implied line, implied plane, space, mass, density,<br />
weight, gravity, form, simulation, surface, tactile, subtractive, additive<br />
Materials<br />
Plaster<br />
Tie-Wire<br />
Wire cutters/Pliers<br />
Plaster carving tools, sandpaper<br />
NO GLUE, TAPE, ETC.<br />
<strong>Teaching</strong> <strong>Portfolio</strong> - 24<br />
CORE 3D Design, Fall 2011, K.V. Wiskirchen
Assignment 6: Mass and Form<br />
Process<br />
1. Take a walk outdoors. You may choose to go somewhere that you do not normally walk, or if<br />
you take your walk in a familiar area, stay tuned in to aspects of your surroundings that you<br />
might normally overlook. Do choose to walk in the park, go out in the desert, walk in your own<br />
neighborhood? What draws your attention? What in your surrounding environment makes you<br />
think? Plants, insects, litter, street signs?<br />
2. On your walk, pick up 10 different items that are easily carried. Select objects that draw your<br />
attention. These ten objects will be the basis for your project. When you have your entire<br />
collection, see if you notice any themes in the objects that you chose. What can this personal<br />
selection say about the way that you interact with and think about the natural world?<br />
3. Examine the form of these objects. Experiment with the wire by creating dimensional contour<br />
drawings of three different objects.<br />
4. Select either one of the 10 objects, or a combination of 2 objects as the basis for your project. What<br />
does the object or two objects say about your own relationship with the natural world?<br />
5. Do at least 5 fully developed sketches of different ideas for your project. Consider how you can<br />
create a representation of these objects out of both plaster and wire. The plaster carving will be<br />
supported, carried, nested, restrained, presented by your wire sculpture. The two parts should<br />
relate to one another and should work together as a compositional whole. Can the plaster feel<br />
light and the wire heavy? Can the wire feel free and the plaster constrained? Consider different<br />
types of wire line: aggressive, expressive, geometric, organic, contour.<br />
6. From a 6” X 6” cube of plaster, carve the plaster component.<br />
7. Construct the wire structure which will support/interact with the plaster component.<br />
8. Before assembling the final structure, apply intentional surface treatment to the plaster. You may<br />
create a carved texture, or if you want it smooth, you should sand the surface.<br />
<strong>Teaching</strong> <strong>Portfolio</strong> - 25<br />
CORE 3D Design, Fall 2011, K.V. Wiskirchen
Assignment 6: Mass and Form<br />
Student Projects<br />
<strong>Teaching</strong> <strong>Portfolio</strong> - 26<br />
CORE 3D Design, Fall 2011, K.V. Wiskirchen
Assignment 7: Dynamics and Kinetics<br />
Kinetic Symphony<br />
Objectives<br />
Studio Fundamentals: To understand and experiment with the elements of "time, change, and motion" in<br />
the construction of three-dimensional forms.<br />
Concept/Theme: To use one of the most basic machines—the wheel—to create a sound which is<br />
triggered by a kinetic motion.<br />
Project Description<br />
For this assignment, you will create a music box. The interior of the box will house a “sound device” which is<br />
activated by wheels and a hand crank. You will add sculptural elements and paint the exterior of the box to relate<br />
to the sound device on the interior.<br />
Materials:<br />
Sound device of your choice<br />
<br />
<br />
<br />
<br />
<br />
References<br />
<br />
Wood<br />
Dowels<br />
Paint<br />
Rubber Bands<br />
Cardboard and brads for planning<br />
Artists: Alexander Calder, Theo Jansen, Jean Tinguely, Pol Bury, Arthur Ganson<br />
Process<br />
1. Consider different objects from your everyday life which have the potential for making sound such as<br />
crinkling tinfoil or marbles rolling in a jar. Think about the impact of different sounds (loud or harsh<br />
noises versus soft or subtle).<br />
2. In class, we will explore different types of wheel-operated machines. After our class brainstorm, sketch<br />
different ways that you might build a wheel system that can trigger your sound. In your sketching, plan<br />
the size of your wheels, and appropriate dimensions for your box.<br />
Consideration: You can create wood gears with cogs that transfer motion through contact or you can use<br />
belts (rubber bands).<br />
3. Create a mock-up of your idea in cardboard. We will look at and discuss these in class.<br />
4. Build your music box out of wood. We will have a tool safety orientation as well as discussing different<br />
methods for wood joinery.<br />
5. Add additional elements (a lid, sculptural wooden parts, etc) to the exterior of your box which reflect the<br />
sound device on the interior. Paint your box in a way that also reflects the audial impact of your sound<br />
device.<br />
6. For critique, we will have a Sound Symphony!<br />
<strong>Teaching</strong> <strong>Portfolio</strong> - 27<br />
CORE 3D Design, Fall 2011, K.V. Wiskirchen
Assignment 7: Dynamics and Kinetics<br />
Student Projects<br />
<strong>Teaching</strong> <strong>Portfolio</strong> - 28<br />
CORE 3D Design, Fall 2011, K.V. Wiskirchen
Assignment 7: Dynamics and Kinetics<br />
<strong>Teaching</strong> <strong>Portfolio</strong> - 29<br />
CORE 3D Design, Fall 2011, K.V. Wiskirchen