Pavilion Marquee Instructions www.extrememarquees.com.au ph ...
Pavilion Marquee Instructions www.extrememarquees.com.au ph ...
Pavilion Marquee Instructions www.extrememarquees.com.au ph ...

Create successful ePaper yourself
Turn your PDF publications into a flip-book with our unique Google optimized e-Paper software.
<strong>Pavilion</strong> <strong>Marquee</strong> <strong>Instructions</strong><br />
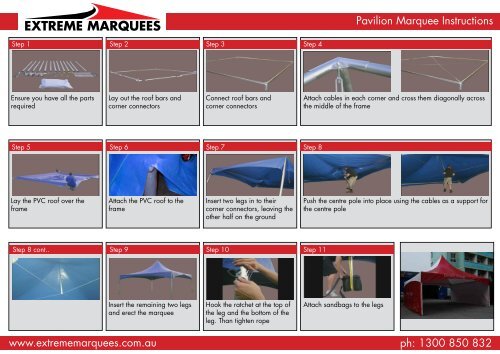
Step 1<br />
Step 2<br />
Step 3<br />
Step 4<br />
Ensure you have all the parts<br />
required<br />
Lay out the roof bars and<br />
corner connectors<br />
Connect roof bars and<br />
corner connectors<br />
Attach cables in each corner and cross them diagonally across<br />
the middle of the frame<br />
Step 5<br />
Step 6<br />
Step 7<br />
Step 8<br />
Lay the PVC roof over the<br />
frame<br />
Attach the PVC roof to the<br />
frame<br />
Insert two legs in to their<br />
corner connectors, leaving the<br />
other half on the ground<br />
Push the centre pole into place using the cables as a support for<br />
the centre pole<br />
Step 8 cont..<br />
Step 9<br />
Step 10<br />
Step 11<br />
Insert the remaining two legs<br />
and erect the marquee<br />
Hook the ratchet at the top of<br />
the leg and the bottom of the<br />
leg. Than tighten rope<br />
Attach sandbags to the legs<br />
<strong>www</strong>.<strong>extrememarquees</strong>.<strong>com</strong>.<strong>au</strong> <strong>ph</strong>: 1300 850 832
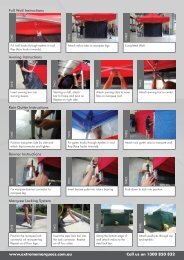
Attaching Walls<br />
Step 1<br />
Step 2<br />
Starting from the middle of the frame feed the right hand side of the wall towards<br />
the right leg. Keep feeding all the tabs and drag the wall across.<br />
Step 3<br />
Starting from the middle of the frame feed the left hand side of the wall towards<br />
the left leg. Keep feeding all the tabs and drag the wall across.<br />
Step 4<br />
Pick the bottom of the wall and feed the tabs into the leg starting from the top.<br />
Keep feeding all the tabs while pulling the wall downwards. Repeat this action<br />
for each wall.<br />
Walls can now be zipped and Velcro in the middle section<br />
<strong>ph</strong>: 1300 850 832