User Manual - Vertex Supply Co.,Ltd
User Manual - Vertex Supply Co.,Ltd
User Manual - Vertex Supply Co.,Ltd

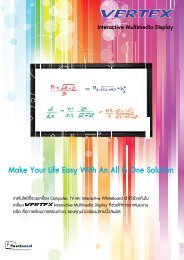
You also want an ePaper? Increase the reach of your titles
YUMPU automatically turns print PDFs into web optimized ePapers that Google loves.
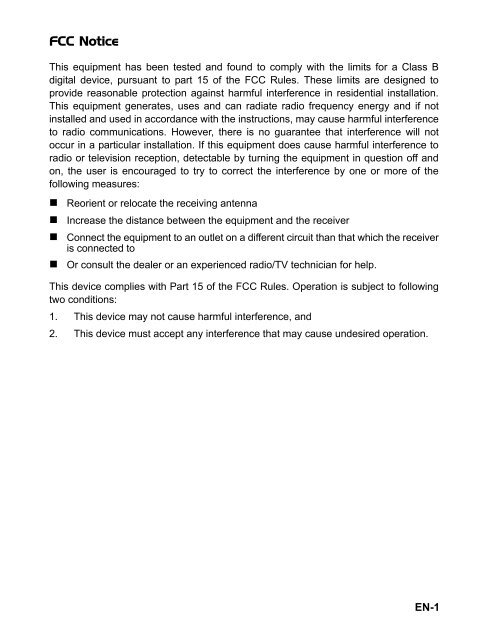
FCC Notice<br />
This equipment has been tested and found to comply with the limits for a Class B<br />
digital device, pursuant to part 15 of the FCC Rules. These limits are designed to<br />
provide reasonable protection against harmful interference in residential installation.<br />
This equipment generates, uses and can radiate radio frequency energy and if not<br />
installed and used in accordance with the instructions, may cause harmful interference<br />
to radio communications. However, there is no guarantee that interference will not<br />
occur in a particular installation. If this equipment does cause harmful interference to<br />
radio or television reception, detectable by turning the equipment in question off and<br />
on, the user is encouraged to try to correct the interference by one or more of the<br />
following measures:<br />
• Reorient or relocate the receiving antenna<br />
• Increase the distance between the equipment and the receiver<br />
• <strong>Co</strong>nnect the equipment to an outlet on a different circuit than that which the receiver<br />
is connected to<br />
• Or consult the dealer or an experienced radio/TV technician for help.<br />
This device complies with Part 15 of the FCC Rules. Operation is subject to following<br />
two conditions:<br />
1. This device may not cause harmful interference, and<br />
2. This device must accept any interference that may cause undesired operation.<br />
EN-1
Safety Instructions<br />
Read all of these instructions before you operate your projector and save for future<br />
reference.<br />
1. Read instructions<br />
All the safety and operating instructions should be read before the appliance is<br />
operated.<br />
2. Notes and warnings<br />
All notes and warnings in the operating instructions should be adhered to.<br />
3. Cleaning<br />
Unplug the projector from the wall socket before cleaning. Use a damp cloth for<br />
cleaning the projector housing. Do not use liquid or aerosol cleaners.<br />
4. Accessories<br />
Do not place this product on an unstable cart, stand, or table. The product may fall,<br />
causing serious damage to the product.<br />
Keep the plastic packing materials (from the projector, accessories and optional<br />
parts) out of the reach of children as these bags may result in death by<br />
suffocation. Be particularly careful around the small children.<br />
5. Ventilation<br />
The projector is equipped with ventilation holes (intake) and ventilation holes (exhaust).<br />
Do not block or place anything near these slots, or internal heat build-up may occur,<br />
causing picture degradation or damage to the projector.<br />
6. Power sources<br />
Check that the operating voltage of your unit is identical with the voltage of your local<br />
power supply.<br />
7. Servicing<br />
Do not attempt to service this projector yourself. Refer all servicing to qualified<br />
service personnel.<br />
8. Replacement parts<br />
When replacement parts are required, be sure that the replacement parts are<br />
specified by the manufacture. Unauthorized substitutions may result in fire, electric<br />
shock or other hazards.<br />
9. Moisture <strong>Co</strong>ndensation<br />
Never operate this projector immediately after moving it from a cold location to a<br />
warm one. When the projector is exposed to such a change in temperature,<br />
moisture may condense on the lens and the crucial internal parts. To prevent the<br />
unit from possible damage, do not use the projector for at least 2 hours when<br />
there is an extreme or sudden change in temperature.<br />
EN-2
Notes on the AC Power <strong>Co</strong>rd<br />
AC Power <strong>Co</strong>rd must meet the requirement of countries where you use this projector.<br />
Please confirm your AC plug type with the graphics below and ensure that the proper<br />
AC Power <strong>Co</strong>rd is used. If the supplied AC Power <strong>Co</strong>rd does not match your AC outlet,<br />
please contact your sales dealer. This projector is equipped with a grounding type AC<br />
line plug. Please ensure that your outlet fits the plug. Do not defeat the safety purpose<br />
of this grounding type plug. We highly recommend using a video source device also<br />
equipped with a grounding type AC line plug to prevent signal interference due to<br />
voltage fluctuations.<br />
Ground<br />
EN-3
CONTENTS<br />
Introduction ........................................................................................................5<br />
Projector Features .......................................................................................................5<br />
Package <strong>Co</strong>ntents .......................................................................................................6<br />
Projector Overview ......................................................................................................7<br />
Using the Product ........................................................................................ 9<br />
<strong>Co</strong>ntrol Panel ..............................................................................................................9<br />
<strong>Co</strong>nnection Ports .......................................................................................................10<br />
Remote <strong>Co</strong>ntrol .........................................................................................................11<br />
Replacing the Battery ................................................................................................12<br />
Remote <strong>Co</strong>ntrol Operation ........................................................................................13<br />
Installation ........................................................................................................14<br />
<strong>Co</strong>nnecting the Projector ...........................................................................................14<br />
Powering On/Off the Projector ..................................................................................15<br />
Adjusting the Projector ..............................................................................................16<br />
Menu Operation ............................................................................................18<br />
Maintenance ...................................................................................................22<br />
Cleaning the Lens .....................................................................................................22<br />
Cleaning the Projector Housing ................................................................................22<br />
Replacing the Lamp ..................................................................................................23<br />
Specifications ...............................................................................................25<br />
Appendix ............................................................................................................26<br />
LED Indicator Messages ...........................................................................................26<br />
<strong>Co</strong>mpatibility Modes ..................................................................................................27<br />
Troubleshooting ........................................................................................................28<br />
EN-4
Introduction<br />
Projector Features<br />
The projector integrates high-performance optical engine projection and a user - friendly<br />
design to deliver high reliability and ease of use.<br />
The projector offers the following features:<br />
• Single chip 0.55" Texas Instruments DLP ® technology<br />
• XGA (1024 x 768 pixels)<br />
• Auto image re-sizing (Auto-Sync.) to 1024 x 768 full screen with scaling<br />
compression compatibility for VGA, SVGA, XGA and SXGA*<br />
• <strong>Co</strong>mpatibility with Macintosh ® computers<br />
• <strong>Co</strong>mpatibility with NTSC, PAL, SECAM and HDTV<br />
• D-Sub 15-pin terminal for analog video connectivity<br />
• <strong>User</strong>-friendly, multi-language on-screen display<br />
• Advanced electronic keystone correction<br />
* means compressed.<br />
EN-5
Package <strong>Co</strong>ntents<br />
When you unpack the projector, make sure you have all these components:<br />
Projector with Lens<br />
Cap<br />
AC Power <strong>Co</strong>rd<br />
VGA Cable (D-SUB<br />
to D-SUB)<br />
<strong>Co</strong>mposite Video<br />
Cable<br />
S-Video Cable Remote <strong>Co</strong>ntrol (IR) CD <strong>User</strong>’s <strong>Manual</strong> Quick Start Guide<br />
• Save the original shipping carton and packing material; they will comein handy<br />
if you ever to ship your unit. For maximum protection, repack your unit as it was<br />
originally packed at the factory.<br />
• Accessories and components may vary by retailer and region.<br />
EN-6
Projector Overview<br />
Front View<br />
11<br />
10<br />
9<br />
8<br />
7<br />
6<br />
5<br />
4<br />
1 2<br />
3<br />
Lens cap<br />
1 7<br />
Elevator button<br />
2 8<br />
Lens cap strap<br />
3 9<br />
Front IR remote control sensor<br />
4 10<br />
Projection lens<br />
5 11<br />
6<br />
Ventilation holes<br />
AC power socket<br />
Zoom ring<br />
Focus ring<br />
<strong>Co</strong>ntrol panel<br />
Lamp cover<br />
EN-7
Rear View<br />
1 2 3 4<br />
1<br />
2<br />
3<br />
4<br />
<strong>Co</strong>nnection ports<br />
Kensington lock<br />
Rear IR remote control sensor<br />
Ventilation holes<br />
Bottom View<br />
3<br />
2<br />
1<br />
1<br />
2<br />
3<br />
Elevator foot<br />
Ceiling mount (3-M4*6)<br />
Tilt-adjustment foot<br />
• This projector can be used with a ceiling mount for support. The ceiling mount is<br />
not included in the package.<br />
EN-8
Using the Product<br />
<strong>Co</strong>ntrol Panel<br />
LED<br />
1 2<br />
8<br />
3<br />
4<br />
1<br />
2<br />
Lamp (Lamp LED indicator)<br />
Refer to “LED Indicator Messages”.<br />
Temp (Temperature LED indicator)<br />
Refer to “LED Indicator Messages”.<br />
7<br />
6<br />
5<br />
Button Function<br />
3<br />
4<br />
5<br />
6<br />
7<br />
8<br />
Four directional buttons<br />
Use four directional buttons to select items or make adjustments to your selection.<br />
Enter<br />
Enter to sub-menu and confirm the menu selection. Activate in <strong>Co</strong>lor Setting, Lamp<br />
<strong>Co</strong>unter Reset and Factory Default menu operations.<br />
Resync<br />
Resynchronize the projector to the input signal from a computer.<br />
Power<br />
Turn the projector on or off.<br />
Source<br />
<strong>Manual</strong>ly select an input source.<br />
Menu<br />
Display or exit the on-screen display menus.<br />
EN-9
<strong>Co</strong>nnection Ports<br />
1 2 3 4 5 6 7<br />
1<br />
2<br />
3<br />
4<br />
5<br />
6<br />
7<br />
VGA OUT<br />
<strong>Co</strong>nnect to a computer display, etc.<br />
VGA IN-1<br />
<strong>Co</strong>nnect image input signal (analog RGB or component) to this jack.<br />
VGA IN-2<br />
<strong>Co</strong>nnect image input signal (analog RGB or component) to this jack.<br />
RS232<br />
When operating the projector via a computer, connect this to the controlling<br />
computer’s RS-232C port.<br />
S-VIDEO<br />
<strong>Co</strong>nnect S-Video output from video equipment to this jack.<br />
VIDEO<br />
<strong>Co</strong>nnect composite video output from video equipment to this jack.<br />
USB<br />
This connector is for page up & down mouse control function and firmware update.<br />
EN-10
Remote <strong>Co</strong>ntrol<br />
1<br />
2<br />
SOURCE<br />
<strong>Manual</strong>ly select an input source.<br />
RESYNC<br />
Resynchronize the projector to the input<br />
signal from a computer.<br />
3 BLANK<br />
Hide the screen. Press again to cancel the<br />
BLANK function.<br />
4 FREEZE<br />
Press “FREEZE” to pause the screen image.<br />
Press again to cancel the FREEZE function.<br />
5 VOLUME + / -<br />
Adjust the volume level.<br />
* Not available in this model.<br />
6 PAGE / (<strong>Co</strong>mputer mode only)<br />
Scroll back and forth on the screen when<br />
7<br />
giving a presentation. <strong>Co</strong>nnect the projector<br />
and your computer with a USB cable to use<br />
these buttons.<br />
MUTE<br />
Cut off the sound temporarily. Press again<br />
to cancel the MUTE function.<br />
* Not available in this model.<br />
13<br />
8 MENU<br />
Display or exit the on-screen display menus.<br />
9 ECO<br />
14<br />
Press this button to activate the eco mode.<br />
10 ASPECT<br />
Press this button to switch the image aspect<br />
ratio from 1:1, 4:3 to 16:9.<br />
* 1:1 is only available for computer mode.<br />
15<br />
11 ESC<br />
- Act as computer Esc button when keyboard<br />
16<br />
function is selected.<br />
- Act as mouse right button when mouse 17<br />
function is selected.<br />
12 Four directional buttons<br />
- Use four directional buttons to select items<br />
18<br />
or make adjustments to your selection.<br />
- Act as computer keyboard (four directional<br />
buttons) when keyboard function is selected.<br />
- Act as mouse navigation when mouse<br />
function is selected.<br />
1<br />
2<br />
3<br />
4<br />
5<br />
6<br />
7<br />
14<br />
8<br />
13<br />
9<br />
12<br />
10 11<br />
ENTER<br />
- Enter to sub-menu and confirm the<br />
menu selection. Activate in <strong>Co</strong>lor<br />
Setting, Lamp <strong>Co</strong>unter Reset and<br />
Factory Default menu operations.<br />
- Act as computer Enter button when<br />
keyboard function is selected.<br />
- Act as mouse left button when<br />
mouse function is selected.<br />
POINTER(<strong>Co</strong>mputer mode only)<br />
Toggle this button to activate keyboard<br />
function or mouse function when your<br />
projector is connected with a USB cable.<br />
KEYSTONE + / -<br />
<strong>Co</strong>rrect the keystone distortion.<br />
D-ZOOM + / -<br />
Zoom in and out the images.<br />
VIDEO MODE<br />
Select PC, Movie, sRGB or <strong>User</strong> mode.<br />
(Power)<br />
Turn the projector on or off.<br />
18<br />
17<br />
16<br />
15<br />
EN-11
Replacing the Battery<br />
For the first time use:<br />
Remove the transparent insulation tape by pulling it before use.<br />
For battery change:<br />
1. Remove the battery holder.<br />
2. Remove the old Lithium coin cell and install new one (CR2025).<br />
Ensure that the side with the mark "+" is up.<br />
3. Push the battery holder back into the remote control until<br />
you feel a click.<br />
• Keep the battery out of the reach of children. There is a danger of death by<br />
accidentally swallowing the battery.<br />
• Do not recharge the used battery or expose the battery to fire or water.<br />
• Do not dispose of the used battery along with household waste. Dispose of<br />
used batteries according to local regulations.<br />
• Danger of explosion may happen if batteries are incorrectly replaced.<br />
Replace only with the same type recommended by the manufacturer.<br />
EN-12
7m<br />
Remote <strong>Co</strong>ntrol Operation<br />
Point the remote control at the infrared remote sensor and press a button.<br />
• Operating the projector from the front<br />
15 15<br />
• Operating the projector from the rear<br />
15 15<br />
7m<br />
• The remote control may not operate when there is sunlight or other strong<br />
light such as a fluorescent lamp shining on the remote sensor.<br />
• Operate the remote control from a position where the remote sensor is visible.<br />
• Do not drop the remote control or jolt it.<br />
• Keep the remote control out of locations with excessively high temperature or<br />
humidity.<br />
• Do not get water on the remote control or place wet objects on it.<br />
• Do not disassemble the remote control.<br />
EN-13
Installation<br />
<strong>Co</strong>nnecting the Projector<br />
VGA Cable (D-Sub to D-Sub)<br />
RS-232 Cable<br />
USB Cable<br />
1 4<br />
2 5<br />
3 6<br />
VGA (D-SUB) to HDTV (RCA) Cable<br />
S-Video Cable<br />
<strong>Co</strong>mposite Video Cable<br />
Laptop type<br />
Desktop type<br />
1 1 1<br />
2<br />
3<br />
4<br />
4 5 6<br />
• When connecting cable, power cords of both a projector and external equipment<br />
should be disconnected from AC outlet.<br />
• The figure above is a sample connection. This does not mean that all of these<br />
devices can or must be connected simultaneously.<br />
• The cables that come with the projector may differ from the above illustration.<br />
The included cables are based on actual shipment delivery.<br />
EN-14
Powering On/Off the Projector<br />
Powering On the Projector:<br />
1. Remove the projector lens cap.<br />
2. <strong>Co</strong>mplete the AC power cord and peripheral signal cable(s) connections.<br />
3. Press button to turn on the projector.<br />
The projector takes a minute or so to warm up.<br />
4. Turn on your source (computer, notebook, DVD, etc.). The projector automatically<br />
detects your source.<br />
• If you are connecting multiple sources to the projector simultaneously, press<br />
the Source button on the control panel or the SOURCE button on the remote<br />
control.<br />
Warning:<br />
• Remove the lens cap first before powering on.<br />
• Never look into the lens when the lamp is on. This can damage your eyes. It<br />
is especially important that children are not allowed to look into the lens.<br />
Powering Off the Projector:<br />
1. Press button to turn off the projector lamp. You will see a message "Power<br />
off? Press Power again" appear on the screen.<br />
2. Press button again to confirm.<br />
• The cooling fans continue to operate for cooling cycle.<br />
• When the Lamp LED begins flashing, the projector has entered stand-by mode.<br />
• If you want to turn the projector back on, you must wait until the projector has<br />
completed the cooling cycle and has entered stand-by mode. Once in standby<br />
mode, simply press button to restart the projector.<br />
3. Disconnect the AC power cord from the electrical outlet and the projector.<br />
4. Do not turn on the projector immediately following a power off procedure.<br />
EN-15
Adjusting the Projector<br />
Adjusting the Projector Height<br />
Tilt-adjustment foot<br />
Elevator foot<br />
Elevator button<br />
The projector is equipped with an elevator foot to adjust the image height.<br />
To raise or lower the image:<br />
1. To raise or lower the image, press the elevator button and raise or lower the front<br />
of the projector. Release the button to lock the adjustment.<br />
2. To level the image on the screen, turn the tilt-adjustment foot to fine-tune the height.<br />
• To avoid damaging the projector, make sure that the elevator foot and tiltadjustment<br />
foot are fully retracted before placing the projector in its carrying<br />
case.<br />
Adjusting the Projector Zoom and Focus<br />
Zoom ring<br />
Focus ring<br />
1. Focus the image by rotating the focus ring. A still image is recommended for focusing.<br />
2. Adjust the image by sliding the zoom ring.<br />
EN-16
Adjusting Projection Image Size<br />
Refer to the graphic and table below to determine the screen size and projection distance.<br />
300<br />
139<br />
250<br />
83<br />
116<br />
69<br />
56<br />
46<br />
33<br />
28<br />
1.2m (Min.)<br />
2.0m<br />
3.0m<br />
5.0m<br />
10.8m(Max.)<br />
Projection Distance<br />
(meters)<br />
Screen Size (for 4:3 aspect ratio diagonal length)<br />
Wide (inches)<br />
Tele (inches)<br />
1.2 33 28<br />
2 56 46<br />
3 83 69<br />
5 139 116<br />
10.8 300 250<br />
• Position the projector in a horizontal position; other positions can cause heat<br />
build-up and damage to the projector.<br />
• Make sure the heat ventilation holes are not blocked.<br />
• Do not use the projector in a smoky environment. Smoke residue may cause<br />
build-up on critical parts (i.e. DMD, lens assembly, etc.)<br />
EN-17
Menu Operation<br />
The projector has multilingual on-screen display menus that allow you to make image<br />
adjustments and change a variety of settings.<br />
Picture<br />
Brightness 0 - 100<br />
<strong>Co</strong>ntrast<br />
0 - 100<br />
<strong>Co</strong>lor Setting<br />
Keystone<br />
-20-+20<br />
Aspect Ratio 1:1, 4:3, 16:9<br />
Image<br />
PC, Movie, sRGB, <strong>User</strong><br />
Red, Green, Blue<br />
White Intensity<br />
Gamma<br />
0 - 10<br />
0 - 6<br />
<strong>Co</strong>mputer Image<br />
Total dots<br />
Fine sync<br />
H Position<br />
V Position<br />
-50 - 50<br />
0 - 31<br />
-10 - 10<br />
-10 - 10<br />
Video Image<br />
<strong>Co</strong>lor<br />
Sharpness<br />
Tint<br />
0 - 100<br />
0 - 31<br />
0 - 100<br />
Setting<br />
Menu Position<br />
Mounting<br />
Logo<br />
Signal Type<br />
Lamp <strong>Co</strong>unter<br />
Lamp <strong>Co</strong>unter Reset<br />
Power Saving<br />
Auto Source<br />
ECO Mode<br />
Highland<br />
OSD Timeout<br />
On, Off<br />
YPbPr, RGB, YCbCr<br />
Yes, No<br />
Yes, No<br />
Yes, No<br />
Yes, No<br />
5, 15, 30, 45, 60 Sec<br />
Language<br />
Factory Default<br />
Yes, No<br />
EN-18
How to operate<br />
1. Press the Menu button on the control panel or the MENU button on the remote<br />
control to open the OSD menu.<br />
2. When OSD is displayed, use / to select any feature in the main menu.<br />
3. After selecting the desired main menu feature, press to enter sub-menu for<br />
feature setting.<br />
4. Adjust the settings with / .<br />
5. Press the Menu button on the control panel or the MENU button on the remote<br />
control, the screen will return to the main menu.<br />
6. To exit OSD, Press the Menu button on the control panel or the MENU button on the<br />
remote control again. The OSD menu will close and the projector will automatically<br />
save the new settings.<br />
Picture (<strong>Co</strong>mputer / Video Mode)<br />
Brightness<br />
Brighten or darken the image.<br />
<strong>Co</strong>ntrast<br />
Set the difference between light and dark areas.<br />
<strong>Co</strong>lor Setting<br />
Adjust the color temperature. At higher temperature the screen looks colder; at lower<br />
temperature, the screen looks warmer. If you select “<strong>User</strong>”, “Red”, “Green” and “Blue”<br />
cab be adjusted.<br />
Keystone<br />
<strong>Co</strong>rrect the keystone distortion.<br />
Aspect Ratio (<strong>Co</strong>mputer Mode)<br />
Select how the picture fits on the screen:<br />
• 1:1 : When the aspect ratio of input source is not 4:3, the input source will keep the<br />
image with original width-height ratio and maximize the image to fit native<br />
horizontal or vertical pixels.<br />
When the aspect ratio of input source is 4:3:<br />
If input source is smaller than DMD output resolution, it will keep the<br />
original size and aspect ratio.<br />
If input source is bigger than DMD output resolution, it will keep aspect<br />
ratio and full all the whole screen.<br />
• 4:3 : The input source will be scaled to fit the projection screen.<br />
• 16:9 : The input source will be scaled to fit the width of the screen.<br />
Aspect Ratio (Video Mode)<br />
Select how the picture fits on the screen:<br />
• 4:3 : The input source will be scaled to fit the projection screen.<br />
• 16:9 : The input source will be scaled to fit the width of the screen.<br />
EN-19
Image<br />
There are many factory presets optimized for various types of images.<br />
• PC : For computer or notebook.<br />
• Movie : For home theater.<br />
• sRGB : For PC standard color.<br />
• <strong>User</strong> : Memorize user’s settings.<br />
White Intensity<br />
Increase the brightness of white areas.<br />
Gamma<br />
Effect the represent of dark scenery. With greater gamma value, dark scenery will look brighter.<br />
<strong>Co</strong>mputer Image (<strong>Co</strong>mputer Mode)<br />
Total dots<br />
Adjust the timing of the projector relative to the computer.<br />
Fine sync<br />
Adjust the phase of the projector relative to the computer.<br />
* You can fine-tune the Fine sync, but it is not easily identified.<br />
H Position (Horizontal Position)<br />
Adjust the image left or right within the projection area.<br />
V Position (Vertical Position)<br />
Adjust the image up or down within the projection area.<br />
Video Image (Video Mode)<br />
<strong>Co</strong>lor<br />
Adjust the intensity of colors.<br />
Sharpness<br />
Sharpen or soften the image.<br />
* You can fine-tune the Sharpness, but it is not easily identified.<br />
Tint<br />
Shift colors toward red or green.<br />
Setting (<strong>Co</strong>mputer / Video Mode)<br />
Menu Position<br />
Choose the menu location on the display screen.<br />
Mounting<br />
Adjust the picture to match the orientation of the projector: upright or upside-down, in<br />
front of or behind the screen. Invert or reverse the image accordingly.<br />
Logo<br />
Choose to display the logo or not.<br />
EN-20
Signal Type<br />
Specify the source to the <strong>Co</strong>mputer In terminal that you wish to project.<br />
• YPbPr : For component 480p,576p,720p,1080i signals<br />
• RGB : For VGA signal<br />
• YCbCr : For component 480i,576i signals<br />
Lamp <strong>Co</strong>unter<br />
Display the lamp’s elapsed operating time (in hours).<br />
Lamp <strong>Co</strong>unter Reset<br />
Reset the lamp counter to 0 hours.<br />
Power Saving<br />
If no operation is performed for a specific period of time, the power to the projector is<br />
automatically turned off.<br />
Auto Source<br />
Automatically scan the input source.<br />
ECO Mode<br />
Use this function to dim the projector lamp light output which will lower power<br />
consumption and increase lamp life.<br />
Highland<br />
Turning on Highland mode operates the fans at full speed continuously to allow for<br />
proper high altitude cooling of the projector.<br />
OSD Timeout<br />
Duration OSD menu stays active (at idle state by second).<br />
Language (<strong>Co</strong>mputer / Video Mode)<br />
Select the language used by the on-screen menu.<br />
Factory Default (<strong>Co</strong>mputer / Video Mode)<br />
Restore all menu settings to factory default settings.<br />
EN-21
Maintenance<br />
The projector needs proper maintenance. You should keep the lens clean as dust, dirt<br />
or spots will project on the screen and diminish image quality. If any other parts need<br />
replacing, contact your dealer or qualified service personnel. When cleaning any part<br />
of the projector, always switch off and unplug the projector first.<br />
Warning:<br />
Never open any of the covers on the projector. Dangerous electrical voltages inside<br />
the projector can cause severe injury. Do not attempt to service this product yourself.<br />
Refer all servicing to qualified service personnel.<br />
Cleaning the Lens<br />
Gently wipe the lens with lens cleaning paper. Do not touch the lens with your hands.<br />
Cleaning the Projector Housing<br />
Gently wipe with a soft cloth. If dirt and stains are not easily removed, use a soft cloth<br />
damped with water, or water and neutral detergent, and wipe dry with a soft, dry cloth.<br />
• Turn off the projector and remove the AC power cord from the power outlet<br />
before beginning maintenance work.<br />
• Make sure the lens is cool before cleaning.<br />
• Do not use detergents or chemicals other than those noted above. Do not use<br />
benzene or thinners.<br />
• Do not use chemical sprays.<br />
• Use a soft cloth or lens paper only.<br />
EN-22
Replacing the Lamp<br />
As the projector operates over time, the brightness of the projector lamp gradually<br />
decreases and the lamp becomes more susceptible to breakage. We recommend<br />
replacing the lamp if a warning message is displayed. Do not attempt to replace the<br />
lamp yourself. <strong>Co</strong>ntact the qualified service personnel for replacement.<br />
• The lamp becomes high temperature after turning off the projector with the<br />
power button. If you touch the lamp, you may scald your finger. When you<br />
replace the lamp, wait for at least 45 minutes for the lamp to cool down.<br />
• Do not touch the lamp glass at any time. The lamp may explode due to<br />
improper handling, including the touching of the lamp glass.<br />
• Lamp lifetime may differ from lamp to lamp and according to the environment<br />
of use. There is no guarantee of the same lifetime for each lamp. Some lamps<br />
may fail or terminate their lifetime in a shorter period of time than other similar<br />
lamps.<br />
• A lamp may explode as a result of vibration, shock or degradation as a result of<br />
hours of use as its lifetime draws to an end. Risk of explosion may differ<br />
according to the environment or conditions in which the projector and lamp are<br />
being used.<br />
• Wear protective gloves and eyeglasses when fixing or detaching the lamp.<br />
• Faster on-off-cycles will damage the lamp and reduce lamp life. Wait at least<br />
for 5 minutes to turn off the projector after powering on.<br />
• Do not operate the lamp in proximity to paper, cloth, or other combustible<br />
material nor cover it with such materials. Otherwise it could cause a fire.<br />
• Do not operate the lamp in an atmosphere containing an inflammable<br />
substance, such as thinner. Otherwise it could cause a fire or explosion.<br />
• Thoroughly ventilate the area or the room when operating the lamp in an<br />
oxygen atmosphere (in the air). If ozone is inhaled, it could cause headaches,<br />
nausea, dizziness, etc.<br />
• The inorganic mercury is involved in the lamp. If the lamp bursts, the mercury<br />
inside the lamp will go out of the projector. Leave the area immediately if the<br />
lamp shatters while being operated and ventilate the area for at least 30<br />
minutes in order to avoid the inhalation of mercury fumes. Otherwise it could be<br />
harmful to user’s health.<br />
EN-23
1. Turn off the projector.<br />
2. If the projector is installed in a<br />
ceiling mount, remove it from the<br />
mount.<br />
3. Unplug the power cord.<br />
4. Loosen the screw in the side of the<br />
lamp cover and remove the cover.<br />
5. Remove the screws from the lamp<br />
module, raise the handle, and lift<br />
out the module.<br />
6. Insert the new lamp module into the<br />
projector and tighten the screws.<br />
7. Replace the lamp cover and tighten<br />
the screw.<br />
8. Turn on the projector. If the lamp<br />
does not turn on after the warm-up<br />
period, try reinstalling the lamp.<br />
9. Reset the lamp hour. Refer to the<br />
“Setting (<strong>Co</strong>mputer/Video)” menu.<br />
• Dispose of the used lamp according to local regulations.<br />
• Ensure that screws are tightened properly. Screws not tightened fully may<br />
result in injury or accidents.<br />
• Since the lamp is made of glass, do not drop the unit and do not scratch the<br />
glass.<br />
• Do not reuse the old lamp. This could cause the lamp to explode.<br />
• Be sure to turn off the projector and unplug the AC power cord before<br />
replacing the lamp.<br />
• Do not use the projector with the lamp cover removed.<br />
EN-24
Specifications<br />
Display Type<br />
Single 0.55" DLP panel<br />
Resolution (Pixels) XGA (1024 x 768)<br />
Brightness<br />
2700 ANSI Lumens<br />
Lens<br />
<strong>Manual</strong> Zoom (1.2x)<br />
<strong>Co</strong>ntrast Ratio 2500:1<br />
Screen Size 16" - 305"<br />
Lamp<br />
180 W<br />
Input / Output Source D-Sub 15 pin, S-video, composite video, USB, RS232<br />
Video <strong>Co</strong>mpatibility NTSC 3.58, NTSC4.43<br />
PAL-60, M, N<br />
SECAM, HDTV (480i/p, 576i/p, 720p, 1080i)<br />
Scanning Frequency<br />
Horizontal Freq.<br />
Vertical Freq.<br />
Noise Level<br />
Environment<br />
31 - 79 KHz<br />
50 - 85 Hz<br />
Normal: 32dBA; ECO: 30dBA<br />
Operating:<br />
Temperature: 5°C to 35°C<br />
Humidity: 30%-85%<br />
Storage:<br />
Temperature: -20°C to 60°C<br />
Humidity: 30%-85%<br />
AC 100 - 240 V, 50 - 60 Hz<br />
230 W<br />
271 x 223 x 90 mm<br />
2.7 kg (6lb)<br />
Power Requirement<br />
Power <strong>Co</strong>nsumption<br />
Dimension<br />
Weight<br />
Note: Design and Specifications are subject to change without prior notice.<br />
EN-25
Appendix<br />
LED Indicator Messages<br />
LED Type <strong>Co</strong>lor Status Meaning<br />
LAMP LED<br />
TEMP LED<br />
LAMP LED<br />
TEMP LED<br />
LAMP LED<br />
TEMP LED<br />
LAMP LED<br />
TEMP LED<br />
LAMP LED<br />
TEMP LED<br />
LAMP LED<br />
TEMP LED<br />
LAMP LED<br />
TEMP LED<br />
Green<br />
Off<br />
Green<br />
Green<br />
Green<br />
Green<br />
Amber<br />
Green<br />
Amber<br />
Amber<br />
Green<br />
Red<br />
Amber<br />
Off<br />
Flash<br />
-<br />
Solid<br />
Flash<br />
Solid<br />
Solid<br />
Solid<br />
Solid<br />
Solid<br />
Solid<br />
Solid<br />
Flash<br />
Solid<br />
-<br />
The projector is in standby mode.<br />
The projector system has some problems with<br />
its fan, so the projector cannot start up.<br />
The lamp is in good condition and is projecting<br />
at maximum brightness.<br />
The lamp has reached its end of life and must<br />
be changed soon. The lamp will continue to<br />
operate until it fails. Change the lamp. If the<br />
lamp is off, then the ballast will become<br />
malfunction.<br />
The projector is shutting and the fan motor is<br />
cooling the lamp for shutdown. Do not unplug<br />
the power cord or turn the power off before the<br />
Lamp LED changes to flashing. The fan motor<br />
will turn off when the lamp has cooled.<br />
Temperature is too high. The lamp will turn off.<br />
The fan motor is cooling the lamp.<br />
The lamp ignition failed. If temperature is too<br />
high, the fans will cool the lamp.<br />
EN-26
<strong>Co</strong>mpatibility Modes<br />
<strong>Co</strong>mputer:<br />
<strong>Co</strong>mpatibility Resolution H-Sync [KHz] V-Sync [Hz]<br />
VGA 640 x 480 31.5 59.9<br />
37.9 72.8<br />
37.5 75.0<br />
43.3 85.0<br />
SVGA 800 x 600 35.2 56.3<br />
37.9 60.3<br />
48.1 72.2<br />
46.9 75.0<br />
53.7 85.1<br />
XGA 1024 x 768 48.4 60.0<br />
56.5 70.1<br />
60.0 75.0<br />
68.7 85.0<br />
SXGA 1152 x 864 64.0 70.0<br />
67.5 75.0<br />
1280 x 960 60.0 60.0<br />
75.0 75.0<br />
1280 x 1024 64.0 60.0<br />
WXGA 1280 x 768 47.8 60.0<br />
60.3 74.9<br />
68.6 84.8<br />
1280 x 800 49.7 59.8<br />
62.8 74.9<br />
Video:<br />
Signal Horizontal Frequency (kHz) Vertical Frequency (Hz)<br />
480i 15.8 60<br />
480p 31.5 60<br />
576i 15.6 50<br />
576p 31.3 50<br />
720p 45.0 60<br />
720p 37.5 50<br />
1080i 33.8 60<br />
1080i 28.1 50<br />
EN-27
Troubleshooting<br />
Refer to the symptoms and measures listed below before sending the projector<br />
forrepairs. If the problem persists, contact your local reseller or service center. Please<br />
refer to "Indicator Messages" as well.<br />
Start-up problems<br />
If no lights turn on:<br />
• Be sure that the power cord is securely connected to the projector and the other end<br />
is plugged into an outlet with power.<br />
• Press the power button again.<br />
• Unplug the power cord and wait for a short while, then plug it in and press the power<br />
button again.<br />
Image problems<br />
If the searching source is displayed:<br />
• Press the Source button on the control panel or the SOURCE button on the remote<br />
control one or more times to select another active input source.<br />
• Be sure the external source is turned on and connected.<br />
• For a computer connection, ensure your notebook computer’s external video port is<br />
turned on. Refer to the computer manual.<br />
If the image is out of focus:<br />
• Be sure the lens cover is open.<br />
• While displaying the on-screen menu, adjust the focus ring. (The image size should<br />
not change; if it does, you are adjusting the zoom, not the focus.)<br />
• Check the projection lens to see if it needs cleaning.<br />
If the image is flickering or unstable for a computer connection:<br />
• Press the Resync button on the control panel or the RESYNC button on the remote<br />
control.<br />
• Press the Menu button on the control panel or the MENU button on the remote<br />
control, go to <strong>Co</strong>mputer Image and adjust Total dots or Fine sync.<br />
Remote control problems<br />
If the remote control does not operate:<br />
• Be sure nothing is blocking the remote control receiver on the front or back of the<br />
projector. Use the remote control within the effective range.<br />
• Aim the remote control at the screen or at the front or back of the projector.<br />
• Move the remote control so it is more directly in front of or behind the projector and<br />
not as far to the side.<br />
EN-28