SpaceX Falcon 9 Stomp Rocket â 1:150 scale
SpaceX Falcon 9 Stomp Rocket â 1:150 scale
SpaceX Falcon 9 Stomp Rocket â 1:150 scale

You also want an ePaper? Increase the reach of your titles
YUMPU automatically turns print PDFs into web optimized ePapers that Google loves.
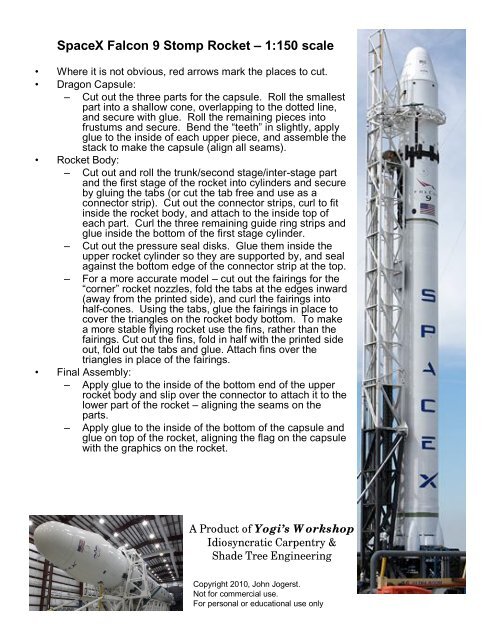
<strong>SpaceX</strong> <strong>Falcon</strong> 9 <strong>Stomp</strong> <strong>Rocket</strong> – 1:<strong>150</strong> <strong>scale</strong><br />
• Where it is not obvious, red arrows mark the places to cut.<br />
• Dragon Capsule:<br />
– Cut out the three parts for the capsule. Roll the smallest<br />
part into a shallow cone, overlapping to the dotted line,<br />
and secure with glue. Roll the remaining pieces into<br />
frustums and secure. Bend the “teeth” in slightly, apply<br />
glue to the inside of each upper piece, and assemble the<br />
stack to make the capsule (align all seams).<br />
• <strong>Rocket</strong> Body:<br />
– Cut out and roll the trunk/second stage/inter-stage part<br />
and the first stage of the rocket into cylinders and secure<br />
by gluing the tabs (or cut the tab free and use as a<br />
connector strip). Cut out the connector strips, curl to fit<br />
inside the rocket body, and attach to the inside top of<br />
each part. Curl the three remaining guide ring strips and<br />
glue inside the bottom of the first stage cylinder.<br />
– Cut out the pressure seal disks. Glue them inside the<br />
upper rocket cylinder so they are supported by, and seal<br />
against the bottom edge of the connector strip at the top.<br />
– For a more accurate model – cut out the fairings for the<br />
“corner” rocket nozzles, fold the tabs at the edges inward<br />
(away from the printed side), and curl the fairings into<br />
half-cones. Using the tabs, glue the fairings in place to<br />
cover the triangles on the rocket body bottom. To make<br />
a more stable flying rocket use the fins, rather than the<br />
fairings. Cut out the fins, fold in half with the printed side<br />
out, fold out the tabs and glue. Attach fins over the<br />
triangles in place of the fairings.<br />
• Final Assembly:<br />
– Apply glue to the inside of the bottom end of the upper<br />
rocket body and slip over the connector to attach it to the<br />
lower part of the rocket – aligning the seams on the<br />
parts.<br />
– Apply glue to the inside of the bottom of the capsule and<br />
glue on top of the rocket, aligning the flag on the capsule<br />
with the graphics on the rocket.<br />
A Product of Yogi’s Workshop<br />
Idiosyncratic Carpentry &<br />
Shade Tree Engineering<br />
Copyright 2010, John Jogerst.<br />
Not for commercial use.<br />
For personal or educational use only
<strong>Rocket</strong> Motor Guide Ring<br />
(Glue three layers inside rocket bottom)<br />
inner guide ring – inside bottom of stage one<br />
inner guide ring – inside bottom of stage one<br />
inner guide ring – inside bottom of stage one<br />
FIRST STAGE<br />
Capsule Nose<br />
Fairing parts<br />
Fairings – “Corner”<br />
<strong>Rocket</strong> Nozzles.<br />
cut on red lines, fold<br />
on dotted lines<br />
DISCARD<br />
For a better flying model-replace<br />
fairings with fins<br />
Internal pressure seal.<br />
Glue under connector<br />
at top of trunk just<br />
under the capsule.<br />
connect trunk module to capsule<br />
connect first stage to inter-stage<br />
INTERSTAGE 2 ND STAGE TRUNK<br />
F A L C O N<br />
9
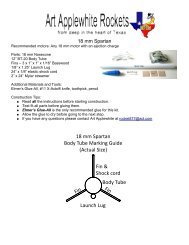
Simple stomp rocket launcher<br />
Assemble the parts below. Joints can be glued or<br />
simply press fit. Do not glue the elbow fitting as it<br />
should rotate to adjust the launch angle.<br />
The ½ inch PVC pipe will slip inside the neck of a soda<br />
bottle – tape for a better seal if desired or bore a<br />
closely fitting hole through the bottle cap, slip the<br />
tubing through the cap and screw the cap down to<br />
seal.<br />
If using ¾ inch pipe, a grey conduit coupler is more<br />
flexible than white PVC and will allow the soda bottle’s<br />
neck to be jammed/screwed in securely to attach it.<br />
Launcher can be made<br />
from ½ or ¾ inch PVC<br />
tubing. Size rockets to<br />
fit the tubing used.<br />
<strong>Rocket</strong>s are made by loosely wrapping a half sheet<br />
(4 ¼ x 11) of card stock or construction paper around<br />
the removable launch tube and taping the seam<br />
lengthwise. Fins are added or cut into the bottom<br />
of the tube. Pinch the top shut and tape securely.<br />
Slide rocket over tube and stomp away!<br />
Side view<br />
Launch tube can<br />
be removed for<br />
storage and to wrap<br />
rockets.<br />
cross<br />
fitting<br />
12-18”<br />
pipe<br />
soda<br />
bottle<br />
12-18”<br />
pipe<br />
6”<br />
pipe<br />
elbow<br />
Top view<br />
cross<br />
fitting<br />
cap<br />
12”<br />
pipe<br />
elbow &<br />
launch tube<br />
Materials<br />
1 - 8’ stick of ½ ” PVC pipe (uses 5 ½’)<br />
1 - ½ ” PVC cross fitting<br />
2 - ½ ” PVC end cap<br />
1 - ½ ” PVC elbow<br />
soda<br />
bottle<br />
12-18”<br />
pipe<br />
12”<br />
pipe<br />
6”<br />
pipe<br />
2 liter soda bottle<br />
Card stock (65 or 110lb)<br />
Tape (to seal bottle neck if desired)<br />
PVC glue (if desired)<br />
cap<br />
A Product of Yogi’s Workshop<br />
Idiosyncratic Carpentry &<br />
Shade Tree Engineering