You also want an ePaper? Increase the reach of your titles
YUMPU automatically turns print PDFs into web optimized ePapers that Google loves.
What’s <strong>New</strong> <strong>in</strong> <strong>FEMAP</strong><br />
<strong>FEMAP</strong> 10.1 <strong>in</strong>cludes enhancements and new features, which are detailed below:<br />
“User Interface” on page 3<br />
“Mesh<strong>in</strong>g” on page 5<br />
“Elements” on page 5<br />
“Loads and Constra<strong>in</strong>ts” on page 6<br />
“Connections (Connection Properties, Regions, and Connectors)” on page 9<br />
“Groups and Layers” on page 10<br />
“Groups and Layers” on page 10<br />
“Views” on page 11<br />
“Output and Post-Process<strong>in</strong>g” on page 20<br />
“Geometry Interfaces” on page 23<br />
“Analysis Program Interfaces” on page 23<br />
“OLE/COM API” on page 26<br />
“Preferences” on page 28<br />
<strong>FEMAP</strong> 10.0, 10.0.1, and 10.0.2 <strong>in</strong>clude enhancements and new features, which are detailed below:<br />
(Please note, <strong>FEMAP</strong> 10.0.2 is a ma<strong>in</strong>tenance release only, therefore noth<strong>in</strong>g is listed <strong>in</strong> this document. See<br />
readme.pdf for additional details about 10.0.2)<br />
“User Interface” on page 29<br />
“Mesh<strong>in</strong>g” on page 49<br />
“Mesh Associativity” on page 59<br />
“Properties” on page 59<br />
“Functions” on page 61<br />
“Loads and Constra<strong>in</strong>ts” on page 61<br />
“Connections (Connection Properties, Regions, and Connectors)” on page 61<br />
“Geometry” on page 62<br />
“Groups and Layers” on page 68<br />
“Views” on page 68<br />
“Output and Post-Process<strong>in</strong>g” on page 69<br />
“Geometry Interfaces” on page 73<br />
“Analysis Program Interfaces” on page 74<br />
“Tools” on page 76<br />
“OLE/COM API” on page 77<br />
“Preferences” on page 79
10.1-2<br />
F<strong>in</strong>ite Element Model<strong>in</strong>g
What’s <strong>New</strong> for version 10.1 10.1-3<br />
What’s <strong>New</strong> for version 10.1<br />
User Interface<br />
General<br />
General, Menu, Toolbars, Model Info tree, Data Table/Entity Editor, Status Bar, Graphics<br />
• Added Tab Location option to View W<strong>in</strong>dows. Now the “View Tabs” may be places on the Top, Left, Right, or<br />
Bottom of a View W<strong>in</strong>dow.<br />
• Changed list<strong>in</strong>g of model size from Bytes to MBytes when us<strong>in</strong>g “List, Model Info” command<br />
• Updated “List, Model, Element” command to list element formulation based on solver set <strong>in</strong> the “active” Analysis<br />
Set <strong>in</strong> the Analysis Set Manager.<br />
• Added Axis of Revolution method to Vector Def<strong>in</strong>ition dialog box.<br />
• Added X Axis Log Scale option to Function Def<strong>in</strong>ition dialog box.<br />
Menu<br />
• Added Model, Load, Enforce Motion to Model menu. See Loads and Constra<strong>in</strong>ts section for more details.<br />
• Renamed Model, Load, Set to Model, Load, Create/Manage Set on Model menu. See Loads and Constra<strong>in</strong>ts<br />
section for more details.<br />
• Renamed Model, Constra<strong>in</strong>t, Set to Model, Constra<strong>in</strong>t, Create/Manage Set on Model menu. See Loads and<br />
Constra<strong>in</strong>ts section for more details.<br />
• Added Model, Output, Global Ply to Model menu. See Output and Post-Process<strong>in</strong>g section for more details.<br />
• Renamed Model, Output, Set to Model, Output, Create/Manage Set on Model menu. See Output and Post-Process<strong>in</strong>g<br />
section for more details.<br />
• Renamed Group, Set to Group, Create/Manage on Group menu. See Group and Layers section for more details.<br />
• Reorganized top section of Group, Operations menu on Group menu. See Group and layers section for more<br />
details.<br />
• Renamed View, Set to View, Create/Manage on View menu. See View section for more details.<br />
• Added View, Visibility command to View menu. See View section for more details.<br />
• Added View, Advanced Post, Contour Model Data command to View menu. See View section for more details.<br />
• Removed View, Layers command from View menu. Replaced by View, Visibility command.<br />
Toolbars<br />
• Replaced “View Layers” and “Quick Options” icons with “Visibility” icon on View Toolbar.<br />
• Added “Model Data Contour” icon to View Toolbar.<br />
• Added “Lam<strong>in</strong>ate Options” and “Contour Vectors” options to Post Options drop-down menu on Post Toolbar.<br />
Model Info tree<br />
• Added “Reset All Visibility Options” button.\
10.1-4<br />
F<strong>in</strong>ite Element Model<strong>in</strong>g<br />
• Added Visibility check boxes (on/off) for Elements (Shape and Type), Properties, Materials, and Layers.<br />
• Added Visibility check boxes (Show/Hide/Clear) for Groups.<br />
• Added Elements object and context-sensitive menu to tree.<br />
Visibility check boxes<br />
Visibility “check boxes” exist for toggl<strong>in</strong>g visibility on/off of Elements (by Element Shape, Element Type), Materials<br />
(Elements of that material), Properties (Elements of that Property), Groups (Show, Hide, and Clear options),<br />
and Layers. The check boxes for each entity type perform the same functions they do <strong>in</strong> the View, Visibility dialog<br />
box. See Section 6.1.4, "View, Visibility...". Also, multiple entities may be highlighted <strong>in</strong> a given section and special<br />
context-sensitive menus exist when the cursor is then placed over the visibility check boxes.<br />
• Added “Copy” command to context-sensitive menus for Coord<strong>in</strong>ate Systems, Connections-Properties, Connections-Regions,<br />
Materials, Properties, Layups, Functions, and Groups<br />
• Added “Color” command to context-sensitive menus for Materials and Properties.
Data Table/Entity Editor 10.1-5<br />
• Added “Layer” command to context-sensitive menus for Materials and Properties.<br />
• Added “Global Ply” command to Layups context-sensitive menu.<br />
• Added “Referenced Sets” command to context-sensitive menus for Loads and Constra<strong>in</strong>ts.<br />
• Added “Edit Where Applied” command to context-sensitive menus for Load Def<strong>in</strong>itions and Constra<strong>in</strong>t Def<strong>in</strong>itions.<br />
• Changed “Edit” command to “Edit Load” on Load Def<strong>in</strong>ition context-sensitive menu.<br />
• Changed “Edit” command to “Edit Constra<strong>in</strong>t” on Constra<strong>in</strong>t Def<strong>in</strong>ition context-sensitive menu.<br />
• Added “Show Constra<strong>in</strong>ed Entities” command to Constra<strong>in</strong>ts context-sensitive menu.<br />
• Added “Referenced Groups” command to Groups context-sensitive menu.<br />
• Changed “View Active” command to “Show Active Group” and added “Show Full Model” and “Show Multiple<br />
Groups” to Groups context-sensitive menu.<br />
• Changed “Show All Layers” to “View All Layers” and “Show Visible Layers Only” to “View Visible Layers<br />
Only” on Layers context-sensitive menu.<br />
• Removed “Make Visible”, “Make Hidden”, and “Manage” commands from Layers context-sensitive menu. No<br />
longer needed due to Visibility check boxes.<br />
Data Table/Entity Editor<br />
Status Bar<br />
Graphics<br />
• Added “Memb-Bend Coupl<strong>in</strong>g” fields for plate elements.<br />
• Added support for “Nastran LOAD Comb<strong>in</strong>ation Sets” and “Nastran SPCADD/MPCADD Comb<strong>in</strong>ation Sets”<br />
• Changed “Set” to “Create/Manage (Set)” for Load Sets, Constra<strong>in</strong>t Sets, Groups, and Output Sets<br />
• Changed “View Active” to “Show Active” for Groups and added “Show Full Model” and “Show Multiple”<br />
options<br />
Facets are now stored <strong>in</strong> memory <strong>in</strong>stead of with the model file. When model is opened, it will be facetted. This is<br />
beneficial as model files conta<strong>in</strong><strong>in</strong>g a large amount of geometry will be smaller.<br />
Geometry<br />
Mesh<strong>in</strong>g<br />
Elements<br />
Layups<br />
• Implemented the Solid Manager which is used to activate, update, or make no solids active <strong>in</strong> the model.<br />
• Modified Geometry, Curve - From Surface, Pad command. Enter<strong>in</strong>g an Pad Size Factor of 1.0 will extend<br />
curves out us<strong>in</strong>g the radius of the chosen circular curves, while enter<strong>in</strong>g a value of 1.5 would offset the curves<br />
1.5*the radius of the chosen circular curves <strong>in</strong> all directions.<br />
• Added “Use Reference Po<strong>in</strong>t” option to Mesh, Mesh Control, Attributes Along Curve<br />
• Added Update Button to Def<strong>in</strong>e RIGID Element dialog box. Allows you to update the Interpolation Factor and<br />
DOFs on any number of highlighted nodes <strong>in</strong> the Nodes to Average section when us<strong>in</strong>g the Interpolation<br />
option.<br />
• Updated Global Ply Def<strong>in</strong>ition dialog box for Layups<br />
Global Ply ID (optional):<br />
This option can be used to save a particular ply of one layup for use <strong>in</strong> other layups <strong>in</strong> your model.
10.1-6<br />
F<strong>in</strong>ite Element Model<strong>in</strong>g<br />
The “Global Ply” concept can also be used for Post Process<strong>in</strong>g purposes by allow<strong>in</strong>g you to choose any ply of any<br />
layup to be the same “Global Ply” as any ply of a any other layup. For <strong>in</strong>stance, a model has two layups, Layup 1<br />
has 7 plies and Layup 2 has 9 plies. If you wanted to post process the results of a particular output vector on the<br />
“middle ply” of the model, the “middle ply” for Layup 1 would be ply 4, while the “middle ply” for Layup 2 would<br />
be ply 5. Once these plies have been designated with the same Global Ply ID, you can use the Lam<strong>in</strong>ate Options<br />
functionality of View, Select to create a contour/criteria plot us<strong>in</strong>g a the results of the “Global Ply”.<br />
You can create a new Global Ply by click<strong>in</strong>g the Global Ply Icon Button next to the drop down list. In the Global<br />
Ply Def<strong>in</strong>ition dialog box, you may create a new global ply us<strong>in</strong>g the <strong>New</strong> Ply button. In the <strong>New</strong> Global Ply dialog<br />
box, you may enter a Title (up to 79 characters), and optionally choose a Material, and/or enter a Thickness.<br />
Once you have at least one global ply, you may highlight any ply from the list and then use Edit Ply to change the<br />
Title, Material, and/or Thickness, Renumber to renumber the selected ply, or Delete to delete the selected ply,<br />
Delete All will simply delete all of the global plies <strong>in</strong> the model, while Show will highlight all of the elements <strong>in</strong> the<br />
graphics w<strong>in</strong>dow which are currently us<strong>in</strong>g the Global Ply.<br />
Note:<br />
A Global Ply can only be referenced <strong>in</strong> a Layup one time. If you use a Global Ply more than once <strong>in</strong> a<br />
Layup, the most recently entered <strong>in</strong>stance of the Global Ply will have the Global Ply designation.<br />
Material, Thickness and Angle:<br />
The Material drop-down list allows you to choose the material to be referenced for each ply. If you want to create a<br />
new material, simply click the “Material” Icon Button next to the Material drop-down list.<br />
Thickness allows you to enter the physical thickness of each ply. Angle is used to enter the orientation angle of each<br />
ply. The angles are specified relative to the material axes which were def<strong>in</strong>ed for the element. If you did not specify<br />
a material orientation angle, these angles are measured from the first side of the element (the edge from the first to<br />
the second node). They are measured from the rotated material axes otherwise.<br />
Loads and Constra<strong>in</strong>ts<br />
• Added “Torque” Load type to “Model, Load, On Surface” command.<br />
• Added “Total Load” option for “Force”, “Moment”, and “Torque” load types to “Model, Load, On Surface”<br />
command. Allows you to take a “total load” and spread it across all of the selected surfaces.
Loads and Constra<strong>in</strong>ts 10.1-7<br />
• Added “Total Load” option for “Force” and “Moment” load types to “Model, Load, On Curve” command.<br />
Allows you to take a “total load” and spread it across all of the selected curves.<br />
• Implemented the Load Set Manager for creation, management, and activation of Load Sets<br />
Create new load sets<br />
Update the title of an<br />
exist<strong>in</strong>g load set<br />
Renumber highlighted<br />
Load Set<br />
Delete highlighted<br />
Load Set<br />
Delete all Load Sets<br />
Copy highlighted<br />
Load Set<br />
Def<strong>in</strong>e “Nastran LOAD<br />
Comb<strong>in</strong>ation Set”<br />
Deactivate All Load<br />
Sets<br />
• Added option to create a Load “Set Type” option which allows you to create a Nastran LOAD Comb<strong>in</strong>ation and<br />
use Referenced Load Sets<br />
Load Set Type<br />
You may choose a Set Type for the new load set. A Standard load set is any comb<strong>in</strong>ation of Load Def<strong>in</strong>itions, Body<br />
Loads, and Other Loads used to def<strong>in</strong>e the load<strong>in</strong>g conditions for that load set.<br />
A Nastran LOAD Comb<strong>in</strong>ation is a special type of load set which is a comb<strong>in</strong>ation of “referenced” Standard load<br />
sets <strong>in</strong> the model. When used, all of the selected Standard load sets referenced by a Nastran LOAD Comb<strong>in</strong>ation<br />
Set are written to the Nastran <strong>in</strong>put file and comb<strong>in</strong>ed by Nastran via a LOAD entry also written to the <strong>in</strong>put file.<br />
Note:<br />
Only Forces, Moments, Pressures, loads on Scalar po<strong>in</strong>ts (SPOINTS), Rotational Velocity Body Loads,<br />
and Gravity Loads may be comb<strong>in</strong>ed us<strong>in</strong>g the LOAD entry. Also, Nastran LOAD Comb<strong>in</strong>ations <strong>in</strong><br />
<strong>FEMAP</strong> are only used when perform<strong>in</strong>g a Static Analysis.
10.1-8<br />
F<strong>in</strong>ite Element Model<strong>in</strong>g<br />
Once a Nastran LOAD Comb<strong>in</strong>ation has been created, highlight it from the list <strong>in</strong> the Load Set Manager and press<br />
the Referenced Sets button. The Referenced Load Sets for Nastran LOAD dialog box will appear:<br />
Highlight any number of Standard load sets from the list of Available Sets. Click Add Referenced Set to have them<br />
placed <strong>in</strong> the Referenced Sets list. By default, each load set placed <strong>in</strong>to the Referenced Sets list will be <strong>in</strong>cluded with<br />
a Scale Factor of “1.0”. If desired, the For Referenced Set “Scale Factor” can be changed before press<strong>in</strong>g the Add<br />
Referenced Set button and all highlighted load sets will be placed <strong>in</strong> the Referenced Sets list us<strong>in</strong>g that Scale Factor.<br />
These scale factors will be written to the appropriate “Si” fields of the Nastran LOAD entry for each load set.<br />
Also, an Overall “Scale Factor” may be entered for the entire set, which is written to the “S” field of LOAD entry.<br />
Note:<br />
A Referenced Load Sets command may be added to any menu or toolbar us<strong>in</strong>g the Tools, Toolbars, Customize<br />
command. This command is located <strong>in</strong> the Additional Commands category on the Commands<br />
tab of the Customize dialog box..<br />
• Implemented the Constra<strong>in</strong>t Set Manager for creation, management, and activation of Constra<strong>in</strong>ts Sets<br />
Create new Constra<strong>in</strong>t<br />
Sets<br />
Update the title of an<br />
exist<strong>in</strong>g Constra<strong>in</strong>t Set<br />
Renumber highlighted<br />
Constra<strong>in</strong>t Set<br />
Delete highlighted<br />
Constra<strong>in</strong>t Set<br />
Delete all Constra<strong>in</strong>t<br />
Sets<br />
Copy highlighted<br />
Constra<strong>in</strong>t Set<br />
Def<strong>in</strong>e “SPCADD/<br />
MPCADD Set”<br />
Deactivate All<br />
Constra<strong>in</strong>t Sets
Connections (Connection Properties, Regions, and Connectors) 10.1-9<br />
• Added option to create a Load Set which represents a Nastran SPCADD/MPCDD Comb<strong>in</strong>ation and use Referenced<br />
Constra<strong>in</strong>t Sets<br />
You may choose a Set Type for the new constra<strong>in</strong>t set. A Standard constra<strong>in</strong>t set is any comb<strong>in</strong>ation of Constra<strong>in</strong>t<br />
Def<strong>in</strong>itions and Other Loads used to def<strong>in</strong>e the boundary conditions for that constra<strong>in</strong>t set.<br />
A Nastran SPCADD/MPCADD Comb<strong>in</strong>ation is a special type of constra<strong>in</strong>t set which “references” any number of<br />
exist<strong>in</strong>g Standard constra<strong>in</strong>t sets <strong>in</strong> the model. When used, all of the selected Standard constra<strong>in</strong>t sets referenced by<br />
a particular Nastran SPCADD/MPCADD Comb<strong>in</strong>ation are written to the Nastran <strong>in</strong>put file and comb<strong>in</strong>ed by Nastran<br />
via a SPCADD entry when deal<strong>in</strong>g with normal constra<strong>in</strong>ts or a MPCADD when deal<strong>in</strong>g with constra<strong>in</strong>t equations.<br />
Once a Nastran SPCADD/MPCADD Comb<strong>in</strong>ation Set has been created, highlight it from the list <strong>in</strong> the Constra<strong>in</strong>t<br />
Set Manager and press the Referenced Sets button. The Referenced Constra<strong>in</strong>t Sets for Nastran SPCADD/<br />
MPCADD dialog box will appear:<br />
Highlight any number of Standard constra<strong>in</strong>t sets from the list of Available Sets. Click Add Referenced Set to have<br />
them placed <strong>in</strong> the Referenced Sets list.<br />
Note:<br />
A Referenced Constra<strong>in</strong>t Sets command may be added to any menu or toolbar us<strong>in</strong>g the Tools, Toolbars,<br />
Customize command. This command is located <strong>in</strong> the Additional Commands category on the Commands<br />
tab of the Customize dialog box..<br />
Connections (Connection Properties, Regions, and Connectors)<br />
• Added “Reverse” button to Connection Regions to switch “positive” to “negative” and vice versa for surfaces<br />
and “Face 1” to “Face 2” and vice versa for shell elements.<br />
NX L<strong>in</strong>ear tab<br />
• Added Adaptive Stiffness and Penetration Factor to the Contact Property (BCTPARM) section. Create the<br />
PENAPAPT and PENETFAC fields on the BCTPARM entry.<br />
• Added Glue Type and Glue Factor to the Common Contact (BCTPARM) and Glue (BGPARM) Parameters section.<br />
Create the GLUETYPE and PENGLUE fields on the BGPARM entry.<br />
• Added Auto Penalty Factor to the Common Contact (BCTPARM) and Glue (BGPARM) Parameters section.<br />
Creates the PENAUTO field on the BCTPARM entry.
10.1-10<br />
F<strong>in</strong>ite Element Model<strong>in</strong>g<br />
• Modified Penalty Factor Units <strong>in</strong> the Common Contact (BCTPARM) and Glue (BGPARM) Parameters section<br />
to have different options depend<strong>in</strong>g on what option is set for Connect Type.<br />
NEiNastran tab<br />
• Added 10..Offset Welded Contact option to Penetration Type drop-down list.<br />
Groups and Layers<br />
• Implemented the Group Manager for creation, management, and activation of Groups<br />
Create new Group<br />
Regular Group<br />
icon<br />
Update the title of an<br />
exist<strong>in</strong>g Group<br />
Renumber highlighted<br />
Constra<strong>in</strong>t Set<br />
Delete highlighted<br />
Group<br />
Delete all Groups<br />
Def<strong>in</strong>e “Referenced<br />
Group”<br />
Group conta<strong>in</strong><strong>in</strong>g<br />
Referenced Groups<br />
icon<br />
Deactivate All<br />
Groups<br />
• Added ability to create “Referenced Groups”<br />
The concept of Referenced Groups allows an exist<strong>in</strong>g group to “reference” other exist<strong>in</strong>g groups <strong>in</strong> your model<br />
(essentially, create a “Group of Groups”). A group which “references” other groups may also conta<strong>in</strong> any number
Views 10.1-11<br />
of additional entities. Once a group is referenc<strong>in</strong>g other groups, the icon will change <strong>in</strong> the Group Manager dialog<br />
box. Groups which reference other groups may also be referenced by any other group.<br />
The Referenced Groups for Group drop-down list may be used to select any exist<strong>in</strong>g group. Any number of groups<br />
may be moved between the Available Groups list and Referenced Groups list for a particular group by highlight<strong>in</strong>g<br />
the groups <strong>in</strong> the appropriate list and press<strong>in</strong>g the Add or Remove buttons. Remove All will move all groups from<br />
Referenced Groups to Available Groups. When a group which references other groups is added to the Referenced<br />
Groups list, the referenced groups will be listed <strong>in</strong> a “tree structure” beneath that group (Shown above).<br />
Note:<br />
If Group “A” is referenced by Group “E” and Group “F” and both groups “E” and “F” are then referenced<br />
by another group, Group “G”, Group “A” will only appear once <strong>in</strong> the Referenced Groups list.<br />
All other <strong>in</strong>stances of Group “A” will be shown us<strong>in</strong>g a red “X” <strong>in</strong> the middle of group brackets.<br />
• Updated Group, Operations, Evaluate; Group, Operations, Evaluate Always; and Group, Operations, Renumber<br />
Rules to allow selection of multiple groups.<br />
• Updated Group, Operations, Condense to allow selection of multiple groups and “condense” the groups “<strong>in</strong><br />
place” without creat<strong>in</strong>g a copy.<br />
• Added Condense <strong>New</strong> Group option to Group, Operations, Copy to also condense the active group when copied.<br />
• Implemented the Layer Manager for creation, management, and activation of Layers<br />
Create new Layer<br />
Update the Title or Color<br />
of exist<strong>in</strong>g Layer<br />
Renumber highlighted<br />
Layer<br />
Delete highlighted<br />
Layer<br />
Delete all Layers<br />
Deactivate All<br />
Layers<br />
Views<br />
This dialog box works just like the other “Create/Manage” set dialog boxes. Simply press the <strong>New</strong> Layer button to<br />
create a new layer. Then enter a Title, choose a Color by press<strong>in</strong>g the Palette button, then press OK to return to the<br />
Layer Manager dialog box or More to be prompted to create another new layer.<br />
• View, Create/Manage<br />
Displays the View Manager, which allows you to create a new view us<strong>in</strong>g the <strong>New</strong> View button. The new view will<br />
become the active view when created. The Update Title, Delete View, and Copy View buttons can be used to update<br />
the name, delete, or copy the view currently highlighted <strong>in</strong> the Available Views - Selected View is Active list.
10.1-12<br />
F<strong>in</strong>ite Element Model<strong>in</strong>g<br />
• View, Visibility<br />
This command allows you to control visibility of Entity Types, Entity Labels, Groups (one or multiple), Layers,<br />
Load Sets, Constra<strong>in</strong>t Sets, and sets of Elements based on Element Shape, Element Type, associated Material, and/<br />
or associated Property.<br />
Each tab of the Visibility dialog box controls different aspects of what is displayed <strong>in</strong> the <strong>FEMAP</strong> graphics w<strong>in</strong>dow.<br />
Comb<strong>in</strong>ations of sett<strong>in</strong>gs on multiple tabs give the user a vast array of options for creat<strong>in</strong>g the desired display.<br />
The two buttons at the bottom of the dialog box, Reset All and Done are available while <strong>in</strong> any tab. Done closes the<br />
Visibility dialog box, while Reset All returns the model to the “default display configuration” of <strong>FEMAP</strong>, which is:<br />
• All Entity Types displayed<br />
• Labels on for Coord<strong>in</strong>ate Systems, all Constra<strong>in</strong>ts (<strong>in</strong>clud<strong>in</strong>g Permanent and Equations), and all Loads<br />
• View All Layers option set on Layer tab, Show Full Model option set on Group tab.<br />
• View Active Load Set and View Active Constra<strong>in</strong>t Set options set on Load/Constra<strong>in</strong>t tab.<br />
• All Element Shapes, Element Types, and Elements associated with all Properties and Materials displayed<br />
The number of buttons on the right side of the dialog box and what the buttons actually do changes for each tab.<br />
Once displayed, certa<strong>in</strong> entities may or may not be available for selection based on the visibility options.<br />
For <strong>in</strong>stance, if Elements are turned off on the Entity/Label tab, no Groups are be<strong>in</strong>g viewed (i.e., Show Full Model<br />
option), all Layers are currently visible, and all Element shapes, Element types, and elements associated with all<br />
Materials and Properties are also displayed, then elements are still available for selection from the graphics w<strong>in</strong>dow.<br />
On the other hand, only entities <strong>in</strong> displayed Groups, on visible Layers, and Elements of types, shapes, and associated<br />
to Properties and Materials which are currently checked “on” <strong>in</strong> the Visibility dialog box or the Model Info tree<br />
are available for selection from the graphics w<strong>in</strong>dow.<br />
Note:<br />
The Visibility sett<strong>in</strong>gs on the Entity/Label, Group, Layer, and Load/Constra<strong>in</strong>t tabs apply to the Active<br />
View only. Sett<strong>in</strong>gs on the Element, Material, and Property tabs apply to All Views <strong>in</strong> the model.
Views 10.1-13<br />
F<strong>in</strong>d button<br />
The F<strong>in</strong>d button is available for use <strong>in</strong> all tabs of the Visibility dialog box except the Load/Constra<strong>in</strong>t tab. Simply<br />
enter text <strong>in</strong>to the field, then click the F<strong>in</strong>d button. Any item <strong>in</strong> the “list” of the current tab which conta<strong>in</strong>s the text<br />
you entered, will be automatically highlighted. This functionality can be very helpful <strong>in</strong> f<strong>in</strong>d<strong>in</strong>g certa<strong>in</strong> groups or<br />
layers <strong>in</strong> complex models.<br />
Quickly Choos<strong>in</strong>g Visibility<br />
In addition to us<strong>in</strong>g the Visibility icon on the View Toolbar or us<strong>in</strong>g Ctrl+Q, you can also access the Visibility dialog<br />
box directly from the “Quick Access” menu. Simply press the right mouse button with the cursor anywhere <strong>in</strong>side<br />
any graphics w<strong>in</strong>dow, and select Visibility.<br />
Entity/Label tab<br />
There are times that you will want to quickly toggle on/off the overall visibility of entire entity types and/or the<br />
labels for various entity types. The Entity/Label tab of the Visibility dialog box provides a s<strong>in</strong>gle place to perform<br />
both of these actions.<br />
When Draw Entity is selected above the lists of entity types, visibility of each entity type is controlled by the check<br />
box next to the entity type name. When Labels is selected, visibility for the entity type labels is controlled by the<br />
check box. Visibility and/or labels for portions of the list can be turned on/off us<strong>in</strong>g the “special” check box next to<br />
any entity type “header” (Geometry, Mesh, Connections, Constra<strong>in</strong>ts, and Loads).<br />
Two additional options exist when the Labels option is selected. When Entity Color is checked, all labels will be<br />
displayed us<strong>in</strong>g the same color as the entity. When Erase Background is checked, <strong>FEMAP</strong> will erase the area<br />
where the label will be drawn, prior to draw<strong>in</strong>g the label. If you are labell<strong>in</strong>g filled areas, it is often good to choose<br />
this option, as they are easier to read.<br />
The table describes the functions performed by each of the command buttons:<br />
Entity/Label Button<br />
All On<br />
All Off<br />
Selected On<br />
Selected Off<br />
Function<br />
Turns Draw Entity or Labels check box on for all entities.<br />
Turns Draw Entity or Labels check box off for all entities.<br />
Turns Draw Entity or Labels check box on for selected entities.<br />
Turns Draw Entity or Labels check box off for selected entities.
10.1-14<br />
F<strong>in</strong>ite Element Model<strong>in</strong>g<br />
Entity/Label Button<br />
Function<br />
Selected Only Turns Draw Entity or Labels check box on for selected entities, while turn<strong>in</strong>g<br />
all unselected entities off.<br />
Entity Colors Changes Color mode to Entity Colors for all options.<br />
View Colors Changes Color mode to View Colors for all options.<br />
Note: The follow<strong>in</strong>g buttons change the entire view (selections, alignment, magnification, etc.), not<br />
just the view options.<br />
Load View<br />
Updates the current view by restor<strong>in</strong>g from the View library.<br />
Save View<br />
Store the current view <strong>in</strong> the View library<br />
Reset View<br />
Resets the entire view to <strong>FEMAP</strong> defaults.<br />
Group tab<br />
This tab enables you to specify visibility options for groups which allow you to display only a portion of your<br />
model. Groups are essentially subsets of the model based on entity IDs, rules to <strong>in</strong>clude entities related to other<br />
entities already <strong>in</strong> the group (i.e., nodes on elements currently <strong>in</strong> the group), or limited by “clipp<strong>in</strong>g” regions.<br />
Group Set to “Show”<br />
Groups Set to “Hide”<br />
Referenced Group<br />
Set to “Show”<br />
There are 4 visibility options for groups:<br />
• Show Full Model - Groups are not currently be<strong>in</strong>g used to only display a portion of your model.<br />
• Show Active Group - The “active” group will be used to only display a portion of your model. The active group<br />
can be changed by select<strong>in</strong>g a different group from the drop-down list.<br />
• Show S<strong>in</strong>gle Group - Any s<strong>in</strong>gle group can be chosen from the drop-down menu and used to display only a portion<br />
of the model.<br />
• Show/Hide Multiple Groups - Any number of groups can be set to “Show” (Green Circle with “+”), “Hide”<br />
(Red Circle with “-”), or “Clear” (no marker <strong>in</strong> box) to create the desired display.<br />
By default, the Group option is set to Show Full Model, therefore the entire model will be displayed. Activat<strong>in</strong>g an<br />
exist<strong>in</strong>g group will not change the display, but will allow you to graphically select entities from your entire model<br />
to place <strong>in</strong>to the group. If you want to display only a portion of your model, switch this option to Show Active<br />
Group, Show S<strong>in</strong>gle Group, or Show/Hide Multiple Groups. Then only the entities which are <strong>in</strong> the appropriate<br />
group(s) will be displayed.
Views 10.1-15<br />
The Show/Hide Multiple Groups option gives you the most flexibility when creat<strong>in</strong>g a display. Show All will<br />
change the “Show/Hide flag” of all groups to “show”, while Clear All will change the flag for all groups to “Clear”.<br />
You may also highlight any number of groups from the list, then click Show Selected (set flag for all selected<br />
groups to “Show”), Hide Selected (set flag to “Hide”), Clear Selected (set flag to “Clear”), or Show Selected Only<br />
(sets flag of selected groups to “Show”, while sett<strong>in</strong>g flags of unselected groups to “Clear”).<br />
Note:<br />
When Show/Hide Multiple Groups is set and ALL Groups are “Clear”, the whole model will be visible.<br />
For Example:<br />
In this model, there are 11 total groups. Individual groups exist for the elements of each color (7 groups). Also, one<br />
group conta<strong>in</strong><strong>in</strong>g both the blue and green elements, one group conta<strong>in</strong><strong>in</strong>g the red, yellow, and cyan elements, one<br />
group conta<strong>in</strong><strong>in</strong>g the top two rows of elements, and one “L-shaped” group.<br />
“Green and Blue” “Red, Yellow, and “Top 2 Rows” “L-Shaped” Group<br />
Group<br />
Cyan” Group<br />
Group<br />
Here are a few visibility scenarios <strong>in</strong>volv<strong>in</strong>g the Groups <strong>in</strong> this example model:<br />
All Groups “Clear”<br />
(Whole Model shown)<br />
“Orange” and “Purple”<br />
set to “Show”<br />
“Blue and Green” and “Top<br />
2 Rows” set to “Show”<br />
“L-Shaped” set to “Show”, “L-Shaped” and “Blue and “L-Shaped” set to “Hide”,<br />
“Yellow” and “Blue” set to Green” set to “Show”, “Top all other groups set to<br />
“Hide” 2 Rows” set to “Hide” “Show”
10.1-16<br />
F<strong>in</strong>ite Element Model<strong>in</strong>g<br />
“Cyan”, “Top 2 Rows” and<br />
“L-Shaped” set to “Show”,<br />
“Red” and “Blue set to “Hide”<br />
“Yellow”, “Top 2 Rows”, and<br />
“Blue and Green” set to “Show”<br />
“Blue” set to “Hide”<br />
Layers tab<br />
Controls which layers will be displayed <strong>in</strong> the model. Also allows you to specify the Active Layer as well as the<br />
NoPick Layer.<br />
<strong>New</strong> Layer<br />
icon button<br />
The default sett<strong>in</strong>g is View All Layers. If you want to only view selected layers, change to View Multiple Layers,<br />
then “check” the layers you would like to see <strong>in</strong> the view. The All On and All Off buttons simply “check” or<br />
“uncheck” all of the layers <strong>in</strong> the model. Selected On will “check” the highlighted layers, while Selected Off will<br />
“uncheck” them. Selected Only will “check” the selected layers while also “uncheck<strong>in</strong>g” all of the non-highlighted<br />
layers.<br />
As you “check” or “uncheck” the boxes next to various layers, the display <strong>in</strong> the graphics w<strong>in</strong>dow will update “onthe-fly”.<br />
In addition to controll<strong>in</strong>g your display, visible layers may also be used to control entity selection. Only entities on<br />
visible layers and which are not on the NoPick Layer can be selected graphically. With the Active Layer option, you<br />
can also select the layer that will be used for entity creation. You may also use the <strong>New</strong> Layer icon button next to<br />
the Active Layer drop-down list to create a new layer <strong>in</strong> your model.
Views 10.1-17<br />
.<br />
Note:<br />
By default, entities used for solid geometry construction (such as a boundary surface for an extrusion)<br />
are automatically deleted after be<strong>in</strong>g used. On the Geometry/Model tab of the File, Preferences dialog<br />
box, you can change the “Construction Geometry... when used” option to “1..Move to NoPick Layer”.<br />
When this option is set, the construction geometry will be moved to “9999..Construction Layer”, which<br />
is the default for the NoPick Layer. This can be used to prevent construction geometry from be<strong>in</strong>g<br />
selected for load or constra<strong>in</strong>t application. If you need to access this geometry, change the NoPick<br />
Layer to “0..none” and you will be able to graphically select these entities. Be careful when do<strong>in</strong>g this<br />
however, s<strong>in</strong>ce this geometry may occupy the identical space as a solid face or edge.<br />
Load/Constra<strong>in</strong>t tab<br />
Here you can choose the load set and/or constra<strong>in</strong>t set that will be displayed <strong>in</strong> the view.<br />
By default, View Active Load Set and View Active Constra<strong>in</strong>t Set are the selected options, therefore the active load<br />
set and active constra<strong>in</strong>t set will be displayed. You can change the “active” Load Set and/or Constra<strong>in</strong>t Set us<strong>in</strong>g the<br />
appropriate drop-down list. You may elim<strong>in</strong>ate loads and/or constra<strong>in</strong>ts from the display by choos<strong>in</strong>g the View No<br />
Loads and/or View No Constra<strong>in</strong>ts options. Also, you can select a particular set for display whether or not it is<br />
active by us<strong>in</strong>g the View Selected Load Set and/or View Selected Constra<strong>in</strong>t Set options and select<strong>in</strong>g an exist<strong>in</strong>g set<br />
from the appropriate drop-down list.
10.1-18<br />
F<strong>in</strong>ite Element Model<strong>in</strong>g<br />
Element, Material, and Property tabs<br />
These tabs allow you to control the visibility of elements based on Element Shape and/or Element Type (Element<br />
tab) and elements associated with specific Materials or Properties <strong>in</strong> your model.<br />
The number of elements of each type or shape is listed after the type name or shape name when <strong>in</strong> the Element tab.<br />
A special check box exists <strong>in</strong> the Material tab which allows you to toggle visibility on/off for “Elements with No<br />
Material” which <strong>in</strong>clude plot only, l<strong>in</strong>k, spr<strong>in</strong>g/damper, DOF spr<strong>in</strong>g, gap, lam<strong>in</strong>ate (reference several materials, not<br />
one), mass, mass matrix, rigid/<strong>in</strong>terpolation, stiffness matrix, and slide l<strong>in</strong>e elements. A similar box exists <strong>in</strong> the<br />
Property tab for “Elements with No Property” which <strong>in</strong>clude plot only and rigid/<strong>in</strong>terpolation elements.<br />
Note:<br />
Element visibility us<strong>in</strong>g the Element, Material, and Property tabs applies to All Views <strong>in</strong> the model, not<br />
just the Active View like the Entity/Label, Group, Layer, and Load/Constra<strong>in</strong>t tabs.<br />
This table describes the functions performed by each of the command buttons when <strong>in</strong> a Element, Material, or<br />
Property tab:<br />
Entity/Label Button<br />
All On<br />
All Off<br />
Selected On<br />
Selected Off<br />
Selected Only<br />
Function<br />
“Checks” boxes for ALL element shapes/types, materials, or properties (<strong>in</strong>cludes<br />
box for Elements with No Material/Property).<br />
“Unchecks” boxes for all element shapes/types, materials, or properties (<strong>in</strong>cludes<br />
box for Elements with No Material/Property).<br />
“Checks” boxes of highlighted element shapes/types, materials, or properties.<br />
“Unchecks” boxes of highlighted element shapes/types, materials, or properties.<br />
“Checks” boxes of highlighted element shapes/types, materials, or properties, while<br />
“uncheck<strong>in</strong>g” boxes of shapes/types, materials, or properties which are not currently<br />
highlighted.<br />
Only elements of shapes/types or associated with materials or properties which are currently “checked” will be<br />
available for selection <strong>in</strong> the graphics w<strong>in</strong>dow. This can make it very easy to perform “box”, “circle”, “polygon”, or<br />
“freehand” pick<strong>in</strong>g of certa<strong>in</strong> element types/shapes, materials, or properties.
Views 10.1-19<br />
• View Options: Quick Options button - removed for 10.1<br />
• View Options: Labels, Entities and Color category: - Added Load - Body options for display<strong>in</strong>g Body Loads:<br />
This option controls the display of translational acceleration (straight solid arrow), rotational acceleration (curved<br />
solid arrow with 2 arrowheads), and rotational velocity (curved solid arrow with 1 arrowhead) body loads <strong>in</strong> the<br />
graphics w<strong>in</strong>dow. Labels, Location for the “rotational” body loads, and Color may also be set.<br />
By default, when only one of the above body loads is be<strong>in</strong>g applied <strong>in</strong> the “Active” load set, the correspond<strong>in</strong>g<br />
symbol for that load will appear <strong>in</strong> the “middle” of the View Axis, oriented to the XYZ of the View Axis.<br />
Translational Acceleration Rotational Acceleration Rotational Velocity<br />
(-1 <strong>in</strong> Y-direction) (100 about X-axis) (20 about X-Axis)<br />
When more than one body load is be<strong>in</strong>g applied, translational acceleration will be displayed <strong>in</strong> the YZ plane, rotational<br />
acceleration <strong>in</strong> the ZX plane, and rotational velocity <strong>in</strong> the XY plane of the View Axis.<br />
Chang<strong>in</strong>g the Location from 0..View Axis to 1..Model, will only affect the position of rotational body loads. They<br />
will be shown with the same symbol, but will also show a dotted-l<strong>in</strong>e represent<strong>in</strong>g the rotation axis of the load<br />
with<strong>in</strong> the model itself.<br />
• View Options: Labels, Entities and Color category: Moment and Torque - now controls display of Moment and<br />
Torque loads<br />
• View Options: Tools and View Style category: Render Options - Changed “1..Surfaces Only” option for Surface<br />
Hatch to “1..Hatch Wireframe Surfaces” and added “2..Never Hatch Surfaces” option.<br />
• View Options: Tools and View Style category: Stereo - option removed for 10.1
10.1-20<br />
F<strong>in</strong>ite Element Model<strong>in</strong>g<br />
Output and Post-Process<strong>in</strong>g<br />
• View, Advanced Post, Contour Model Data<br />
... allows you to view model data as contour/criteria plots or beam diagrams. This commands is not really a postprocess<strong>in</strong>g<br />
capability. Some common uses would be view<strong>in</strong>g a contour plot of the thicknesses of plane elements <strong>in</strong><br />
a shell model or a criteria plot of Youngs Modulus of the materials <strong>in</strong> an assembly model us<strong>in</strong>g solid elements.<br />
If you would like to display model data on elements <strong>in</strong> the graphics w<strong>in</strong>dow, the first option to check would be<br />
Show Model Data Contour <strong>in</strong> the Contour Data From section. Next choose a s<strong>in</strong>gle material/property data value<br />
for display by highlight<strong>in</strong>g a specific value from the tree structure. Most material/property data values <strong>in</strong> <strong>FEMAP</strong><br />
should be available for selection, with the major exceptions be<strong>in</strong>g the material values of the materials of the “Other<br />
Types” material type. There are 5 “special cases” which are a little more flexible with regard to the type of materials/properties<br />
<strong>in</strong> the model. For <strong>in</strong>stance, “Plane Element Thickness” will work for any plane elements which have<br />
a thickness, <strong>in</strong>clud<strong>in</strong>g lam<strong>in</strong>ates. Others like “Bar/Beam/Rod Area” will allow you to show a criteria plot of areas<br />
on all the Beams/Bars/Rods <strong>in</strong> your model at once.<br />
Once a value is chosen, you can choose to display the values as a Contour, Criteria, or Beam Diagram <strong>in</strong> the Show<br />
As section. The Allow Labels will toggle the output labels on/off for all three of the Show As options.<br />
F<strong>in</strong>ally, you can choose to plot the material/property data values on the entire model us<strong>in</strong>g the All option <strong>in</strong> the<br />
Show On section or only a portion of the model by choos<strong>in</strong>g Group and then select<strong>in</strong>g an exist<strong>in</strong>g group from the<br />
drop-down list.<br />
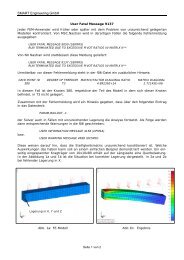
For example, here is a contour plot of “Plane Element Thickness” on a Shell model conta<strong>in</strong><strong>in</strong>g lam<strong>in</strong>ates of various<br />
thicknesses:
Output and Post-Process<strong>in</strong>g 10.1-21<br />
To turn off the display of material/property data values, choose the command aga<strong>in</strong> and UNCHECK the Show<br />
Model Data Contour check box <strong>in</strong> the Contour Data From section.<br />
Note:<br />
While the Show Model Data Contour box is checked, all Contour Style sett<strong>in</strong>gs <strong>in</strong> the View Select dialog<br />
box (View, Select command) will be ignored until the display of model data has been turned off.<br />
• View, Select: Contour Vectors - 2D Tensor Plot option<br />
The 2D Tensor Plot (i.e.,“Crow’s Foot” plot) allows you to create a plot of three vectors on a 2D element. Vector 1<br />
will be plotted <strong>in</strong> the X-direction (based on the option selected <strong>in</strong> the Output Data is Stored Relative To section),<br />
Vector 2 <strong>in</strong> the Y-direction, and Vector 3 at a 45 degree angle between the X-direction and the Y-direction.<br />
Although it may be used to show any three vectors on 2D elements, this is very useful when show<strong>in</strong>g three related<br />
vectors, with two be<strong>in</strong>g “directional” and one be<strong>in</strong>g “shear”, such as Plate X Normal Stress (Vector 1), Plate Y Normal<br />
Stress (Vector 2), and Plate XY Shear Stress (Vector 3).<br />
2D Tensor Plot show<strong>in</strong>g X Normal Stress, Y Normal Stress and XY Shear Stress<br />
This plot differs from the other available Vector Type plots. By default, the options set <strong>in</strong> the PostProcess<strong>in</strong>g category<br />
of View Options for Vector Style and Contour Vector Style will be ignored, and the plot will be always be<br />
shown with all vectors displayed us<strong>in</strong>g uniform vector length, centered on the element, with output values<br />
Note:<br />
If you want the 2D Tensor Plot to follow the options set <strong>in</strong> Vector Style and Contour Vector Style, simply<br />
select the File, Preferences command, choose the Views tab, then “uncheck” the “2D Tensor Plot View<br />
Options Override” option.<br />
• View, Select: Lam<strong>in</strong>ate Options<br />
Used to control the display of lam<strong>in</strong>ate results. By default, this option will be set to Selected Output Vector, which<br />
will simply create a contour/criteria plot us<strong>in</strong>g the Contour vector currently selected <strong>in</strong> the Output Vectors section<br />
of the Select PostProcess<strong>in</strong>g Data dialog box. The other options are Top Ply of Layup, Bottom Ply of Layup, and<br />
Global Ply.
10.1-22<br />
F<strong>in</strong>ite Element Model<strong>in</strong>g<br />
When us<strong>in</strong>g any of the other options, <strong>FEMAP</strong> will use the Contour vector currently selected <strong>in</strong> the Output Vectors<br />
section of the Select PostProcess<strong>in</strong>g Data dialog box along with the first ply entered for a each layup (Bottom Ply<br />
of Layup option), last play entered (Top Ply of Layup), or designated ply <strong>in</strong> the layup (Global Ply) to create the<br />
appropriate contour/criteria plot.<br />
For example, a model conta<strong>in</strong>s sections of lam<strong>in</strong>ate elements us<strong>in</strong>g 3 different layups, one section with 7 plies<br />
(Layup 1), one with 11 plies (Layup 2), and the last with 15 plies (Layup 3).<br />
.<br />
Layup 3 - 15 Plies Layup 2 - 11 Plies Layup 1 - 7 Plies<br />
If you want to display the “X Normal Stress” for the “Top Ply” of this model, the “X Normal Stress” results from<br />
Ply 7 for Layup 1, Ply 11 for Layup 2, and Ply 15 for Layup 3 will be used to create the contour/criteria plot.
Geometry Interfaces 10.1-23<br />
If you want to display the “X Normal Stress” for the “Bottom Ply” of this model, the “X Normal Stress” results<br />
from Ply 1 for Layup 1, Ply 1 for Layup 2, and Ply 1 for Layup 3 will be used to create the contour/criteria plot.<br />
F<strong>in</strong>ally, if you want to display the “X Normal Stress” for the “Middle Ply” of this model, you would need to designate<br />
the “middle ply” of each layup us<strong>in</strong>g a “Global Ply”. To set up a “Global Ply”, you will need to first create a<br />
global ply <strong>in</strong> the Layup Editor, then choose a ply <strong>in</strong> each Layup and click the Update Global Ply button. See Section<br />
4.2.5, "Model, Layup..." for more <strong>in</strong>formation about a global ply.<br />
Once the Global Ply has been assigned to a ply <strong>in</strong> each layup, you can then choose it from the Global Ply dropdown<br />
list. In this case, the “X Normal Stress” results from Ply 4 for Layup 1, Ply 6 for Layup 2, and Ply 8 for<br />
Layup 3 will be used to create the contour/criteria plot.<br />
• View Options: PostProcess<strong>in</strong>g category: Contour Vector Style - Added “Exponent” Color Modes, Digits, and<br />
Length options<br />
Geometry Interfaces<br />
The follow<strong>in</strong>g <strong>FEMAP</strong> <strong>in</strong>terfaces have been updated to support newer geometry formats:<br />
<strong>FEMAP</strong> Interface<br />
Latest Supported Version<br />
Parasolid Parasolid 22.0<br />
Solid Edge Solid Edge with Synchronous Technology 2<br />
NX NX 6<br />
Pro/Eng<strong>in</strong>eer Wildfire 4<br />
ACIS ACIS 20<br />
CATIA V5 V5 release 18<br />
SolidWorks SolidWorks 2009<br />
For details, see “Geometry Interfaces” <strong>in</strong> the <strong>FEMAP</strong> User Guide.<br />
Analysis Program Interfaces<br />
Several of the analysis program <strong>in</strong>terfaces have been improved. These changes <strong>in</strong>clude:
10.1-24<br />
F<strong>in</strong>ite Element Model<strong>in</strong>g<br />
• Analysis Set Manager Enhancements<br />
• <strong>FEMAP</strong> Neutral File Interface<br />
• NX Nastran Interface<br />
• Nastran Interfaces (NX and MSC/MD)<br />
• MSC/MD Nastran Interface<br />
• NEi Nastran Interface<br />
• ANSYS Interface<br />
• ABAQUS Interface<br />
• DYNA Interface<br />
Analysis Set Manager Enhancements<br />
For details, see “Analysis Program Interfaces” <strong>in</strong> the <strong>FEMAP</strong> User Guide.<br />
• Added Previous (Prev...) buttons to many of the Analysis Set Manager dialog boxes when us<strong>in</strong>g the Nastran<br />
Solvers.<br />
• Enhanced Analyze and Analyze Multiple options to use <strong>in</strong>ternal solver queu<strong>in</strong>g system when multiple jobs <strong>in</strong><br />
one model or jobs from any number of models are sent to the solver. Queu<strong>in</strong>g system now tracks which model<br />
the analysis job was launched from and will attempt to return to the correct model and import results before<br />
beg<strong>in</strong>n<strong>in</strong>g the next analysis job. Also, added “Clear Queue” button to clear the <strong>in</strong>ternal queu<strong>in</strong>g system.<br />
<strong>FEMAP</strong> Neutral File Interface<br />
• Updated Neutral Read and Write for v10.1 changes<br />
NX Nastran Interface<br />
A number of bugs were corrected<br />
Solution 601 updates<br />
• Turned the “Loads Change with Deformation” option <strong>in</strong> the Analysis Options section of NXSTRAT Solver<br />
Parameters dialog box “on” by default.<br />
• Turned the “Constra<strong>in</strong>t Force” option <strong>in</strong> the Nodal section of Nastran Output Requests dialog box “on” by<br />
default.<br />
• Added support to SOL601 for function dependent acceleration body loads.<br />
Solution 701 updates<br />
• Turned the “Loads Change with Deformation” option <strong>in</strong> the Analysis Options section of NXSTRAT Solver<br />
Parameters dialog box “on” by default.<br />
• Turned the “Constra<strong>in</strong>t Force” option <strong>in</strong> the Nodal section of Nastran Output Requests dialog box “on” by<br />
default.<br />
For details, see “Analysis Program Interfaces” <strong>in</strong> the <strong>FEMAP</strong> User Guide.<br />
Nastran Interfaces (NX and MSC/MD)<br />
• Turned off PARAM,MAXRATIO by default<br />
• Added support to read the CVISC and PVISC entries<br />
• Added support to read and write PARAM,RESVINER<br />
• Added support to read and write LOAD, SPCADD, and MPCADD entries<br />
• Added support to set the All Plates as QUADR/TRIAR option when CQUADR and CTRIAR elements are<br />
imported
Nastran Interfaces (NX and MSC/MD) 10.1-25<br />
• Added ability to write GEOMCHECK, NONE and read GEOMCHECK entries and populate GEOMCHECK<br />
dialog box <strong>in</strong> Analysis Set Manager<br />
• Added Dynamic Control Options dialog box to Analysis Set Manager for analysis Types 3..Transient Dynamic/<br />
Time History, 4..Frequency/Harmonic Response, 5..Response Spectrum, and 6..Random Response.<br />
Replaces us<strong>in</strong>g the “Model, Load, Dynamic Analysis” command and all fields of this dialog box should be populated<br />
when import<strong>in</strong>g a Nastran <strong>in</strong>put file for Solution Sequences (SOL) 108, 109, 111, or 112. Added<br />
• Added Nonl<strong>in</strong>ear Control Options dialog box to Analysis Set Manager for analysis Types 10..Nonl<strong>in</strong>ear Static<br />
and 12..Nonl<strong>in</strong>ear Transient Response.
10.1-26<br />
F<strong>in</strong>ite Element Model<strong>in</strong>g<br />
Replaces us<strong>in</strong>g the “Model, Load, Nonl<strong>in</strong>ear Analysis” command and all fields of this dialog box should be populated<br />
when import<strong>in</strong>g a Nastran <strong>in</strong>put file for Solution Sequences (SOL) 106 or 129, when an NLPARM entry<br />
exists.<br />
• Added support to read DLOAD, NONLINEAR, TSTEP, TSTEPNL, NLPARM, SDAMPING, FREQUENCY,<br />
RANDOM Case Control entries<br />
• Added support to read PARAMs LMODES, LFREQ, HFREQ, W3, W4, G, RSPECTRA, SCRSPEC, OPTION<br />
(ABS, SRSS, NRL, NRLO), CLOSE, LANGLE<br />
• Added support to read TSTEP, TSTEPNL, NLPARM, NLPCI, RANDPS, DTI Bulk Data entries<br />
A number of bugs were corrected<br />
For details, see “Analysis Program Interfaces” <strong>in</strong> the <strong>FEMAP</strong> User Guide.<br />
MSC/MD Nastran Interface<br />
A number of bugs were corrected.<br />
For details, see “Analysis Program Interfaces” <strong>in</strong> the <strong>FEMAP</strong> User Guide.<br />
NEi Nastran Interface<br />
• Added support to read PARAM,OPTION,CQC<br />
A number of bugs were corrected.<br />
For details, see “Analysis Program Interfaces” <strong>in</strong> the <strong>FEMAP</strong> User Guide.<br />
ANSYS Interface<br />
A number of bugs were corrected.<br />
For details, see “Analysis Program Interfaces” <strong>in</strong> the <strong>FEMAP</strong> User Guide.<br />
ABAQUS Interface<br />
A number of bugs were corrected.<br />
For details, see “Analysis Program Interfaces” <strong>in</strong> the <strong>FEMAP</strong> User Guide.<br />
DYNA Interface<br />
• Added support 8-noded Quad elements<br />
• Added support for nonstructural mass for Beam and Shell elements<br />
• Added support for the follow<strong>in</strong>g element formulations:<br />
Fully Integrated DKT triangular, Fully Integrated l<strong>in</strong>ear DK quadrilateral, Fully Integrated l<strong>in</strong>ear assumed stra<strong>in</strong><br />
C0, 1 po<strong>in</strong>t Eulerian Navier-Stokes, 8 po<strong>in</strong>t Eulerian Navier-Stokes, and CVFEM Eulerian Navier-Stokes<br />
A number of bugs were corrected.<br />
For details, see “Analysis Program Interfaces” <strong>in</strong> the <strong>FEMAP</strong> User Guide.<br />
OLE/COM API<br />
<strong>New</strong> API Objects and Attributes<br />
• Added NasBulkDynLdAsLOADSET, NasBulkResV<strong>in</strong>er, NasGCheckNone, NasBulkWriteAllLoadBCSets,<br />
NasDynOn, NasDynUseLoadSet, NasDynDampOverall, NasDynDampW3, NasDynDampW4, vNasDynKeep-<br />
Freq, NasDynTranDT, NasDynFreqTbl, NasDynDampModalTbl, NasDynKeepModes, NasDynTran-<br />
TimeSteps, NasDynTransOutInt, NasDynDampModalMethod, NasDynRespSpect, vNasDynNoFreq,<br />
vNasDynLogInterp, vNasDynFreqType, vNasDynM<strong>in</strong>Freq, vNasDynMaxFreq, and vNasDynSpreadCluster to<br />
AnalysisMgr object
OLE/COM API 10.1-27<br />
• NasCnlIncrements, NasCnlTime_Increment, NasCnlMaxIter, vNasCnlConvergenceFlags, vNasCnlConvergenceValue,<br />
NasCnlCtiffnessMethod, NasCnlKstep, NasCnlIntermediateOutput, NasCnlOutputInterval,<br />
NasCnlSolutionStrategy, NasCnlSolutionOverrides, NasCnlModnewtonL<strong>in</strong>eSearch, NasCnlModnewton-<br />
Quasi<strong>New</strong>ton, NasCnlModnewtonBisection, NasCnlArcConstra<strong>in</strong>tType, NasCnlArcM<strong>in</strong>Adjust, NasCnlArc-<br />
MaxAdjust, NasCnlArcLoadScale, NasCnlArcDesiredIter, NasCnlArcMaxSteps, NasCnlTimeSkipAdjust,<br />
NasCnlDom<strong>in</strong>antPeriodSteps, NasCnlBoundsRb, NasCnlStabilityTolerance, NasCnlDivergenceLimit, NasCnlQuasi<strong>New</strong>tonVectors,<br />
NasCnlMaxL<strong>in</strong>eSearch, NasCnlCreep, NasCnlL<strong>in</strong>eSearchTolerance, NasCnlMaxBisections,<br />
NasCnlMaxRotation, NasCnlFstress, and NasCnlMaxAdjust to AnalysisMgr object.<br />
• Added IsComb<strong>in</strong>ation to LoadSet object.<br />
• Added Gradient to LoadETemp object.<br />
• Added IsComb<strong>in</strong>ation to BCSet object<br />
• Added GlobalPlyLocation to View object.<br />
<strong>New</strong> API Methods<br />
• Added AddCoord<strong>in</strong>ate, AddAroundPo<strong>in</strong>t, AddAroundVector, AddAroundPlane, AddNodesOnGeometry, and<br />
SelectList methods for Set object<br />
• Added RemoveSet, ConvertToBoundarySurfaces, and SelectListmethods for Sort object<br />
• Added ClearAnalysisQueue, GetCorrelate2, and PutCorrelate2 methods forAnalysisMgr object<br />
• Added GetDataSurfType method for DataSurf object<br />
• Added PartialLengthXYZ, PartialLengthNode, and SelectList methods for Curve object<br />
• Added IsBound<strong>in</strong>gSolidRegion, Mesh, and ResetMeshAttr methods for Surface object<br />
• Added IsGeneral method for Solid object<br />
• Added GetClosest method for Node object<br />
• Added Thickness, Area, and Inertia methods for Elem object<br />
• Added Thickness, Area, and Inertia methods for Prop object<br />
• Added GetComb<strong>in</strong>ation and PutComb<strong>in</strong>ation methods for LoadSet object<br />
• Added GetComb<strong>in</strong>ation and PutComb<strong>in</strong>ation methods for BCSet object<br />
• Added ReferencedGroups method for Group object<br />
• Added Def<strong>in</strong>eReal method for Var object<br />
• Added GetMultiGroupList, SetMultiGroupList, and ClearMultiGroupList methods for View object<br />
• Added InitScalarAtBeam and PutScalarAtBeam methods for Output object<br />
• Added Reverse method for Contact and ConnectionRegion objects<br />
<strong>New</strong> Global Variables<br />
• Added Pref_NastranUseILP64, Pref_ConstructionGeometry, and Pref_NastranWriteAllLdbcSets<br />
• Added FLT_SNTORQUE for Load Type<br />
• Added FVD_AXIS_OF_SURFACE for Vector Def<strong>in</strong>ition Method<br />
The follow<strong>in</strong>g functions have been added:<br />
• feSurfaceRemoveHole<br />
• feModifySolidFacett<strong>in</strong>g<br />
• feSolidRemoveFace<br />
• feMeshSurface2<br />
• feAppRegisterAddInPaneWithFrame<br />
• feVectorAxisOfSurface
10.1-28<br />
F<strong>in</strong>ite Element Model<strong>in</strong>g<br />
• feMeshSurfaceByAttributes<br />
Preferences<br />
Views<br />
• Added 2D Tensor Plot View Options Override option.<br />
This option is on by default. When view<strong>in</strong>g contour vectors us<strong>in</strong>g the 2D Tensor Plot option, the options set <strong>in</strong> the<br />
PostProcess<strong>in</strong>g category of View Options for Vector Style and Contour Vector Style will be ignored, and the plot<br />
will be always be shown with all vectors displayed us<strong>in</strong>g uniform vector length, centered on the element, with output<br />
values<br />
Database<br />
• Added Open/Save Method option.<br />
This option should only be used if you are experienc<strong>in</strong>g VERY slow open<strong>in</strong>g/sav<strong>in</strong>g <strong>FEMAP</strong> model files. On certa<strong>in</strong><br />
hardware, switch<strong>in</strong>g to option “2..64K widows I/O” may make a dramatic difference <strong>in</strong> the time a model takes<br />
to open/save. Essentially, what option 2 does is copy to (open<strong>in</strong>g) and from the scratch directory (sav<strong>in</strong>g) <strong>in</strong> 64K<br />
“blocks” <strong>in</strong>stead of allow<strong>in</strong>g the hardware to choose the size. Options 1 and 3 are simply other alternatives to try.<br />
Interfaces<br />
• Added Use ILP-64bit NX Nastran option.<br />
If you have NX Nastran <strong>in</strong>stalled on a 64-bit system, this option will <strong>in</strong>struct NX Nastran to solve us<strong>in</strong>g the “ILP”<br />
version of 64-bit Nastran. “ILP” is able to allocate more memory than “regular” 64-bit NX Nastran by us<strong>in</strong>g a 64-<br />
bit word size and 64-bit memory po<strong>in</strong>ter, while <strong>in</strong>tegers are 64-bits and float<strong>in</strong>g po<strong>in</strong>t uses one 64-bit word.<br />
• Added Write All Static Load/BC Sets option.<br />
When this option is on, <strong>FEMAP</strong> will write ALL loads and constra<strong>in</strong>t sets to the Nastran <strong>in</strong>put file for L<strong>in</strong>ear Static<br />
Analysis. This essentially forces <strong>FEMAP</strong> to write out Nastran <strong>in</strong>put files for SOL 101 the way it has <strong>in</strong> all versions<br />
before <strong>FEMAP</strong> 10.1.
What’s <strong>New</strong> for versions 10.0 and 10.0.1 10.1-29<br />
What’s <strong>New</strong> for versions 10.0 and<br />
10.0.1<br />
User Interface<br />
"W<strong>in</strong>dows Vista", "General", "Menu", "Entity Select", "Toolbars", "Mesh<strong>in</strong>g Toolbox", "Model Info tree", "Data<br />
Table", "Entity Editor", "API Programm<strong>in</strong>g", "Status Bar", "Graphics", "Astroid"<br />
W<strong>in</strong>dows Vista<br />
General<br />
<strong>FEMAP</strong> is now supported on 32-bit and 64-bit versions of W<strong>in</strong>dows Vista.<br />
Many issues from previous “unsupported” versions of <strong>FEMAP</strong> with regards to W<strong>in</strong>dows Vista, such as entity pick<strong>in</strong>g<br />
and proper use of the Model Info tree have been addressed.<br />
• Renamed Weld Property Element/Property Type to Weld/Fastener to <strong>in</strong>clude Fastener Elements<br />
• Added support to create GIF, Animated GIF, TIFF, and PNG files when us<strong>in</strong>g File, Picture, Save command.<br />
• Improved length-based spac<strong>in</strong>g, distance along, and other length-based curve functions to perform better when<br />
highly nonl<strong>in</strong>ear parametric doma<strong>in</strong>s exist on curves.<br />
Menu<br />
• Added Tools, Mesh<strong>in</strong>g Toolbox command to the Tools menu. See the Mesh<strong>in</strong>g section for more <strong>in</strong>formation on<br />
this dockable pane.<br />
• Added Geometry, Curve - From Surface, Split at Locations; Geometry, Curve - From Surface, Offset Curve/<br />
Washer; Geometry, Curve - From Surface, Pad; Geometry, Curve - From Surface, Po<strong>in</strong>t to Po<strong>in</strong>t; Geometry,<br />
Curve - From Surface, Po<strong>in</strong>t to Edge; and Geometry, Curve - From Surface, Edge to Edge commands to Geometry<br />
menu. See the Geometry section for more <strong>in</strong>formation on these commands.<br />
• Deleted Geometry, Curve - From Surface, Split at Po<strong>in</strong>ts. See the Geometry section for more <strong>in</strong>formation on<br />
these commands. Replaced by Geometry, Curve - From Surface, Split at Locations.<br />
• Added Geometry, Surface, NonManifold Add and Geometry, Surface, Recover Manifold Geometry commands<br />
to the Geometry menu. See the Geometry section for more <strong>in</strong>formation on these commands.<br />
• Added Geometry, Midsurface, Offset Tangent Surfaces command to the Geometry menu. See the Geometry<br />
section for more <strong>in</strong>formation on this command.<br />
• Added Modify, Associativity, Automatic command to the Modify menu. See the Mesh Associativity section for<br />
more <strong>in</strong>formation on this command.<br />
• Added Modify, Update Other, Solid Facett<strong>in</strong>g command to the Modify menu.<br />
Entity Select<br />
• Added “Comb<strong>in</strong>ed Curves” options (Default, All Po<strong>in</strong>ts/Curves, Po<strong>in</strong>ts/Curves Elim<strong>in</strong>ated by Comb<strong>in</strong>ed<br />
Curves, and Comb<strong>in</strong>ed Curves Only) to the Pick Menu <strong>in</strong> the standard Entity Selection dialog box. Only one<br />
mode can be selected at any given time.<br />
• Added “Boundary Surfaces” options (Default, All Curves/Surfaces, Curves/Surfaces Elim<strong>in</strong>ated by Boundary,<br />
and Boundary Surfaces Only) to the Pick Menu <strong>in</strong> the standard Entity Selection dialog box. Only one mode can<br />
be selected at any given time.
10.1-30<br />
F<strong>in</strong>ite Element Model<strong>in</strong>g<br />
Toolbars<br />
• Added “Add Connected Fillets” option to the Pick Menu <strong>in</strong> the standard Entity Selection dialog box. Allows<br />
you to quickly add “connected fillets” to the selection list by first choos<strong>in</strong>g any number of surfaces which represent<br />
fillets <strong>in</strong> your geometry. This is a helpful pick<strong>in</strong>g tool when us<strong>in</strong>g Geometry, Solid, Remove Face or the<br />
Feature Removal Tool set to “Surfaces” <strong>in</strong> the Mesh<strong>in</strong>g Toolbox to try and remove fillets from geometry. Only<br />
visible when select<strong>in</strong>g surfaces.<br />
• Added “Add Tangent Surfaces” option to the Pick Menu <strong>in</strong> the standard Entity Selection dialog box. Allows<br />
you to add surfaces based on their relationship to surfaces which have already been selected. In this case, surfaces<br />
“tangent” to any number of surfaces already <strong>in</strong> your selection list will be added to the list. This is a helpful<br />
command when you would like to pick all of the surfaces on “one side” of a part. Only visible when select<strong>in</strong>g<br />
surfaces.<br />
• Updated direction of mouse wheel for Query Pick list to follow direction of mouse wheel.<br />
• Added Mesh<strong>in</strong>g Toolbox icon to Panes Toolbar.<br />
• Added Curve Washer, Curve Pad, Split Between Po<strong>in</strong>ts, Split Po<strong>in</strong>t to Edge, and Split Edge to Edge icons to<br />
Curves on Surface Toolbar.<br />
• Improved Select Related mode of the Select Toolbar to <strong>in</strong>clude coord<strong>in</strong>ate systems used as def<strong>in</strong>ition coord<strong>in</strong>ate<br />
systems for other selected Coord<strong>in</strong>ate Systems and <strong>in</strong>clude reference nodes on beams when the nodes are<br />
related to elements, properties, or materials.<br />
Mesh<strong>in</strong>g Toolbox<br />
The Mesh<strong>in</strong>g Toolbox is completely new for <strong>FEMAP</strong> 10 and conta<strong>in</strong>s several <strong>in</strong>dividual tools which can be very<br />
helpful dur<strong>in</strong>g the mesh<strong>in</strong>g process. There are tools which allow you to simplify geometry; create “comb<strong>in</strong>ed” geometric<br />
entities for mesh<strong>in</strong>g purposes us<strong>in</strong>g several “underly<strong>in</strong>g” geometric entities; change the mesh size, bias<strong>in</strong>g,<br />
and other options on any number of curves <strong>in</strong>teractively; move any number of nodes dynamically while see<strong>in</strong>g the<br />
mesh update; and plot the element quality <strong>in</strong> the graphics w<strong>in</strong>dow.<br />
The Mesh<strong>in</strong>g Toolbox also conta<strong>in</strong>s the Entity Locator, which can be used to locate Curves or Surfaces <strong>in</strong> your<br />
model which meet certa<strong>in</strong> search criteria (for example, “short” curves or “sliver” surfaces which may cause problems<br />
dur<strong>in</strong>g mesh<strong>in</strong>g). Once the “Locator” identifies entities, you can then cycle through all of the located entities<br />
<strong>in</strong> the model one at a time and take action us<strong>in</strong>g the Geometry Tools <strong>in</strong> the Mesh<strong>in</strong>g Toolbox, when appropriate.<br />
Mesh<strong>in</strong>g Toolbox Icons<br />
Mesh Quality Toggle Select Entity<br />
Entity Locator<br />
Remesh Modes Dialog Select<br />
Toggle Tools<br />
Toggle Tools menu - By default, all 7 of the “tools”<br />
will be visible <strong>in</strong> the Mesh<strong>in</strong>g Toolbox.<br />
Us<strong>in</strong>g the drop-down menu from this icon, you can<br />
make all of the tools visible or hidden at once us<strong>in</strong>g<br />
“Toggle All Tools”, <strong>in</strong>dividually toggle them on and off<br />
by choos<strong>in</strong>g the <strong>in</strong>dividual “tool name” (for example,<br />
Feature Suppression) from the menu, or decide to<br />
show only one “set” of tools at a time by select<strong>in</strong>g the<br />
appropriate “tool set name” (for example, Geometry<br />
Tools). When a tool is visible, there will be a check<br />
mark next to it <strong>in</strong> the list.<br />
Here is a short description of each “set” of tools:<br />
Geometry Tools<br />
• Feature Suppression - Basically, this tool allows you to use the same options available <strong>in</strong> the Mesh, Mesh Control,<br />
Feature Suppression command <strong>in</strong>teractively. You may suppress loops (curves of <strong>in</strong>ternal holes on surfaces<br />
and solids, “base curves” of bosses and extrusions on solids), curves (usually relatively small <strong>in</strong> size), and surfaces<br />
(usually sliver surfaces, not fillets or chamfers). Suppressed geometry still exists <strong>in</strong> the model and can be<br />
“restored” at any time. See "Feature Suppression Tool"
Mesh<strong>in</strong>g Toolbox 10.1-31<br />
• Feature Removal - Most of the functionality <strong>in</strong> this tool, which is used to permanently remove geometric entities<br />
to simplify geometry, is offered <strong>in</strong> other <strong>FEMAP</strong> commands. This tool br<strong>in</strong>gs them together <strong>in</strong> one place<br />
where they can be used <strong>in</strong>teractively. Remov<strong>in</strong>g “Loops” basically mimics the functionality of the Geometry,<br />
Surface, Remove Hole command, while remov<strong>in</strong>g “Surfaces” essentially uses the same process as Geometry,<br />
Solid, Remove Face. F<strong>in</strong>ally, remov<strong>in</strong>g “Curves” uses portions of the Geometry, Solid, Cleanup command<br />
along some other methodology to try and remove redundant curves. In the case of “Aggressive Removal”,<br />
localized geometry around the selected curve may be slightly altered to accommodate the curve no longer be<strong>in</strong>g<br />
part of the geometry. See "Feature Removal Tool"<br />
• Comb<strong>in</strong>ed/Composite Curves - In some cases, comb<strong>in</strong><strong>in</strong>g several smaller curves along the edge of a surface<br />
will allow you to create a higher quality mesh on the surface. This tool allows you to comb<strong>in</strong>e curves by choos<strong>in</strong>g<br />
the curves themselves or a po<strong>in</strong>t that two curves share. A “Composite Curve” will be created <strong>in</strong> <strong>FEMAP</strong>,<br />
which will be used for mesh siz<strong>in</strong>g purposes <strong>in</strong>stead of the underly<strong>in</strong>g curves. There are also options for splitt<strong>in</strong>g<br />
a “composite curve” at a selected po<strong>in</strong>t or remov<strong>in</strong>g any of the underly<strong>in</strong>g curves. See "Comb<strong>in</strong>ed/Composite<br />
Curve Tool"<br />
• Comb<strong>in</strong>ed/Boundary Surfaces - Much like creat<strong>in</strong>g “composite curves” to improve mesh quality, it may be a<br />
good idea to comb<strong>in</strong>e several surfaces <strong>in</strong>to a “Boundary Surface”. This tool uses the same concept as the Geometry,<br />
Boundary Surface, From Surfaces on Solid command. This can be especially helpful when there are “sliver<br />
surfaces” next to a much larger surface. By comb<strong>in</strong><strong>in</strong>g the selected surfaces <strong>in</strong>to one “boundary surface”, all of<br />
the <strong>in</strong>ternal curves can be ignored dur<strong>in</strong>g the mesh<strong>in</strong>g process. “Boundary surfaces” can be created by select<strong>in</strong>g<br />
a curve shared by multiple surfaces or choos<strong>in</strong>g the surfaces themselves. Also, any underly<strong>in</strong>g surface can be<br />
removed from a boundary surface or “split” along a chosen curve. See "Comb<strong>in</strong>ed/Boundary Surface Tool"<br />
Mesh<strong>in</strong>g Tools<br />
• Mesh Siz<strong>in</strong>g - Comb<strong>in</strong>es the options used to set mesh siz<strong>in</strong>g and node spac<strong>in</strong>g on curves (Mesh, Mesh Control,<br />
Size on Curve) with the “Add, Subtract, and Set To” functionality of the Mesh, Mesh Control, Interactive command.<br />
When us<strong>in</strong>g the Auto Remesh option <strong>in</strong> the Mesh<strong>in</strong>g Toolbox you will be able to see the mesh update “on<br />
the fly” after each change to siz<strong>in</strong>g or node spac<strong>in</strong>g, while you also monitor the element quality update (Mesh<br />
Quality Toggle “On”). There are also options for match<strong>in</strong>g any number of selected curves to a “Master Curve”,<br />
as well as sett<strong>in</strong>g bias<strong>in</strong>g and length based siz<strong>in</strong>g without chang<strong>in</strong>g the number of elements on the curve. See<br />
"Mesh Siz<strong>in</strong>g Tool"<br />
Mesh Edit<strong>in</strong>g Tools<br />
• Mesh Locate - There may be times when you would like to make small changes to an exist<strong>in</strong>g mesh simply by<br />
mov<strong>in</strong>g one or several nodes without chang<strong>in</strong>g the number of elements. This tool will allow you to do this while<br />
mak<strong>in</strong>g sure that as you move the node or nodes dynamically, they rema<strong>in</strong> attached to specified solid(s), surface(s),<br />
and curve(s), or if you have no geometry, follow the overall topology of the selected standalone mesh.<br />
There are also options to move the selected nodes by a def<strong>in</strong>ed amount, cont<strong>in</strong>ually smooth the mesh as the<br />
nodes are moved, and allow the moved nodes to no longer be attached to surfaces or curves. Much like the<br />
Mesh Siz<strong>in</strong>g tool, you can also turn on the Mesh Quality Toggle and monitor the element quality “real time” as<br />
the nodes are moved. See "Mesh Locate Tool"<br />
• Mesh Quality - Creat<strong>in</strong>g a mesh with high quality elements is essential to the accuracy of a F<strong>in</strong>ite Element<br />
model. When the Mesh Quality Toggle <strong>in</strong> the Mesh<strong>in</strong>g Toolbox is set to “on”, this tool allows you to graphically<br />
see an element quality value plotted on each element similar to a contour/criteria plot. There are several different<br />
element quality types which can be selected and each type has default automatic values, but user-def<strong>in</strong>ed<br />
values can also be specified. Also, the m<strong>in</strong>imum and maximum distortion values for the specified “quality type”<br />
are listed <strong>in</strong> the bottom fields of the tool. See "Mesh Quality"<br />
Entity Locator menu - The Entity Locator is very helpful <strong>in</strong> f<strong>in</strong>d<strong>in</strong>g “Short Edges” and “Sliver/Small Surfaces”<br />
which may be caus<strong>in</strong>g mesh<strong>in</strong>g issues. It may also make it easier to locate “free edges” <strong>in</strong> troublesome geometry.<br />
This menu conta<strong>in</strong>s commands for toggl<strong>in</strong>g the Entity Locator on and off, cycl<strong>in</strong>g through the entities currently <strong>in</strong><br />
the Entity Locator, remov<strong>in</strong>g the current entity from the Entity Locator or clear<strong>in</strong>g it entirely, as well as creat<strong>in</strong>g a<br />
group from the entities currently <strong>in</strong> the Entity Locator or send<strong>in</strong>g them to the Data Table.<br />
• Toggle Entity Locator - When this icon is toggled “on”, the Entity Locator is ready to be filled with entities<br />
and the Locator fields will be available <strong>in</strong> the Mesh<strong>in</strong>g Toolbox. Depend<strong>in</strong>g on which entity type is selected <strong>in</strong><br />
the Search For drop-down list, Curves or Surfaces, the Locator fields change. The Locate Options and Show
10.1-32<br />
F<strong>in</strong>ite Element Model<strong>in</strong>g<br />
Options can be used to modify how the Entity Locator searches for entities and then displays them. Also, the<br />
entities loaded <strong>in</strong> the Entity Locator update after each change made <strong>in</strong> the Locator fields, unless Auto Locate is<br />
turned “off” <strong>in</strong> the Locate Options section.<br />
Once entities are loaded <strong>in</strong>to the Entity Locator, use the follow<strong>in</strong>g commands to move from entity to entity. By<br />
default, the “current entity” <strong>in</strong> the Entity Locator will be “highlighted” <strong>in</strong> the graphics w<strong>in</strong>dow us<strong>in</strong>g the display<br />
options currently set <strong>in</strong> the Style portion of the W<strong>in</strong>dows, Show Entities command (See Section 6.3.2.3, "W<strong>in</strong>dow,<br />
Show Entities..."). There are other options for automatically rotat<strong>in</strong>g the model and zoom<strong>in</strong>g <strong>in</strong> to get a better view<br />
of the entity. See the Locate Options and Show Options sections <strong>in</strong> the Locator section for more <strong>in</strong>formation.<br />
• Next - Makes the next entity <strong>in</strong> the Entity Locator the “current entity”.<br />
• Previous- Makes the previous entity <strong>in</strong> the Entity Locator the “current entity”.<br />
Note:<br />
Once either Next or Previous has been selected, the icon will “persist” at the top of the Entity Locator<br />
menu <strong>in</strong> the Mesh<strong>in</strong>g Toolbox. This enables you to easily go to the “next” or “previous” entity simply by<br />
click<strong>in</strong>g the icon. When you reach the “last” entity <strong>in</strong> the Entity Locator, the Next icon will automatically<br />
become the Previous icon and vice versa.<br />
• Current - “Re-highlights” the “current entity” <strong>in</strong> the Entity Locator. This can be helpful if you have regenerated<br />
or rotated the model.<br />
• First - Makes the “first” entity <strong>in</strong> the Entity Locator the “current entity”. When us<strong>in</strong>g Search Methods based on<br />
physical size, the smallest “located” entity will be the “first” entity.<br />
• Last - Makes the last entity <strong>in</strong> the Entity Locator the “current entity”. When us<strong>in</strong>g Search Methods based on<br />
physical size, the largest “located” entity will be the “last” entity.<br />
• Do Not Locate - Places the current entity <strong>in</strong>to a group which is then automatically specified <strong>in</strong> the Not In Group<br />
field of the Locate Options.<br />
• Remove - Removes the current entity from the Entity Locator until cleared or new search criteria are entered.<br />
• Clear Locator - Simply clears the Entity Locator of all entities.<br />
• Create Group - Creates a new group with all of the entities currently <strong>in</strong> the Entity Locator or adds/removes/<br />
excludes those entities from an exist<strong>in</strong>g group.<br />
• Add to Data Table - Adds all entities currently loaded <strong>in</strong> the Entity Locator to the Data Table. The Data Table<br />
needs to be “open” <strong>in</strong> the User Interface and “unlocked” for the command to be available.<br />
Search For - Indicates the entity type, Curves or Surfaces, the Entity Locator will currently be able to “locate” <strong>in</strong><br />
the model. Depend<strong>in</strong>g on the entity type, different Locator fields become available.<br />
Locator fields and buttons when Search For is set to Curves:<br />
Search Method - Specifies the method the Entity Locator uses to “f<strong>in</strong>d, then load” itself with specific Curves <strong>in</strong><br />
the model. Depend<strong>in</strong>g on the Search Method, other options may become available.<br />
Here are descriptions of the different Search Methods:
Mesh<strong>in</strong>g Toolbox 10.1-33<br />
•Short Edges - “Short edges” will be loaded <strong>in</strong>to the Entity Locator<br />
us<strong>in</strong>g criteria specified <strong>in</strong> the current Based On option.<br />
When Based On is set to:<br />
Global Mesh Size - Curves whose length is shorter than the specified<br />
% of Mesh Size (default) will be loaded <strong>in</strong>to the Entity Locator.<br />
Curve Length - Curves will only loaded <strong>in</strong>to the Entity Locator<br />
which are Shorter Than a user-specified value. You may type the<br />
value <strong>in</strong> directly or specify the value by click<strong>in</strong>g the “Select Curve<br />
to Set Length” icon button, then choos<strong>in</strong>g any curve on the screen.<br />
Shortest Curves - F<strong>in</strong>ds the shortest “specified % of All Curves” <strong>in</strong><br />
the model (For example, if set to 5, it will f<strong>in</strong>d the bottom 5% of<br />
curves, based on length) and loads them <strong>in</strong>to the Entity Locator.<br />
This value can be set from 0 to 25 us<strong>in</strong>g the “slider bar” or a value<br />
can be entered directly (if value is higher than 25, loads all curves<br />
satisfy<strong>in</strong>g that criteria <strong>in</strong>to the Entity Locator, then returns to 25).<br />
•Free Edges - Locates all edges <strong>in</strong> a Solid which are not stitched to<br />
another surface. “Free Edges” <strong>in</strong> a Solid usually <strong>in</strong>dicate “gaps” or<br />
“holes” <strong>in</strong> the geometry, mean<strong>in</strong>g the Solid does not fully enclose a<br />
volume and is probably not viable for solid mesh<strong>in</strong>g (tet or hex). If<br />
multiple surfaces are “stitched” together but do not enclose a volume<br />
(Sheet Solid) or “jo<strong>in</strong>ed” us<strong>in</strong>g the Geometry, Surface, Non-<br />
Manifold Add command (General Bodies), then “free edges” may<br />
also <strong>in</strong>dicate “gaps” or “holes” between surfaces. Of course, “free edges” <strong>in</strong> this type of geometry may be <strong>in</strong>ternal<br />
holes/loops or the outside edge of the stitched/jo<strong>in</strong>ed “part”, which are normal.<br />
“Free Edges” of set of surfaces<br />
“Stitched” together<br />
“Free Edges” of surfaces jo<strong>in</strong>ed us<strong>in</strong>g “NonManifold Add”<br />
• NonManifold Edges - Locates all “NonManifold” edges <strong>in</strong> the geometry. Only geometry that has been jo<strong>in</strong>ed<br />
us<strong>in</strong>g the Geometry, Surface, NonManifold Add command (General Bodies) will have any of these edges. Typical<br />
“NonManifold Edges” are found where surfaces come together at “T-junctions” or a surface has been “Non-<br />
Manifold added” to a Solid.<br />
Two Examples of<br />
“NonManifold Edges”<br />
Surfaces jo<strong>in</strong>ed us<strong>in</strong>g “NonManifold Add”<br />
Surface and Solid jo<strong>in</strong>ed us<strong>in</strong>g “NonManifold Add”<br />
• From Group - Loads all Curves <strong>in</strong> a specified Group <strong>in</strong>to the Entity Locator.
10.1-34<br />
F<strong>in</strong>ite Element Model<strong>in</strong>g<br />
Show ‘#’ Curves button - By default, when you <strong>in</strong>itially place Curves <strong>in</strong> the Entity Locator, ALL of the “found”<br />
Curves will be highlighted <strong>in</strong> the graphics w<strong>in</strong>dow us<strong>in</strong>g the display options currently set <strong>in</strong> the Style portion of the<br />
W<strong>in</strong>dows, Show Entities command (See Section 6.3.2.3, "W<strong>in</strong>dow, Show Entities..."). Like W<strong>in</strong>dows, Show Entities<br />
and the “Show When Selected” capabilities of the Data Table and Model Info tree, once the view has been redrawn<br />
or regenerated the “highlight<strong>in</strong>g” is removed and the view is restored to how it appeared before the “show” command.<br />
If you want to “highlight” the curves aga<strong>in</strong>, simply click the Show ‘#’ Curves button.<br />
Locator fields and buttons when Search For is set to Surfaces:<br />
Search Method - Specifies the method the Entity Locator will use to “search and locate” specific Surfaces <strong>in</strong> the<br />
model. Depend<strong>in</strong>g on the Search Method, other options may become available.<br />
Here are descriptions of the different Search Methods:<br />
• Surface Geometry - This method is used <strong>in</strong> conjunction with any comb<strong>in</strong>ation of the Small Surfaces, Slivers,<br />
Spikes, and By Area options. If none of these options are turned on (checked), no surface geometry will be<br />
loaded <strong>in</strong>to to the Entity Locator.<br />
Small Surfaces (Fit In Radius value) - Surfaces which completely fit <strong>in</strong>side a sphere with a specified radius<br />
(def<strong>in</strong>ed by Fit In Radius value) will be loaded <strong>in</strong>to the Entity Locator. Enter the Fit In Radius value directly or<br />
click the “Measure Distance” icon button to specify the sphere radius by pick<strong>in</strong>g two locations graphically. Default<br />
value is equal to the default Merge Tolerance <strong>in</strong> the model.<br />
Slivers (Sliver Tolerance value) - Surfaces which have high aspect ratios and small areas are known as “Slivers”.<br />
Exam<strong>in</strong><strong>in</strong>g a surface’s “maximum width” is often a good <strong>in</strong>dication of whether a surface is a “sliver” or not. Surfaces<br />
with a “maximum width” smaller than the Sliver Tolerance will be loaded <strong>in</strong>to the Entity Locator. Enter the<br />
Sliver Tolerance value directly or click the “Measure Distance” icon button and choose two locations graphically to<br />
specify a distance. Default value is equal to the default Merge Tolerance <strong>in</strong> the model.<br />
Spikes (Spike Width value) - Much like “slivers”, Surfaces with “spikes” also have high aspect ratio and small area.<br />
The ma<strong>in</strong> difference is that only a portion of the surface fits this criteria, not the entire surface. When this option is<br />
on and a “spike” on a surface is detected (smaller than Spike Width), <strong>FEMAP</strong> will try and remove the “spike”,<br />
while keep<strong>in</strong>g the rest of the surface <strong>in</strong>tact. Enter the Sliver Tolerance value directly or click the “Measure Distance”<br />
icon button and choose two locations graphically to specify a distance. Default value is equal to the default<br />
Merge Tolerance <strong>in</strong> the model.<br />
By Area (Area Less Than value) - Surfaces which have an Area Less Than the specified size will be loaded <strong>in</strong>to the<br />
Entity Locator. Enter the Area Less Than value directly or click the “Measure Area of Surface” icon button to specify<br />
an area by choos<strong>in</strong>g a surface graphically. Default value is equal to 1/1000 of the “model box diagonal”.<br />
• From Group - Loads all Surfaces <strong>in</strong> a specified Group <strong>in</strong>to the Entity Locator.<br />
Show ‘#’ Surfaces button - By default, when you <strong>in</strong>itially place Surfaces <strong>in</strong> the Entity Locator, ALL of the<br />
“found” Surfaces will be highlighted <strong>in</strong> the graphics w<strong>in</strong>dow us<strong>in</strong>g the display options currently set <strong>in</strong> the Style portion<br />
of the W<strong>in</strong>dows, Show Entities command (See Section 6.3.2.3, "W<strong>in</strong>dow, Show Entities..."). Like W<strong>in</strong>dows,<br />
Show Entities and the “Show When Selected” capabilities of the Data Table and Model Info tree, once the view has<br />
been redrawn or regenerated the “highlight<strong>in</strong>g” is removed and the view is restored to how it appeared before the<br />
“show” command. If you want to “highlight” the curves aga<strong>in</strong>, simply click the Show ‘#’ Surfaces button.<br />
Locate Options:<br />
• Only In Group - The Locator will only attempt to “locate” entities which meet the specified criteria <strong>in</strong> the<br />
selected group.<br />
• Not In Group - The Locator will only attempt to “locate” entities which meet the specified criteria and are<br />
NOT <strong>in</strong> the selected group.<br />
Note:<br />
A group based on any number of solids can be “generated” directly from the Locator by click<strong>in</strong>g the<br />
“Select Solids for Group with Related Entities” icon button next to the Only In Group or Not In Group<br />
drop-down list.<br />
• Ignore If - Instructs the Locator to “ignore” entities which meet the specified criteria which are either Suppressed<br />
or Comb<strong>in</strong>ed. If you want to change the options, simply expand the Ignore If portion of the Locate<br />
Options and check or uncheck Suppressed or Comb<strong>in</strong>ed accord<strong>in</strong>gly.
Mesh<strong>in</strong>g Toolbox 10.1-35<br />
• Auto Locate - When this option is on, the Locator will automatically be loaded with the entities that meet the<br />
criteria currently specified. If it is turned “off”, you will need to click the Locate button which is now visible.<br />
• Update Selector - If this option is checked, the “Selection List” (usually created us<strong>in</strong>g the Select Toolbar) will<br />
be cleared, then updated with the entities currently placed <strong>in</strong> the Locator.<br />
Note:<br />
If you have entities currently <strong>in</strong> the “Selection List” before the Locator is filled with entities, they will<br />
be cleared and replaced once the Locator is filled with entities.<br />
Show Options:<br />
• Show All On Locate - When “on”, entities loaded <strong>in</strong>to the Locator will be highlighted on the screen immediately.<br />
The “highlight<strong>in</strong>g” is controlled by the options currently set <strong>in</strong> the Style portion of the W<strong>in</strong>dows, Show<br />
Entities command (See Section 6.3.2.3, "W<strong>in</strong>dow, Show Entities..."). If this is set to “off”, you will have to<br />
click the appropriate Show button to highlight the entities <strong>in</strong> the graphics w<strong>in</strong>dow.<br />
• Auto Rotate - When this option is “on”, the view will be automatically rotated to align the current entity <strong>in</strong> the<br />
Locator on the screen. For surfaces, the view will align so the “normal” of the surface is po<strong>in</strong>t<strong>in</strong>g “out of the<br />
screen” and centered about the CG of the surface. For curves, the vector tangent to the curve, at the curve’s midpo<strong>in</strong>t,<br />
will be used to align the view to the horizontal screen axis. The midpo<strong>in</strong>t of the curve will be centered <strong>in</strong><br />
the view and the “normal” vectors of all the surfaces to which the current curve is attached will be averaged<br />
together and that “averaged normal” will po<strong>in</strong>t “out of the screen”.<br />
• Auto Zoom- If this option is checked, <strong>FEMAP</strong> will zoom <strong>in</strong> to the current entity <strong>in</strong> the Locator a specified<br />
amount. The size of the current entity is used <strong>in</strong> conjunction with the Zoom Factor, which is a percentage of<br />
graphics w<strong>in</strong>dow size, to determ<strong>in</strong>e how far <strong>FEMAP</strong> zooms <strong>in</strong> to the entity. The Zoom Factor can be set from<br />
“1” to “100” (us<strong>in</strong>g the “slider bar” or enter<strong>in</strong>g a value directly), with “1” essentially zoom<strong>in</strong>g <strong>in</strong> as far as possible,<br />
while still be<strong>in</strong>g able to see the entire entity <strong>in</strong> the graphics w<strong>in</strong>dow, and “100” mak<strong>in</strong>g the length of the<br />
entity 1/100 the width of the graphics w<strong>in</strong>dow.<br />
Note:<br />
If the Entity Locator is filled with very small entities, <strong>FEMAP</strong> may only be able to zoom <strong>in</strong> so far<br />
before it reaches the “magnification limit”, which is 1/10000 of model box size.<br />
Mesh Quality Toggle - Toggles a plot of mesh quality on and off for all of the currently visible elements. Please<br />
see the section regard<strong>in</strong>g the Mesh Quality tool below for more <strong>in</strong>formation on the different quality “types” and<br />
plott<strong>in</strong>g options.<br />
Jacobian check shown with 2 distortion levels<br />
Jacobian check shown with 4 distortion levels<br />
Elements shown <strong>in</strong> red are above the specified Max Allowable Value for the Jacobian distortion check<br />
set to 0.4<br />
Remesh Modes menu - This menu conta<strong>in</strong>s several “modes” for remesh<strong>in</strong>g the model when us<strong>in</strong>g all tools except<br />
the Mesh Locate tool. There are three separate “modes”: Auto Remesh, Disable Remesh, and Track Mesh<strong>in</strong>g<br />
Changes. The fourth option on the menu, Remesh Entities, is only used when us<strong>in</strong>g the Track Mesh<strong>in</strong>g Changes<br />
mode. Essentially, only one mode can be active at any given time.<br />
When Auto Remesh is on, the mesh will be updated every time a change is made us<strong>in</strong>g one of the tools <strong>in</strong> the Mesh<strong>in</strong>g<br />
Toolbox.<br />
Note:<br />
Once Disable Remesh or Auto Remesh has been chosen, the icon will persist at the top of the Remesh<br />
Modes menu. You can now toggle back and forth between these two modes by simply click<strong>in</strong>g the icon.
10.1-36<br />
F<strong>in</strong>ite Element Model<strong>in</strong>g<br />
Disable Remesh does not track any of the changes made us<strong>in</strong>g the tools <strong>in</strong> the Mesh<strong>in</strong>g Toolbox. Any changes made<br />
with the tools are applied to the model, but you will need to delete and remesh the model us<strong>in</strong>g the commands on<br />
the Mesh, Geometry... menu or switch to Auto Remesh mode and make a change with any tool.<br />
Note:<br />
Hav<strong>in</strong>g the model Auto Remesh after every s<strong>in</strong>gle change may not be the efficient way to use the tools<br />
<strong>in</strong> the Mesh<strong>in</strong>g Toolbox, especially for larger models. You may want to use the Disable Remesh mode,<br />
make changes to your model us<strong>in</strong>g the Mesh<strong>in</strong>g Toolbox, then remesh the model.<br />
Track Mesh<strong>in</strong>g Changes will “track” all of the changes made us<strong>in</strong>g the different tools <strong>in</strong> the Mesh<strong>in</strong>g Toolbox, but<br />
the model will only be remeshed by click<strong>in</strong>g the icon for the Remesh Entities command, which will be at the top of<br />
the Remesh Modes menu whenever you are <strong>in</strong> Track Mesh<strong>in</strong>g Changes mode.<br />
Note:<br />
Sometimes <strong>in</strong> larger models, track<strong>in</strong>g the mesh<strong>in</strong>g changes can be quite computationally <strong>in</strong>tensive. You<br />
may want to turn Track Mesh<strong>in</strong>g Changes off, which is accomplished by go<strong>in</strong>g to Disable Remesh.<br />
Select Entity - Many of the tools <strong>in</strong> the Mesh<strong>in</strong>g Toolbox require you to select entities. Depend<strong>in</strong>g on which tool is<br />
currently “active” and how the options for that tool are currently set, will determ<strong>in</strong>e the type of entity you will be<br />
able to select when Select Entity is toggled “on”. When “on”, you can graphically choose entities from the graphics<br />
w<strong>in</strong>dow one at a time or use box/circle pick<strong>in</strong>g to select multiple entities (hold down the Shift key to make a pick<br />
“box” or the Ctrl key to make a circular pick<strong>in</strong>g area). Depend<strong>in</strong>g on which tool you are us<strong>in</strong>g and the current<br />
Remesh Mode set, you will be able to see the mesh update “real time” as you choose entities.<br />
For example, if you are us<strong>in</strong>g the Add “Operation” <strong>in</strong> the Mesh Siz<strong>in</strong>g tool, and have Auto Remesh “on”, every time<br />
you select a curve or curves (box/circle pick) <strong>in</strong> the graphics w<strong>in</strong>dow, the mesh will be updated “real time”.<br />
Dialog Select - Very similar to Select Entity, except it allows you to use the typical Entity Selection dialog box to<br />
choose entities. See Section 4.3.1, "Entity Selection" of the <strong>FEMAP</strong> User Guide for more <strong>in</strong>formation on the different<br />
selection methods available.<br />
Feature Suppression Tool<br />
This tool allows you to use the “manual” options available <strong>in</strong> the<br />
Mesh, Mesh Control, Feature Suppression command <strong>in</strong>teractively.<br />
You may suppress loops, curves (usually relatively small <strong>in</strong> size),<br />
and surfaces (usually sliver surfaces, not fillets or chamfers). Suppressed<br />
geometry still exists <strong>in</strong> the model and can be “restored” at<br />
any time.<br />
Feature Type - Choose which entity type you would like to suppress/restore.<br />
When us<strong>in</strong>g Select Entity or Dialog Select <strong>in</strong> the<br />
Mesh<strong>in</strong>g Toolbox, only the selected entity type will be available<br />
for selection.<br />
•Loops - Usually curves of <strong>in</strong>ternal holes on surfaces and solids or<br />
“base curves” of bosses and extrusions on solids.<br />
•Curves - In this case, “curves” usually refers to curves which are<br />
relatively small <strong>in</strong> size compared to the rest of the geometry.<br />
•Surfaces - Like “curves”, “surfaces” to be suppressed are usually<br />
small <strong>in</strong> size compared to the rest of the geometry, thus creat<strong>in</strong>g<br />
the possibility of mesh<strong>in</strong>g issues.<br />
Action - This option specifies what action will take place when<br />
entities are selected us<strong>in</strong>g Select Entity or Dialog Select. When<br />
either Suppress or Restore is set, all entities selected will either be<br />
“suppressed” or “restored”. When Toggle Suppression is set,<br />
select<strong>in</strong>g an exist<strong>in</strong>g entity the first time will “suppress” the entity,<br />
while select<strong>in</strong>g it aga<strong>in</strong> will restore the entity.<br />
Limit Size - When used, this option limits the entities which can be chosen based on size. Only “loops” that are<br />
Smaller Than the specified size, curves that are Shorter Than the specified length, and surfaces with Area Less<br />
Than the specified area will be available to suppress/restore. This can be helpful to “filter” what is <strong>in</strong>cluded when<br />
choos<strong>in</strong>g multiple entities with Select Entity or Dialog Select.
Mesh<strong>in</strong>g Toolbox 10.1-37<br />
Update Colors - When a loop, curve, or surface is suppressed, the color of the entity will be changed to the color<br />
specified here. This allows you to easily see which entities have been suppressed. Click the “Color Wheel” icon<br />
button to br<strong>in</strong>g up the Color Palette dialog box to choose different colors for suppressed entities.<br />
Show Suppressed (Curves and Surfaces buttons) - Highlights either suppressed curves or suppressed surfaces <strong>in</strong><br />
the graphics w<strong>in</strong>dow us<strong>in</strong>g the display options currently set <strong>in</strong> the Style portion of the W<strong>in</strong>dows, Show Entities command<br />
(See Section 6.3.2.3, "W<strong>in</strong>dow, Show Entities..."). Like W<strong>in</strong>dows, Show Entities and the “Show When<br />
Selected” capabilities of the Data Table and Model Info tree, once the view has been redrawn or regenerated the<br />
“highlight<strong>in</strong>g” is removed and the view is restored to how it appeared before the “show” command.<br />
Restore All (In Solids and In Model buttons) - Restores all features on either selected solids by click<strong>in</strong>g the In<br />
Solids button or all the features <strong>in</strong> the model by click <strong>in</strong> the In Model button.<br />
For example<br />
Orig<strong>in</strong>al Solid Part with “stepped hole” Curve chosen for “loop” to “Suppressed” Result<strong>in</strong>g Solid Mesh<br />
See Section 5.1.1.16, "Mesh, Mesh Control, Feature Suppression..." for additional examples<br />
Feature Removal Tool<br />
This tool is used to permanently remove geometric entities <strong>in</strong>teractively to simplify geometry. Most of this tool’s<br />
functionality is offered <strong>in</strong> other <strong>FEMAP</strong> commands. Remov<strong>in</strong>g “Loops” basically mimics the functionality of the<br />
Geometry, Surface, Remove Hole command, while remov<strong>in</strong>g “Surfaces” essentially uses the same process as<br />
Geometry, Solid, Remove Face. F<strong>in</strong>ally, remov<strong>in</strong>g “Curves” uses portions of the Geometry, Solid, Cleanup command<br />
along some other methodology to try and remove redundant curves.<br />
Feature Type - Choose which entity type you would like to remove.<br />
When us<strong>in</strong>g Select Entity or Dialog Select <strong>in</strong> the Mesh<strong>in</strong>g Toolbox,<br />
only the selected entity type will be available for selection.<br />
•Loops - Usually curves of <strong>in</strong>ternal holes on surfaces and solids or<br />
“base curves” of bosses and extrusions on solids.<br />
•Curves - In this case, “curves” usually refers to curves which are relatively<br />
small <strong>in</strong> size compared to the rest of the geometry.<br />
•Surfaces - Surfaces to remove can be all the surfaces of a hole, fillets,<br />
chamfers, and “cutouts”. In some cases, you may have to remove<br />
more then one surface at a time for this command to be successful.<br />
Limit Size - When used, this option limits the entities which can be<br />
chosen based on size. Only “loops” that are Smaller Than the specified<br />
size, curves that are Shorter Than the specified length, and surfaces<br />
with Area Less Than the specified area will be available to<br />
remove. This can be helpful to “filter” what is <strong>in</strong>cluded when choos<strong>in</strong>g<br />
multiple entities with Select Entity or Dialog Select.<br />
Aggressive Removal - If you have attempted to remove a curve or surface and FEAMP was not successful, then<br />
you may want to try us<strong>in</strong>g this option.<br />
For curves, Aggressive Removal uses functionality from the “Parasolid Bodyshop” to try and remove curves and<br />
then “heal” the geometry, which may change the topology of the geometry.
10.1-38<br />
F<strong>in</strong>ite Element Model<strong>in</strong>g<br />
For surfaces, <strong>in</strong>stead of us<strong>in</strong>g the process used by Geometry, Solid, Remove Face, the Aggressive Removal option<br />
<strong>in</strong>structs <strong>FEMAP</strong> to take a completely different approach. The chosen surface is deleted from the model and the<br />
rema<strong>in</strong><strong>in</strong>g surfaces are stitched together us<strong>in</strong>g a stitch tolerance which is slightly larger the chosen surface.<br />
Note:<br />
Select<strong>in</strong>g relatively large surfaces while the Aggressive Removal option is on can have very adverse<br />
effects on the geometry. Because the stitch tolerance is set so high, other surfaces may be removed dur<strong>in</strong>g<br />
the stitch<strong>in</strong>g process and the result<strong>in</strong>g solid may not really be very similar to the orig<strong>in</strong>al solid.<br />
There may also be times when this process creates an <strong>in</strong>valid solid.<br />
Examples<br />
Here is an example of remov<strong>in</strong>g “Loops” from a surface.<br />
Choose one curve on each<br />
“<strong>in</strong>terior hole” and all of the<br />
curves mak<strong>in</strong>g up the “loop”<br />
will be found and removed<br />
from the surface<br />
All <strong>in</strong>ternal holes have been<br />
removed from the surface<br />
Surface with several “<strong>in</strong>terior holes”<br />
In this example, the hole feature is removed differently from this solid geometry by choos<strong>in</strong>g different “Loops”.<br />
Orig<strong>in</strong>al Solid Part with “stepped hole” Curve chosen for “loop” <strong>in</strong> Remove Face Result<strong>in</strong>g Solid Geometry<br />
Orig<strong>in</strong>al Solid Part with “stepped hole” Curve chosen for “loop” <strong>in</strong> Remove Face Result<strong>in</strong>g Solid Geometry
Mesh<strong>in</strong>g Toolbox 10.1-39<br />
In this example, the features can be removed from this solid geometry by either remov<strong>in</strong>g “Loops” or “Surfaces”.<br />
Orig<strong>in</strong>al solid geometry<br />
The holes <strong>in</strong> the solid along with the boss and the post can<br />
be removed from the geometry by remov<strong>in</strong>g “loops” and<br />
choos<strong>in</strong>g one curve on each “feature”.<br />
Alternatively, the features can be removed by select<strong>in</strong>g all of<br />
the surfaces of each <strong>in</strong>dividual feature.<br />
Geometry shown with holes and boss removed<br />
Here is an example of remov<strong>in</strong>g a curve with the Aggressive Removal option turned “on”.<br />
Orig<strong>in</strong>al solid geometry<br />
Small curve to Remove<br />
Modified geometry without curve
10.1-40<br />
F<strong>in</strong>ite Element Model<strong>in</strong>g<br />
Here is an example of remov<strong>in</strong>g a surface with the Aggressive Removal option turned “on”.<br />
Orig<strong>in</strong>al solid geometry<br />
Modified geometry without surface<br />
Small surface to Remove<br />
Comb<strong>in</strong>ed/Composite Curve Tool<br />
In some cases, comb<strong>in</strong><strong>in</strong>g several smaller curves along the edge of a surface<br />
will allow you to create a higher quality mesh on the surface. This tool<br />
allows you to comb<strong>in</strong>e curves by choos<strong>in</strong>g the curves themselves or a po<strong>in</strong>t<br />
that two curves share. A “Composite Curve” will be created <strong>in</strong> <strong>FEMAP</strong>,<br />
which will be used for mesh siz<strong>in</strong>g purposes <strong>in</strong>stead of the underly<strong>in</strong>g<br />
curves.<br />
Action - This option specifies how <strong>in</strong>dividual curves may be comb<strong>in</strong>ed to<br />
form Composite Curves (Add by Po<strong>in</strong>t or Add Curves) and how Composite<br />
Curves can be partitioned (Split At and Remove). You can also delete Composite<br />
Curves completely us<strong>in</strong>g Delete, which may be more convenient than<br />
us<strong>in</strong>g Delete, Geometry, Curve.<br />
•Add by Po<strong>in</strong>t - Comb<strong>in</strong>es two curves connected to a selected po<strong>in</strong>t <strong>in</strong>to a<br />
Composite Curve. If you are creat<strong>in</strong>g a Composite Curve along the edge of a<br />
surface with many small curves, you can watch the Composite Curve “grow”<br />
simply by start<strong>in</strong>g at one end and choos<strong>in</strong>g the po<strong>in</strong>ts <strong>in</strong> sequence.<br />
Comb<strong>in</strong>e Surfaces - When this option is checked, a Boundary Surface will<br />
automatically be created from the surfaces connected to the “underly<strong>in</strong>g<br />
curves”. As additional curves are added to the Composite Curve by choos<strong>in</strong>g<br />
po<strong>in</strong>ts, more surfaces will be comb<strong>in</strong>ed <strong>in</strong>to Boundary Surfaces.<br />
• Add Curves - Creates a Composite Curve by allow<strong>in</strong>g you to choose <strong>in</strong>dividual curves. There are also several<br />
options which can be used to make the process of creat<strong>in</strong>g Composite Curves more automatic.<br />
Merge to Exist<strong>in</strong>g - When checked, each curve selected will be added to an exist<strong>in</strong>g Composite Curve, unless the<br />
selected curve is not with<strong>in</strong> Max Tangent Angle to the exist<strong>in</strong>g Composite Curve.<br />
Add Short Curves - Automatically <strong>in</strong>cludes any Curve Shorter Than the specified length that is adjacent to a<br />
selected curve <strong>in</strong> the Composite Curve. You may type the value <strong>in</strong> directly or specify the value by click<strong>in</strong>g the<br />
“Select Curve to Set Length” icon button, then choos<strong>in</strong>g any curve on the screen.<br />
Add to Branch - Allows you to choose one curve and have a Composite Curve created by simply “branch<strong>in</strong>g out”<br />
from that curve until it reaches the “corner” of a surface.<br />
Comb<strong>in</strong>e Surfaces - When this option is checked, a Boundary Surface will automatically be created from the surfaces<br />
connected to the “underly<strong>in</strong>g curves”. As additional curves are added to the Composite Curve, more surfaces<br />
will be comb<strong>in</strong>ed <strong>in</strong>to Boundary Surfaces<br />
• Split At - Allows you to choose po<strong>in</strong>ts to “partition/break” a s<strong>in</strong>gle Composite Curve <strong>in</strong>to two.
Mesh<strong>in</strong>g Toolbox 10.1-41<br />
• Remove - Allows you to remove any of the “underly<strong>in</strong>g curves” from a Composite Curve. It you remove a<br />
curve from the end, the Composite Curve will get shorter, but otherwise rema<strong>in</strong> <strong>in</strong>tact. If you a curve is removed<br />
from the middle, the Composite Curve will be split <strong>in</strong>to two with a gap <strong>in</strong> between.<br />
Note:<br />
The appearance of Composite Curves can be controlled via the Comb<strong>in</strong>ed Curve option <strong>in</strong> the Labels,<br />
Entities and Color category of the View, Options command (See Section 6.1.5.3, "View, Options...").<br />
Orig<strong>in</strong>al Surface (9 <strong>in</strong>dividual curves on front edge of surface)<br />
Small curves on edge of surface create a skewed mesh<br />
The 9 curves of the “front edge” have been comb<strong>in</strong>ed to<br />
create one Composite Curve.<br />
The quality of the mesh has been improved by us<strong>in</strong>g a<br />
Composite Curve.<br />
• Delete - Allows you to delete a Composite Curve completely from <strong>FEMAP</strong>. The “underlay<strong>in</strong>g curves” of the<br />
Composite Curve will be available for pick<strong>in</strong>g aga<strong>in</strong> once it has been deleted.<br />
Comb<strong>in</strong>ed/Boundary Surface Tool<br />
Much like creat<strong>in</strong>g “composite curves” to improve mesh quality, it may be a<br />
good idea to comb<strong>in</strong>e several surfaces <strong>in</strong>to a Boundary Surface. This tool<br />
uses the same concept as the Geometry, Boundary Surface, From Surfaces<br />
on Solid command. This can be especially helpful when there are “sliver surfaces”<br />
next to a much larger surface. By comb<strong>in</strong><strong>in</strong>g the selected surfaces <strong>in</strong>to<br />
one “boundary surface”, all of the <strong>in</strong>ternal curves can be ignored dur<strong>in</strong>g the<br />
mesh<strong>in</strong>g process.<br />
Action - This option specifies how <strong>in</strong>dividual curves may be comb<strong>in</strong>ed to<br />
form Boundary Surface (Add by Curve or Add Surfaces) and how Boundary<br />
Surface can be partitioned (Split Along and Remove). You can also delete<br />
Boundary Surface completely us<strong>in</strong>g Delete, which may be more convenient<br />
than us<strong>in</strong>g Delete, Geometry, Surface.<br />
•Add by Curve - Comb<strong>in</strong>es two surfaces shar<strong>in</strong>g a s<strong>in</strong>gle curve <strong>in</strong>to a<br />
Boundary Surface. If you select a curve that a regular surface shares with a<br />
Boundary Surface, the regular surface will simply be added as another<br />
underly<strong>in</strong>g surface for the exist<strong>in</strong>g Boundary Surface.<br />
•Add Surfaces - Creates a Boundary Surface by allow<strong>in</strong>g you to choose<br />
<strong>in</strong>dividual surfaces. Us<strong>in</strong>g the Merge to Exist<strong>in</strong>g<br />
• Split Along - Allows you to choose curves to “partition/break” a s<strong>in</strong>gle Boundary Surface <strong>in</strong>to two.<br />
• Remove - Allows you to remove any of the “underly<strong>in</strong>g surfaces” from a Boundary Surface.
10.1-42<br />
F<strong>in</strong>ite Element Model<strong>in</strong>g<br />
• Delete - Allows you to delete a Boundary Surface completely from <strong>FEMAP</strong>. The “underlay<strong>in</strong>g surfaces” of the<br />
Boundary Surface will be available for pick<strong>in</strong>g aga<strong>in</strong> once it has been deleted.<br />
Note:<br />
The appearance of Boundary Surfaces can be controlled via the Boundary option <strong>in</strong> the Labels, Entities<br />
and Color category of the View, Options command (See Section 6.1.5.3, "View, Options...").<br />
Orig<strong>in</strong>al Geometry (11 <strong>in</strong>dividual surfaces make up the “bump”)<br />
Quad mesh on the <strong>in</strong>dividual surfaces of the “bump”<br />
Boundary Surface created us<strong>in</strong>g all 11 <strong>in</strong>dividual surfaces of the “bump”<br />
Quad mesh on boundary surface<br />
Mesh Siz<strong>in</strong>g Tool<br />
Comb<strong>in</strong>es the options used to set mesh siz<strong>in</strong>g and node spac<strong>in</strong>g on curves (Mesh, Mesh Control, Size on Curve)<br />
with the “Add, Subtract, and Set To” functionality of the Mesh, Mesh Control, Interactive command. When us<strong>in</strong>g<br />
the Auto Remesh option <strong>in</strong> the Mesh<strong>in</strong>g Toolbox you will be able to see the mesh update “on the fly” after each<br />
change to siz<strong>in</strong>g or node spac<strong>in</strong>g, while you also monitor the element quality update (Mesh Quality Toggle “On”).<br />
There are also options for match<strong>in</strong>g any number of selected curves to a “Master Curve”, as well as sett<strong>in</strong>g bias<strong>in</strong>g<br />
and length based siz<strong>in</strong>g without chang<strong>in</strong>g the number of elements on the curve.
Mesh<strong>in</strong>g Toolbox 10.1-43<br />
Siz<strong>in</strong>g Option - This switch is used to specify which method,<br />
Size Curve(s) or Match Curve(s), is currently set for updat<strong>in</strong>g<br />
the mesh size on curves.<br />
•Size Curves - When selected, this method uses the option<br />
currently set <strong>in</strong> Operation along with the specified Spac<strong>in</strong>g<br />
options to dynamically change the mesh siz<strong>in</strong>g on curves.<br />
With Select Entity on <strong>in</strong> the Mesh<strong>in</strong>g Toolbox, every time you<br />
click on a curve the “Mesh Size” will be updated. You can<br />
also change the size on multiple curves all at once us<strong>in</strong>g a<br />
“box pick” or Dialog Select.<br />
•Match Curves - With this method, a Master Curve ID may<br />
be entered directly or selected graphically after click<strong>in</strong>g the<br />
“Select Master Curve” icon button. Once the “Master Curve”<br />
is specified, turn on Select Entity <strong>in</strong> the Mesh<strong>in</strong>g Toolbox to<br />
match curves to the “Master Curve” one at a time by select<strong>in</strong>g<br />
them or change multiple curves all at once with a “box pick”<br />
or us<strong>in</strong>g Dialog Select.<br />
Operation - Allows you to select the current operation for<br />
the Mesh Siz<strong>in</strong>g tool. You can choose to Add or Subtract the<br />
specified Number of Nodes from the selected curve(s), update<br />
the siz<strong>in</strong>g on any curve(s) to the Number of Nodes us<strong>in</strong>g Set<br />
To, or simply change the Spac<strong>in</strong>g options (“Bias” and if<br />
Length Based Siz<strong>in</strong>g should be used) without chang<strong>in</strong>g the<br />
number of nodes along the curve(s) with Set Spac<strong>in</strong>g Options.<br />
Manual Update - When this option is on, the specified<br />
“Operation” and other options will not be used to update the<br />
mesh size and spac<strong>in</strong>g until the Apply Operation button is pressed. Us<strong>in</strong>g a “box pick” while Select Entity is active<br />
or us<strong>in</strong>g Dialog Select <strong>in</strong> the Mesh<strong>in</strong>g Toolbox, is a very efficient method to update multiple curves at one time.<br />
Press<strong>in</strong>g the “‘#’ Curve(s) Selected” button will “highlight” the selected curves <strong>in</strong> the graphics w<strong>in</strong>dow. Press<strong>in</strong>g<br />
Clear Selection sets the number of selected curves currently ready to be updated to “0”.<br />
Spac<strong>in</strong>g - This drop-down allows you to specify bias<strong>in</strong>g options. By default, this option is set to Equal, which will<br />
place a uniform distance between each node along a curve. The other options allow you to “bias” the mesh size and<br />
the level of “bias<strong>in</strong>g” will be controlled by the Bias Factor. here is a breakdown of the bias<strong>in</strong>g options:<br />
• Biased us<strong>in</strong>g Pick Location - The node spac<strong>in</strong>g on the curve is biased us<strong>in</strong>g the location of the cursor when the<br />
curve is selected. The “smaller distances between nodes” will be positioned by the selection location. When<br />
work<strong>in</strong>g <strong>in</strong> a model that is not “planar”, which is quite common, it is a good idea to have the “snap mode” set to<br />
either Snap to Node or Snap to Po<strong>in</strong>t. This will allow <strong>FEMAP</strong> to use the po<strong>in</strong>t or node related to the curve closest<br />
to “pick location” to determ<strong>in</strong>e where the bias<strong>in</strong>g should occur.<br />
Note:<br />
When the “snap mode” is set to Snap to Po<strong>in</strong>t, you will only be able to “bias” towards one end of the<br />
curve or the other. When it is set to Snap to Node, you will be able to bias towards either end of the<br />
curve or towards the center, much like you can us<strong>in</strong>g Biased Small at Center <strong>in</strong> the Spac<strong>in</strong>g options.<br />
• Biased Small at Ends - The “smaller distances between nodes” will be positioned at each end of the curve with<br />
the “larger distances between nodes” be<strong>in</strong>g at the center.<br />
• Biased Small at Center - The “smaller distances between nodes” will be positioned at the center of the curve<br />
with the “larger distances between nodes” be<strong>in</strong>g at the at each end of the curve.<br />
Bias Factor - This factor is a ratio of the “largest distance between nodes” to the “smallest distance between nodes”<br />
along a given curve. For example, when it is set to “2”, the “largest distance” equals the “smallest distance” multi-
10.1-44<br />
F<strong>in</strong>ite Element Model<strong>in</strong>g<br />
plied by “2”. All of the “distances between the other nodes” along the curve are def<strong>in</strong>ed us<strong>in</strong>g a l<strong>in</strong>ear <strong>in</strong>terpolation<br />
of the large and small distances.<br />
Mesh Elements = 10<br />
Bias Small towards this end<br />
Bias Factor = 3<br />
Mesh Elements = 10<br />
Bias Small towards this end<br />
Bias Factor = 4<br />
Mesh Elements = 10<br />
Bias Small at Ends<br />
Bias Factor = 2<br />
Mesh Elements = 10<br />
Bias Small at Ends<br />
Bias Factor = 2<br />
Mesh Elements = 8<br />
Bias Small at Center<br />
Bias Factor = 3<br />
Mesh Elements = 8<br />
Bias Small at Center<br />
Bias Factor = 2<br />
Mesh Elements = 10<br />
Bias Small towards this end<br />
Bias Factor = 3<br />
Mesh Elements = 10<br />
Bias Small towards this end<br />
Bias Factor = 4<br />
Length Based Siz<strong>in</strong>g - Allows you to choose whether mesh locations will be located <strong>in</strong> parametric or length coord<strong>in</strong>ates<br />
along the curve. For l<strong>in</strong>es, arcs and circles, these options make no difference s<strong>in</strong>ce the parametric and<br />
length coord<strong>in</strong>ates are equivalent. For spl<strong>in</strong>e curves however, parametric coord<strong>in</strong>ates are typically much different.<br />
In most cases, choos<strong>in</strong>g parametric spac<strong>in</strong>g is the preferred method. It results <strong>in</strong> a f<strong>in</strong>er mesh <strong>in</strong> areas of high curvature,<br />
which is often desirable. However, if you have two spl<strong>in</strong>e curves side by side, which happen to have different<br />
parametric coord<strong>in</strong>ates, check<strong>in</strong>g Length Based Siz<strong>in</strong>g will allow you to match the meshes on those two curves (this<br />
can also be accomplished us<strong>in</strong>g a matched custom mesh size on one of the curves - see Section 5.1.1.7, "Mesh,<br />
Mesh Control, Custom Size Along Curve...".<br />
Propagate Mapped Approach - This option, which is on by default, will update the mesh siz<strong>in</strong>g accord<strong>in</strong>gly on<br />
all appropriate curves of a surface which has a “mapped” approach set us<strong>in</strong>g Mesh, Mesh Control, Approach on<br />
Surface, <strong>in</strong> order for the approach to rema<strong>in</strong> valid. Also, any other surfaces with a mapped approach which would<br />
be effected by chang<strong>in</strong>g the size will also have their siz<strong>in</strong>g updated as well. For more <strong>in</strong>formation on sett<strong>in</strong>g mesh<br />
approaches, see Section 5.1.1.15, "Mesh, Mesh Control, Approach On Surface".<br />
Note:<br />
If this option is turned “off”, there is a good chance that chang<strong>in</strong>g the mesh siz<strong>in</strong>g on only one curve<br />
of the surface will create <strong>in</strong>appropriate siz<strong>in</strong>g for <strong>FEMAP</strong> to create a mapped mesh on the surface.<br />
For Example, this geometry is three surfaces stitched together. Each surface has a “Mapped-Four Corner” mesh<strong>in</strong>g<br />
approach specified and has been sized with the default mesh size.<br />
3 Surfaces with<br />
Mapped - Four Corner<br />
Approaches Set<br />
Mesh us<strong>in</strong>g default<br />
Mesh Size<br />
2 Nodes “Added” to siz<strong>in</strong>g<br />
on either of these Curves<br />
Two “Subtracted”<br />
from this Curve<br />
Three Nodes “Added”<br />
from this Curve<br />
Change is “Propagated” through entire Model<br />
as all surfaces effected by new mesh size.<br />
Changes only “Propagated” locally to <strong>in</strong>dividual<br />
surface where mesh<strong>in</strong>g siz<strong>in</strong>g was changed.<br />
Show Free Edges - Simply highlights the nodes of any free edges <strong>in</strong> your model. This can be helpful for confirm<strong>in</strong>g<br />
the mesh is still fully connected after siz<strong>in</strong>g has been updated.
Mesh<strong>in</strong>g Toolbox 10.1-45<br />
Mesh Locate Tool<br />
There may be times when you would like to make small changes to an exist<strong>in</strong>g mesh simply by mov<strong>in</strong>g one or several<br />
nodes without chang<strong>in</strong>g the number of elements. This tool will allow you to do this while mak<strong>in</strong>g sure that as<br />
you move the node(s) dynamically, they rema<strong>in</strong> attached to specified solid(s), surface(s), and curve(s). If you have<br />
no geometry, there is an option to have the nodes follow the “overall topology” of the selected standalone mesh as<br />
they are moved. There are additional options to move the selected nodes by a def<strong>in</strong>ed amount, cont<strong>in</strong>ually smooth<br />
the mesh as the nodes are moved, and allow the moved nodes to no longer be projected to a surface or rema<strong>in</strong> along<br />
a curve. Much like the Mesh Siz<strong>in</strong>g tool, you can also turn on the Mesh Quality Toggle and monitor the element<br />
quality “real time” as the nodes are moved. F<strong>in</strong>ally, once the mesh locations have been updated, you have the<br />
choice to Save the new mesh or Discard the updated mesh and revert to the orig<strong>in</strong>al mesh.<br />
Select Mesh to Edit - Limits the elements whose nodes will be<br />
allowed to move <strong>in</strong> this command. Simply choose an option, then<br />
click the “...” icon button to choose the entities. Only elements and<br />
nodes connected to the selected entities will be visible and available<br />
for update of nodal locations.<br />
Note:<br />
You must use the Select Mesh to Edit first <strong>in</strong> order for the<br />
other options <strong>in</strong> this tool to become available.<br />
•Attached to Surface - Allows you to choose surfaces <strong>in</strong> the model<br />
to limit the nodes and elements for possible update.<br />
•Attached to Solid - Allows you to choose solids <strong>in</strong> the model <strong>in</strong> the<br />
model to limit the nodes and elements for possible update.<br />
•Standalone Mesh - When no geometry is available, this option<br />
allows you to choose any number of elements from the model and use<br />
the “overall topology” of the selected mesh to limit where the nodes<br />
can be moved, when the Project option is on.<br />
Note:<br />
To create the “overall topology”, the exist<strong>in</strong>g mesh is<br />
“facetted”, much like a surface. This allows the node(s)<br />
to be projected back onto “pseudo geometry” <strong>in</strong> order to<br />
ma<strong>in</strong>ta<strong>in</strong> the general shape of the model.<br />
Locate Multiple - When this option is checked, it enables you to move more than one node at a time. To select<br />
multiple nodes to move, turn on Select Entity <strong>in</strong> the Mesh<strong>in</strong>g Toolbox and then choose the nodes one at a time, with<br />
a “box pick” (hold down Shift key), or “circle pick” (hold down Ctrl key). Once the nodes are selected, they will<br />
move <strong>in</strong> unison based on the chosen Locate Method. Press the “X” icon button to choose different nodes to move.<br />
Locate Method - You may choose to move the node(s) “dynamically”, based on screen position, or “manually”,<br />
us<strong>in</strong>g a vector. If you have the Mesh Quality Toggle on, you will likely want to use the Dynamic option and move<br />
the node(s) around until the attached elements reach the desired quality. On the other hand, if you would like to<br />
move the nodes a precise distance, it is probably better to use the Manual, Vector option.<br />
Orig<strong>in</strong>al Mesh<br />
Dynamically<br />
modified Mesh<br />
with improved<br />
Jacobian element<br />
quality values<br />
When us<strong>in</strong>g the Dynamic method, simply<br />
choose the node(s) us<strong>in</strong>g Entity Select <strong>in</strong> the<br />
Mesh<strong>in</strong>g Toolbox and then “drag” the node(s) to<br />
the desired location.<br />
Note:<br />
It is best to have the “Snap Mode”<br />
set to Snap to Screen when us<strong>in</strong>g the<br />
Dynamic method to allow for<br />
“smooth” movement of the selected<br />
node(s). This allows the most flexibility<br />
when position<strong>in</strong>g the node(s).
10.1-46<br />
F<strong>in</strong>ite Element Model<strong>in</strong>g<br />
When us<strong>in</strong>g the Manual, Vector method, the Move Along Vector<br />
fields will appear. You may use the “Select Vector” icon button<br />
to choose a vector graphically us<strong>in</strong>g any method available <strong>in</strong><br />
the Select Vector dialog box. Another option is to enter a “Base<br />
Po<strong>in</strong>t” for the vector or use the “Select Coord<strong>in</strong>ates” icon button<br />
to pick it graphically, then enter the distances <strong>in</strong> each direction<br />
(dX, dY, and dZ) manually. Once the vector has been<br />
specified, click the Apply Vector button to complete the move to<br />
the new location.<br />
Smooth - When this option is checked, the selected mesh will<br />
constantly be “smoothed” as nodal locations are updated. If you<br />
want to only have the elements directly connected to the<br />
selected node(s), turn this option off.<br />
Project - When this option is enabled, the selected nodes are<br />
constantly projected back to the surface to which they are attached. When the Standalone Mesh option for Select<br />
Mesh to Edit is used, the nodes are projected back to “pseudo geometry” created us<strong>in</strong>g the “overall topology” of the<br />
selected elements.<br />
Constra<strong>in</strong> to Curve - Nodes which are attached to curves will only be allowed to move along the attached curve,<br />
when this option is on. This is the default configuration and is usually the desired behavior, as it attempts to prevent<br />
undesired “holes” from accidentally be<strong>in</strong>g <strong>in</strong>troduced <strong>in</strong>to the mesh.<br />
Save and Discard buttons - Once the mesh locations have been updated, you have the choice to Save the new<br />
mesh or Discard the updated mesh and revert to the orig<strong>in</strong>al mesh.<br />
Note:<br />
If you choose to use the “Undo” command (Tools, Undo or Ctrl+Z) after press<strong>in</strong>g the Save button, ALL<br />
changes to the mesh s<strong>in</strong>ce the Save button was last used will be “undone”, not the movement of <strong>in</strong>dividual<br />
nodes. Also, if you use “Undo” before choos<strong>in</strong>g Save or Discard, the “orig<strong>in</strong>al mesh” will be<br />
restored.<br />
Mesh Quality<br />
When the Mesh Quality Toggle <strong>in</strong> the Mesh<strong>in</strong>g Toolbox is set to “on”, this tool allows you to graphically see element<br />
quality values plotted on each element similar to a contour/criteria plot. There are several different element<br />
quality types which can be selected and each type has default automatic values. User-def<strong>in</strong>ed values can also be<br />
specified. Also, the m<strong>in</strong>imum and maximum distortion values for the specified “quality type” are listed <strong>in</strong> the bottom<br />
fields of the tool.<br />
Quality Type - There are 8 different “types” of element quality check<strong>in</strong>g<br />
available through the Mesh<strong>in</strong>g Toolbox. They correspond to the element<br />
distortion checks of the Tools, Check, Distortion command.<br />
The element checks are:<br />
•Aspect Ratio<br />
•Taper<br />
•Alternate Taper<br />
•Internal Angles<br />
•Warp<strong>in</strong>g<br />
•Nastran Warp<strong>in</strong>g<br />
•Jacobian<br />
•Comb<strong>in</strong>ed Quality<br />
See Section 7.4.5.6, "Tools, Check, Distortion..." for more details on the<br />
<strong>in</strong>dividual element checks.
Mesh<strong>in</strong>g Toolbox 10.1-47<br />
Depend<strong>in</strong>g on which element check is currently set, the name of the element check will appear along with a Max<br />
Allowable Value field <strong>in</strong> the Mesh Quality tool.<br />
When Quality Type is set to Comb<strong>in</strong>ed, all of the other <strong>in</strong>dividual Quality Types will also be displayed <strong>in</strong> the Mesh<br />
Quality tool. The Max Allowable Value for each element quality type can be modified or <strong>in</strong>dividual types can be<br />
turned on or off to modify which will be <strong>in</strong>cluded when calculat<strong>in</strong>g the Comb<strong>in</strong>ed element quality.<br />
To specify customized default values for all of the element distortion checks, use the Element Distortion button <strong>in</strong><br />
the Geometry/Model tab of File, Preferences. See Section 2.6.2.6, "Geometry/Model" for more <strong>in</strong>formation.<br />
Note:<br />
When the Mesh Quality tool is used on models conta<strong>in</strong><strong>in</strong>g solid elements, the distortion plotted on the<br />
visible element face(s) is the quality of the quadrilateral or triangular element face, NOT the solid<br />
element. This is important to remember, especially for element distortion checks which can be used<br />
for solid elements, such as Jacobian and Aspect Ratio.<br />
Number of Distortion Levels - Simply <strong>in</strong>dicates the number of levels to use <strong>in</strong> the plot of the current element<br />
quality set <strong>in</strong> Quality Type. Choose between 2 levels or 4 levels.<br />
When the Number of Distortion Levels is set to 2, all elements with element distortion values above the Max Allowable<br />
Value for the specified Quality Type will be plotted “Red”, while all other elements will be “Green”.<br />
When the Number of Distortion Levels is set to 4, all elements with element distortion values above the Max Allowable<br />
Value for the specified Quality Type will be also be plotted “Red”. The rema<strong>in</strong><strong>in</strong>g elements will be plotted<br />
from 0 to the Max Allowable Value <strong>in</strong> the follow<strong>in</strong>g manner:<br />
Distortion value = 0.0 to (1/3 * Max Allowable Value) are plotted “Green”<br />
Distortion value = (1/3 * Max Allowable Value) to (2/3 * Max Allowable Value) are plotted “Yellow”<br />
Distortion value = (2/3 * Max Allowable Value) to Max Allowable Value are plotted “Orange”<br />
Smooth Contours - When on, the colors on the contour legend “blend” from low to high, similar to a Contour plot.<br />
When off, the plot resembles a Criteria plot.<br />
Internal Angle check shown with 2 distortion levels<br />
Internal Angle check shown with 4 distortion levels<br />
Elements shown <strong>in</strong> red are above the specified Max Allowable Value for the Internal Angle distortion check<br />
Same values as above, Smooth Contours “On”<br />
Same values as above, Smooth Contours “On”<br />
This plot allows you to see which elements may be close to pass<strong>in</strong>g the distortion check.<br />
M<strong>in</strong> Distortion and Max Distortion - Simply lists the best and worst element quality <strong>in</strong> the selected mesh.
10.1-48<br />
F<strong>in</strong>ite Element Model<strong>in</strong>g<br />
Model Info tree<br />
Data Table<br />
• Updated Show When Selected functionality. Entities already chosen will now highlight when Show When<br />
Selected is turned on and un-highlight when turned off.<br />
• Added “Transformed To” capability for list<strong>in</strong>g nodal and elemental output.<br />
• Updated Show When Selected functionality. Entities already chosen will now highlight when Show When<br />
Selected is turned on and un-highlight when turned off.<br />
• Added “Save to a File” command (<strong>FEMAP</strong> 10.0.1).<br />
Entity Editor<br />
• Added “Transformed To” capability for display<strong>in</strong>g nodal output and elemental output.<br />
• Added support for Load Def<strong>in</strong>ition and Constra<strong>in</strong>t Def<strong>in</strong>ition <strong>in</strong>formation.<br />
• Added support for Rotor Region <strong>in</strong>formation.<br />
• Added support for Layup ID <strong>in</strong>formation.<br />
• Added "is suppressed" fields for curves and surfaces<br />
• Enhanced Loads and Coord<strong>in</strong>ate Systems so they are displayed <strong>in</strong> def<strong>in</strong>ition CSys, transformed on the fly, then<br />
saved <strong>in</strong> global or def<strong>in</strong>ition system.
API Programm<strong>in</strong>g 10.1-49<br />
API Programm<strong>in</strong>g<br />
• Changed the default l<strong>in</strong>es of code when a new API is created from scratch to:<br />
Status Bar<br />
Graphics<br />
Astroid<br />
Mesh<strong>in</strong>g<br />
This change allows the API Programm<strong>in</strong>g dockable pane <strong>in</strong> that particular <strong>in</strong>stance of <strong>FEMAP</strong> to connect directly<br />
to <strong>FEMAP</strong> to run APIs <strong>in</strong> that <strong>in</strong>stance. Previously, APIs could only be used from the API Programm<strong>in</strong>g w<strong>in</strong>dow <strong>in</strong><br />
the first <strong>in</strong>stance of <strong>FEMAP</strong> which was currently open on the mach<strong>in</strong>e. Any *.bas files <strong>in</strong> the Custom Tools directory<br />
or added to the menus or toolbars us<strong>in</strong>g this mechanism for attachment will also run <strong>in</strong> the current <strong>in</strong>stance of<br />
<strong>FEMAP</strong>.<br />
• Added the ability to customize what entity types appear on the Status Bar.<br />
Right click<strong>in</strong>g anywhere on the status bar will br<strong>in</strong>g up the Customize Status Bar menu, which allows you to turn<br />
any entity type <strong>in</strong> the “Tray” on or off with a left mouse click. When an entity type is on, it will be designated with<br />
a “check mark” next to the entity type name.<br />
Improved Curve and Surface facett<strong>in</strong>g to more accurately display geometry.<br />
Implemented support of the Astroid 3D controller from Spatial Freedom.<br />
The focus of version10 was to improve the overall mesh capabilities <strong>in</strong> <strong>FEMAP</strong>.<br />
"General Mesh<strong>in</strong>g", "Surface Mesh<strong>in</strong>g", "Solid Tetrahedral Mesh<strong>in</strong>g"<br />
Updates and improvements were made <strong>in</strong> the areas of surface mesh<strong>in</strong>g, solid tetrahedral mesh<strong>in</strong>g, mesh siz<strong>in</strong>g, and<br />
specify<strong>in</strong>g mesh attributes. A substantial change for version 10 is that once a surface has been meshed, the “mesh<br />
attributes” are automatically set on that surface. See Us<strong>in</strong>g Mesh Attributes <strong>in</strong> the Surface Mesh<strong>in</strong>g section below<br />
for more details. Also, the Mesh<strong>in</strong>g Toolbox was <strong>in</strong>troduced to offer an <strong>in</strong>teractive “toolbox” which consolidated<br />
functionality used dur<strong>in</strong>g the mesh<strong>in</strong>g process. Tools for feature suppression and removal, creat<strong>in</strong>g comb<strong>in</strong>ed<br />
curves and boundary surfaces, specify<strong>in</strong>g mesh siz<strong>in</strong>g on curves, dynamically updat<strong>in</strong>g nodal positions, and plott<strong>in</strong>g<br />
mesh quality can all be accessed <strong>in</strong> one place with the ability to remesh “on the fly” as changes are made. See<br />
Mesh<strong>in</strong>g Toolbox <strong>in</strong> the User Interface section of this document.<br />
General Mesh<strong>in</strong>g<br />
• Added 3 new patterns to Mesh, Edit<strong>in</strong>g, Interactive<br />
• Added “Offset from Reference Po<strong>in</strong>t” option to Modify, Update Elements, L<strong>in</strong>e Element Offsets.<br />
• Added “Spr<strong>in</strong>g Elements” option to the Connection Type section of the Mesh, Connect, Unzip and Mesh, Connect,<br />
Co<strong>in</strong>cident L<strong>in</strong>k commands.<br />
• Removed “Quad Mesh Layer Options” option from Mesh, Mesh Control, Size on Solid.
10.1-50<br />
F<strong>in</strong>ite Element Model<strong>in</strong>g<br />
• Updated Mesh, Remesh, Convert Facets command to <strong>in</strong>cluded capability to associate facets/nodes with the<br />
orig<strong>in</strong>al geometry.<br />
• Updated Mesh, Extrude, Element Face command to automatically delete plot-only elements that it creates on<br />
the selected element faces<br />
Surface Mesh<strong>in</strong>g<br />
• Added “Suppress Short Edges” option to Mesh, Mesh Control, Size on Surface.<br />
• Removed “Quad Mesh Layer Options” option from Mesh, Mesh Control, Size on Surface. This capability was<br />
improved and is now the Quad Edge Layers “mesh attribute” which can be specified before mesh<strong>in</strong>g us<strong>in</strong>g<br />
Mesh, Mesh Control, Attribute on Surface or dur<strong>in</strong>g the mesh<strong>in</strong>g process us<strong>in</strong>g Mesh, Geometry, Surface.<br />
• Added and updated many options found <strong>in</strong> the Mesh, Geometry, Surface command. All of the options set when<br />
the surface is <strong>in</strong>itially meshed are now automatically specified as “mesh attributes”. Additions <strong>in</strong>clude the new<br />
“3-D Tri” triangle mesher, new mapped mesh<strong>in</strong>g options, the ability to specify mesh offsets on the surface,<br />
automatic node merg<strong>in</strong>g when mesh<strong>in</strong>g surfaces connected to surfaces which have already been meshed, and a<br />
“Post-Mesh<strong>in</strong>g Cleanup” option which improves the mesh by elim<strong>in</strong>at<strong>in</strong>g certa<strong>in</strong> patterns and collapsed holes.<br />
Automesh Surfaces dialog box<br />
When you select the Mesh, Geometry, Surface command, you must select the surfaces to mesh. After they are<br />
selected, the Automesh Surfaces dialog box appears.<br />
After choos<strong>in</strong>g the appropriate property, you can decide to press OK to accept default options or click the More<br />
Options button to set up additional mesh<strong>in</strong>g controls. See More Options section below.<br />
The Mesher section allows you to choose between mesh<strong>in</strong>g the surfaces with quadrilateral surface elements, where<br />
possible (Quad option), or all triangular surface elements (Tri option). When us<strong>in</strong>g the Tri option, you may choose<br />
to use Auto, which will exam<strong>in</strong>e each surface one at a time and attempt to choose the Tri mesher which will create<br />
the best overall triangular mesh on each <strong>in</strong>dividual surface. If you want <strong>FEMAP</strong> to use a particular Tri mesher,<br />
uncheck Auto and choose one of the three triangle meshers. See the "Element Shape" section below for details.<br />
Check<strong>in</strong>g the Midside Nodes option will create parabolic surface elements <strong>in</strong>stead of l<strong>in</strong>ear surface elements, while<br />
turn<strong>in</strong>g the Mapped Mesh<strong>in</strong>g Options will attempt to create a mapped mesh on the surface, if possible us<strong>in</strong>g the<br />
options currently set.<br />
Node and Element Options<br />
These options control parameters that are assigned to the nodes and elements that you will create. The CSys option<br />
does not control the mesh <strong>in</strong> any way. It is just assigned as the def<strong>in</strong>ition coord<strong>in</strong>ate system of each node. The property<br />
is most important. You must choose a property which corresponds to a planar element.<br />
Us<strong>in</strong>g Mesh<strong>in</strong>g Attributes<br />
If the surfaces that you are mesh<strong>in</strong>g have mesh attributes def<strong>in</strong>ed, you will see an additional property (0..Use Mesh<strong>in</strong>g<br />
Attributes) <strong>in</strong> the list. If you choose that “property”, <strong>FEMAP</strong> will use the attributes to def<strong>in</strong>e the property, type<br />
of elements that will be created, and which mesh<strong>in</strong>g options will be used dur<strong>in</strong>g the mesh<strong>in</strong>g process. If you wish to<br />
ignore the attributes, simply pick a different property from the drop-down list or create a new property.<br />
If you wish to use the property specified <strong>in</strong> the attribute, but set different mesh<strong>in</strong>g options, check the Use Property<br />
Attribute Only option, which is only available when Property is set to “0..Use Mesh<strong>in</strong>g Attributes”.
Surface Mesh<strong>in</strong>g 10.1-51<br />
More Options<br />
When the More Options... button has been pressed, the Automesh Surfaces dialog box will expand to offer many<br />
more mesh<strong>in</strong>g options. Depend<strong>in</strong>g on which options are selected <strong>in</strong> the Mesher section, certa<strong>in</strong> portions of the dialog<br />
will “gray” and “un-gray” to only allow you to choose appropriate options for the selected Mesher.<br />
Mesher<br />
The Mesher section allows you to choose between mesh<strong>in</strong>g the surfaces with quadrilateral surface elements, where<br />
possible (Quad option), or all triangular surface elements (Tri option). When us<strong>in</strong>g the Tri option, you may choose<br />
to use Auto, which will exam<strong>in</strong>e each surface one at a time and attempt to choose the Tri mesher which will create<br />
the best overall triangular mesh on each <strong>in</strong>dividual surface. If you want <strong>FEMAP</strong> to use a particular Tri mesher,<br />
uncheck Auto and choose one of the three triangle meshers. See the "Element Shape" section below for details.<br />
Pre-v10 Mesh<strong>in</strong>g<br />
The surface mesh<strong>in</strong>g <strong>in</strong> <strong>FEMAP</strong> has dramatically changed for version 10. This switch allows you to use the “prev10”<br />
surface mesh<strong>in</strong>g if you feel more comfortable with pre-version 10 meshers. This box will be checked by<br />
default if you have “Pre-v10 Surface Mesh<strong>in</strong>g” checked on the “Geometry/Model” tab <strong>in</strong> the “Preferences” dialog<br />
box (See Section 2.6.2.6, "Geometry/Model").<br />
Note:<br />
Only options available is versions of <strong>FEMAP</strong> before version 10 will be available when Pre-v10 Mesh<strong>in</strong>g<br />
is checked. Notice, Quad Edge Layers is now set <strong>in</strong> the Automesh Surfaces dialog box when us<strong>in</strong>g<br />
the Mesh, Geometry, Surfaces command <strong>in</strong>stead of <strong>in</strong> the Automatic Mesh Siz<strong>in</strong>g dialog box, which<br />
appears when us<strong>in</strong>g the Mesh, Mesh Control, Size on Surface command.<br />
Node Options<br />
Midside Nodes<br />
Check<strong>in</strong>g the Midside Nodes option will create parabolic surface elements <strong>in</strong>stead of l<strong>in</strong>ear surface elements. By<br />
default, “midside nodes” are created along the element edge between the corner nodes of an element. You project<br />
the midside nodes onto the geometry by us<strong>in</strong>g the Move to Geometry option. In some cases, you may want to limit<br />
the distortion of elements created by project<strong>in</strong>g the midside nodes. If this is the case, check Max Distortion Angle<br />
and enter the max allowable distortion angle.
10.1-52<br />
F<strong>in</strong>ite Element Model<strong>in</strong>g<br />
Connect Edge Nodes<br />
When this option is turned on, <strong>FEMAP</strong> will use exist<strong>in</strong>g nodes on edges of adjacent surfaces <strong>in</strong>stead of creat<strong>in</strong>g<br />
new nodes when at least one of the adjacent surfaces has already been meshed. This option is only applicable when<br />
the adjacent surfaces are stitched together to form a solid (or sheet solid) or jo<strong>in</strong>ed together <strong>in</strong>to a “general body”<br />
us<strong>in</strong>g Geometry, Surface, Non-Manifold Add<br />
.<br />
Three Surfaces stitched together us<strong>in</strong>g<br />
Geometry, Solid, Stitch command<br />
Surfaces 1 and 3 meshed at the same time<br />
Free Edge Plot of exist<strong>in</strong>g mesh on<br />
Surfaces 1 and 3<br />
Edges surface 2 shares with previously<br />
meshed adjacent surfaces 1 and 3<br />
Free Edge Plot after mesh<strong>in</strong>g surface 2 with<br />
“Connect Edge Nodes” turned ON<br />
Free Edge Plot after mesh<strong>in</strong>g surface 2 with<br />
“Connect Edge Nodes” turned OFF<br />
Smooth<strong>in</strong>g<br />
These options are the same as those described <strong>in</strong> the Mesh, Smooth command. After an <strong>in</strong>itial mesh is generated, it<br />
is automatically smoothed to reduce element distortions. You will usually just want to accept the default values for<br />
these options. For more <strong>in</strong>formation, see Section 5.3.4, "Mesh, Smooth...".<br />
Offset<br />
Allows you to automatically offset the surface mesh so the Top Face (Face 1) or Bottom Face (Face 2) of shell elements<br />
will be aligned with the surface(s) currently be<strong>in</strong>g meshed. There is also an option to simply offset the mesh<br />
away from the Centerl<strong>in</strong>e of the elements (default) a specified amount. Enter<strong>in</strong>g a positive number will offset the<br />
mesh towards the Top Face (Face 1) of the elements, while enter<strong>in</strong>g a negative value will offset towards the Bottom<br />
Face (Face 2).<br />
Note:<br />
The best way to determ<strong>in</strong>e which face is the Top Face and which face is the Bottom Face is to view the<br />
normal direction of the elements. This can be accomplished by sett<strong>in</strong>g options for the Element - Direction<br />
option <strong>in</strong> the Labels, Entities and Color category of the View, Options command (See Section<br />
6.1.5.3, "View, Options..."). To see the “normal vector” on each element, choose “1..Normal Vectors”<br />
from the Normal Style list, check the box next Show Direction and then click Apply or OK. The arrow<br />
represent<strong>in</strong>g the normal vector po<strong>in</strong>ts towards the Top Face of the element.<br />
For Example, the “thicker” Black l<strong>in</strong>es represent a Surface. Elements are shown with Normal Vectors “on”.<br />
Mesh with no offsets<br />
(Centerl<strong>in</strong>e of Elements<br />
Aligned with Surface)<br />
Mesh Offset so “Top<br />
Face” of elements Aligned<br />
with Surface<br />
Mesh Offset so “Bottom<br />
Face” of elements Aligned<br />
with Surface<br />
Mesh Offset from element<br />
Centerl<strong>in</strong>e a specified<br />
“positive” distance from<br />
surface<br />
Mapped Mesh<strong>in</strong>g Options<br />
When Mapped Mesh<strong>in</strong>g is set to Off, <strong>FEMAP</strong> will simply mesh the selected surface(s) with a “free mesh”, unless a<br />
“Mapped Mesh<strong>in</strong>g Approach” is set. If Mapped Mesh<strong>in</strong>g is On, <strong>FEMAP</strong> will attempt to create a “Mapped Mesh”.
Surface Mesh<strong>in</strong>g 10.1-53<br />
<strong>FEMAP</strong> uses the values set for Max Angle Deviation and M<strong>in</strong> Corner Angle to determ<strong>in</strong>e “corners” it can use to<br />
attempt a mapped mesh on surfaces.<br />
There are several other options available:<br />
• Equal Sides Only - <strong>FEMAP</strong> will only attempt a mapped mesh on surface(s) with equal mesh siz<strong>in</strong>g on oppos<strong>in</strong>g<br />
“sides” of the surface(s). The “sides” are the curve(s) between the “corners” the mesher locates.<br />
• Map Subdivisions - As the “subdivision” meshers “subdivide” the geometry dur<strong>in</strong>g the mesh<strong>in</strong>g process, the<br />
mesher will determ<strong>in</strong>e if each “subdivision” can by mapped meshed. If possible, that portion of the surface will<br />
be mapped meshed and then “smoothed” us<strong>in</strong>g the current Smooth<strong>in</strong>g sett<strong>in</strong>gs to create the overall surface<br />
mesh.<br />
• Split Quad Map - Only available when us<strong>in</strong>g the Tri option <strong>in</strong> the Mesher section. <strong>FEMAP</strong> will actually create a<br />
quad mesh first and then split the quads <strong>in</strong>to the best possible triangles us<strong>in</strong>g the same approach as the Modify,<br />
Update Elements, Split Quads command.<br />
Triangle Mesh us<strong>in</strong>g Split<br />
Curved Geometry<br />
Default Triangle Mesh Quad Map Option<br />
• Alternate - Only available when us<strong>in</strong>g one of the Tri options <strong>in</strong> the Mesher section. The mesher will attempt to<br />
alternate the direction of triangles which are side by side <strong>in</strong>stead of hav<strong>in</strong>g them all go <strong>in</strong> one direction.<br />
• Right Bias - Only available when us<strong>in</strong>g one of the Tri options <strong>in</strong> the Mesher section. The mesher uses the opposite<br />
direction to start when choos<strong>in</strong>g the direction of the triangles.<br />
Triangle Mesher Mapped Off Mapped On<br />
Mapped On<br />
Alternate On<br />
Mapped On<br />
Right Bias On<br />
Mapped On<br />
Alternate and<br />
Right Bias On<br />
Subdivision<br />
Fast Tri<br />
3-D Tri<br />
Subdivision Options (Tri Mesher set to Subdivision, Quad Mesher only)<br />
These options control the size and shape of the mesh <strong>in</strong>side the boundary. The elements along the boundary edges<br />
are def<strong>in</strong>ed by the mesh sizes that you choose and are unaffected by these sett<strong>in</strong>gs. Those mesh sizes also have substantial<br />
impact on the <strong>in</strong>terior of the mesh, but these options give you additional control.<br />
Post-Mesh<strong>in</strong>g Cleanup<br />
This option, which is on by default, attempts to elim<strong>in</strong>ate specific “patterns” <strong>in</strong> a mesh <strong>in</strong> an effort to create an<br />
overall higher quality mesh. It also does additional element check<strong>in</strong>g <strong>in</strong> an attempt to elim<strong>in</strong>ate mesh<strong>in</strong>g situations<br />
which may cause problems with surface and/or solid mesh<strong>in</strong>g.
10.1-54<br />
F<strong>in</strong>ite Element Model<strong>in</strong>g<br />
Additional clean-up <strong>in</strong>cludes <strong>in</strong>sert<strong>in</strong>g extra mesh po<strong>in</strong>ts on long cyl<strong>in</strong>drical surfaces with course mesh siz<strong>in</strong>g. This<br />
elim<strong>in</strong>ates the possibility of elements “bridg<strong>in</strong>g the gap” result<strong>in</strong>g <strong>in</strong> a “collapsed” hole.<br />
Note:<br />
In almost all cases, this option should be turned “on”, as it will usually create a better overall mesh. The<br />
only potential drawback to us<strong>in</strong>g this option is the possibility that the “clean-up” will replace “patterns”<br />
with less elements and therefore create a slightly courser mesh than expected.<br />
Here are a few examples of mesh patterns which will be recognized and the result<strong>in</strong>g mesh after the “clean-up”.<br />
Patterns<br />
“Diamond” elements elim<strong>in</strong>ated<br />
Orig<strong>in</strong>al After Clean-up<br />
Quad Edge Layers<br />
This option specifies the number of layers of quadrilateral elements that <strong>FEMAP</strong> will attempt to place around every<br />
boundary curve on a surface. You can choose to have either 1, 2, or 3 layers of quads around each boundary curve<br />
of a surface, <strong>in</strong>clud<strong>in</strong>g <strong>in</strong>ternal curves from the drop-down list. Additionally, you may enter a number higher than 3<br />
directly <strong>in</strong>to the field and the mesher will attempt to create the specified number of quad element layers. If there is<br />
not enough room for the requested number of layers based on the mesh size, <strong>FEMAP</strong> will try to put as many layers<br />
of quads <strong>in</strong> as possible. The process goes one layer at a time, mean<strong>in</strong>g that one layer of quads will be placed around<br />
all boundary curves (external curves first, <strong>in</strong>ternal curves second) before a second layer of quads will be attempted.<br />
In many cases, more layers will produce a higher quality mesh, but on some pieces of geometry us<strong>in</strong>g only 1 or 2<br />
layers may produce better overall mesh quality than us<strong>in</strong>g 3 or more layers.<br />
0 Layers 1 Layers<br />
2 Layers<br />
3 Layers 5 Layers<br />
M<strong>in</strong> Elements Between Boundaries<br />
As a boundary is be<strong>in</strong>g meshed, groups of elements are often generated between two opposite edges of a boundary.<br />
Sometimes, the mesh sizes that you have def<strong>in</strong>ed are large enough that a s<strong>in</strong>gle element will span the distance<br />
between surfaces. S<strong>in</strong>ce this may not be enough ref<strong>in</strong>ement for the model that you are creat<strong>in</strong>g, you can control this<br />
behavior by sett<strong>in</strong>g a m<strong>in</strong>imum number of elements that must be created between any boundary edges.<br />
Sett<strong>in</strong>g this parameter does not guarantee that you will get that number of elements between every edge. But wherever<br />
possible (based on compatibility with your surface mesh sizes) that number of elements or greater will be created.<br />
It is usually best to leave this parameter set to 1 <strong>in</strong>itially, then if the results are undesirable, undo the mesh and try it<br />
aga<strong>in</strong> with the number <strong>in</strong>creased. Sett<strong>in</strong>g this number greater than 1 can greatly <strong>in</strong>crease the number of elements<br />
that are generated.
Surface Mesh<strong>in</strong>g 10.1-55<br />
You will usually only have to set this option if you are mesh<strong>in</strong>g a<br />
M<strong>in</strong> Elements = 1<br />
surface that is long and th<strong>in</strong> relative to the mesh size, or one that has<br />
long, th<strong>in</strong> “appendages”, as this example demonstrates.<br />
Max Element Aspect Ratio<br />
M<strong>in</strong> Elements = 3 (or 2)<br />
Like the M<strong>in</strong> Elements sett<strong>in</strong>g described above, this option controls<br />
the elements <strong>in</strong>side the mesh. In this case however, control over the<br />
number of elements is only a secondary effect of this option. Primarily,<br />
this number is used as a guidel<strong>in</strong>e for how “long” elements can<br />
be relative to their “width”. You must always specify a value that is greater than or equal to 1.0. Smaller numbers<br />
usually create slightly more uniform meshes with elements that are better shaped. Large numbers can lead to<br />
severely distorted elements. If you make a mesh that conta<strong>in</strong>s long, th<strong>in</strong> or distorted elements, try aga<strong>in</strong> with a<br />
smaller aspect ratio.<br />
Quick-Cut boundaries with More Than “n” Nodes (n = 300 by default)<br />
Mesh<strong>in</strong>g large non-uniform surfaces can often take some time. Turn<strong>in</strong>g this option on shortens the time required<br />
while usually hav<strong>in</strong>g m<strong>in</strong>imal impact on the overall mesh quality. If you want the best possible mesh, and are will<strong>in</strong>g<br />
to wait, turn this option off. You can also control the threshold by sett<strong>in</strong>g the number of nodes to a smaller or<br />
larger number. Do not reduce the number of nodes too much, or mesh quality will substantially decrease.<br />
Cut Quads with Angle Deviation Above “n” deg (n = 60 degress by default)<br />
Typically, quadrilateral elements with an angle deviation above 60 degrees will have poor element quality. Triangles<br />
are created wherever a quadrilateral would be severely distorted. You can override the default 60 degree allowable<br />
distortion with any value that you want. Lower distortion values will result <strong>in</strong> more triangles <strong>in</strong> your mesh.<br />
Element Shape<br />
Quad Mesher<br />
Although the mesher is called Quad, it is physically impossible on some surfaces with certa<strong>in</strong> mesh siz<strong>in</strong>g to create<br />
a mesh us<strong>in</strong>g “all quads” without some be<strong>in</strong>g highly distorted. The Quad option will generate quadrilateral elements<br />
whenever possible us<strong>in</strong>g a “subdivision” approach <strong>in</strong> the “parametric space” of each surface be<strong>in</strong>g meshed.<br />
Note:<br />
You must always get at least one triangle if you specify an odd number of nodes on the surface.) Triangles<br />
are created wherever quadrilaterals cannot meet the specified boundary mesh sizes and wherever a<br />
quadrilateral would be severely distorted.<br />
Tri Meshers<br />
These options control the creation of triangular elements <strong>in</strong> your mesh. If you want to create all triangles (Tri<br />
option), you may choose from the Subdivision, Fast Tri, or 3-D Tri options. Use the Auto option to have <strong>FEMAP</strong><br />
choose which Tri mesh<strong>in</strong>g option should be used on each surface.<br />
• Subdivision - <strong>FEMAP</strong>’s orig<strong>in</strong>al triangle mesher. It creates triangle elements by mak<strong>in</strong>g subdivisions of a surface<br />
based on “parametric space”. It works very similar to the Quad mesher, but <strong>in</strong>stead of mak<strong>in</strong>g 90 degree<br />
“splits” to create quadrilateral elements, it makes 60 degree “splits” to make triangles. In a few cases, it may<br />
produce better quality mesh than the Fast Tri or 3-D Tri meshers.<br />
• Fast Tri - creates large triangles <strong>in</strong> “2-D parametric space” of a surface (U and V directions) then creates the<br />
f<strong>in</strong>al mesh through a process of splitt<strong>in</strong>g and improv<strong>in</strong>g the shape of the triangles based on where they are positioned<br />
<strong>in</strong> each surface’s “parametric space”. The Fast Tri mesher generally produces fewer triangles with better<br />
aspect ratios than the Subdivision mesher. This technique works particularly well if you have a long th<strong>in</strong> surface<br />
with holes.<br />
• 3-D Tri - uses the “facets” of each surface as a “triangular seed mesh”, then uses a similar “splitt<strong>in</strong>g and<br />
improv<strong>in</strong>g triangle shape” technique as the Fast Tri mesher, except it evaluates the shape of the triangles <strong>in</strong> true<br />
“3-D space” <strong>in</strong>stead of the surface’s “parametric space”. Also, the nodes are constantly projected back to each
10.1-56<br />
F<strong>in</strong>ite Element Model<strong>in</strong>g<br />
surface to match the actual shape of the surface as closely as possible. In many cases, this will produce the best<br />
quality mesh and is the recommended option for mesh<strong>in</strong>g “boundary surfaces” created from surfaces which are<br />
part of a solid or stitched sheet solid.<br />
Note:<br />
One of the only drawbacks to us<strong>in</strong>g the 3-D Tri mesher, is when try<strong>in</strong>g to mesh surfaces which “wrap<br />
around” with a large amount of curvature over a short distance. When us<strong>in</strong>g a relatively course mesh<br />
size on this type of surface, the mesher may create elements which do not follow the curvature of the<br />
surface properly, as a better shaped element can be created without follow<strong>in</strong>g the curvature based on the<br />
positions of the nodes <strong>in</strong> 3-D space.<br />
Mesh<strong>in</strong>g a surface which has already been meshed<br />
If you choose a surface to mesh which has already been<br />
meshed, <strong>FEMAP</strong> will give you three options:<br />
•Delete Exist<strong>in</strong>g Mesh and Remesh - Simply deletes the<br />
mesh and remeshes the surface.<br />
•Skip Meshed Surfaces - If you have chosen a number of surfaces<br />
to mesh, some of which have already been meshed,<br />
only the surfaces which currently are not meshed will be<br />
meshed.<br />
•Create Duplicate Meshes on Meshed Surfaces - Usually<br />
used when you want to “sk<strong>in</strong>” a solid mesh with a shell mesh.<br />
Surface Mesh Attributes dialog box<br />
... is used to assign mesh<strong>in</strong>g attributes to one or more surfaces. Simply choose a surface element property to be<br />
assigned to the surface(s) and specify the desired mesh options. The mesh options are identical to the ones which<br />
can be specified when us<strong>in</strong>g the Mesh, Geometry, Surface command (See "Automesh Surfaces dialog box" section<br />
for descriptions of the mesh<strong>in</strong>g options). Press the <strong>New</strong> Property “icon button” if you have not already created the<br />
property that you need.<br />
Once attributes have been def<strong>in</strong>ed, surfaces can be easily meshed with elements, as properties (thicknesses, materials...)<br />
will be automatically assigned. Attributes are automatically assigned once a surface has been meshed.
Solid Tetrahedral Mesh<strong>in</strong>g 10.1-57<br />
If you want to assign offsets to the planar elements (typically plates only), specify an option <strong>in</strong> the Offset portion of<br />
this dialog box. You can offset the mesh to align the “Top Face” (Face 1) of the elements to the surface, align the<br />
“Bottom Face” (Face 2) to the surface, or enter an offset from the “Centerl<strong>in</strong>e” directly (Positive values offset the<br />
mesh towards Face 1, negative values offset towards Face 2).<br />
By default, both the property and mesh options will be set for all of the selected surfaces. If you only want to<br />
change the property of a number of surfaces but leave each surface’s mesh<strong>in</strong>g options <strong>in</strong>tact, make sure that Update<br />
Property is “checked” and Update Other Attributes is “unchecked”. Vice versa, if you only want to change the<br />
mesh options, but leave the properties assigned to each surface <strong>in</strong>tact, uncheck Update Property and check Update<br />
Other Attributes.<br />
If you would like to clear all of the attributes from the selected surface(s), click the Remove Attributes button.<br />
Solid Tetrahedral Mesh<strong>in</strong>g<br />
<strong>FEMAP</strong>’s tetrahedral mesher uses a triangular surface mesh as the basis for creat<strong>in</strong>g the solid mesh. Improved surface<br />
mesh<strong>in</strong>g, discussed <strong>in</strong> the previous section, has a lot to do with improved solid tetrahedral mesh<strong>in</strong>g <strong>in</strong> version<br />
10. Other options for <strong>in</strong>itial siz<strong>in</strong>g, us<strong>in</strong>g a “recovery mesher”, send<strong>in</strong>g element quality to the Data Table, and locat<strong>in</strong>g<br />
problem areas which have caused the tet mesher to fail have also been added.<br />
Also new for 10, if the tet mesher fails, <strong>FEMAP</strong> will ask “OK to Update Selector and Data Table with # nodes<br />
caus<strong>in</strong>g errors?”. If you answer Yes, the “problem” nodes will be sent to the selection list and Data Table for easy<br />
identification us<strong>in</strong>g the Show When Selected tool <strong>in</strong> the Model Info tree and Data Table.<br />
• Added Initial Size Ratio option to the Automesh Solids dialog box. The Initial Size Ratio is another mesh<strong>in</strong>g<br />
control you can use to change the number of elements the tetrahedral mesher creates. The default value of<br />
“0.5001” should give you the best “mesh quality” with the least number of elements possible.<br />
• Updated Adjust Nodal Precision option is to be on by default.
10.1-58<br />
F<strong>in</strong>ite Element Model<strong>in</strong>g<br />
• Added Recovery Mesher (Use only if Standard Mesher fails) option to the Solid Automesh<strong>in</strong>g Options. This<br />
option should ONLY be checked if the standard mesher has already failed. The tet-mesher conta<strong>in</strong>s a special<br />
“boundary recover<strong>in</strong>g” mesher which will attempt to create a volume mesh start<strong>in</strong>g from extremely poor quality<br />
surface mesh (almost flat triangles on the surface, high density propagation, extreme aspect ratios, etc.) which<br />
fail with the standard mesher. The result<strong>in</strong>g volume mesh will likely have a very poor quality and this mesher<br />
should only be used when a volume mesh is absolutely required, regardless of element quality,<br />
Note:<br />
If the surface mesh is <strong>in</strong>valid or not watertight (it conta<strong>in</strong>s holes, overlaps, gaps, self <strong>in</strong>tersections, etc.)<br />
this “boundary recover<strong>in</strong>g” mesher will not repair the surface mesh and not create a volume mesh.<br />
• Added Update Data Table with Mesh Quality option to the Solid Automesh<strong>in</strong>g Options. The Data Table needs<br />
to be open <strong>in</strong> <strong>FEMAP</strong> for this option to be available. If the Data Table is locked, <strong>FEMAP</strong> will ask if you want to<br />
unlock it when leav<strong>in</strong>g the Solid Automesh<strong>in</strong>g Options dialog box. When this option is checked, every element<br />
created <strong>in</strong> the current mesh<strong>in</strong>g operation will be added to the Data Table along with correspond<strong>in</strong>g values for<br />
“Tet Collapse” and “Jacobian” element quality checks.<br />
• Updated the feedback sent to the Messages w<strong>in</strong>dow dur<strong>in</strong>g tet-mesh<strong>in</strong>g. <strong>FEMAP</strong> will produce status messages<br />
while the tetrahedral mesh<strong>in</strong>g is occurr<strong>in</strong>g and provide feedback on element numbers and quality. The table <strong>in</strong><br />
the Surface Mesh Quality section of the list<strong>in</strong>g displays the number of elements which fall <strong>in</strong>to each range of<br />
values us<strong>in</strong>g <strong>FEMAP</strong>’s “M<strong>in</strong>imum Angle” element quality check, while the table <strong>in</strong> the Tetrahedral Mesh<br />
Quality section conta<strong>in</strong>s similar list<strong>in</strong>gs of values for “Tet Collapse” and “Jacobian”. For more <strong>in</strong>formation on<br />
how <strong>FEMAP</strong> calculates element quality, please see Section 7.4.5.6, "Tools, Check, Distortion...".<br />
The follow<strong>in</strong>g is a sample of a typical status message list sent to the Messages w<strong>in</strong>dow dur<strong>in</strong>g the tetrahedral mesh<strong>in</strong>g<br />
process:
Mesh Associativity 10.1-59<br />
Mesh Associativity<br />
Modify, Associativity, Automatic<br />
There is a new command under the Modify, Associativity menu. It conta<strong>in</strong>s the Automatic command which is<br />
designed to automatically associate a solid mesh with solids or shell mesh with surfaces (sheet solids).<br />
This command will attempt to associate the nodes of<br />
selected elements with selected solids (Tet or Hex Elements)<br />
or surfaces/sheet solids (Shell Elements). In addition<br />
to the nodes and elements be<strong>in</strong>g associated to the ma<strong>in</strong><br />
entity (solids or surfaces/sheet solids), they will then also be<br />
associated to the surfaces of solids, curves on those surfaces,<br />
and po<strong>in</strong>ts on those curves allow<strong>in</strong>g you to use geometry<br />
based commands <strong>in</strong> <strong>FEMAP</strong> (i.e., Loads and<br />
Constra<strong>in</strong>ts on geometry, any selection method us<strong>in</strong>g a geometric<br />
entity, etc.).<br />
There are a few options <strong>in</strong> the Automatic Geometry Associativity<br />
dialog box. The Search Tolerance is used as a tolerance<br />
for attachment. If a node from a selected element is not<br />
with<strong>in</strong> this distance to any of the selected geometry, it will<br />
not be attached. By default, the Search Tolerance is the<br />
Merge Tolerance set <strong>in</strong> Tools, Parameters.<br />
The Remove All Previous Associativity is on by default and should be on if you are tak<strong>in</strong>g an entire f<strong>in</strong>ite element<br />
model and try<strong>in</strong>g to attach it to selected geometric entities.<br />
Check Solid Element Conta<strong>in</strong>ment <strong>in</strong> Multiple Solids is only available when tet or hex elements have been selected.<br />
This first runs a check of all the element centroids to determ<strong>in</strong>e which elements are “<strong>in</strong>side” which solid. <strong>FEMAP</strong><br />
then goes about attach<strong>in</strong>g the nodes of those elements to each solid one at a time. On by default and should probably<br />
rema<strong>in</strong> on when you have chosen multiple solids, although command will run faster when this option is off.<br />
Attach Midside Nodes Even if not <strong>in</strong> Tolerance option will attach any<br />
midside nodes on elements that have been attached, even if these midside<br />
nodes are not with<strong>in</strong> the distance specified <strong>in</strong> Search Tolerance.<br />
Group Nodes/Elements not Associated will create a group with all of the<br />
selected nodes and elements which were NOT attached to any geometry<br />
dur<strong>in</strong>g the command and turn<strong>in</strong>g on Detailed Associativity Summary<br />
will create a summery of the attached entities to the Messages w<strong>in</strong>dow.<br />
This command is very useful if you have an analysis model and the<br />
orig<strong>in</strong>al geometry from which the model was created. Also, if you try to<br />
attach nodes and elements to geometry which is completely different,<br />
chances are the command will not be very successful.<br />
Properties<br />
• Added Section Evaluation option to Cross Section Def<strong>in</strong>ition dialog box for Beam, Bar, and Curved Beam<br />
Properties (<strong>FEMAP</strong> 10.0.1).<br />
• Added PBEAML/PBARL to Section Evaluation for use with Nastran PBEAML/PBARLs. The PBEAML/<br />
PBARL evaluation method is always used when import<strong>in</strong>g a Nastran <strong>in</strong>put file that conta<strong>in</strong>s PBEAMLs and/or<br />
PBARLs (<strong>FEMAP</strong> 10.0.1).<br />
• Modified the Weld property to be the Weld/Fastener property.<br />
• Added switch to specify if the property will used with CWELD (Weld) or CFAST (Fastener) elements. All Weld<br />
property <strong>in</strong>puts are the same as before.<br />
• Added property <strong>in</strong>puts for CFAST (Fastener) elements.
10.1-60<br />
F<strong>in</strong>ite Element Model<strong>in</strong>g<br />
CFAST<br />
Options <strong>in</strong> the Def<strong>in</strong>e Property - WELD/FASTENER Element Type dialog box when CFAST is chosen.<br />
Diameter - This value represents the diameter of the virtual fastener, which is used to locate the virtual grids<br />
(nodes) on the shell element patch.<br />
Mass - Mass of the fastener.<br />
Struc Damp<strong>in</strong>g - Structural damp<strong>in</strong>g of fastener<br />
Material CSys - Material Coord<strong>in</strong>ate System <strong>in</strong> which translational (KTX, KTY, and KTZ) and rotational stiffness<br />
(KRX, KRY, and KRZ) are applied. This option is unchecked by default and Nastran uses a predef<strong>in</strong>ed method to<br />
determ<strong>in</strong>e the x, y, and z-axis of the fastener element. Please see Note below<br />
Note:<br />
When unchecked, the x-axis of the fastener element will be col<strong>in</strong>ear to a vector from the location the<br />
fastener <strong>in</strong>tersects “Patch 1” (Element ID or Property ID) to the location the fastener <strong>in</strong>tersects “Patch<br />
2”, which is def<strong>in</strong>ed when creat<strong>in</strong>g the element. The y-axis will then be perpendicular to the element x-<br />
axis and oriented to the closest basic coord<strong>in</strong>ate axis (<strong>in</strong> case of identical proximity, basic x-axis first,<br />
then y, then z will be chosen for orientation). F<strong>in</strong>ally, the z-axis is the cross product of the element x-<br />
axis and z-axis.<br />
Absolute - When checked, specifies the Material Coord<strong>in</strong>ate System is an “Absolute” Coord<strong>in</strong>ate System.<br />
Unchecked specifies the Material Coord<strong>in</strong>ate System is a “Relative” Coord<strong>in</strong>ate System.<br />
KTX, KTY, and KTZ - These values represent the translational stiffness of the fastener <strong>in</strong> the x, y, and z-axis<br />
specified for the element.<br />
KRX, KRY, and KRZ - These values represent the rotational stiffness of the fastener <strong>in</strong> the x, y, and z-axis specified<br />
for the element.
Functions 10.1-61<br />
Functions<br />
• Added dynamic XY plott<strong>in</strong>g of functions to the Function Def<strong>in</strong>ition dialog box.<br />
Loads and Constra<strong>in</strong>ts<br />
• Modified Directional Pressure loads to no longer be affected by choos<strong>in</strong>g a particular element face. Older models<br />
with these types of loads will be converted to the new standard, but will be modified <strong>in</strong> the version 10 <strong>in</strong><br />
such a way to create the same analysis <strong>in</strong>put file as <strong>FEMAP</strong> 9.3.1 and earlier.<br />
• Added option to apply nodal constra<strong>in</strong>ts us<strong>in</strong>g the “-1..Use Nodal Output System” option when choos<strong>in</strong>g a<br />
coord<strong>in</strong>ate system. Allows you to NOT force the nodal output CSys to be updated to the constra<strong>in</strong>t CSys.<br />
Connections (Connection Properties, Regions, and Connectors)<br />
• Updated Connection Regions to support 2-D contact <strong>in</strong> NX Nastran Solution 601.<br />
Connection Regions for 2-D contact <strong>in</strong> Solution 601 of NX Nastran (usually <strong>in</strong> conjunction with axisymmetric elements)<br />
must be def<strong>in</strong>ed us<strong>in</strong>g nodes only and are written out to the Nastran file as BLSEG entries. The nodes must<br />
be selected <strong>in</strong> proper order with contact occurr<strong>in</strong>g to the “left side” of the region. The BCTSET entry is used to<br />
specify which BLSEG entries are <strong>in</strong> contact with one another. If a BLSEG is specified as “Rigid”, it must be the<br />
“target” <strong>in</strong> the Connector (Contact Pair). BLSEG entries <strong>in</strong> Nastran <strong>in</strong>put files for solution sequences other than<br />
Solution 601 represent “slidel<strong>in</strong>e” elements.<br />
There were several enhancements to the NX Nastran Connection Properties:<br />
NX L<strong>in</strong>ear tab<br />
• Moved Normal Penalty Factor and Tangential Penalty Factor from the Contact Property (BCTPARM) section<br />
to the Common Contact (BCTPARM) and Glue Parameters (BGPARM) section.<br />
• Moved Shell Z-Offset from Glued Contact Property (BGSET and BGPARM) section to Contact Property (BCT-<br />
PARM) section.<br />
• Removed Penalty Factor from Glued Contact Property (BGSET and BGPARM) section.<br />
• Replaced Num Allow Contact Changes with Convergence Criteria and Num For Convergence <strong>in</strong> the Contact<br />
Property (BCTPARM) section. Together, these two values create the NCHG field on the BCTPARM entry.
10.1-62<br />
F<strong>in</strong>ite Element Model<strong>in</strong>g<br />
• Added Contact Inactive to the Contact Property (BCTPARM) section. Creates the CSTRAT field on the BCT-<br />
PARM entry.<br />
• Added Penalty Factor Units to Common Contact (BCTPARM) and Glue Parameters (BGPARM) section. Creates<br />
the PENTYP field on the BCTPARM or PGPARM entry.<br />
NX Adv Nonl<strong>in</strong> tab<br />
• Added Glued Contact Property (BGSET) section with Extension Factor option. Extension Factor enters a value<br />
<strong>in</strong> the EXTi field specified on the BGSET entry for the contact pair “i”. Specifies an “extension factor” for the<br />
target region.<br />
• Removed the Time Activation section and moved Birth Time and Death Time options to the General section.<br />
• Added Friction Delay option to Standard Contact Algorithm section.<br />
• Moved all options found <strong>in</strong> the Rigid Target Contact Algorithm section except Normal Modulus to a the Old<br />
Algorithm (RTALG=1 on NXSTRAT) section of the NX Adv Nonl<strong>in</strong> Rigid Target Algorithm dialog box, which is<br />
accessed by click<strong>in</strong>g the Rigid Target Options button. Normal Modulus is found <strong>in</strong> Common Options.<br />
• Added Penetration Cutback and Max Penetration options to the Old Algorithm (RTALG=1 on NXSTRAT) section<br />
of the NX Adv Nonl<strong>in</strong> Rigid Target Algorithm dialog box.<br />
• Added Max Tensile Contact Force (TFORCE), Max Slid<strong>in</strong>g Velocity (SLIDVEL), Oscillation Check<br />
(OCHECK), Contact Gap (GAPBIAS), and Offset Method (OFFDET) options to the Current Algorithm<br />
(RTALG=0 on NXSTRAT) section of the NX Adv Nonl<strong>in</strong> Rigid Target Algorithm dialog box.<br />
NX Explicit tab<br />
• Renamed Rigid Contact Algorithm section to Old Rigid Contact Algorithm section.<br />
• Added Current Rigid Target Algorithm section with Max Slid<strong>in</strong>g Velocity (SLIDVEL), Contact Gap (GAP-<br />
BIAS), and Offset Method (OFFDET) options.<br />
Geometry<br />
• Updated Geometry, Curve - From Surface, Update Surfaces flag to be on by default.<br />
• Added Geometry, Curve - From Surface, Offset Curve/Washer command.
Geometry 10.1-63<br />
Washer mode should only be used for circular holes on planar surfaces, while Offset Curves is a more “general”<br />
mode that can be used for oblong holes, slots, and other “general shapes” on many different types of geometric surfaces.<br />
In either mode, once you click OK <strong>in</strong> the Def<strong>in</strong>e Washer or Offset Curves dialog box, <strong>FEMAP</strong> will ask you to select<br />
the appropriate curves to offset. For Washer mode, only curves that make up circular holes will be eligible for<br />
selection and only one curve per hole is required. In Offset Curves mode, all types of curves are eligible for selection<br />
and you will want to select all curves to be offset.<br />
Click<strong>in</strong>g Cancel <strong>in</strong> the Entity Selection - Select Edges dialog box <strong>FEMAP</strong> will return you to the Def<strong>in</strong>e Washer or<br />
Offset Curves dialog box. You can now change the mode and size options, then click OK and choose different<br />
curves. Click Cancel <strong>in</strong> the Def<strong>in</strong>e Washer or Offset Curves dialog box to exit the command.<br />
Washer Mode<br />
In Washer mode you will first want to enter an Offset, then choose whether or not to Save Split L<strong>in</strong>es. By sav<strong>in</strong>g the<br />
“split l<strong>in</strong>es”, a l<strong>in</strong>e will be created from the end po<strong>in</strong>ts of each curve <strong>in</strong> the circular hole to the end po<strong>in</strong>ts of the new<br />
offset curves, which will create an <strong>in</strong>dividual surface set-up for mapped mesh<strong>in</strong>g.<br />
With “Save Split<br />
L<strong>in</strong>es” Checked<br />
Without “Save Split<br />
L<strong>in</strong>es” Checked<br />
Offset Curves Mode<br />
In Offset Curves mode you also enter an Offset, but <strong>in</strong> this mode you have more choices. Aga<strong>in</strong>, you can choose<br />
whether or not to Save Split L<strong>in</strong>es, but this time every selected curve will get an <strong>in</strong>dividual surface set-up for<br />
mapped mesh<strong>in</strong>g.<br />
Without “Save Split<br />
L<strong>in</strong>es” Checked<br />
With “Save Split<br />
L<strong>in</strong>es” Checked
10.1-64<br />
F<strong>in</strong>ite Element Model<strong>in</strong>g<br />
AutoSelect Surfaces will automatically offset the selected curves to ALL of the surfaces connected to those curves.<br />
If you would like to choose which surfaces get the new offset curves, uncheck AutoSelect Surfaces. You will be<br />
prompted for the surfaces after you have selected the curves and clicked OK.<br />
With “AutoSelect<br />
Surfaces” checked<br />
With “AutoSelect<br />
Surfaces” unchecked<br />
and only top surface<br />
selected.<br />
When Extend Splits is on, <strong>FEMAP</strong> will try to extend all offset curves that do not meet up with another offset curve<br />
to the closest edge of the surface onto which the curve was offset. In most cases, this should be checked if Save<br />
Split L<strong>in</strong>es has not been checked.<br />
With “Extend Splits” unchecked<br />
Curve does not extend<br />
Enough to break surface fully.<br />
With “Extend Splits” checked<br />
Curve extends to<br />
fully break surface
Geometry 10.1-65<br />
If Update Surfaces is on, the affected surface will also be partitioned by this command.<br />
Note:<br />
Due to the process used <strong>in</strong> the Offset Curves mode, the specified Offset can not be larger than the radius<br />
of any of the chosen curves. If you receive the message “Error sweep<strong>in</strong>g along edge curves, offset not<br />
possible”, try aga<strong>in</strong> us<strong>in</strong>g an Offset value reduced the by 25 %.<br />
Also, many times a larger offset can be used <strong>in</strong> conjugation with the Save Split L<strong>in</strong>es option turned on.<br />
• Added Geometry, Curve - From Surface, Pad command.<br />
Requires you to choose a circular edge on a surface to create a “pad” pattern around the hole. The “pad” pattern<br />
essentially creates a square a specified distance away from the center of the circular edge and then connects the<br />
midpo<strong>in</strong>ts of each l<strong>in</strong>e of the square to four po<strong>in</strong>ts on the circle (usually located at 0, 90, 180, and 270 degrees).<br />
The distance the curves of the pad are positioned from the selected hole<br />
is determ<strong>in</strong>ed by the Pad Size Factor.<br />
The Pad Size Factor uses the diameter of the hole to calculate the size of<br />
the pad. If it is set to “1”, the pad will extend out half the length of the<br />
diameter (the radius) <strong>in</strong> all directions. If it is set to “1.25”, it will create<br />
the l<strong>in</strong>es 0.625 times the radius <strong>in</strong> all directions, while sett<strong>in</strong>g it to “0.75”<br />
will create the l<strong>in</strong>es 0.375 times the radius.<br />
When Setup Mapped Mesh<strong>in</strong>g is on, the four newly created surfaces will<br />
automatically have a “Four Corner” mesh approach set on them. For more <strong>in</strong>formation on mesh approaches, see<br />
Section 5.1.1.15, "Mesh, Mesh Control, Approach On Surface".<br />
Pad Size Factor = 0.75 Pad Size Factor = 1.0 Pad Size Factor = 1.25<br />
If only a portion of a hole has been selected (a curve which is not 180 degrees or a full 360 degree curve), you will<br />
also be prompted for a Pad/Width Length, select a po<strong>in</strong>t as the Pad Center, then specify an Pad Alignment Vector.<br />
If Update Surfaces is on, the affected surface will also be partitioned by this command.<br />
• Added Geometry, Curve - From Surface, Po<strong>in</strong>t to Po<strong>in</strong>t command.<br />
Creates a parametric curve along a surface by choos<strong>in</strong>g a start po<strong>in</strong>t and an end po<strong>in</strong>t.<br />
If Update Surfaces is on, the affected surface will also be partitioned by this command.<br />
• Added Geometry, Curve - From Surface, Po<strong>in</strong>t to Edge command.
10.1-66<br />
F<strong>in</strong>ite Element Model<strong>in</strong>g<br />
Creates a parametric curve along a surface by choos<strong>in</strong>g a po<strong>in</strong>t and then a curve on the same surface. The location<br />
of the newly created po<strong>in</strong>t on the chosen curve is created by project<strong>in</strong>g the chosen po<strong>in</strong>t onto the selected curve<br />
us<strong>in</strong>g the shortest possible distance.<br />
Selected Curve<br />
If Update Surfaces is on, the affected surface will also be partitioned by this command.<br />
• Added Geometry, Curve - From Surface, Edge to Edge command.<br />
Creates parametric curves along a surface by choos<strong>in</strong>g a s<strong>in</strong>gle curve (To Curve) on a surface and then a choos<strong>in</strong>g<br />
any number of curves also on that surface (From Curves). The locations of the newly created po<strong>in</strong>ts on the “From<br />
Curve” are created by project<strong>in</strong>g the end po<strong>in</strong>ts of all the “To Curves” onto the “From Curve” us<strong>in</strong>g the shortest<br />
possible distance and then jo<strong>in</strong><strong>in</strong>g the two sets of po<strong>in</strong>ts with parametric curves.<br />
“From Curves”<br />
“To Curve”<br />
If Update Surfaces is on, the affected surface will also be partitioned by this command.<br />
• Added “Measure Distance” icon button to Geometry, Midsurface, Automatic command.<br />
• Added Geometry, Midsurface, Offset Tangent Surfaces command.<br />
This command is for use on solids of constant thickness only. You will be prompted for a “seed surface”, then a<br />
“tangency tolerance”. All of the surfaces tangent to the “seed surface” with<strong>in</strong> the “tangency tolerance” will be chosen<br />
and highlighted. Next a “Mid-Surface Tangent Offset” value needs to be entered. This value is the distance<br />
used to offset the selected surfaces towards the middle of the solid part. <strong>FEMAP</strong> will attempt to calculate this value<br />
automatically and will fill the value <strong>in</strong> if successful. The offset surfaces will be automatically stitched together and<br />
f<strong>in</strong>ally you will be asked if you want to delete the orig<strong>in</strong>al solid.
Geometry 10.1-67<br />
Orig<strong>in</strong>al geometry<br />
Surface selected as “Seed Surface”<br />
Tangent Surfaces Selected<br />
Result<strong>in</strong>g midsurface geometry<br />
(orig<strong>in</strong>al Geometry deleted)<br />
• Added “Ok to Consolidate Properties by Thickness?” question to Geometry, Midsurface, Assign Mesh<br />
Attributes command after the material has been chosen.<br />
If you answer No, each selected surface will have an <strong>in</strong>dividual property created represent<strong>in</strong>g the thickness of that<br />
portion of the model and assigned to that surface only. If you answer Yes, you will also be prompted for a “thickness<br />
percentage tolerance” and any surfaces which have the same thickness, with<strong>in</strong> the specified tolerance, will<br />
have a s<strong>in</strong>gle property created for all of them, then assigned. Along with the property <strong>in</strong>formation, the mesh options<br />
on each surface will set to use the Quad surface mesher<br />
• Added Geometry, Surface, NonManifold Add command.<br />
Allows you to create “Non-Manifold Solid Geometry”, an option <strong>in</strong> the Parasolid model<strong>in</strong>g kernel which creates<br />
“General Bodies” as opposed to regular solids (<strong>FEMAP</strong> solids) and sheet solids (<strong>FEMAP</strong> surfaces). The command<br />
allows you to Boolean Add sheet solids to one another, as well as add “sheet solids” to Parasolid “solids”.<br />
The use of Non-Manifold Geometry can be very useful <strong>in</strong> creation of mid-surface models with “T-Junctions”, models<br />
where shell elements (2-D) and solid elements (3-D) need to be connected and portions of the shell mesh are<br />
embedded <strong>in</strong>to the solid mesh, and “solids” with <strong>in</strong>ternal “surfaces” used <strong>in</strong> certa<strong>in</strong> types of analysis.<br />
Note:<br />
When bodies have been added together us<strong>in</strong>g “NonManifold Add”, many of the other commands on the<br />
Geometry, Solid... menu will not function as they did before the geometry was changed from regular<br />
geometry to “general body” geometry. A good idea is to have both the surfaces and solids “ready to go”<br />
before us<strong>in</strong>g the “NonManifold Add” command.<br />
If you need to stitch or add more bodies <strong>in</strong>to those that have been put together with this command, you<br />
will want to use the Geometry, Surface, Recover Manifold Geometry command to recover component<br />
solids and sheet solids, which will allow you to use the commands on the Geometry, Solid... menu.<br />
• Added Geometry, Surface, Recover NonManifold Geometry command.
10.1-68<br />
F<strong>in</strong>ite Element Model<strong>in</strong>g<br />
Essentially the opposite of the Geometry, Solid, NonManifold Add command. The command will take all selected<br />
“general bodies” <strong>in</strong> your model and separate them <strong>in</strong>to component “Manifold” parasolid solids (<strong>FEMAP</strong> solids)<br />
and sheet solids (<strong>FEMAP</strong> Surfaces). Once the “Manifold” solids and sheet solids have been recovered, the commands<br />
on the Geometry, Solid... menu will be available to modify and operate on the geometry aga<strong>in</strong>.<br />
Note:<br />
To break a “general body” <strong>in</strong>to <strong>in</strong>dividual sheet solids for each and every surface, use the Geometry,<br />
Solid, Explode command.<br />
• Added “Cleanup Mergeable Curves” option to Geometry, Solid Stitch command\<br />
When Cleanup Mergeable Curves is “on”, which is the default, <strong>FEMAP</strong> will remove all <strong>in</strong>ternal curves which are<br />
redundant. The “stitched” geometry will conta<strong>in</strong> as few surfaces as possible by remov<strong>in</strong>g curves which are not<br />
needed to def<strong>in</strong>e the overall topology of the geometry. When “off”, all of the surfaces be<strong>in</strong>g stitched together will<br />
rema<strong>in</strong> <strong>in</strong> the geometry.<br />
Orig<strong>in</strong>al Geometry<br />
Stitched Geometry<br />
Cleanup Mergeable<br />
Curves “On”<br />
Stitched Geometry<br />
Cleanup Mergeable<br />
Curves “Off”<br />
• Added Modify, Update Other, Solid Facett<strong>in</strong>g command.<br />
• Added option to Modify, Project, Po<strong>in</strong>t along Vector and Modify, Project, Node along Vector commands to<br />
project <strong>in</strong> both directions along the vector.<br />
Groups and Layers<br />
Views<br />
• Improved Group, Operations, Add Related Entities to <strong>in</strong>clude coord<strong>in</strong>ate systems used as def<strong>in</strong>ition coord<strong>in</strong>ate<br />
systems for Coord<strong>in</strong>ate Systems <strong>in</strong> the selected group and <strong>in</strong>clude reference nodes on beams when the nodes are<br />
related to elements, properties, or materials <strong>in</strong> the selected group.<br />
• Added options for Comb<strong>in</strong>ed Curve, Element - Coord<strong>in</strong>ate System, Comb<strong>in</strong>ed - Elim<strong>in</strong>ated Po<strong>in</strong>ts, Comb<strong>in</strong>ed -<br />
Elim<strong>in</strong>ated Curves, Comb<strong>in</strong>ed - Elim<strong>in</strong>ated Surfaces to the View, Options command.<br />
• Added Rotate Around option to the View, Rotate, Model command (F8 key).
Output and Post-Process<strong>in</strong>g 10.1-69<br />
Us<strong>in</strong>g Rotate Around option<br />
You may choose any def<strong>in</strong>ed coord<strong>in</strong>ate system <strong>in</strong> <strong>FEMAP</strong> to Rotate Around (default is 0..Basic Rectangular).<br />
This <strong>in</strong>cludes local coord<strong>in</strong>ate systems and the chosen coord<strong>in</strong>ate system will be used by both the scroll arrows and<br />
the standard orientation buttons.<br />
You may also choose -1..Screen Axes to have rotation via the scroll arrows occur us<strong>in</strong>g the screen axes where the<br />
“screen” X axis is always horizontal to the right, Y is always upward, and Z is always a vector perpendicular to<br />
your monitor (i.e., “out of the screen”). When -1..Screen Axes has been selected, the standard orientation buttons<br />
default to us<strong>in</strong>g 0..Basic Rectangular.<br />
• Updated Default Direction of the Mouse Wheel for Zoom to match direction of mouse movement.<br />
Output and Post-Process<strong>in</strong>g<br />
Transform<strong>in</strong>g Output (on the fly)<br />
Added Transformation buttons for the Deformation output vector and the Contour output vector to the Select Post-<br />
Process<strong>in</strong>g Data dialog box. The Select PostProcess<strong>in</strong>g Data dialog box is accessed by press<strong>in</strong>g the Deformed and<br />
Contour Data button <strong>in</strong> the View Select dialog box, click<strong>in</strong>g the Post Data icon on the Post Toolbar, right-mouse<br />
click<strong>in</strong>g <strong>in</strong> the graphics w<strong>in</strong>dow and choos<strong>in</strong>g Post Data from the menu, or choos<strong>in</strong>g Post Data from the contextsensitive<br />
menu when a results set is highlighted <strong>in</strong> the Model Info tree.<br />
The Deformation and Contour Output Vectors can be transformed <strong>in</strong>to different directions or coord<strong>in</strong>ate systems<br />
us<strong>in</strong>g the Transformation buttons. The transformed output can then be viewed us<strong>in</strong>g any of the options <strong>in</strong> Deformed<br />
Style and/or Contour Style (except Beam Diagram and Contour Vector). This option is for display purposes only as<br />
additional output vectors are not created, as they are when us<strong>in</strong>g the Model, Output, Transform command. Also, the<br />
Post Titles will <strong>in</strong>clude <strong>in</strong>formation regard<strong>in</strong>g the transformed output currently be<strong>in</strong>g displayed.<br />
Displacement Output Vector Transformation<br />
The Deformation Transformation dialog box<br />
allows you to choose a Dest<strong>in</strong>ation to transform the<br />
chosen nodal output vector <strong>in</strong>to and also which<br />
Active Components should be displayed <strong>in</strong> the plot<br />
of the deformation.<br />
The Dest<strong>in</strong>ation options are:<br />
•None - no transformation (default)<br />
•Into CSys - transforms the output vector <strong>in</strong>to an<br />
exist<strong>in</strong>g coord<strong>in</strong>ate system<br />
•Into Output CSys - transforms the nodal output<br />
vector <strong>in</strong>to each node’s specified output coord<strong>in</strong>ate<br />
system.<br />
In Active Components, choose which component(s) of the transformed output vector should be displayed. For<br />
<strong>in</strong>stance, if you are show<strong>in</strong>g “1..Total Translation” <strong>in</strong> the “2..Basic Spherical” coord<strong>in</strong>ate system, you can choose to<br />
deform the model <strong>in</strong> only the “Theta” component of the translated vector (no “R” or Phi” components).
10.1-70<br />
F<strong>in</strong>ite Element Model<strong>in</strong>g<br />
Contour Output Vector Transformation<br />
The Contour Transformation dialog box allows you<br />
to transform output that references global X, Y, Z<br />
components (like Total Translation, Reaction<br />
Forces, etc.) <strong>in</strong>to any chosen coord<strong>in</strong>ate system or<br />
<strong>in</strong>to the nodal output coord<strong>in</strong>ate system at each<br />
node.<br />
You may also transform plate element forces,<br />
stresses, and stra<strong>in</strong>s <strong>in</strong>to predef<strong>in</strong>ed “material directions”,<br />
a selected coord<strong>in</strong>ate system, or along a<br />
specified vector from the standard output orientation<br />
direction.<br />
F<strong>in</strong>ally, solid element stresses and stra<strong>in</strong>s can be<br />
transformed <strong>in</strong>to a s<strong>in</strong>gle chosen coord<strong>in</strong>ate system<br />
or the current material direction (Material Axes)<br />
specified on the solid properties of the solid elements<br />
currently be<strong>in</strong>g displayed.<br />
Nodal Vector Output<br />
In the Nodal Vector Output section, you will f<strong>in</strong>d<br />
these options:<br />
•None - no transformation (default)<br />
•Into CSys - transforms the nodal output vector <strong>in</strong>to<br />
an exist<strong>in</strong>g coord<strong>in</strong>ate system.<br />
• Into Node Output CSys - transforms the nodal output vector <strong>in</strong>to each node’s output coord<strong>in</strong>ate system.<br />
Plate Forces, Stresses and Stra<strong>in</strong>s<br />
The options for Plate Forces, Stresses and Stra<strong>in</strong>s are:<br />
• None - no transformation (default)<br />
• Into Matl Direction - transforms output us<strong>in</strong>g the predef<strong>in</strong>ed “material angle” specified for each element. You<br />
can set the “material angle” when creat<strong>in</strong>g plane properties (<strong>in</strong> Def<strong>in</strong>e Property dialog box, choose Elem/Property<br />
Type, then click Element Material Orientation) or at anytime us<strong>in</strong>g the Modify, Update Elements, Material<br />
Angle command (for more <strong>in</strong>formation, see Section 4.7.3.13, "Modify, Update Elements, Material Angle..."),<br />
which has several options.<br />
• Into CSys - transforms the output vector to align the X-direction of output vector to the chosen X, Y, or Z component<br />
of an exist<strong>in</strong>g coord<strong>in</strong>ate system.<br />
• Along Vector - transforms the output vector to align the X-direction of output vector to a vector specified by<br />
click<strong>in</strong>g the Vector button, then us<strong>in</strong>g the standard vector def<strong>in</strong>ition dialog box.<br />
Note:<br />
Before us<strong>in</strong>g the “Into Matl Direction” method, be sure to refer to your analysis program documentation<br />
to see how material orientation angles are used and to f<strong>in</strong>d any limitations.<br />
The other <strong>in</strong>put required for the proper transformation of plate element output is the def<strong>in</strong>ition of the orig<strong>in</strong>al component<br />
data, which can be selected us<strong>in</strong>g the Output Orientation button. Please see the Output Orientation section<br />
below.<br />
Solid Stresses and Stra<strong>in</strong>s<br />
Stresses and Stra<strong>in</strong>s for solid elements are returned to <strong>FEMAP</strong> from the solver <strong>in</strong> a direction specified us<strong>in</strong>g the<br />
Material Axes for each solid property prior to runn<strong>in</strong>g the analysis (for more <strong>in</strong>formation, see the Solid Element<br />
Properties head<strong>in</strong>g <strong>in</strong> Section 4.2.2.3, "Volume Elements").<br />
For Solid Stresses and Stra<strong>in</strong>s, you may pick from these options:<br />
• None - no transformation (default)
Output and Post-Process<strong>in</strong>g 10.1-71<br />
• Into CSys - transforms the standard component solid stresses and stra<strong>in</strong>s <strong>in</strong>to an exist<strong>in</strong>g coord<strong>in</strong>ate system.<br />
• Into Matl Direction - transforms standard component solid stresses and stra<strong>in</strong>s from the analysis <strong>in</strong>to the current<br />
sett<strong>in</strong>g for Material Axes for each solid property.<br />
As with plate elements, the other important <strong>in</strong>put needed to properly transform the output is the def<strong>in</strong>ition of the<br />
orig<strong>in</strong>al component data orientation, which can be selected us<strong>in</strong>g the Output Orientation button. Please see the<br />
Output Orientation section below for more <strong>in</strong>formation.<br />
For Example, model run us<strong>in</strong>g three different options for solid element material axis..<br />
Solid Element Output recovered <strong>in</strong><br />
Global Rectangular Coord<strong>in</strong>ate System<br />
Solid Element Output recovered <strong>in</strong><br />
Global Spherical Coord<strong>in</strong>ate System<br />
Solid Element Output aligned to<br />
Individual Elements<br />
Each material axis option transformed <strong>in</strong>to a specified coord<strong>in</strong>ate system.<br />
Solid Element Output recovered <strong>in</strong><br />
Global Rectangular Coord<strong>in</strong>ate System<br />
transformed <strong>in</strong>to Global Spherical<br />
Coord<strong>in</strong>ate System.<br />
Solid Element Output recovered <strong>in</strong><br />
Global Spherical Coord<strong>in</strong>ate System<br />
transformed <strong>in</strong>to Global Rectangular<br />
Coord<strong>in</strong>ate System<br />
Solid Element Output aligned to<br />
Individual Elements transformed <strong>in</strong>to<br />
Global Spherical Coord<strong>in</strong>ate System<br />
Output Orientation<br />
The Current Output Orientation dialog box conta<strong>in</strong>s the “default” output orientation for both Plane and Solid elements.<br />
For Plane elements, there is an option for each type of output data to transform (Stress, Stra<strong>in</strong>, and Force),<br />
for each Plane element shape that may appear <strong>in</strong> the model (Tria3, Tria6, Quad4, and Quad8).<br />
There are two options for triangular elements (“0..First Edge” or “1..Midside Locations”) with the default be<strong>in</strong>g<br />
“0..First Edge”, while there are three options for quadrilateral elements (“0..First Edge”, “1..Midside Locations”, or<br />
“2..Diagonal Bisector”) with “2..Diagonal Bisector” be<strong>in</strong>g the default.<br />
For Solid elements, there are three orientation options (“0..Material Direction”, “1..Global Rectangular”, or<br />
“2..Element”) for different material types associated with Solid properties (Isotropic, Anisotropic, or Hyperelastic).
10.1-72<br />
F<strong>in</strong>ite Element Model<strong>in</strong>g<br />
Press<strong>in</strong>g the Reset button when the Current Output Orientation dialog box is accessed through either the Deformation<br />
Transformation or Contour Transformation dialog box will reset all of the output orientation options to the values<br />
currently set <strong>in</strong> the Preferences.<br />
For more <strong>in</strong>formation about these various orientation options, please see the Output Orientation portion of Section<br />
2.6.2.6, "Geometry/Model".<br />
Consult your analysis program’s documentation concern<strong>in</strong>g the orig<strong>in</strong>al coord<strong>in</strong>ate system def<strong>in</strong>ition.<br />
Transform<strong>in</strong>g Output (new output vectors)<br />
You may also transform plate element forces,<br />
stresses, and stra<strong>in</strong>s <strong>in</strong>to the material direction, a<br />
selected coord<strong>in</strong>ate system, or along a specified<br />
vector from the standard output direction.<br />
Solid element stresses and stra<strong>in</strong>s can also be<br />
transformed <strong>in</strong>to a ca s<strong>in</strong>gle chosen coord<strong>in</strong>ate<br />
system or the current material direction specified<br />
for the solid properties of the selected elements.<br />
When you choose this command, you will see the<br />
Transform Output Data dialog box. There are<br />
seven transform options available:<br />
•Vector Output (<strong>in</strong>to CSys)<br />
•Vector Output (<strong>in</strong>to Node Output CSys)<br />
•Plate Forces, Stresses and Stra<strong>in</strong>s (<strong>in</strong>to Matl<br />
Direction)<br />
•Plate Forces, Stresses and Stra<strong>in</strong>s (<strong>in</strong>to CSys)<br />
•Plate Forces, Stresses and Stra<strong>in</strong>s (along Vector)<br />
•Solid Stresses and Stra<strong>in</strong>s (<strong>in</strong>to CSys)<br />
•Solid Stresses and Stra<strong>in</strong>s (<strong>in</strong>to Matl Direction)<br />
Vector Output<br />
When you choose the Vector Output (<strong>in</strong>to CSys) option:<br />
1. Use the Into CSys field to choose the coord<strong>in</strong>ate system that you want to transform <strong>in</strong>to.<br />
2. Select the output set and output vector that you want to transform. Typically you will want to pick the “Total”<br />
vector, (like Total Translation), not a component vector (like X or T1 Translation). If you want to transform just<br />
the vector that you select, make certa<strong>in</strong> that All Sets is not checked. If you want to transform that vector <strong>in</strong> every<br />
output set, turn on All Sets.<br />
When us<strong>in</strong>g the Vector Output (<strong>in</strong>to Node Output CSys) option, you will only have to do step 2 above. <strong>FEMAP</strong> will<br />
transform the selected output vectors <strong>in</strong>to each selected node’s specified output coord<strong>in</strong>ate system.<br />
What You Get - Vector Output<br />
This command creates 12 new output vectors from the s<strong>in</strong>gle vector that you select. These vectors are the three<br />
transformed components of the orig<strong>in</strong>al global data, and n<strong>in</strong>e additional vectors that are the global X, Y, Z components<br />
of the transformed components. <strong>FEMAP</strong> needs these additional n<strong>in</strong>e vectors so that you can use the transformed<br />
component vectors for deformed plots, arrow plots, or other post-process<strong>in</strong>g options that work with global<br />
components.<br />
Plate Forces, Stresses, and Stra<strong>in</strong>s<br />
These options allow you to transform standard component plate forces, stresses, and stra<strong>in</strong>s to a specified “material<br />
angle”, a chosen axis of an exist<strong>in</strong>g coord<strong>in</strong>ate system, or by simply specify<strong>in</strong>g a vector.<br />
If you want to see component stresses output us<strong>in</strong>g the “<strong>in</strong>to Matl Direction” option, you will first want to set the<br />
“material angle” for the elements us<strong>in</strong>g the Modify, Update Elements, Material Angle command (for more <strong>in</strong>formation,<br />
see Section 4.7.3.13, "Modify, Update Elements, Material Angle..."), which has several options. <strong>FEMAP</strong> then
Geometry Interfaces 10.1-73<br />
uses the material angle for each output and the standard output vectors <strong>in</strong> the selected output set (unless you select<br />
All Sets) to transform the components <strong>in</strong>to the material angle coord<strong>in</strong>ate system for each element.<br />
Note:<br />
Before us<strong>in</strong>g the “<strong>in</strong>to Matl Direction” method, be sure to refer to your analysis program documentation<br />
to see how material orientation angles are used and to f<strong>in</strong>d any limitations.<br />
When us<strong>in</strong>g the “<strong>in</strong>to Csys” option, the vector and result<strong>in</strong>g angle are simply def<strong>in</strong>ed along a selected coord<strong>in</strong>ate<br />
direction (X, Y, or Z) of an exist<strong>in</strong>g coord<strong>in</strong>ate system selected from the Into CSys drop-down list. This method is<br />
especially useful if you want to align the material axes to the radial or tangential direction <strong>in</strong> a cyl<strong>in</strong>drical or spherical<br />
coord<strong>in</strong>ate system.<br />
If you choose the “along Vector” option, you will want to click the Vector button to also specify a vector. The standard<br />
vector def<strong>in</strong>ition dialog box will appear to allow you to assign a vector direction. <strong>FEMAP</strong> will transform the<br />
output for each element and align the X-direction of the output vector with the specified vector.<br />
The other <strong>in</strong>put required for the transformation of plate element output is the def<strong>in</strong>ition of the orig<strong>in</strong>al component<br />
data, which can be selected us<strong>in</strong>g the Output Orientation button. Please see the Output Orientation section below<br />
for more <strong>in</strong>formation. The new component plate forces, stresses, and stra<strong>in</strong>s will be placed <strong>in</strong> the user def<strong>in</strong>ed output<br />
vector numbers (9,000,000+).<br />
Solid Stresses and Stra<strong>in</strong>s<br />
These options allow you to transform standard component solid stresses and stra<strong>in</strong>s from the Material Axes specified<br />
for each solid property prior to runn<strong>in</strong>g the analysis (for more <strong>in</strong>formation, see the Solid Element Properties<br />
head<strong>in</strong>g <strong>in</strong> Section 4.2.2.3, "Volume Elements") to a specified exist<strong>in</strong>g coord<strong>in</strong>ate system or the current sett<strong>in</strong>g for<br />
Material Axes for each solid property.<br />
As with plate elements, the other important <strong>in</strong>put needed to properly transform the output is the def<strong>in</strong>ition of the<br />
orig<strong>in</strong>al component data orientation, which can be selected us<strong>in</strong>g the Output Orientation button. Please see the<br />
Output Orientation section below for more <strong>in</strong>formation. The new component solid stresses and stra<strong>in</strong>s will be<br />
placed <strong>in</strong> the user def<strong>in</strong>ed output vector numbers (9,000,000+).<br />
Output Orientation<br />
The Current Output Orientation dialog box conta<strong>in</strong>s the “default” output orientation for both Plate and Solid elements.<br />
For plane elements, there is an option for each type of output data to transform (Stress, Stra<strong>in</strong>, and Force),<br />
for each plane element shape that may appear <strong>in</strong> the model (Tria3, Tria6, Quad4, and Quad8).<br />
There are two options for triangular elements (“0..First Edge” or “1..Midside Locations”) with the default be<strong>in</strong>g<br />
“0..First Edge”, while there are three options for quadrilateral elements (“0..First Edge”, “1..Midside Locations”, or<br />
“2..Diagonal Bisector”) with “2..Diagonal Bisector” be<strong>in</strong>g the default.<br />
For solids, there are three orientation options (“0..Material Direction”, “1..Global Rectangular”, or “2..Element”)<br />
for different material types associated with solid properties (Isotropic, Anisotropic, and Hyperelastic).<br />
Press<strong>in</strong>g the Reset button when the Current Output Orientation dialog box is accessed through either the Transform<br />
Output Data dialog box will reset all of the output orientation options to the values currently set <strong>in</strong> the Preferences.<br />
For more <strong>in</strong>formation about these various orientation options, please see the Output Orientation portion of Section<br />
2.6.2.6, "Geometry/Model".<br />
Geometry Interfaces<br />
• Added support for direct geometry import of SolidWorks parts and assemblies.<br />
• Changed CATIA V5 direct geometry translator. CATIA V5 versions R7 to R18 are supported. Read<strong>in</strong>g of CAT-<br />
Parts and CATProducts created us<strong>in</strong>g versions prior to R7 is not supported<br />
The follow<strong>in</strong>g <strong>FEMAP</strong> <strong>in</strong>terfaces have been updated to support newer geometry formats:<br />
<strong>FEMAP</strong> Interface<br />
Latest Supported Version<br />
Parasolid Parasolid 20.0<br />
Solid Edge Solid Edge with Synchronous Technology (V 21)<br />
NX NX 6<br />
Pro/Eng<strong>in</strong>eer Wildfire 4
10.1-74<br />
F<strong>in</strong>ite Element Model<strong>in</strong>g<br />
For details, see “Geometry Interfaces” <strong>in</strong> the <strong>FEMAP</strong> User Guide.<br />
Analysis Program Interfaces<br />
Several of the analysis program <strong>in</strong>terfaces have been improved. These changes <strong>in</strong>clude:<br />
• “Analysis Set Manager Enhancements” on page 74<br />
• “<strong>FEMAP</strong> Neutral File Interface” on page 74<br />
• “NX Nastran Interface” on page 74<br />
• “Nastran Interfaces (NX and MSC/MD)” on page 75<br />
• “MSC/MD Nastran Interface” on page 75<br />
• “NEi Nastran Interface” on page 75<br />
• “ANSYS Interface” on page 75<br />
• “ABAQUS Interface” on page 76<br />
• “DYNA Interface” on page 76<br />
Analysis Set Manager Enhancements<br />
For details, see “Analysis Program Interfaces” <strong>in</strong> the <strong>FEMAP</strong> User Guide.<br />
• Added Analyze Multiple option. This accesses a multi-select dialog box which allows you to pick any number<br />
of Analysis Sets and run them one after another.<br />
<strong>FEMAP</strong> Neutral File Interface<br />
• Removed option for choos<strong>in</strong>g B<strong>in</strong>ary and Formatted <strong>in</strong> File Format Section. All Neutral files are Formatted.<br />
• Updated Neutral Read and Write for v10.0 changes<br />
NX Nastran Interface<br />
<strong>FEMAP</strong> Interface<br />
ACIS ACIS 19 Service Pack 1<br />
CATIA V5 V5 release 18<br />
SolidWorks SolidWorks 2009<br />
Latest Supported Version<br />
A number of bugs were corrected<br />
• Added support for triangle and quadrilateral axisymmetric elements (CTRAX3, CTRAX6, CQUADX4, and<br />
CQUADX8), which were new for NX Nastran version 6.<br />
• Added option for “Extended Solution Status Monitor<strong>in</strong>g”. Writes SYSTEM(442)=-1 to the *.dat file. This<br />
option is on by default and the feedback it produces is used by the NX Nastran Analysis Monitor<br />
• Added BOLTFACT to the PARAM section of the NASTRAN Bulk Data Options dialog box.<br />
• Added “Gaps as Contact” to the “Plate, Beam, and Rigid” section of the NASTRAN Bulk Data Options dialog<br />
box. Writes out a BCSET entry <strong>in</strong> Case Control.<br />
• Added Support for CQUADR and CTRIAR Composite Stress and Stra<strong>in</strong> output from the op2.<br />
Solution 601 updates<br />
• Added “Large Stra<strong>in</strong> Form” (ULFORM), “Incompatible Mode for 4 Node Shells” (ICMODE), “Max Disp/Iteration”<br />
(MAXDISP), and “Drill<strong>in</strong>g DOF Factor” (DRILLKF) options to the Analysis Options section of<br />
NXSTRAT Solver Parameters dialog box.<br />
• Added “Bolt Force Increments” (BOLTSTP), “Convert Dependency to True Stress” (CVSSVAL), and “Allow<br />
Element Rupture” (XTCURVE) options to the Other Parameters section of NXSTRAT Solver Parameters dialog<br />
box.
Nastran Interfaces (NX and MSC/MD) 10.1-75<br />
• Added “L<strong>in</strong>e Search Lower Bound” (LSLOWER) and “L<strong>in</strong>e Search Lower Bound” (LSUPPER) options to the<br />
L<strong>in</strong>e Search Sett<strong>in</strong>g section of NXSTRAT Iterations and Convergence Parameters dialog box.<br />
• Added “Do not allow Consistent Contact Forces” (TNSLCF) and “Use Old Rigid Target Algorithm”<br />
(RTALG=1) options to the Contact Control section of NXSTRAT Iterations and Convergence Parameters dialog<br />
box.<br />
• Changed “Segment Type” (CSTYPE) options from “0..Old” and “1..<strong>New</strong>” to “0..L<strong>in</strong>ear Contact” and “1..Element<br />
based” <strong>in</strong> the Contact Control section of NXSTRAT Iterations and Convergence Parameters dialog box.<br />
• Added support for 2-D Contact, usually used <strong>in</strong> analysis with axisymmetric elements.<br />
• Added support for Glued Contact.<br />
Solution 701 updates<br />
• Added Contact Control section to NXSTRAT Solver Parameters dialog box. Added “Segment Type”<br />
(CSTYPE) and “Use Old Rigid Target Algorithm” (RTALG=1) to this section.<br />
• Added Other Parameters section to NXSTRAT Solver Parameters dialog box. Added “Convert Dependency to<br />
True Stress” (CVSSVAL) and “Allow Element Rupture” (XTCURVE) options to this section.<br />
For details, see “Analysis Program Interfaces” <strong>in</strong> the <strong>FEMAP</strong> User Guide.<br />
Nastran Interfaces (NX and MSC/MD)<br />
• Added support for “-2..Automatic(Statics)” for INREL to the PARAM section of the NASTRAN Bulk Data<br />
Options dialog box.<br />
• Added support for SUPORT1 to the Boundary Conditions dialog box.<br />
• Added support for Fastener elements (CFAST) and properties (PFAST).<br />
• Added support for spr<strong>in</strong>g/damper elements (CELAS1 and CDAMP1) which use a property (PELAS and<br />
PDAMP). How the spr<strong>in</strong>g/damper elements are exported to the Nastran <strong>in</strong>put file is controlled via the element<br />
formulation.<br />
• Added Beam/Bar Cross-Section Dimensions as comments when Nastran <strong>in</strong>put file is written. When a Nastran<br />
file with these comments is imported <strong>in</strong>to <strong>FEMAP</strong>, the Beam/Bar Cross-Section Dimensions will be filled-<strong>in</strong>.<br />
• Added support for read<strong>in</strong>g Nastran Free-Field Auto Cont<strong>in</strong>uation (long entries with or without embedded cont<strong>in</strong>uation<br />
fields and large-field free field).<br />
• Changed SESTATICS to SESTATIC, which is correct for Nastran<br />
• Supported read<strong>in</strong>g results from multiple subcases (and not overwrit<strong>in</strong>g) from modal frequency and nonl<strong>in</strong>ear<br />
(static and transient)<br />
A number of bugs were corrected<br />
For details, see “Analysis Program Interfaces” <strong>in</strong> the <strong>FEMAP</strong> User Guide.<br />
MSC/MD Nastran Interface<br />
A number of bugs were corrected.<br />
For details, see “Analysis Program Interfaces” <strong>in</strong> the <strong>FEMAP</strong> User Guide.<br />
NEi Nastran Interface<br />
A number of bugs were corrected.<br />
For details, see “Analysis Program Interfaces” <strong>in</strong> the <strong>FEMAP</strong> User Guide.<br />
ANSYS Interface<br />
• Added support for MPC184 rigid beam/l<strong>in</strong>k elements. Specified us<strong>in</strong>g element Formulation.<br />
• Added support for output from rigid elements (Rigid Axial Force, Rigid Y Moment, Rigid Z Moment, Rigid Y<br />
Shear Force, Rigid Z Shear Force, and Rigid Torsional Moment)
10.1-76<br />
F<strong>in</strong>ite Element Model<strong>in</strong>g<br />
A number of bugs were corrected.<br />
For details, see “Analysis Program Interfaces” <strong>in</strong> the <strong>FEMAP</strong> User Guide.<br />
ABAQUS Interface<br />
A number of bugs were corrected.<br />
For details, see “Analysis Program Interfaces” <strong>in</strong> the <strong>FEMAP</strong> User Guide.<br />
DYNA Interface<br />
Tools<br />
• Added support for 10-noded tetrahedral elements. Also, added “16..10 Node Tetrahedron - EQ 16” and “17..10<br />
Node Composite Tetrahedron” formulations.<br />
• Added support for Rigid and Interpolation elements. Writes *CONSTRAINED_NODAL_RIGID_BODY<br />
(Rigid) and *CONSTRAINED_INTERPOLATION (Interpolation) entries.<br />
A number of bugs were corrected.<br />
For details, see “Analysis Program Interfaces” <strong>in</strong> the <strong>FEMAP</strong> User Guide.<br />
Check, Co<strong>in</strong>cident Elem...<br />
• Added choice between Quick Check (Just Corners) and Full Check and added Check Rigid Element option.<br />
Quick Check (Just Corners)<br />
<strong>FEMAP</strong> will only compare elements with the same number of “end” or “corner” nodes to one another to determ<strong>in</strong>e<br />
if they are co<strong>in</strong>cident. This option will f<strong>in</strong>d a l<strong>in</strong>ear element and parabolic element co<strong>in</strong>cident if the two elements<br />
share all corner nodes. You can only use the Check Elements with Different Types and/or Check Mass Elements<br />
options with this procedure.<br />
Full Check<br />
This method checks all nodes of all elements to determ<strong>in</strong>e co<strong>in</strong>cidence based on the options selected. Also, two<br />
additional options, Check Elements with Different Shape and Check Rigid Elements are only available when us<strong>in</strong>g<br />
this method.<br />
Check Rigid Elements<br />
This option <strong>in</strong>cludes Rigid elements <strong>in</strong> the check. Of course, if a rigid element shares all of the same nodes with<br />
another rigid element, those elements are considered co<strong>in</strong>cident. Also, if a s<strong>in</strong>gle “leg” of a rigid spider element<br />
(<strong>in</strong>dependent node to dependent node) is shared with a “leg” of another rigid spider element, those elements will be<br />
considered co<strong>in</strong>cident. F<strong>in</strong>ally, when the Check Elements of Different Types and Check Elements of Different Shape<br />
are both on, a “l<strong>in</strong>e element” (bar, beam, tube, etc.) which shares both nodes with a “leg” of a rigid spider element<br />
will be considered co<strong>in</strong>cident.<br />
Check, Distortion<br />
• Added Permanent and Reset buttons to the Check Element Distortions dialog box. Press<strong>in</strong>g the Reset button<br />
will set the values to the default values currently specified for each distortion check <strong>in</strong> the Element Distortion<br />
Preferences dialog box, which is accessed from the Geometry/Model tab of File, Preferences command. Press<strong>in</strong>g<br />
the Permanent button will take the values currently specified <strong>in</strong> this dialog box and make them the default<br />
values for Element Distortion Preferences.<br />
• Added “Nastran Warp<strong>in</strong>g” and “Comb<strong>in</strong>ed” Element Checks<br />
Nastran Warp<strong>in</strong>g Check<strong>in</strong>g...<br />
... evaluates the planarity of element faces, us<strong>in</strong>g the same equations Nastran uses when us<strong>in</strong>g the GEOMCHECK<br />
option “Q4_WARP”. This check only looks at quadrilateral faces. Internally, the Nastran Warp<strong>in</strong>g factor is def<strong>in</strong>ed<br />
by determ<strong>in</strong><strong>in</strong>g the distance of the corner po<strong>in</strong>ts of the element to the “mean plane” of the nodes divided by the<br />
average of the element’s diagonal lengths. For “flat” elements, all of the corner nodes lie on a plane, therefore the<br />
Nastran Warp<strong>in</strong>g factor is zero.
OLE/COM API 10.1-77<br />
Comb<strong>in</strong>ed (Quality) Check<strong>in</strong>g...<br />
The comb<strong>in</strong>ed element quality ranges from 0.0 (good) to 1.0 (bad). Any values outside this range will return a<br />
value of 1.0 and therefore <strong>in</strong>dicate the element quality is not adequate. Comb<strong>in</strong>ed Quality is useful as it provides a<br />
s<strong>in</strong>gle value that attempts to <strong>in</strong>dicate “overall” quality while dynamically modify<strong>in</strong>g nodal locations or chang<strong>in</strong>g<br />
mesh sizes. It is not a guarantee that a model will solve.<br />
The value for Comb<strong>in</strong>ed Quality is determ<strong>in</strong>ed us<strong>in</strong>g the maximum value of these seven values: Aspect Ratio,<br />
Taper, Alternate Taper, Internal Angle, Warp<strong>in</strong>g, Nastran Warp<strong>in</strong>g, and Jacobian. Only element checks which are<br />
currently “on” and applicable to the element shape will be used when calculat<strong>in</strong>g the Comb<strong>in</strong>ed Quality. Also, the<br />
values currently specified <strong>in</strong> the Check Element Distortions dialog box for each quality check are used by the Comb<strong>in</strong>ed<br />
Quality calculation.<br />
Note:<br />
Customized default values for each of the element distortion checks can be set <strong>in</strong> File, Preferences on<br />
the Geometry/Model tab by press<strong>in</strong>g the Element Distortion button. See Section 2.6.2.6, "Geometry/<br />
Model" for more <strong>in</strong>formation.<br />
If the “distortion check” calculated for Comb<strong>in</strong>ed Quality is less than 0.75 times the value specified for a particular<br />
“distortion check”, the correspond<strong>in</strong>g value is set to 0.0. If the calculated “distortion check” value is more than the<br />
value specified for a particular “distortion check”, the correspond<strong>in</strong>g value is 1.0. The Comb<strong>in</strong>ed Quality values are<br />
l<strong>in</strong>early <strong>in</strong>terpolated between 75% and 100% of the specified value for each distortion check.<br />
Here is a plot of “% of distortion” value vs. “Comb<strong>in</strong>ed Quality” value:<br />
OLE/COM API<br />
<strong>New</strong> API Objects and Attributes<br />
• Added NasExecSolutionMonitor, NasBulkInrelVal, NasBulkGapsAsContact, NasBulkBoltFact, and NasBulk-<br />
BoltFactVal to AnalysisMgr object<br />
• Added NasNXStratMaxDisp, NasNXStratBoltstp, NasNXStratCvssval, NasNXStratXtcurve, NasNXStratRtalg,<br />
NasNXStratTnslcf, NasNXStratDrillkf, NasNXStratLslower, and NasNXStratLsupper to AnalysisMgr<br />
object.<br />
• Added InternalToBoundary and InComb<strong>in</strong>edCurve to Curve object.<br />
• Added InternalToBoundary, attrTopology, attrMesher, attrMappedLevel, attrMapSubdivisions, attrMapEqualOnly,<br />
attrMapAltTri, attrMapRightBias, attrMapSplitQuads, attrMapAngleDeviation, attrMapM<strong>in</strong>CornerAngle,<br />
attrMidsideGeom, attrMidsideAngle, attrM<strong>in</strong>Between, attrMaxAspect, attrQuickCutNodes,<br />
attrQuickCutAngle, attrSmoothLaplacian, attrSmoothIter, attrSmoothTolerance, attrConnectEdgeNodes, attr-<br />
ConnectEdgeNodeTol, attrOffsetFrom, attrInitialized, and attrPostMeshCleanup to Surface object
10.1-78<br />
F<strong>in</strong>ite Element Model<strong>in</strong>g<br />
• Added RotateCSys, TransformDeformMode, TransformDeformCSys, TransformDeformX, TransformDeformY,<br />
TransformDeformZ, TransformNodalMode, TransformNodalCSys, TransformPlateMode, Transform-<br />
PlateCSys, TransformPlateDOF, vTransformPlateVector, TransformPlateVector, TransformSolidMode, and<br />
TransformSolidCSys to View object.<br />
• Added Info_OrientSolidIsoOutput, Info_OrientSolidAnisoOutput, Info_OrientSolidHyperOutput,<br />
Info_OrientTria3StressOuput, Info_OrientTria3Stra<strong>in</strong>Ouput, Info_OrientTria3ForceOuput,<br />
Info_OrientTria6StressOuput, Info_OrientTria6Stra<strong>in</strong>Ouput, Info_OrientTria6ForceOuput,<br />
Info_OrientQuad4StressOuput, Info_OrientQuad4Stra<strong>in</strong>Ouput, Info_OrientQuad4ForceOuput,<br />
Info_OrientQuad8StressOuput, Info_OrientQuad8Stra<strong>in</strong>Ouput, Info_OrientQuad8ForceOuput to the Global<br />
Properties of the ma<strong>in</strong> <strong>FEMAP</strong> application object.<br />
• Added Pref_ReadTabSize, PickBoundaryInternalMode, and PickComb<strong>in</strong>edCurveInternalMode to the Global<br />
Properties of the ma<strong>in</strong> <strong>FEMAP</strong> application object.<br />
<strong>New</strong> API Methods<br />
• Added SelectID, NextInSet, FirstInSet, and Count methods to the Common Entity Properties object<br />
• Added OutputVectors method to the OutputSet object<br />
• Added AnalyzeMultiple method to AnalysisMgr object<br />
• Added GetMeshLoc, GetMeshLocXYZ, IsSmoothEdge, Surfaces, SurfacesAsSet, ElementsAsSet, NodesAs-<br />
Set, Normal, IsComb<strong>in</strong>edCurve, GetComb<strong>in</strong>edCurves, Comb<strong>in</strong>eCurves, Comb<strong>in</strong>eCurvesAsSet, and Facets<br />
methods to Curve object<br />
• Added AddOutput method to DataTable object<br />
• Added GetCentroid, GetEdgeNodes, GetFaceNodes, and IsParabolic methods to Elem object<br />
• Added Add method to Group object<br />
• Added GetPly, SetPly, GetAllPly, and SetAllPly methods to Layup object<br />
• Added InComb<strong>in</strong>edCurve, NodesAsSet, Curves, CurvesAsSet, and SurfacesAsSet methods to Po<strong>in</strong>t object<br />
• Added SharedDelete, JumpToEnd, Size, Time Created, TimeWritten, and TimeAccessed methods to Read<br />
object<br />
• Added RemoveNotCommon, RemoveNotCommonToGroup, RemoveGroup, Debug, IsSetAdded, Convert-<br />
ToAllSurfaces, ConvertToBoundarySurfaces, ConvertToBoundarySurfacesOnly, ConvertToInternalSurfaces,<br />
ConvertToAllCurves, ConvertToComb<strong>in</strong>edCurves, ConvertToComb<strong>in</strong>edCurvesOnly, ConvertToInternal-<br />
Curves, IsArrayAdded, HasCommon, and RemoveArray methods to Set object<br />
• Added CurvesAsSet, SurfacesAsSet, ElementsAsSet, and NodesAsSet methods to Solid object<br />
• Added Current method to Sort object<br />
• Added NormalAtXYZ, NormalBox, BoundarySurfaces, AdjacentSurfaces, BoundarySurfacesAsSet, Adjacent-<br />
SurfacesAsSet, CurvesAsSet, Po<strong>in</strong>tsAsSet, EndPo<strong>in</strong>tsAsSet, ElementsAsSet, NodesAsSet, and Solid methods<br />
to Surface object<br />
Updated and Corrected API Methods<br />
• Updated Curves and Surfaces methods of Solid Object.<br />
• Updated Curves and Po<strong>in</strong>ts methods of Surface Object.<br />
The follow<strong>in</strong>g functions have been added:<br />
• feAppModelDefragment<br />
• feGetElementEdges<br />
• feElementFreeEdge<br />
• feElementFreeFace<br />
• feSurfaceNormalDeviation<br />
• feAddToolbarSubmenuSubmenu
Preferences 10.1-79<br />
• feBoundaryAddSurfaces<br />
• feCoordVectorPlaneIntersect<br />
• feSurfaceConvert<br />
• feGroupMoveToLayer<br />
• feBoundaryFromPo<strong>in</strong>ts<br />
• feAutoMeshAssociativity<br />
• feSolidStitchNoCleanup<br />
• feAppVersion<br />
The follow<strong>in</strong>g functions have been fixed, changed or removed:<br />
• feFilePictureSave has been modified to support new file types available <strong>in</strong> File, Picture, Save.<br />
• feOutputTransform has been modified to support new options available <strong>in</strong> Model, Output, Transform.<br />
• feRenumber has been modified to allow renumber<strong>in</strong>g of Layups, Connectors, Regions, Connection Properties,<br />
Functions, Analysis Sets, and Layers.<br />
• feDelete has been modified to allow delet<strong>in</strong>g of Layups, Analysis Sets <strong>in</strong> the Analysis Manager, Connection<br />
Properties, and Connectors.<br />
Preferences<br />
Views<br />
• Removed preference for Autoplot Created/Modified Geometry. <strong>FEMAP</strong> needs to do this <strong>in</strong> order to function<br />
properly.<br />
Render<br />
• Added preference for XOR Pick<strong>in</strong>g Graphics.<br />
XOR pick<strong>in</strong>g effects how entities are highlighted when graphically pick<strong>in</strong>g <strong>in</strong> <strong>FEMAP</strong>. This was the only pick<strong>in</strong>g<br />
graphics method <strong>in</strong> <strong>FEMAP</strong> before version 10. With the advent of W<strong>in</strong>dows Vista, pick<strong>in</strong>g was not able to draw to<br />
the screen image directly which made XOR pick<strong>in</strong>g much less efficient (slower) on some graphics cards. If XOR<br />
pick<strong>in</strong>g is “off”, <strong>FEMAP</strong> basically draws a bitmap of the screen image and then determ<strong>in</strong>es the color that is the<br />
“XOR” of the entity color and draws the entity twice, once with the “XOR” of the entity color but larger or thicker<br />
and once with the entity color. Un-highlight<strong>in</strong>g is done by redraw<strong>in</strong>g the bitmap of the screen. In non Vista hardware,<br />
turn<strong>in</strong>g XOR pick<strong>in</strong>g “on” will likely give better clarity but for Vista, performance is better with it “off”.<br />
• Added preference for Dialog Refresh.<br />
With certa<strong>in</strong> graphics cards, the view will not be redrawn beh<strong>in</strong>d open dialog boxes, thus if the dialog box is moved<br />
after the model has been dynamically rotated the display may not be correct. When this option is “on”, <strong>FEMAP</strong><br />
will force a redraw of the graphics w<strong>in</strong>dow.<br />
• Added preference for Block Size.<br />
The block size determ<strong>in</strong>es the size of “blocked data” <strong>in</strong> “collectors” used by <strong>FEMAP</strong> <strong>in</strong>ternally. If you have a few<br />
large “collectors”, a larger block size should provide better performance. On the other hand, if you have a large<br />
number of small collectors (i.e., often happens with lam<strong>in</strong>ates), you might use a great deal of memory with too<br />
large a block size, so select<strong>in</strong>g a smaller block size should be beneficial.<br />
User Interface<br />
• Updated how Load Layout works when load<strong>in</strong>g a layout from an older version of the software <strong>in</strong>to a newer version.<br />
If a *.LAYOUT file is loaded <strong>in</strong>to a newer version of the software, only “Shortcut Keys” and “User Commands”<br />
will be updated, while “Menus and Toolbars” and “Panes” will not.<br />
Geometry/Model<br />
• Added “Construction Geometry - when used” preference.<br />
Allows you to choose how “construction geometry” will be handled <strong>in</strong> <strong>FEMAP</strong> after the construction geometry has<br />
been used by another geometry command. In simplest terms, “construction geometry” is a curve used to create a
10.1-80<br />
F<strong>in</strong>ite Element Model<strong>in</strong>g<br />
surface us<strong>in</strong>g certa<strong>in</strong> methods on the “Geometry, Surface...” menu (Edge Curves, Aligned Curves, Ruled, Extrude,<br />
Revolve, and Sweep) or a surface or boundary surface used to create a solid via extrud<strong>in</strong>g or revolv<strong>in</strong>g. Construction<br />
geometry also <strong>in</strong>cludes any curves used by a “construction surface” and all po<strong>in</strong>ts on “construction curves”.<br />
<strong>FEMAP</strong> has three options for handl<strong>in</strong>g “construction geometry”:<br />
0..Delete (default) - All “construction geometry” will be automatically deleted from the model after use by one of<br />
the geometry commands specified above.<br />
1..Move to NoPick Layer - Moves all “construction geometry” to layer “9999..Construction Layer”. Layer “9999”<br />
is always the default “NoPick Layer”. When an entity is on the “NoPick Layer” and that layer is visible entities can<br />
be seen but not graphically selected from the graphics w<strong>in</strong>dow. You will need to change the “NoPick Layer” to<br />
“0..None” <strong>in</strong> order to select these entities graphically if you would like to use them aga<strong>in</strong> for any reason.<br />
2..Do Noth<strong>in</strong>g - “Construction geometry” will not be moved to Layer “9999..Construction Layer” and will also not<br />
be deleted from the model. All “construction geometry” will rema<strong>in</strong> <strong>in</strong> the model on the orig<strong>in</strong>al layer and be available<br />
for graphical selection when the layer conta<strong>in</strong><strong>in</strong>g the geometry is visible.<br />
Note:<br />
The only option available for “construction geometry” <strong>in</strong> <strong>FEMAP</strong> prior to version 10, was “1..Move to<br />
NoPick Layer”, so set this option to have <strong>FEMAP</strong> handle construction geometry as it has <strong>in</strong> the past.<br />
• Added Output Orientation button which accesses the Current Output Orientation dialog box.<br />
This dialog box allows you to choose the default orientation of the “X”<br />
direction for different types of output for different element types. The<br />
options set <strong>in</strong> this dialog box will be the default values set for all new<br />
models. These options can be changed “on the fly” for a particular<br />
model when us<strong>in</strong>g the Model, Output, Transform command (see Section<br />
8.5.8, "Model, Output, Transform...") or when us<strong>in</strong>g the “Transformation”<br />
functionality of the View, Select command (see Section<br />
8.2.2.2, "Select<strong>in</strong>g Data for a Deformed or Contour Style").<br />
The Current Output Orientation dialog box conta<strong>in</strong>s the “default” output<br />
orientation for both Plate and Solid elements. For plane elements,<br />
there is an option for each type of output data to transform (Stress,<br />
Stra<strong>in</strong>, and Force), for each plane element shape that may appear <strong>in</strong><br />
the model (Tria3, Tria6, Quad4, and Quad8).<br />
Defaults are for Nastran. Consult your analysis program’s documentation<br />
concern<strong>in</strong>g the orig<strong>in</strong>al coord<strong>in</strong>ate system def<strong>in</strong>ition.<br />
There are two options for triangular elements (“0..First Edge” or<br />
“1..Midside Locations”) with the default be<strong>in</strong>g “0..First Edge”<br />
First Edge<br />
Midside Locations<br />
Node 1 Node 2 Node 1 Node 2<br />
“0..First Edge” orients the element X-direction to a vector between “Node 1” and “Node 2” of the element, while<br />
“1..Midside Locations” orients the element X-direction to a vector from the “midpo<strong>in</strong>t” between “Node 1” and<br />
“Node 3” to the midpo<strong>in</strong>t between “Node 2” and “Node 3”.<br />
There are three options for quadrilateral elements (“0..First Edge”, “1..Midside Locations”, or “2..Diagonal Bisector”)<br />
with “2..Diagonal Bisector” be<strong>in</strong>g the default.
Preferences 10.1-81<br />
First Edge Midside Locations Diagonal Bisector<br />
Node 3 Node 3 Node 3<br />
Node 4 Node 4 Node 4<br />
Node 1 Node 2 Node 1 Node 2 Node 1 Node 2<br />
“0..First Edge” orients the element X-direction to a vector between “Node 1” and “Node 2” of the element, while<br />
“1..Midside Locations” orients the element X-direction to a vector from the “midpo<strong>in</strong>t” between “Node 1” and<br />
“Node 4” to the midpo<strong>in</strong>t between “Node 2” and “Node 3”. “2..Diagonal Bisector” orients the X-direction of the<br />
elements to a vector orig<strong>in</strong>at<strong>in</strong>g from the po<strong>in</strong>t where a l<strong>in</strong>e from “Node 2” to “Node 4” <strong>in</strong>tersects a l<strong>in</strong>e from<br />
“Node 1” to “Node 3” and extends out follow<strong>in</strong>g a vector which bisects the angle from “Node 2” to the “Intersection<br />
po<strong>in</strong>t” to “Node 3”.<br />
For solids, there are three orientation options (“0..Material Direction”, “1..Global Rectangular”, or “2..Element”)<br />
for different material types associated with solid properties (Isotropic, Anisotropic, and Hyperelastic).<br />
Press<strong>in</strong>g the Reset button when the Current Output Orientation dialog box is accessed through the Preferences will<br />
reset all of the output orientation options to the default values set when <strong>FEMAP</strong> is first <strong>in</strong>stalled.<br />
• Added Element Distortion button which accesses the Element Distortion Preferences dialog box.<br />
This dialog box allows you to set default values used when check<strong>in</strong>g<br />
element distortions. Also, you may choose which element<br />
checks will be “on” by default when us<strong>in</strong>g the Tools, Check, Distortion<br />
command.<br />
The Element Distortion checks are:<br />
•Aspect Ratio<br />
•Taper<br />
•Alternate Taper<br />
•Internal Angles<br />
•Warp<strong>in</strong>g<br />
•Nastran Warp<strong>in</strong>g<br />
•Tet Collapse<br />
•Jacobian<br />
•Comb<strong>in</strong>ed<br />
See Section 7.4.5.6, "Tools, Check, Distortion..." for descriptions<br />
of the <strong>in</strong>dividual element distortion checks.<br />
The values set <strong>in</strong> this dialog box will be used for element distortion every time <strong>FEMAP</strong> is opened. If you change<br />
the values while <strong>FEMAP</strong> is open, those values will persist until that session of <strong>FEMAP</strong> has been closed. Press<strong>in</strong>g<br />
the Permanent button when us<strong>in</strong>g the Tools, Check, Distortion command will update these default values.<br />
• Added Pre-v10 Tet Mesh<strong>in</strong>g and Pre-v10 Surface Mesh<strong>in</strong>g preferences. The tetrahedral and surface mesh<strong>in</strong>g <strong>in</strong><br />
<strong>FEMAP</strong> has dramatically changed for version 10. You will f<strong>in</strong>d <strong>in</strong> the “options” of several of the Mesh, Geometry...<br />
commands, there are check boxes to use the “pre-v10” meshers. These two switches <strong>in</strong> the preferences<br />
allow you to always use the “pre-v10” tetrahedral and/or surface mesh<strong>in</strong>g if you feel more comfortable with<br />
these meshers and the associated default values they use.
10.1-82<br />
F<strong>in</strong>ite Element Model<strong>in</strong>g<br />
Interfaces<br />
• Added Improve S<strong>in</strong>gle Field Precision option. When this option is on, <strong>FEMAP</strong> will write all values specified<br />
us<strong>in</strong>g “scientific notation” or longer than 8 characters to the Nastran <strong>in</strong>put file without the “E” designation. For<br />
<strong>in</strong>stance, a value such as “4.86111E-4” <strong>in</strong> <strong>FEMAP</strong> would appear <strong>in</strong> the Nastran <strong>in</strong>put file as “4.8611-4” when<br />
this option is on <strong>in</strong>stead of “4.861E-4”. Small field only.<br />
Colors<br />
• Added preference for sett<strong>in</strong>g the default color of Comb<strong>in</strong>ed Curves.<br />
Spaceball<br />
• Added preference for Pr<strong>in</strong>t Debug Messages.