Bitology - Weaver Leather
Bitology - Weaver Leather
Bitology - Weaver Leather

Create successful ePaper yourself
Turn your PDF publications into a flip-book with our unique Google optimized e-Paper software.
1<br />
<strong>Bitology</strong><br />
We know it’s tempting to buy the prettiest, coolest looking bit that jumps out at you when<br />
you’re looking at the bit wall in your local tack store. But did you know that the type of bit,<br />
mouthpiece and shanks serve different purposes on your horse?<br />
On the surface, bits may seem pretty cut and dry, but when you start digging deeper, you will realize that there is a<br />
science behind them and their functions. It is important to remember as you read through our information and do<br />
further research on your own that there are varying opinions on the uses of certain types of bits as well as different<br />
training methods. We recommend you find the bit that works well and is comfortable for both you and your horse.<br />
Any bit in the wrong hands can do damage to a horse’s mouth. Finding the right bit may require some trial and<br />
error, so it is best to start with the least severe bit possible.<br />
Bits are available in a wide selection of styles to meet a variety of needs and the options can be overwhelming. Bits<br />
are a communication tool intended to work with your body’s cues as you direct your horse. If you’re looking for a<br />
bit to solve your horse’s behavioral problems, we recommend consulting a trainer instead. No bit can fix everything<br />
and there is no one bit that works well for every horse.<br />
Please use the information here, and advice from a trainer, to choose the right bit for you and your horse.<br />
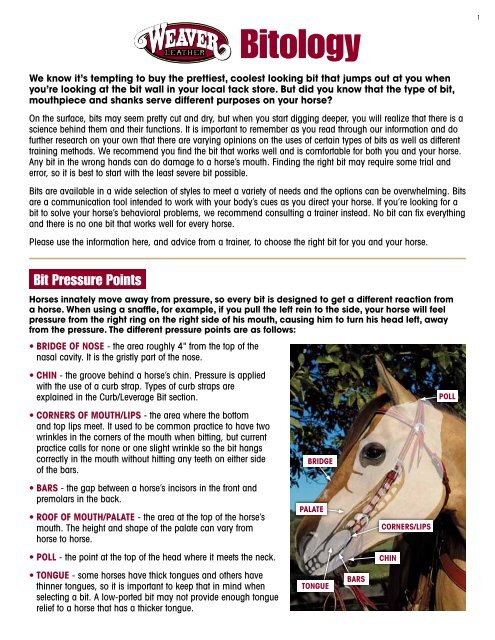
Bit Pressure Points<br />
Horses innately move away from pressure, so every bit is designed to get a different reaction from<br />
a horse. When using a snaffle, for example, if you pull the left rein to the side, your horse will feel<br />
pressure from the right ring on the right side of his mouth, causing him to turn his head left, away<br />
from the pressure. The different pressure points are as follows:<br />
• Bridge of nose - the area roughly 4" from the top of the<br />
nasal cavity. It is the gristly part of the nose.<br />
• Chin - the groove behind a horse’s chin. Pressure is applied<br />
with the use of a curb strap. Types of curb straps are<br />
explained in the Curb/Leverage Bit section.<br />
• Corners of mouth/lips - the area where the bottom<br />
and top lips meet. It used to be common practice to have two<br />
wrinkles in the corners of the mouth when bitting, but current<br />
practice calls for none or one slight wrinkle so the bit hangs<br />
correctly in the mouth without hitting any teeth on either side<br />
of the bars.<br />
• Bars - the gap between a horse’s incisors in the front and<br />
premolars in the back.<br />
• Roof of mouth/palate - the area at the top of the horse’s<br />
mouth. The height and shape of the palate can vary from<br />
horse to horse.<br />
• Poll - the point at the top of the head where it meets the neck.<br />
• Tongue - some horses have thick tongues and others have<br />
thinner tongues, so it is important to keep that in mind when<br />
selecting a bit. A low-ported bit may not provide enough tongue<br />
relief to a horse that has a thicker tongue.<br />
BRIDGE<br />
PALATE<br />
tongue<br />
bars<br />
CORners/lips<br />
CHIN<br />
poll
2<br />
Parts of a Bit<br />
• Purchase - The part of the bit that is located above the<br />
mouthpiece. With a short purchase, the bit will act quicker in<br />
a horse’s mouth when the rider pulls on the reins. With a long<br />
purchase, the bit is slower to react and works more on the poll.<br />
bars<br />
mouthpiece<br />
purchase<br />
shank<br />
cheek<br />
• Shank - The part of the bit that is located below the mouthpiece.<br />
It will give you leverage on the mouthpiece. The shorter<br />
the shank, the softer it is. The longer the shank, the more<br />
control you have.<br />
• Cheeks - This refers to the sides of the bit. The cheek includes<br />
both the purchase and the shank.<br />
• Mouthpiece - The mouthpiece goes in the horse’s mouth,<br />
across and on top of the tongue.<br />
• Bars - The bars of a bit rest on the bars of the horse’s mouth.<br />
The closer together the bars of the bit are, the more pressure is<br />
applied to the bars of the horse’s mouth.<br />
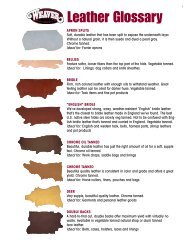
Types of Mouthpiece Metal<br />
Sweet Iron<br />
Sweet iron is intended to<br />
rust. It produces a sweet<br />
taste as rusting occurs to<br />
promote salivation.<br />
Copper<br />
Copper causes a horse’s<br />
mouth to salivate. This<br />
allows the mouth to<br />
stay soft and useable<br />
to the rider.<br />
Copper Inlay<br />
Like copper, a copper<br />
inlay encourages<br />
salivation and is often<br />
found on a sweet iron or<br />
stainless steel mouthpiece.<br />
Stainless Steel<br />
Stainless steel provides<br />
superior strength and a<br />
clean, neat look to any<br />
mouthpiece. A solid<br />
stainless steel mouthpiece,<br />
however, does not promote<br />
salivation and is best for<br />
horses with a consistently<br />
moist mouth. Stainless steel<br />
mouthpieces are available<br />
with copper inlays.<br />
Common Mouthpieces<br />
When it comes to mouthpieces, a general rule of thumb to follow<br />
is that the thicker the mouthpiece, the gentler it will be on your<br />
horse’s mouth. A thinner mouthpiece is more severe because the<br />
pressure it applies is focused on a smaller area on the tongue and<br />
bars. Remember, even the mildest mouthpiece can be damaging to<br />
a horse’s mouth in the wrong hands.<br />
Smooth-Mouth Snaffle<br />
Typically broken in the middle, this mild mouthpiece is gentle<br />
on your horse and helps to keep its mouth soft and responsive.<br />
It works on the corners of the mouth and the bars.<br />
Three-Piece Snaffle Mouth<br />
This mild mouthpiece is broken in two places which adds<br />
tongue pressure and allows the bit to work on the outside<br />
corners of the bars.<br />
Twisted Wire Snaffle Mouth<br />
Typically considered a mouthpiece with more authority, this should<br />
be used only in experienced hands. The twist creates rigid edges<br />
that can damage a horse’s mouth in the wrong hands. In the right<br />
hands, it can sharpen a horse’s responsiveness. We recommend<br />
this mouthpiece only be used by more advanced riders.<br />
Solid Mouth<br />
The firm feel of this type of mouthpiece allows more pressure<br />
to be applied to the tongue and bars than that of a broken<br />
mouthpiece. Be sure to find the right port that allows enough<br />
tongue relief for your horse.<br />
Correction Mouth<br />
Even though “correction” sounds like this could be harsh, the<br />
jointed action on these mouthpieces actually makes them milder<br />
than a solid mouth bit and allows your horse to feel signals before<br />
the bit completely engages. The port on correction mouthpieces<br />
is designed to provide tongue relief and work on the palate.
3<br />
Types of Bits<br />
Generally speaking, bits can be classified into three main categories, snaffle, curb/leverage and<br />
hackamore and are designed to work on different pressure points.<br />
Snaffle Bits<br />
By definition a snaffle bit is a direct pull or direct action bit, meaning that when you are holding the reins in two<br />
hands atop your horse, you have direct contact with its mouth. Whatever you do with your hands, your horse<br />
should do. For example, when you move your hand to the left, your horse will feel that cue and realize that you<br />
want him to go that way.<br />
Most trainers will start a young horse in a snaffle to gain the framework it needs to transition to a curb bit. Such a<br />
foundation includes lateral flexion, collection, transitions, responsiveness to leg cues and more. Again, this depends<br />
on the method of training the trainer uses. In the vaquero tradition of training, for example, horses are typically<br />
started in a bosal hackamore.<br />
Best if used with an all leather curb strap to prevent the bit from pulling through the horse’s mouth, O-ring and<br />
offset D-ring snaffles are great bits for starting young colts, training exercises, introducing a new riding discipline or<br />
softening an older, more seasoned horse’s mouth.<br />
Types of snaffles (snaffles are usually a matter of preference):<br />
➊<br />
➋<br />
➌<br />
➊ O-Ring Snaffle<br />
These very mild, functional bits are typically available with smooth or twisted wire broken<br />
mouthpieces. The mouthpiece slides up and down the rings and moves independently of<br />
the rings, meaning that your horse can feel the movement caused by even a subtle rein<br />
cue. This type of snaffle helps keep the mouth soft and your horse responsive. Works on<br />
the bars, corners of the mouth and tongue.<br />
➋ Offset D-Ring Snaffle<br />
Offset refers to the fixed position of the rings and how they connect to the mouthpiece.<br />
The straight side of the D-ring connected to the mouthpiece is designed to help prevent<br />
the bit from pulling through the mouth and to eliminate any pinching. The rings and<br />
mouthpiece also work independently of each other on this bit, making this mild bit great<br />
for starting or re-schooling a horse. Works on the bars, corners of the mouth and tongue.<br />
➌ Full Cheek Snaffle<br />
Typically seen in English disciplines, the full cheeks on this bit are designed to help prevent<br />
the bit from pulling through the mouth. Works on the bars, corners of the mouth and<br />
tongue (can also work on the poll when bit loops are used with a bridle).<br />
➍<br />
➍ D-Ring Snaffle<br />
The rings on this bit help prevent it from pulling through the horse’s mouth. Often seen in<br />
the English discipline but also used in western riding, it is another mild bit great for starting<br />
or re-schooling a horse. Works on the bars, corners of the mouth and tongue.<br />
➎<br />
➎ Eggbutt Snaffle<br />
Another bit commonly used for English riding, the name refers to the shape of the ring. It<br />
can come in either a straight or broken mouthpiece and is designed to prevent pinching<br />
of the horse’s mouth. Works on the poll and bars of the mouth.
Curb/Leverage Bits<br />
Curb bits are leverage bits that are generally used on more seasoned, finished horses and when riding with one<br />
hand. There are a wide variety of curb bits with different mouthpieces, different cheeks and different lengths of<br />
shanks. They work on the tongue, bars of the mouth, palate, corners of the mouth and under the chin (with the<br />
use of a curb strap). Comfort is key when choosing any bit for your horse.<br />
The longer the shank is on the bit, the more leverage you have when the reins are pulled. At the same time, the<br />
horse is also rewarded quicker when the pressure from the reins is released. A curb bit with a shorter shank,<br />
however, will not have as much leverage and is slower to reward your horse with the release of pressure.<br />
The amount of pressure applied by a curb bit is determined by a leverage ratio. To<br />
determine the ratio, measure from the middle of the side of the mouthpiece to the<br />
inside of the top ring where the headstall connects. This is the purchase measurement.<br />
Then, measure from the middle of the mouthpiece to the point on the bottom ring<br />
where the reins connect. This is the shank measurement. Next, divide the smaller of<br />
the two numbers into the larger to get the ratio. If, for example, the purchase measures<br />
2" and the shank measures 6", the leverage ratio would be 3:1. This means that your<br />
horse will feel 3 pounds of pressure for every pound of pressure you apply to the bit<br />
with your hands. The higher the ratio, the more severe the bit will be.<br />
leverage ratio Example<br />
Purchase<br />
Measurement<br />
= 2"<br />
Shank<br />
Measurement<br />
= 6"<br />
2/6 = 3/1 = 3:1 Leverage Ratio<br />
Common Types of Curb Bits<br />
The general purpose bits pictured below feature 7" loose cheeks with curved grazing shanks that offer you the<br />
flexibility of a mild to moderately leveraged bit for great control on a seasoned horse. The loose cheeks leave a<br />
door open for your horse to feel the signal coming before the curb strap engages.<br />
These are great bits for performance, competition, trail and everyday riding. Remember, any bit in the wrong hands<br />
can be dangerous. The proper bit should be selected based on the horse AND the rider. Another important thing to<br />
keep in mind is that a thinner mouthpiece will not be as gentle as a thicker one and has the potential to bruise your<br />
horse’s mouth. The following are just a sampling of the wide array of mouthpieces available.<br />
4<br />
➊<br />
➊ 5" Sweet Iron Snaffle Mouth with Copper Inlay<br />
This smooth, mild snaffle mouth is gentle on your horse and<br />
is designed to work on the tongue, bars and corners of the mouth.<br />
➋<br />
➋ 5" Sweet Iron Ported Mouth with Copper Cricket and Inlay<br />
Designed with a cricket to keep the jaw relaxed or to pacify a nervous horse,<br />
this bit works on the tongue, bars, palate and chin.<br />
➌<br />
➌ 5" Medium Port Mouth with Copper Inlay<br />
This bit provides a moderate amount of tongue relief as it<br />
works on the corners of the mouth, tongue, bars and palate.<br />
➍<br />
➍ 5" Low Port Correction Mouth with Flat Copper Roller Bars<br />
Working on the bars, chin and palate, this bit provides ample tongue relief<br />
with its medium port.
Curb/Leverage Bits Cont.<br />
CURB straps<br />
• A curb strap is an important piece of tack that applies pressure under<br />
the horse’s chin to help with the leverage and timing of a curb bit.<br />
• Like bits, the types of curb straps and chains vary. Single chain curbs<br />
apply more pressure than the double chain variety while an all leather<br />
curb strap tends to be the gentlest and supplest.<br />
• A common rule of thumb to follow when adjusting curb straps is that<br />
you should be able to fit two fingers vertically between the strap and<br />
the chin groove.<br />
• A looser curb strap or chain allows time for the horse to get the signal<br />
that pressure under its chin is coming. Riders who have quick hands or<br />
are prone to jerking would be better off using a looser chin strap. On the<br />
other hand, riders who have quiet, soft hands and great timing can get<br />
away with using a little bit tighter strap. When a rider has great timing,<br />
he will reward the horse by releasing pressure the instant his horse<br />
performs the desired action.<br />
Types of Curb Straps and Chains<br />
4-1/2" Single Flat Link Chain Curb Strap<br />
Heavy-Duty Single Link Chain Curb Strap<br />
Double Flat Link Chain Curb Strap<br />
Flat <strong>Leather</strong> Curb Strap<br />
5<br />
Types of Cheeks<br />
There is a vast array of bits on the market today and it can be very confusing trying to decide what will work best<br />
for you and your horse. <strong>Weaver</strong> <strong>Leather</strong> has various types of cheeks available on our curb bits. Cheeks include the<br />
purchase and the shanks.<br />
➊<br />
➋<br />
➌<br />
➍<br />
➎<br />
➏<br />
➊ Shank Bits with 8" Cheeks<br />
Designed for showing or for more seasoned, older horses, the longer shanks on these moderate to high leverage<br />
bits provide a faster response from the rider’s hand to the horse’s mouth as well as a quicker reward when<br />
pressure is released. As with any bit, the quieter the hands, the less severe the bit will be.<br />
➋ Shank Bits with 7" Cheeks<br />
The curved grazing design of these shanks offers the rider the flexibility of a mild to moderately leveraged bit,<br />
providing great control. These are probably the most versatile, well-rounded type of shanks offered to both<br />
horse and rider, making them great for a variety of disciplines from performance and competition to trail and<br />
everyday riding.<br />
➌ Argentine Bits<br />
These low leverage training bits are commonly used as a transition bit from a ring snaffle to a fuller shank bit<br />
and can be used by any level of rider needing a softer feel. Designed to be used with a curb strap, these bits<br />
help introduce young horses to curb pressure. Reins can also be placed in the ring located near the middle of<br />
the cheek for more direct action on the corners of the horse’s mouth, like a snaffle.<br />
➍ Grazing Shanks/Cheeks<br />
The cheeks on these bits are fixed (not broken or flexible) and the shanks curve backward to provide mild<br />
leverage. The greater the curve of the shank, the more delayed the signal time is to the horse, which makes<br />
this style of cheek a popular choice with novice riders on trained horses.<br />
➎ “S” Shank Bits<br />
An “S” shank design is great for horses that are prone to lipping the shank. Our moderately leveraged “S”<br />
Shank bits use mouthpieces that are great for performance horses in speed events where lift and quicker<br />
response are needed.<br />
➏ Gag & Wonder Bits<br />
Depending on the degree of slide on the gag, these bits aid in lifting the shoulders, allow more flex for turning<br />
and provide more control at a higher rate of speed, making them popular for barrel racing and other speed<br />
events. The action of these bits works off the top of the poll to create softness and should be used with a loose<br />
chain curb.
HACKAMORES<br />
A hackamore may look relatively simple in its construction of a noseband connected to a headstall and reins;<br />
however, to control a horse without a mouthpiece takes patience and training. Hackamores were introduced<br />
to America in the early 1800s by Spanish vaqueros. Since then, many trainers have found great value in<br />
implementing hackamores into their training regimens. Some trainers may start young horses in a hackamore<br />
while others may introduce the hackamore after starting a horse off in a snaffle. Again, it is a matter of preference.<br />
Bosal and mechanical hackamores are often also used on older horses, bit-sour horses or horses with damaged<br />
bars and/or tongues.<br />
6<br />
Proper placement is important when fitting a hackamore. Adjusted too low, it will hinder the horse’s breathing. It<br />
should sit on the gristly part of your horse’s nose, approximately 4" from the top of the nasal cavity. Size of the<br />
hackamore is also important. The wider/thicker the nosepiece, the more pressure is dispersed, thereby making it<br />
gentler than a thinner nosepiece. There are two common types of hackamores used today:<br />
Bosal Hackamore - commonly used for training<br />
This type of hackamore consists of a bosal (braided noseband), headstall (bosal hanger) and,<br />
traditionally, horsehair reins called a mecate [muh-kah-tee]. Braided nylon mecates are also<br />
used, so it typically depends on preference. Bosal hackamores work on the bridge of the nose,<br />
the sensitive tissue along the nose and the chin.<br />
Bosal hackamores can teach a horse to be softer in the face and carry itself so its poll, spine<br />
and body are balanced. When you pick up on the mecate, the sensitive nerves in the soft tissue<br />
on either side of the nose are lightly squeezed to achieve the desired pressure and results.<br />
Mechanical Hackamore - commonly used in trail riding, team roping and other speed events<br />
Mechanical hackamores work off of leverage via a noseband, curb strap/chain and shanks. As<br />
with curb bits, the longer the shanks, the more leverage you will have. These hackamores work<br />
on the nose, chin, lower jaw and the poll.<br />
COMMON BIT QUESTIONS<br />
Where does the bit fit in a horse’s mouth?<br />
Bits are designed to fit with the mouthpiece across and on top of the tongue and resting on the bars of the mouth<br />
between the incisors (front teeth) and premolars (back teeth).<br />
What is the standard size mouthpiece for a horse?<br />
Mouthpieces measuring 5" are the standard for most horses, while the standard for ponies is 4-1/2". Draft horses<br />
normally take a 6"-6-1/2" mouthpiece.<br />
How do I know which bit is the right one for my horse?<br />
Every horse is different and so is every rider. Bitting a horse properly is a combination of matching up the bit with<br />
both your horse AND how you control your hands. If your horse is tossing his head a lot, for example, it could be a<br />
result of how hard you are pulling on the reins combined with the bit working too much on his palate or pinching.<br />
The bit could also be putting too much pressure on your horse’s bars, which can cause discomfort. These are just<br />
a couple examples, but there are a many factors that go into choosing the right bit. We encourage you to read our<br />
complete <strong>Bitology</strong> section to gain a general understanding of bits or contact a trusted trainer in your area if you are<br />
having trouble finding the right bit that works well for both you and your horse.<br />
What are the long term consequences of using an incorrect or too severe bit on my horse?<br />
Eventually, you will end up damaging the bars, tongue or palate of your horse’s mouth which can deaden the<br />
nerves. If that happens, you will never again be able to rely on a bit that’s designed to specifically work on those<br />
areas of the mouth. A damaged mouth is one reason people go to hackamores down the road. One thing to always<br />
keep in mind is the quieter your hands, the less severe any bit will be. We recommend asking your trainer or<br />
a trusted trainer in your area about what bit you should change to.
7<br />
BIBLIOGRAPHY<br />
Avila, Bob with Copeland, Sue M. “Bit Basics, Part 1: Snaffles.” Horse & Rider July 2009: 34-36.<br />
Avila, Bob with Copeland, Sue M. “Bit Basics, Part 2: Leverage (Shanked) Bits.”<br />
Horse & Rider August 2009: 26-29.<br />
Denison, Jennifer. “Jaquima a Freno Part III: Into the Bridle.” Western Horseman May 2010: 79-86.<br />
Denison, Jennifer. “Part I: Handy with a Hackamore.” Western Horseman March 2010: 45-50.<br />
Forrest, Sheri. “The Dying Art of the Hackamore.” Performance Horse October 2008: 33-40.<br />
Garland, Tommy with Thorson, Juli S.” Bosal Intro.” Horse & Rider January 2011: 62-65.<br />
Lambert, Annie. “Murphy’s Bit Laws.” Barrel Horse News May 2011: 38-44.<br />
Mankin, Julie. “Trends & Choices.” Barrel Horse News May 2009: 36-41.<br />
Randall, Tanya. “Hackamores by Design.” Barrel Horse News May 2009: 42-44.<br />
Rudin, Dale. “Single-Handed Success.” Horse Illustrated April 2011: 60-66.<br />
Benny’s Bits: Hackamores. Retrieved May 7, 2012, from http://www.bennyguitron.com/articles/23200423175<br />
Benny’s Bits: Leverage Bits. Retrieved May 7, 2012, from http://www.bennyguitron.com/articles/232004233622<br />
Bit Selection for Riding and Training Horses. Oklahoma State University. Retrieved April 13, 2012,<br />
from http://pods.dasnr.okstate.edu/docushare/dsweb/Get/Document-2081/ANSI-3924web.pdf<br />
Bits & Spurs. Retrieved April 30, 2012, from http://www.lesvogt.com/bits_tack/category/5/bits-%26-Spurs<br />
Different Types of Bit Mouthpieces. Retrieved April 27, 2012<br />
from http://horses.about.com/od/bitsexplained/tp/bitmouthpieces<br />
Horse Training Tips - Bitting Info. Retrieved April 13, 2012, from http://www.horsetrainingvideos.com/bittinginfo<br />
Spencer Training & Horsemanship School. Retrieved April 13, 2012, from http://infohorse.com/bits<br />
Why Buy a Good Bit. Retrieved April 13, 2012, from http://www.culturedcowboy.com/bits/pages/bitintro