You also want an ePaper? Increase the reach of your titles
YUMPU automatically turns print PDFs into web optimized ePapers that Google loves.
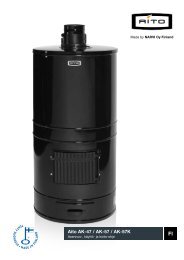
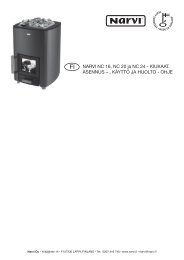
Made by NARVI <strong>Oy</strong> Finland<br />
<strong>Aito</strong> <strong>AK</strong>-<strong>47</strong> / <strong>AK</strong>-<strong>57</strong> / <strong>AK</strong>-<strong>57</strong>K<br />
Installation, use and service instructions<br />
GB
GB<br />
Table of contents<br />
1.1 General information 24<br />
1.2 Materials 24<br />
1.3 Sauna heater stones 25<br />
1.4 Area of the steam room 25<br />
1.5 Substrate 25<br />
1.6 Smoke flue 25<br />
1.7 Safety clearances to combustible<br />
structures 25<br />
1.8 Fuel 25<br />
2. Installation 26<br />
2.1 Opening direction of the firebox 26<br />
2.2 Assembly of the bottom part 26<br />
2.3 Bottom cover and valley elements 26<br />
2.4 Raising element<br />
(only for model <strong>AK</strong>-<strong>57</strong>K) 26<br />
2.5 Top cover 27<br />
2.6 Firebricks 27<br />
2.7 Stacking sauna heater stones 27<br />
2.8 Cast iron lid and insulation wool 27<br />
2.9 Sheet metal cover and fastening<br />
of the connective flue 27<br />
2.10 Masonry connection and flue connection 28<br />
2.11 Connective flue and tightening bracket 28<br />
2.12 Steam hatch and ash drawer 28<br />
3. Heating 29<br />
3.1 First heating 29<br />
3.2 Heating 29<br />
4. Cleaning and maintenance 30<br />
4.1 General cleaning 30<br />
4.3 Replacement of sauna heater stones 30<br />
5. Soot fire 30<br />
6. Warranty 30<br />
7. Lay-out scheme of <strong>AK</strong>-<strong>47</strong> 31<br />
8. Lay-out scheme <strong>AK</strong>-<strong>57</strong> and <strong>AK</strong>-<strong>57</strong>K 32<br />
9. Stone sets 33<br />
9.1 <strong>AK</strong>-<strong>47</strong> Kerkes ceramic stones 33<br />
9.2 <strong>AK</strong>-<strong>57</strong> Kerkes ceramic stones 33<br />
9.3 <strong>AK</strong>-<strong>57</strong>K Kerkes ceramic stones 33<br />
9.4 Olivine stone sets 33<br />
Yrittäjäntie 14, FI-27230 Lapland • Phone: +358 0207 416 740 • Fax: +358 0207 416 743 • www.narvi.fi
<strong>Aito</strong><br />
<strong>AK</strong>-<strong>47</strong> / <strong>AK</strong>-<strong>57</strong> / <strong>AK</strong>-<strong>57</strong>K<br />
Thank you for having chosen our heat storing <strong>Aito</strong> sauna<br />
heater. To make the most of your sauna heater please read<br />
the manual carefully before you start installing and using it.<br />
1.1 General information<br />
<strong>Aito</strong> sauna heater is the traditional heat storing sauna<br />
heater, which lets you enjoy steam in its truest form. The<br />
stones are heated at once into a red glow, after which the<br />
closing pan is closed. The mass of the sauna heater and<br />
the amount of stones guarantee long, soft and oxygen-rich<br />
steam for many hours.<br />
The sauna heater will be shipped in parts that are ready to<br />
be installed. The parts will be assembled without plaster<br />
onto the desired spot. The delivery will include all necessary<br />
parts.<br />
1.2 Materials<br />
The casing of the sauna heater is made of stylish black<br />
enamel-lined sheet metal. The glassy surface rejects dirt<br />
and dust and is easy to maintain clean. Enamelling protects<br />
steel and helps to prevent corrosion and at the same<br />
<strong>Aito</strong> sauna heater <strong>AK</strong>-<strong>47</strong> <strong>AK</strong>-<strong>57</strong> <strong>AK</strong>-<strong>57</strong>K<br />
Nominal power (kW) 25 30 30<br />
Diameter (mm) <strong>47</strong>0 <strong>57</strong>0 <strong>57</strong>0<br />
Height (mm) 1010 1160 1380<br />
Total weight of the heater (kg) 160 240 255<br />
Weight of stones (kg) 60 90 130<br />
Total weight (kg) 220 330 385<br />
Outer diameter of the connective flue (mm) 150 150 150<br />
Distance of the bottom edge of the connective flue<br />
from the floor (mm)<br />
1275 * 1445 * 1730 *<br />
Length of firewood (cm) 32 41 41<br />
* The height of the connective flue is valid when the sauna heater is at a distance of 50 mm from the flue located in the rear.<br />
If the top cover of the sauna heater is turned, the height is to be measured separately.<br />
Yrittäjäntie 14, FI-27230 Lapland • Phone: +358 0207 416 740 • Fax: +358 0207 416 743 • www.narvi.fi 3<br />
GB
time strengthens the casing of the sauna heater. The casing<br />
is insulated and the insulation is protected with rustproof<br />
sheet metal. The firebox is made of fireproof mass<br />
and cast elements. The stone compartment is lined with<br />
firebricks. The firebox hatch, the grate and inner lid are<br />
made of cast iron. The sauna heater stones are included<br />
in the delivery.<br />
1.3 Sauna heater stones<br />
The sauna heater is delivered with extremely durable ceramic<br />
sauna heater stones, which reduce the time of heating<br />
and also the firewood consumption is half less than<br />
usual. The round shape of ceramic stones also improves<br />
draught. As the stones have excellent thermal resistance,<br />
the lifetime of the stones is longer.<br />
1.4 Area of the steam room<br />
If the walls of a steam room are made of uncovered brick<br />
or concrete add 0.8–1.5 m3 per square meter of such wall<br />
and the final choice of the heater shall be made based on<br />
the sum of the area.<br />
RECOMMENDED AREA OF THE STEAM ROOM:<br />
<strong>AK</strong>-<strong>47</strong> <strong>AK</strong>-<strong>57</strong> <strong>AK</strong>-<strong>57</strong>K<br />
8–12 m 2 9–20 m 2 11–23 m 2<br />
If the heater is installed in a sauna that is normally not<br />
heated or the sauna is made of massive logs, multiply the<br />
sauna area with 1.5 and choose the heater based on this.<br />
1.5 Substrate<br />
<strong>AK</strong> sauna heaters must be installed on a stable, fireproof<br />
base. NB! The surface temperature of the floor tiles under<br />
the sauna heater may increase to 250° C. Such temperature<br />
may damage the moisture barrier if it is installed under<br />
the sauna heater or the underfloor heating.<br />
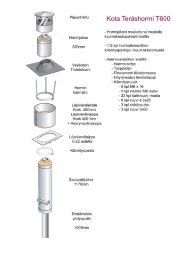
1.6 Smoke flue<br />
NB! When connecting the sauna heater with the smoke<br />
flue it has to be ensured that no excessive load is applied<br />
on the sauna heater.<br />
flue safety clearances stipulated in the installation manual<br />
of the flue shall be followed.<br />
The diameter of the modular flue shall be 150 mm.<br />
1.7 Safety clearances to combustible<br />
structures<br />
Safety clearances of wood-burning sauna heaters to combustible<br />
structures without additional shielding:<br />
<strong>AK</strong>-<strong>47</strong> / <strong>AK</strong>-<strong>57</strong> / <strong>AK</strong>-<strong>57</strong>K<br />
Front surface<br />
1 000 mm<br />
Side surfaces 500 mm *<br />
Back surfaces 500 mm *<br />
Top surface 1 200 mm **<br />
*) The safety clearance can be reduced by 50% when a<br />
single light protective screen is used and by 75% when a<br />
double light protective screen is used.<br />
**) The safety clearance can be reduced by 25% when a<br />
single light protective screen is used and by 50% when a<br />
double light protective screen is used.<br />
A single light protective screen can be made of a noncombustible,<br />
fibre-reinforced cement plate that is at least<br />
7 mm thick or a metal plate that is at least 1 mm thick,<br />
which is attached to the wall sufficiently tight. An air gap of<br />
at least 30 mm must be left between the protective screen<br />
and the plate.<br />
A double protective screen can be made of two 7 mm<br />
thick non-combustible, fibre-reinforced cement plates or<br />
two metal plates with a minimum thickness of 1 mm. The<br />
plates are fastened with screws to the base and if required<br />
also with one another. An air gap of at least 30 mm must be<br />
left between the protective screen and the plate and also<br />
between both plates.<br />
A space with a minimum size of one meter must be left in<br />
front of the sauna heater to facilitate maintenance of the<br />
firebox.<br />
MASONRY SMOKE FLUE<br />
According to the requirements of part E3 of the Building<br />
Act concerning smoke flues, a masonry smoke flue must<br />
be the so-called half-brick flue, the minimum length of<br />
which measured on the smoke heater is 3 meters.<br />
MODULAR FLUE<br />
A modular flue must meet the requirements of class T600<br />
and provided with CE-marking. When installing a modular<br />
1.8 Fuel<br />
Dry and clean wood must be used as fuel. Both hardwood<br />
and softwood can be used to heat the sauna heater. Dry<br />
wood heats the sauna heater the best and ensures the<br />
best efficiency.<br />
Chipboard, fibreboard, painted and treated wood, waste<br />
and plastics are not allowed to be used as fuel.<br />
Yrittäjäntie 14, FI-27230 Lapland • Phone: +358 0207 416 740 • Fax: +358 0207 416 743 • www.narvi.fi 4<br />
GB
2. Installation<br />
GENERAL<br />
No mortar should be applied for installing brickwork. The<br />
bricks must simply be placed carefully on one another. Before<br />
stacking stones in the sauna heater all stones should<br />
be rinsed with water to remove dust. The sauna heater<br />
must be placed so that there is an air gap with a minimum<br />
size of 5 cm between the sauna heater and the fire wall.<br />
Other safety clearances must meet the requirements stipulated<br />
in the part “Safety clearances” (page 3).<br />
Assemble the bottom part of the sauna heater in the sequence<br />
described above. Remember to consider with the<br />
opening direction of the firebox. Once all elements are assembled<br />
verify that the surface is level.<br />
2.3 Bottom cover and valley elements<br />
2.1 Opening direction of the firebox<br />
B<br />
B<br />
When installing the base, the opening direction of the firebox<br />
must be determined. Remember that once the flue is<br />
connected it should be possible to turn the top cover of the<br />
sauna heater as shown on the drawing below.<br />
A<br />
A<br />
Fire wall<br />
5 cm<br />
<strong>AK</strong>-<strong>47</strong><br />
<strong>AK</strong>-<strong>57</strong><br />
<strong>AK</strong>-<strong>57</strong>K<br />
A. Install the bottom cover.<br />
B. Install valley elements.<br />
(<strong>AK</strong>-<strong>47</strong>: 2 pcs, <strong>AK</strong>-<strong>57</strong> and <strong>AK</strong>-<strong>57</strong>K: 4 pcs)<br />
2.4 Raising element (only for model <strong>AK</strong>-<strong>57</strong>K)<br />
When the location of the sauna heater and the opening<br />
direction of the firebox have been determined, start assembly<br />
from the bottom.<br />
A<br />
2.2 Assembly of the bottom part<br />
E<br />
C<br />
E<br />
E<br />
B<br />
B<br />
A<br />
A. Place the ash drawer<br />
base in its place, edges<br />
under the bottom<br />
elements<br />
B. Bottom elements (2 pcs)<br />
C. Grate<br />
E. Bottom side elements<br />
(2 pcs) and bottom back<br />
element<br />
F<br />
E<br />
D<br />
C<br />
F<br />
E<br />
E<br />
B<br />
B<br />
A<br />
A. Place the ash drawer<br />
base in its place, edges<br />
under the bottom<br />
elements.<br />
B. Bottom elements (2 pcs)<br />
C. Grate<br />
D. Fire plate<br />
E. Bottom side elements<br />
(2 pcs) and bottom<br />
back element<br />
F. Upper side elements (2 pcs)<br />
and the upmost back<br />
element<br />
F<br />
A<br />
A. Install the raising element (includes ready-installed<br />
insulation and a stainless steel inner layer).<br />
Only for model <strong>AK</strong>-<strong>57</strong>K. When assembling a sauna<br />
heater <strong>AK</strong>-<strong>47</strong> or <strong>AK</strong>-<strong>57</strong>, skip this part and continue<br />
with the next step.<br />
Yrittäjäntie 14, FI-27230 Lapland • Phone: +358 0207 416 740 • Fax: +358 0207 416 743 • www.narvi.fi 5<br />
GB
2.5 Top cover<br />
A<br />
A<br />
Do not complete the first layer fully before the first heating.<br />
During heating add stones in places that start glowing first.<br />
The first layer functions as an adjustment layer. To reduce<br />
excessive draught add stones in the first layer.<br />
The amount of stones is sufficient when some are left over.<br />
Not all stones should be placed in the sauna heater. When<br />
the draught of the sauna heater is poor and heating takes<br />
very long, check whether the stones are not stuck too<br />
tightly. Wood that is moist or of poor quality also prolongs<br />
the heating time.<br />
A. Install the top cover (includes ready-installed insulation<br />
and a stainless steel inner layer).<br />
In case of questions regarding installation of sauna<br />
heater stones or arches, please contact us: NARVI <strong>Oy</strong><br />
020 741 6740 or Kerkes <strong>Oy</strong> 050 373 1313<br />
2.6 Firebricks<br />
2.8 Cast iron lid and insulation wool<br />
A<br />
A<br />
B<br />
B<br />
A. Firebricks must be laid in two layers. Lay the first layer<br />
of firebricks vertically along the edges. When the bricks<br />
do not fit well, cut one brick in half and make the brick<br />
layer tight.<br />
B. Place the arches. Check that the arches are tightly in<br />
place and lay the sauna heater stones (balls with the<br />
diameter of 100 mm) on the arches starting with bigger<br />
stones.<br />
A. Place the cast iron lid with the closing pans.<br />
B. Do not forget to place a piece of insulation wool<br />
included in the delivery on top of the cast iron lid.<br />
Also the space between the cast iron lid (edges) and sauna<br />
heater casing must be insulated with wool. This prevents<br />
accumulation of soot on the upper part of the sauna heater<br />
and keeps heat better in the sauna heater.<br />
2.7 Stacking sauna heater stones<br />
100 MM BALLS<br />
Place 100 mm balls in the bottom. Smaller balls may be<br />
used for supporting the edges of the structure.<br />
80 MM BALLS<br />
Next place 80 mm balls. As the height increases, also continue<br />
with stacking the sauna heater stones.<br />
2.9 Sheet metal cover and fastening of the<br />
connective flue<br />
A<br />
B<br />
60 MM BALLS<br />
Place 60 mm balls evenly on top of 80 mm balls.<br />
TETRA-STONES<br />
Lay small tetra-stones in the upper layer.<br />
Yrittäjäntie 14, FI-27230 Lapland • Phone: +358 0207 416 740 • Fax: +358 0207 416 743 • www.narvi.fi 6<br />
GB
A. As a next step install the enamel-lined sheet metal<br />
cover.<br />
Check that insulation placed on top of the cast iron<br />
cover does not restrict the correct position of the sheet<br />
metal cover.<br />
B. Install the fastening of the connective flue.<br />
2.12 Steam hatch and ash drawer<br />
A<br />
A<br />
2.10 Masonry connection and flue<br />
connection<br />
Masonry smoke flue<br />
Clay mortar masonry<br />
Masonry connection<br />
Connective flue<br />
60°-bend<br />
B<br />
A. Install the steam hatch.<br />
B. Install the ash drawer.<br />
B<br />
Tightening bracket<br />
Sauna heater<br />
A<br />
Install the masonry connection (A) in the flue. The flue connection<br />
must be maid according to the above drawing.<br />
Fasten the connective flue delivered with the sauna heater<br />
to the fastening of the connective flue with a tightening<br />
bracket so that the shorter end of the pipe always faces the<br />
sauna heater. Otherwise the pipe will not reach the flue and<br />
also the height of the connective flue will not be the same<br />
as stated in the description.<br />
2.11 Connective flue and tightening bracket<br />
A<br />
B<br />
A. Place the connective flue in the right place and tighten,<br />
if needed.<br />
B. Connect the connective flue with the sauna heater with<br />
the tightening bracket.<br />
A connective flue delivered with <strong>Aito</strong> sauna heater can<br />
also be provided with enamel-lined extension pipes.<br />
Extensions: 400 mm, 600 mm or 1000 mm.<br />
Yrittäjäntie 14, FI-27230 Lapland • Phone: +358 0207 416 740 • Fax: +358 0207 416 743 • www.narvi.fi 7<br />
GB
3. Heating<br />
3.1 First heating<br />
Once the sauna heater has been installed, do the first heating<br />
which must be done with half capacity and thereafter<br />
allow the sauna heater to cool, so that the bricks and<br />
stones settle down. The first heating also removes any<br />
possible humidity from the bricks, which might increase<br />
the heating time of the sauna heater. If the upper stones do<br />
not become evenly hot, add small stones to the hot spots<br />
to get an even draught in the whole upper surface of the<br />
stone compartment.<br />
When there are almost no embers left, push ash on the<br />
grate in the ash drawer. The ash drawer should be emptied.<br />
Now close the ash drawer, firebox hatch and the closing<br />
pan and the valve in front of the closing pan. After this<br />
the glowing redness spreads to the upper surfaces of the<br />
stones and the stones become free from soot. Let the sauna<br />
heater stay like this for a while so that heat will spread<br />
evenly in the area and the sauna heater is ready for the<br />
steam bath (“löyly”).<br />
Before starting enjoying your sauna throw the first “löyly”,<br />
which removes any ash dust on the stones and the next<br />
“löylys” will already be cleaner. The first “löyly” is thrown<br />
with the closing pan open and the valve in front of the<br />
closing pan closed. In this way any ash on the stones<br />
is directed in the stack via the flue. After this the sauna<br />
is ventilated.<br />
3.2 Heating<br />
Open the ash drawer 5-10 cm. See that sufficient volume<br />
of combustion air enters in the sauna either from the valve<br />
or through the door.<br />
If there is no ventilation valve in the upper part of the sauna,<br />
the sauna can, when necessary, be ventilated by closing<br />
the steam hatch and by opening the valve in front of the<br />
closing pan. In this case the closing pan must be closed<br />
(see the drawing below). This method can also be used for<br />
drying the sauna after the bathing procedure.<br />
To ensure correct travel path of smoke, open the valve in<br />
front of the closing plan, open the closing pan and close<br />
the valve in front of the closing pan as shown on the above<br />
drawing. Check that the flue is open.<br />
The heating time depends significantly on the wood quality.<br />
The fastest method to heat the sauna heater to the<br />
temperature suitable for steam procedures is to use finely<br />
cut birch wood that is dry. Fill the firebox with wood as<br />
usual and light it from above. During burning the fire box<br />
hatch should be kept closed and the ash drawer opened.<br />
When more than half of the wood has been burned, continue<br />
refilling the firebox sufficiently often. Towards the end<br />
of heating the draught can be reduced with the help of the<br />
ash drawer.<br />
Heating is stopped, when the lower parts of the upmost<br />
stones start glowing red. For the last fill of the firebox we<br />
recommend using small firewood, which burn up quickly<br />
and do not leave coal glowing long. To prevent soot<br />
problems, AITO sauna heater should always be heated so<br />
hot that the lower halves of the upper stones glow red.<br />
!<br />
Due to the risk of carbon monoxide, it is<br />
strictly forbidden to heat the heat storing<br />
sauna heater additionally during the bathing<br />
procedure.<br />
If for some reason the sauna heater requires additional<br />
heating, the bathing procedure should be interrupted and<br />
the sauna heater should be heated once again. The bathing<br />
procedure can be continued only when there are no<br />
flames and embers left, the ash drawer has been emptied<br />
and the first “löyly” has been thrown according to the<br />
instructions.<br />
The sauna heater is ready for the bathing procedure when<br />
the first “löyly” has been thrown, the opening pan and the<br />
valve in front of the opening pan is closed and the steam<br />
hatch is open (see the above drawing).<br />
To start the bathing procedure open the steam hatch.<br />
Throw “löyly” in small quantities. The mass of the sauna<br />
heater and the amount of stones guarantee long, soft and<br />
oxygen-rich steam for many hours.<br />
Enjoy your sauna!<br />
Yrittäjäntie 14, FI-27230 Lapland • Phone: +358 0207 416 740 • Fax: +358 0207 416 743 • www.narvi.fi 8<br />
GB
4. Cleaning and<br />
maintenance<br />
4.1 General cleaning<br />
The sauna heater does not require any specific maintenance,<br />
the only procedures required are to empty the ash<br />
drawer and to ask the chimneysweep to clean the system.<br />
Removal of ash after each heating improves burning efficiency<br />
and prolongs the life-time of the grate.<br />
For easy maintenance of the enamel-lined sauna heater<br />
clean it with water and a soft cloth.<br />
4.2 Replacement of sauna heater stones<br />
The lifetime of ceramic sauna heater stones is significantly<br />
longer than of the natural stones. In addition they also heat<br />
up much more quickly. Thereat we recommend using ceramic<br />
stones in the sauna heater.<br />
5. Soot fire<br />
!<br />
IN CASE OF SOOT FIRE (ALSO IF IT<br />
HAS ALREADY BEEN EXTINGUISHED)<br />
ALWAYS NOTIFY THE EMERGENCY<br />
CENTRE!<br />
6. Warranty<br />
Pursuant to consumer protection legislation <strong>Aito</strong> sauna<br />
heaters’ warranty period is one year.<br />
Do not modify the structure of the product! Use only accessories<br />
approved by the manufacturer with this product!<br />
Failure to comply with the manual or fire safety regulations<br />
can result in a fire or damage to the sauna heater. More<br />
detailed information about the fire safety regulations can<br />
be obtained from the regional branch of the rescue board,<br />
for instance.<br />
Yet the sauna heater stones should be periodically checked<br />
and friable stones should be replaced.<br />
More specific instructions regarding Kerkes ceramic<br />
stones can be found in part 9.<br />
When you are not going to use your sauna heater for a<br />
longer period, clean it from soot and ash. To facilitate drying,<br />
the steam hatch and firebox hatch should be left open.<br />
Yrittäjäntie 14, FI-27230 Lapland • Phone: +358 0207 416 740 • Fax: +358 0207 416 743 • www.narvi.fi 9<br />
GB
7. Lay-out scheme of <strong>AK</strong>-<strong>47</strong><br />
Masonry connection 2210-394<br />
Connective flue 60°, enamel-lined 5334<br />
Bracket 2210-395<br />
Fastening 2210-391<br />
Flap of the fastening<br />
Sheet metal cover 2210-224<br />
Steam hatch 2210-016<br />
Closing pan<br />
2210-393<br />
Cast iron cover<br />
2210-387<br />
Rockwool panel<br />
(between the covers)<br />
2210-746<br />
Top cover<br />
(includes insulation wool protected<br />
with a stainless steel inner layer)<br />
2210-222<br />
Stone set <strong>AK</strong>-<strong>47</strong>, 90 kg 5524<br />
Small tetra-stones (black case)<br />
60 mm balls (white box)<br />
80 mm balls (white box)<br />
100 mm balls (black case)<br />
Bottom cover<br />
2210-221<br />
Firebricks, 20 pcs 85152<br />
Firebox hatch + frame<br />
2210-012<br />
Fire plate<br />
2210-382<br />
Valley element, 2 pcs<br />
2210-705<br />
Arches<br />
Back element 2210-702<br />
Side element, 2 pcs 2210-703<br />
Grate <strong>AK</strong>-<strong>47</strong> 1454<br />
Bottom element, 2 pcs 2210-701<br />
Ash drawer base 2210-209<br />
Ash drawer 2210-020<br />
Yrittäjäntie 14, FI-27230 Lapland • Phone: +358 0207 416 740 • Fax: +358 0207 416 743 • www.narvi.fi 10<br />
GB
8. Lay-out scheme<br />
<strong>AK</strong>-<strong>57</strong> and <strong>AK</strong>-<strong>57</strong>K<br />
<strong>AK</strong>-<strong>57</strong> and <strong>AK</strong>-<strong>57</strong>K are generally the<br />
same, except the fact that model <strong>57</strong>K is<br />
equipped with a raising element installed<br />
between the bottom and top cover.<br />
Masonry connection 2210-394<br />
Connective flue 60°, enamel-lined 5334<br />
Tightening bracket 2210-395<br />
Fastening 2210-391<br />
Valve at the fastening<br />
Steam hatch 2220-224<br />
Sheet metal cover 2210-016<br />
Closing pan<br />
2210-393<br />
Cast iron cover<br />
2220-387<br />
Rockwool panel<br />
(between the covers)<br />
2220-749<br />
Top cover<br />
(includes wall and a stainless steel<br />
inner layer)<br />
2220-222<br />
Stone set <strong>AK</strong>-<strong>57</strong>, 90 kg 5525K<br />
Small tetra-stones<br />
60 mm balls<br />
80 mm balls<br />
100 mm balls<br />
Raising element<br />
(only for model <strong>AK</strong>-<strong>57</strong>K)<br />
Firebricks, 26 pcs 85152<br />
Bottom cover<br />
2220-221<br />
Firebox hatch + frame<br />
2220-012<br />
Fire plate<br />
2220-382<br />
Arches<br />
Valley element, 4 pcs<br />
2220-705<br />
Front piece for grate<br />
2220-382<br />
Upper back element 2220-702<br />
Upper side element, 2 pcs 2220-704<br />
Bottom back element 2220-702<br />
Bottom side element, 2 pcs 2220-703<br />
Grate <strong>AK</strong>-<strong>57</strong> 1455<br />
Bottom element, 2 pcs 2220-701<br />
Ash drawer base 2220-209<br />
Ash drawer 2220-020<br />
Yrittäjäntie 14, FI-27230 Lapland • Phone: +358 0207 416 740 • Fax: +358 0207 416 743 • www.narvi.fi 11 GB
9. Stone sets<br />
9.1 <strong>AK</strong>-<strong>47</strong> Kerkes ceramic stones 9.2 <strong>AK</strong>-<strong>57</strong> Kerkes ceramic stones<br />
Stone<br />
Package<br />
Per<br />
sauna<br />
heater<br />
Stone<br />
Package<br />
Per<br />
sauna<br />
heater<br />
Ball 100 mm 10 kg case 10 kg<br />
Ball 80 mm 20 kg, white box 20 kg<br />
Ball 60 mm 20 kg, white box 20 kg<br />
Ball 100 mm<br />
Ball 80 mm<br />
1 x 20 kg, white<br />
box<br />
2 x 20 kg, white<br />
box<br />
20 kg<br />
40 kg<br />
Small tetra-stones 10 kg case 10 kg<br />
Arches<br />
Package<br />
Ball 60 mm<br />
1 x 20 kg, white<br />
box<br />
20 kg<br />
Small tetra-stones 1 x 10 kg, case 10 kg<br />
<strong>AK</strong>-<strong>47</strong> box with<br />
arches<br />
On one side of the case:<br />
”<strong>AK</strong>-<strong>47</strong> arches and laying instruction”<br />
Arches<br />
Package<br />
IN TOTAL 5 boxes 60 kg<br />
<strong>AK</strong>-<strong>57</strong><br />
box with arches<br />
In the white box:<br />
”<strong>AK</strong>-<strong>57</strong> arches and laying instruction”<br />
IN TOTAL 6 boxes 90 kg<br />
9.3 <strong>AK</strong>-<strong>57</strong>K Kerkes ceramic stones 9.4 Olivine stone sets<br />
Stone<br />
Ball 100 mm<br />
Package<br />
1 x 20 kg, white<br />
box<br />
Per<br />
sauna<br />
heater<br />
20 kg<br />
Sauna<br />
heater<br />
Product<br />
number<br />
Package / quantity of stones<br />
<strong>AK</strong>-<strong>47</strong> <strong>AK</strong>-<strong>57</strong> <strong>AK</strong>-<strong>57</strong>K<br />
5534 5535 5536<br />
Ball 80 mm<br />
4 x 20 kg, white<br />
box<br />
80 kg<br />
> 20 cm 1 x 30 kg 2 x 30 kg 2 x 30 kg<br />
Ball 60 mm<br />
1 x 20 kg, white<br />
box<br />
20 kg<br />
Small tetra-stones 1 x 10 kg, case 10 kg<br />
Arches<br />
Package<br />
12–20 cm 2 x 20 kg 3 x 20 kg 6 x 20 kg<br />
7–12 cm 1 x 20 kg 2 x 20 kg 2 x 20 kg<br />
IN TOTAL 90 kg 160 kg 220 kg<br />
<strong>AK</strong>-<strong>57</strong><br />
box with arches<br />
In the white box:<br />
”<strong>AK</strong>-<strong>57</strong> arches and laying instruction”<br />
IN TOTAL 8 boxes 130 kg<br />
Yrittäjäntie 14, FI-27230 Lapland • Phone: +358 0207 416 740 • Fax: +358 0207 416 743 • www.narvi.fi 12<br />
GB