Metro Tile Battenless Installation Guide - Best Buy Metals
Metro Tile Battenless Installation Guide - Best Buy Metals
Metro Tile Battenless Installation Guide - Best Buy Metals

You also want an ePaper? Increase the reach of your titles
YUMPU automatically turns print PDFs into web optimized ePapers that Google loves.
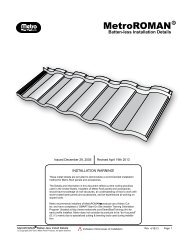
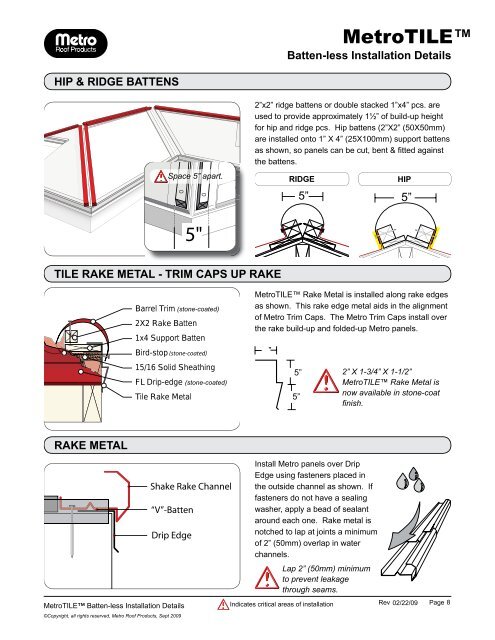
<strong>Metro</strong>TILE<br />
Batten-less <strong>Installation</strong> Details<br />
HIP & RIDGE BATTENS<br />
Space 5” apart.<br />
<br />
<br />
<br />
<br />
<br />
the battens.<br />
RIDGE<br />
5”<br />
HIP<br />
5”<br />
TILE RAKE METAL - TRIM CAPS UP RAKE<br />
Barrel Trim (stone-coated)<br />
2X2 Rake Batten<br />
1x4 Support Batten<br />
Bird-stop (stone-coated)<br />
15/16 Solid Sheathing<br />
FL Drip-edge (stone-coated)<br />
<strong>Tile</strong> Rake Metal<br />
<br />
<br />
of <strong>Metro</strong> Trim Caps. The <strong>Metro</strong> Trim Caps install over<br />
the rake build-up and folded-up <strong>Metro</strong> panels.<br />
”<br />
5”<br />
5”<br />
2” X 1-3/4” X 1-1/2”<br />
<strong>Metro</strong>TILE Rake Metal is<br />
now available in stone-coat<br />
<br />
RAKE METAL<br />
“V”-Batten<br />
<strong>Metro</strong>TILE Batten-less <strong>Installation</strong> Details<br />
©Copyright, all rights reserved, <strong>Metro</strong> Roof Products, Sept 2009<br />
Install <strong>Metro</strong> panels over Drip<br />
<br />
the outside channel as shown. If<br />
<br />
washer, apply a bead of sealant<br />
around each one. Rake metal is<br />
notched to lap at joints a minimum<br />
<br />
channels.<br />
Lap 2” (50mm) minimum<br />
to prevent leakage<br />
through seams.<br />
Indicates critical areas of installation Rev 02/22/09 8