Endnote for Beginners - IUPUI University Library
Endnote for Beginners - IUPUI University Library
Endnote for Beginners - IUPUI University Library

Create successful ePaper yourself
Turn your PDF publications into a flip-book with our unique Google optimized e-Paper software.
Getting Started with EndNote X3 PART 1<br />
VOCABULARY<br />
<strong>Library</strong>: a database or collection of bibliographic records/citations.<br />
Reference: Citation/item in your bibliography<br />
Reference Type: e.g. book, journal article, web page, dissertation, etc.<br />
Field: Names <strong>for</strong> categories of in<strong>for</strong>mation contained in each Reference. e.g.<br />
Author, Title, Publisher, Year, etc.<br />
Output Style: Style convention e.g. Chicago, APA, MLA, etc.<br />
Import Filter: Used in conjunction with database such as ERIC, PsycInfo, MLA,<br />
etc. Allows EndNote to configure your imported references into your EndNote<br />
<strong>Library</strong>.<br />
Connection File: Used when directly searching a catalog (IUCAT, <strong>Library</strong> of<br />
Congress) or database (PubMed, Ovid).<br />
GETTING EndNote X3 FOR YOUR HOME COMPUTER<br />
Download <strong>for</strong> free from IUware Online website:<br />
http://iuware.iu.edu/title.aspx?id=1146<br />
FINDING HELP FOR EndNote<br />
Help screens within EndNote<br />
User Manual that comes with program (799-page PDF file)<br />
http://www.endnote.com/support/helpdocs/EndNoteX3WinManual.pdf<br />
<strong>IUPUI</strong> Libraries web site: http://www.ulib.iupui.edu/libinfo/researchsoft/endnote<br />
EndNote Tech Support: http://www.endnote.com/support/ensupport.asp<br />
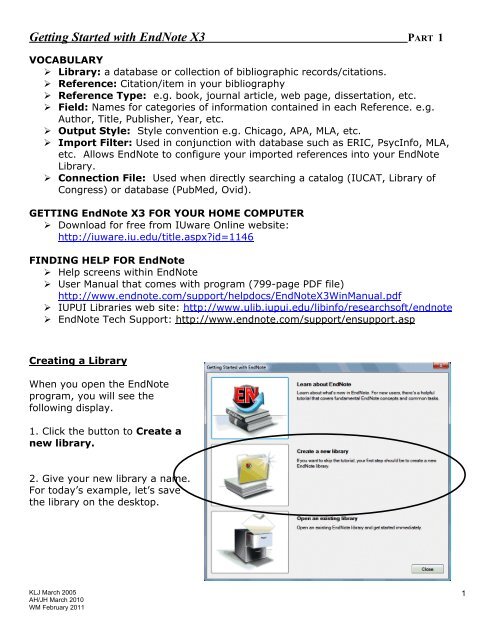
Creating a <strong>Library</strong><br />
When you open the EndNote<br />
program, you will see the<br />
following display.<br />
1. Click the button to Create a<br />
new library.<br />
2. Give your new library a name.<br />
For today’s example, let’s save<br />
the library on the desktop.<br />
KLJ March 2005<br />
AH/JH March 2010<br />
WM February 2011<br />
1
Manually Adding References to a <strong>Library</strong><br />
There are no references in a brand new library, so to add one, click on this icon:<br />
You can also add a reference by going to References New Reference or<br />
using Ctrl+N.<br />
The default reference type is a Journal Article. Use your mouse or the tab key to<br />
move between fields to enter in<strong>for</strong>mation. Click on the box with the X within the<br />
reference to close it and enter another. EndNote will ask if you want to save the<br />
changes you’ve just made.<br />
<br />
<br />
Author names can be entered either “First Middle Last” or “Last, First Middle”<br />
Use a carriage return/hit ‘Enter’ if entering multiple authors<br />
When you close your record, you will now see it displayed in your library.<br />
Editing References in a <strong>Library</strong><br />
KLJ March 2005<br />
AH/JH March 2010<br />
WM February 2011<br />
2
1. Spell Check<br />
You can only spell check an individual reference, not the entire library at once. Doubleclick<br />
on the reference you’d like to spell check, then go to Tools Spell<br />
Check, use Ctrl + Y or click on the spell check icon:<br />
The first time you use the spell check, it might stop at every word. If this happens<br />
follow the steps below:<br />
In EndNote go to "Edit Preferences" and click on the "Spell Check" option. Then<br />
click on the "Options" button. Under "Main Dictionary Language" select "American<br />
English Medical." Click "OK."<br />
Then click on the "Dictionaries" button. Under "Files" you should have<br />
"ssceam.tlx" listed. If it is not, click on the "Add File" button and select<br />
"ssceam.tlx." Click "OK" to close the preferences window and then open a<br />
reference and per<strong>for</strong>m the spell check again.<br />
2. Changing Citation Output Style<br />
To change the output style, click Edit<br />
Output Styles Open Style<br />
Manager <strong>for</strong> a list of available citation<br />
styles.<br />
TIP: The standard installation of<br />
EndNote X3 only loads 100 citation<br />
styles. Further styles can be<br />
downloaded by clicking the “Get More<br />
on the Web…” button circled to the<br />
right. This will take you online to<br />
EndNote’s library of more than 3600<br />
styles. When you find the style you<br />
want, you will need to download it and<br />
save it to the EndNote Styles folder.<br />
The location of the styles folder can be<br />
found within EndNote by going to Edit<br />
PreferencesFolder Locations. The Style Manger will need to be closed and<br />
opened again be<strong>for</strong>e you can choose your newly downloaded style.<br />
You can also create a custom style by going to Edit Output Styles New Style.<br />
After you choose a style and close the Style Manager, select the desired output style<br />
from the main page’s tool bar pull down menu.<br />
KLJ March 2005<br />
AH/JH March 2010<br />
WM February 2011<br />
3
Getting Started with EndNote X3 PART 2<br />
Exporting and Importing Records from a Database<br />
1. Direct Export into EndNote<br />
While EndNote offers the ability to enter records manually, a more efficient means of<br />
adding items to your library is to import records directly from a database. Several<br />
databases support direct export.<br />
In this example, per<strong>for</strong>m a search in an EbscoHost Database (such as Academic Search<br />
Premier). Click on a record to get to a screen like the one below. If you hover over the<br />
icon with the green arrow, it says, “Export to Bibliographic Manager.”<br />
From the screen below, simply click “Save.” You should be taken back to EndNote.<br />
KLJ March 2005<br />
AH/JH March 2010<br />
WM February 2011<br />
4
Your EndNote library will now display the imported reference(s). If you want to see all<br />
the items in your library, click on “All References” on the left.<br />
Other databases also offer direct export. In the<br />
WilsonWeb example to the right, the export option is<br />
also in the upper right hand corner of the record like<br />
EbscoHost. For this example though, you will have to<br />
select a filter after exporting to EndNote that<br />
corresponds to the database in order to get your<br />
references to import correctly.<br />
1a. Direct Import from Google Scholar<br />
Direct Export from Google Scholar:<br />
To allow direct export from Google Scholar to EndNote, you need to set up your Google<br />
Scholar Preferences:<br />
• In Google Scholar http://scholar.google.com/ , click on Scholar Preferences<br />
• Scroll down to Bibliography Manager and select “Show links to import citations<br />
into.”<br />
• From the dropdown menu, select EndNote<br />
• Click Save Preferences.<br />
From now on, your Google Scholar search results will include an “Import into EndNote”<br />
option:<br />
KLJ March 2005<br />
AH/JH March 2010<br />
WM February 2011<br />
5
2. Importing Records into EndNote<br />
Some databases will require you to save a text file and import it into EndNote. For this<br />
example, conduct a search in the ERIC database available through CSA. Mark an item<br />
you want to put in your library and click the Save/Print/Email Records link.<br />
Select “full <strong>for</strong>mat,” then save this record in PC <strong>for</strong>mat. You will probably want to give<br />
this file a recognizable name and save it to the desktop so you can easily find it in a<br />
moment. Make sure the file extension is set to text document (.txt).<br />
KLJ March 2005<br />
AH/JH March 2010<br />
WM February 2011<br />
6
Be<strong>for</strong>e the next step in importing the citation, you will probably need to import the<br />
correct filter. The X3 default installation only includes about 100 import filters. Follow<br />
the same steps covered <strong>for</strong> importing styles except to use the Filter Manager instead of<br />
the Style Manager (bottom of page 3). Edit Import Filters Open Filter<br />
Manager. Any filters you download will need to be saved to EndNote’s Filters folder.<br />
The location of the Filters folder can be found within EndNote by going to<br />
PreferencesFolder Locations.<br />
Now you’re ready need to return to EndNote to import the citation.<br />
Either go to FileImport, or click the import icon<br />
In the dialog box, select the file you saved to the desktop. Next, choose the correct<br />
filter <strong>for</strong> the file you’re importing by selecting one from the dropdown list beside “import<br />
option.” It is very important that you select the correct filter <strong>for</strong> the database and the<br />
in<strong>for</strong>mation provider/vendor of that database (in our example, that’s ERIC from CSA).<br />
KLJ March 2005<br />
AH/JH March 2010<br />
WM February 2011<br />
7
Whether you’re directly exporting or importing, it’s important to proofread your<br />
references. Some references will need to be corrected. One common problem is that<br />
the entire citation, including volume, issue number, year, and pages will be included<br />
with the journal title.<br />
3. Obtaining Instructions from EndNote on how to correctly save citations.<br />
EndNote contains tips on<br />
how to successfully<br />
download citations from a<br />
database. Because<br />
databases provide many<br />
options, this can be<br />
important so that your<br />
citations will import<br />
properly.<br />
Select EDIT Import<br />
Filters Open Filter<br />
Manager<br />
This is the Filter Manager Screen:<br />
KLJ March 2005<br />
AH/JH March 2010<br />
WM February 2011<br />
8
You can sort the list by database title, or the In<strong>for</strong>mation Provider (Vendor/company<br />
providing the database).<br />
Marking the box next to the databases that you search most often is a good<br />
idea…they will appear later in a list of frequently used filters.<br />
The Comments box gives instructions about downloading from this database. For<br />
example, these are the instructions <strong>for</strong> downloading citations from the above slide, the<br />
ERIC (CSA) database:<br />
Download instructions:<br />
From the CSA search results screen, click on 'Save/Print/Email'. On the<br />
"Save/Print/Email" screen, choose "Full Format" and none other.<br />
Click the 'Save' button. Your web browser will ask you where to save the file. If<br />
your web browser gives you the option to save in different file <strong>for</strong>mats, be sure to<br />
save as a "Text Only (*.txt)" file. You may also click Print Preview, then copy and<br />
paste the data into a text file.<br />
Limitations:<br />
1. Older records may still use two-digit years (e.g. "'70") which are not recognized<br />
as such by EndNote; thus, they are imported into the Date field with the month, if<br />
present.<br />
KLJ March 2005<br />
AH/JH March 2010<br />
WM February 2011<br />
9
Getting Started with EndNote X3 PART 3<br />
Finding Full Text<br />
Once you filled your library with references, you may need to review the articles again.<br />
EndNote’s Open Link feature provides swift access to the original source of the record.<br />
For example, records exported from Ebscohost return you to their database record and<br />
their options to full text access. This feature will not work <strong>for</strong> those records created<br />
manually.<br />
To take full advantage of this feature, first you should add the <strong>IUPUI</strong> Open URL Link to<br />
your EndNote <strong>Library</strong>. Select EDIT PREFERENCES. After the Preferences window<br />
opens, select FIND FULL TEXT. Enter http://ulib.iupui.edu/findit/openurl in the<br />
OpenURL Path box. Enter http://ulib.iupui.edu/cgi-bin/proxy.pl?url= in the<br />
Authenticate with URL box.<br />
To find the full-text of an entry, select the reference; click the Open Link icon at the top<br />
of the screen. You can also right-click the reference, select URL, then Open URL Link.<br />
KLJ March 2005<br />
AH/JH March 2010<br />
WM February 2011<br />
10
This will open an Internet window with the full-text of the reference or the <strong>IUPUI</strong><br />
<strong>University</strong> <strong>Library</strong> FIND IT page which allows you to easily find the full-text of the item<br />
by selecting the FIND IT icon. You can also select the Find-Full Text icon to the left, and<br />
EndNote will attempt to download a copy of the PDF.<br />
TIP: If you are having trouble with this feature off-campus, use <strong>IUPUI</strong> VPN connection<br />
to ease access. www.vpn.iu.edu<br />
Attaching Full Text and Other Files<br />
You can attach up to 12 files of any type (PDF, JPG, MP3, etc) to any record in your<br />
EndNote <strong>Library</strong>. To attach a file select FILE ATTACHMENTS ATTACH FILE.<br />
Browse your computer to find the desired file and select OPEN. A paperclip icon appears<br />
next to the record to show that it has an attachment. EndNote saves attachments in the<br />
library’s data file (.DATA)<br />
KLJ March 2005<br />
AH/JH March 2010<br />
WM February 2011<br />
11
Getting Started with EndNote X3 PART 4<br />
Using “Cite While You Write” with Microsoft Word 2007<br />
When EndNote is installed on your computer, it should automatically install a separate<br />
EndNote tab into Microsoft Word. Be<strong>for</strong>e we begin, verify that these tools are available<br />
1. Inserting Citations in a Document<br />
Move your cursor to the point in your document where you would like to insert a<br />
citation. You can search EndNote <strong>for</strong> a specific citation while inside Word (2007)<br />
by clicking the “Insert Citation” icon.<br />
A search box will open. Insert a search term (i.e. name of author, or a word in the title)<br />
and click Search. When you have located the desired reference, click on the reference<br />
to highlight, then click the Insert button.<br />
EndNote will then insert a citation and a references entry into your Word document in<br />
the following way:<br />
KLJ March 2005<br />
AH/JH March 2010<br />
WM February 2011<br />
12
The citations are linked to your EndNote library and you should NOT edit your citation<br />
within Word. If you have ever created a Merge file, it works in a similar way.<br />
2. Inserting previously marked citations<br />
You can also highlight the desired citation within EndNote and then insert it<br />
into your document. Click the “Insert Citation” icon.<br />
3. Changing Bibliography Format in Word<br />
To change your bibliography’s <strong>for</strong>mat, click the “Update Citations and<br />
Bibliography” icon.<br />
4. Editing Citations within Word<br />
If you would like to edit the<br />
appearance of the citation<br />
inserted into Word, (i.e. to<br />
remove the author’s name if<br />
you already mention it in a<br />
sentence), Either Right Click<br />
on the desired citation and<br />
select Edit Citation(s) or<br />
put your cursor on the<br />
citation and use the “edit<br />
citations” icon.<br />
KLJ March 2005<br />
AH/JH March 2010<br />
WM February 2011<br />
13
The following box will appear and allow you to alter certain attributes of your citation:<br />
When you’ve made the necessary changes, such as adding page numbers or checking<br />
the box to exclude author, click on the OK button.<br />
To send your document to a publisher or colleague:<br />
You may want to send an electronic copy of your paper to someone. It is recommended<br />
that you break the link between your EndNote library and your Word document<br />
(remember, your document links to your EndNote library much like a Mail Merge would).<br />
SAVE your linked document first. Then from the <strong>Endnote</strong> tab in Word select the<br />
Convert Citations and Bibliography dropdown, and select Convert to Plain Text.<br />
This will open a second copy of your document in a new window. Save this second copy<br />
as a regular Word document under a new name.<br />
KLJ March 2005<br />
AH/JH March 2010<br />
WM February 2011<br />
14
![[Name of collection, Date Span] - IUPUI University Library](https://img.yumpu.com/51655257/1/190x245/name-of-collection-date-span-iupui-university-library.jpg?quality=85)