Instruction Manual - Days Healthcare
Instruction Manual - Days Healthcare
Instruction Manual - Days Healthcare

Create successful ePaper yourself
Turn your PDF publications into a flip-book with our unique Google optimized e-Paper software.
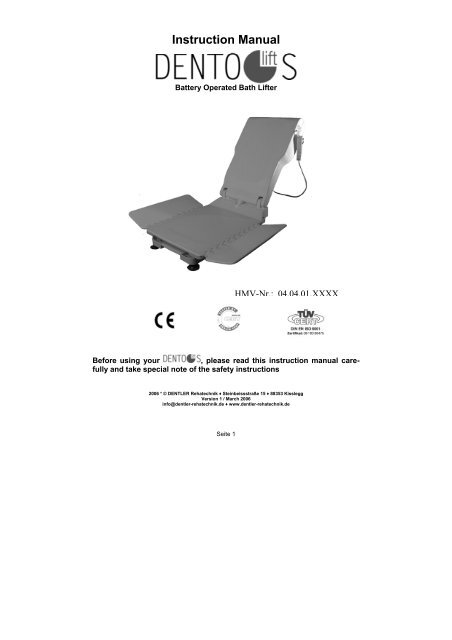
<strong>Instruction</strong> <strong>Manual</strong><br />
Battery Operated Bath Lifter<br />
HMV-Nr.: 04.04.01.XXXX<br />
Before using your<br />
, please read this instruction manual carefully<br />
and take special note of the safety instructions<br />
2006 * © DENTLER Rehatechnik ♦ Steinbeissstraße 15 ♦ 88353 Kisslegg<br />
Version 1 / March 2006<br />
info@dentler-rehatechnik.de ♦ www.dentler-rehatechnik.de<br />
Seite 1
Introduction<br />
Congratulations - you are now the owner of a high-quality product which will<br />
help you to enjoy your daily bath and will also ensure your complete safety.<br />
Our qualified experts for medical product safety continually check that our<br />
manufacturing process conforms to all applicable norms and regulations.<br />
Your specialist dealer will give you detailed instructions on how to operate your<br />
.<br />
Before using your<br />
for the first time, please read this instruction<br />
manual carefully, taking special attention to the safety precautions in Chapter<br />
2. If you have any questions, please contact your dealer or the manufacturer at<br />
the following telephone number:<br />
0049 – 7563 -113 20 (Germany)<br />
Your<br />
comes complete with a 3 year product guaranty with the exception<br />
of the following:<br />
• the Seat and Backrest Covers<br />
• the Battery<br />
• the Suction Cups<br />
We wish you much pleasure bathing with your !<br />
Seite 2
Table of Contents<br />
Introduction 2<br />
1. Bath Lift Components and Transportation 4<br />
1.1. Seat Unit (Pre-assembled) 4<br />
1.2. Backrest (pre-assembled) 4<br />
1.3. Battery Charger (see Page 9, Diagram2) 5<br />
1.4. Battery (see Page 9, Diagram2) 5<br />
1.5. <strong>Instruction</strong> <strong>Manual</strong> 5<br />
1.6. Transportation 5<br />
2. Safety Precautions 5<br />
2.1. Bath Lifter (see Diagram 1, Page 4) 5<br />
2.2. Battery and Battery Charger (see diagram 2, Page 9) 6<br />
2.3. Electronic Control Unit (see diagram 3, Page 11) 7<br />
3. Preparing the for use 8<br />
3.1. Unpacking 8<br />
3.2. Charging the battery 9<br />
3.3. Setting up (see Diagram 1) 9<br />
3.4. Electronic Control Unit 11<br />
3.5. Dismantling of the 11<br />
4. Bathing with the 12<br />
5. Cleaning/ Care/ Maintenance 13<br />
5.1. Seat unit and backrest. 13<br />
5.2. Battery and Battery Charger 14<br />
5.3. Maintenance 14<br />
6. Troubleshooting 15<br />
7. Technical Specifications : 16<br />
8. Hygiene and Disinfection plan for refurbishing the 16<br />
9. Disposal 18<br />
10. Warranty 19<br />
Seite 3
1. Bath Lift Components and Transportation<br />
1 Backrest<br />
2 Seat unit<br />
3 Slot for Main Control Unit<br />
4 Slot for Battery<br />
5 Side flaps<br />
6 Hand Control Unit<br />
7 Actuator<br />
8 Lifting Scissors<br />
9 Suction Cups<br />
10 Baseplate<br />
11 Locking Lever<br />
Diagram 1<br />
1.1. Seat Unit (pre-assembled)<br />
The seat unit includes the following parts:<br />
• Baseplate (10) and Suction Cups (9)<br />
• Lifting Scissors (8)<br />
• Seat with pivotal side flaps (5)<br />
• Seat Cover (Optional)<br />
1.2. Backrest (pre-assembled)<br />
The backrest includes the following parts:<br />
• Backrest with built-in actuator<br />
• Main electronic control unit connected to the hand control unit with a cable<br />
• Backrest cover (Optional)<br />
The seat unit and backrest are mounted together when they leave the factory.<br />
Seite 4
1.3. Battery Charger (see Page 9, Diagram2)<br />
1.4. Battery (see Page 9, Diagram2)<br />
1.5. <strong>Instruction</strong> <strong>Manual</strong><br />
1.6. Transportation<br />
If you need to ship the<br />
please ensure the following:<br />
• The seat unit must be attached to the Backrest.<br />
• Do not remove the suction cups.<br />
• Remove the battery from the backrest and package it separately.<br />
2. Safety Precautions<br />
CE-Marking: The<br />
conforms to the EMV guideline for Medical<br />
Products 93/42/EWG as well as Norm DIN EN 60601-1-2 (Electromagnetic<br />
Compatibility).<br />
2.1. Bath Lifter (see Diagram 1, Page 4)<br />
• The intended use of the Bath Lifter is specifically limited to assist only one<br />
person while bathing in a bathtub.<br />
• The Bath Lift may not be used for any other purpose whether in our out of<br />
the bathtub.<br />
• The Bath Lift can be used at home or by professional carers.<br />
• Handicapped or people with an illness or medical condition must have<br />
someone to assist them while bathing or within calling distance.<br />
• The maximum lifting capacity of the is 145 kg.<br />
Always follow the advice of your doctor.<br />
Seite 5
• If the distance between the bottom of the bathtub and the rim is more than<br />
42cm, you will need to procure height adaptors from your supplier. These<br />
are available in the following sizes: 2cm, 4cm and 6 cm.<br />
• Prior to bathing, perform a test run of the bath lift to ensure that the lifter<br />
operates properly. Completely descend and elevate the lift, verifying that<br />
the Emergency Stop button functions properly. Ensure that the battery is<br />
fully charged.<br />
• Do not place your hands between the base plate and the seat near the<br />
lifting scissors. There is a danger of your hands/fingers getting caught in<br />
the scissors.<br />
• Never clean the backrest with high-pressure cleaners (steam jets, etc.).<br />
• If you add bath oil, bath salts, or grease solvents to your bath water, please<br />
use only the recommended amount. A too high concentration can affect the<br />
sliding mechanism of the lift and can leave deposits that are difficult to<br />
clean. Bath salts and bath foam that quickly dissolve can be used without a<br />
problem.<br />
• Please store the lift in a dry room with temperatures between 0°C and 40°C<br />
and 30% - 75% humidity.<br />
2.2. Battery and Battery Charger (see diagram 2, Page 9)<br />
• Only use the original battery delivered with the . Do not use the<br />
battery for any other purposes other than in the bath lifter.<br />
• Do not throw the battery into a fire and do not store near fire.<br />
• The battery contacts should not be short circuited. The battery casing is<br />
designed to prevent accidental short circuiting. Place the battery on a dry<br />
non-conductive surface when it is not in the backrest.<br />
• The battery should never be opened for any reason. Opening the battery<br />
case voids the guaranty. If the battery is damaged and diluted sulphuric<br />
acid comes into contact with the skin or clothing, immediately wash with<br />
running water.<br />
Seite 6
• If diluted sulphuric acid comes into contact with the eyes, immediately<br />
clean your eyes with a large amount of running water and contact your<br />
doctor.<br />
• Damaged or used batteries must be disposed of according to the local<br />
regulations applying to battery disposal.<br />
• Only recharge the batteries in dry rooms, not in the bathroom.<br />
• Use the battery charger only to charge the battery delivered with the lift.<br />
• The battery charger should only be connected to the mains after the plug is<br />
inserted in the battery.<br />
Keep out of the reach of children.<br />
2.3. Electronic Control Unit (see diagram 3, Page 11)<br />
• The electronic control unit is comprised of the hand control which is connected<br />
via a cable to the main control unit.<br />
• The main control unit, which is found in the top of the backrest, should only<br />
be removed from the backrest in the event of malfunction or professional<br />
cleaning.<br />
• To remove the main control unit, first remove the battery and then the main<br />
control unit. Please insert the main control unit in the backrest before inserting<br />
the battery.<br />
• The hand control unit contains the following controls:<br />
• A green button on the right side which elevates the lift <br />
• A green button on the left side which descends the lift <br />
• A red button in the middle for emergency stop.<br />
• Please ensure that the hand control unit is always within easy reach, in the<br />
event that you need to use the emergency stop. The lift can only move<br />
when you push one of the green buttons.<br />
• When the green button is released, the lift stops immediately.<br />
• The electronic control measures the amount of battery charge to ensure<br />
that there is adequate capacity to lower you and raise you out of the bath-<br />
Seite 7
tub. In the event that the battery's capacity is not adequate, the lift will not<br />
descend and the red light in the hand control unit will light.<br />
• If you activate the emergency stop, the lifter will only move in<br />
the opposite direction from which the lifter was moving at the<br />
time of activation of the emergency stop button. Take your finger<br />
off of the emergency stop button and push the green button<br />
to continue normal lifting operations.<br />
• There is no danger if the hand control unit comes in contact<br />
with water. The unit is waterproof and will float in the water.<br />
• In the middle of the three buttons is a RED light. This light goes on when<br />
the battery needs to be recharged.<br />
Children should not play with the electronic control unit.<br />
• Should you have any problems with your bath lift, please contact your<br />
nearest authorized service center.<br />
DO NOT TRY TO REPAIR OR REPLACE ANY PARTS OF THE BATH LIFT.<br />
3. Preparing the for use<br />
3.1. Unpacking<br />
• Open the carton on the top side.<br />
• Remove the battery and battery charger. These can be found under the<br />
cardboard flap on the end of the carton<br />
• Lift the out of the box by placing one hand on the lower end of<br />
the backrest and the other hand on the base plate.<br />
Seite 8
3.2. Charging the battery<br />
Diagram 2<br />
• The battery provides the with the necessary energy. Please<br />
treat the battery with care to ensure an extra long battery life.<br />
• The battery is a rechargeable battery. Please use only the battery charger<br />
that was delivered with the lift.<br />
• The manufacturer recommends that the battery be fully charged after each<br />
bath. If the bath lifter is not used for longer periods of time, please recharge<br />
the battery periodically.<br />
• Clean the battery with a dry or slightly moist towel.<br />
• Place the jack of the battery charger into the plug on the bottom of the battery.<br />
Connect the battery charger to the mains.<br />
Warning: Only charge the battery in a dry room, not in the bathroom.<br />
The battery is fully charged when the red control lamp on the battery charger is<br />
extinguished.<br />
3.3. Setting up (see Diagram 1)<br />
• Place the in a dry clean bath and lightly press the seat downwards<br />
so that the suction cups (9) adhere to the bottom of the bath. Please<br />
ensure that the backrest (1) is positioned at the slanted end of the bath.<br />
Seite 9
• Lift the backrest (1) up and let it gently recline backwards.<br />
• Slide the fully charged battery in the battery slot (4) at the top of the backrest<br />
(1). Press lightly down on the battery to ensure that it sits firmly in the<br />
backrest.<br />
Please note:<br />
• If your bath lift has hand rails which might interfere with the side flaps,<br />
please use the optionally available side flap protectors.<br />
• Please ensure that the actuator is not extended when lifting the backrest<br />
into position. Otherwise, the actuator can not lock into the base plate.<br />
• The bath lifter weighs 11.9 kg (w/o Battery and electronic controller) of<br />
which the seat unit weighs 5.9 kg and the backrest 6 kg.<br />
• If the bath lifter is too heavy, you can easily separate it into two pieces.<br />
• Unlatch the backrest (1) by sliding the levers (11) on the backside<br />
of the backrest towards the center of the backrest. You<br />
can now lift the backrest straight up off the seat unit. You can<br />
place the seat unit (2) in the dry, clean bath, pressing lightly<br />
down so that the suction cups (9) adhere to the bottom of the<br />
bath.<br />
• After placing the seat unit in the bath, place the backrest back<br />
on the seat unit ensuring that the backrest is parallel to the<br />
seat unit and slide the levers towards the outer side of the<br />
backrest.<br />
• Putting the covers on the lift<br />
• The seat unit cover is placed over the side flaps. Slide each pocket<br />
over the side flaps on the lift.<br />
• The backrest cover is secured in place with the clips located on the<br />
covers, which go into the holes in the back of the backrest.<br />
Seite 10
3.4. Electronic Control Unit<br />
• The main control unit comes installed in the backrest's control slot (3) upon<br />
delivery.<br />
• After sliding a fully charged battery into the backrest's battery slot (4)<br />
(found on the top side of the backrest) you can use the hand control as follows:<br />
• A green button on the right side which elevates the lift <br />
• A green button on the left side which descends the lift <br />
• A red button in the middle for emergency stop.<br />
Diagram 3<br />
• Prior to bathing, please perform a trial run to ensure proper functioning<br />
of the lift.<br />
Verify that the lift is assembled correctly. Raise the lift to the uppermost position,<br />
test the emergency stop and lower the lift to its lowest position to ensure<br />
proper functioning of the lift. When you activate the emergency stop,<br />
you can only move the lift in the opposite direction from which it was moving<br />
at the time of pushing the emergency button.<br />
3.5. Dismantling of the<br />
• Drain the water from the bath.<br />
• Lower the lift by use of the hand control to the fully reclined position.<br />
Seite 11
• Remove the battery<br />
• Place the battery on a dry surface (not in the bath) to recharge.<br />
• Lift the side flaps up and flip over onto the seat. Flip the backrest forward<br />
onto the seat.<br />
• You can now remove the bath lift from the bath. Place one hand on the<br />
front side of the base plate and the other hand on the back of the lift. Slide<br />
the lifter to the side of the bath to loosen the suction cups and then take the<br />
lift out of the bath tub.<br />
Tip 1:<br />
You can slide the lifter toward the side of the bath. This releases the suction<br />
cups as they move on the curved side.<br />
Tip 2:<br />
If the lift is too heavy, you can take the backrest off and remove the backrest<br />
and seat unit separately.<br />
Tip 3:<br />
You can remove the lift from the bath in the upright position. Grab the top<br />
of the backrest with one hand and the front of the seat with the other. Pull<br />
the backrest towards you, releasing the suction cups.<br />
4. Bathing with the<br />
• Please insert a fully charged battery into the battery slot found on the top of<br />
the backrest.<br />
• Ensure that the lifter is securely positioned in the bath and that the suction<br />
cups adhere to the bottom of the bath.<br />
• Verify that there are no hindrances in the movable part of the lift.<br />
• Raise the lift to its uppermost position, flip the side flaps off the seat unit<br />
onto the top of the bath tub, and verify that the emergency stop and movement<br />
buttons function properly.<br />
• Fill the bath with water and check that the water temperature is at your<br />
desired level.<br />
Seite 12
• Sit on the side flap which is lying on the top of the bath and place your legs<br />
next to the bath.<br />
• Slide over to the middle of the seat unit and lift your legs into the bath in a<br />
comfortable bathing position.<br />
• Once you have obtained a comfortable bathing position, you can lower the<br />
lift into the water with use of the hand control.<br />
• Please ensure that the cable on the hand control does not get caught between<br />
parts of the lift when raising and lowering the seat unit.<br />
• Please ensure that the hand control unit is always within easy reach, in the<br />
event that you need to use the emergency stop.<br />
• After the lift has fully declined in the bath, pressing the down button will<br />
gently recline the back rest into a position of your choice. By pushing the<br />
hand control's up button, the backrest raises into an upright position and<br />
moves upwards.<br />
• To get out of the bath, raise the lifter to its uppermost position so that the<br />
side flaps are resting over the side of the bath. Lift your legs over the side<br />
of the bath and get up from the seat.<br />
• If you have difficulties sliding to the middle of the lift and lifting your legs,<br />
please contact your specialist dealer, and ask about the "Swivel and Slide-<br />
Over Aid".<br />
• We recommend that you recharge the battery after each bath to ensure<br />
that the battery is fully charged for your next bath.<br />
5. Cleaning/ Care/ Maintenance<br />
5.1. Seat unit and backrest.<br />
• As with all equipment and aids for personal hygiene, the<br />
should always be cleaned carefully after each use.<br />
• You can use an alcohol based disinfection solution as needed (e.g.<br />
DENTLER DESINFEKTIONSMITTEL).<br />
Seite 13
• The covers on the backrest and seat unit are removable and machine<br />
washable at 60°C. We recommend using a gentle detergent.<br />
• Do not place in the dryer. Do not tumble dry.<br />
• The chassis may also be cleaned in water up to 60°C. A brush and standard<br />
bath cleaner can be used for easier cleaning.<br />
5.2. Battery and Battery Charger<br />
• Before cleaning the battery, please remove the battery charger from the<br />
battery and mains.<br />
• Do not place the charger in water or spray with water. You can clean the<br />
battery charger with a slightly moist towel and dry with a clean towel.<br />
• Do not place the battery in water. You can clean the battery with a slightly<br />
moist towel and dry with a clean towel.<br />
• When using a commercial disinfectant, please follow the manufacturer's<br />
instructions.<br />
5.3. Maintenance<br />
• The battery can only be maintained by the manufacturer. Please do not<br />
open the battery as there are no user serviceable parts inside.<br />
• Periodic maintenance:<br />
The lift must be checked at a minimum of every 24 months on the following<br />
areas:<br />
- Functional impairment and mechanical damage to the lifter<br />
and accessories<br />
- The frictionless movement of the actuator<br />
- Readability of the safety relevant information<br />
- Functionality of the lift as described in the instruction manual<br />
The periodic maintenance must be performed by specialists, who as a result<br />
of their training, education, knowledge and practical experience are<br />
capable of performing these checks. The person who is performing the<br />
periodic checks must not be constrained by others in any way, shape or<br />
form.<br />
Please contact your specialty shop to arrange for the routine inspection.<br />
Seite 14
Spare parts list and additional documentation is available from the supplier<br />
or specialty shop at your request.<br />
All repairs must be carried out by an authorized specialty shop. Please<br />
contact the supplier for a list of authorized repair centers nearest you.<br />
6. Troubleshooting<br />
In the event that your<br />
is not functioning properly, please refer to<br />
the following table. If you can not remedy the fault, please contact an authorized<br />
service dealer directly.<br />
Fault Possible Cause Remedy<br />
The red light on the hand Electronic battery charge Fully charge the battery<br />
control is on and the lift<br />
does not move in a<br />
downward position<br />
control is activated. Batter<br />
charge inadequate.<br />
Battery is fully charged Battery can be put into<br />
The charger is plugged<br />
into the mains but the red<br />
charging light is not lit<br />
The bath lift does not<br />
move. No sound from the<br />
motor<br />
Control Light is broken<br />
The plug from the battery<br />
charger is not inserted<br />
completely in the battery.<br />
Battery contacts are dirty<br />
or battery is not fully<br />
charged<br />
No battery in the battery<br />
slot in the backrest<br />
Battery or main control<br />
unit not inserted completely<br />
in the backrest<br />
The battery is defect<br />
The actuator is defect<br />
Main control unit is defect<br />
normal use<br />
Insert battery and perform<br />
a trial run. If problems<br />
persist, replace the<br />
battery charger.<br />
Insert the plug as far as<br />
it will go<br />
Remove the battery,<br />
clean the contacts and<br />
recharge the battery<br />
Insert a fully charged<br />
battery in the backrest<br />
Completely insert the<br />
battery and main control<br />
unit<br />
Replace battery<br />
Send to authorized service<br />
center<br />
Remove main control<br />
unit and send to authorized<br />
repair center<br />
Seite 15
7. Technical Specifications :<br />
Medical Equipment Type B with internal energy source and a maximum lifting<br />
capacity of 145 kg<br />
Measurements:<br />
Seat length<br />
590 mm<br />
Seat width with extended side flaps<br />
715 mm<br />
Seat width with out extended side flaps<br />
390 mm<br />
Seat height at lowest position<br />
60 mm<br />
Seat height at uppermost position<br />
420 mm<br />
Reclining angle of backrest 6° - 40 °<br />
Backrest height<br />
630 mm<br />
Backrest width<br />
354 mm<br />
Total length in the lowest/highest position<br />
930/680 mm<br />
Weight:<br />
Total weight (without Battery and Hand control)<br />
Battery and Control Unit<br />
Seat Unit<br />
Backrest<br />
Maximum load<br />
Sound level<br />
11,9 kg<br />
1,9 kg<br />
5,9 kg<br />
6,0 kg<br />
145 kg<br />
< 60 dB(A)<br />
8. Hygiene and Disinfection plan for refurbishing the<br />
(for the Specialty Store)<br />
• The lifter is sent to the service store in proper packaging.<br />
• The bath lift is taken out of the package (wear gloves), removing and disposing<br />
of suction cups and covers<br />
• Remove the battery and electronic control unit from the backrest. Please<br />
refer to the instruction manual.<br />
Seite 16
• Remove the screws from the backrest and separate the backrest into the<br />
two pieces (front and back shell).<br />
• Remove the 2 screws that hold the actuator in place and remove the actuator.<br />
• Disinfect all pats of the lift with an alcohol based disinfection solution eg.:<br />
„DENTLER ALKOHOLISCHES DESINFEKTIONSMITTEL“.<br />
• Spay all parts completely<br />
• Let the disinfection solution work for app. 30 seconds<br />
• The solution dries without any residual matter. There is no need to rub the<br />
parts dry.<br />
• Clean all parts with an appropriate cleaning solution eg.:<br />
"DENTLER FLÜSSIGER KRAFTREINIGER“ in a approved room.<br />
ATTENTION!!!<br />
Do not immerse the electronic control unit, battery, battery charger<br />
nor the motor in water. Clean only with a slightly damp cloth.<br />
• Spray the cleaning solution and the parts and wait for app. 5 minutes.<br />
• Clean the parts with a standard brush and hot water.<br />
• Rinse all parts with clean hot water.<br />
• Dry the surfaces (eg: pressed air).<br />
• Verify the usability of all the parts and replace as necessary.<br />
• A list of available spare parts can be obtained directly from the manufacturer.<br />
• Assemble the lift in the reverse sequence of dismantling. If you use an<br />
electric screwdriver, please ensure that the torque is set to 6 for the backrest<br />
screws.<br />
Seite 17
• Mount the 6 suction cups on the base of the lifter. Insert the electronic control<br />
unit first in the backrest. Insert a fully charged battery in the backrest.<br />
Place new covers, as necessary on the lift.<br />
• Perform a test run of the bath lift to ensure that the lifter operates properly.<br />
Completely descend and elevate the lift, verifying that the Emergency Stop<br />
button functions properly. Ensure that the battery is fully charged.<br />
• Document the refurbishment work and file this information with the Bath<br />
lift's documentation.<br />
• Pack the lift in proper packaging and ensure that the instruction manual is<br />
also included.<br />
• In case of problems, call your specialty dealer.<br />
9. Disposal<br />
This product conforms to Waste Electrical and Electronic Directive 2002/96/CE.<br />
This product contains substances that are harmful to the environment if not<br />
disposed of properly. Please follow your local government's requirements regarding<br />
disposal of plastics, batteries and electronic equipment.<br />
Seite 18
10. Warranty<br />
Dear Valued Customer,<br />
Your<br />
is a state of the art product which complies with all current<br />
norms and regulations.<br />
In the event of damage or malfunctioning, please contact your specialty dealer<br />
or the manufacturer.<br />
The warranty begins on the delivery date as printed on the delivery note. The<br />
warranty is valid from 3 years from this date and covers all parts with the exception<br />
of the covers, suction cups and battery.<br />
The warranty is valid on the condition that the equipment has been used according<br />
to the instruction manual and that it has only been used for the purpose<br />
for which it was designed.<br />
The warranty is dependent upon the legal regulations of the country in which<br />
the lift was delivered to.<br />
The warranty is void if:<br />
• The documents mentioned above are illegible or have been altered without<br />
prior written consent of the manufacturer.<br />
• The serial number on the bath lift has been altered, erased, removed or<br />
made illegible in any way shape or form. The bath lift has been repaired, altered,<br />
or modified without prior written authorization of the manufacturer.<br />
• Damage has been caused by external influences (eg. cables pulled off, cut<br />
through, battery and electronic control unit cases have been broken or<br />
opened, etc.).<br />
Seite 19