EasyTouch Meter Manual
EasyTouch Meter Manual
EasyTouch Meter Manual

You also want an ePaper? Increase the reach of your titles
YUMPU automatically turns print PDFs into web optimized ePapers that Google loves.
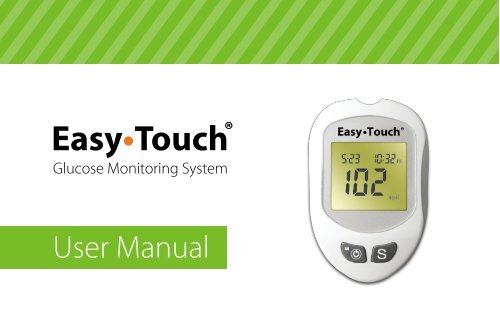
<strong>EasyTouch</strong> ®<br />
Glucose Monitoring System<br />
User <strong>Manual</strong>
<strong>EasyTouch</strong> ®<br />
Glucose Monitoring System<br />
See our other products at<br />
www.<strong>EasyTouch</strong>Products.com
Table of Contents<br />
Important Information ..................................................................................3<br />
Introduction ...................................................................................................7<br />
About the Product ........................................................................................8<br />
About the <strong>EasyTouch</strong> ® <strong>Meter</strong> ................................................................9<br />
About the <strong>EasyTouch</strong> ® <strong>Meter</strong> Display ................................................. 11<br />
About the <strong>EasyTouch</strong> ® Test Strip ........................................................13<br />
About the <strong>EasyTouch</strong> ® Test Strip Vial .................................................14<br />
Installing/Replacing the Battery ..........................................................15<br />
Setting Up the <strong>Meter</strong> ...................................................................................16<br />
Setting Up the Date, Time ..................................................................16<br />
Setting Up Alarm ................................................................................17<br />
Unit Selecton ......................................................................................20
The Control Solution Test ......................................................................... 21<br />
Testing Your Blood Glucose Level ........................................................... 25<br />
Preparing the Test Strip ..................................................................... 26<br />
Obtaining a Blood Sample................................................................. 27<br />
Applying Blood Sample to the <strong>EasyTouch</strong> ® Test Strip ....................... 28<br />
Memory Features ....................................................................................... 31<br />
Transfer Test Results to a Computer ....................................................... 33<br />
Care and Storage ....................................................................................... 34<br />
Display Messages...................................................................................... 35<br />
............................................................................................ 42<br />
Limitations of the Procedure.............................................................. 44<br />
Service and Warranty ................................................................................ 44<br />
Customer Service ...................................................................................... 46
Important Information<br />
Available Alternate Sites Testing : Palm and Forearm.<br />
Alternate Site Testing (AST) means you can use other parts of the body other<br />
<br />
1. The <strong>EasyTouch</strong> ® Glucose Monitoring System allows you to test on the<br />
<br />
3<br />
Palm<br />
There are limitations for doing AST. Please<br />
consult your healthcare professional before<br />
you do AST.<br />
Forearm
4 <br />
<br />
<br />
alternative site if:<br />
<br />
<br />
<br />
<br />
<br />
<br />
CAUTION:<br />
<br />
<br />
<br />
<br />
samples from the forearm and other alternate sites. Rub the alternate test<br />
sites about 20 seconds before lancing. If you are testing for hypoglycemia<br />
(low blood glucose), or if you suffer from hypoglycemia unawareness, we
more often than you do now. For people with diabetes, more frequent<br />
testing is a good thing. Just remember: any time you want to be sure of an<br />
<br />
ONLY in the following intervals:<br />
<br />
<br />
<br />
DO NOT use AST if:<br />
<br />
<br />
<br />
<br />
<br />
<br />
5
6 <br />
medical condition. If your blood glucose reading is unusually low or high,<br />
or if you do not feel the way your reading indicates, repeat the test with<br />
a new test strip. If your reading is not consistent with your symptoms or<br />
if your blood glucose result is less than 60 mg/dL (3.3 mmol/L) or higher<br />
than 240 mg/dL (13.3 mmol/L) you should contact your<br />
healthcare professional.<br />
® blood<br />
glucose test results without the consent and advice of a physician or<br />
healthcare professional is not recommended.<br />
<br />
results. If you believe you are suffering from severe dehydration, consult<br />
your physician immediately.
Introduction<br />
® Glucose Monitoring System, the<br />
latest advancement in biosensor technology.<br />
®<br />
Glucose Monitoring System is designed to process accurate results utilizing<br />
only a small amount of blood for in vitro diagnostics. The <strong>EasyTouch</strong> ®<br />
Glucose Monitoring System is intended for use in the home and in<br />
professional settings to monitor whole blood glucose levels obtained from the<br />
<br />
7
8<br />
About the Product<br />
The <strong>EasyTouch</strong> ® Glucose <strong>Meter</strong> & Monitoring System is available in two<br />
different package options with the following contents:<br />
A. Your <strong>EasyTouch</strong> ® Glucose Monitoring System contains:<br />
® <strong>Meter</strong><br />
<br />
<br />
<br />
<br />
<br />
<br />
B. Your <strong>EasyTouch</strong> ® Institutional (<strong>Meter</strong> Only) Box contains:<br />
® <strong>Meter</strong><br />
<br />
Test Strips, Control Solution, & Lancing Device can be purchased individually.
About the <strong>EasyTouch</strong> ® <strong>Meter</strong><br />
9<br />
<strong>EasyTouch</strong> ®<br />
BLOOD GLUCOSE METER<br />
For In Vitro Diagnostic Use Only<br />
Made in Taiwan to Specs of<br />
MHC Medical Products, LLC<br />
8695 Seward Road<br />
Fairfield, OH 45011<br />
Toll #: 877.358.4342<br />
<br />
S/N:M05B13286
10 1. Display<br />
screen guides you through the test by using numbers and symbols.<br />
2. M Button The M (mode) button is used to set time, alarm, enters the<br />
memory mode to show the consecutive 7/14/30-day average results and<br />
turns the <strong>Meter</strong> on and off.<br />
3. S Button The S (select/set) button is used to select year, month, day,<br />
time, memory of results and control solution mode.<br />
4. Test Port This is where you insert the Test Strip into the <strong>Meter</strong>.<br />
5. Unit Switch Switch for mmol/L or mg/dL.1 mmol/L =18 mg/dL<br />
6. Battery Cover<br />
7. Label<br />
8. Reset Button Press this button to re-set the system.<br />
9. Data Port
About the <strong>EasyTouch</strong> ® <strong>Meter</strong> Display<br />
11<br />
4<br />
3<br />
1<br />
12<br />
9<br />
11<br />
2<br />
7<br />
8<br />
10<br />
5<br />
13<br />
6<br />
1. Date<br />
2. Time<br />
3. Control Solution Test<br />
Appears when doing a control<br />
<br />
result as a control solution<br />
test.<br />
4. Memory Symbol<br />
Indicates in memory mode.<br />
5. Units of Measurement<br />
Unit of mmol/L or mg/dL will<br />
appear with the test result.
12 6. Battery Symbol<br />
Appears when the battery is low or must be replaced.<br />
7. Blood Drop Symbol<br />
Flashes when it is ready to apply sample to Test Strip.<br />
8. Warning Symbol<br />
Appears when result is out of the range of your setting reference value.<br />
9. Alarm Function Symbol<br />
<br />
10. Test Strip Symbol<br />
Appears to tell you when the meter is ready for test.<br />
11. Day Average Symbol<br />
Shows the average value of test results.<br />
12. Test Result Area<br />
Display test results.<br />
13. Temperature Message<br />
Appears if your meter is out of operating temperature range.
About the <strong>EasyTouch</strong> ® Test Strip<br />
13<br />
3<br />
1<br />
2<br />
The <strong>EasyTouch</strong> ® Test Strip is used to perform<br />
<br />
<strong>EasyTouch</strong> ® <strong>Meter</strong>.<br />
Each strip can be used only once.<br />
The Test Strip consists of the following parts:<br />
<br />
<br />
has been applied to the target area.<br />
2. Target Area<br />
This is where blood is drawn into the Test Strip.<br />
3. Contact Bar<br />
This end of the Test Strip is inserted into the Test<br />
Port to activate the <strong>Meter</strong>. (white side face up).
14<br />
About the <strong>EasyTouch</strong> ® Test Strip Vial<br />
VIAL LABEL<br />
TEST STRIP VIAL<br />
Easy ®<br />
Glucose Test Strips<br />
WARNING: Re-cap immediately &<br />
always close lid tightly.<br />
Store at 39-86°F (4-30°C).<br />
Do not refrigerate.<br />
Always store test strips inside vial.<br />
Discard Date: ______________<br />
Discard 3 months after opening.<br />
Made in Taiwan to Specifications of<br />
MHC Medical Products, LLC<br />
8695 Seward Rd, Fairfield, OH 45011<br />
<br />
50 TEST STRIPS<br />
For use with ® <strong>Meter</strong>.<br />
For testing of glucose in capillary whole blood.<br />
For in vitro diagnostic use.<br />
EXP<br />
Lot Number<br />
Easy ®<br />
Glucose Test Strips<br />
WARNING: Re-cap immediately &<br />
always close lid tightly.<br />
Store at 39-86°F (4-30°C).<br />
Do not refrigerate.<br />
Always store test strips inside vial.<br />
Discard Date: ______________<br />
Discard 3 months after opening.<br />
Made in Taiwan to Specifications of<br />
MHC Medical Products, LLC<br />
8695 Seward Rd, Fairfield, OH 45011<br />
<br />
Control Solution Range<br />
Expiration Date
Installing/Replacing the Battery<br />
15<br />
<br />
<br />
<br />
is shown, the <strong>Meter</strong> will provide accurate results for<br />
<br />
How to Replace the Battery<br />
<br />
<br />
<br />
1 2 3<br />
<strong>EasyTouch</strong> ®<br />
BLOOD GLUCOSE METER<br />
For In Vitro Diagnostic Use Only<br />
Made in Taiwan to Specs of<br />
MHC Medical Products, LLC<br />
8695 Seward Road<br />
Fairfield, OH 45011<br />
Toll #: 877.358.4342<br />
<br />
<strong>EasyTouch</strong> ®<br />
BLOOD GLUCOSE METER<br />
For In Vitro Diagnostic Use Only<br />
Made in Taiwan to Specs of<br />
MHC Medical Products, LLC<br />
8695 Seward Road<br />
Fairfield, OH 45011<br />
Toll #: 877.358.4342<br />
<br />
<strong>EasyTouch</strong> ®<br />
BLOOD GLUCOSE METER<br />
For In Vitro Diagnostic Use Only<br />
Made in Taiwan to Specs of<br />
MHC Medical Products, LLC<br />
8695 Seward Road<br />
Fairfield, OH 45011<br />
Toll #: 877.358.4342<br />
<br />
<strong>EasyTouch</strong> ®<br />
BLOOD GLUCOSE METER<br />
For In Vitro Diagnostic Use Only<br />
Made in Taiwan to Specs of<br />
MHC Medical Products, LLC<br />
8695 Seward Road<br />
Fairfield, OH 45011<br />
Toll #: 877.358.4342
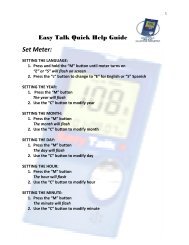
16 Setting Up the <strong>Meter</strong><br />
<br />
<br />
Setting Up the Date & Time<br />
1. Press the M button to enter this mode.<br />
Press and release S<br />
<br />
mode, press M button and the year setting<br />
will appear. Press and release the S button<br />
until the correct year appears. (Fig.1)<br />
2. To set the year and move on to choose the<br />
month, press the M button. To change the<br />
month, press the S button. (Fig.2)<br />
3. To set the month and move on to choose the<br />
day, press the M button. To change the day,<br />
press the S button. (Fig.3)<br />
(Fig.1)<br />
(Fig.2)<br />
(Fig.3)
4. To set the day and move on to choose the hour setting,<br />
press the M button. (Fig.3)<br />
5. To change the hour, press the S button. To set the hour<br />
and move on to change the minutes, press the M button.<br />
(Fig.4)<br />
6. To change the minutes, press the S button. To set the<br />
minutes and move on to choose the alarm setting, press<br />
the M button. (Fig.4)<br />
Setting Up Alarm<br />
M button (yes). If you<br />
press S button (no), it will be moved on to health<br />
management alarm setting (step 11). To change the hour,<br />
press S button. To enter the hour and move on to change<br />
the minutes, press M button. To change the minutes,<br />
press S button. To enter the minutes and move on to<br />
choose the second alarm setting, press the M button.<br />
(Fig.5)<br />
(Fig.4)<br />
(Fig.5)<br />
17
18 8. To set the second alarm, press the M button (yes).<br />
If you press S button (no), it will be moved on to health<br />
management alarm setting (step 11). To change the hour,<br />
press S button. To set the hour and move on to change the<br />
minutes, press M button. To change the minutes, press S<br />
button. To set the minutes and move on to choose the third<br />
alarm setting, press the M button. (Fig.6)<br />
9. To set the third alarm, press the M button (yes). If you press<br />
S button (no), it will be moved on to health management<br />
alarm setting (step 11). To change the hour, press S button.<br />
To set the hour and move on to change the minutes, press<br />
M button. To change the minutes, press S button. To set the<br />
minutes and move on to choose the fourth alarm setting,<br />
press the M button. (Fig.7)<br />
(Fig.6)<br />
(Fig.7)
10. To set the fourth alarm, press the M button (yes). If<br />
you press S button (no), it will be moved on to health<br />
management alarm setting (step 11). To change the hour,<br />
press S button. To set the hour and move on to change<br />
the minutes, press M button. To change the minutes,<br />
press S button. To set the minutes and move on to health<br />
M button. (Fig.8)<br />
S or M button to<br />
turn off the alarm or the alarm will turn off automatically<br />
after 30 seconds.<br />
S button. To set<br />
<br />
press M button. (Fig.9)<br />
S button.<br />
Further press M<br />
<br />
(Fig.8)<br />
(Fig.9)<br />
19
www.<strong>EasyTouch</strong>Products.com<br />
20<br />
Unit Selection<br />
<br />
Note: The mg/dL is the standard unit in the United States.<br />
<strong>Meter</strong>s used in the United States must be set to read in mg/dL.<br />
<strong>EasyTouch</strong> ®<br />
BLOOD GLUCOSE METER<br />
For In Vitro Diagnostic Use Only<br />
MHC Medical Products, LLC.<br />
8695 Seward Road<br />
Fairfield, OH 45011<br />
Toll #: 877.358.4342<br />
S/N:M05B13286<br />
mmol/L mg/dL
When to Perform a Control Solution Test<br />
® ®<br />
<br />
results. The system is performing correctly if the control solution test<br />
<br />
Test Strip vial.<br />
<br />
If you suspect your blood glucose test are not consistent with how you<br />
feel or your test are higher or lower than normal, you may validate the<br />
<br />
Note: <br />
<br />
<br />
For greater accuracy, we recommend that two sets of control solution be<br />
used, a high level and a low level control solution. For ordering information,<br />
<br />
21
22 To Perform a Control Solution Test<br />
<br />
<br />
<br />
Push all the way into test port until meter automatically turns on. (Fig.10)<br />
<br />
<br />
S button for 3 sec to switch<br />
<br />
<br />
<br />
(Fig.10)<br />
(Fig.11)<br />
(Fig.12)
Do not apply<br />
<br />
6. Bring the tip of the Test Strip to lightly touch the drop of<br />
<br />
<br />
The meter will now begin counting down from 5 to 1 and<br />
<br />
<br />
Please remember that in order to prevent contamination, follow<br />
<br />
23
24 Comparing Control Solution Results<br />
The <strong>EasyTouch</strong> ® Glucose Monitoring System is functioning properly if the<br />
<br />
<br />
<br />
<br />
<br />
<br />
<br />
<br />
<br />
<br />
DO NOT use the system if the problem persists.
Testing Your Blood Glucose Level<br />
Before testing blood glucose, you need the following items:<br />
1. <strong>EasyTouch</strong> ® <strong>Meter</strong><br />
2. <strong>EasyTouch</strong> ® Test Strip<br />
<br />
4. Sterile Lancet<br />
25<br />
Caution: To reduce the chances of infection:<br />
Never share a lancing device and lancet with another person.<br />
Always use a new and sterile lancet. Lancets are for single use only<br />
Always use a new Test Strip, Test Strips are for single use only.<br />
Do not get lotion, oil, dirt or debris in or on the lancet and lancing device.
26 Preparing the Test Strip<br />
<br />
thoroughly.<br />
2. Pull out a Test Strip from the vial and re-cap the vial<br />
immediately.<br />
3. <br />
<br />
automatically turns on.<br />
<br />
<br />
MHC Medical Products<br />
<br />
WARNING: Always close lid tightly.<br />
Re-cap immediately.<br />
Store at 40-85°F (4-30°C).<br />
Do not refrigerate.<br />
Always store test strips inside vial.<br />
Discard Date: ______________<br />
Discard 3 months after opening.<br />
EXP<br />
Easy ® For testing of glucose in capi lary whole blood.<br />
For in vitro diagnostic use.<br />
Glucose Test Strips For use with ® <strong>Meter</strong>.<br />
50 TEST STRIPS
Obtaining a Blood Sample<br />
27<br />
<br />
For further instructions please see the insert provided with lancing device.<br />
1. Unscrew and remove the endcap of the lancing device.<br />
2. Insert the lancet into the lancet holder.<br />
<br />
needle tip.<br />
4. Recapping and screwing the endcap to the body of the lancing device.<br />
<br />
<br />
button.<br />
7. After sampling, remove the endcap containing the used lancet carefully.<br />
8. Remove the lancet from the lancing device. Discard the used lancet<br />
properly in accordance with local, state, and federal law.
28 Applying Blood Sample to the <strong>EasyTouch</strong> ® Test Strip<br />
1. After obtaining a blood sample, place the drop onto the test well of the<br />
Test Strip. Blood is automatically drawn into the Test Strip.<br />
<br />
of the Test Strip, the <strong>Meter</strong> will beep and begin counting down from 5 to 1.<br />
<br />
into the <strong>Meter</strong> memory automatically.
3. After the test result appears, if no further tests are performed, the <strong>Meter</strong><br />
<br />
recommend using a tissue to remove the used strip from the <strong>Meter</strong> for<br />
proper disposal.<br />
29
30 HI and LO Readings<br />
1. The test results range between 20 to 600 mg/dL (1.1 to<br />
<br />
your <strong>Meter</strong> has detected that your blood glucose level is<br />
higher than 600 mg/dL(33.3 mmol/L). It is suggested that<br />
you review your testing procedure and test again with<br />
If the same result<br />
occurs, consult your healthcare professional immediately.<br />
(Fig.13)<br />
<br />
detected that your blood glucose level is lower than 20<br />
mg/dL (1.1 mmol/L). It is suggested that you review your<br />
testing procedure and test again with a new Test Strip to<br />
If the same result occurs, consult your<br />
healthcare professional immediately. (Fig.14)<br />
(Fig.13)<br />
(Fig.14)
Memory Features<br />
The <strong>EasyTouch</strong> ® <strong>Meter</strong> automatically stores the 300 most recent blood<br />
glucose results with date and time in its memory. It also provides you with a<br />
consecutive 7/14/30-day average of your blood glucose test results.<br />
31<br />
1. Press M<br />
<br />
2. Press S button, the result of control solution will appear on<br />
display.*<br />
3. Press S button, the consecutive 7-day average will be shown.*<br />
4. Press S button, the consecutive 14-day average will be shown.*<br />
5. Press S button, the consecutive 30-day average will be shown.*<br />
Note : * If there is no test results during this stage, it will directly<br />
appear the most recent test result.
32<br />
6. Press S button, the most recent test result will appear. If it<br />
has 14-day average result, it will show under the screen at<br />
the same time. Each time you press the S button, the meter<br />
<br />
memory is full, the oldest result is removed and replaced<br />
with the newest result.<br />
7. Press and release the S button to the end of the memory,<br />
S button again or press M<br />
button at anytime to turn off the meter.<br />
Exiting the Memory Mode<br />
1. Press the M button to turn off the meter.<br />
2. <strong>Meter</strong> will shut down automatically after 3 minutes with no further action.<br />
Note: The consecutive 7/14/30-day average is calculated from the blood<br />
glucose results obtained during the last consecutive 7/14/30-day.<br />
To Record Your Results
Transfer Test Results to a Computer<br />
® Glucose Monitoring System, it is easy to transfer test<br />
results to your personal computer. Follow these simple instructions:<br />
1. Obtain the required software and USB cable<br />
<br />
2. Install the software on your computer<br />
Installation instructions will be provided with the software.<br />
3. Get ready to transfer test results<br />
<br />
connect the other end of interface cable to the data port located on<br />
the side of the meter with the meter turned off<br />
the display, indicating that the meter is in the communication mode.<br />
4. Transfer data<br />
Follow the instructions provided in the software to download the results<br />
M button to turn<br />
off the meter.<br />
<br />
<br />
respond to computer commands.<br />
33
34<br />
Care and Storage<br />
1. <br />
damage to the device.<br />
<br />
conditions, such as high humidity, heat, freezing cold or dust.<br />
3. Always wash hands with soap and water and rinse and dry completely<br />
before handling the meter and Test Strips.<br />
<br />
soft cloth. DO NOT USE ANY ORGANIC SOLVENT for cleaning.<br />
5. The meter should be stored at room temperature in a dry and clean<br />
space. DO NOT STORE IN DIRECT SUNLIGHT OR AREAS WITH HIGH<br />
HUMIDITY AND/OR DUST. It is advised that you store the meter and its<br />
accessories into the provided carrying case.<br />
For healthcare professionals using this system on multiple patient, please be aware that all<br />
items that come in contact with human blood should be handled as potential biohazards.<br />
Users should follow the guidelines for prevention of blood-borne transmittable diseases in a<br />
healthcare setting for potentially infectious human blood specimens as recommended in the<br />
<br />
Instrument Biohazards and Infectious Disease Transmitted by Blood, Body Fluids and Tissue:<br />
Approved Guideline. NCCLS document M29-A [ISBN 1-56238-339-6].
Display Messages<br />
35<br />
DISPLAY WHAT IT MEANS ACTION<br />
<br />
that all segments of the<br />
meter are functioning.<br />
No action necessary<br />
The system is ready to<br />
accept a blood sample.<br />
<br />
blood sample.<br />
The system is ready to<br />
<br />
sample.<br />
<br />
<br />
sample.
36<br />
DISPLAY WHAT IT MEANS ACTION<br />
Indicate the result is<br />
<br />
<br />
management.<br />
For your reference or you<br />
can change the default<br />
setting value 100 mg/dL<br />
according to page 19.<br />
Indicate the result is<br />
<br />
<br />
management.<br />
<strong>Meter</strong> detects blood<br />
glucose level is higher<br />
than 600 mg/dL<br />
(33.3 mmol/L).<br />
For your reference or you<br />
can change the default<br />
setting value 70 mg/dL<br />
according to page 19.<br />
Indicates high blood<br />
glucose level. Repeat test.<br />
If result still occurs, consult<br />
your physician immediately.
DISPLAY WHAT IT MEANS ACTION<br />
<strong>Meter</strong> detects blood<br />
glucose level is lower than<br />
20 mg/dL (1.1 mmol/L).<br />
Indicates low blood glucose<br />
level. Repeat test. If result<br />
still occurs, consult your<br />
physician immediately.<br />
37<br />
Temperature is high during<br />
the test procedure.<br />
Temperature is low during<br />
the test procedure.<br />
Result may be larger<br />
variation. Move to a cooler<br />
<br />
<br />
minutes before re-testing.<br />
Result may be larger<br />
variation. Move to a warmer<br />
<br />
<br />
minutes before re-testing.
38<br />
DISPLAY WHAT IT MEANS ACTION<br />
Temperature is too high to<br />
perform the test.<br />
Repeat the test in a cooler<br />
<br />
<br />
before re-testing.<br />
Temperature is too low to<br />
perform the test.<br />
An error message<br />
indicating a problem with<br />
the Test Strip.<br />
Repeat the test in a warmer<br />
<br />
<br />
before re-testing.<br />
Review the instructions<br />
and try again with a new<br />
Test Strip.
DISPLAY WHAT IT MEANS ACTION<br />
An error message<br />
indicating a problem with<br />
the meter.<br />
Battery power is low. <strong>Meter</strong><br />
<br />
50 more measurements.<br />
Pr<br />
<br />
the test strip. If the problem<br />
<br />
Service for help.<br />
Replace with a new 3-Volt<br />
<br />
39<br />
Battery power is too low<br />
for further usage.<br />
Replace with a new 3-Volt<br />
<br />
immediately.
40<br />
DISPLAY WHAT IT MEANS ACTION<br />
All testing values recorded<br />
in the memory have been<br />
shown.<br />
Press M or S button or wait<br />
for 3 minutes to turn off the<br />
meter.<br />
The setting alarm is ringing<br />
to remind of doing the<br />
blood glucose test.<br />
Press M or S button to shut<br />
off or the alarm will turn off<br />
automatically after 30 sec.
Other problems that may occur<br />
The Test Strip has not been inserted<br />
into the meter properly.<br />
Defective Test Strip.<br />
<br />
Test Strip remains in the test port for<br />
more than 3 minutes prior to testing.<br />
<br />
when trying to perform a test.<br />
Action<br />
Review the instructions and re-insert<br />
the Test Strip correctly (white side<br />
face up).<br />
Replace with a new Test Strip.<br />
Repeat the test with new Test Strip.<br />
<strong>Meter</strong> will automatically turn-off. Reinsert<br />
the Test Strip to the test port.<br />
<br />
41
42 <br />
<strong>Meter</strong> Operating Conditions<br />
Temperature<br />
<br />
Humidity<br />
<br />
Hematocrit 35 - 55%<br />
Test Sample<br />
<br />
Sample Volume >0.5 µl<br />
Measuring Unit mg/dL or mmol/L<br />
Measuring Range 20-600 mg/dL (1.1-33.3 mmol/L)<br />
Test Time<br />
5 sec<br />
Memory Capacity 300 most recent results<br />
Average<br />
7/14/30 days average results<br />
External Output <br />
Power supply <br />
Battery Life<br />
<br />
Dimension and Weight
Limitations of the Procedure<br />
Caution: The <strong>EasyTouch</strong> ® Glucose Monitoring System is designed for in<br />
vitro diagnostic use only and is not intended to test on newborns. Any<br />
change or administer of medication based on the <strong>EasyTouch</strong> ® Glucose test<br />
results without the consent advice of a physician or healthcare professional<br />
is not recommended.<br />
The <strong>EasyTouch</strong> ® Test Strips are designed for use with fresh capillary<br />
<br />
results may occur when performing the test while severely dehydrated,<br />
<br />
If you believe you are suffering from any of the above symptoms, consult a<br />
healthcare professional immediately.<br />
43
44<br />
Service and Warranty<br />
<br />
<strong>EasyTouch</strong> ® <strong>Meter</strong> when used with Test Strips other than those designed<br />
for the <strong>EasyTouch</strong> ® Glucose Monitoring System. The <strong>EasyTouch</strong> ® Glucose<br />
Monitoring System manufacturer warranty is valid only when used properly<br />
<br />
<strong>EasyTouch</strong> ® Glucose Monitoring System and <strong>EasyTouch</strong> ® Test Strip are<br />
used improperly.
TRUE Lifetime Warranty<br />
<br />
<br />
of original purchase. Our company will repair or replace any <strong>EasyTouch</strong> ®<br />
Glucose Monitoring System found defective with a new unit at our discretion.<br />
This warranty does not apply to the performance of a <strong>EasyTouch</strong> ® Glucose<br />
Monitoring System that has been altered, misused, tampered with or abused.<br />
In no event shall our company be liable to the purchaser or any other person<br />
for any incidental, consequential, or punitive damages arising from or in any<br />
way connected with the purchase or operation of the <strong>EasyTouch</strong> ® Glucose<br />
Monitoring System or its parts.<br />
For manufacturer warranty services, purchaser must contact<br />
<br />
45
46 Customer Service<br />
If you have any questions or concerns regarding this product or its<br />
<br />
happy to assist you.<br />
Customer Service Hotline<br />
1.877.358.4342<br />
E-Mail us at info@<strong>EasyTouch</strong>Products.com<br />
www.<strong>EasyTouch</strong>Products.com<br />
® <strong>Meter</strong>,<br />
<strong>EasyTouch</strong> ® Test Strip and all other supplies available. This will allow us to<br />
<br />
<br />
MHC Medical Products, LLC<br />
<br />
B04Q106100(02)<br />
Rev. date: 12/2011<br />
DH-080411.10
®<br />
Toll: 1.877.358.4342<br />
Web:<br />
Email:<br />
www.<strong>EasyTouch</strong>Products.com<br />
info@<strong>EasyTouch</strong>Products.com<br />
8695 Seward Road, Fairfield, Ohio 45011