GS300 Test Strip Insert-EN(101-3GS300-xxx)-æªè½æ²ç·.cdr
GS300 Test Strip Insert-EN(101-3GS300-xxx)-æªè½æ²ç·.cdr
GS300 Test Strip Insert-EN(101-3GS300-xxx)-æªè½æ²ç·.cdr

Create successful ePaper yourself
Turn your PDF publications into a flip-book with our unique Google optimized e-Paper software.
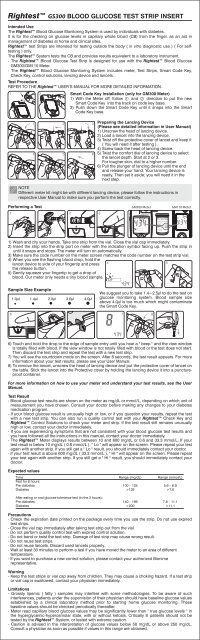
Rightest <strong>GS300</strong> BLOOD GLUCOSE TEST STRIP INSERT<br />
Intended Use<br />
The Rightest Blood Glucose Monitoring System is used by individuals with diabetes.<br />
It is for the checking on glucose levels in capillary whole blood (CB) from the finger, as an aid in<br />
management of diabetes at home and clinical sites.<br />
Rightest test <strong>Strip</strong>s are intended for testing outside the body ( in vitro diagnostic use ) ( For selftesting<br />
) only.<br />
The Rightest System tests the CB and provides results equivalent to a laboratory instrument.<br />
- The Rightest Blood Glucose <strong>Test</strong> <strong>Strip</strong> is designed for use with the Rightest Blood Glucose<br />
GM300/GM110 Meter.<br />
- The Rightest Blood Glucose Monitoring System includes meter, <strong>Test</strong> <strong>Strip</strong>s, Smart Code Key,<br />
Check Key, control solutions, lancing device and lancets.<br />
<strong>Test</strong> Procedure<br />
REFER TO THE Rightest USER’S MANUAL FOR MORE DETAILED INFORMATION.<br />
1 2<br />
Smart Code Key Installation (only for GM300 Meter)<br />
1) With the Meter off, follow 1 and 2 direction to put the new<br />
Smart Code Key into the track on code key base.<br />
2) Push down the Smart Code Key until it snaps into the Smart<br />
Code Key base.<br />
1 2 3<br />
4 5 6<br />
Preparing the Lancing Device<br />
(Please see detailed information in User Manual)<br />
1) Unscrew the head of lancing device.<br />
2) Load a lancet into the lancing device.<br />
3) Twist off the protective cover of lancet and keep it<br />
( You will need it after testing ).<br />
4) Screw back the head of lancing device.<br />
5) Twist the comfort dial of lancing device to select<br />
the lancet depth. Start at 2 or 3.<br />
For tougher skin, dial to a higher number.<br />
6) Pull the plunger of lancing device until the end<br />
and release your hand. Your lancing device is<br />
ready. Then set it aside; you will need it in the<br />
next step.<br />
NOTE<br />
Different meter kit might be with different lancing device, please follow the instructions in<br />
respective User Manual to make sure you perform the test correctly.<br />
Performing a <strong>Test</strong><br />
1 2 3<br />
GM300 Meter<br />
GM110 Meter<br />
1) Wash and dry your hands. Take one strip from the vial. Close the vial cap immediately.<br />
2) <strong>Insert</strong> the strip into the strip port on meter with the indication symbol facing up. Push the strip in<br />
until it snaps and stops. The meter will turn on automatically.<br />
3) Make sure the code number on the meter screen matches the code number on the test strip vial.<br />
4) When you see the flashing blood drop, hold the<br />
lancet device to side of your fingertip and press<br />
the release button.<br />
5) Gently squeeze your fingertip to get a drop of<br />
blood. Our meter only needs a tiny blood sample.<br />
4<br />
5<br />
Sample Size Example<br />
1.0 µl 1.4 µl 2.0 µl 3.0 µl 4 .0µl<br />
We suggest you to take 1.4~2.5µl to do the test on<br />
glucose monitoring system. Blood sample size<br />
above 4.0µl is too much which might contaminate<br />
the Smart Code Key.<br />
6 7<br />
8<br />
6) Touch and hold the drop to the edge of sample entry until you hear a " beep " and the view window<br />
is totally filled with blood. If the view window is not totally filled with blood or the test does not start.<br />
Then discard the test strip and repeat the test with a new test strip.<br />
7) You will see the countdown mode on the screen. After 8 seconds, the test result appears. For more<br />
information about your test results, please see your User Manual.<br />
8) To remove the lancet, unscrew the head of lancing device and put the protective cover of lancet on<br />
the table. Stick the lancet into the Protective cover by holding the lancing device it into a punctureproof<br />
container.<br />
For more information on how to use your meter and understand your test results, see the User<br />
Manual.<br />
<strong>Test</strong> Result<br />
- Blood glucose test results are shown on the meter as mg/dL or mmol/L, depending on which unit of<br />
measurement you have chosen. Consult your doctor before making any changes to your diabetes<br />
medication program.<br />
- If your blood glucose result is unusually high or low, or if you question your results, repeat the test<br />
with a new test strip. You can also run a quality control test with your Rightest Check Key and<br />
Rightest Control Solutions to check your meter and strip. If the test result still remains unusually<br />
high or low, contact your doctor immediately.<br />
- If you are experiencing symptoms that are not consistent with your blood glucose test results and<br />
you have followed all the instructions in this manual, contact your doctor immediately.<br />
- The Rightest Meter displays results between 10 and 600 mg/dL or 0.6 and 33.3 mmol/L. If your<br />
test result is below 10 mg/dL ( 0.6 mmol/L ), " Lo " will appear on the screen. Please repeat your test<br />
again with another strip. If you still get a " Lo " result, you should immediately contact your doctor.<br />
- If your test result is above 600 mg/dL ( 33.3 mmol/L ), " Hi " will appear on the screen. Please repeat<br />
your test again with another strip. If you still get a " Hi " result, you should immediately contact your<br />
doctor.<br />
Expected values<br />
Time<br />
Fast for 8 hours:<br />
Pre-diabetes<br />
Diabetes<br />
After eating or oral glucose tolerance test (in the 2 hours):<br />
Pre-diabetes<br />
Diabetes<br />
Range (mg/dL)<br />
100 – 125<br />
>126<br />
140 – 199<br />
>200<br />
Range (mmol/L)<br />
5.6 – 6.9<br />
>7.0<br />
7.8 – 11.1<br />
>11.1<br />
Precautions<br />
- Check the expiration date printed on the package every time you use the strip. Do not use expired<br />
test strips.<br />
- Close the vial cap immediately after taking test strip out from the vial.<br />
- Do not perform quality control test with expired control solution.<br />
- Do not bend or twist the test strip. Damage of test strip may cause wrong result.<br />
- Do not reuse test strips.<br />
- Do not reuse lancets. Discard used lancets properly.<br />
- Wait at least 30 minutes to perform a test if you have moved the meter to an area of different<br />
temperature.<br />
- If you want to purchase a new control solution, please contact your authorized Bionime<br />
representative.<br />
Warning<br />
- Keep the test strips or vial cap away from children. They may cause a choking hazard. If a test strip<br />
or vial cap is swallowed, contact your physician immediately.<br />
Limitations<br />
- Grossly lipemic ( fatty ) samples may interfere with some methodologies. To be aware of such<br />
interferences, patients under the supervision of their physician should have baseline glucose values<br />
established by a clinical laboratory method prior to starting home glucose monitoring. These<br />
baseline values should be checked periodically thereafter.<br />
- Meter read capillary blood glucose values may be significantly lower than " true glucose levels " in<br />
the hyperglycemic-hyperosmolar state, with or without ketosis. Critically ill patients should not be<br />
tested by the Rightest System, or tested with extreme caution.<br />
- Caution is advised in the interpretation of glucose values below 50 mg/dL or above 250 mg/dL.<br />
Consult a physician as soon as possible if values in this range are obtained.
- Healthcare professionals should evaluate their technique and their patients' technique at periodic<br />
intervals. To accomplish this, it is recommended that BGM results be compared with a concurrently<br />
obtained laboratory measurement on the same blood sample. A well characterized clinical<br />
laboratory method employing hexokinase or glucose oxidase should be used as the comparative<br />
method.<br />
- Fluoride should not be used as a preservation for venous specimens when using blood glucose<br />
monitors.<br />
- Hands and fingers contaminated with sugar from foods or beverages may cause falsely elevated<br />
results.<br />
- Differences in whole blood and serum/plasma values may cause variability in results.<br />
- Storage of strips near bleach as well as bleach containing products will affect results of glucose<br />
oxidase strips.<br />
- The use of cellular phones and other radio transmitting devices should be prohibited in areas where<br />
testing occurs.<br />
- Rightest Blood Glucose <strong>Test</strong> <strong>Strip</strong>s are designed for use with capillary whole blood samples.<br />
Do not use serum or plasma samples.<br />
- Incorrect test results may be obtained at high altitude more than about 10000 feet (3048 meters)<br />
above sea level.<br />
- Hematocrits below 30% may cause higher results, and hematocrits above 55% may cause lower<br />
results.<br />
- Severe dehydration and excessive water loss may cause inaccurately low results.<br />
- Rightest Blood Glucose Monitoring System has not been validated for use on neonates.<br />
Therefore, it should not be used for neonates.<br />
- Do not perform the blood glucose test at temperatures below 10 ℃ (50 ℉ ) or above 40 ℃ (104 ℉ ),<br />
below 10% or above 90% relative humidity.<br />
Storage and Handling<br />
- Store the strips in the original capped vial at temperatures between 4 ℃ to 30 ℃ (39 to 86 ℉ ) and<br />
relative humidity below 90%. Do not freeze.<br />
- Replace the vial cap immediately and close tightly after taking test strip out from the vial. Do not<br />
leave the cap of vial opened. If the strip is exposed in the air too long, it will absorb the moisture and<br />
cause wrong test result.<br />
- Use test strips within 3 months after first opening.<br />
Measurement Range<br />
The measurement range of the Rightest System is 10 to 600 mg/dL or 0.6 to 33.3 mmol/L.<br />
Quality Control Section<br />
Please refer to the Quality Control section of the User Manual.<br />
Accuracy<br />
The accuracy of the test study of the Rightest Blood Glucose Meter was demonstrated by comparing<br />
whole blood (plasma equivalent) glucose values on the Rightest meter with plasma glucose values on a<br />
lab instrument.<br />
A total of 176 patients were enrolled. Each patient collected and tested their own blood samples (from the<br />
fingertip) using the Rightest Meter. Another blood sample was collected within 5 minutes and got the<br />
plasma to be analyzed on the lab instrument. Ninety-seven percent of the results were within +/- 20% of the<br />
comparison method results at glucose concentrations ≧ 75 mg/dL and within +/-15 mg/dL at glucose<br />
concentrations 0.54 mmol/L (> 9.0 mg/dL)<br />
L -Dopa > 0.076 mmol/L (> 1.5 mg/dL)<br />
Methyldopa > 0.071 mmol/L (> 1.5 mg/dL)<br />
Cholesterol > 6.5 mmol/L (> 250 mg/dL)<br />
Reagents<br />
Each Blood Glucose <strong>Test</strong> <strong>Strip</strong> contains the following<br />
reagents:<br />
Glucose Oxidase (Aspergillus niger) (GOD) 8.5 %<br />
Potassium ferricyanide 48.5 %<br />
Non-reactive ingredients 43 %<br />
Patient<br />
Fingerstick (mg/dL)<br />
600<br />
550<br />
500<br />
450<br />
400<br />
350<br />
300<br />
250<br />
200<br />
150<br />
100<br />
50<br />
0<br />
E<br />
D<br />
N=176<br />
Slope=1.03<br />
Intercept=-0.25<br />
r=0.9911<br />
C<br />
C<br />
B<br />
0 50 100 150 200 250 300 350 400 450 500 550 600<br />
B<br />
D<br />
E<br />
YSI (mg/dL)<br />
A<br />
A<br />
References<br />
1) Consensus statement on self monitoring of blood glucose. Diabetes Care 1987; 1:95-99.<br />
2) Diabetes Information - American Diabetes Association and National Institute of Diabetes and<br />
Digestive and Kidney Diseases ( NIDDK )<br />
IVD<br />
For in vitro diagnostic use Manufacturer LOT<br />
Lot number<br />
Use by<br />
Store between tempe rature 4 ℃ and 30 ℃ ( 39 ℉ and 86 ℉ )<br />
BIONIME CORPORATION<br />
694, Renhua Road, Dali City,<br />
Taichung County, Taiwan 412<br />
Tel: +886 4 24951268 Fax: +886 4 24952568<br />
E-mail: info@bionime.com http://www.bionime.com<br />
EU Representative:<br />
BIONIME GmbH<br />
Heinrich Wild Strasse 202,<br />
CH-9435 Heerbrugg<br />
Switzerland<br />
<strong>101</strong>-3<strong>GS300</strong>-034<br />
<strong>EN</strong>