

DOOR REMOVAL, LEVELING AND ALIGNMENT - Whirlpool
DOOR REMOVAL, LEVELING AND ALIGNMENT - Whirlpool
DOOR REMOVAL, LEVELING AND ALIGNMENT - Whirlpool

You also want an ePaper? Increase the reach of your titles
YUMPU automatically turns print PDFs into web optimized ePapers that Google loves.
<strong>DOOR</strong> <strong>REMOVAL</strong>, <strong>LEVELING</strong> <strong>AND</strong> <strong>ALIGNMENT</strong><br />
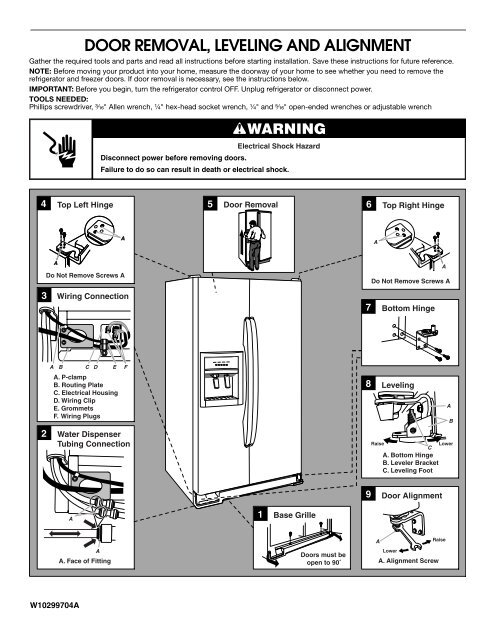
Gather the required tools and parts and read all instructions before starting installation. Save these instructions for future reference.<br />
NOTE: Before moving your product into your home, measure the doorway of your home to see whether you need to remove the<br />
refrigerator and freezer doors. If door removal is necessary, see the instructions below.<br />
IMPORTANT: Before you begin, turn the refrigerator control OFF. Unplug refrigerator or disconnect power.<br />
TOOLS NEEDED:<br />
Phillips screwdriver, ³⁄₁₆" Allen wrench, ¹⁄₄" hex-head socket wrench, ¹⁄₄" and ⁵⁄₁₆" open-ended wrenches or adjustable wrench<br />
4 Top Left Hinge<br />
AA<br />
Do Not Remove Screws A<br />
3 Wiring Connection<br />
A B C D E<br />
A. P-clamp<br />
B. Routing Plate<br />
C. Electrical Housing<br />
D. Wiring Clip<br />
E. Grommets<br />
F. Wiring Plugs<br />
2 Water Dispenser<br />
Tubing Connection<br />
A<br />
W10299704A<br />
A<br />
A. Face of Fitting<br />
WARNING<br />
Electrical Shock Hazard<br />
Disconnect power before removing doors.<br />
Failure to do so can result in death or electrical shock.<br />
AA<br />
F<br />
5 Door Removal<br />
1 Base Grille<br />
Doors must be<br />
open to 90˚<br />
6<br />
7<br />
8<br />
9<br />
A<br />
Top Right Hinge<br />
Do Not Remove Screws A<br />
A<br />
Bottom Hinge<br />
Leveling<br />
C<br />
A. Bottom Hinge<br />
B. Leveler Bracket<br />
C. Leveling Foot<br />
Door Alignment<br />
Lower<br />
A. Alignment Screw<br />
A<br />
Raise Lower<br />
Raise<br />
A<br />
B
2<br />
Remove the Doors<br />
WARNING<br />
Electrical Shock Hazard<br />
Disconnect power before removing doors.<br />
Failure to do so can result in death or electrical shock.<br />
1. Unplug refrigerator or disconnect power.<br />
2. Open both doors to 90°. Remove the base grille by removing<br />
the two screws, then pulling out on the outside corners. See<br />
Graphic 1.<br />
NOTE: The doors must only be opened to 90°. If they are<br />
opened all the way, the base grille will not come off.<br />
3. Remove food, the ice storage bin, and any adjustable door or<br />
utility bins from doors.<br />
4. Disconnect the water tubing, located behind the base grille on<br />
the freezer door side. See Graphic 2.<br />
■ Press the colored outer ring against the face of fitting and<br />
pull the water tubing free.<br />
NOTE: Keep the water tubing connector attached to the<br />
tube that runs underneath the freezer. The door cannot be<br />
removed if the connector is still attached to the tube that<br />
runs through the door hinge.<br />
5. Disconnect the wiring, located behind the base grille on the<br />
freezer door side. See Graphic 3.<br />
■ Remove the P-clamp using a ¹⁄₄" hex-head socket wrench.<br />
Remove the small wiring bundle from the P-clamp.<br />
■ Remove the wiring clip using a ¹⁄₄" hex-head socket<br />
wrench.<br />
■ Pull the electrical housing out from under the refrigerator.<br />
Disconnect the wiring plugs from the housing.<br />
■ Gently pull the large wiring bundle (with two white plugs)<br />
through the routing plate.<br />
6. Close both doors and keep them closed until you are ready to<br />
lift them free from the cabinet.<br />
7. Use a ³⁄₁₆" Allen wrench to remove the top left hinge screws as<br />
shown. See Graphic 4.<br />
IMPORTANT: Do not remove either screw A.<br />
WARNING<br />
Excessive Weight Hazard<br />
Use two or more people to lift the freezer door.<br />
Failure to do so can result in back or other injury.<br />
8. Lift freezer door straight up off bottom hinge. See Graphic 5.<br />
The water tubing and wiring remain attached to the freezer<br />
door and pull through the bottom left hinge.<br />
NOTE: This may require two people - one to lift the door and<br />
another to feed the water tubing and wiring through the hinge.<br />
Be sure the hole in the hinge is clear of obstructions, then<br />
gently pull one water tube through the hinge. (Avoid kinking<br />
the tube.) Next, gently pull the other water tube through the<br />
hinge, again avoiding kinks. Finally, gently pull the wiring<br />
bundle (including the grommet and wiring plugs) through the<br />
hinge.<br />
IMPORTANT: Rest the door on its side on a soft, clean<br />
surface, such as a towel, blanket or piece of cardboard. This<br />
will help avoid damaging the door, water tubing and wiring.<br />
9. Use a ³⁄₁₆" Allen wrench to remove the top right hinge screws<br />
as shown. See Graphic 6.<br />
IMPORTANT: Do not remove either screw A.<br />
10. Lift the refrigerator door straight up off bottom hinge.<br />
11. It may not be necessary to remove the bottom hinges to move<br />
the refrigerator through a doorway. Both bottom hinges have<br />
similar construction.<br />
■ If necessary, disassemble the hinges. See Graphic 7.<br />
IMPORTANT: The leveler brackets are mounted behind<br />
the hinges. If you remove the hinges, make sure that the<br />
leveler brackets are replaced when reinstalling the hinges.<br />
Replace the Doors and Hinges<br />
1. Replace both bottom hinges, if removed. Make sure that the<br />
leveler brackets are assembled behind the hinges. Tighten<br />
screws.<br />
IMPORTANT: When the screws are tightened properly, there<br />
should not be any gaps between the refrigerator, leveler<br />
bracket and hinge.<br />
NOTE: There are two wiring bundles that run underneath the<br />
freezer - a large bundle with a large grommet and two white plugs<br />
at the end, and a small bundle with a small grommet and one<br />
yellow plug at the end.
WARNING<br />
Excessive Weight Hazard<br />
Use two or more people to lift the freezer door.<br />
Failure to do so can result in back or other injury.<br />
2. Before replacing the freezer door on the bottom left hinge,<br />
feed the small wiring bundle through the hinge. Assistance<br />
may be needed.<br />
IMPORTANT: Do not feed the large wiring bundle through the<br />
hinge. This bundle is intended to run directly from the door to<br />
the connections beneath the freezer. Forcing the large bundle<br />
through the hinge may damage the door and/or the wiring,<br />
and will keep the door from closing properly.<br />
3. Feed both water tubes through the bottom left hinge, then<br />
replace the freezer door on the hinge. Assistance may be<br />
needed.<br />
NOTE: Provide additional support for the doors while the top<br />
hinges are being replaced. Do not depend on the door magnets to<br />
hold the doors in place while you are working.<br />
4. Align and replace the top left hinge as shown. See Graphic 4.<br />
Tighten screws.<br />
5. Reconnect water tubing and wiring.<br />
IMPORTANT: Do not intertwine the water tubing and wiring<br />
bundles when reconnecting them.<br />
■ Push the larger ⁵⁄₁₆" (7.94 mm) water tube into the blue<br />
fitting until it stops, then push the smaller ¹⁄₄" (6.35 mm)<br />
water tube into the green fitting until it stops. See<br />
Graphic 2.<br />
■ Reinstall the P-clamp around the small wiring bundle (with<br />
one yellow plug), then replace the P-clamp on the top<br />
screw hole of the routing plate. See Graphic 3.<br />
■ Gently route the large wiring bundle (with two white plugs)<br />
through the hole in the routing plate, so that the wiring<br />
runs behind the right side of the routing plate. See<br />
Graphic 3.<br />
NOTE: The large wiring bundle should always remain<br />
below the small wiring bundle.<br />
■ Reconnect the wiring plugs to the electrical housing, then<br />
push the housing back under the refrigerator. Align the left<br />
hole in the front lip of the housing with the right hole in the<br />
refrigerator's base crossbar. See Graphic 3.<br />
■ Reinstall the wiring clip over the grommets. First install the<br />
smaller grommet into the top of the clip, then install the<br />
larger grommet into the bottom of the clip (closest to the<br />
screw hole). See Graphic 3.<br />
■ Align the clip's screw hole with the left hole in the electrical<br />
housing and the right hole in the crossbar, and screw in<br />
the clip using a single screw. Tighten screw. See<br />
Graphic 3.<br />
IMPORTANT: Once connected, the wiring bundles should<br />
not be taut. Some flexibility is needed to allow the freezer<br />
door to open properly.<br />
6. Replace the refrigerator door by lifting the door onto the<br />
bottom right hinge.<br />
7. Align and replace the top right hinge as shown. See Graphic 6.<br />
Tighten screws.<br />
8. Replace the ice storage bin and any adjustable door or utility<br />
bins.<br />
9. Plug refrigerator into a grounded 3 prong outlet.<br />
Leveling and Door Closing<br />
Your refrigerator has two adjustable front feet — one on the right<br />
and one on the left. In most cases, the refrigerator should be<br />
steady when both feet are touching the floor. If your refrigerator<br />
seems unsteady or if you want the doors to close more easily,<br />
adjust the refrigerator's tilt using the instructions below:<br />
1. Move the refrigerator into its final location. If necessary, open<br />
both doors to 90° and remove the base grille. See Graphic 1.<br />
2. The two leveling feet are located on the brackets on each side<br />
of the product. See Graphic 8.<br />
NOTE: Having someone push against the top of the refrigerator<br />
takes some weight off the leveling feet. This makes it easier to<br />
make adjustments.<br />
3. Use a ¹⁄₄" open-ended or adjustable wrench to adjust the<br />
leveling feet. Turn the leveling foot to the left to raise that side<br />
of the product, or turn it to the right to lower that side of the<br />
product.<br />
4. Open both doors again and check that they close as easily as<br />
you like. If not, tilt the refrigerator slightly more to the rear by<br />
turning the leveling feet to the left. It may take several more<br />
turns, and you should turn both leveling feet the same<br />
amount.<br />
NOTE: Whenever you need to move the refrigerator, turn the<br />
leveling feet to the right until they are no longer touching the<br />
ground. This will allow the refrigerator to roll more easily.<br />
Door Alignment<br />
A refrigerator that is not level from side-to-side may appear to<br />
have doors that are not properly aligned. If the doors appear this<br />
way, use the instructions in the previous section to check the<br />
leveling.<br />
The doors are designed to be slightly different heights when the<br />
refrigerator is empty, in order to account for the weight of food<br />
that will be placed on the doors. If the doors are still not aligned<br />
after checking the leveling and loading the refrigerator with food,<br />
follow the steps below to adjust the door alignment.<br />
1. If necessary, open both doors to 90° and remove the base<br />
grille. See Graphic 1.<br />
2. Locate the alignment screw on the bottom hinge of the<br />
refrigerator door. See Graphic 9.<br />
3. Use a ⁵⁄₁₆" open-ended or adjustable wrench to turn the screw.<br />
To raise the refrigerator door, turn the screw to the right. To<br />
lower the door, turn the screw to the left.<br />
4. Check that the doors are even at the top. If necessary,<br />
continue to turn the alignment screw until the doors are<br />
aligned.<br />
5. Open both doors to 90°. Replace the base grille. See<br />
Graphic 1.<br />
3