
Create successful ePaper yourself
Turn your PDF publications into a flip-book with our unique Google optimized e-Paper software.
MAP D<br />
St. Eadric‘s Bunkhouse<br />
H<br />
Unlock Requirements<br />
Complete “Two Knights and a Troll”<br />
Quest Giver<br />
Hallam the White<br />
Quest Giver Location<br />
House of Ballads, Odarath<br />
Objectives<br />
A Find Etair the Alchemist<br />
B Speak to the Monks<br />
C Search Etair’s study<br />
D Descend the Mission Well<br />
E Find the missing crystals<br />
F Kill Brother Wulf<br />
G Loot Wulf’s body<br />
H Use the Whistle<br />
I Return to Hallam the White<br />
J Speak to Hallam the White<br />
Areas Traversed<br />
St. Eadric’s Mission<br />
The Sidhe<br />
St. Eadric’s Well<br />
Key Locations<br />
St. Eadric’s Mission<br />
Key Characters<br />
Hallam the White<br />
Brother Wulf<br />
Maid of Windemere<br />
Key Items<br />
Storage Case<br />
5 Crystals<br />
Whistle<br />
Enemies<br />
Name<br />
Page Ref.<br />
Kobold 156<br />
Kobold Rouge 157<br />
Kobold Nightblade 157<br />
Brother Wulf (if you do not<br />
Dispel his curse)<br />
137-142<br />
Additional Rewards<br />
None<br />
Mission 04<br />
What Lies Beneath<br />
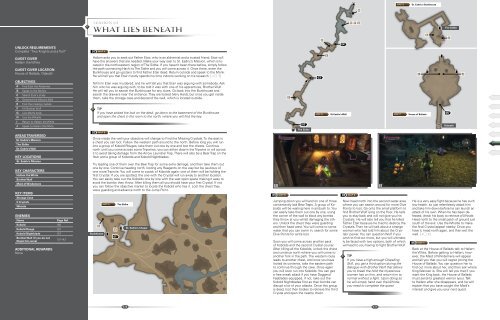
01 MAP A<br />
Hallam asks you to seek out Father Etair, who is an alchemist and a trusted friend. Etair will<br />
have the answers that are needed. Make your way over to St. Eadric’s Mission, which is located<br />
in the northwestern region of The Sidhe. If you haven’t been there before, simply follow<br />
the path connecting Haxhi to The Sidhe and you will come across it. Once there, enter the<br />
Bunkhouse and go upstairs to find Father Etair dead. Return outside and speak to the Monk.<br />
He will tell you that Etair mostly spends his time indoors working on his research. [a 1]<br />
Tell him Etair was murdered, and he will tell you that Etair was arguing with somebody. Ask<br />
him who he was arguing with, to be told it was with one of his apprentices, Brother Wulf.<br />
He will tell you to search the Bunkhouse for any clues. Go back into the Bunkhouse and<br />
search the drawers near the entrance. They are locked (Very Hard), but once you get inside<br />
them, take the storage case and descend the well, which is located outside.<br />
tip<br />
If you have picked the lock on the desk, go down to the basement of the Bunkhouse<br />
and open the chest in the room to the north, where you will find the key.<br />
02 MAP B<br />
Once inside the well your objective will change to Find the Missing Crystals. To the east is<br />
a chest you can loot. Follow the western path around to the north. Before long you will run<br />
into a group of Kobold Rouges; take them out one by one and loot the chests. Continue<br />
north until you come across some Tripwires; you can either disarm the Tripwire or roll across<br />
it to avoid taking damage from the Arrow Launcher Trap. There will also be a Bear Trap on the<br />
floor and a group of Kobolds and Kobold Nightblades.<br />
Try leading one of them over the Bear Trap for some extra damage, and then take them out<br />
one by one. Continue heading north, looting any Reagents on the way but be cautious of<br />
one more Tripwire. You will come to a pack of Kobolds again: one of them will be holding the<br />
first Crystal. If you are spotted, the one with the Crystal will run away to another location.<br />
You can easily take out the Kobolds one by one with the vast open space making it easy to<br />
avoid the bombs they throw. After killing them all you should have your first Crystal. If not<br />
you can follow the objective marker to locate the Kobold who has it. Loot the chest they<br />
were guarding and advance north to the Jump Point.<br />
D<br />
Bunkhouse<br />
MAP A<br />
B<br />
01<br />
The Sidhe<br />
St. Eadric’s Chapel<br />
1 2<br />
03 MAP B<br />
E<br />
02<br />
The Sidhe<br />
03<br />
MAP B<br />
Jumping down you will land on one of three<br />
conveniently laid Bear Traps. A group of Kobolds<br />
will be waiting here in ambush to. You<br />
can easily take them out one by one, using<br />
the corner of the wall to block any bombs<br />
they throw at you whilst damaging the others.<br />
Unlock the chest they were guarding<br />
and then head west. You will come to some<br />
water that you can swim in; search for some<br />
Dive Points for extra loot.<br />
Soon you will come across another pack<br />
of Kobolds and the second Crystal courier.<br />
After killing all the Kobolds, unlock the chest<br />
and continue north where you will come to<br />
another fork in the path. The western route<br />
leads to another chest, and once you have<br />
looted its contents, take the eastern path<br />
to continue through the cave. Once again<br />
you will soon run into Kobolds. You can get<br />
a free sneak attack if you have Daggers/<br />
Faeblades equipped, if not, take out the<br />
Kobold Nightblades first as their bombs can<br />
disrupt a lot of your attacks. Once this group<br />
is dead, loot their bodies to retrieve the third<br />
Crystal and open the nearby chest.<br />
E<br />
E<br />
04<br />
St Eadric‘s Well<br />
E F G<br />
04 MAP B<br />
MAP C<br />
Now head north into the second water area<br />
where you can search around for more Dive<br />
Points to loot. Go onto the small platform to<br />
find Brother Wulf lying on the floor. He tells<br />
you to stay back and will not give you his<br />
Crystals. He will also tell you that he killed<br />
Father Etair because he tried to destroy the<br />
Crystals. Then he will talk about a strange<br />
woman who had told him about the Crystals’<br />
power. You can question Wulf if you<br />
wish to find out more, but you will ultimately<br />
be faced with two options, both of which<br />
will lead to you having to fight Brother Wulf.<br />
tip<br />
If you have a high enough Dispelling<br />
Skill, you get a third option during the<br />
dialogue with Brother Wulf that allows<br />
you to break the hold the mysterious<br />
woman has on him, and return him to<br />
normal without a fight. Upon doing so<br />
he will simply hand over the Whistle<br />
you need to complete the quest.<br />
House of Ballads<br />
I<br />
He is a very easy fight because he has such<br />
low health, so just relentlessly attack him<br />
and take him down before he can launch an<br />
attack of his own. When he has been defeated,<br />
check his body to retrieve a Whistle.<br />
Head north to the small patch of ground just<br />
south of the exit. Use the Whistle to make<br />
the final Crystal appear nearby. Once you<br />
have it, head north again, and then exit the<br />
well. [a 2]<br />
05 MAP C<br />
A<br />
The Sidhe<br />
05<br />
Odarath<br />
Back at the House of Ballads talk to Hallam<br />
the White. Before getting to Hallam, however,<br />
the Maid of Windemere will appear<br />
and tell you that you will regret joining the<br />
House of Ballads. You can question her to<br />
find out more about her, and then ask where<br />
King Wencen is. She will tell you that if you<br />
want the King back, the House of Ballads<br />
must send its greatest warrior (you). Talk<br />
to Hallam after she disappears, and he will<br />
explain that you have caught the Maid’s<br />
interest and give you your next quest.<br />
C<br />
J<br />
428 429