Dual mount Installation Instr... - Seaview Global
Dual mount Installation Instr... - Seaview Global
Dual mount Installation Instr... - Seaview Global

You also want an ePaper? Increase the reach of your titles
YUMPU automatically turns print PDFs into web optimized ePapers that Google loves.
<strong>Dual</strong> Mount <strong>Installation</strong> <strong>Instr</strong>uctions<br />
Light bar is optional and must be ordered separately<br />
3/16” Allen Key<br />
” Socket/ Torque Wrench<br />
<br />
<br />
<br />
<br />
<br />
<br />
<br />
<br />
<br />
<br />
<br />
<br />
<br />
<br />
<br />
½<br />
TOOLS AND PARTS REQUIRED:<br />
Silicone Sealant/ Adhesive<br />
Backing Plate or oversized washers if necessary (backing plate supplied with PMA-<br />
DM2 models)<br />
Drill<br />
6 ea. 3/8” Round Head Fasteners, long enough to fit through deck or arch + Fender<br />
washers & nuts.<br />
3/8” Drill Bit<br />
SUPPLIED PARTS:<br />
Modular Top Gasket<br />
O-rings for LTB entry<br />
Foam base gasket (silicone is advised)<br />
12 ea. Nylon countersunk bushings<br />
12 ea. 5/16” Nylon shoulder washers (to isolate bolts from powder coat)<br />
½<br />
10 ea. ” Nylon shoulder washers (to isolate bolts from powder coat)<br />
12 ea. 5/16” Flat HD bolts<br />
4 ea. 5/16” Nyloc Nuts<br />
Grommet to seal radar cable entry<br />
A gasket should be provided with your Satellite dome. If you need a gasket they are<br />
available to purchase separately from <strong>Seaview</strong>.<br />
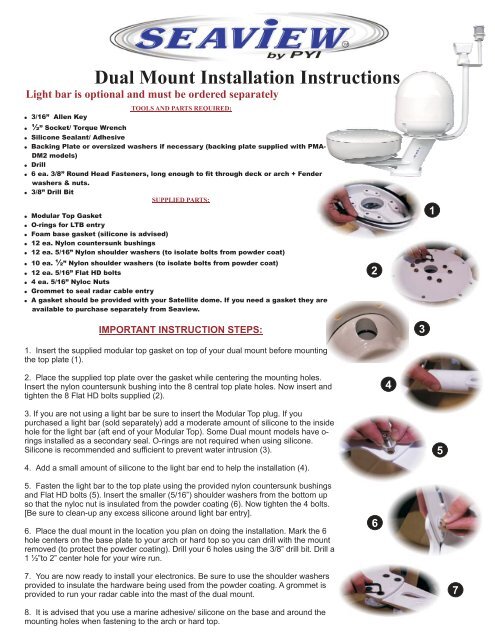
2<br />
1<br />
IMPORTANT INSTRUCTION STEPS:<br />
3<br />
1. Insert the supplied modular top gasket on top of your dual <strong>mount</strong> before <strong>mount</strong>ing<br />
the top plate (1).<br />
2. Place the supplied top plate over the gasket while centering the <strong>mount</strong>ing holes.<br />
Insert the nylon countersunk bushing into the 8 central top plate holes. Now insert and<br />
tighten the 8 Flat HD bolts supplied (2).<br />
4<br />
3. If you are not using a light bar be sure to insert the Modular Top plug. If you<br />
purchased a light bar (sold separately) add a moderate a<strong>mount</strong> of silicone to the inside<br />
hole for the light bar (aft end of your Modular Top). Some <strong>Dual</strong> <strong>mount</strong> models have o-<br />
rings installed as a secondary seal. O-rings are not required when using silicone.<br />
Silicone is recommended and sufficient to prevent water intrusion (3).<br />
4. Add a small a<strong>mount</strong> of silicone to the light bar end to help the installation (4).<br />
5<br />
5. Fasten the light bar to the top plate using the provided nylon countersunk bushings<br />
and Flat HD bolts (5). Insert the smaller (5/16”) shoulder washers from the bottom up<br />
so that the nyloc nut is insulated from the powder coating (6). Now tighten the 4 bolts.<br />
[Be sure to clean-up any excess silicone around light bar entry].<br />
6. Place the dual <strong>mount</strong> in the location you plan on doing the installation. Mark the 6<br />
hole centers on the base plate to your arch or hard top so you can drill with the <strong>mount</strong><br />
removed (to protect the powder coating). Drill your 6 holes using the 3/8” drill bit. Drill a<br />
1 ½”to 2” center hole for your wire run.<br />
6<br />
7. You are now ready to install your electronics. Be sure to use the shoulder washers<br />
provided to insulate the hardware being used from the powder coating. A grommet is<br />
provided to run your radar cable into the mast of the dual <strong>mount</strong>.<br />
7<br />
8. It is advised that you use a marine adhesive/ silicone on the base and around the<br />
<strong>mount</strong>ing holes when fastening to the arch or hard top.
D<br />
ITEM<br />
NO.<br />
PART NUMBER DESCRIPTION QTY.<br />
1 base plate 10 x 10 x .375 Base Plate 1<br />
2 Large Extrusion Large Oval Extrusion 1<br />
3 PMA-DM1 MID PLATE PMA-DM1 MID PLATE 1<br />
4 PMA-DM1 GUSSET<br />
GUSSET (WELDED TO BASE AND<br />
EXTRUSION)<br />
2<br />
5 Modular Top 3 REV C<br />
Modular Top (ADC12 cast<br />
aluminum)<br />
1<br />
6<br />
8 7 6 5 4 3 2 1<br />
KVH M3, SeaTel 14 and SeaKing 14<br />
Modular Top<br />
1/4" plate for KVH M3 with holes<br />
for bolt on LTB<br />
7 Bolt on Plate LTB Bolt on plate (.25") 1<br />
8 DM-LTB 1.25" LTB 1<br />
15 countersunk bushing Rev. A Nylon Countersunk Bushing 12<br />
1<br />
8<br />
D<br />
C<br />
16<br />
Shoulder bushing (.3125 in) for Bolt<br />
on LTB<br />
Nylon Shoulder Washer (5/16"<br />
bolt)<br />
17 SCHCSCREW 0.375-16x1x1-HX-S 12<br />
18 HNUT 0.3750-16-D-N 4<br />
19 Modular Top Gasket rubber 1<br />
8<br />
6<br />
16<br />
15<br />
17<br />
7<br />
C<br />
20<br />
Shoulder bushing (.50 in) for 10x10<br />
base<br />
Nylon Shoulder Washer (.375" bolt) 6<br />
19<br />
3<br />
5<br />
18 16<br />
B<br />
B<br />
2<br />
4<br />
1<br />
20<br />
A<br />
PROPRIETARY AND CONFIDENTIAL<br />
THE INFORMATION CONTAINED IN THIS<br />
DRAWING IS THE SOLE PROPERTY OF<br />
PYI, INC. ANY REPRODUCTION IN PART OR<br />
AS A WHOLEWITHOUT THE WRITTEN<br />
PERMISSION OF PYI, INC. IS PROHIBITED.<br />
NEXT ASSY<br />
WEIGHT:<br />
USED ON<br />
SHEET 1 OF 1<br />
UNLESS OTHERWISE SPECIFIED:<br />
DIMENSIONS ARE IN INCHES<br />
TOLERANCES:<br />
FRACTIONAL<br />
ANGULAR: MACH BEND<br />
TWO PLACE DECIMAL<br />
THREE PLACE DECIMAL<br />
INTERPRET GEOMETRIC<br />
TOLERANCING PER:<br />
MATERIAL<br />
FINISH<br />
DO NOT SCALE DRAWING<br />
DRAWN<br />
CHECKED<br />
ENG APPR.<br />
MFG APPR.<br />
Q.A.<br />
COMMENTS:<br />
NAME DATE<br />
JR 01.25.08<br />
PYI, INC.<br />
TITLE:<br />
PMA-DM1-M3<br />
(MODULAR)<br />
SIZE DWG. NO.<br />
B<br />
SCALE: 1:12 WEIGHT:<br />
PMA-DM1-MOD<br />
Beverly Park Rd<br />
Lynnwood, WA 98087<br />
Ph. 425-355-3669 Fax. 425-355-3661<br />
REV<br />
N/C<br />
SHEET 1 OF 1<br />
A<br />
8<br />
5<br />
7<br />
4 6 3 5 2 4 1<br />
3<br />
2<br />
1