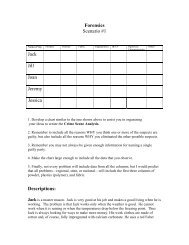
Forensics 2005 Qualitative Analysis Hints
Forensics 2005 Qualitative Analysis Hints
Forensics 2005 Qualitative Analysis Hints

You also want an ePaper? Increase the reach of your titles
YUMPU automatically turns print PDFs into web optimized ePapers that Google loves.
<strong>Forensics</strong> <strong>2005</strong> <strong>Qualitative</strong> <strong>Analysis</strong> <strong>Hints</strong><br />
Part 1: <strong>Qualitative</strong> <strong>Analysis</strong>: Worth 30% of the event.<br />
This portion will be scored based on correct answers to the identity of the<br />
substance. It will count all or none for each of the substances.<br />
SAFETY CONCERNS:<br />
All of the chemistry events are consistent with the safety rules.<br />
-Lab aprons or lab coats must be worn and pants or shirts must go to the ankle.<br />
If you live in a warm climate, have the students bring in a pair of sweat pants or<br />
something for the competition. They can remove them when they leave the lab.<br />
-Closed Toed Shoes: Be sure they understand this especially as the weather<br />
gets better towards the state and national tournaments.<br />
-Safety Goggles: I can’t tell you how many times I have to not allow students to<br />
participate in the laboratory because of goggles. The goggles have to be splash<br />
approved with indirect vents. I brought a pair to show you. There is a note in the<br />
front of the book about goggles. Just order some and have them. They are not a<br />
large cost and we want to be safe at all levels of the competition.<br />
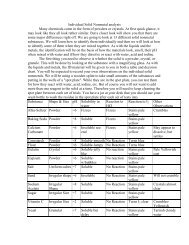
A. Substances to identify:<br />
Sodium acetate, sodium chloride, sodium hydrogen carbonate, sodium<br />
carbonate, lithium chloride, potassium chloride, calcium nitrate, calcium sulfate,<br />
calcium carbonate, cornstarch, glucose, sucrose, magnesium sulfate, boric acid,<br />
and ammonium chloride. There are no mixtures this year.<br />
B. Materials to do the tests:<br />
Students may bring:<br />
Test tubes, test tube holders or any device in which they can perform a test, (I<br />
recommend spot plates for quick tests and beakers for conductivity) droppers,<br />
funnels, filter paper, pH or litmus paper, spatulas, plastic spoons or stirring rods,<br />
9 volt conductivity tester, thermometer, flame test equipment and metal tongs.<br />
Make a kit for the students.<br />
Supervisor will provide:<br />
Iodine solution, 2 M HCl, 2M NaOH, benedict’s solution, a hot water bath, heat<br />
source for flame tests and distilled water.<br />
C. Philosophy behind this portion of the event:<br />
The materials listed above come from the old <strong>Qualitative</strong> <strong>Analysis</strong> event. A few<br />
more substances were added to make it a little more interesting, the flame test is<br />
back, students may bring a thermometer, and a conductivity tester may be used.<br />
Students have to work quickly in this event but they will not have to analyze a<br />
mixture at this time. Next year, mixtures will be added and questions will be<br />
asked about the reactions.<br />
D. Coaching <strong>Hints</strong>:
1. Have the students do paperwork on each substance before going into the<br />
laboratory. This means they look up the substance in a Merck Index or other<br />
reference guide and learn about the substance. Take good notes in a lab<br />
notebook and keep adding to it as you practice.<br />
2. Study the solubility rules for each substance when placed in water.<br />
Now enter the laboratory. As a coach, I make the students prepare the bottles<br />
for testing. I use small bottles with caps. Some of the substances are<br />
hygroscopic and they should be stored with an airtight lid. The students should<br />
be aware of these substances from their bookwork above.<br />
Have the students prepare labels for each bottle. Have them label the bottle with<br />
the chemical name, the chemical formula, and any important information that<br />
should be shared with others practicing this event such as: Hygroscopic:<br />
Replace the cap immediately.<br />
3. Practice each substance separately and take notes on each reaction. Do<br />
only one substance at a time. Learn it well before moving to the next substance.<br />
4. Start with solubility of the substance in water. Many times, students will place<br />
too much of the powder in the water, thus forming a saturated solution. They will<br />
assume that the substance is insoluble because it falls to the bottom of the test<br />
tube and will automatically assume the substance is cornstarch, calcium<br />
carbonate, or calcium sulfate. I put the water in the test tube first, about 5 mL<br />
and then I sprinkle just a little of the powder in. Then I mix the substances by<br />
creating a vortex in the test tube to mix. I will demonstrate. If the substance<br />
goes in, then I can add more for better testing later.<br />
5. When you test for solubility, you can test for a change in temperature. You<br />
can do this using your arm (inside of the wrist) or using a thermometer. A word<br />
of caution, rinse the thermometer after each test. This takes time and I don’t<br />
need a thermometer after much practice. Practice with a thermometer and your<br />
arm. After awhile, you can tell if there is a temperature change.<br />
**If you use a thermometer, don’t hold the test tube at the bottom. The heat of<br />
your hand will raise the temperature every time, maybe even up to 37°C.<br />
Some substances are slightly endothermic, some very endothermic, some<br />
slightly exothermic and others are very exothermic. Memorize them.<br />
6. Test for the presence of a carbonate using the dry powder and the HCl. It is a<br />
much better reaction this way than with a solution.<br />
7. Test the pH of the distilled water before testing the pH of the solutions. Now<br />
test the pH of the solution. Note the changes in pH if there are any. Sodium<br />
carbonate really increases the pH of the distilled water.
To test the pH, a good habit to form is to bring the solution to the pH paper. Use<br />
a stirring rod, touch the solution and touch it to the paper. This way, there won’t<br />
be chemicals added to your solution in case you want to test conductivity next.<br />
8. Conductivity: Ionic compounds that dissolve in water will produce ions. Ions<br />
are necessary for conduction. The problem comes in when students<br />
contaminate their containers or they don’t rinse off their conductivity meter in<br />
between tests. This is a good way to tell if the compound is an ionic or a<br />
molecular substance.<br />
9. Benedict’s solution: This is used to distinguish between glucose and<br />
sucrose. When both are placed in water, they dissolve. They do not change the<br />
pH of the water and there is no significant change in the temperature of the<br />
water. They look the same and basically smell the same. To tell them apart, you<br />
will use benedict’s solution. Dissolve the substance in about 5mL of water. Add<br />
benedict’s solution to make the color of the solution blue. Place the test tube in a<br />
hot water bath. If there is a reducing sugar (glucose) a precipitate will begin to<br />
form. The precipitate contains a copper +1 ion and is not soluble in water. If the<br />
substance contains sucrose, no precipitate will form. You do not need to wait for<br />
the precipitate to go through a series of color changes. It will eventually turn a<br />
brick-red in color. You can tell almost immediately as it warms in the hot bath.<br />
Benedict’s solution is also handy to test for ammonium chloride. When NH 4 Cl is<br />
placed in Benedict’s solution, a beautiful purple-blue complex forms.<br />
10. Flame Tests: This is a very important part of the competition if you are given<br />
substances that contain sodium, calcium, potassium, and lithium ions. It will also<br />
help you to distinguish boric acid from the other substances.. Don’t tell them the<br />
colors they will be, let them experiment first, them memorize them.<br />
Many people don’t know how to perform a flame test. If a substance contains<br />
certain ions and they are heated in a flame, a beautiful color is produced. Not all<br />
substances give a color with a naked eye, but those containing sodium, calcium,<br />
potassium and lithium do. Boric acid is beautiful.<br />
The cobalt blue glass is used in case there is sodium contaminating the<br />
substance. Sodium is everywhere. It is in tap water and your test tubes have<br />
been washed with tap water.<br />
You can perform the flame test on solutions or with the solid. Make sure you<br />
have a clean nicrome wire each time. To clean it, place it in the flame until no<br />
color is given off except the color of the burning flame. You can use a little of the<br />
HCl provided by the supervisor to rinse and your distilled water. Be careful not to<br />
burn yourself. If you look at a flame and you see yellow, this could be due to<br />
sodium in the compound or sodium contaminating the compound. If you place<br />
the cobalt blue glass between you and the flame, if another substance such as<br />
lithium is present, then another flame is seen through the glass. If the substance<br />
only has sodium in it or contaminating it, then the flame will disappear.
Remember: Blue and yellow light make white light. They are complements of<br />
each other.<br />
11. Iodine: Tests for starch only. Messy!! Only 1 drop is needed. Instant test.<br />
12. 2M HCl: This will help find the carbonates. Test the dry powder, it is a better<br />
test.<br />
13. 2M NaOH: This will be helpful to test for magnesium and calcium ions.<br />
Calcium hydroxide and magnesium hydroxide from a gel-like substance. Without<br />
additional testing, it was difficult to distinguish between the two. With the flame<br />
test, the calcium is easy to identify. Magnesium ions don’t show up with the<br />
flame test. NaOH added to a solution of ammonium chloride will cause the<br />
ammonia gas to be released. You can add some to a solution of ammonium<br />
chloride, heat it slightly, and then test the gas coming out of the top of the test<br />
tube with a piece of moistened pH paper. It will become more basic.<br />
14. Clean up: I wouldn’t waste my time trying to clean out my test tubes and<br />
equipment at the competition. I would dispose of the liquids as directed by the<br />
event supervisor and then just place my equipment in my box and clean<br />
everything later.<br />
In forensic science, there has to be a balance between time and money.<br />
Students do not need to perform all of the tests to figure out which powders<br />
are which. They need to budget their time and perform enough tests to be sure<br />
of the results. If they have time and resources, then they can go back later and<br />
double check their results. The flame test really distinguishes the chlorides from<br />
each other. Remember, the scoring is all or none when it comes to the identity of<br />
the powder. Do enough tests to be absolutely sure but have enough time for the<br />
other parts of the competition.